1 An Introduction to Adobe XD
Lesson overview
In this lesson, you’ll explore the workspace and learn the following:
What Adobe XD is.
A typical Adobe XD workflow.
How to open an Adobe XD file.
How to work with the tools and panels.
How to zoom, pan, and navigate multiple artboards.
How to preview your projects.
How to share your projects.

This lesson will take about 30 minutes to complete. To get the lesson files used in this chapter, download them from the web page for this book at www.adobepress.com/XDCIB2020. For more information, see “Accessing the lesson files and Web Edition” in the Getting Started section at the beginning of this book.

In this first lesson, you’ll be introduced to a typical Adobe XD design workflow and explore the workspace.
Introducing Adobe XD
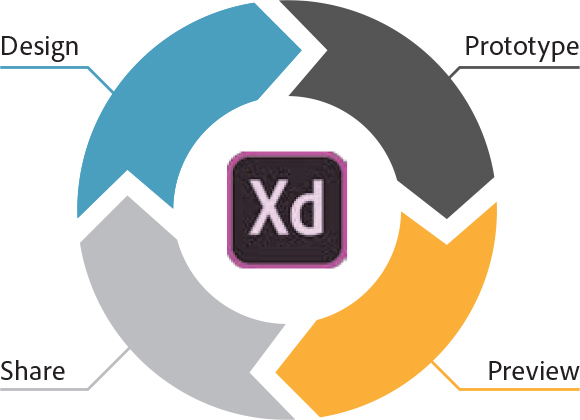
Adobe XD is a complete end-to-end solution for designing user experiences for mobile apps, websites, presentations, and more. You can design, prototype, preview, and share using this one tool.
XD allows you to create the visual appearance of an app, website, or whatever you need—the behavior it exhibits is there merely to illustrate how the “real” app works. The prototype of the user experience you create in XD is not the actual app, website, or other, even though it can mimic much of the interactivity of the final product.
You design all the screens or pages of your project in a single Adobe XD file. Each page in Adobe XD is called an artboard, and you can add different sized artboards depending on the required screen sizes. You can then define interactivity between them to visualize how users navigate through the screens or pages. You can test the prototype you create locally or on a device and easily share prototypes with others to gather feedback via commenting and annotations. That feedback can then be incorporated into the design. Finally, you can send design specs and exported production-ready assets to a developer to create the app or website outside of Adobe XD.
A typical UX design workflow
In the early days of the web, designers created the user experience (UX) for websites on desktops, making sure to optimize that experience across different browsers, browser versions, and operating systems.
Since the rise of touchscreen devices, like the Apple iPhone, designers have had to consider the overall user experience of apps and websites on those different devices. These days, with the multitude of screen sizes and devices, operating systems, screen pixel densities (think Retina or hiDPI), and other factors, creating a consistent and pleasurable user experience is an integral part of the web or app design process. To get our products to market on time and budget, and to gain and retain users, we need to work quickly and efficiently.
In a typical web or app design workflow today, we follow the general process shown in the following figure:
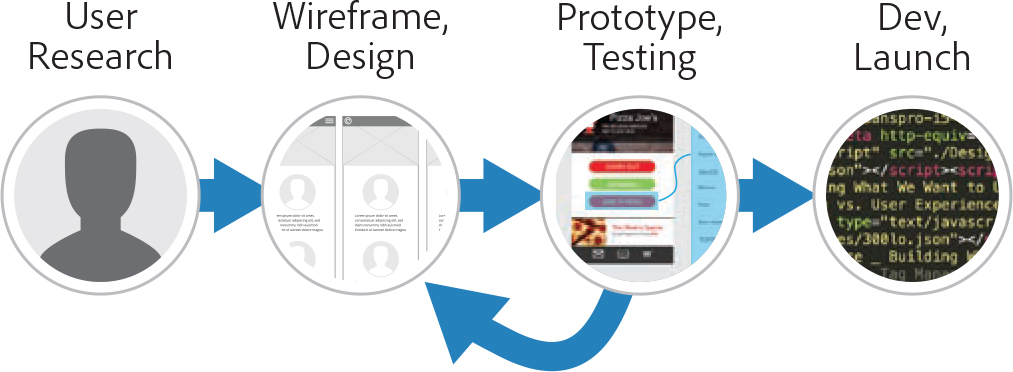
Your design process may be different, depending on the project scope, budget, size, and type, but this is generally how the process works.
First, we gather information through research. You can ask questions of clients and your potential target audience, work with focus groups, check existing analytics, and more. We then start a design. Your designs can be a hand-drawn sketch—also called a low-fidelity (low-fi) wireframe—or a fully designed, high-fidelity (hi-fi) design. Early in the days of the mobile web, we would sketch, wireframe, and design. Today we typically design, prototype, and collaborate (share).

To test the user experience, we create an interactive prototype at some point in the design process. A prototype is a tool for gathering feedback on the feasibility and usability of our designs. In the following figure, you’ll see an example of prototyping interactivity in a high-fidelity design.

![]() Note
Note
The smaller blue area at the bottom of the artboard on the left (covering the Continue button) represents a hotspot, or interactive area that users will tap or click. The larger blue area on the right represents the resulting screen that shows. The blue connector (also called a wire) indicates the connection between the hotspot and the resulting screen.
Adobe XD was born out of the need for a single all-in-one cross-platform tool for designing and prototyping websites and mobile apps.
Starting Adobe XD and opening a file
![]() Note
Note
If you have not already downloaded the project files for this lesson to your computer from your Account page at peachpit.com, make sure to do so now. See the “Getting Started” section at the beginning of the book.
To start working in Adobe XD, you’ll open a document and explore the XD workspace. You’ll create and manipulate your design content using elements such as panels, bars, and windows, all of which make up the workspace.
The Home screen
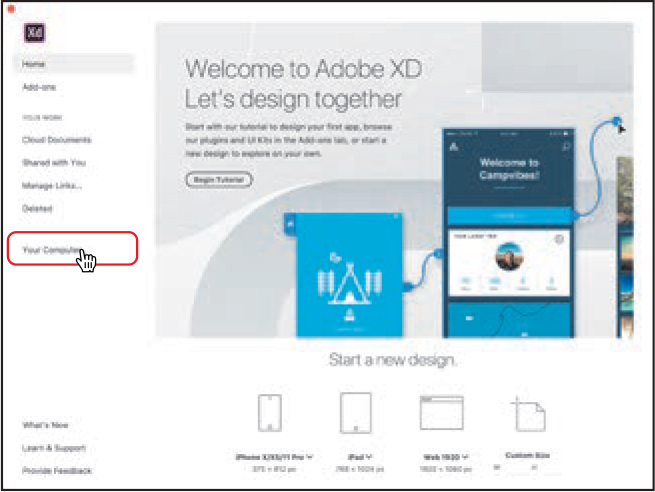
When you first launch Adobe XD, the Home screen appears. The Home screen gives you easy access to presets, a list of recent files (if available), a list of add-ons, resources, a jumpstart tutorial, and more. The Home screen appears when you create a new file, regardless of whether a file is already open, or when you click the Home button (![]() ) in the upper-left corner of the application window with a document open.
) in the upper-left corner of the application window with a document open.
Start Adobe XD.
Click Your Computer on the left side of the Home screen. Navigate to the Lessons > Lesson01 folder and open the L1_start.xd file.
 Note
NoteThe Home screen you see may look different, depending on your version of XD and whether you’ve opened files previously.
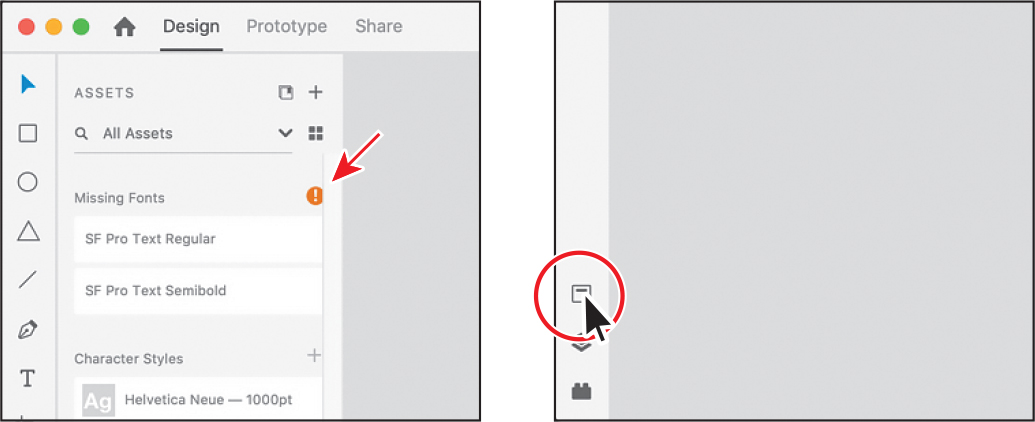
After the file opens in XD, the Assets panel may open on the left side of the workspace. In the panel, you may see a message about missing fonts. You can close the Assets panel for now by clicking the Assets panel icon (
 ) in the lower-left corner of the application. To learn more about missing fonts, see the sidebar titled, “Fixing missing fonts” in Lesson 3. Note
To maximize the Adobe XD application and give yourself more room to work, you may want to Option-click the green maximize button in the upper-left corner of the application window (macOS) or click Maximize in the upper-right corner (Windows).
You will use the L1_start.xd file to practice navigating, zooming, and investigating an Adobe XD document and the workspace.
Exploring the workspace (macOS)
With the L1_start.xd project file open on macOS, you’ll see the default XD workspace. If you are on Windows, proceed to the next section.
Choose View > Zoom To Fit All to see everything.

The menu bar at the top of the application window provides access to commands available in Adobe XD (macOS).
The application modes (Design, Prototype, and Share) provide a way to switch between Design mode, Prototype mode, and Share mode.
The toolbar contains tools for selecting, drawing, and editing shapes, paths, and artboards.
The Property Inspector is docked on the right side of the application window. Adobe XD consolidates many of the most frequently accessed options in the Property Inspector. The properties shown in the Property Inspector are contextual, which means that they are based on the content selected in the document.
Adobe XD uses artboards to represent the screens in your app or website.
The pasteboard is the gray area around the artboards; it’s where you can place content that you don’t want to associate with an existing artboard. The pasteboard and artboards are contained within the document window.
Access the Layers, Assets, and Plugins panels by clicking the appropriate button in the lower-left corner of the application window.
macOS users can skip the next section, “Exploring the workspace (Windows),” and proceed to the section “Working in Design mode.”
Exploring the workspace (Windows)
With the L1_start.xd project file open on Windows, you’ll see the default XD workspace.
Press Ctrl+0 (zero) to see everything.

On Windows, there is no top-level menu bar. Right-click an object and use the context menu instead. XD on Windows has a “hamburger” menu (
 ) in the upper-left corner that allows you to create or open files, save, export assets, and more.
The application modes (Design, Prototype, and Share) provide a way to switch between Design mode, Prototype mode, and Share mode.
Adobe XD uses artboards to represent the screens in your app or website.
The Property Inspector is docked on the right side of the application window. Adobe XD consolidates many of the most frequently accessed options in the Property Inspector. The properties shown in the Property Inspector are contextual, which means they are based on the content selected in the document.
Access the Layers, Assets, and Plugins panels by clicking the appropriate button in the lower-left corner of the application window.
The toolbar contains tools for selecting, drawing, and editing shapes, paths, and artboards.
The pasteboard is the gray area around the artboards; it’s where you can place content that you don’t want to associate with an existing artboard. The pasteboard and artboards are contained within the document window.
Working in Design mode
On both macOS and Windows, when working on your project in Adobe XD, there are three modes you will be using: Design, Prototype, and Share. When you select a mode, certain features and tools specific to that mode become available in the application window. Each mode represents a stage in the design process.
When you open a file in Adobe XD, the program starts out in Design mode. In Design mode, you create and edit artboards and add your design content to them.
Getting to know the tools
In Design mode, the toolbar on the left side of the workspace contains selection and editing tools, drawing tools, a text tool, an artboard tool, and a zoom tool. As you progress through the lessons, you’ll work with all of these tools.
Move the pointer over the Select tool (
 ) in the toolbar. Notice that the name (Select) and keyboard shortcut (V) are displayed in a tooltip.
Adobe XD was built for speed. To work faster, you can switch between tools using the keyboard command associated with each of the tools. For instance, pressing the letter Z will switch to the Zoom tool, and pressing the letter V will switch back to the Select tool.
Working with the Property Inspector
The Property Inspector is the docked panel on the right side of the workspace. It offers quick access to options and commands relevant to the currently selected content. It’s also where you’ll set appearance properties for most of your content.
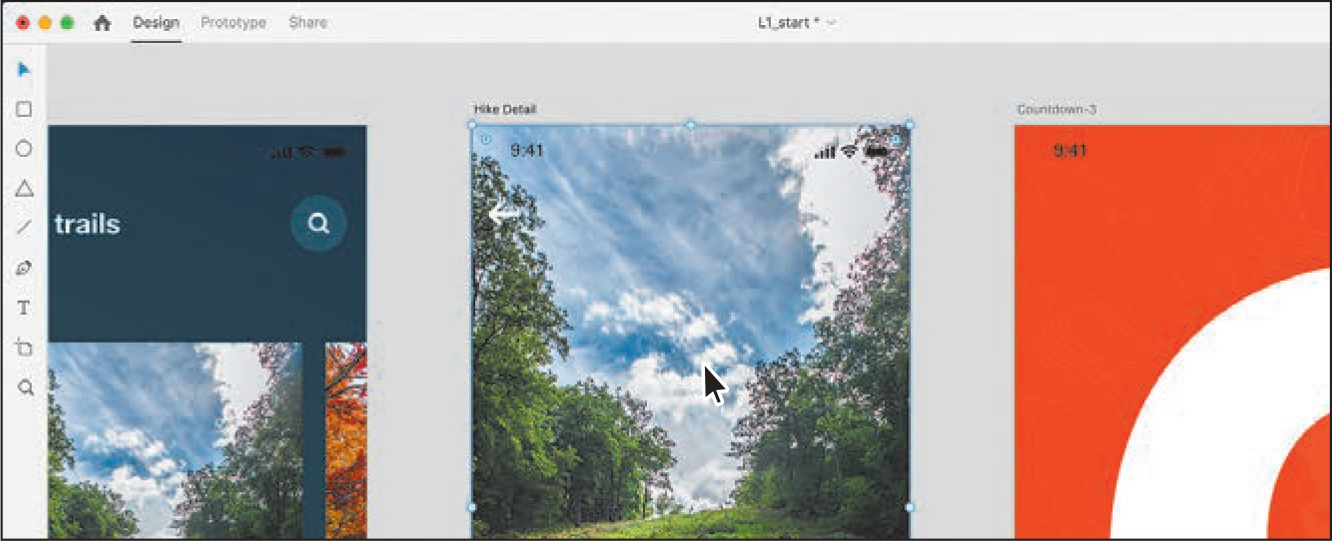
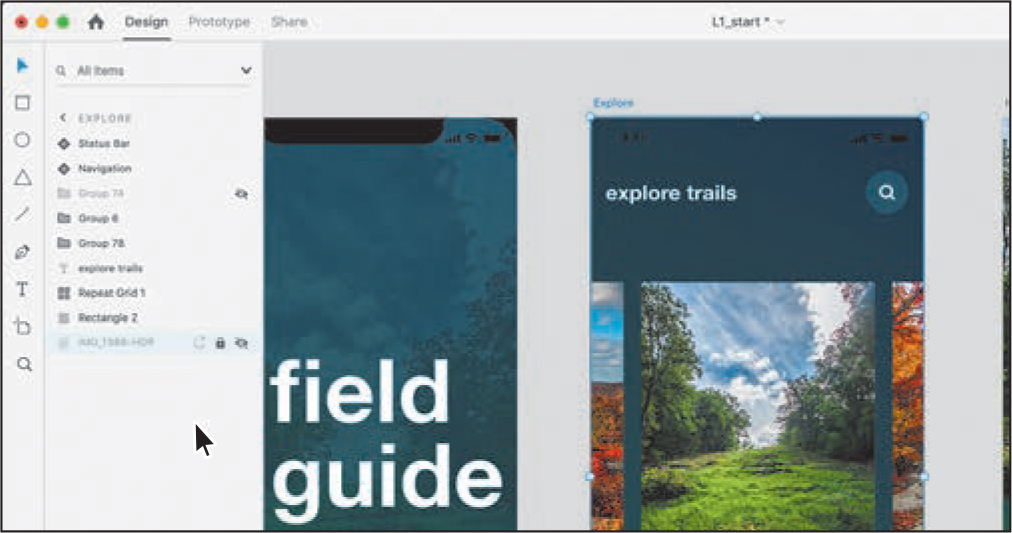
Select the Select tool (
) in the toolbar, and click the image at the top of the artboard named Hike Detail.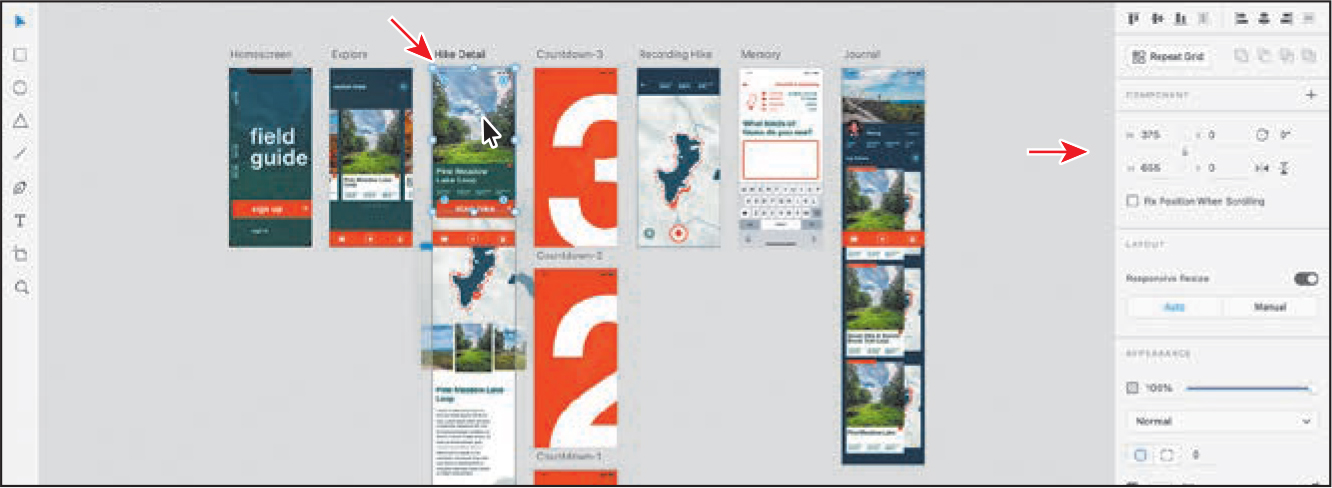
The options for the selected content appear in the Property Inspector on the right, including options for colors, border, effects, and more.
In the Property Inspector, click the checkmark to the left of the Fill option to deselect that option for the selected content (turn the fill off). The image disappears. Select the same Fill option to show the image again.

Most of the content in the Property Inspector changes depending on what is selected. If there is nothing selected, the Property Inspector is dimmed.
 Tip
TipTo deselect all, you can also press Command+Shift+A (macOS) or Ctrl+Shift+A (Windows).
Click in the gray pasteboard area, away from the artboards, or choose Edit > Deselect All (macOS), so that the content on the artboard is no longer selected.
Working with panels
There are three main panels in Adobe XD, aside from the Property Inspector on the right, that give you quick access to layers, assets, and plugins. They are each opened by clicking a button in the lower-left corner of the workspace or pressing a keyboard command. Next, you’ll experiment with closing and opening these panels.
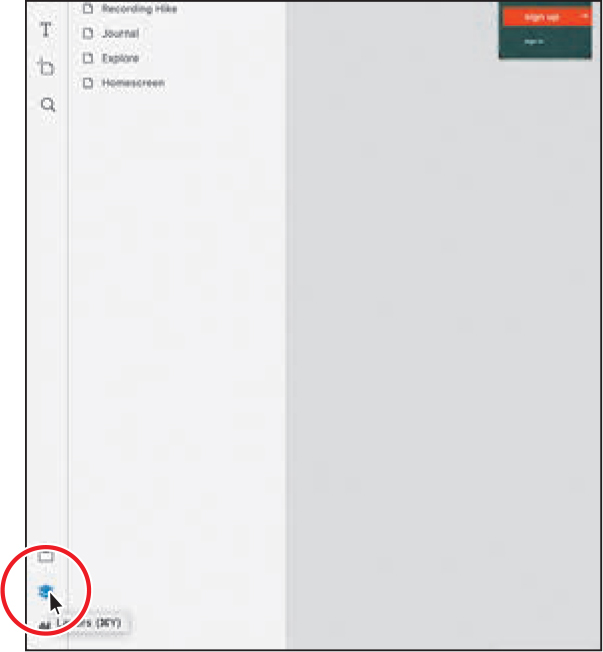
Click the Layers panel button (
 ) in the lower-left corner of the application window to open the Layers panel, if it isn’t already open.
The Layers panel lists all of the artboards in the document when nothing in the document window is selected. You can think of an artboard as a page in a web design or a screen in an app design. Later in this lesson, you’ll learn more about artboards and how to navigate them.
 Tip
TipYou can also press Command+Y (macOS) or Ctrl+Y (Windows) to toggle the Layers panel open and closed, or choose View > Layers (macOS).
With the Select tool (
) selected in the toolbar, click the same image on the Hike Detail artboard you selected earlier.
When you select content on an artboard, all of the content of that artboard is listed in the Layers panel. The Layers panel is contextual, which means it shows different content depending on what is (or isn’t) selected.
Click the Layers panel button (
) in the lower-left corner of the workspace to hide the Layers panel.
Prototype mode
As a step in the design process, you may wish to connect artboards (screens) to each other to visualize how users navigate your app, website, or presentation. With Adobe XD, you can create interactive prototypes to visualize the interactions between screens or wireframes in Prototype mode. You can preview the interaction to validate the user experience and iterate on your design to save time on development. You can also record the interactions and share them with stakeholders to get their feedback. Next, you’ll briefly explore Prototype mode. You’ll learn more about Prototype mode in Lesson 8, “Creating a Prototype.”
Press Command+0 (macOS) or Ctrl+0 (Windows) to make sure you can see all of the design content.
Choose Edit > Deselect All (macOS) or click in a blank part of the gray pasteboard area to deselect all.
Click Prototype in the upper-left corner of the application window to enter Prototype mode.
 Tip
TipIn Design mode on macOS, you can choose View > Switch Workspace to switch between modes. You can also press Control+Tab (macOS) or Ctrl+Tab (Windows) to toggle between Design, Prototype, and Share modes.
In Prototype mode, notice that the only tools available in the toolbar are the Select tool and Zoom tool, and the Property Inspector now contains settings for interactions. The main purpose of Prototype mode is to add interactivity to your designs. So for the purpose of visualizing how a transition from one screen to another might look, for instance, you can add the interactivity between those screens here.
To select all of the content in the document, press Command+A (macOS) or Ctrl+A (Windows).
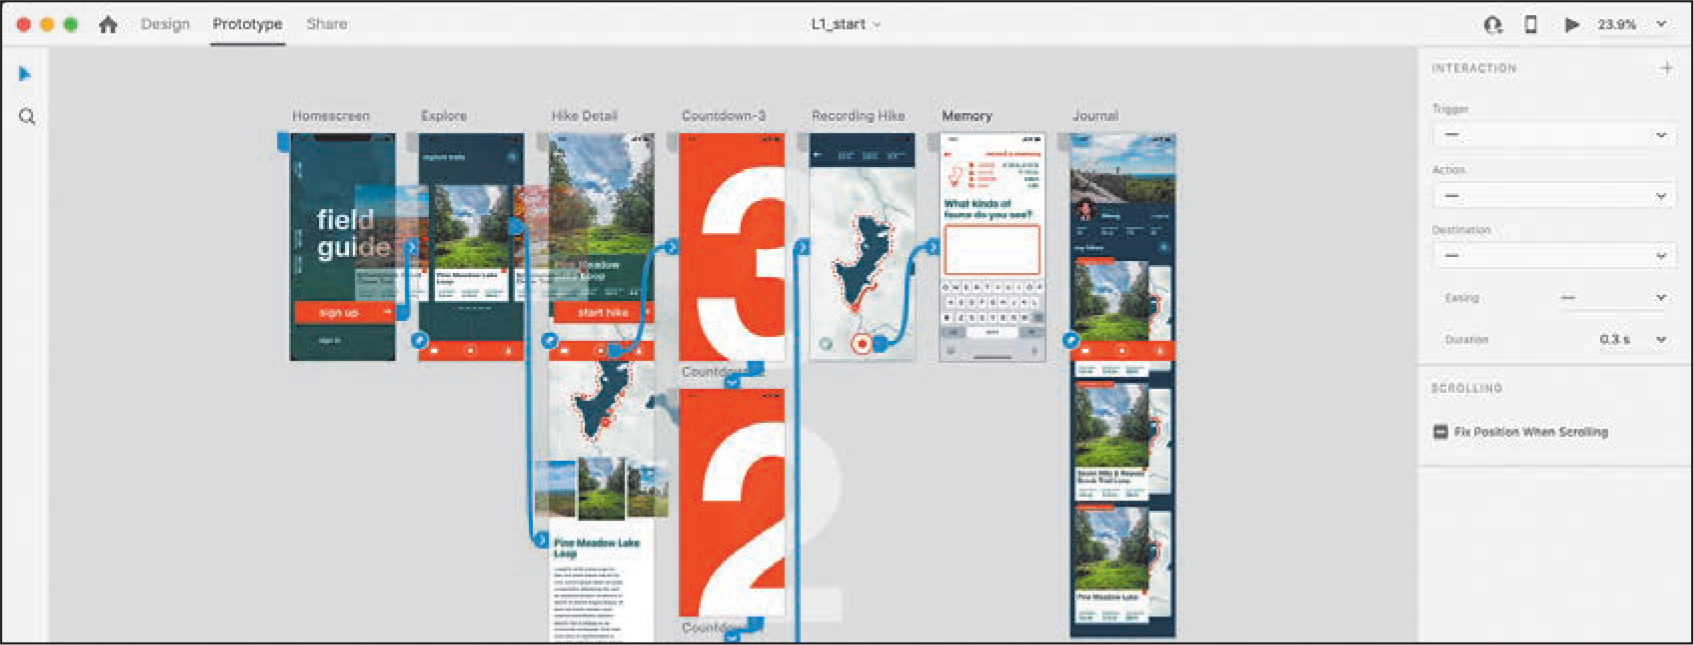
In the lesson file you currently have open, L1_start.xd, the artboards have interactivity added. The interaction between content appears as blue connector lines (also called “wires”). There will be no interactivity by default when you create a design. You can select an artboard or object and create a connection between it and another artboard. In Lesson 8, you’ll learn all about how to create an interactive prototype.
As you add interactivity to your designs, you can test that interactivity either within the desktop version of Adobe XD or on a mobile device using the Adobe XD mobile app.
To deselect the artwork, choose Edit > Deselect All (macOS) or press Command+Shift+A (macOS) or Ctrl+Shift+A (Windows).
Changing the view of artwork
When you’re working in files, it’s likely that you’ll need to change the zoom level and navigate among artboards. The magnification level, which can range from 2.5% to 6400%, is displayed near the upper-right corner of the application window.
There are a lot of ways to change the zoom level in Adobe XD, and in this section you’ll explore several of the most common methods.
Using view commands
Next you’ll familiarize yourself with enlarging or reducing the view of artwork using the View menu.
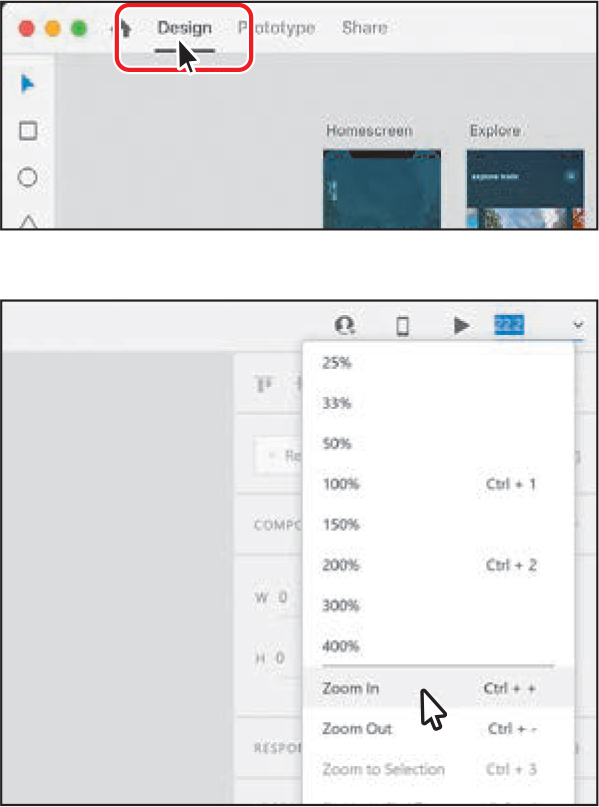
Click Design in the upper-left corner of the application window to enter Design mode.
 Tip
TipYou can zoom in using the keyboard shortcut Command and + (macOS) or Ctrl and + (Windows). You can zoom out using the keyboard shortcut Command and – (macOS) or Ctrl and – (Windows).
Choose View > Zoom In (macOS), or open the Zoom menu in the upper-right corner of the application window and choose Zoom In (Windows), to enlarge the display of the artwork.
NoteUsing any of the viewing tools and commands affects only the display of the artwork, not the actual size of the artwork.
Choose View > Zoom Out (macOS), or click the Zoom menu in the upper-right corner of the application window and choose Zoom Out (Windows), to reduce the view of the artwork.
The zoom level appears in a menu in the upper-right corner of the application window, identified by a down arrow next to a percentage.
Choose 150% from the Zoom menu in the upper-right corner of the application window.

On Windows in the Zoom menu, you’ll see more options, like Zoom In and Zoom Out. On either platform, you can also type a value into the Zoom field and press Return or Enter to view your document content at different sizes.
Choose View > Zoom To Fit All (macOS), or choose Zoom To Fit All from the Zoom menu (Windows).
TipYou can also press Command+0 (macOS) or Ctrl+0 (Windows) to fit all.
Because the gray pasteboard (the area outside the artboards) extends to 50,000 pixels in both directions, you can easily lose sight of your design content. By choosing Zoom To Fit All, you make sure that all content is fit (and centered) in the document window.
With the Select tool (
) selected in the toolbar on the left, click the image you selected earlier on the Hike Detail artboard.Choose View > Zoom To Selection (macOS), or choose Zoom To Selection from the Zoom menu in the upper-right corner of the application window (Windows), to zoom in to the selected content, centering it in the document window.
 Tip
TipYou can also press Command+3 (macOS) or Ctrl+3 (Windows) to zoom in to the selected content.
This zoom command is very useful, and one you will most likely use a lot. Learning the keyboard shortcut for this command, Command+3 (macOS) or Ctrl+3 (Windows), will allow you to work even faster.
Press Command+0 (macOS) or Ctrl+0 (Windows) to fit all of the artboards in the window before continuing.
Using the Zoom tool
In addition to the Zoom menu options, you can use the Zoom tool (![]() ) to magnify and reduce the view of artwork to predefined magnification levels. If you’re familiar with the Zoom tool in other Adobe applications, you’ll be familiar with the Zoom tool in XD.
) to magnify and reduce the view of artwork to predefined magnification levels. If you’re familiar with the Zoom tool in other Adobe applications, you’ll be familiar with the Zoom tool in XD.
Select the Zoom tool (
 ) in the toolbar on the left, and then move the pointer into the document window.
Notice that a plus sign (+) appears at the center of the Zoom tool pointer.
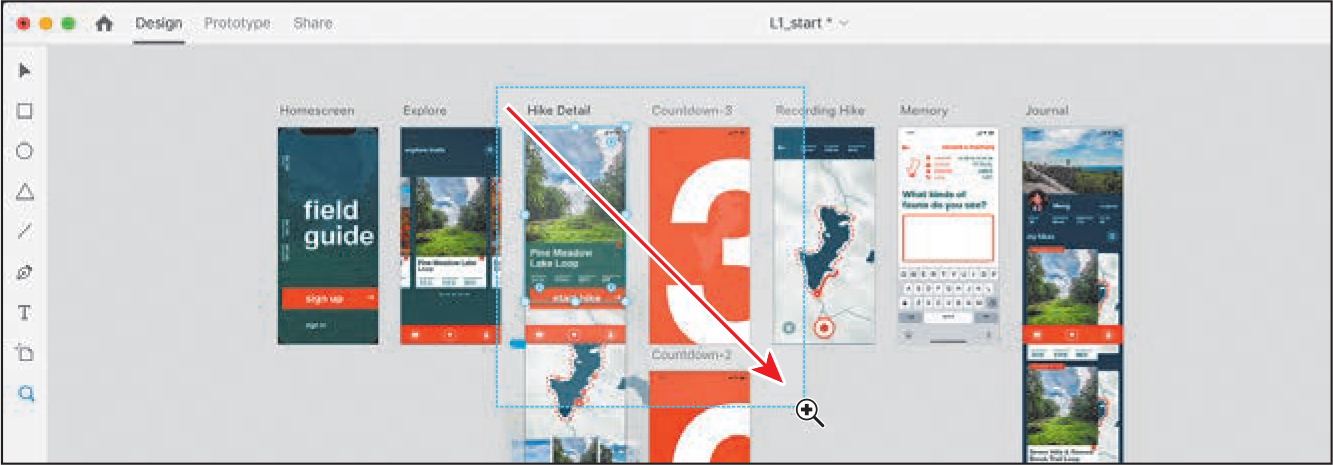
Move the Zoom tool over the large white number 3, and click a few times to zoom in.

The Zoom tool performs an animated zoom, and the artwork is displayed at a higher magnification.
Move the pointer over another part of the document and click a few more times. Notice that the area where you clicked is magnified.
With the Zoom tool still selected, move the pointer over another part of the document and press the Option (macOS) or Alt (Windows) key. A minus sign (–) appears at the center of the Zoom tool pointer. With the Option or Alt key pressed, click twice in the document window to reduce the view of the artwork.

You’ll use the Zoom tool frequently during the editing process to enlarge and reduce the view of artwork. Because of this, Adobe XD allows you to select it using the keyboard at any time without first deselecting any other tool you may be using. With any other tool selected, try the following:
To access the Zoom tool using your keyboard, press spacebar and then Command (macOS), or press Ctrl+spacebar (Windows), and either click or drag to zoom in.
To zoom out, press spacebar+Option+Command (macOS) or Ctrl+Alt+spacebar (Windows) and click.
NoteDragging with the Zoom tool selected while pressing the Option (macOS) or Alt (Windows) key will zoom out, but it won’t be an animated zoom. The effect is the same as Option-clicking (macOS) or Alt-clicking (Windows) with the Zoom tool selected.
Press Command+0 (macOS) or Ctrl+0 (Windows) to see all of the design content again.
With the Zoom tool selected, drag from left to right across the content to zoom in.
This creates a marquee that indicates the area to be zoomed in to. You can drag in any direction to create a zoom box to zoom in to.
Scrolling through a document
In Adobe XD, you can use the Hand tool (![]() ) to pan to different areas of a document. Using the Hand tool allows you to push the document around much like you would a piece of paper on your desk. In this section, you’ll access the Hand tool and see how it works.
) to pan to different areas of a document. Using the Hand tool allows you to push the document around much like you would a piece of paper on your desk. In this section, you’ll access the Hand tool and see how it works.
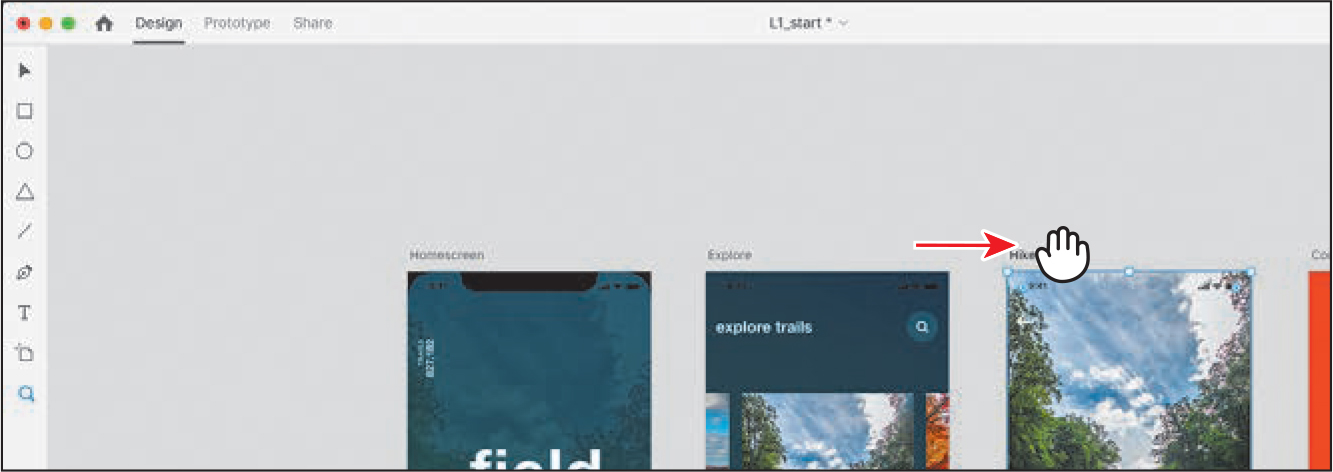
Click to select any tool in the toolbar, and move the pointer into the document window.
Press and hold the spacebar to temporarily select the Hand tool, and then drag in any direction in the document window. When finished, release the spacebar.
 Note
NoteThe spacebar shortcut for the Hand tool (
 ) does not work when the Text tool (
 ) is active and the cursor is in text. If the cursor is in text, you can press the Esc key (possibly a few times) to select the text object, not the text. You can then press the spacebar to access the Hand tool.
Instead of panning with the Hand tool, you can also drag on a trackpad with two fingers to pan in the document window.
![]() Note
Note
To use the Hand tool, Windows users may need to press and hold the spacebar and, while pressing, press and let go of another key (like the Alt key). Then, while still pressing the spacebar, pan in the document window.
Navigating artboards
Artboards represent the screens in your app design or the pages in your web design or presentation (they’re similar to artboards in Adobe Illustrator or Adobe Photoshop) and are found in the gray pasteboard area. You can have as many artboards in a single Adobe XD document as you like, and most documents you create in Adobe XD start with a single artboard. You can easily add, remove, and edit artboards after the document is created.
In Lesson 2, “Setting Up a Project,” you’ll learn how to work with artboards. In this section, you’ll learn how to efficiently navigate a currently open document that contains multiple artboards.
Choose View > Zoom To Fit All (macOS), or choose Zoom To Fit All from the Zoom menu (Windows), to see all of the design content again.
The artboards in a document can be arranged in any order or orientation and can be different sizes—they can even overlap. Suppose that you want to create a simple app with four screens or design a website showing the screen sizes that represent different devices. You can create different artboards for every screen, all with the same (or a different) size and orientation.
With the Select tool (
) selected, click in the gray pasteboard area around the artboards to ensure that all artwork is deselected.Click the Layers panel button (
) in the lower-left corner of the application window to show the Layers panel.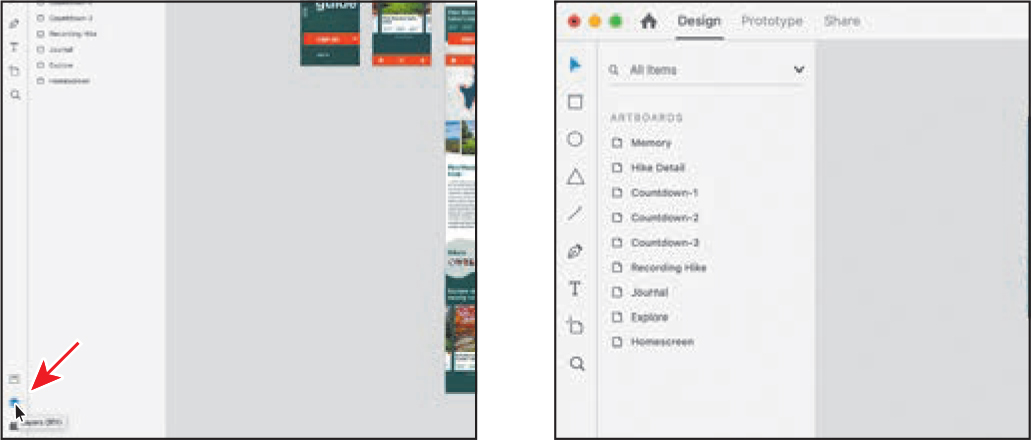
The content you see in the Layers panel is contextual, which means it changes depending on what is selected in the document. If nothing is selected, you’ll see a listing of all of the artboards in the open document. When you select artwork, the artboard that the artwork is on becomes the active artboard. The active artboard is listed at the top of the Layers panel. It’s also indicated on the pasteboard by a subtle outline around the artboard. In the Layers panel, you can navigate between artboards, rename artboards, duplicate or delete artboards, and more.
Click each of the artboards in the Layers panel list, and notice that doing so selects that artboard in the document window.
 Tip
TipYou can also click an artboard name in the document window to select an artboard. You’ll learn all about selecting artboards in Lesson 2.
You can tell which artboard is selected because the name above the artboard is highlighted in blue and there is a blue highlight around the artboard.
Double-click the artboard icon (
 ) that appears to the left of the artboard name “Explore” in the Layers panel.
 Note
NoteDouble-clicking the artboard name (not the artboard icon [
 ]) in the Layers panel or above the artboard in the document allows you to change the name of the artboard.
The artboard named Explore is now centered in the document window. The Layers panel no longer lists all of the artboards and instead shows the content on the Explore artboard.
 Note
NoteSimply clicking content on an artboard also shows the content for that artboard in the Layers panel.
Press Command+Y (macOS) or Ctrl+Y (Windows) to collapse the Layers panel.
Previewing your designs
You can test your prototype within Adobe XD using the desktop preview or the Adobe XD app on your iOS or Android device. Next, you’ll take a look at previewing your designs within XD.
Press Command+0 (macOS) or Ctrl+0 (Windows) to see all of the design content again.
Click in the gray pasteboard area outside of the artboards to deselect all.
With nothing selected, click Desktop Preview (
 ) in the upper-right corner of the application window to open the Preview window.
 Tip
TipYou can also choose Window > Preview (macOS) to open the Preview window, or press Command+Return (macOS) or Ctrl+Enter (Windows).
In the Preview window, you should see the home artboard (named Homescreen), since nothing is selected. Normally, the artboard that is in focus (selected) shows in the Preview window. The Preview window opens at the size of either the selected artboard or the first artboard (with nothing selected).
NoteOn a Windows touch device such as a Microsoft Surface Pro, the Preview window may appear as a split screen. You can drag the divider between the screens to hide the Preview window.
Click the Sign Up button in the Preview window to show the next artboard that contains an image carousel.
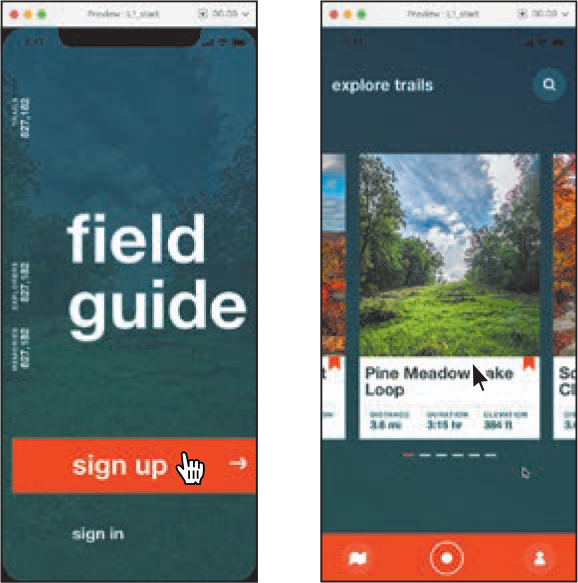
Clicking interactive elements allows you to easily test the navigation between screens as you build your prototype.
Click the red button (macOS) or the X (Windows) in the corner of the Preview window to close it.
Sharing your designs
At any point in the design process you may want to share your saved documents with others for collaboration to gather feedback, pass design specifications like font size and color to developers, and more. You can share the entire project, or a subset of artboards, with reviewers by providing them a web link they can use to view your prototype, test it, present it, or look at design specs in a web browser.
![]() Note
Note
You’ll learn about sharing an entire project or a subset of artboards in Lesson 10.
Next, you’ll take a quick look at how you can share your design and what that means. In Lesson 10, “Sharing Your Designs,” you’ll learn about sharing your prototypes and design specs with others.
Click Share in the upper-left corner of the application window to enter Share mode.
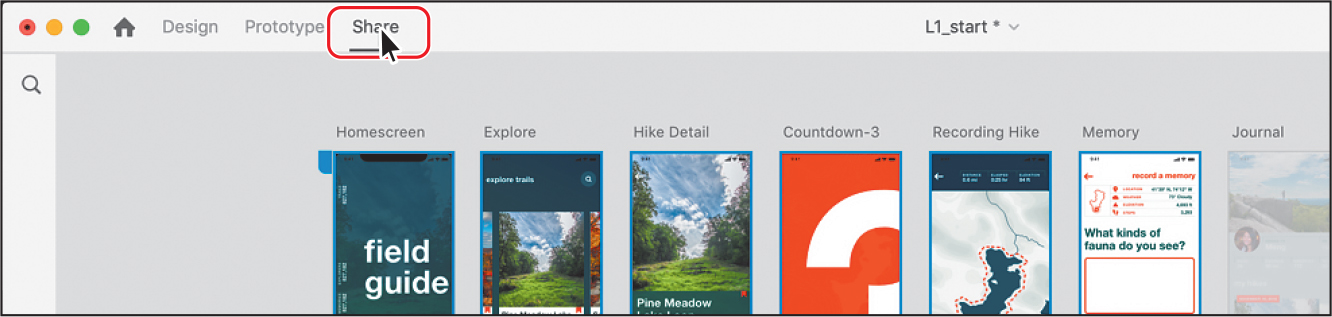
In the Properties panel on the right, click the View Setting to show a menu.

You can share your document for a variety of purposes, including for a design review, development, a presentation, user testing, and more. If you make changes later, you can always update what you share or create a new version from the current design.
Press the Esc key or click away from the View Setting menu to hide it.
Switching between documents
When working in Adobe XD, you can have multiple documents open at one time. To switch between open documents, you’ll first open another file to have another document open to work with.
Choose File > Open or Open From Your Computer (macOS) or, on Windows, click the menu icon (
 ) and choose Open or Open From Your Computer. Navigate to a second file and open it in Adobe XD.
The document opens in a separate application window.
To switch to another open document, on macOS either choose Window > [name of file] or press Command+~, or, on Windows, press Alt+Tab to switch between the open documents.
Finding resources for using Adobe XD
For complete and up-to-date information about using Adobe XD, choose Help > Learn & Support (macOS) or, with a document open on Windows, click the menu icon (![]() ) and choose Help > Learn & Support from within Adobe XD. The helpx.adobe.com/support/xd.html page will open in a web browser. From that web page you can explore the library of tutorials, projects, and articles to learn more about Adobe XD.
) and choose Help > Learn & Support from within Adobe XD. The helpx.adobe.com/support/xd.html page will open in a web browser. From that web page you can explore the library of tutorials, projects, and articles to learn more about Adobe XD.
![]() Note
Note
The web page you see will most likely look different, and that’s okay.

Choose File > Close (macOS), or click the X in the upper-right corner of the open window (Windows), to close the L1_start.xd file. If you’re asked whether you want to save your changes, click Don’t Save.
Review answers
1. Adobe XD is a complete end-to-end solution for designing user experiences for websites, mobile apps, and presentations. You can design, prototype, preview, and share in the same tool.
2. A low-fidelity wireframe is a way to determine the functional elements of a page or screen without diving into design specifics like colors and fonts. It is a quick method of exploring the basic structure of content in an app or website using rough representations of graphics and layout.
3. To change the zoom level of a document, you can choose commands from the View menu (macOS) or the Zoom menu (macOS and Windows). You can also use the Zoom tool (![]() ) in the toolbar and click in or drag over a document to enlarge or reduce the view. In addition, you can use keyboard shortcuts to magnify or reduce the display of artboards.
) in the toolbar and click in or drag over a document to enlarge or reduce the view. In addition, you can use keyboard shortcuts to magnify or reduce the display of artboards.
4. Interactive prototypes allow us to test our designs and to gather feedback on the feasibility and usability of our designs.
5. Currently, the two main methods for previewing (testing) a prototype are by using Desktop Preview with Adobe XD or by using the Adobe XD app on your iOS or Android device.
6. Sharing a document is useful for collaboration, testing a prototype, gathering feedback on your design, sharing design specs, and more.