In This Chapter
 Getting ready for an introductory Power Yoga workout
Taking that walk in the park
This routine, named Just a Walk in the Park, is fairly easy and makes a good introduction to Power Yoga. This workout is perfect if you have just under an hour for your practice. You can complete it in 30 to 45 minutes.
In this chapter, you find some background information about the postures of this short, well-balanced workout, and the instructions show you when to incorporate a linking movement, or vinyasa, to move from one posture to the next. Because this routine takes relatively little time, you get a full dose of Power Yoga benefits in a small package; that’s a good deal from all angles. So grab your yoga mat, put on those Power Yoga togs, and get moving!
The Beginner’s Routine: Just a Walk in the Park
This routine starts you off with some Power Yoga breathing techniques, moves you softly into a few warm-ups, and then gives you a mild vinyasa to take you to a standing pose. After you get a taste of some powerful standing poses, you move softly back to the floor and practice the traditional, whole-body finishing poses, or asanas. You complete your journey with breathing and deep relaxation.
Starting well is breathing well
 Always start your Power Yoga practice with yoga breathing to find your center and quiet your mind. Check out Book IV, Chapter 1 for a reminder of how to do this.
Follow these steps to begin your walk in the park:
-
Sit cross-legged on the floor with your spine straight and your shoulders back.
If you find this position uncomfortable, experiment with placing a small but firm pillow or rolled blanket under just the bony part of your seat (leave those cheeks behind!). If you still feel uncomfortable or if your knees just hang high in space, place a small, supportive pillow under each thigh just above the knee.
If you’re a beginning Power Yoga student, you may find it more comfortable to sit on the edge of a small pillow or on the edge of a chair until you gain more flexibility.
- Extend your arms over your knees, resting your wrists on your knees, with your palms facing upward.
- Form jnana mudra with your hands by bending your index finger in to touch the tip of your thumb; your remaining fingers should be straight but not stiff or tense (see Figure 3-1).
-
Practice your yoga breathing.
Allow your breathing to calm your mind and body and help center your thoughts on your practice. Continue your yoga breathing for 5 to 10 slow, deep breaths.
- Open your eyes, and go on to the neck and shoulder exercise listed in the next section.
Working the kinks out of your shoulders and neck
 The steps in this section walk you through these powerful neck and shoulder exercises. If you need more background information, refer to Book IV, Chapter 2.
Follow these steps to warm up your neck and shoulders:
-
Sit on the floor, with your spine straight and shoulders back; keep your arms relaxed and your hands resting in your lap.
If sitting on the floor is uncomfortable, sit on the edge of a heavy chair.
-
On an inhalation, rotate your shoulders back as you lift them toward your ears; then, as you exhale, finish the backward rotation as you lower your shoulders to their original position.
-
Repeat Step 2, reversing the direction of your shoulder rotation.
Repeat each rotation three or four times, and then relax your shoulders.
-
Maintain your erect, relaxed sitting position; on an exhalation, tilt your head forward and let your chin drop to your chest.
You’ll feel the muscles in the back of your neck stretch.
- Inhale, and lift your head back to its upright position.
-
Exhale, and tilt your head back as far as you can without hurting anything.
You’ll feel the muscles in the front of your neck and under your chin stretch.
- Inhale again, and lift your head back to the center.
- Repeat Steps 4 through 7 four times, and then return to your original upright posture.
- Exhale, and lower your head to your right shoulder; inhale, and raise your head to its original position.
- Exhale, lower your head to the left side, and then go back to the center on an inhalation.
- Relax for 3 complete breaths, using your yoga breathing technique.
- On an exhalation, turn your head to the right, keeping your head level as you gaze over your right shoulder; inhale and turn your head back to look straight ahead.
- Repeat Step 12, turning your head and gazing to the left on an exhalation and back to the center on an inhalation.
- Finish by closing your eyes and relaxing for 3 complete breaths.
Moving into the cat stretch
The cat stretch is a wonderful warm-up exercise because it affects almost every part of your body. Book IV, Chapter 2 covers the details of this posture, so if you need a refresher, you can refer to that chapter.
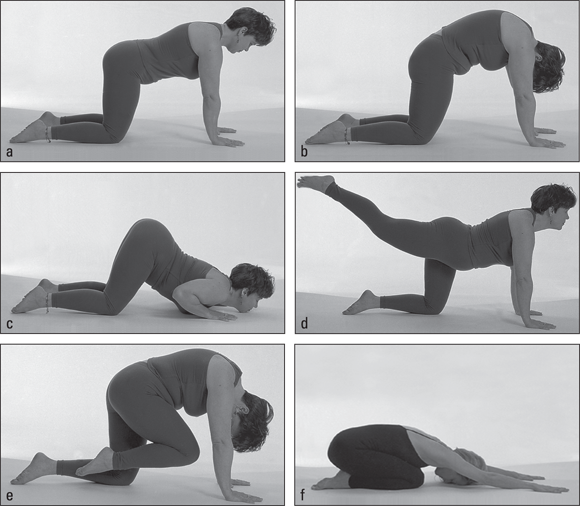
Follow these steps to stretch like a cat (see Figure 3-2):
-
Start from a kneeling position; sit back on your heels, with your toes pointed backward.
Your back should be straight, and you should feel your neck lengthen.
- Lift your hips, and place your hands on the floor so that you’re resting on your hands and knees.
-
Keep your back straight, but not rigid, and relax as you take 3 slow, deep breaths.
Have your hands right under your shoulders and your knees right under your hips — this is the table pose (Figure 3-2a).
- On an exhalation, arch your back like a cat; relax your neck as you drop your head downward and gaze toward your knees ( Figure 3-2b).
- On an inhalation, lower your back and let it sway downward as you bend your arms to lower your chest and bring your chin to rest on the floor between your hands ( Figure 3-2c).
-
Exhale, and slowly draw your body up and return to the arched-back position you reached in Step 4 ( Figure 3-2b).
Time your moves with your breathing. Take your time, and try to flow from one position to the next.
-
On an inhalation, sway your back downward again, but keep your arms straight and lift your head upward as you extend your right leg back and upward ( Figure 3-2d).
Your body should form a smile. Don’t swing or jerk into this posture: Try to keep your movements fluid and soft as you lift your head and extend your leg back and up at the same time.
- On an exhalation, reverse the stretch by arching your back again, dropping your head, and bending your right knee toward your chest; try to touch your nose with your knee ( Figure 3-2e).
- Repeat Steps 7 and 8, but extend your left leg this time.
- Practice two to four repetitions of Steps 1 through 9, and then relax into the child’s posture with arms in front, shown in Figure 3-2f.
- Relax for 2 breaths, and then push your torso off the floor and come to rest on your hands and knees.
Strengthening with power cat push-ups
The power cat push-ups strengthen the shoulder, arm, and pectoral muscles. Follow these steps to perform the power cat push-ups:
-
Form a table by supporting your body on your hands and knees, with back straight but relaxed (see Figure 3-3a).
This is the table pose.
-
Move your arms forward slightly, bend your elbows, and on an exhalation, lower your whole torso flat to the floor (see Figure 3-3b).
If you can’t get all the way down at first, lower as far as you can and still push yourself up again. You’ll soon be doing the full power cat push-up!
- Inhale, and push your torso up to the starting position on your hands and knees (as in Figure 3-3a again).
-
Repeat Steps 1 through 3 three to ten times, and then relax into the child’s posture with arms in front (refer to Figure 3-2f).
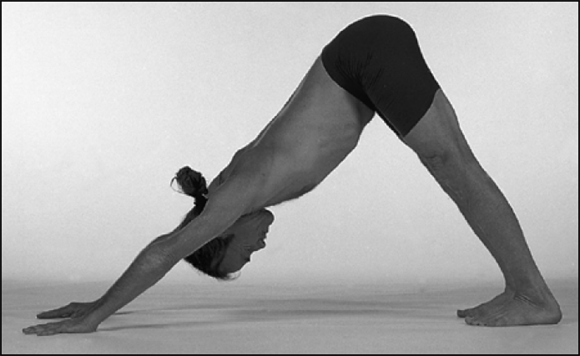
Stretching into the downward-facing dog
The downward-facing dog (adhomukha shvanasana) position resembles a dog stretching after awakening from his nap. As the dog awakens, he stretches his hips high in the air while he lengthens his entire spine and stretches his back. If you’ve ever been around a dog, you’ve seen this posture, and you may have thought “Oh, that looks like it feels so good.”
Follow these steps to find out how good Fido feels when he stretches:
-
Move into the table pose: Rest on your hands and knees, with your hips, back, neck, and head forming a straight line.
Your knees should be directly under your hips and your hands directly under your shoulders.
-
Roll up on your toes, slowly straighten your legs to push your hips upward, and drop your head toward the ground; keep your arms straight and elbows relaxed.
Keep your shoulders wide and away from your ears, and your feet about a foot apart.
-
Try to flatten your soles on the ground as your legs straighten; your feet should be about 1 foot apart.
 If you can’t comfortably straighten your legs, don’t force it! Don’t worry if you can’t straighten your legs when you first try this posture. Power Yoga is supposed to feel good, so don’t push too hard.
-
Without straining or locking your elbows or knees, try to create a 90-degree angle with your body as you make a straight line from your heels to your hips and another straight line from your hips to your hands (see Figure 3-4).
- Gaze toward your toes, and begin taking slow breaths; try to hold this position for 3 to 5 complete breaths.
-
Relax, lower your knees to the ground, and fold your body in half, so that your seat rests near your heels and your forehead reaches all the way to the floor.
Again, don’t force yourself. Just relax.
-
Stretch your arms in front of you, with palms facing downward.
Keeping a relaxed and extended neck and throat, get as close to the floor as you can. This is called the child’s pose with arms in front (head to Book II, Chapter 10 for details on this pose).
- Remain in this position as you take a few slow, deep breaths, and then slowly lift your torso and return to sitting on your knees in preparation for the next exercise.
Moving with the missing link upward
The missing link upward pose is a movement that lets you connect seated poses to standing poses. In the missing link, you stretch and counter-stretch your back and neck, and you invigorate your spine with the movement’s wavelike motion. This vinyasa teaches balance, grace, and self-confidence. The brain receives a gentle, peaceful vibration from the vinyasa’s fluid movement and quiet transition. This cooler vinyasa requires minimum amounts of energy and is poetry in motion.
Follow these steps to achieve the missing link upward:
-
Start from the seated angle pose.
Sit on the floor with your legs stretched straight before you and your arms at your sides (refer to Book IV, Chapter 2 to see what this posture looks like); engage your Mula bandha and Uddiyana bandha now (see Book IV, Chapter 1 for the location of these muscle locks).
- Exhale completely, and then inhale as you expand your chest and lift your arms out to your sides and over your head.
- Start your exhalation, and slowly bend your elbows as you fold your arms over your chest in prayer fashion; as you fold your arms, bend your knees and bring your feet toward your torso (see Figure 3-5a).
-
When your knees are drawn up to your hands, separate your hands and lower your arms to your sides (see Figure 3-5b).
You should now be sitting in a compact ball, with your knees tucked into your body, your arms by your sides, and your hands resting on the floor.
-
Still exhaling, push against your hands to raise your hips from the floor as you roll your torso forward and drop your head.
These movements help you flow into a standing forward bend, shown in Figure 3-5c.
You should do Steps 3, 4, and 5 all in one exhalation, but if you can’t quite handle that yet, take extra breaths as necessary. As your Power Yoga skills build, so will your ability to match your breathing to the ideal in this posture.
- Expand your chest as you lift your arms out to your sides, and come to a full standing position; stretch your arms straight up over your head, and gaze up toward your hands ( Figure 3-5d).
- Stand up straight as you lower your arms toward your sides and gaze forward in the mountain pose.
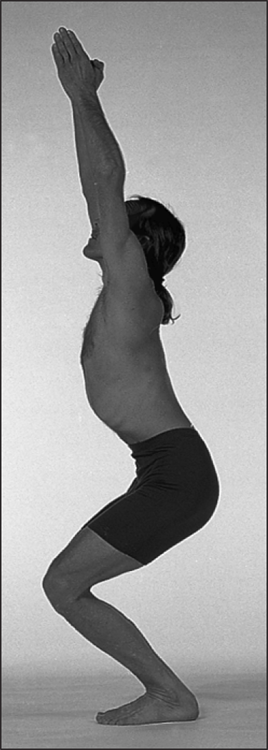
Building stability with the powerful chair
In the powerful chair posture (utkatasana), you strengthen and firm the muscles of your legs, expand your chest, and release tension from your shoulders. In this posture, you take on the characteristics of a strong and powerful chair.
Follow these steps to achieve the powerful chair pose:
- Stand up straight, with shoulders back, spine straight, and vision forward; keep your feet together, and stand strong, yet relaxed.
- Start taking slow, deep inhalations and exhalations, and practice your yoga breathing throughout this exercise.
- On an inhalation, lift your arms out to your sides and over your head, bringing your palms together.
- At the same time, bend your knees and come to a half sitting position, as if you were preparing to sit in a chair; gaze up toward your hands, and keep your lower back flat, tucking your tailbone forward. Feel your abdominal muscles engage (see Figure 3-6).
- Hold this position for 5 to 10 slow, deep breaths.
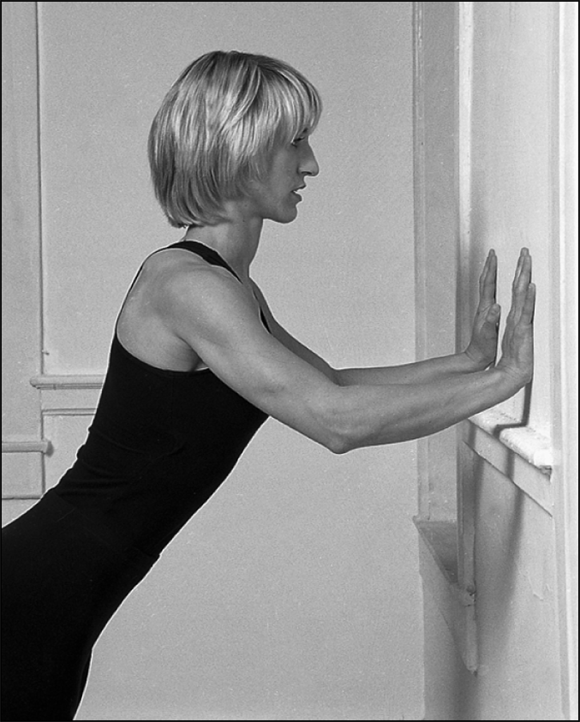
Strengthening your upper body with wall push-ups and the standing dog stretch
Wall push-ups strengthen the muscles of your arms and shoulders and give your upper-body muscles a great stretch. In this exercise, you do some modified push-ups against a wall, and you finish with a standing dog stretch.
-
With your arms extended, your hands should be about 1 to 2 feet from the wall.
Stand facing a wall, and extend your arms in front of you, toward the wall.
- From your standing position, lean forward and support yourself against the wall with your hands.
- Exhale, and bend your arms to lower your chest to the wall; inhale, and push yourself away from the wall by straightening your arms, as shown in Figure 3-7.
-
Repeat Steps 1 through 3 five to ten times.
To make your wall push-ups more difficult, move out away from the wall; to make them easier, move closer to the wall.
-
When you finish your push-ups, place your hands on the wall at about head level; keeping your arms straight, lean toward the wall, drop your head and shoulders downward, and extend your hips backward as if you were pushing a heavy load.
This exercise, called the standing dog stretch, gives your shoulders a great stretch and releases tension.
- Relax and return to a standing position.
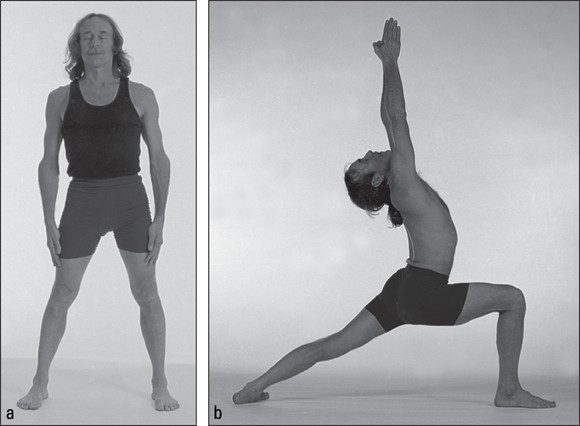
Building balance with the warrior I
In Power Yoga, you use three variations of the warrior pose (virabhadrasana). In warrior I, used in this exercise, your arms come together pointed toward the sky.
 The warrior I pose opens your chest and shoulders and works to stimulate the nerves in your spine and to correct its alignment. This pose strengthens the muscles of your legs, opens your hips, and builds flexibility in your back and ankles. The warrior I posture improves your balance and can leave you feeling refreshed and confident. To see how to prepare for and move into the warrior pose, check out the video at
 www.dummies.com/go/yogaaiofd.
Follow these steps to be a warrior, or at least feel like one:
-
Start this posture from the expanded mountain pose (see Figure 3-8a).
Stand with your spine straight, shoulders back, arms at your sides, and feet about 4 feet apart.
-
Pivot on your feet to turn your body to the right until your right foot points straight to your right and your left foot is at a 45-degree angle from your right.
Your hips, shoulders, and torso should be squarely aligned to your right and your feet firmly planted on the ground.
-
Lunge forward by bending your right knee until it forms a 90-degree angle from your hamstring to calf muscle.
Your knee should be over your heel and your thigh parallel to the floor.
-
On an inhalation, lift your arms out to your sides and over your head; straighten your arms, touch your palms together, and point toward the sky.
Tilt your head back only as far as necessary to see your thumbs. Remember to keep your shoulders broad and down from your ears.
-
Drop your head back and stretch your torso upward, as shown in Figure 3-8b, keeping your back foot flat on the floor.
If this move is too difficult or uncomfortable, turn your toes downward on your left leg and rest on your toes.
- Hold this position for 5 to 10 complete breaths, and then inhale and straighten your right leg.
- Drop your arms to your sides, return to the expanded mountain pose (as described in Step 1), and relax.
- Repeat Steps 3 through 7, but lunge on your left leg this time.
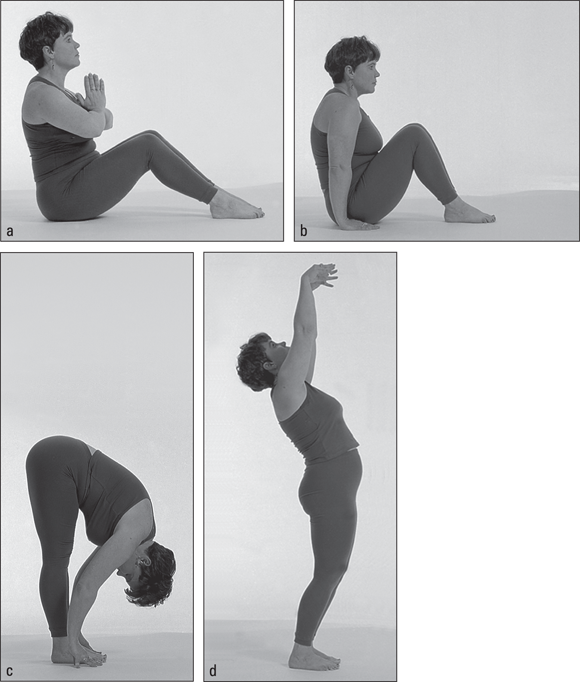
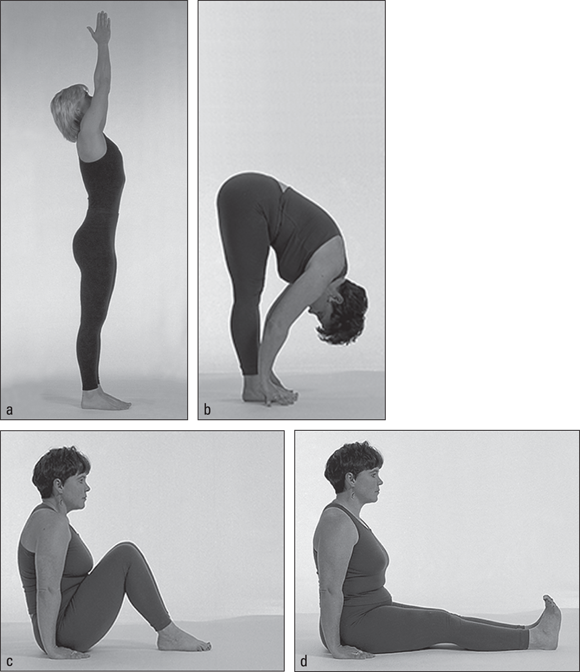
Finding the missing link downward
It’s time to take the missing link in the opposite direction to return you to the floor for your seated asanas.
Follow these steps to achieve the missing link downward:
- Start from the mountain I pose: Stand up straight, with your shoulders back and your arms down by your sides.
-
On an inhalation, lift your arms out to your sides and over your head, and touch your palms together in the mountain III pose as seen in Figure 3-9a.
-
Exhale, and fold forward at your hips, moving into a standing forward bend as you lower your arms toward your feet ( Figure 3-9b).
Rest your hands on the floor beside your feet.
- Inhale, and bend your knees as if you were preparing to sit in a chair.
-
Lift your head upward, and continue lowering your body until your hips touch the floor; support your hips with your hands on the floor in the beach ball pose, as shown in Figure 3-9c.
- Exhale, and straighten your legs in front of you, resting into the seated angle pose and forming a 90-degree angle from head to hips and hips to feet ( Figure 3-9d).
Stretching your leg and back muscles with the seated forward bend
The seated forward bend (paschimottanasana) stretches muscles on the back of your body — the back of your legs, the muscles along your spine, and your shoulders and upper back — and therefore is named for the direction that those muscles belong to.
 The Sanskrit word paschima translates as “west.” As you face the east, your back is to the west.
Follow these steps to practice stretching your “west” side:
- Start from the seated angle pose; exhale completely.
- With an inhalation, lift your arms in front of your body and over your head; keep your wrists soft as you completely fill your lungs with air.
- On an exhalation, gently lower your arms outward in a circular motion, reaching toward your toes, as shown in Figure 3-10a.
-
If you’re relatively flexible, try to rest your torso on your thighs and take hold of your toes with your hands, keeping your feet flexed upward; relax and hold this position for 5 slow, deep breaths.
This is the extended seated forward bend, as shown in Figure 3-10b.
As an alternative, you can place a pillow under your knees for support and place your hands on your shins instead of reaching for your toes. You can also wrap a yoga strap around your feet and hold the ends of the strap rather than grasping your feet in your hands.
- On an inhalation, slowly return your torso to an upright position as you lift your arms over your head, keeping your wrists soft; exhale, and lower arms to your sides, returning to the seated angle pose.
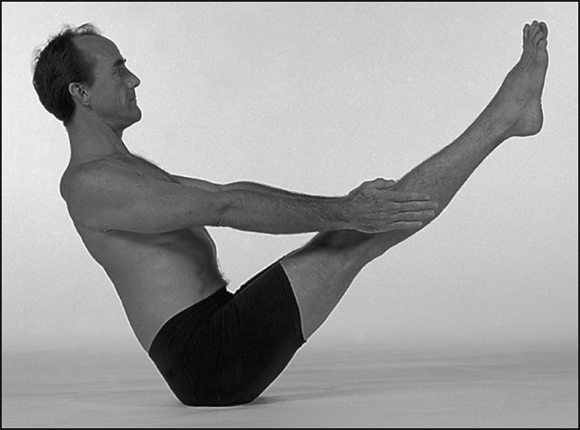
Working your stomach muscles in the boat pose
The boat pose (navasana) is a good alternative for a full-power vinyasa, and it strengthens many of the muscles necessary for a progressive Power Yoga practice. In this pose, you resemble a boat floating in the water.
Follow these steps to work your stomach muscles with the boat pose:
- Begin in the seated angle pose — hands by your sides and legs extended in front of you; bend your knees, and place your feet flat on the floor.
- Rock back on your rear as you lift your feet off the floor and extend your arms to your sides parallel to the ground; balance in this position for 3 complete breaths.
-
Straighten your legs as you lift them to form a 45-degree angle with the floor, as shown in Figure 3-11.
This leg-lift gives your stomach and legs an even greater workout.
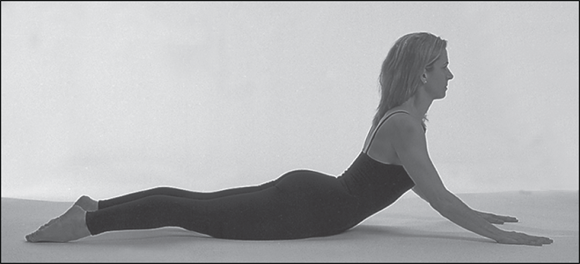
Counter-stretching with the cobra pose
In the cobra pose (bhujangasana), you resemble a snake slowly uncoiling as you roll back your vertebra one at a time. The cobra pose is an excellent counter-stretch for the seated forward bend because it stretches the muscles on the front of your body. For help with preparing for and moving into the cobra pose, watch the video at www.dummies.com/go/yogaaiofd.
Follow these steps to achieve the cobra pose:
- Lie on your stomach with your arms extended by your sides and your palms facing upward; turn your head to one side and then the other, and then close your eyes and relax for a few seconds.
-
Turn your face to the floor, and rest on your forehead; bend your elbows, and place your hands up under your shoulders.
Your feet should be pointed yet relaxed.
-
On an inhalation, slowly lift your shoulders and torso off the floor, one vertebra at a time (see Figure 3-12).
Lift as high as is comfortable for you. If the lifting action becomes uncomfortable, rest on your elbows. If you’re more flexible, lift your torso as you straighten your arms higher by extending your arms more.
You can protect your lower back by pressing the tailbone down to engage the abdominal muscles. Keep the abs engaged as you lift your torso to prevent over-arching the lower back.
-
When you reach your maximum comfortable stretch, remain in that position for 5 deep breaths.
If you have a stiff lower back, you can separate your legs a bit and allow your ankles to turn outward.
-
Exhale, and lower your torso and shoulders to the floor; take your hands out from under your shoulders, extend your arms to your sides, turn your head to the side, and relax.
Sitting and breathing in the easy posture
Before you go into a deep relaxation at the end of your Power Yoga workout, you can slow yourself down with some yogic breathing techniques. This gradual cooling off in your routine helps you to relax completely.
When you prepare for any breathing exercise, begin by finding your center and quieting your mind. You may be more comfortable and find holding a good posture easier if you sit on a small pillow rather than sitting directly on the floor or on your yoga mat. As always, you may sit on the edge of a chair if that is more comfortable to you. The object is to be able to concentrate on your breathing, not the pain in your backside!
Follow these steps to easy breathing:
- Repeat the yoga breathing exercise recommended at the beginning of this routine (refer to “Starting well is breathing well”).
- When you finish your yoga breathing, lie down on your back and prepare for a wonderful journey into deep relaxation.
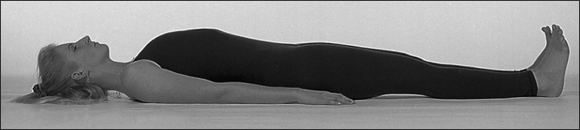
Enjoying a moment of deep relaxation with the corpse posture
In the corpse posture, you lie flat on the floor, completely relaxed and motionless. The corpse posture, shown in Figure 3-13, is a great way to experience the deep relaxation phase that caps off your Power Yoga session.
In the deep relaxation phase, you release stress and tension throughout your entire body and mind. Your blood pressure decreases, your heart rate slows, and you’re rewarded with a euphoric feeling that can last for hours. You also relieve stress and tension and create total relaxation in every fiber of your body. The deep relaxation phase promotes complete physical and mental rejuvenation as it boosts your motivation and self-esteem.
- Lie on your back, with your arms at your sides and your legs extended (the corpse pose).
- Close your eyes, relax, and begin taking slow, deep breaths.
- Lift your right leg about 12 inches from the floor, tense every muscle in your leg for a few seconds, relax, and then gently lower your leg to the floor; repeat this step with your left leg.
- Tighten the muscles in your hips and buttocks for a few seconds, and then relax and let your gluteus muscles melt into the floor.
- Arch your back, pressing down with your elbows and shoulders as you expand your chest toward the ceiling; hold this position for a few seconds, gently lower your back to the floor, and then relax.
- Press your lower back into the floor by tightening your buttocks and stomach muscles as you press against the floor; hold this position for a few seconds, and then relax completely.
- Lift your right arm about 12 inches off the floor, tensing all the muscles; hold this position for a few seconds, relax and lower your arm to the floor, and repeat this step with your left arm.
- Roll your head slowly to the right and then to the left; return your head to the center, and relax.
- Fill your mouth with air, blowing your cheeks out like balloons; hold for a couple of seconds, and then relax and release the air.
- Gently stretch all your facial muscles, and then relax them.
- Close your eyes, take 5 slow, deep breaths, and clear your mind.
- Working from your toes to your head, visualize each part of your body and tell each muscle to relax.
- Visualize your heart, and mentally ask your heart to relax.
- Visualize your brain, and calm it by releasing your thoughts.
- Clear your mind of all but the most pleasant and positive thoughts.
- After 5 to 30 minutes, slowly stretch your arms over your head on an inhalation and then roll over onto your right side, with your arms and legs slightly bent; remain in this position for a few breaths.
-
Gradually return to a sitting position and try to preserve the positive uplifting thoughts you created.
You should feel calm, refreshed, relaxed, and ready to go! To keep the good feelings alive, consider taking a quiet walk in one of your favorite settings. Notice the world around you, and be happy that you’re on the way to becoming a full-fledged power yogi or yogini.