Chapter 5
Staying Young: Power Yoga for Seniors
In This Chapter
 Making Power Yoga work for you
Checking out Power Yoga postures for seniors
Moving through your own Power Yoga routine
Power Yoga can become your best friend as you hit the post-50 years. At any age, a moderate, regular Power Yoga practice can help you maintain good physical and mental health. But as you reach middle age and beyond, the Power Yoga benefits of increased strength, flexibility, and balance become even more critical. Power Yoga doesn’t stop there, either, in helping you stay young as the years roll by. The strong cardiovascular workout of a good Power Yoga practice keeps your heart healthy and helps keep your blood pumping through strong, clean arteries. You’ll be more alert and more comfortable in body and mind.
In this chapter, you discover how you can adapt Power Yoga routines to cater to your changing body, lifestyle, and fitness needs. This chapter also points out a few special considerations to ensure a safe and comfortable Power Yoga journey.
Embracing Power Yoga for All Ages
Beyond death and taxes, you can count on one other thing in life: change. Time passes, and everyone gets older (and that’s the good scenario). But getting older doesn’t mean that you have to be less active. In fact, after you jump that 50-year hurdle, a strong, active schedule of physical activity becomes more important than ever.
 You don’t need to be a mountain climber-in-training to require a good workout program in your later years; whether you plan to putter around the house or run marathons post-retirement, you need to work at maintaining good fitness, strength, and flexibility. Of all the forms of exercise practiced today, yoga has been proven to be one of the most beneficial exercises for your whole body and mind. Power Yoga has all the benefits of traditional soft-form yoga, with additional aerobic and muscle-strengthening aspects built in.
Of course, your body does change as it ages, and any fitness routine that you adopt needs to be designed to fit your body’s current condition. No single “condition” describes every post-50 body. Countless people in their 60s, 70s, 80s, and even 90s are out climbing mountains and living active lives; other folks are learning to develop a fitness routine late in life, so their bodies need more foundation fitness building. Whatever your condition, the key to building good physical and mental health is to adopt a moderately active program that gets you up and moving regularly.
 Power Yoga is such a diverse practice. Many Power Yoga exercises are appropriate for anyone of any age — and most of them have beginner’s variations or can be modified to suit older students. If you aren’t very active, you can use a beginning-level Power Yoga routine and modify it as necessary to fit your abilities. The key is to practice for short periods on a regular basis; that way, you’ll make good progress and build your endurance, strength, and flexibility over time.
Understanding Power Yoga benefits for seniors
Seniors get many benefits, such as reduced prices at restaurants and hotels, and (usually) a prime seat on a crowded bus! But Power Yoga brings you better benefits: the benefits of mental and physical health. If you’ve been active all your life, you may not notice some of the typical changes of an aging body: Muscles get tighter, reaction times slow, and breathing can become shallower, limiting endurance. Power Yoga fights many signs of aging by offering these benefits:
If you think of Power Yoga as a full-throttle, no-holds-barred workout process, you may think that you’re not interested in — or not capable of — doing it. Well, if Power Yoga is a wild beast, it’s one you’re perfectly capable of taming. Just as walking is the beginning phase of running, which is just another step down from marathon racing, Power Yoga can be as gentle or as demanding as you want it to be.
Considering some cautions
Most people (at any age) aren’t in peak physical condition. If you’ve reached middle age or beyond and you’re just beginning to think about getting in shape, you have a tougher road ahead than does someone who’s been working out and watching his or her diet forever. But so what? Lots of people start working out when they’re 60, 70, or 80; it’s always a good idea, no matter what your age. But you have to keep the following realities of aging in mind as you build a safe practice program:
- Take your time. As you age, your bones become more brittle even as your joints and muscles become less flexible. With that in mind, be careful when you move in and out of poses. Slow your breathing, and move gently into and out of each yoga pose.
-
Use some props. You’re building balance as a Power Yoga student, but initially, your balance may be a bit off. To make sure that you can remain stable and secure during your yoga postures, use props during your Power Yoga workouts.
Props — things like pads, blocks, mats, straps, pillows, blankets, and other objects — help you build strength and stability faster than if you try to wobble through without them; you’ll also enjoy your Power Yoga workouts more. When you first attempt certain Power Yoga postures, for example, you may have trouble keeping your balance or comfortably assuming or maintaining certain positions. With a pillow here or a block there, what had been a wobbly, unsatisfying perch becomes a comfortable, secure pose.
- Grab a partner. Practicing Power Yoga with a partner is fun! And having a partner to help you balance in some positions, hand you props, or just lend general moral support can make a big difference in your confidence — and safety. A partner is also great to have around if you’re going to practice challenging balance postures, especially the upside-down postures such as headstands and handstands. For complete information on partnering in yoga, see Book VI, Chapter 1.
- Balance your workouts with rest. Your muscles may not recuperate from a brand-new workout as quickly as they did when you were younger. So use a low-level workout routine in the beginning, and if your muscles get sore, back off and rest between workouts. If you get sore and tired every time you do Power Yoga, you’ll soon be discouraged by the whole process. If you feel yourself getting sore, take it easier.
-
Before you launch into becoming a student of Power Yoga, see your doctor for a general checkup. Tell your doctor that you’re thinking of doing some Power Yoga exercise, and ask whether that’s okay, given your present condition. Your doctor or health clinic may even be able to recommend some good yoga programs in your area.
Many yoga studios ask all their students to bring in a doctor’s permission for joining practice sessions. If you take medication of any kind, you should let your yoga instructor know.
Getting Acquainted with Power Yoga Poses for Seniors
After your doctor gives you the green light to begin Power Yoga exercises, you need to find a yoga class with which you feel comfortable. Ask your friends, look online (or in the phone book), check with your local senior citizens’ action center, or ask at some local fitness centers. (Check out Book I, Chapter 3 to find info on locating and choosing a yoga center.) When you find a program that looks good to you, talk with the instructor to make sure that the class can accommodate your needs. Then try out a few sample classes to see whether everything feels like a good “fit.”
 No matter what your fitness level is, you should begin your Power Yoga work with some simple postures. Power Yoga makes demands on your body for which other types of exercises may not have prepared you. If you launch your practice by trying to put your feet behind your head while standing upside-down on one hand, you’re unlikely to enjoy the experience and may even hurt yourself. Take it slow and work gradually toward building more complex postures into your beginning routines.
Power Yoga isn’t a competitive sport. You’re in it for you, and you determine what you want to do (or not do) with your practice. Follow your instincts and enjoy the process without feeling out of place, incapable, or silly. Life is an adventure, and developing a regular Power Yoga practice can be one of the most exciting and rewarding trips. Relax, explore, and enjoy.
The following sections describe some Power Yoga exercises that any beginner can enjoy. Check them out for a taste of power.
Developing shoulder relief and leg strength
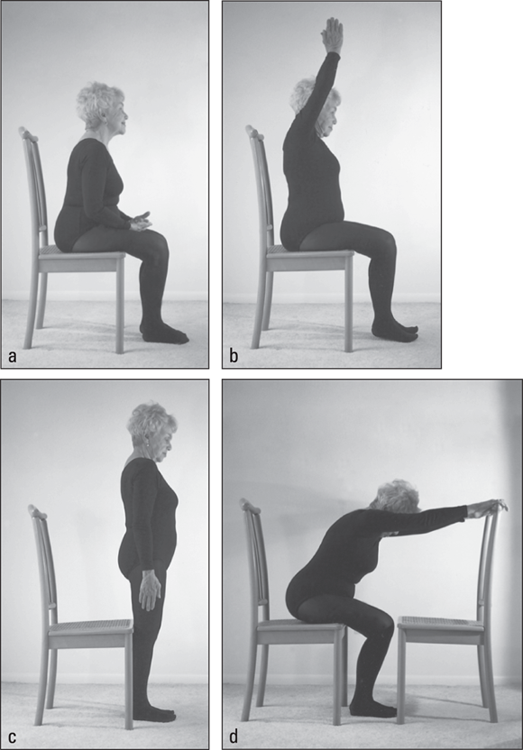
Try the following gentle Power Yoga exercise routine working from a chair, and see how energized you feel. This exercise helps relieve stress and tension in your shoulders, it expands your chest, and it helps to loosen up tight joints as it strengthens your arms and legs.
You need two sturdy, straight-back chairs for the last part of this exercise. Place the chairs facing each other, and sit in one. Follow these steps to achieve the two-chair stretch and release tension:
-
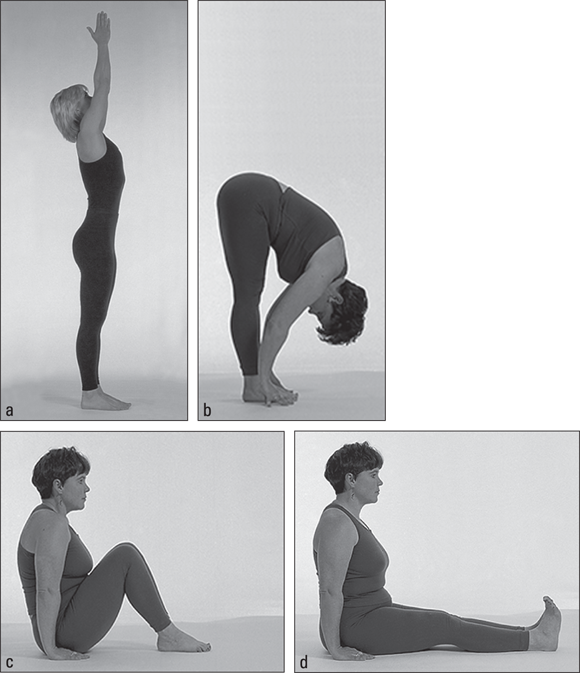
Sit in one chair, with your spine straight and shoulders back, hands folded in your lap (see Figure 5-1a).
Take a few slow, deep breaths, and relax.
- As you inhale, lift your arms out to your sides and over your head with palms touching, as if you’re clapping your hands (see Figure 5-1b).
-
Exhale, and lower your arms to the starting position (hands in your lap).
Keep your shoulders away from your ears as you do.
-
Repeat Steps 2 and 3 five times.
Remember to inhale as you lift your arms and expand your chest. Exhale as you lower your arms and relax.
- Repeat Step 2, inhaling and lifting your arms over your head; exhale as you put weight on your feet and come to a full standing position, with your arms by your sides (see Figure 5-1c).
- Sit back down in your chair, with your spine straight and shoulders back.
-
Repeat Step 5 for five repetitions.
Close your eyes and relax for 10 slow, deep breaths.
- Bend forward at the hips, resting your torso on your thighs, and place your arms on the chair in front of you (see Figure 5-1d).
-
Hold this position for 5 slow, deep breaths.
You’re doing the two-chair stretch, which stretches your torso.
- Come back to a sitting position and relax.
Propping up your extended side angle pose
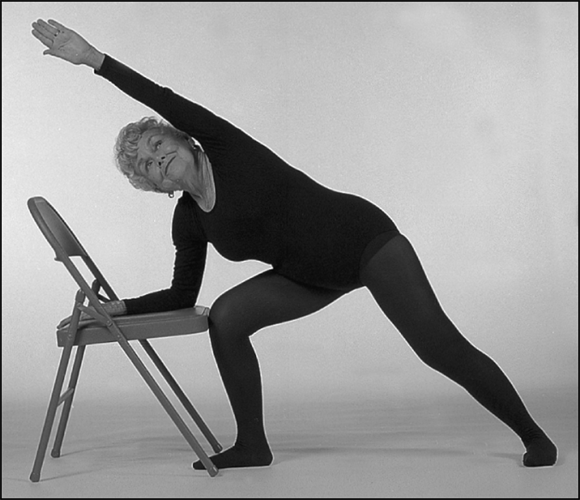
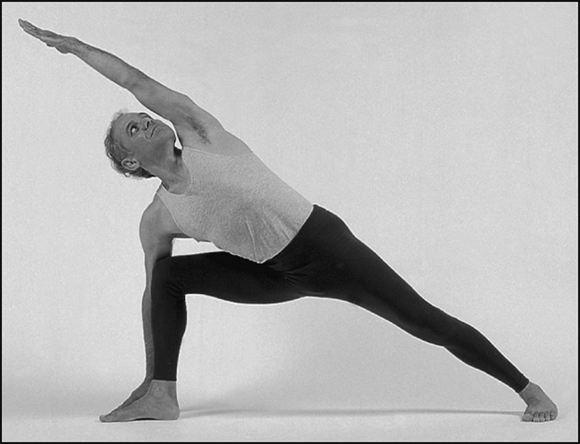
This section provides an easy adaptation of a traditional Power Yoga posture. The traditional extended side angle pose, shown in Figure 5-2, requires you to lunge deep on your right leg with your left leg extended behind you and, at the same time, rest your right hand on the floor.
That’s some pretty tricky stuff! If you’re getting up there in years or you aren’t in the greatest physical condition, you can do the same posture without lunging so deeply and with the benefit of some added support. The following version of the extended side angle pose strengthens legs and tones ankles, knees, and thighs. Using a chair as a prop makes this pose much easier to do, but it doesn’t detract from the posture’s ability to develop your chest and reduce fat around your waist and abdomen. Opening all the muscles of the rib cage also enhances your ability to breathe.
Have a sturdy chair ready to help you achieve the modified extended side angle pose:
-
Start from the extended mountain pose.
Stand strong and firm with correct posture (refer to Book IV, Chapter 4).
- Turn your right foot outward 90 degrees, and turn your left foot in at a 45-degree angle.
- Inhale, lifting your arms to your sides and parallel to the floor.
-
Exhale as you lunge, bending your right knee so that your thigh and shin form a 90-degree angle.
Your right knee comes directly over your right heel, bringing your thigh parallel to the floor.
-
Place your right forearm on the seat of the chair for support (see Figure 5-3).
Use your right hand to slide into position onto the chair close to your right knee.
-
Form a 45-degree angle with your body, from your extended left leg (which is back behind you), through your torso, and all the way out to your fingertips.
Your left arm is extended up at a 45-degree angle on the same plane as your leg and your torso; your palm should be open, and your hand facing outward.
- Turn your head upward, looking up under your arm and toward the ceiling; hold this position for 5 slow, deep breaths.
Using wall support for super shoulder stands
The shoulder stand (see Book IV, Chapter 4) helps to create harmony and happiness throughout your entire body. In this inverted asana (pose), your heart and brain receive a healthy rush of blood; the pose stimulates your endocrine system and gives your thyroid and parathyroid glands a tune-up. The shoulder stand can even help reverse the effects of varicose veins! Best of all, when you come out of the shoulder stand, you feel refreshed and rejuvenated.
You don’t have to be a high-wire artist to pull off the shoulder stand. The version included in this section puts you up against the wall for a perfectly supported and stable experience. By putting your legs up against the wall, you feel more comfortable and less wobbly in this pose.
When you do this exercise, you should have a thick towel or blanket so you can use it to elevate your shoulders and protect your neck from too much tension. Move slowly and carefully, and ask someone to help stabilize your legs when they’re in the air in this exercise.
- Position yourself near a wall, placing a folded blanket on the floor parallel to the wall.
-
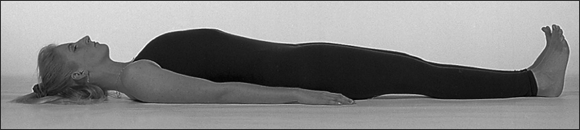
Lie down in the corpse position (refer to Book IV, Chapter 3), with your shoulders on the blanket.
Keep your shoulders elevated and your head resting off the blanket. Lie on your back, arms extended by your sides, your feet about 1 foot apart. Make sure that your palms face upward and your mind is calm and relaxed. Bend your knees, and let your toes touch the wall.
You don’t want to use the blanket as a pillow, because that setup causes more harm than good. The object is to lift your shoulders and create less tension on your neck.
Place your body so you have about 2 inches of blanket beyond the tops of your shoulders. Your body should roll back slightly as you lift up into this posture. When you’re completely lifted up into the posture, your shoulders should still be entirely on the blanket, your neck should be free (that is, you can slip your fingers underneath your neck), and your head should be on the floor.
The pose should feel comfortable. In fact, you may be surprised at how comfortable it does feel. If you feel a lot of pressure behind your eyes or in your head or if you feel pain in your neck or back, come on down and talk to your friendly yoga professional to see whether this pose can be right for you.
- Exhale completely; on an inhalation, place your feet flat on the wall a couple of feet above the floor.
-
Push your weight into your feet as you lift your hips, supporting your hips with your hands.
Tuck in your elbows behind your back, and use your elbows and hands to support your lower back.
-
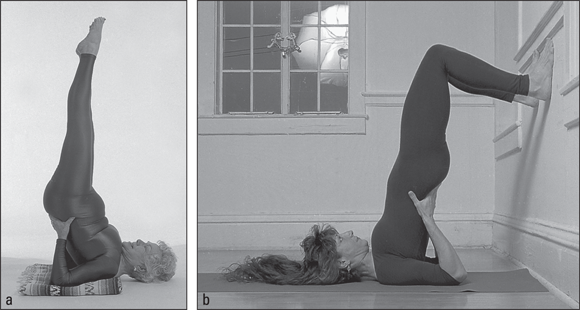
Push up into a full wall-supported shoulder stand.
Hold this position for 5 to 20 complete breaths (see Figure 5-4).
- Inhale again, place your hands under your hips, and push down to lift your hips off the floor.
-
Tuck in your elbows behind your back, and use your elbows and hands to support your elevated legs and hips.
Ask your helper to steady you so you don’t topple to the side.
- Extend your legs and torso as high as you comfortably can, remembering to support your back with your hands.
- Hold this posture for 5 to 20 slow, deep breaths.
- Come down slowly and relax on your back.
If you have, or may have, osteoporosis, take care doing this pose. It’s important not to put weight on your neck vertebrae.
Powering Up with a Post-50 Routine
The best way to make a productive start on your way to becoming a post-50 Power Yoga practitioner is to work with a beginning-level routine.
If you find that the routine in this section is too difficult using the postures as described in the referenced chapters, don’t hesitate to use props and/or the modifications described in the preceding sections. And you don’t need to work through the entire routine right off the bat. You can try practicing a half or a third of the routine, cutting down the number of recommended repetitions, and so on. In other words, make the workout work for you.
Just remember to do at least a 15-minute relaxation (and here, more is better) wherever and whenever you end!
Follow these steps:
- Move into the persuading posture (see Figure 5-5) and hold for 5 breaths.
- Perform five repetitions of the upside-down walker pose (see Figure 5-6).
- Perform two repetitions of the cat stretch (see Figure 5-7).
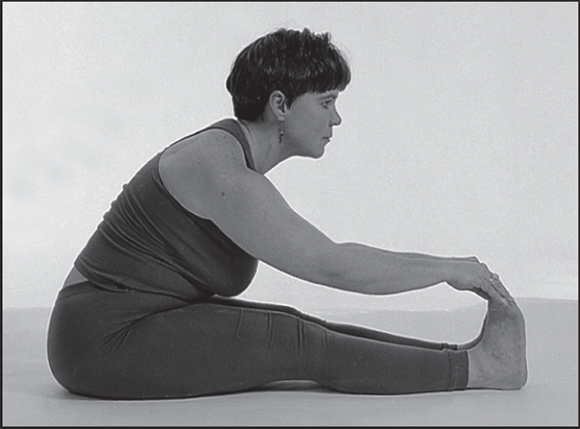
- Perform two repetitions of the seated forward bend (see Figure 5-8).
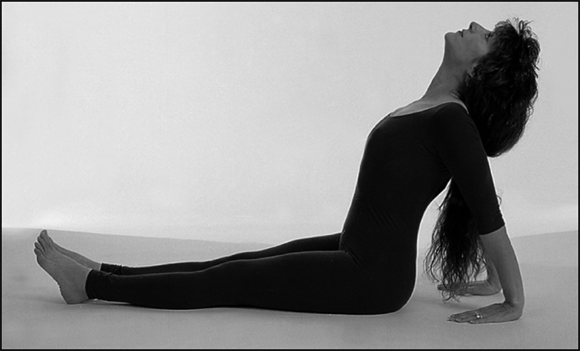
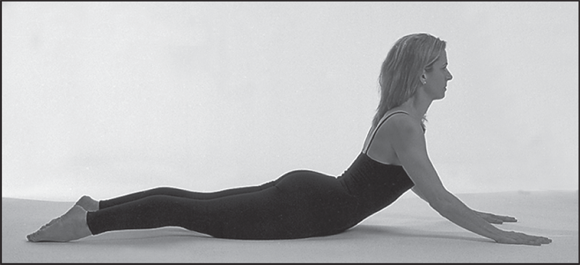
- Move into the cobra pose for two repetitions, holding each for 5 breaths (see Figure 5-9).
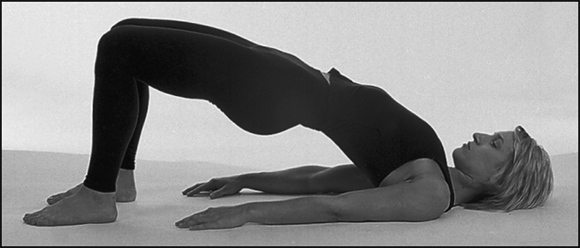
- Assume the bridge pose and hold for 5 breaths (see Figure 5-10).
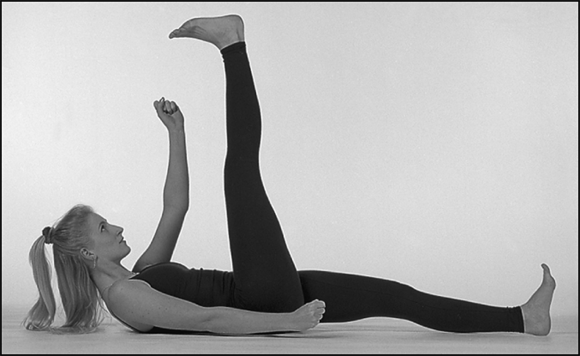
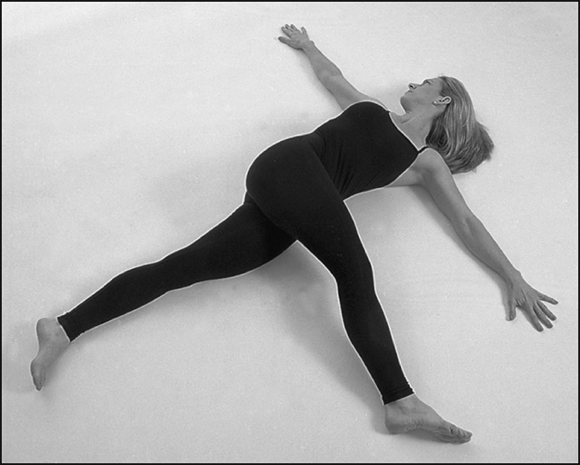
- Do a spine toner for 5 breaths (see Figure 5-11).
- Do one repetition of the missing link upward transition pose (see Figure 5-12).
- Move into an extended side angle and hold for 5 breaths (see Figure 5-13).
- Do one repetition of the missing link downward transition pose (see Figure 5-14).
-
Move into a shoulder stand and hold for 5 to 20 breaths (see Figure 5-15).
Choose whichever pose in Figure 5-15 is more comfortable.
-
Relax with yoga breathing for 5 breaths.
Refer to Book IV, Chapter 1 for instructions.
- Lie in the corpse posture for deep relaxation for 15 to 30 minutes (see Figure 5-16).