Pumped system

Can’t install a gravity system? Pumps can easily send greywater uphill to your plants.
Here’s how: Greywater is directed to a small tank, called a surge tank, and then pumped to the landscape. The water is not stored for more than a day — 24 hours typically is the longest you’re allowed to store it legally, and stored greywater stinks! The system requires access to the plumbing to install a diverter valve, room for the tank, and an electrical outlet to plug in the pump. Permitted systems may also need an electrical permit if the system requires a new outlet.
Pumped systems offer a few advantages over gravity-based systems. They can send water uphill and across long distances. They’re also able to distribute water to more plants than gravity-based systems, and they’re effective for combining flows and distributing the water around the landscape. As for the disadvantages, pumped systems use energy, and the pump will eventually need replacing, perhaps every 10 years if you’re lucky. You can use a pumped system for drip irrigation, but you have to filter the greywater and use special greywater-compatible drip irrigation tubing; otherwise, the emitters will clog.
In this chapter I’ll take you through the design and construction steps of a simple pumped system and discuss options for purchasing a manufactured greywater system that filters the water for drip irrigation.
The first question to ask yourself when designing a pumped greywater system is, “Does this system truly need a pump?” Many people assume that a greywater system needs a pump, when many don’t. These situations, however, do require a pump:
The first step in designing a pumped system is to identify where to install the 3-way diverter valve. See Diverter Valve and Pipe Runs for details.
A pump can send greywater to any part of your landscape, even into separate irrigation zones. Try to route as many greywater sources as you can into the tank. Tank capacity depends on how many fixtures flow into it; size it so there is enough room for all the water to enter and be pumped out without overflow. This is typically 30 to 100 gallons, though the manufactured system Grey Flow uses a smaller collection chamber before pumping out the water (see here).
The tank needs an overflow drain in case the electricity goes out or the pump breaks. Ideally, the drain overflows into the sewer/septic and alerts you of any system failures, such as the pump going out. If your project requires a permit, an overflow to the sewer/septic likely will be mandatory. (Although, conventional sewage ejection pump systems, nearly identical to this system, do not have an overflow and are widely permitted.) Sometimes it’s not possible to overflow to the sewer/septic, in which case you can overflow into a nearby mulched area or skip the overflow and find out that something is wrong when the shower stops draining.
Common tank locations are adjacent to the house, in a basement, buried outside the house, or buried in a crawl space. Some state codes have setback requirements for the tank location, so talk to your local permitting authority for details. Following are three basic setups.
House with a basement: Plumb greywater sources into the tank and locate the tank near an electrical outlet.
House with a crawl space: Place the tank outside of the house. If overflow to sewer is impractical, create an overflow to a mulched area near the tank.
House with a very low crawl space: Either bury the tank under the house or, if you can’t fit a tank into the crawl space, core-drill through the foundation to get the pipe outside and then bury the tank near the house.
If you get a permit for a pumped system, there may be additional requirements not included in the following instructions. Talk to your inspector early on to find out exactly what’s required for your project. Some jurisdictions require backflow prevention with any pumped system — even those with no potable connection — to prevent problems due to future alterations to the system that may create a cross-connection. Installing a backflow prevention device will add $500 to $1,000 to the cost of your system, in addition to a potential annual inspection fee of the backflow prevention device.
The company SaniFlo makes several models of effluent pump units for shower, sink, and washing machine greywater. The pump is designed to move greywater up to a sewer line from a basement level room, which makes it compatible with pumping greywater out of a crawl space and across a flat landscape or up a small slope. Some greywater installers opt for using SaniFlo effluent pumps instead of putting together their own tank and pumped system because the SaniFlo systems can be cheaper, easier, and faster to install. All these systems require venting. Greywater is pumped out to the landscape using the same L2L-type irrigation system (see here for irrigation instruction details).
This project provides an overview of pumped system construction. There are many variables that impact each specific installation, including the existing plumbing, tank location, permit requirements, and the landscape. The installation of the diverter valve can be identical to that of a gravity branched drain system, while the tank location determines where you plumb the greywater pipe and the overflow. Due to the variability of pumped systems, I’ll cover just the basic process to give you a sense of what’s involved; specific construction details will be dictated by your project requirements.
A few common challenges you may encounter when installing your pumped system are installing a below-grade tank, working in a small crawl space, tapping into old plumbing pipes, and (for projects requiring a permit) stringent permit requirements. For example, an inspector may ask for a drain on the tank, but if the tank is below grade, installing a drain is nearly impossible. Once the plumbing and tank are installed, the irrigation portion is much simpler, faster, and lower-cost (in materials) than for a branched drain system.
Follow the same procedures as when installing a diverter for a gravity-based branched drain system (see Install the 3-Way Diverter Valve). This also includes the option of installing an actuator to control the valve remotely (see here).
Surge tanks typically are 30 to 50 gallons for a single fixture, and 50 to 100 gallons for multiple fixtures. The surge tank must be near an outlet so you can plug in the pump. If you do not have solid, flat ground, you’ll need to make a gravel or concrete pad for the tank. Some codes require concrete pads. If your surge tank is below grade make sure it is protected from uplift; if the water table rises, an empty tank will literally float out of the ground. Many buriable, pre-fabricated sump basins come with an “anti-floatation device,” but if you use a repurposed tank and the water table can rise enough to reach the tank, you’ll need to anchor it yourself. For example, construct a bottom hold-down with a slab of concrete below the tank and attach the tank to it, or seek out other suitable methods. Be sure to label your surge tank: Caution Non-Potable Greywater Do Not Drink (or whatever your state code requires).
A high-quality pump will last many years. Look for an effluent pump that’s rated to pump 3⁄4" solids (so it can pump out anything that gets down the drain), is fully submersible, and operates on 115/120-volt (not 230/240-volt) electrical power. A typical sump pump is not powerful enough for this system. Some people use smaller-sized pumps, rated to pump 3⁄8" or 1⁄2" solids, though these aren’t as strong as 3⁄4"-rated units. Note that most effluent pumps are designed for a larger discharge pipe than the 1" irrigation line used in this system. I’m not aware of any problems in the field with reducing the line to 1", though some pump companies may recommend against it.
Because this system is not the standard application for a pump, it can be harder to get help from a pump specialist. Irrigation system pumps typically are sized based on the combined factors of how high and far they will be pumping, as well as the pressure and gallons per minute (gpm) required by the irrigation system; for example, 30 psi at 15 gpm. Since unfiltered greywater doesn’t have these pressure requirements, typical pump sizing calculations do not apply. In most situations any pump rated for 3⁄4" solids will be more than powerful enough to irrigate a typical yard. If you’ll be pumping up more than around 20 feet you’ll need a beefier pump than for a less steeply sloped yard. Another option is to use a SaniSwift pump, which is preinstalled in a container and easy to hook up; see here for details.
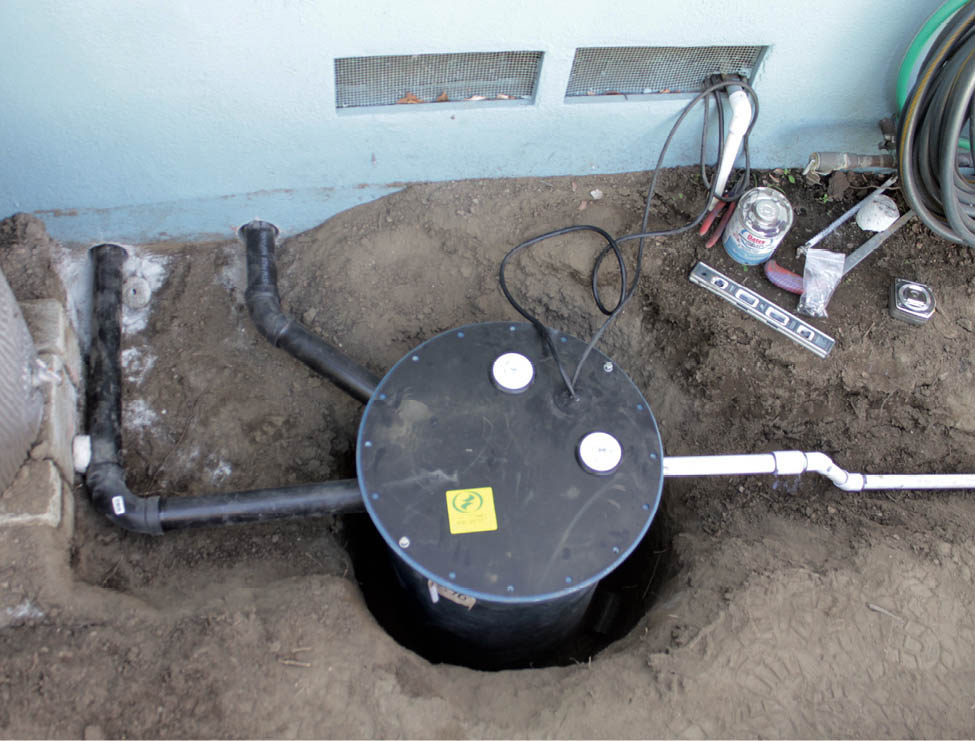
Identify where the greywater source(s) will enter the tank. Drill the appropriate size of hole in the top of the tank (not the lid) for the watertight fitting. See Tapered vs. Straight Threads, in the Appendix, for options for a watertight connection (either a bulkhead fitting, Uniseal gaskets, or electrical conduit male adapter with an electrical female adapter and a washer). Use a hole saw to drill a clean hole.
Add a union before the pipe enters the tank so it’s easy to disconnect the pipe. Plumb the pipe into the tank. Do not screen the inlet or outlets. Screens will quickly clog and require frequent cleaning.
Alternatively, you can purchase a sewage basin made with preformed holes. Called “knock-outs,” these can be conveniently punched out, so no drilling is necessary.
Overflows connected to the sewer/septic must be equipped with a backwater valve in the horizontal position to prevent the possibility of sewage backing up into your tank and getting pumped out to the garden. Locate the overflow slightly lower than the greywater inlet. Install a bulkhead-type fitting the same size as used for the inlet. If you plumbed more than one pipe into the tank, size the overflow to accommodate the total inflow.
Plumb the overflow either back to the sewer (for permitted systems and any system where this is possible) or to a mulch basin. Install a tee-type fitting to connect the overflow to the sewer pipe; the specific fitting will depend on your plumbing configuration. Install the backwater valve. An overflow to a mulch basin doesn’t need a backwater valve here because there is no sewer connection.

Tank interior showing effluent pump and inlet and overflow pipes
The tank must be vented. You can use a standard plumbing vent or an AAV (see Appendix). Alternatively, if the tank isn’t connected to the sewer (and doesn’t require a permit), any loose seal will let air into the tank and function as a vent. If you connect to the household plumbing vent system, make sure you are above the highest sewer connection so a clog couldn’t backflow sewage down the vent and into your tank.
See How to Choose a Pump for help with pump selection. Place the pump in the tank and make sure the float switch can move freely; if it gets hung up on the tank wall, the pump won’t turn on (or off). Drill a hole for the pump’s cable, above the inlet and overflow. Use a waterproof cord connector if your system requires a sealed connection.
Run 1" PVC pipe from the pump to the outside of the building. You’ll need a few fittings to connect the pump to the 1" pipe, and these depend on the type of pump you have. If your landscape is above the tank, install a 1" swing check valve in the 1" pipe in the tank. This prevents water from flowing back into the tank; if enough water flowed back in, it could cause the pump to cycle unnecessarily.
Adjust the float switch so the smallest amount of water is allowed to sit in the tank; that is, the pump stays on as long as possible.
If you are adding a filter to the system it would be installed here, after the pump and before the irrigation system.
Installing a pumped system: pump in tank with piping installed
The irrigation portion of a pumped system can be identical to that of a laundry-to-landscape system (see here), with a couple of key differences. First, you can supply more outlets (20 or more) with a pumped system, although you’ll need to consider how much water stays in the line if you have very long runs and a small surge tank. Second, you can cap the end of the main lines on a pumped system, and you’ll clamp the tee connections on the 1" tubing (these can come apart with the higher pressure from the effluent pump). You can also have multiple zones in a pumped system; see Irrigating with Multiple Zones (below) for ideas, keeping in mind that one zone is simplest. Zones that are controlled manually will require you to switch between them on a regular basis, while automatically controlled zones will add cost and complexity to your system.
On steep slopes be sure to run the tubing to the highest irrigation point, then come down the slope to irrigate the remaining landscape. And, if your site has a lot of elevation changes, you can use zones to help distribute the water. Remember to use mulch basins in the landscape to soak up greywater and slowly release it to the roots of plants, and to size the system based on your estimated greywater production and the plant water requirements of the landscape (see chapter 3 and How Much Water Do My Plants Want?). Your basins will probably be a lot smaller than those for a branched drain or laundry-to-landscape system because less water will come out of each outlet. You’ll also be able to use the smallest mulch shield options (sections of 4" drain pipe; see How to Make a Mulch Shield).
Plug in the pump and run water through the system. Check for leaks and confirm that the pump turns on/off appropriately. Also check for even water distribution in the landscape. If necessary, fine-tune system as described for an L2L system (see here).
Perform the same regular maintenance on the irrigation lines as with an L2L system. In addition, check on the tank and pump annually, or as needed. Clean out the tank if the sludge layer builds up too much.
Standard timers, controllers, and irrigation valves used to create multi-zoned irrigation systems with potable water are not compatible with a simple greywater system. Often, thoughtful planning of the greywater system — and successfully directing different fixtures to distinct areas of the landscape — can obviate the need for multiple zones. However, there are several situations when you may want to spend the extra time and money to create a multi-zoned greywater irrigation system:
Greywater can alternate between zones by manual or automatic methods. The simplest method is manual: Add a second 3-way valve outside, in an accessible location. This creates two zones for which you manually turn the valve to switch back and forth (see here).
Before choosing a manual method, ask yourself whether it’s realistic that you will switch this valve every week for the next 10 years. If not, install a single zone or an automatic switching method. One automatic option to create two zones with unfiltered greywater is to use a Jandy or Pentair type valve with an electronic actuator, controlled by a 7-day timer. Program the timer to switch between the two zones every few days (the cost for this is around $250).
Another common method for automatically controlled zones is to employ an indexing valve that distributes greywater to multiple zones (up to eight). Each time the pump turns on, the indexing valve rotates to a new zone, without need for a controller or power supply. Many indexing valves require high pressure to operate; try a lower-pressure one, such as Fimco’s Wastewater Hydro Indexing Valve (10 psi; costs about $90), which requires minimal filtration. You may need to include a filter to use this valve. Orenco makes a mechanical distribution valve (about $270) that operates with their compatible pump (see Resources for manufacturer websites). While this valve is designed to require filtration (80-mesh), installers report that it works without any. K-Rain also makes an indexing valve designed to work with dirty water (25 psi; costs about $80).
Another option is the Grey Flow Rotor Valve ($160), a volume-based indexing valve, which means each zone receives an equal amount of water (13 gallons); very handy for planning irrigation requirements. The valve requires at least 3-gallons-per-minute flow rate, and 40-mesh filtration. The valve comes with six outlets, and you can combine them if you want fewer.

Each time the pump turns on, the valve rotates to a new zone. (It requires an appropriate pump for the valve to function properly.) Indexing valves typically have two to eight zones.
The holy grail of greywater systems: a low-cost “kit” that sends greywater into drip irrigation tubing without the need for regular maintenance. It works in every home and landscape. And it won’t break in a year. Manufactured greywater systems attempt to do this, with varying degrees of success. The greatest challenges come from the fact that greywater systems are not one-size-fits-all, and they’re a hybrid of plumbing and irrigation systems. You won’t find plumbers or landscapers buying a “kit” when they plumb a house or install an irrigation system; there are too many variables for that to be feasible.
If you need a pump, or want drip irrigation, manufactured systems offer a convenient package with the necessary components: tank, pump, and filter. In addition, you can get technical support from the sales representative for help with installing the system.
The main drawback with kits is that typically you end up with relatively low-quality parts and more frequent maintenance. These kits use parts made for other industries (there are no greywater-specific parts in North America), such as pool, pond, wastewater, or septic effluent equipment. Most systems require regular filter cleaning — an unpleasant task that if forgotten causes a system failure. Find out specifics about required maintenance on filters if you’re considering installing this type of system. Or, pocketbook permitting, get a maintenance contract with an installer. Manufactured systems typically can’t handle kitchen sink water, it will gunk up the filters.
The lower-cost greywater kits range from $500 to $800 and the mid-range kits cost around $2,000, not including the diverter valve; plumbing parts needed to plumb greywater to the system; irrigation components; or any associated preparation, labor, or permitting fees. Now we’ll take a look at three systems currently on the market (see Resources for online suppliers). I’ll discuss other manufactured systems for new construction in the next chapter.
This unit is housed in a small (approximately 2 × 1 × 2-foot) plastic box that has a series of filters (originally made for filtering fish pond water) and a low-capacity pump. It’s rated to pump up to 16 feet at 14 gpm. Greywater is filtered to pass through a 1⁄4-inch tube, so you could install an irrigation system with a 1⁄2-inch main line and 1⁄4-inch branch lines or outlets to plants. If you want to use in-line drip irrigation, an additional 100-micron drip irrigation filter will be needed on the pump output. Use a disc-type filter, as these require less frequent maintenance than screen-type filters.
The Australian company Advanced Waste Water Systems (AWWS) makes several Grey-Flow greywater irrigation systems for both residential and commercial applications. Now available in the United States, these systems can be incorporated into new construction or as part of a retrofit.
G-Flow is GreyFlow’s most basic system, with manually cleaned filters. Greywater flows into the system, though the filters, and is pumped out into the greywater-compatible drip irrigation system. The advantage to this system over the Aqua2Use is the filters are housed in a plastic trough, so when you remove them for cleaning, crud won’t fall into the system and need to be removed. The disadvantage to this system is the filters must be cleaned manually.
GreyFlow PS Plug & Play features automatic filter cleaning. Greywater flows into the system, through the filter, and is pumped out into the irrigation system. On a regular basis the system automatically cleans the filter by blasting compressed air up through the filter, dislodging dirt and debris, and the incoming greywater washes it to the sewer. Using compressed air and greywater to clean the filter reduces installation complexity and permitting fees since there is no potable water connection. Other whole-house systems, such as the Gray-It, use potable water to flush the filters. GreyFlow systems can have up to six irrigation zones. The system dimensions are about 21⁄2 feet deep × 2 feet wide, and 2 or 3 feet tall (a short or tall model).

GreyFlow PS Plug & Play: the most affordable automatically cleaned filter system currently available
Gray-It is a home greywater system developed by the Israeli company Green Solutions. Greywater flows through a small filter, into the pump tank, where it’s pumped out through a disk filter into an irrigation system. All filters require manual cleaning. The irrigation controller monitors how much greywater goes through the system, and if the irrigation program is complete any additional greywater generated that day will flow to the sewer. If there isn’t enough greywater generated the system will bring in makeup water to complete the irrigation cycle.
The controller will show an error message if the system was unable to complete its schedule, which can alert the system owner to problems (if they happen to go outside to look at the controller). Gray-It doesn’t include the irrigation portion of the system.