10.2 Creating and Modeling an SAP BPM Process
This section covers different aspects that come into consideration when creating an SAP BPM process including the concept of perspective in SAP NetWeaver Development Studio, creating a project, and the BPMN model.
10.2.1 Demonstration Scenario
The best way to demonstrate how to implement an SAP BPM process is to use a business process example. Let’s start by describing our fictitious process requirements and the steps involved in completing them.
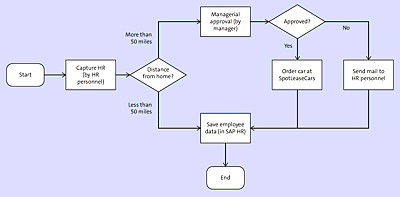
In our scenario, let’s assume that the process expert of your organization approaches you (the SAP BPM expert) to implement the HR department’s process for a company car for new employees. The process has already been drawn for you using the flowchart diagram represented in Figure 10.5.
Figure 10.5 Flow Diagram to Represent the Hiring Process
As represented in the chart, the process to be implemented is made up of the following steps:
- The HR personnel captures the data of the new employee in the company’s portal.
- Based on how far away from the office the employee lives, a company car should be requested. In cases in which the employee lives 50 miles or more away from the office, he has the right to a company car.
- For employees with the right to a company car, approval from the manager is needed.
- If the manager approves the request, a car is ordered. A car can be ordered by calling a web service of the car lease company SpotLeaseCars.
- If the manager rejects the request, then an email is sent to the HR personnel.
- At the end of the process, all of the employee’s data needs to be saved in SAP ERP HCM.
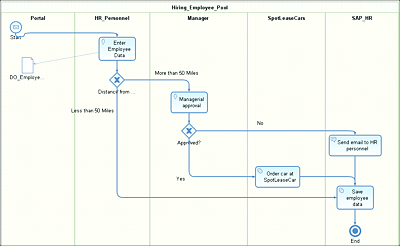
Now, it’s time to draw the process in BPMN 2.0 using the SAP NetWeaver Developer Studio tool. After reading Chapter 9, you should be able to easily produce a BPMN representation for yourself on paper. See a potential BPMN representation of the process in Figure 10.6. Notice that in our process, we’ve identified four roles: HR_Personnel, SpotLeaseCars, Manager, and SAP_HR.
Figure 10.6 BPMN Representation of the Employee Scenario
Remember that this scenario will be used as a reference in the next sections, when we explore the different concepts of SAP BPM.
10.2.2 Building an SAP BPM Process: Overview
Before diving deep into the implementation, let’s review the main tasks to be performed from a high-level perspective:
- Switch to the right perspective in SAP NetWeaver Developer Studio.
- Create a new project in SAP NetWeaver Developer Studio.
- Model your process in BPMN, or reuse an existing model.
- Create or import relevant message structures (data types, message types, or services interfaces).
- Build mapping where relevant.
- If the process contains a human task, then assign the human tasks, and generate or build the required user interfaces (UIs).
- Build and deploy your process.
- Configure the deployed process in SAP NetWeaver Administrator.
- Run or use your process.
In the next sections, we’ll explore each of these high-level steps in more detail.
10.2.3 SAP NetWeaver Developer Studio Perspective Concept
Because SAP NetWeaver Developer Studio has been built on top of Eclipse (a well-known Java IDE), it has the same main functionalities and general features. To perform SAP BPM-related activities, you’ll need to be in the right perspective in SAP NetWeaver Developer Studio.
A perspective is a visual container for a set of views and editors, generally put together to help the developer easily implement a specific type of DC. In other words, with a perspective, the developer has access to all the functionalities required for his development activities. To perform SAP BPM-related activities, three perspectives can be used for specific situations, as described in Table 10.1.
Table 10.1 SAP BPM-Related Perspectives in SAP NetWeaver Developer Studio
To change or switch perspectives in SAP NetWeaver Developer Studio, follow these steps:
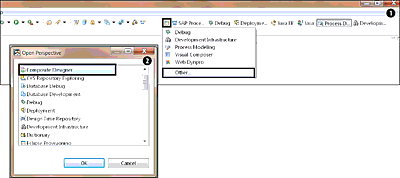
- On the top-right side of the screen, click on the Open Perspective icon. Then, select Other (see Figure 10.7 1).
-
You’ll then see the Open Perspective screen, giving you the choice to select any of the existing perspectives in SAP NetWeaver Developer Studio. As stated earlier, depending on what you plan to achieve, you can choose from among the Composite Designer, Process Development, and Process Modeling perspectives. Figure 10.7 2 shows some perspective selection possibilities for SAP NetWeaver Developer Studio.
Figure 10.7 How to Select a Different Perspective in SAP NetWeaver Developer Studio
Based on our demonstration scenario, you need to create a composite application that will include an SAP BPM process and Web Dynpro (to support the human tasks). Therefore, select the Composite Designer perspective, and click OK. - SAP NetWeaver Developer Studio will switch to the Composite Designer perspective. You’re now ready to start your development activities.
10.2.4 Create a Project in SAP NetWeaver Developer Studio
Given that we’re creating a composite application—which will include a BPM process and Web Dynpro—we’ll now be creating a software product. The software product will include software components (SCs) that, in turn, will be made of several development components (DCs). Each DC will contain an application.
To create a product, follow these steps:
-
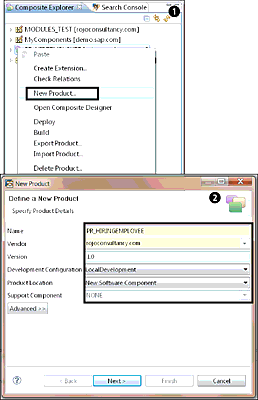
Right-click anywhere in the Composite Explorer, and select New Product (see Figure 10.8 1).
Figure 10.8 Creating a Product for the Composite Application
- In the pop-up screen, fill in the product details 2. Of course, you can use your own name and vendor name. Click on the Next button.
-
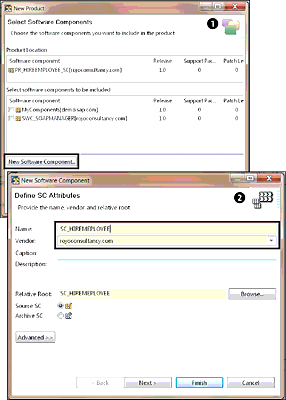
On the next screen, you’re asked to select the SCs that will be included in your product. Depending on how you want to organize your application, you could use an existing SC or create a new one. In this case, choose to create a brand-new SC by clicking on the New Software Component button near the bottom of the screen (see Figure 10.9 1).
Figure 10.9 First Two Steps of the Software Component Creation
- The New Software Component screen appears, in which the attributes of the SC can be filled in. Leave the default values and fill in the name of the SC (Figure 10.9 2). Notice that the vendor name is automatically copied from the product; you can change it if you wish. Then, click on Next.
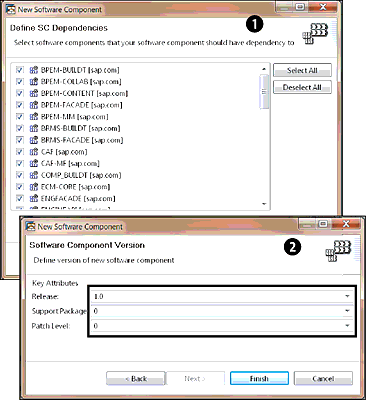
- On the next screen (Figure 10.10 1), a list of SC dependencies are presented. The list of selected dependencies will determine the types of DCs that are allowed to be created in this SC, so it’s important to pay special attention to this step. By default, all existing dependencies are selected. In this case, leave the default values as they are. Click on Next.
-
On the next screen (Figure 10.10 2), you can specify the SC version, and you can specify the desired value in Release, Support Package, and Patch Level. These numbers can help provide visibility and traceability for applied patches and the software lifecycle in general. You can leave the default values for now, and click on Finish.
Figure 10.10 Software Dependencies Selection and Software Component Version Specification
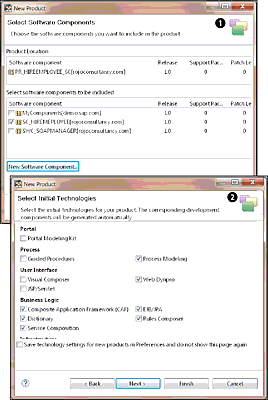
- Now that the creation of the new SC is finished, you’re brought back to the original New Product screen, as shown in Figure 10.11 1. The newly created SC is automatically selected. You can also create additional SCs from here if you so desire. For now, stick with this new SC. Click on Next.
-
On the next screen, you can select the technologies that you’ll need in your product. For every technology that you select, a DC will be created. See Chapter 18, Section 18.1, for more details on the DC concept. For those familiar with other Java IDEs, you can think of a DC as a development project. Click on Finish. Figure 10.11 2 depicts this action. For an explanation of what each technology choice can be used for, see Table 10.2.
Figure 10.11 Selection of Technology Types to be Supported by the Product
Table 10.2 Technology Selections When Creating a Product
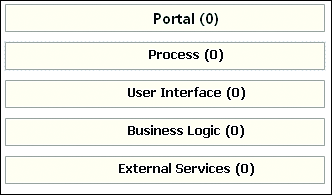
- A new screen in SAP NetWeaver Developer Studio opens with an overview of all the DCs that have been created as a part of your product. The DCs are grouped into their respective categories. You’re now ready to start developing the different DCs. An example of the results for the composite application creation is presented in Figure 10.12.
Figure 10.12 Composite Designer Perspective after the Creation of a Product and Its Different Technologies
10.2.5 Creating a Process for Your BPMN
Now that all the required DCs for the development have been created, it’s time to start the SAP BPM development activities. The first step is to create a process from which you’ll be drawing your BPMN model. To create an SAP BPM process, follow these steps:
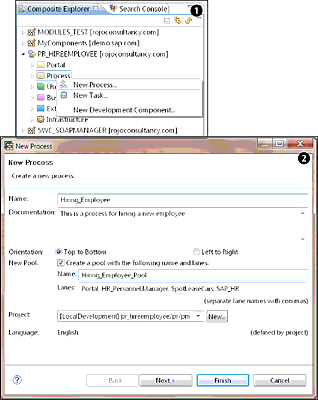
- On the left side of the perspective, right-click on the Process category and choose New Process (see Figure 10.13 1).
- You’ll see a pop-up screen, in which you need to specify a few attributes. Table 10.3 describes each of these attributes; fill in the details accordingly. The final result is presented in Figure 10.13 2.
-
After filling in all the attribute’s details, click on the Next button.
Table 10.3 Attributes Required to Create an SAP BPM Process
Figure 10.13 Creating a New SAP BPM Process and Maintaining Its Attributes
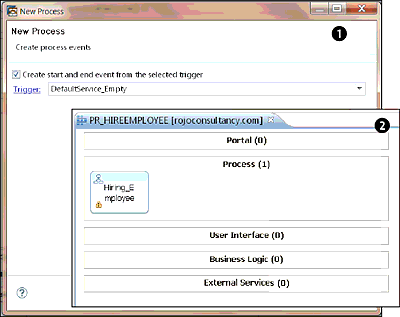
- In this step, you have the option to create a new process event, which signals or triggers to start or end a process. We’ll explore triggers in Section 10.4.1. For now, keep the default value. By default, an empty signal is created, which means that you’ll need to manually start the process. This default trigger is called DefaultService_Empty. Click on the Final button (see Figure 10.14 1).
- Finally, you’re presented with the Overview screen in the Composite Designer perspective. A process has been added to your product 2.
Figure 10.14 New Process Event and Overview of the Product after the Creation of a Process
10.2.6 Creating a BPMN Model
After reading Chapter 9, you should have a good understanding of BPMN and should be equipped with the basic concepts needed to start modeling your process. Refer to Chapter 9 if you need a refresher before proceeding.
Follow these steps to create a BPMN:
- Double-click on the Hiring_Employee block under the Process category. You’ll see another screen with a basic process, including a pool containing all of the roles required by the process in the form of lanes. Furthermore, the process also has a dummy (or default) start and end event for the process.
-
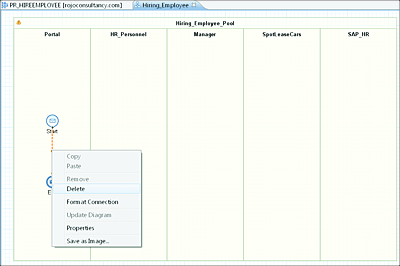
Let’s now modify this default process by modeling the BPMN to suit our needs. Right-click on the connection line between the start and end event. Select Delete to remove it (see Figure 10.15).
Figure 10.15 Removing the Connection Line between the Start and End Event Activities
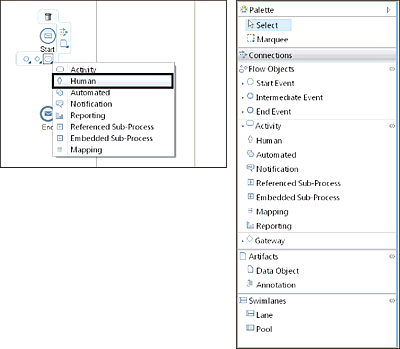
- Mouse over the Start Event Activity icon on the BPMN (as shown in Figure 10.16), and you’ll see menu options around the start event. These menu options are also sometimes referred to as speed buttons. The speed buttons are used to rapidly gain access to the BPMN objects and to speed up the modeling of the process. You can also delete the object by selecting the Delete icon at the top of the screen. Alternatively, you can add any BPMN objects from the palette on the right side of the Composite Designer perspective.
-
Select the Human activity from the speed buttons around the start activity (see the red circle in Figure 10.16). A Human activity represents the task to be performed by a human. In our scenario, the Human activity will represent the task of the HR personnel capturing the new employee’s data.
Figure 10.16 BPMN Element Added from the Speed Buttons or Palette
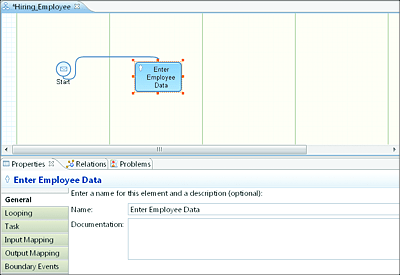
- The selected Human activity is placed in the process and automatically linked to the start event with a connection line. You’re then able to grab the new BPMN element and drag it to the right lane. The Human activity that was just added to the process needs to be placed under the HR_Personnel lane. You also can select the Human activity and maintain its properties. The Properties window automatically appears at the bottom of the perspective. Under the Name attribute, rename it to Enter Employee Data (see Figure 10.17).
- Select the Human activity again, and use the speed buttons to place a gateway on the process. Make sure to select the Exclusive gateway. Give a new name to the newly added gateway.
- Select the exclusive gateway step on the BPMN, and use the speed buttons to add another Human activity for the manager’s approval.
-
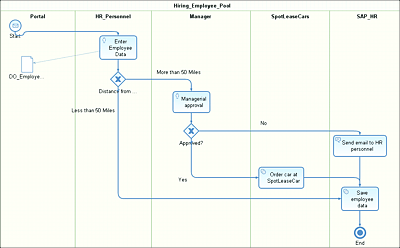
Repeat the same steps to place more BPMN elements until the entire BPMN process is complete. The final result BPMN process is presented in Figure 10.18. Note that the Notification activity is used for sending an email to the HR personnel.
Figure 10.17 Using the Properties of the Human Activity to Name It
Figure 10.18 Completed BPMN Representation of the Process, as Drawn in SAP NetWeaver Developer Studio
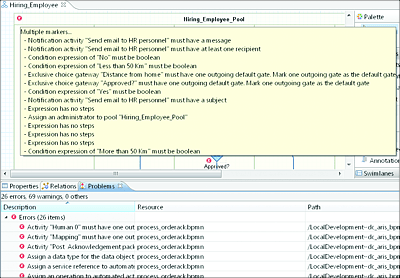
We’ve now completed our BPMN process, but you might have noticed that in the process we’ve drawn, there are some errors; note the red crosses on the left side of some of the BPMN elements. The red marks are a quick way to spot the problem areas in your BPMN.
If you mouse over the red crosses, then you’ll see the details of the errors at hand. You can alternatively select the Problems tab at the bottom of the perspective, as shown in Figure 10.19.
Figure 10.19 Finding the Details of the Errors for the SAP BPM Process
Note
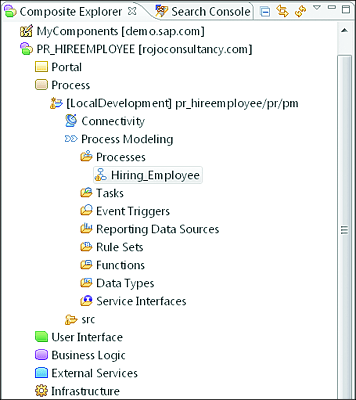
You can navigate your SAP BPM process and project tree by expanding Process, [LocalDevelopment] pr_hireemployee/pr/pm (the DC name), Process Modeling, and Processes in the Composite Explorer view (left panel) of the Composite Designer perspective. You then need to double-click on the process that you want to view (see Figure 10.20).
The tree structure of an SAP BPM process DC is made of many folders, as depicted in Figure 10.20. Table 10.4 explains the purpose of each folder.
Figure 10.20 Structure of the SAP BPM Process Project Tree
| Folder Name | Description |
|---|---|
| Process | Contains your process. Notice that you can create multiple processes in the same project. |
| Tasks | Contains tasks related to human activities. |
| Event Triggers | Holds the triggers that can start a process or be used to trigger an intermediary event in a process. More details about intermediary events will be provided later in Section 10.4.1. This folder also contains escalations. |
| Reporting Data Sources | Holds data sources used for reporting purposes in SAP BPM. |
| Rule Sets | Contains a flow ruleset or a ruleSet. Be aware that you can embed a rule in the SAP BPM project instead of having a separate rule project. |
| Functions | Holds expression functions, mapping functions, and new Enterprise Java Bean (EJB) functions. These are custom functions that can be developed to enhance existing functionality. More details about creating functions will be provided later in Section 10.6.4. |
| Data Types | Holds XML Schema Definitions (XSDs) that have been created or imported from other sources, such as the ES Repository or an external file. |
| Service Interfaces | Holds Web Service Description Language (WSDL) processes that have been created as part of the process or imported from other sources, such as the ES Repository or an external file. It can also hold Remote Function Call (RFC) structures. |
Table 10.4 Folders/Components Contained in a Process DC and Their Roles
