We photographers love our soft light. We are constantly on the lookout for shade, overcast days, and north-facing windows. But what if it isn’t available? What if all you have to work with is harsh, mid-day sunlight? What if the room you’re shooting in doesn’t have a window with indirect light but only bright sun pouring in? Being able to make lemonade from the lemons that the ambient light often serves you is an invaluable skill. Though available light can be a bitch, it is also fairly compliant. It’s a lot like a loyal dog: while it’s often bouncing around the room, as if chasing an invisible squirrel, it will also willingly go wherever you lead it.
Wherever I go, I look at the light. I especially love reflected light and complex shadows ( Figure 1.1 ). You can easily find both in abundance in dense urban areas, such as the downtown area of a decent-sized city. When more than a couple skyscrapers are in close proximity to each other, light starts bouncing off the windows of one building and onto another as the sun makes its way across the sky. The season may affect the light and reflections you see, too. In the fall, for example, the sun is lower in the sky, so it hits different windows than it does in the spring, creating amazing reflected light and shadows where they wouldn’t have occurred earlier in the year ( Figure 1.2 ).
If this kind of light play isn’t something you already notice, start paying attention. Watching light and shadows and how they interact has helped me learn more about off-camera lighting than anything else. Think of the sun as the ultimate studio head, far off in space. Because of the inverse square law, the sun’s light, which is coming from far, far away, is even by the time it reaches us. The next time you’re walking around on a sunny day, take note of your shadow. It’s defined, but a bit soft around the edges. However, if you place your hand several inches from the ground, the shadow created will be especially crisp and defined.
Figure 1.2 Keep an eye out for naturally occurring light and shadow play. Depending not only on the time of day but also the time of year, light will reach places where it previously hadn’t.
All light works the same way. When you place a light on a light stand and turn it on, you are effectively recreating the sun and telling it where to go. After studying naturally occurring light scenarios around town, you now know that your light needs to be far enough away from your subject that the spread is even by the time it reaches them. If you want a crisp shadow on your background, place the subject close to it. If you want a softer or even zero shadow, move the subject further away from the background.
Fences are a fantastic resource for shadows and more ( Figure 1.3 ). Depending on the style of fence and the height and strength of the sun, you can get dramatically different light and results, like those in Figure 1.4 . I know the shot is quite busy, especially with the addition of the pattern on her shirt and her jewelry, but sometimes busy works. Once you start seeing the potential in the light that naturally surrounds you, you’ll realize that you don’t need much gear at all to create a compelling image.
Figure 1.3 The setup. I have walked by this fence a hundred times, but one day I noticed the sun coming through it at just the right angle to create a fantastic shadow. So that’s where I placed my subject.
Figure 1.4 The final shot. It’s a busy shot, but I like it.
For this shoot, I was photographing Mona at her home on a sunny day. The house was a bit small, and the dining room was the most spacious spot for the shoot. The available light was abundant, due to the large window by the table, but the sun pouring in was harsh. Although I had lights with me, the light was so bright in there that I thought it’d be easier to see if I could shape it into something useful rather than fighting to eliminate it with a high strobe output.
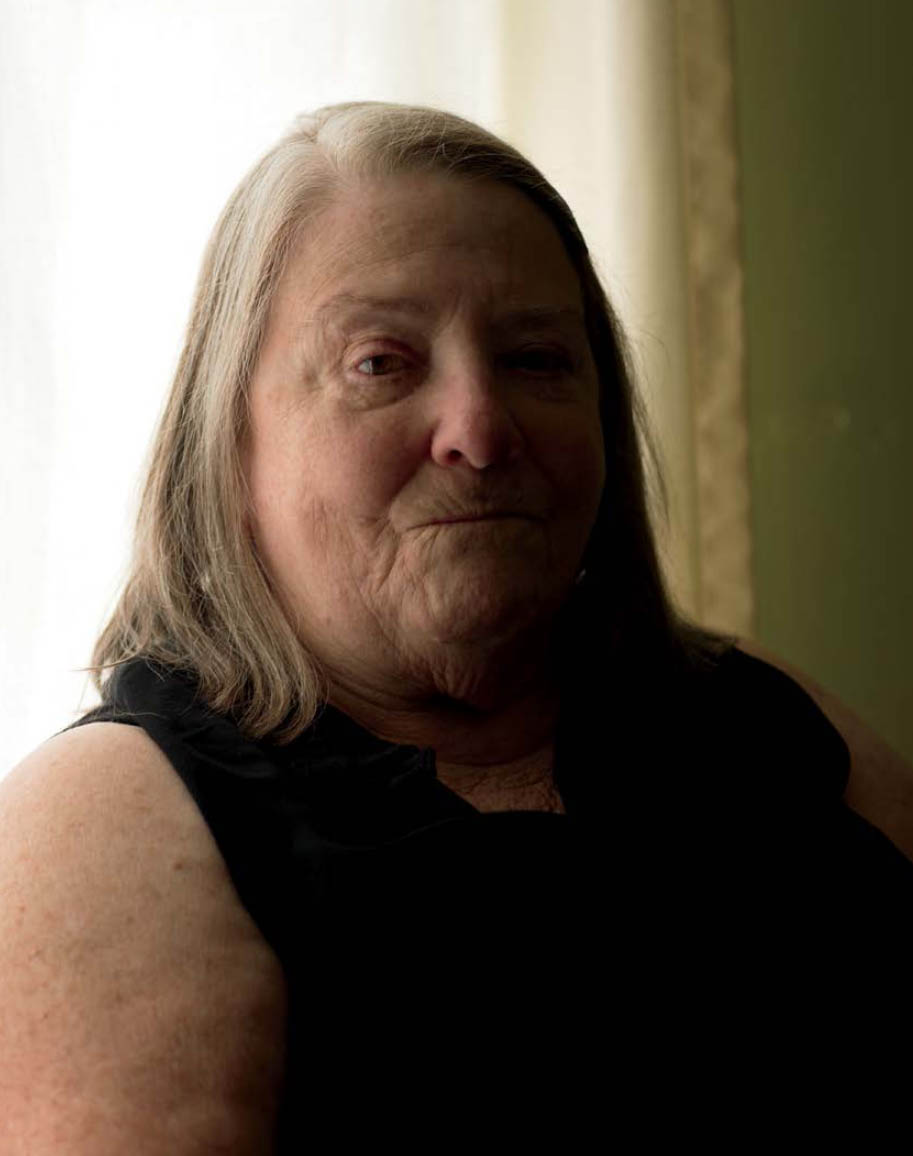
Figure 1.5 Here is the subject sitting in front of drawn curtains on a sunny day. The light, although soft, is boring and unflattering.
I first placed Mona by the window and closed the curtains. Even with the curtains drawn, there was plenty of light coming from the window. But as you can see in Figure 1.5 , although the lighting is soft and even, the image is rather boring. After seeing the first shots, I decided a more visually interesting and flattering lighting for Mona would be a hard, narrow light source that created deep shadows. Think of the chiaroscuro light in old Rembrandt and Caravaggio paintings (if you are unfamiliar with these Renaissance masters, check out their work for plenty of lighting inspiration and ideas).
Figure 1.6 The setup. The harsh sun was pouring in the dining room window, but it was the best spot in the house for a portrait, so I pulled the curtains mostly closed to change the light. Photo by Doral Chenoweth
Figure 1.7 The lighting diagram. I shot at a wider aperture in order to have some separation between Mona and the wall behind her.
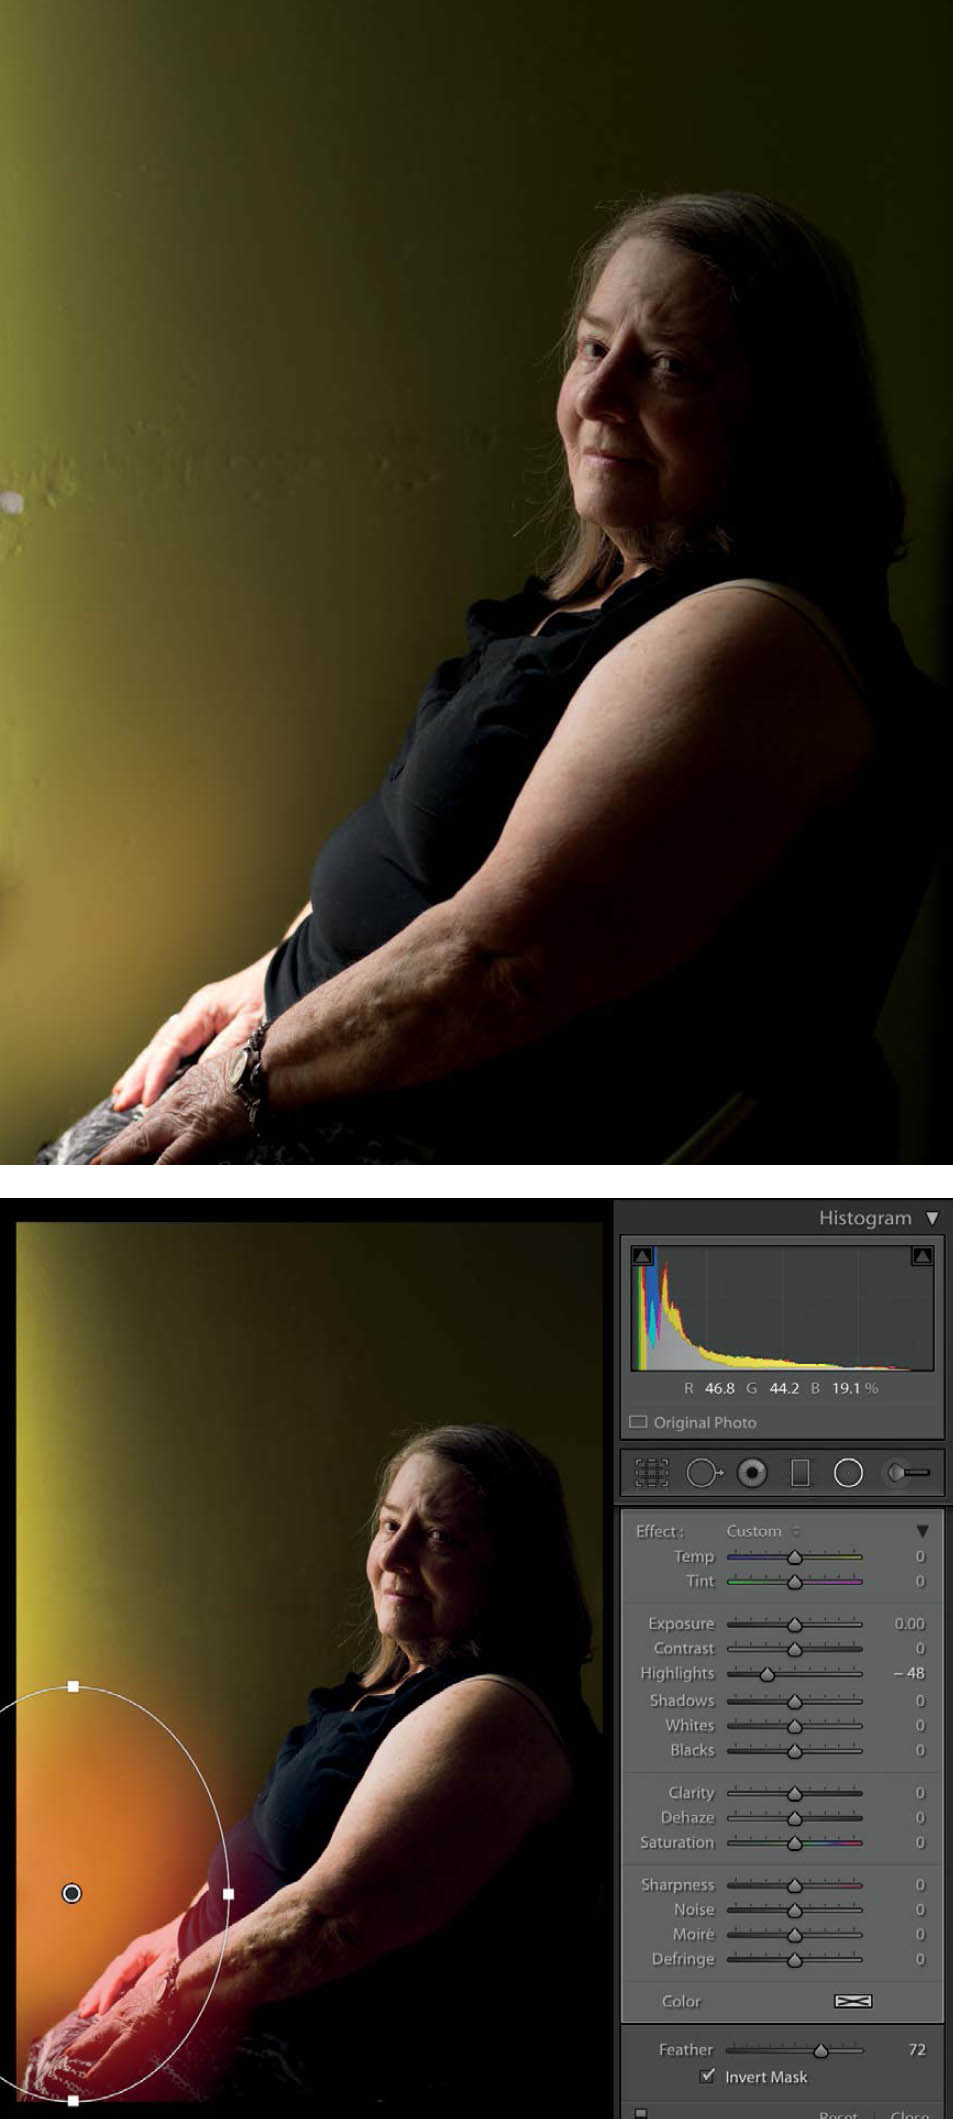
I rearranged Mona, placing her beside the window ( Figure 1.6 ), and opened the curtain about three inches. Now, a sliver of hard sunlight was coming through the window and illuminating the narrow side of Mona, which created a slimming effect to the camera side of her. As you can see in the lighting diagram ( Figure 1.7 ), I shot at a wider aperture in order to have a bit of separation between Mona and the wall behind her. Also, take note of how the vibrant color of the walls comes through in the hard-light image ( Figure 1.8 ), which is the other reason why hard light is my favorite. Hard light punches out the characteristics in a thing. I think about the effect like this: Soft light covers and wraps like a blanket, while hard light penetrates like a nail.
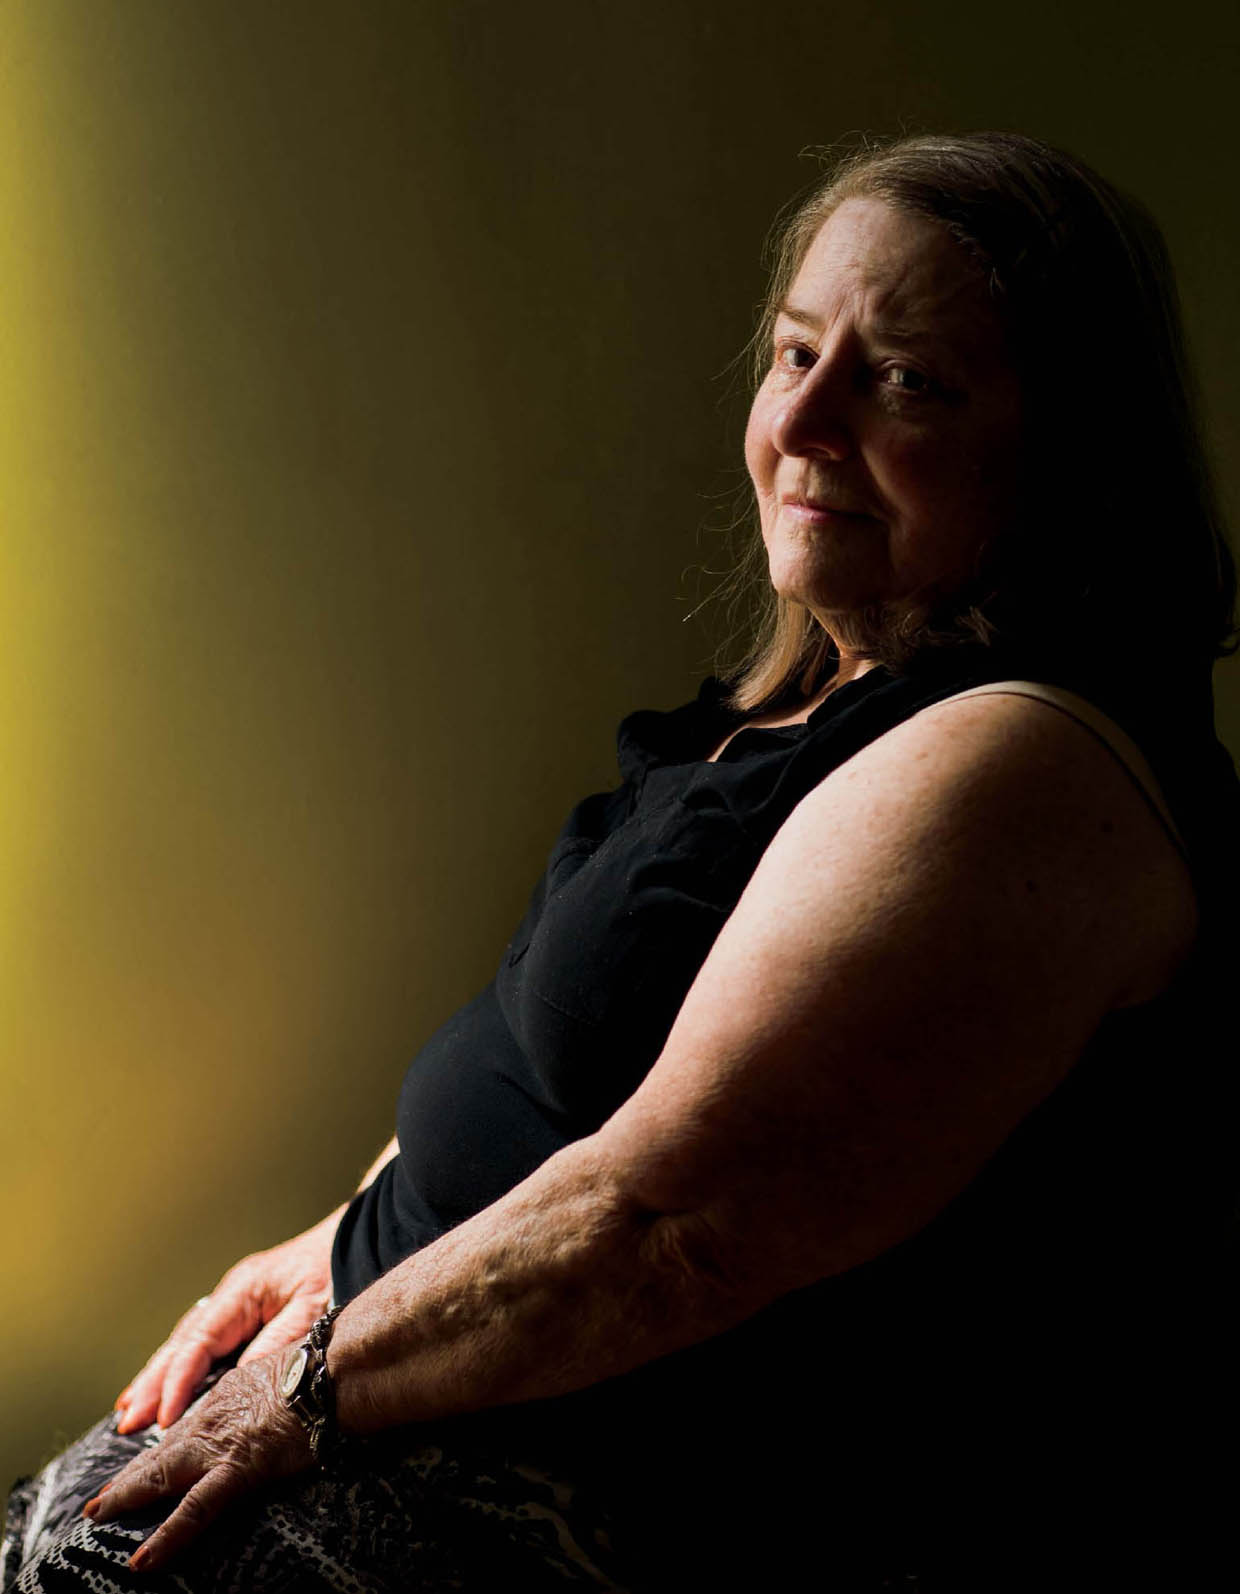
Although the file looked good in the camera, I knew there were a couple of things I was going to need to clean up in Adobe Lightroom. In Figure 1.9 you can see that I made a radial adjustment over her right arm by lowering the Highlights slider; the sun on her arm was a bit too harsh and distracting. By lowering the brightness in the bottom half of the frame, I was able to bring the attention to her face. Other than that, I increased the contrast, popping the colors, and I shifted the hue of the Yellow and Green channels to a warmer color. I like the dramatic light in Figure 1.10 much better than the initial, soft light.
Figure 1.8 The raw file. The narrow sliver of hard light gave the portrait a flattering, beautiful quality, similar to Renaissance paintings.
Figure 1.9 The Lightroom settings. I made a radial adjustment lowering the highlights on her arm, as well as shifted the yellow and green channels to a warmer color.
Figure 1.10 The final shot. I like the dramatic light much more than the soft light in this situation.
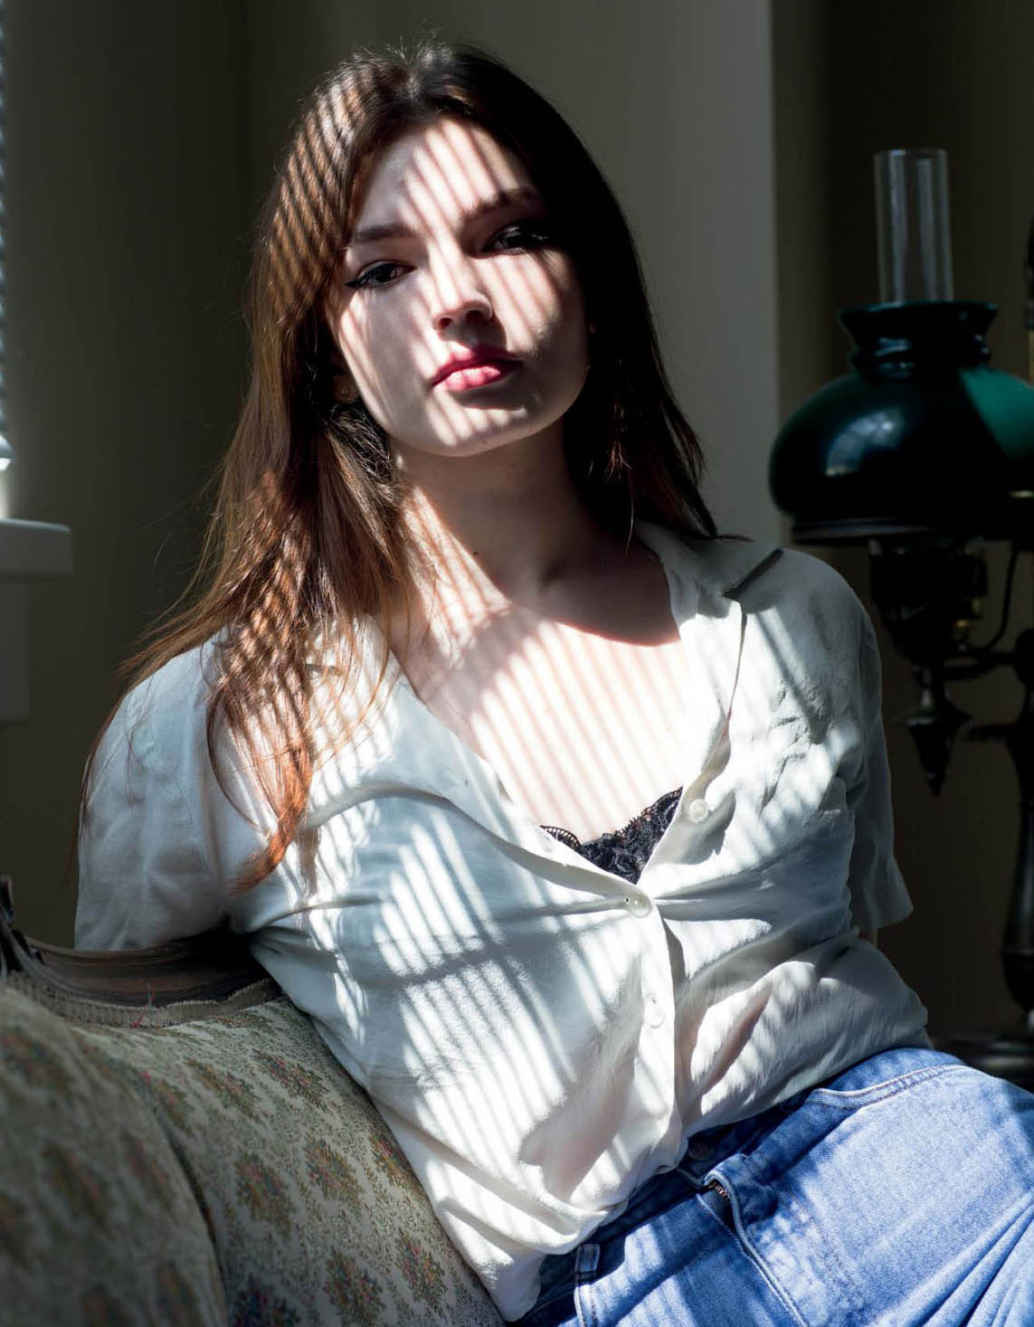
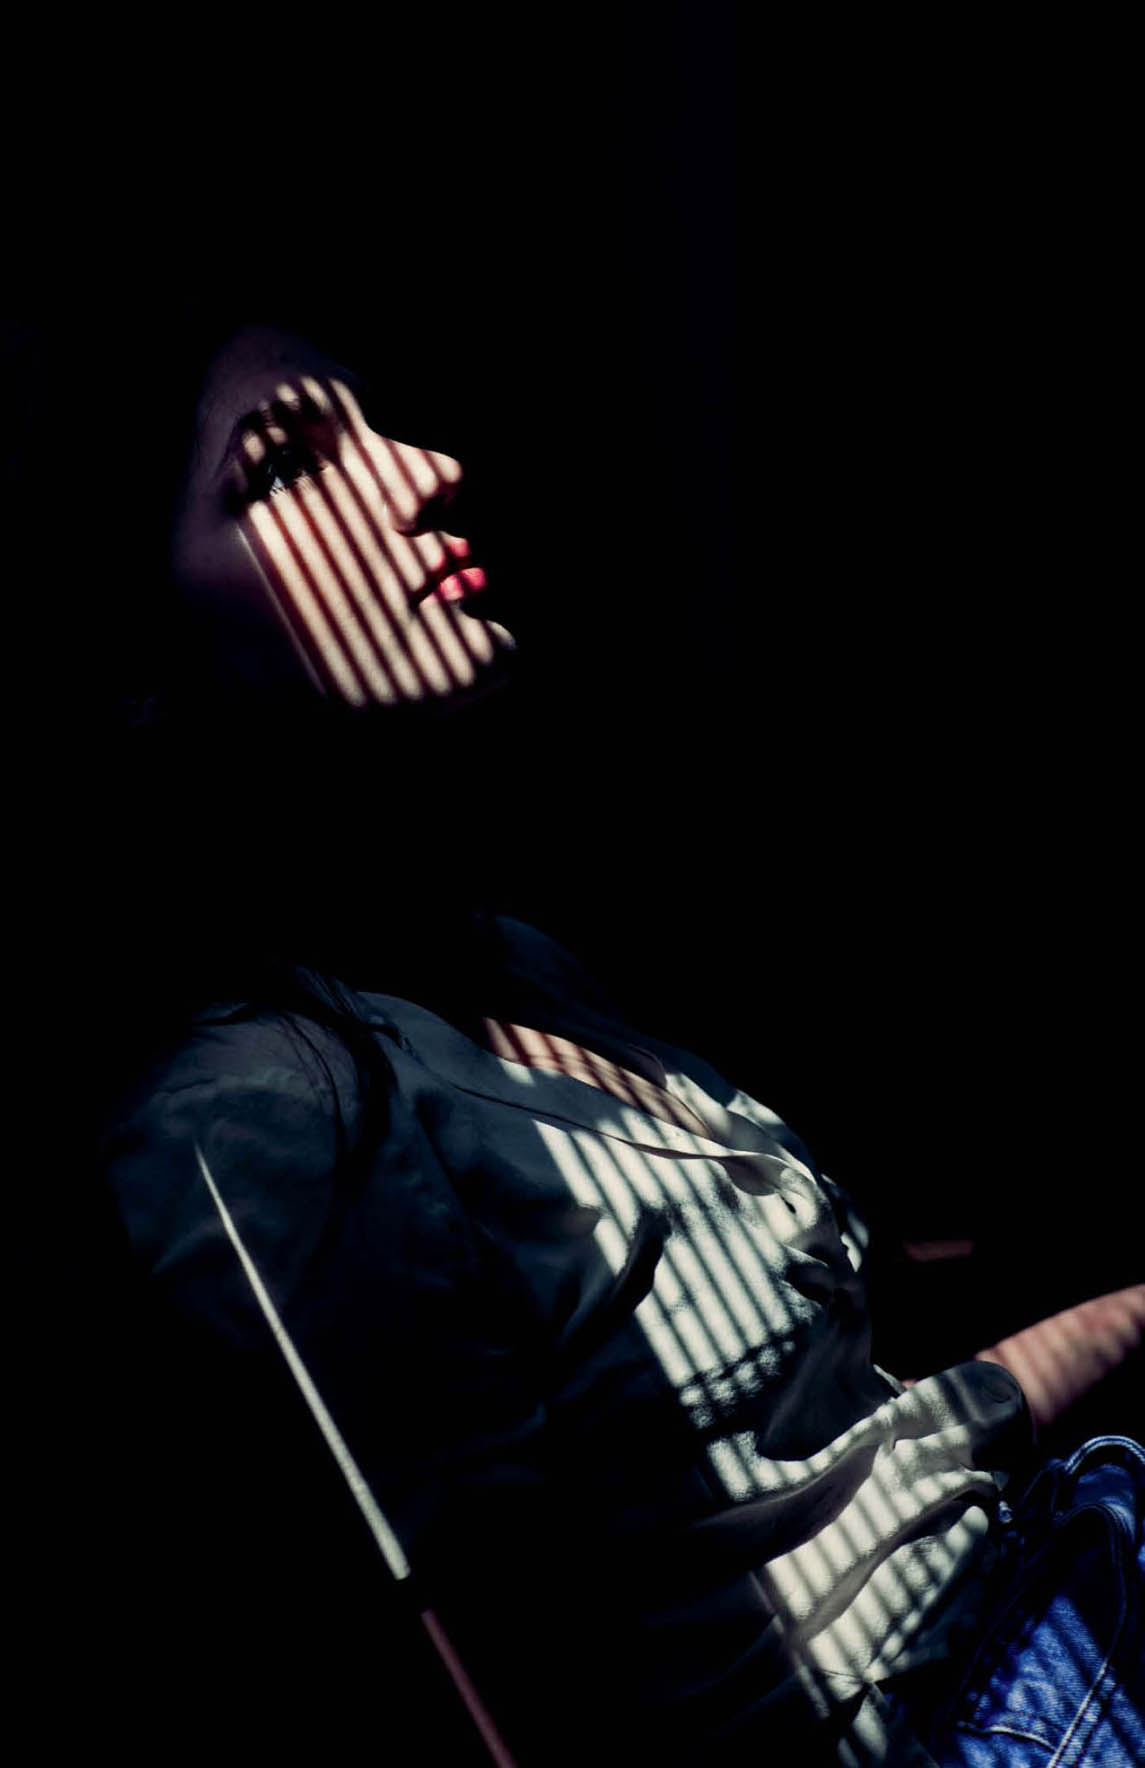
Does your window have blinds instead of curtains? Draw them shut to create a natural light gobo . (A gobo is anything that “goes between” your light source and subject to modify the quality of the light. More on this in Chapter 2 and Chapter 8 .) You can then place your subject under the pattern created by the closed blinds, as shown in Figure 1.11 .
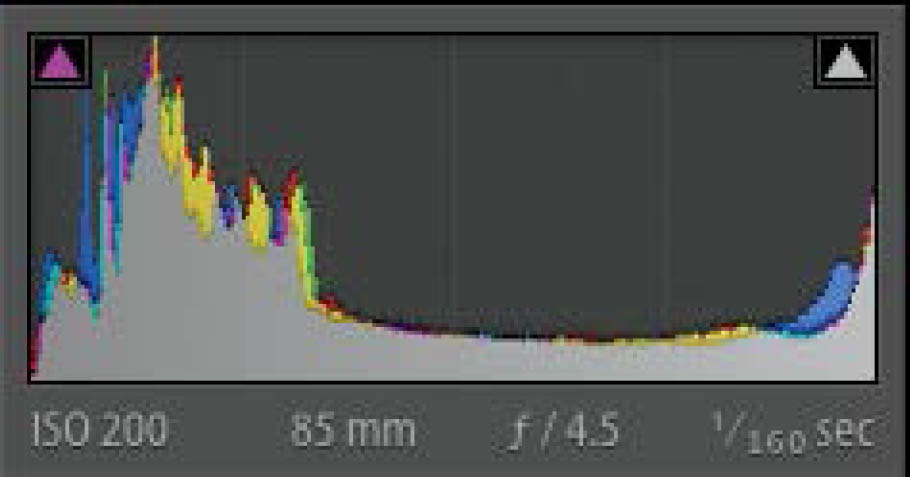
Figure 1.11 Although this image is properly exposed, it’s rather boring.
Figure 1.12 This is the histogram from the boring exposure.
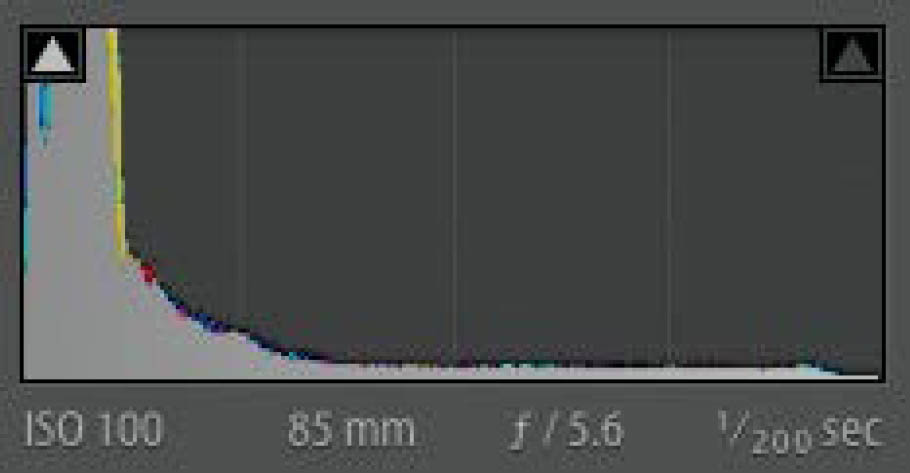
When using this technique, however, be aware of your exposure. As you can see in Figure 1.12 , the histogram for Figure 1.11 contains information in both the shadows and the highlights. Technically, the shot is a properly exposed image, but the drama is lost—it’s a boring image. By exposing for the highlights on the subject’s face, you get a much darker exposure. Although Figure 1.14 is technically a bit underexposed according to its histogram ( Figure 1.13 ), I think you will agree that it is a more dramatic and emotive image. A successful portrait emotes, while an unsuccessful photo draws little to nothing from its viewer. Takeaway lesson: let your images be dark, when appropriate.
Figure 1.13 This is the histogram for the darker exposure.
Figure 1.14 By exposing for the highlights, I created a more dramatic, successful image.
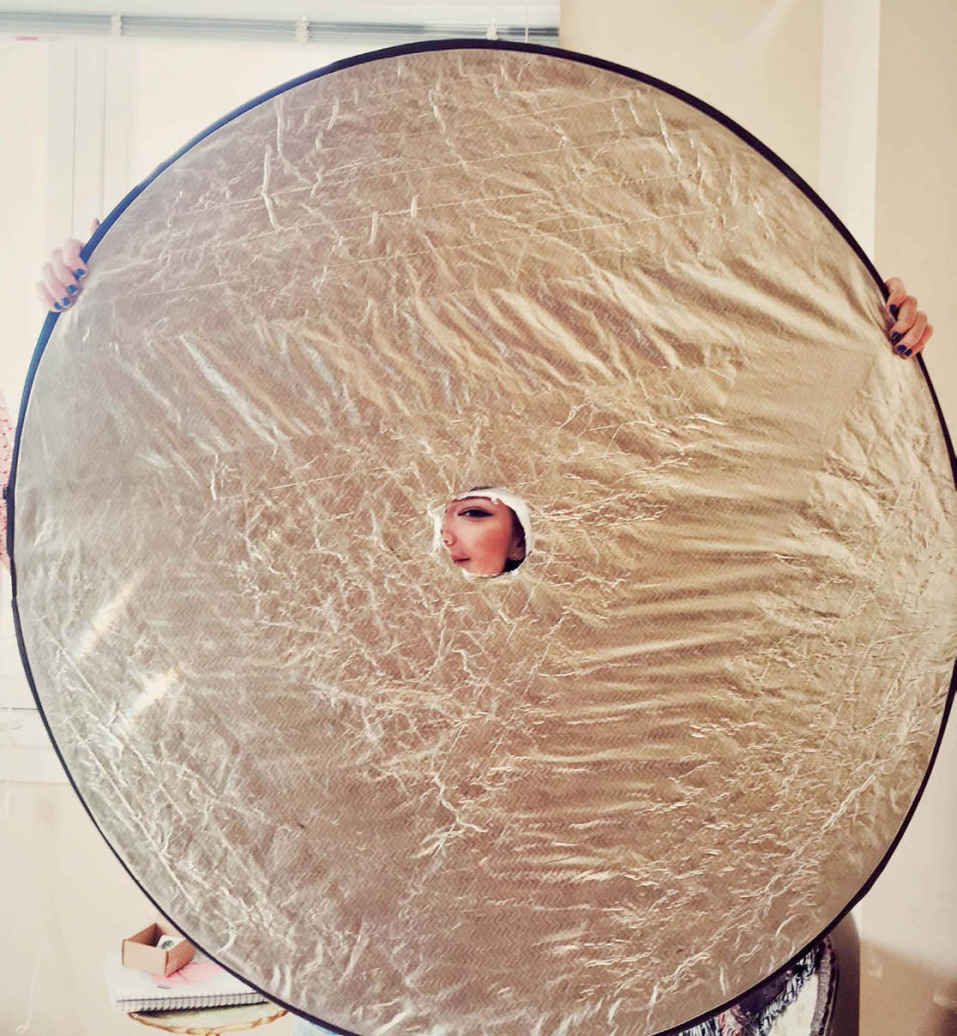
This is the cheapest yet most effective photography hack I can think of. Step one: get disc reflector. Step two: cut lens-sized hole in said reflector ( Figure 1.15 ). Step three: profit.
Seriously, though, there is almost no reason not to do this hack. First of all, the reflector’s fabric is really tough, which means the hole will not spread. Secondly, the reflector can still be used traditionally, even with a hole in it. The only issue that ever arises is if I am using the reflector to block the sun—now there is a spot of hard sunlight poking through.
But . . . but . . . what about the Westcott Omega Reflector??? Well, since you asked, not only is the Omega around $100, it also requires the use of an assistant or reflector stand to use. I can operate a hacked reflector by myself. The camera lens holds the reflector in place, allowing me to use my non-camera hand to angle the reflector to the desired position.
By gaining the ability to shoot through the reflector instead of bouncing light from below or beside the camera, the reflected light is now acting like a ring light—lighting the subject evenly from the front, creating shadow-less light.
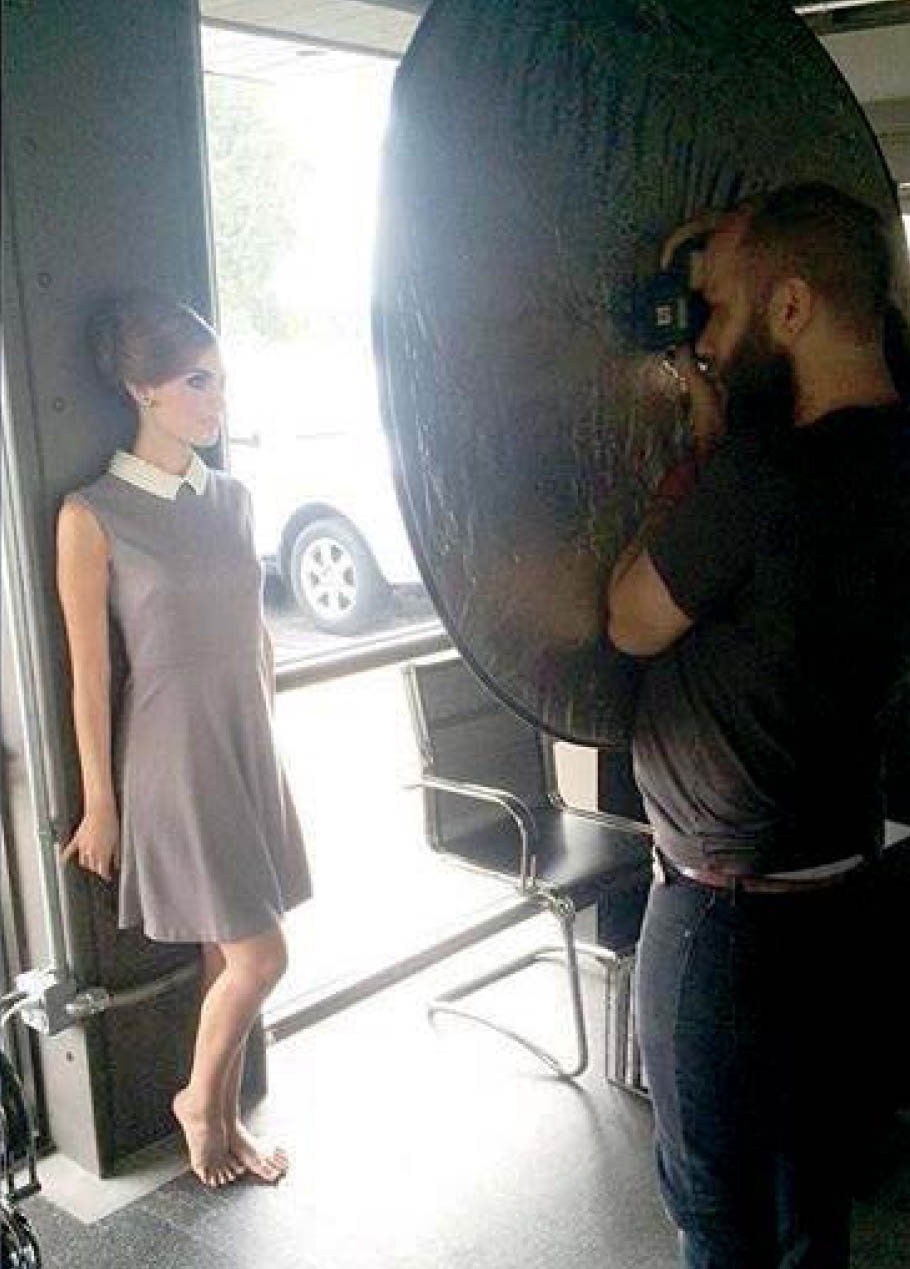
In Figure 1.16 I was shooting in a room that had two large windows with about two feet of space between them. The model’s close proximity to the windows on either side of her created a soft, rim light effect ( Figure 1.17 ).
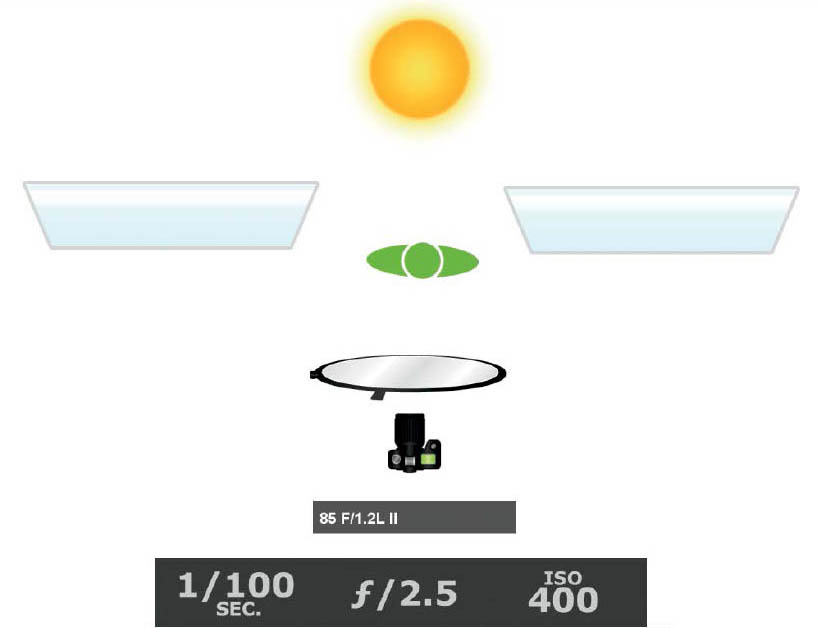
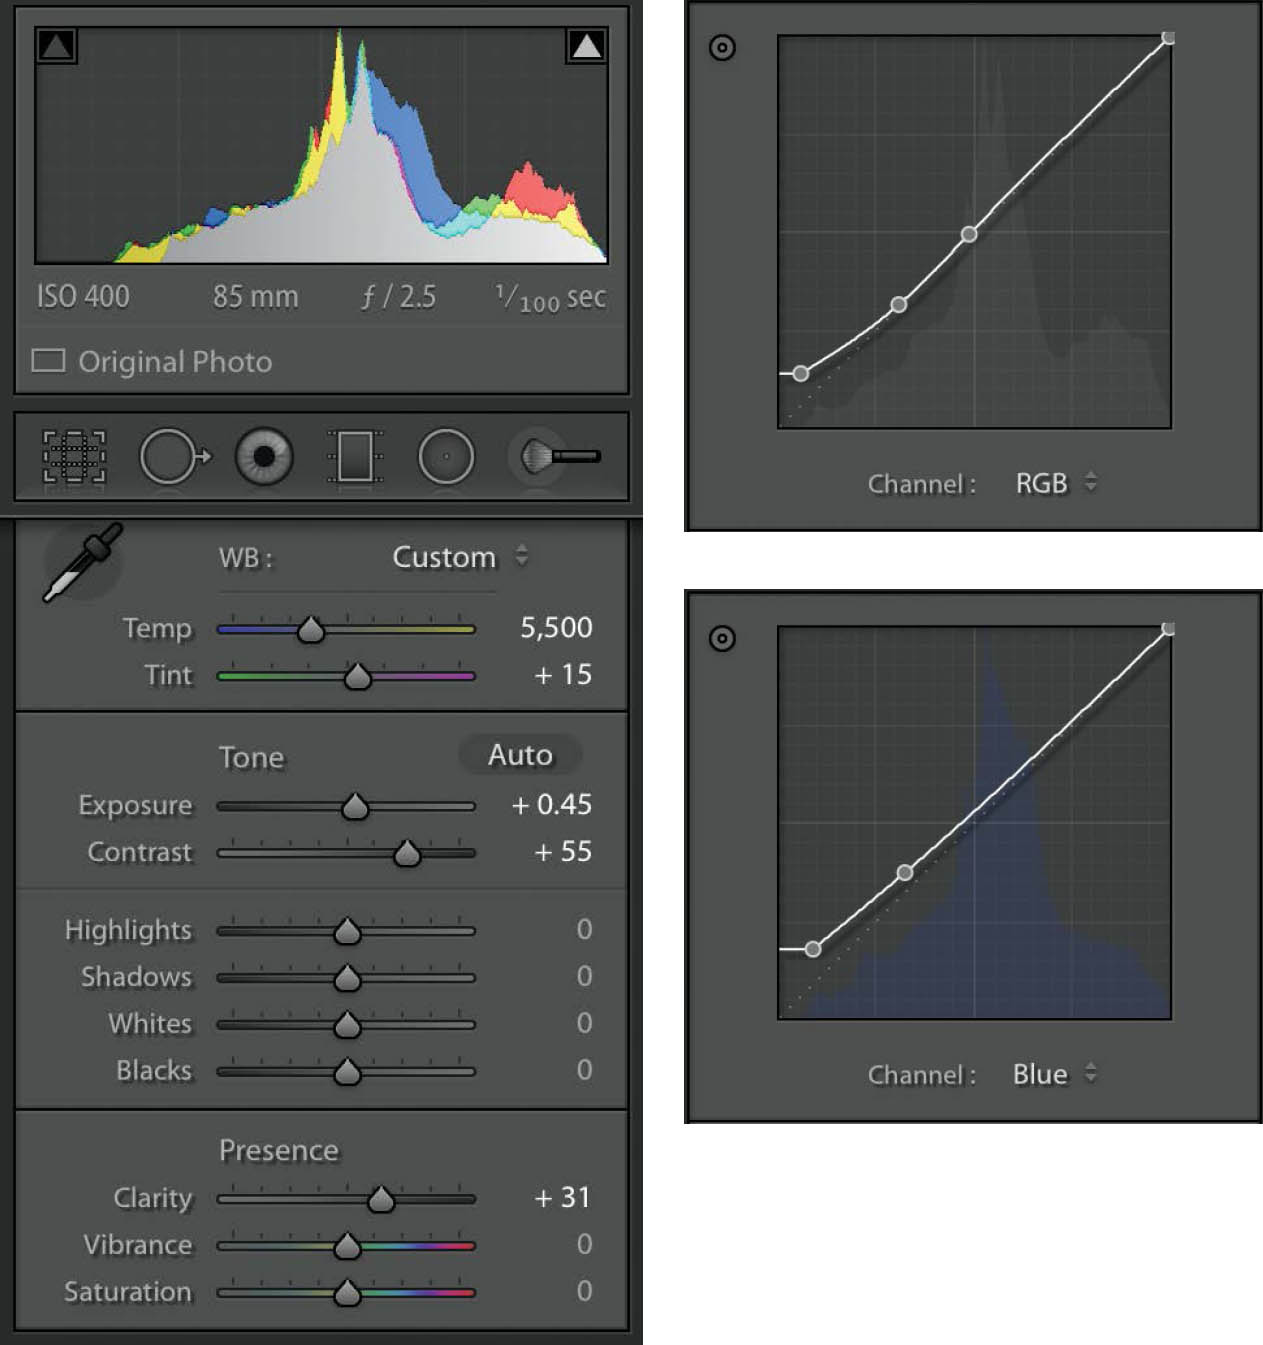
You can see in the lighting diagram ( Figure 1.18 ) that even though I was standing very close to the model, because of the indirect window light, the reflector didn’t provide a ton of light. This meant that I needed to use a slightly higher ISO and wider aperture. In Lightroom, I brought up the shadows and midtones in the RGB and Blue channels of the Tone Curve ( Figure 1.19 ) to give the image a vintage feel. My client for this shoot, a hair salon, requested that I outsource the image to a retoucher to fine-tune the final shot, which you can see in Figure 1.20 .
Figure 1.15 The hacked reflector. The hole is just larger than the size of my lens.
Now I have a soft, natural ring light, and I didn’t even need to drop $100 on Ghionis’s Omega Reflector (which still requires an assistant or stand to operate). Take note that using and angling your hacked reflector may feel a bit awkward at first, but you’ll quickly get used to it. If you are using a larger reflector and your arm can’t easily reach to your reflector’s edge, try modifying a smaller diameter reflector so it better fits your arm span.
Figure 1.16 The setup. The subject is placed between two windows, which create a rim light. A hacked reflector acts as a natural-light ring fill.
Figure 1.17 The raw file. The model’s close proximity to the two windows on either side of her resulted in a soft, rim light effect.
Figure 1.18 The lighting diagram. Even with the close proximity of the reflector to the model, my ISO was a bit elevated and my aperture was fairly wide in order to get a decent exposure.
Figure 1.19 The Lightroom settings. After increasing the contrast, I brought up the shadows and midtones in the RGB and Blue channels of the Tone Curve to give the image a vintage feel.
Figure 1.20 The final shot. Note that after I color graded the image, I outsourced the image to a retoucher to fine-tune the image at the client’s request.