
FILL THE EMPTY SPOT
To fill or decorate an empty spot can be a challenging task. The easiest way to do this is to add multidimensional accessories that will enhance the warm and inviting appeal of a room. I hope the following projects will inspire you to create homely items for those empty spots!
RECYCLED TASSEL

RECYCLED ITEMS:
- small doorknob
- page of a paperback book
- 8 × strips cotton ribbon (24 × 2 cm)
- 8 × strips black satin ribbon (20 × 1 cm)
- 8 × strips striped grosgrain ribbon (22 × 1.5 cm)
- 8 cm black pom-pon fringe trim
- wooden bead
YOU WILL ALSO NEED:
- drill fitted with a 5-mm drill bit
- wallpaper glue
- needle and thread
- fabric glue
- Extend the hole in the doorknob by drilling right through its domed top.
- Decorate the doorknob with small pieces (1 cm × 1 cm) of the paperback page, stuck down in papier-mâché style with wallpaper glue. Leave to dry.
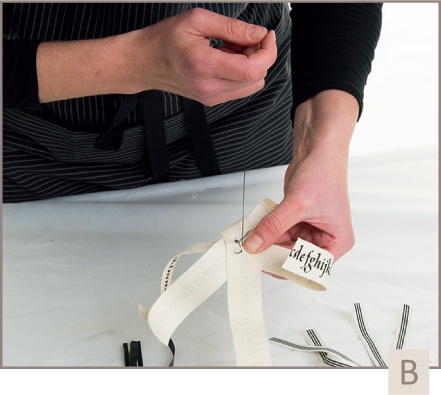
- Arrange a cluster of four of the 24-cm lengths of ribbon across each other and sew together. Repeat this process with clusters of four each of the lengths of ribbon, leaving one length of 20-cm black satin ribbon aside (A, B).
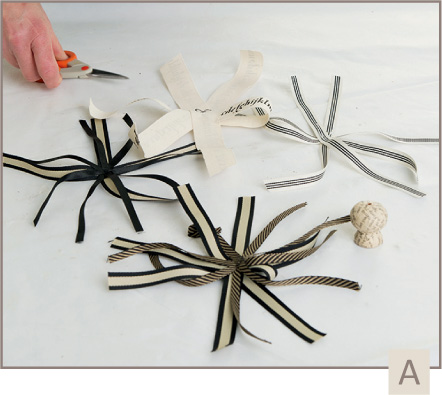
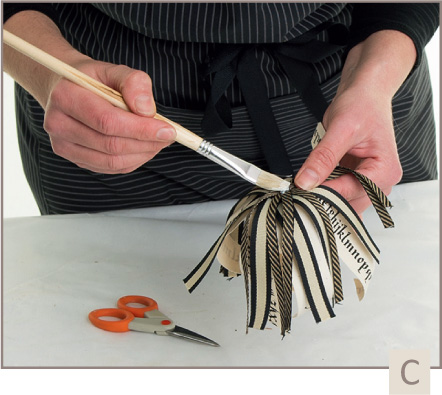
- Stack the clusters on top of one another: 24-cm lengths at the bottom, then the 22-cm lengths and lastly the 20-cm lengths. Glue them together centrally with glue between each layer (C).
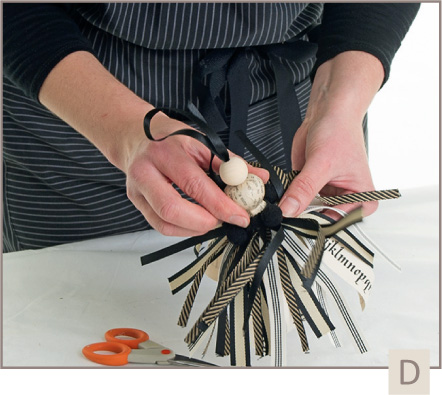
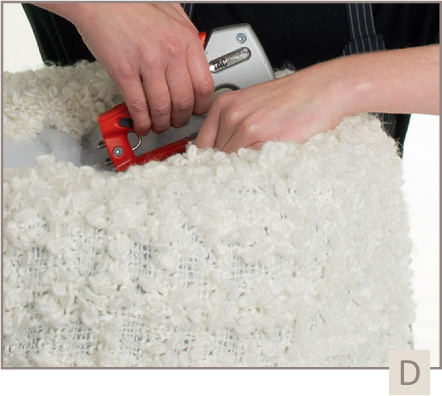
- Fold the remaining 20-cm length of ribbon in half and tie an overhand knot at the two ends to form a loop. Thread the loop through the hole in the doorknob, from the bottom to the top. The knot should wedge into the hole as you pull gently on it, allowing you to hang the nearly completed tassel (D).
- Once the stack of ribbons is dry, glue the centre of the stack to the bottom of the doorknob, concealing the hole and cascading to form a tassel (E).
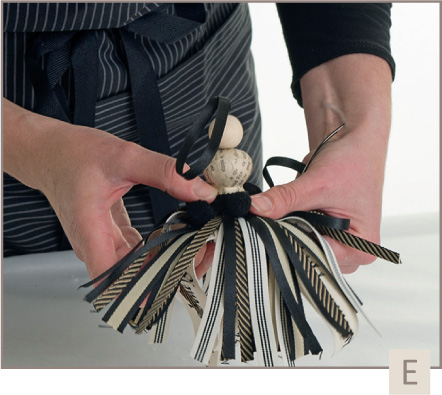
- Complete the tassel by gluing some black pom-pon fringe trim around its base to disguise the spot where the ribbons and doorknob meet.
TYRE OTTOMAN
Tyres are among the largest and most problematic source of waste due to the large volume produced and their durability. However, their reuse potential is phenomenal – from mulch in flowerbeds to ottomans in boardrooms.

RECYCLED ITEMS:
- 2 × small, firm tyres from a tractor lawnmower (or larger ones if you prefer)
- old throw/blanket (as fabric for the covering)
- piece of 6-mm MDF wood
YOU WILL ALSO NEED:
- staple gun
- medium thickness batting/wadding (to pad out the stool) – see steps 3 and 5 to work out the quantity
- pins, round needle and thread
- jigsaw
- fabric glue
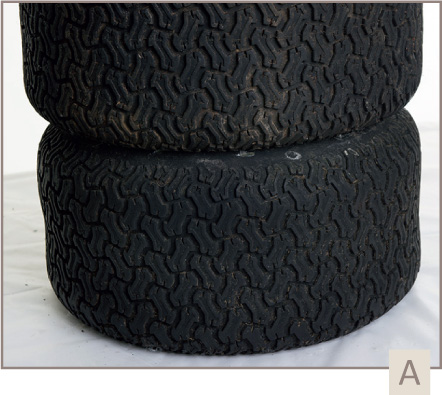
- Clean the tyres well, inside and out, to remove any grease.
- Stack the tyres on top of each other and staple them together (A). This will form the structure of the ottoman.
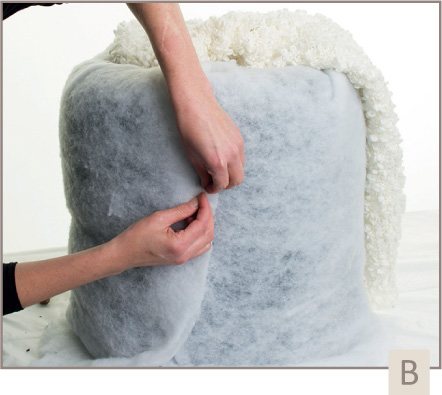
- Measure the height and the circumference of your stacked tyres, then add 30 cm to the height and 5 cm to the circumference; cut the wadding and fabric accordingly.
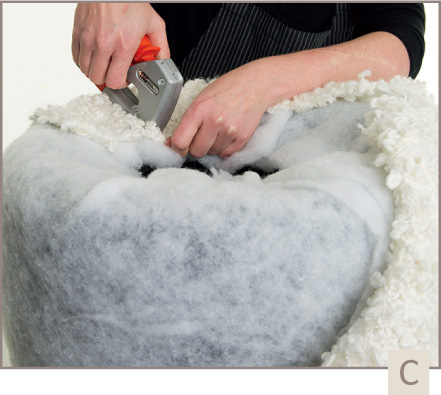
- Cover the tyres with the wadding as if you were wrapping a gift. Use pins to temporarily fasten it where it overlaps along the length of the ottoman, then sew the seam together neatly (B). Remove the pins and use the staple gun to secure the wadding to the top and base of the ottoman (C). Repeat the process with the fabric (D).
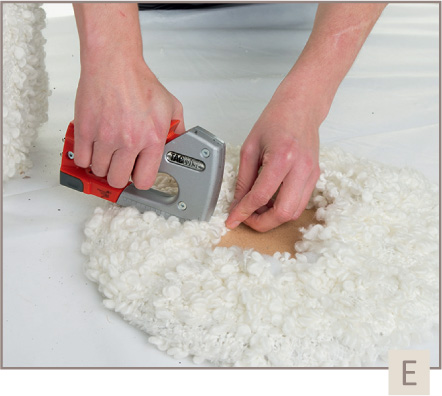
- Measure the diameter of the covered tyre from where the bevelled edge of the rim starts, then cut out two circles of that diameter from the MDF with a jigsaw. These will form the seat and base of the ottoman. Place the remainder of the fabric right-side down, with the remainder of the wadding on top of it. Place the MDF circles next to each other, but at least 10 cm apart on top of the wadding and fabric. Cut out two fabric and wadding circles then fold and staple them over the edge of each of the MDF circles (E).
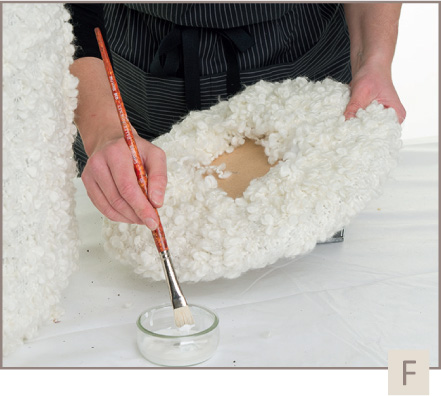
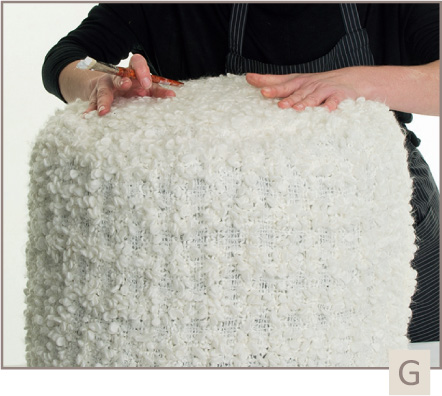
- Glue the seat centrally to the top of the ottoman and the base beneath it (F, G).
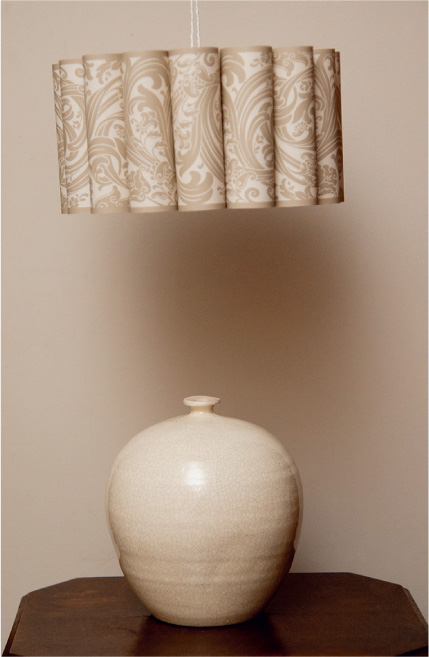
ART DECO LAMPSHADE
Art deco is an artistic design style that began in Paris in the 1920s and flourished internationally throughout the 1930s and into the World War II era. The style is often characterised by bold geometric shapes. Return to the 1920s and be bold in your creativity.
RECYCLED ITEMS:
- leftover border wallpaper or pictures copied onto card
- round paper lampshade with straight sides (resembling a drum) and a diameter of 20 cm
YOU WILL ALSO NEED:
- ruler
- pencil
- guillotine (for ease and efficiency, but you can make the lampshade without it)
- paper glue (if you use card)
- glue gun
- Cut the border paper (or card) into rectangles, with a height measured exactly to match the height of the lampshade, and a width of 16 cm. (A guillotine makes this job easier and more accurate.)
- With the rectangles face-down, draw a line 1 cm from the edge down each vertical side (A).

- Fold each rectangle inwards along those lines and glue them together so as to form a flat edge cylinder (B).(Border wallpaper is less messy as you simply need to peel and stick.)

- Arrange the paper cylinders around the lampshade and ensure that there are no wide gaps between any of the cylinders.
- When you are satisfied with the positioning of the cylinders, use a glue gun to paste the flat edge cylinders to the outside of the lampshade until it is entirely covered (C, D).


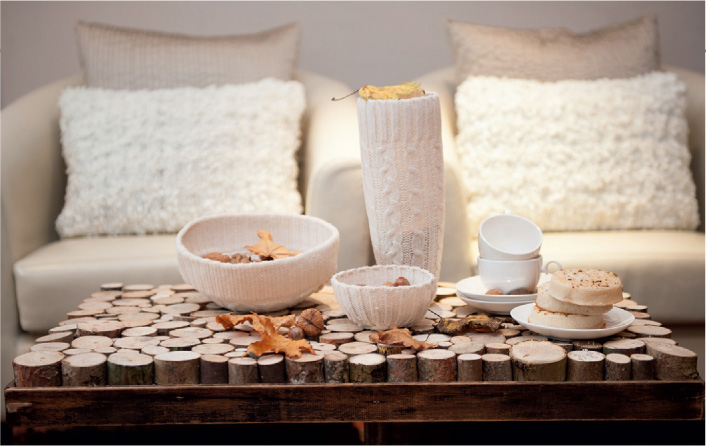
EYE-CATCHING COFFEE TABLE

RECYCLED ITEMS:
- dry branches (various diameters)
- old TV stand/small table
YOU WILL ALSO NEED:
- mitre saw (or a hand saw)
- secateurs
- wood glue
- Saw and transect the branches across their circumference in 2-cm lengths. The number you will need depends on the size of the table top.
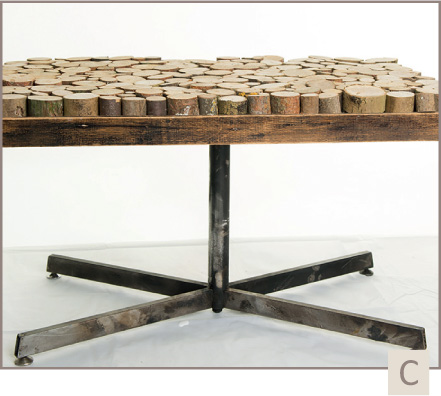
- You will need to prepare the stand/table for decoration. The amount of work required depends on its condition and your desired finish. You might need to deconstruct the frame, removing the legs from the table top, and treat the wood and/or metal to achieve the finish you require. Always follow the manufacturer’s instructions carefully when working with chemicals or tools (e.g. paint stripper or electric sander), and if you sand wood, go with the grain! Sanding metal requires either aluminium oxide or silicon carbide sandpaper (grade 40) (A). Reconstruct the table when all treatments are complete, but leave the top off.

- When the table is ready for decoration, arrange the wooden discs across the top. Do not glue them down until you have covered the whole area. If necessary, cut some sections in half vertically to fill any gaps. When you are satisfied with the arrangement, glue each piece into place with wood glue (B). Fasten the top back to the stand (C).

WOOLLY BOWLS AND VASE
We are often inspired by our natural surroundings, and in this case, it was the northen hemisphere winter that got my creative juices flowing. It is lovely to bring a little of the outdoors indoors and to make a living space as comfortable as possible. I made these woolly items just before one white Christmas and they depict the cosiness of woollen jumpers and the season delight of Yuletide, or indeed, any reason to celebrate winter, whether northern or southern.
RECYCLED ITEM:
YOU WILL ALSO NEED:
- Powertex (see Supplier List on page 176)
- bowls of different sizes and a vase (as moulds)
- clingfilm
- bottles
- fabric scissors
- pins, needle and thread
- bowl (to dip jumpers)
- blunt knife
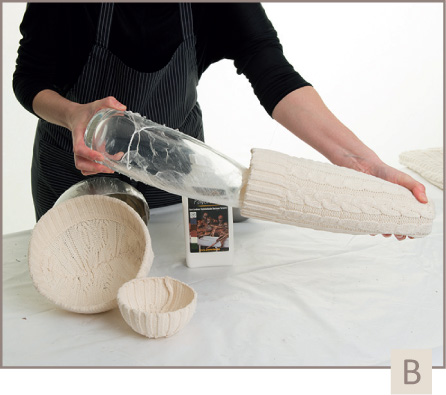
- When you work with Powertex, make sure that you have running water close by and that your work surface is protected. Prepare the bowls and vase by covering them with clingfilm and resting them upside-down over bottles to raise them above the work surface.
- Cut pieces from the jumper large enough to cover the bowls and vase (moulds). (Areas of decorative knitting are the most interesting; I used sections from around the arms and torso of an old jumper.)
- Cover the moulds with the knitted pieces, gently stretching, pinning and eventually sewing any seams together for a snug fit (A).

- Pour some Powertex into a bowl. Remove the woolly items from their moulds, dip them in Powertex and drape over their original moulds once more. Use your fingers to stretch and smooth the fabric gently and to squeeze out any excess glue.
- Leave to dry for eight to ten hours. If you remove them from the moulds before they are completely dry, they will reshape.
- Use a blunt knife to gently prise them off their moulds (B).
Caution: These bowls are not foodsafe.
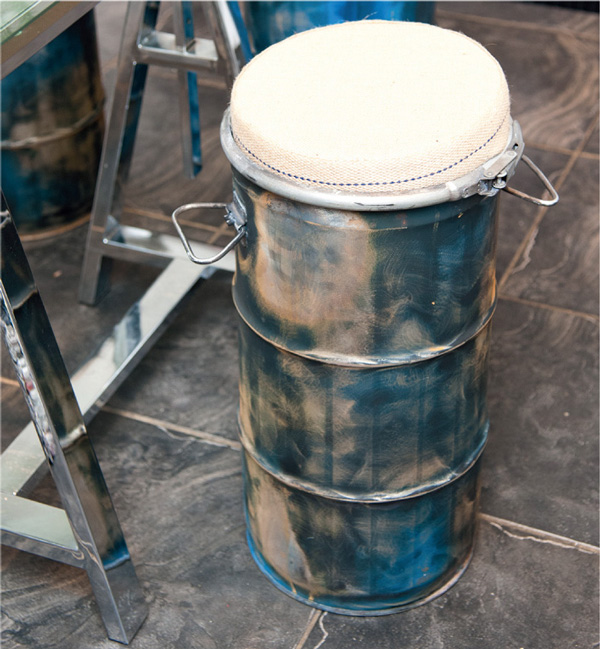
OIL DRUM STOOL
This is a simple project, but with initiative you can create an attractive stool with a unique purpose.
RECYCLED ITEMS:
- 37-litre empty oil drum
- fabric (your choice)
- 5 cm-wide upholstery webbing (length determined by circumference of drum)
- 6 cm-thick sponge (enough to cut a circle to match diameter of drum)
YOU WILL ALSO NEED:
- sandpaper (see step 2)
- electric sander
- damp cloth
- pins, round needle and thread
- fabric glue
- Using the ageing technique on page 10, burn the drum over an open fire then leave to cool and wash.
- At this stage the drum will appear a bit dull. To add accent and appeal, rub it down with sandpaper. Grit or silicon carbide sandpapers are best for sanding metal. Use an assortment of grades, starting with grade 80 (coarse) and progressing through the grades to 120 (fine). This will ensure that any scratches made by the coarse grit will be polished away by the finer grit. It may seem like a lot of work, but if you use an electric sander, it will do most of the work for you (A).

- When you are satisfied with the finish, wipe it clean with a damp cloth.
- Follow steps 5–8 in the instructions for the Paperball Bar Stool on page 130, to make the seat.
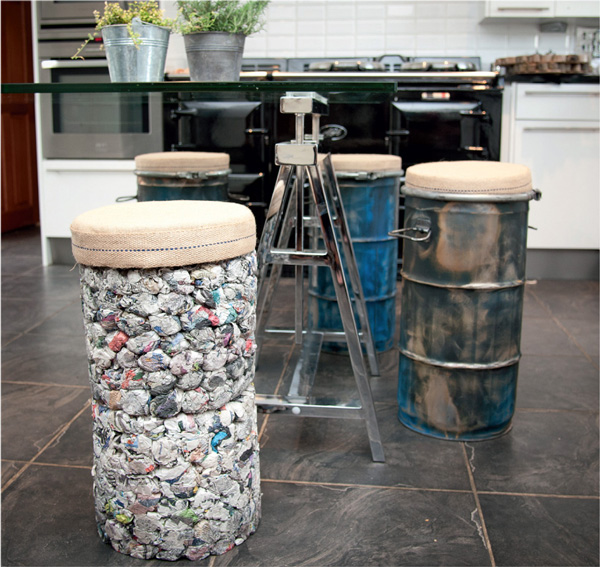
PAPERBALL BAR STOOL
These cost almost nothing to make, and it’s an excellent way to recycle a lot of old newspaper.
RECYCLED ITEMS:
- plenty of newspaper (sheets must all be the same size)
- 5–6 cm-thick sponge (enough to cut a circle to match diameter of buckets)
- fabric to cover the stool seat (45 × 45 cm)
- 5 cm-wide upholstery webbing (length determined by bucket circumference)
YOU WILL ALSO NEED:
- 2 × buckets of same size (± 50 cm high and with the same circumference at top and bottom)
- petroleum jelly
- clingfilm
- 5 litres PVA strong-bond glue
- small foam roller and paint tray
- fabric scissors
- pins, round needle and thread
- fabric glue
- Smother the inside of both buckets with a thick layer of petroleum jelly, then line each bucket with two layers of clingfilm. Make sure you cover them properly and leave some overhanging clingfilm to remove the paper later in the process.
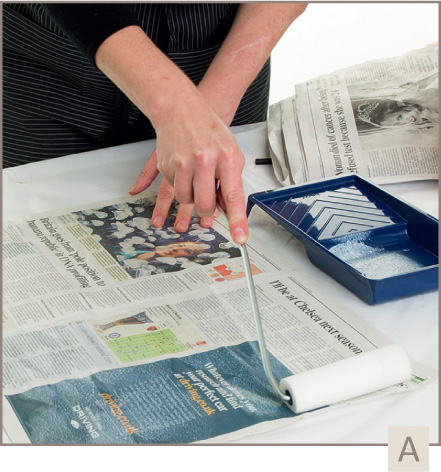
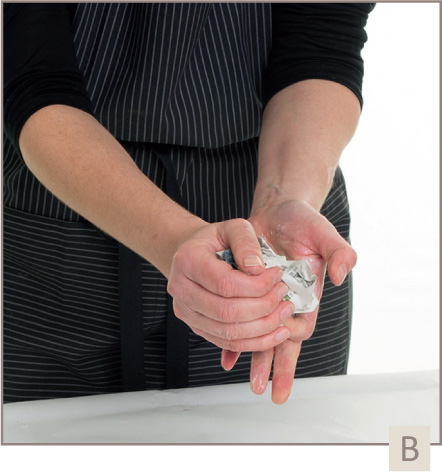
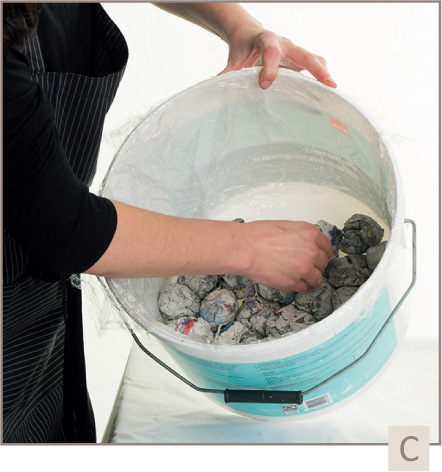
- Pour the PVA glue into the paint tray and, working on a flat surface with one sheet of newspaper at a time, apply a layer of glue over the entire sheet with a roller (A). Scrunch the sheet into a ball (B) and place it in a bucket (C). Continue this process until you have filled both buckets to the brim. Leave to dry for three days. Do not be tempted to rush it; the newspaper balls at the top of the bucket will be completely dry, but the ones in the bottom will still be very wet.
- Place some clingfilm on a flat surface and turn the buckets upside-down. Pull the paperwork out of the buckets, remove all the clingfilm and leave to dry for another four days.
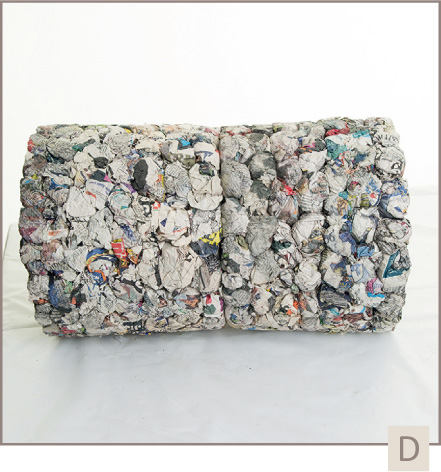
- When completely dry, stack the two paper cylinders on top of each other, and secure with a thick layer of PVA glue, then leave to dry (D).
- In the meantime, measure a circle the same diameter as your paper stool onto the sponge. Use a pair of sharp fabric scissors to cut out the sponge circle, or ask your supplier to do it for you.
- Measure and cut a fabric circle with a diameter 12 cm larger than your sponge one.
- With the fabric circle right-side down, place the sponge circle in the centre of it. Fold the edges of the fabric up and over the edges of the sponge and secure with pins. When you are satisfied with the fabric’s positioning, sew it to the sponge. Once secure, remove the pins. For a neat finish, use fabric glue to paste webbing around the edge of the sponge seat (E).

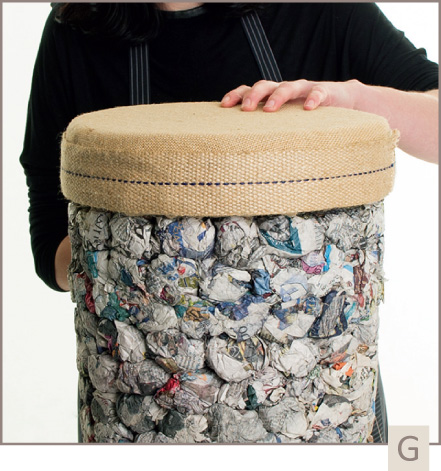
- Secure the seat (wrong-side down) to the stool with fabric glue and leave to dry (F, G).

Caution: A lot of glue will be used to make this item. Make sure your work surface is adequately protected and easy-to-clean.
NO-MESS BIRDCAGE
I love a birdcage, but cannot abide the seed-mess little birds make when they flutter about in their cage. I decided to convert a lamp that I had inherited from a friend into an aviary for replica birds.
RECYCLED ITEMS:
- white fabric netting (enough to cover the shade)
- lampstand and shade
- thin tree branches (to fit inside the shade)
- 3 × small round balls (birds’ heads)
- 3 × polystyrene eggs (birds’ bodies)
- old newspaper
- mohair wool (different colours)
- feathers (collected while out walking)
- small pieces of red velvet (for birds’ beaks)
- white-headed pins or beads or buttons
YOU WILL ALSO NEED:
- binder clips
- scissors
- paintbrushes
- fabric glue
- florist wire
- pins
- PVA paper glue
- brown acrylic paint
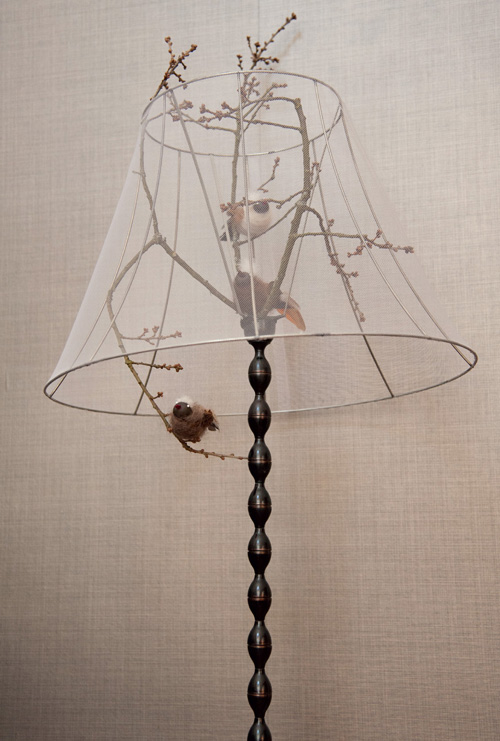
- Arrange the netting around the lampshade and secure it to the top and bottom rims of the frame with binder clips. Make sure it is taut and that you are happy with the fit, before cutting away any excess. Paint some fabric glue onto the upper and lower edges, then press the netting against the rim with your fingers. Keep it in place with binder clips and leave to dry overnight. When the netting is firmly glued to the rim, trim any extra away. Place the shade onto the stand and position the thin branches inside the lampshade. Fasten them to the frame with florist wire.
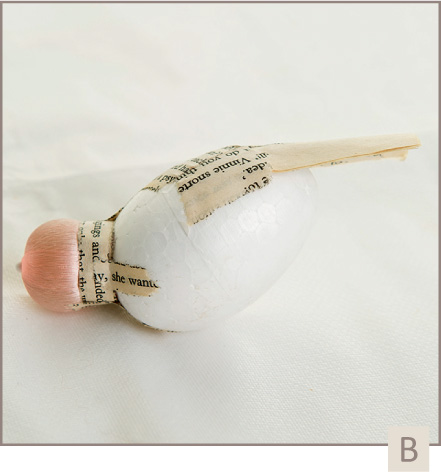
- Attach the small balls to one end of each polystyrene egg with a pin. This will form the heads and bodies of the birds (A).

- Cut the newspaper into long strips and glue them around the heads and bodies, to form a neck. Use a flat piece of paper to fashion a tail, and glue it to the other end of the little body (B).
- Allow to dry before painting the birds’ bodies brown. Leave to dry again (C).

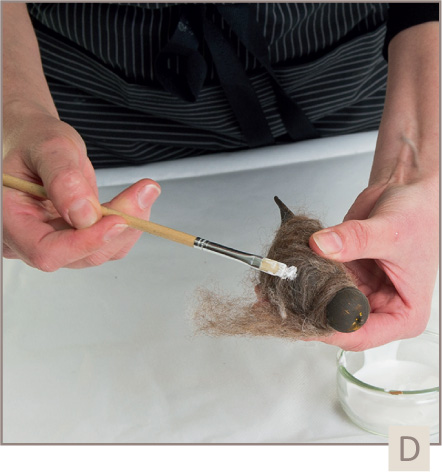
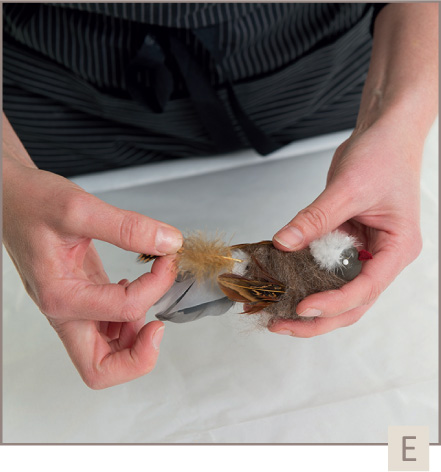
- The bodies are ready for their down-feathers. Coil mohair wool around the bodies and necks of the birds, and secure it with fabric glue (D). Decorate the birds further with real feathers, and give them tiny, triangular velvet beaks. I used pins with white heads as eyes, but you can use beads or buttons (E). Your birds are now ready to sit cleanly, in an empty corner.
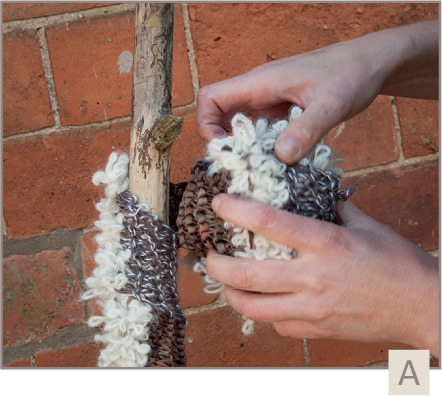
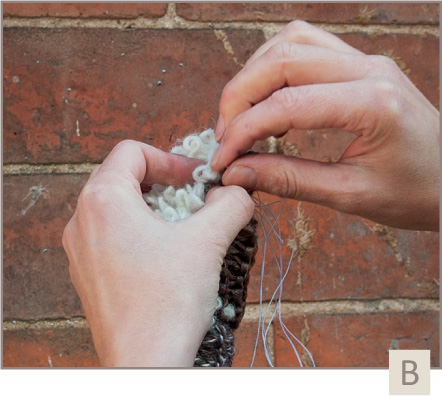
YARNIE HAT STAND
This idea was birthed after the success of our local high school’s charity event: the children knitted scarves in an array of colours, then wrapped them around the stems and branches of trees at the main entrance. Everybody liked it so much that it has become a permanent feature. If knitting isn’t your strength, ask someone to help you.
RECYCLED ITEMS:
- 2 × dry branches large enough to be a hat/coat stand (or even an old coat stand in need of an upgrade)
- 2 × wooden blocks
- yarn/wool in different colours and textures
YOU WILL ALSO NEED:
- mitre saw (or a hand saw)
- hammer
- nails
- knitting needles (I used 10 mm needles)
- needle and thread
- I dried branches and wooden blocks, collected from woodlands near our home, in the garage. When you are sure your wood is dry, trim the base of each branch with a mitre saw so that it is level and able to stand upright when attached to a wooden block. Fix it firmly to the centre of the block with nails. If you can’t find branches, an old metal or wooden hat stand will do.
- For an interesting texture, I used a combination of yarns. Cast on approximately seven stiches and knit a ‘scarf’ of about 5 m in length, making sure to alternate the yarns after every few rows.
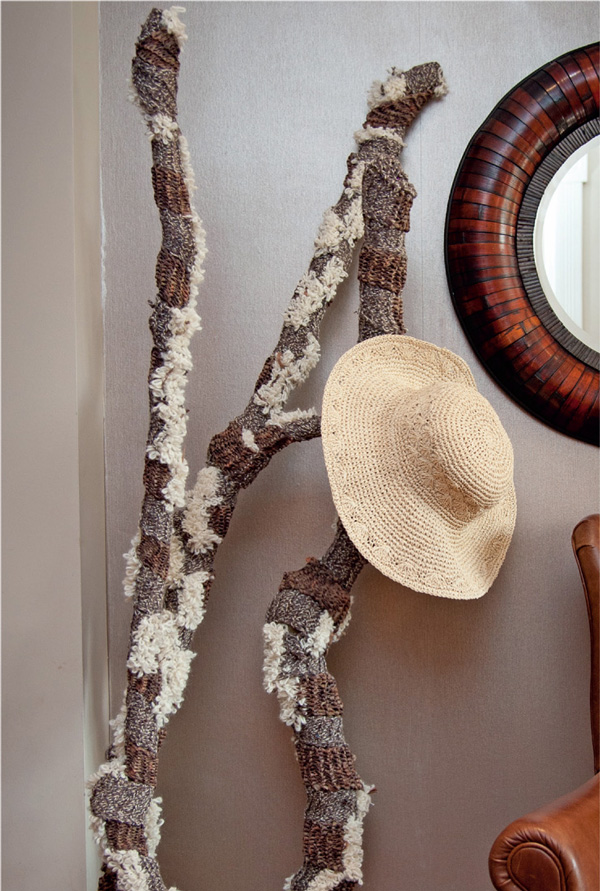
- Coil the scarf around the hat stand from top to base (A), securing it at both ends with a needle and thread (B).
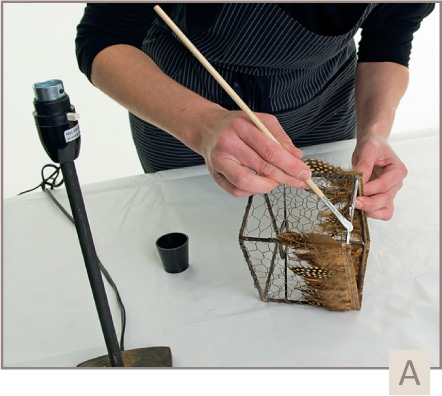
LAMP AND POULTRY BOX SHADE
Of all the objects I have made over the years, this little light attracts the most attention. Everybody notices it and comments, especially men. When I ask, ‘Why do you like it so much?’ the answer is always, ‘I don’t know, I just like it.’ I hope you do too!

RECYCLED ITEMS:
- small piece 13-mm hexagonal galvanised chicken wire
- desk lamp and wire frame of its lampshade
- trim edging decorated with assorted birds’ feathers
YOU WILL ALSO NEED:
- heavy-duty gardening gloves
- bent nose pliers
- wire cutter
- long nose pliers
- fabric glue
- small paintbrush
- Harlequin Rust It Activator (see Supplier List on page 176)
- Using the ageing technique on page 10, burn the chicken wire and the wire frame over an open fire then leave to cool and wash.
- Place the frame on its side in the centre of the chicken wire and cover it by pulling the mesh firmly around its edges. Wear gardening gloves to protect your hands.
- Use bent nose pliers to tighten the mesh over the frame. Cut away surplus wire and work away any strands by folding them around the framework with long nose pliers.
- Paint the fabric glue onto the top rim of the newly made shade and press the trim edging onto it (A).
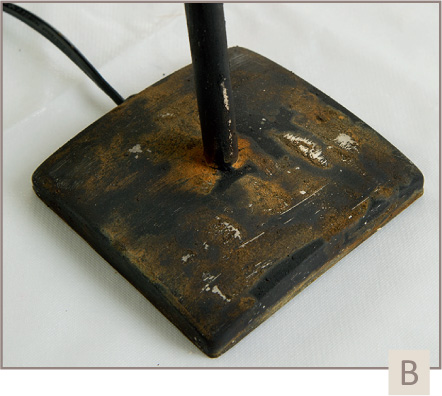
- Use the rust activator and follow the manual instructions to age the lampstand (B).
SINGLE CHAIR WITH A SINGLE PURPOSE
I inherited this little fellow from a house that we bought once. The vendors removed everything from the house – including light fittings and carpets – but left behind this single, seatless chair. I was stunned and kept it as a reminder to be generous and always to leave something good behind wherever I went.

RECYCLED ITEMS:
- 13-mm hexagonal galvanised chicken wire (to fit the chair back and seat)
- single wooden chair
- ribbon
YOU WILL ALSO NEED:
- black spray paint
- dust mask
- plastic gloves
- old cloth
- bent nose pliers
- staple gun
- wire cutter
- long homemade wire needle (see page 36)
- Using the ageing technique on page 10, burn the chicken wire over an open fire then leave to cool and wash.
- Spray paint the chair. Use a cloth to wipe the paint off the edges of the chair before it is completely dry. This will smudge it and give the desired paint-wash effect. Leave to dry overnight.
- Cover the seat area and chair back separately with wire mesh. Measure and cut it so that the wire can be wrapped and secured around the wooden frame.
- Use bent nose pliers to pull the mesh firmly over the frame so that it is taut. Staple the mesh to the base of the seat with a staple gun. Work away any strands by folding them around the back frame of the chair and cut away any surplus wire (A).
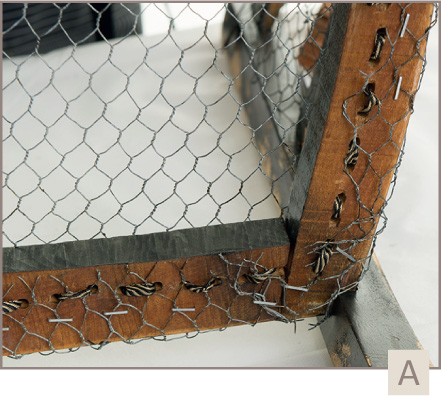
- Decorate as desired by weaving ribbon through the mesh with a long, wire needle (B). (See needle used on page 36 for the cardboard apples.)

- See page 100, for the wooden heart decorative idea.
Caution: Work in a well-ventilated area and wear a dust mask and plastic gloves when using spray paint.