METHODS OF CASTING
Introduction
This chapter puts forward a very simplistic account of casting for those who may have done little of it. It addresses the main questions first. Why and when should one consider casting? What are the basic methods? Which are the least complicated materials and where can they be found? More importantly, for those who have yet to discover the possibilities, it illustrates the fact that casting may be an option for forms one wouldn’t otherwise consider. What follows is a quick overview, before we consider example cases in detail.
When is casting necessary or useful?
Obviously having the means to reproduce a form relatively quickly is a blessing if you need to make more than ten of them. Some forms lend themselves to casting more readily than others – a beer keg, for example, as opposed to a chandelier. But it is surprising what forms can be achievable with just a little extra effort and, as you will see, even the chandelier could become a candidate for casting with a little more skill and ingenuity.
Casting is useful not only for the repetition of individual forms such as beer kegs, but for individual parts which can be repeated and then assembled into a larger or more complex form. An example might be the ornamental strip illustrated. Here, the prototype has been made for one unit which can then be repeated to form a continuous strip. (The word ‘prototype’ will be used throughout this chapter to describe the initial form, because obviously ‘model’ may become confusing.) The detail is complex so the time invested in getting the prototype right and in making a mould of it would be a fraction of the time and concentration needed to sculpt units individually. Better than that, the silicone mould used in this case will keep for many years if properly looked after, to be used over again. Since the form is a component, it could be combined with others to contribute to different forms if needed. For example, if corner pieces are made these could be put together to make a complete frame.
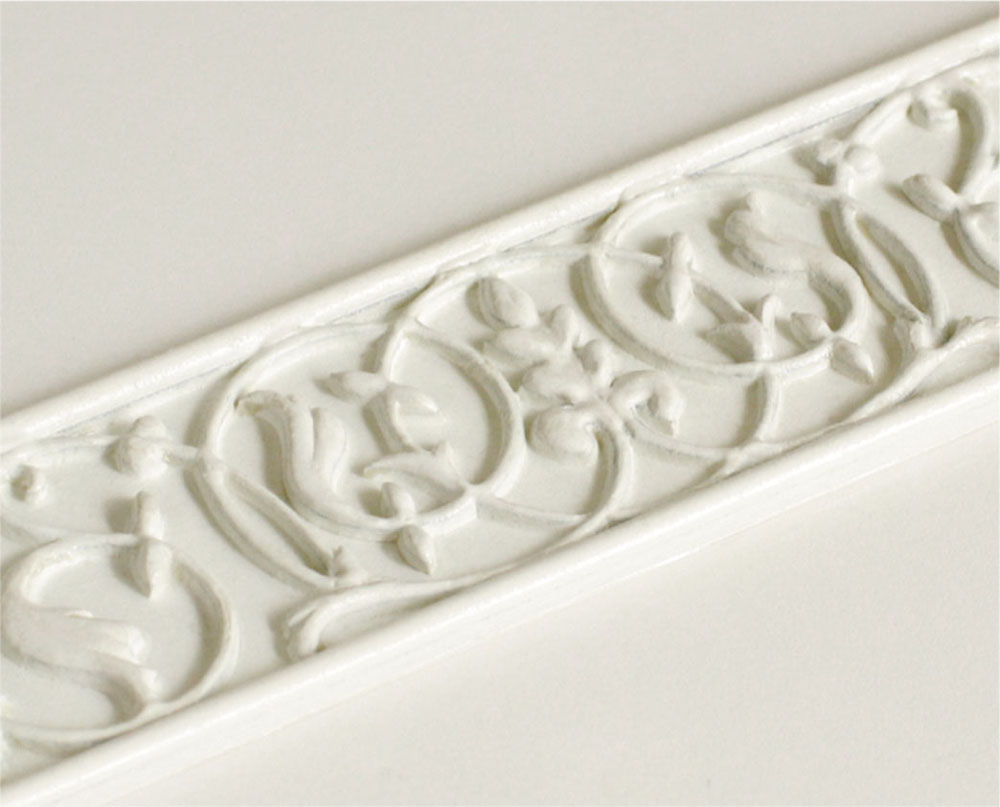
The prototype for an ornamental strip. The basis of the pattern has been carefully cut out of foamed PVC to form a raised template onto which relief paint (see Chapter 5) has been piped to round off the effect.

The completed mould together with castings.
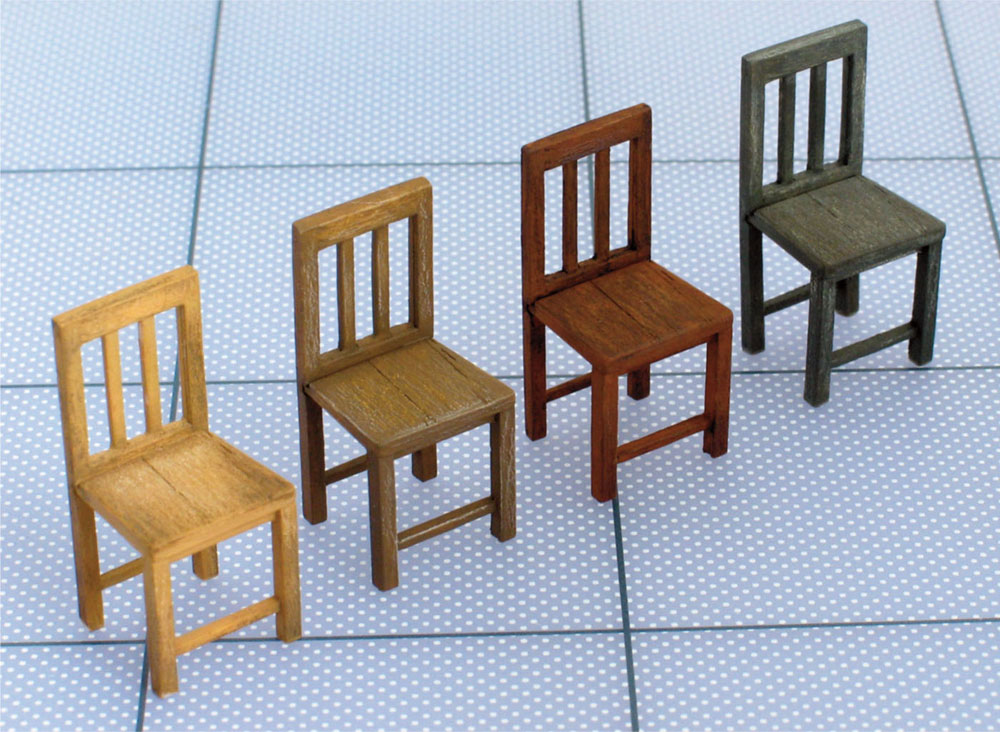
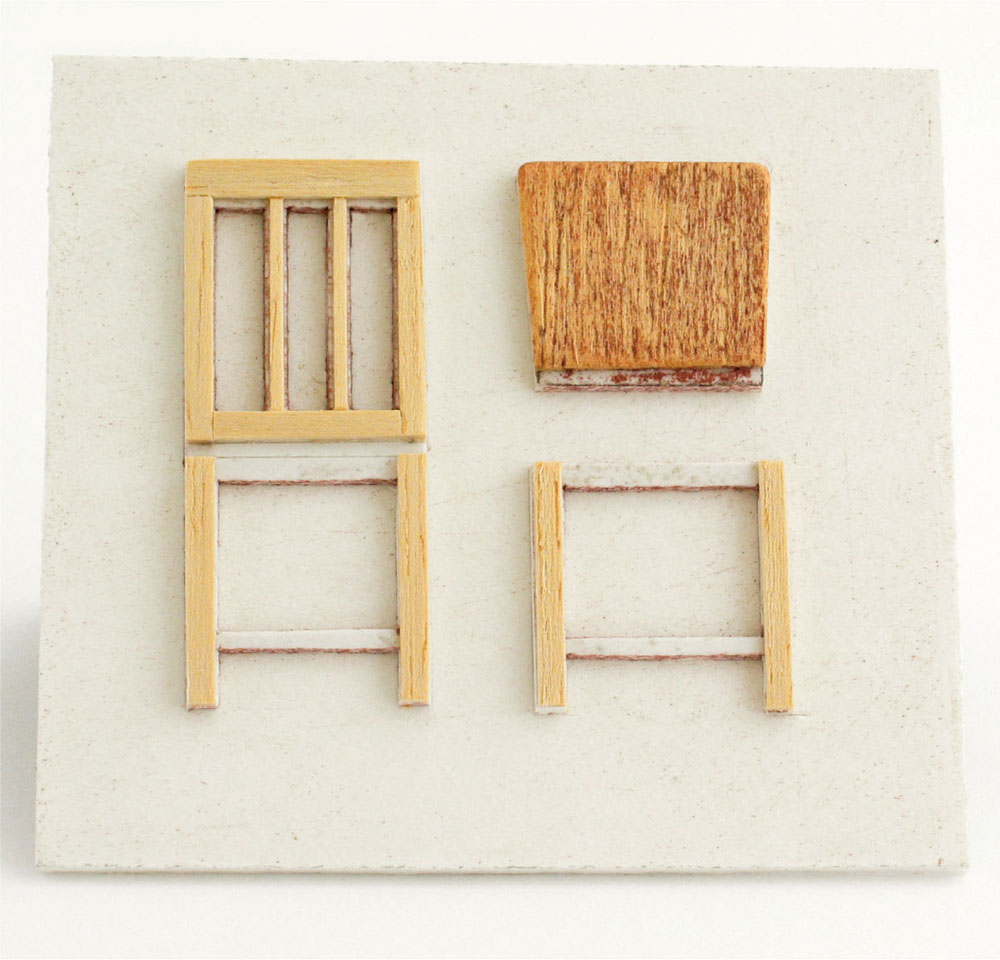
These chairs have been cast in separate pieces and then assembled.

Illustrating the casting process. Objects of this detail and delicacy require a relatively robust silicone for the mould and a fluid resin for the casts. These were cast in two-part polyurethane resin and the silicone used was a pouring one with a fairly high Shore A hardness of 55.

Transforming a material (from the series Excavations by Astrid Bärndal and Marc Steinmetz).
Thinking in this way (of components which can be variously assembled) leads one to realize that many things can be accomplished quite easily. An example of this would be the 1:25 chair illustrated. In itself it is a delicate, involved form which one would never imagine being able to cast while thinking about it in one piece! But divided into three components – back, seat and front legs – it becomes relatively straightforward.
Sometimes it’s necessary (or particularly prudent) to develop a form as a cast if you need to experiment with the finish. It may be a little more time-consuming than creating a one-off, but it certainly alleviates the tension if you’re not sure whether your treatment will work or if you want to try a variety of alternatives.
Casting also becomes essential if you have to transpose a prototype from one material to another, as in the case of producing a durable plaster version of a plasticine form. In this case, it may only be one casting which is needed but it is still an advantage to be able to make more.
The basics
The first thing to come to terms with is that everything in casting is interdependent and that it is not a process that can be rushed into without having a definite plan for each stage. The nature of the form to be reproduced will determine the choice of mould-making material, the type of mould (that is, whether it needs just one part or many) and the material it can be cast in. On the other hand (and working backwards), the use to which the cast is to be put (that is, whether this will be glued, painted or worked into and how long it is supposed to last) will equally determine the choice of casting material, affecting the method of casting and the design of the prototype.
The prototype
In a sense, the prototype can be made out of anything that will maintain its shape long enough for a moulding material to cover it and set. Every surface detail of the prototype is transferred to the mould in this process and if the mould endures the prototype will no longer be needed. Fossils are the most beautiful and poignant illustration of this. They are nature’s way of telling us that negatives can form the templates for new creation. Nature is also telling us, by the way, how easy it can be to make casts! No particular skill was needed for dinosaur footprints to reach us perfectly preserved after millions of years, only the right materials and conditions. Early humankind made use of similar inspiration and the technique of sand casting is still practised today. For this, an exact impression of a form is made in sand (which is usually bound together with oil) and metal is cast directly into it.
Another prototype unit for a decorative frieze being made, this time at a larger scale. The fragile Kapa-line foam used for the details needs only to be sealed and to withstand the silicone rubber being poured over it for the form to become more permanent. Prototypes can combine any variety of materials as long as they will temporarily hold together. Photo: David Neat

The result cast in white concrete. Photo: David Neat
Undercutting
You will need to be able get the hardened cast out of the mould as easily as possible if you wish to use the mould repeatedly. Moulds made in flexible materials will assist in this and that’s what they’re designed for, but there will be a limit to how much they will flex. If you fill a balloon with plaster and let it set, the rubber will only stretch so far to allow you to take the plaster out – the bulb is far bigger than the stalk. Undercutting is the word used to describe this difference and it applies not only to the overall shape but to every surface detail. This doesn’t mean that the form has to be simplified until there is no more undercutting – the form is the last thing that should be compromised – but it does mean that the method of making the mould has to adapt. Perhaps the object needs to be cast in two parts, involving two separate moulds. Or it is more usual to pour the cast in one, but make the mould in more than one part which can then be easily removed from the cast object.
Access
It must also be made as easy as possible for the casting material (usually liquid at first) to fill every bit of the mould. This is simplest in the case of a flat object where the mould becomes a simple tray that just needs to be poured to the brim. Having this access means that air which might become trapped between mould and liquid will have an easy escape and be assisted to the surface. But for a form that is to be seen from all sides, such as a figure, there are hardly any blank or flat areas that can be used as openings from which to pour. It is usually done through the feet, but this means that one has to pour through the smallest of openings. More crucially, it means that the only escape for the air coming out can become blocked by the casting material going in. The way this problem is usually solved is by cutting small channels at various points deeper in the mould so that air can escape out of them. These will inevitably fill with casting material once the air is forced out and will become an unwanted part of the cast, but it will be easy enough to remove them. The other precaution is to build up the area around the feet, perhaps even filling the space between the legs, for better access. These extras can be similarly removed from the cast once it can be worked on.
Mould release
One has to be sure that the mould can be easily and cleanly parted from the prototype once it is set and the same applies between the mould and the cast. Most mould-making materials will be fairly non-stick anyway, but some precautions still have to be made. The surface of the prototype needs to be made as non-absorbent as possible. When this is a dense modelling material such as plasticine it is not a problem, but if other materials such as wood, plaster or foam are used the surface will have to be thoroughly sealed. Various undercoats or varnishes could be used to seal the surface of wood or plaster, but some may react with mould-making materials such as silicone or polyurethane rubber. Some may also start dissolving the surface of styrofoam. If in doubt, it’s best to stick with a sealer that will be safe in any event such as the simplest water-based acrylic undercoat. The surface of the prototype doesn’t have to be hard, just impervious. Another form of sealant that is always safe to use is shellac, which is a natural preparation made from the resinous secretion of a particular insect dissolved in alcohol.
A further barrier may be needed even after sealing the surface of the prototype to serve more as a lubricant assisting the release from the mould. The most common to use is a petroleum jelly such as vaseline. Only a very thin coating is necessary, otherwise it might clog fine detail on the prototype. The directions which come with the different mould-making compounds advise the use of different release agents and on the whole this advice should be trusted. There is usually less need for a release agent between the finished mould and the cast, except in the case of a plaster mould, but using one anyway can often result in better castings and lengthen the life of the mould.
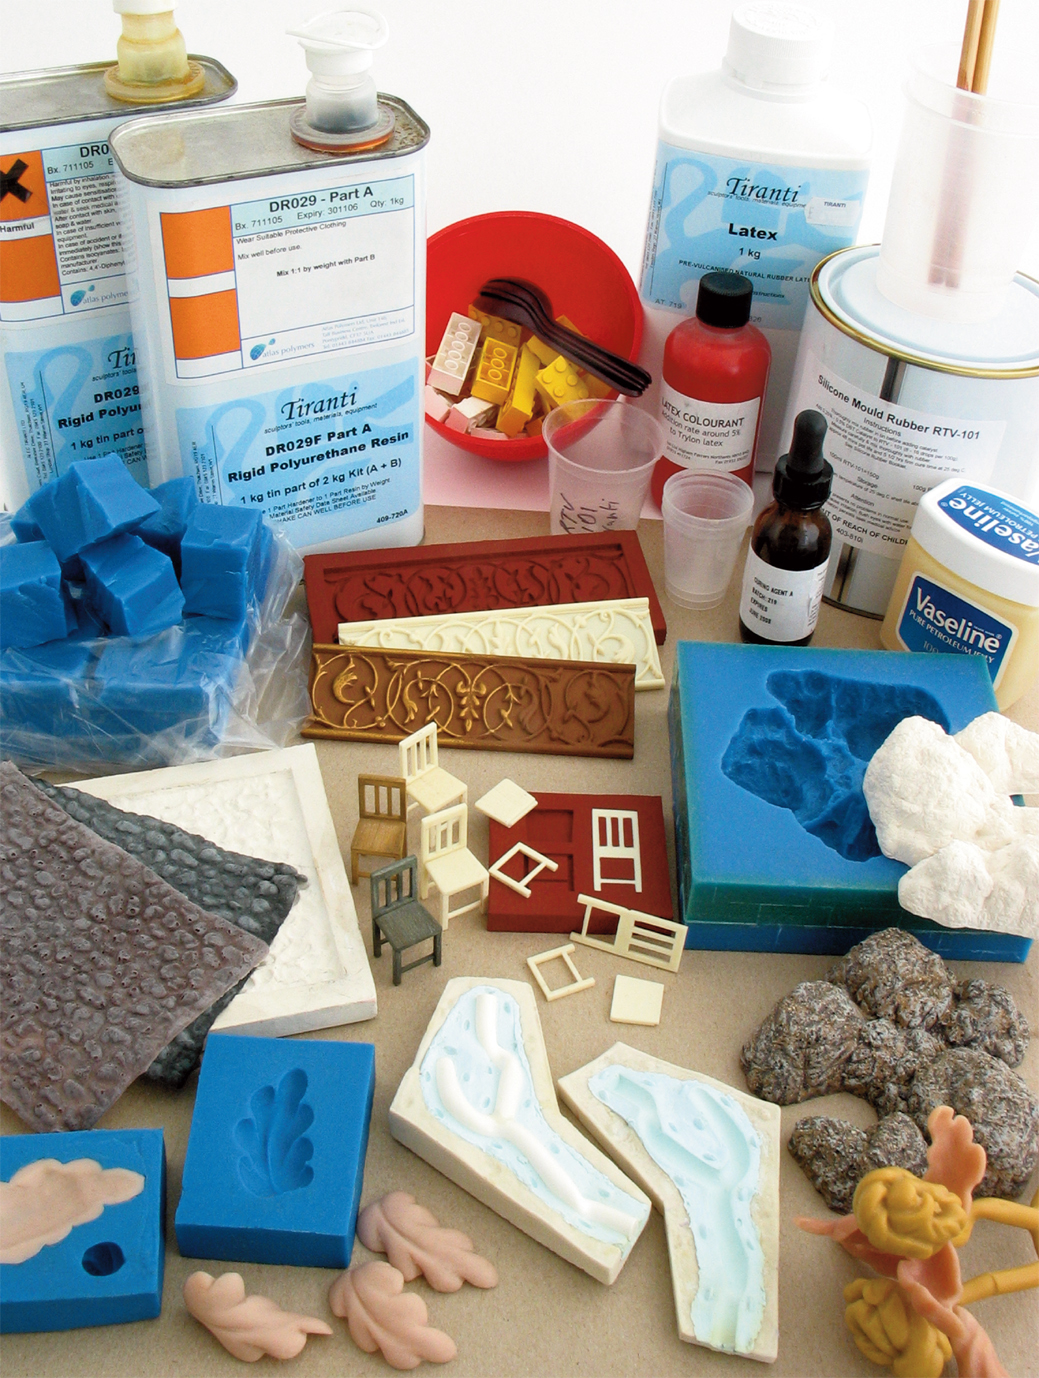
Common mould-making materials
The various materials which can be used for moulds are not interchangeable, that is, what one might achieve another won’t. Although some common properties are shared there are fundamental differences. Some, such as latex, can only be used to make a skin mould (they have to be brushed on in layers), whereas others need to be poured into a block. Some are suitable for both brushing on or pouring, usually with the aid of special additives. The types are listed below.
Latex
This may be the simplest means of making some forms of mould; indeed, it can be so simple that children are encouraged to try it, by covering some basic form such as a plaster gnome figure with successive layers of latex, rolling it off when dry and filling the shape with plaster. This can work for forms which are very limited in shape and where distortions aren’t much of a problem. Latex shrinks, unlike the other materials listed here, and there is a limit to the thickness that can be built up before the surface becomes lumpy. It cannot be poured as a block. It starts as a milky liquid and dries by evaporation, becoming a translucent beige. Because it can be layered to form flexible skins it is ideal for a particular form of casting illustrated at the end of this chapter which is useful for reproducing surface effects. Here it serves, not as the mould-making substance, but as the material for the casts.
Silicone rubbers
Silicone rubbers are by far the most commonly used in various disciplines where good-quality casting is required. They are essential if very fine surface detail needs to be reproduced. They are supplied in liquid form accompanied by a hardening (or more properly ‘curing’) ingredient, the catalyst. A measured amount of this catalyst needs to be thoroughly mixed with the rubber before pouring. After that, the rubber will take anything from two hours to one day to harden, depending on the type of rubber used. The different types will have different degrees of hardness, meaning that some will flex well to accommodate undercuts while others will not. They are expensive, averaging about £25 for a litre, but for small-scale work this amount can go a long way. Unfortunately, they generally have a ‘shelf life’ (the amount of time they can be kept before being used) of six to twelve months, which is a disadvantage if they are used only occasionally.
Polyurethane rubbers
These have much the same properties as silicone and there is also a range of different types. There may be little to choose between polyurethane and silicone, but some polyurethanes work out cheaper. Another difference is that usually they come in two equal parts to be mixed 1:1, which makes mixing a bit simpler. Using silicone may be safer though, especially if you intend to cast in polyurethane resin, because although this resin will work in a polyurethane mould if it is properly coated first, mishaps can occur.
Gelflex
If money is a problem there is Gelflex. This is a re-meltable vinyl which comes in a block very similar to jelly and has almost the same feel. It must be melted first to make it liquid and pourable. Its advantages are that it is a lot cheaper than silicone and that it can also be used more than once. Moulds which are no longer needed can be cleaned up, chopped and re-melted. Gelflex also has a much longer shelf life than silicone, in fact almost indefinite. It comes in a choice of two hardnesses, though even the hard version is quite soft compared to the harder silicones available. The disadvantage is that Gelflex needs to be melted at a temperature of around 150°C and poured soon after. A plastic, foam or plasticine prototype would melt or distort, so the initial form-making is limited to using such materials as wood, plaster or polymer clay. Vinamold is another brand almost identical to Gelflex.
Plaster
Plaster can be used both as a casting and a mould-making material under special circumstances. Its disadvantage for making moulds is that it is not flexible, which means that it can either only be used for very simple forms involving no undercutting whatsoever, or that it has to be built up as a shell which can be parted in sections. A third alternative is possible if used with a casting material which is in itself flexible, as is the case when casting latex skins into a plaster negative. Plaster is relatively cheap and available, but the standard type sold in building supply centres that is used for plastering walls is not suitable for these purposes. It is usually either too coarse, too soft or takes too long to set. Either plaster of Paris (still available from some chemists and DIY centres), or an especially hard casting plaster are much better for this and can be obtained from sculpture supply shops. Before it can be used as a mould the plaster must be fully dried and sealed with shellac or water-resistant PVA.
Using found objects as moulds
Although not illustrated, it may be worth considering the ‘opportunist’ approach of using found forms such as ice-making trays or plastic packaging shapes to cast in. This relies either on having a good memory for these possibilities or keeping a stock of them around. Ready-made moulds of various shapes can also be found in some hobby or sculpture shops for making clear resin castings.
Common casting materials
Polyurethane resin
Polyurethane resin has been used for most of the following examples. It comes in two liquid parts that have to be mixed thoroughly in equal amounts (1:1) and then poured. The type used here will stay transparent until it starts to set, after which it will become increasingly opaque. This transparency is an advantage because there should be just enough time to see any air bubbles which might have become trapped in the mixture when pouring into a simple flat mould. These can be teased to the surface with a piece of wire. Setting is fast, however, and casts can usually be removed from the mould after fifteen minutes. They may still be slightly flexible, but this can also be an advantage in getting them out of the mould and trimming off any unwanted parts at this ‘green’ (a term borrowed from woodwork) stage. If bent in this way, a flat cast should be bent back and laid flat to continue hardening. It may be anything from a few hours to a few days before hardening is completed.
Plaster
This is by far the cheapest material for making casts and it can have a lot of strength, although it will be far too brittle to make the examples illustrated so far. Plaster of Paris (or better still a fine casting plaster such as Basic Alpha) will flow well and reproduce a lot of detail. Dependent upon the type, plaster will set quickly and can be taken out of the mould in as little as twenty minutes. It is perfect for beer kegs (even minute ones), rocks, simple figures or anything which has a similarly robust form. Plasters are mixed by shaking them into water until almost all the water appears to have been filled, then stirring thoroughly. They will seem thick and sluggish when first mixed but flow better when agitated, so getting them into even small mould openings is not as hard as first appears if the mould is shaken or tapped while doing it.
Super Sculpey
The polymer clay Super Sculpey (a particular type from the Sculpey range) features, like Kapa-line foamboard, in just about every chapter of this book because it is so versatile. It has been used to make some of the prototypes in this chapter, but it can also be used as a press-casting material if the mould will allow it. Because it becomes very malleable without being sticky it can be pressed and squeezed into quite deep shapes moulded in plaster or hard silicone and eased out while still soft without too much damage to the shape. If this is difficult the clay can be heated while still in the mould to harden it, either by blasting it for a while with a heat gun or putting it and the mould in the oven at a low setting. A plaster mould will survive this and so will silicone rubber if it’s one of those designed to withstand soft metal casting, which the harder ones usually are.
Example 1: casting a chair using silicone rubber and resin
Because the components of the chair are very small, slender and with fine surface detail, only a good-quality silicone rubber will serve for the mould and only a resin will have the necessary strength when cast. The forms composing this chair are flat without any undercutting and the mould has to be stable to keep them in shape, so a relatively hard silicone was chosen. Silicones are differentiated by their Shore A hardness, the one here being 55 (the relative hardness of elastic materials such as rubber, soft plastics or silicone is determined by using an instrument called a Shore A durometer, which establishes the hardness of a material by the degree to which the durometer can pierce the material, which is then judged from 0 to 100). Softer silicones, which will flex to allow more undercutting, may be as little as 10 on the scale. The other reason for a hard silicone in this case is that excess resin will be wiped from the surface using the edge of a scraper and it needs to stay flat for this.
The process
The chair was first fully drawn up, with frontal, side and overhead views. Making the parts followed much the same layering process as described in Chapter 2, ‘Constructing’.
1. A flat material such as smooth card or PVC is chosen as a base. The chair components are then built up on it, in this case a first layer of 1mm PVC cut-outs, which are then clad with obeche wood, bringing them up to an appropriate scale thickness. Superglue has been used as an adhesive. Remember that casting will unify all materials into one, so it doesn’t matter what mixture of materials one starts with. The components can be kept quite close but, of course, not touching. Since silicone is expensive it makes sense to keep moulds to the minimum size possible. Obeche has been used to give the chairs a realistic sense of grain and this has been enhanced in places by scraping with coarse sandpaper. The silicone will pick up the fine detail of the wood grain and transfer this to the resin.
The prototype chair pieces stuck to a base of PVC.
2. It is very important, particularly with silicone, that all the components are secured flat on the base and that any gaps are sealed. Although silicone will appear to be a thick, sluggish liquid and quite the opposite of water, it will work its way into the finest of cracks before it sets. This property makes it ideal for reproducing fine detail, but it means you have to be stringent in containing it. The coat of vaseline will block it from creeping underneath in this case, but for any larger gaps a surer way is to fill with plasticine. The excess has to be scraped or smoothed away.
3. Vaseline (which can be found in any chemist) must be used as a sealant, otherwise the silicone would stick to the wooden parts. Not all prototypes need to be sealed when using silicone or Gelflex, but it’s necessary if the materials are porous. The coating should be as thin as possible otherwise the whole effect of the grain might be lost. A fine brush has been used in this case.
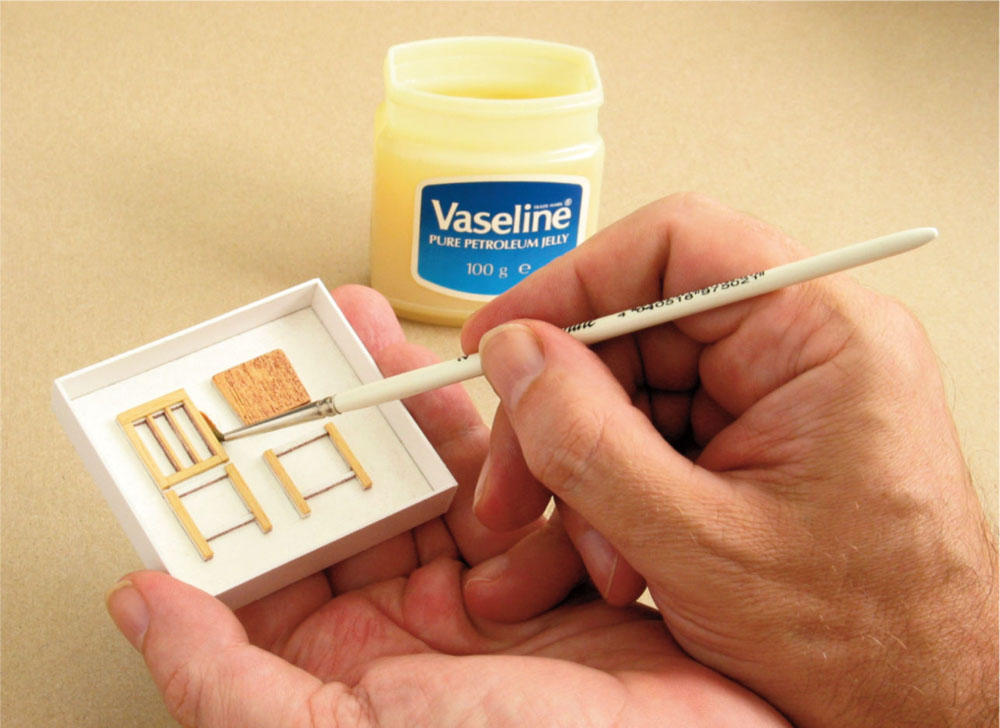
Brushing a thin barrier of vaseline on the prototype.
4. As already seen, a temporary wall has to be built around the forms to contain the silicone. In this case, these walls are strips of PVC attached with superglue. Cardboard and PVA would work just as well for something of this size if the base is also cardboard. Another method, which can be even quicker and more entertaining, is to use Lego bricks. The silicone won’t stick to them, they’re reusable, strong enough to withstand the weight with larger moulds and the corners are tightly sealed. It helps if the wall construction is tacked to the baseboard with small portions of double-sided tape or with strips of masking tape around the outside to keep it in place. Vaseline should also be smeared along the inside edge. The mould wall should obviously be built up to a level above the highest point of your prototype. It is best to allow at least 5mm extra when using a hard silicone, but 10mm for a soft one.
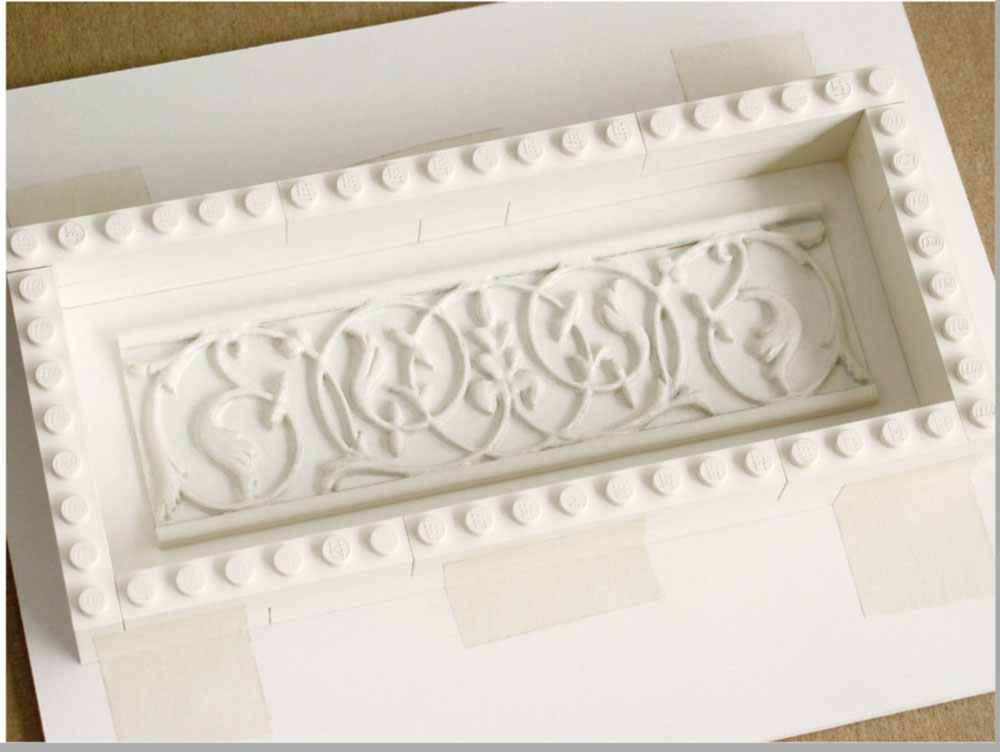
Lego used to make a mould wall. This doesn’t need to be stuck to the base as long as it’s perfectly flat; securing with masking tape around the outside should suffice.
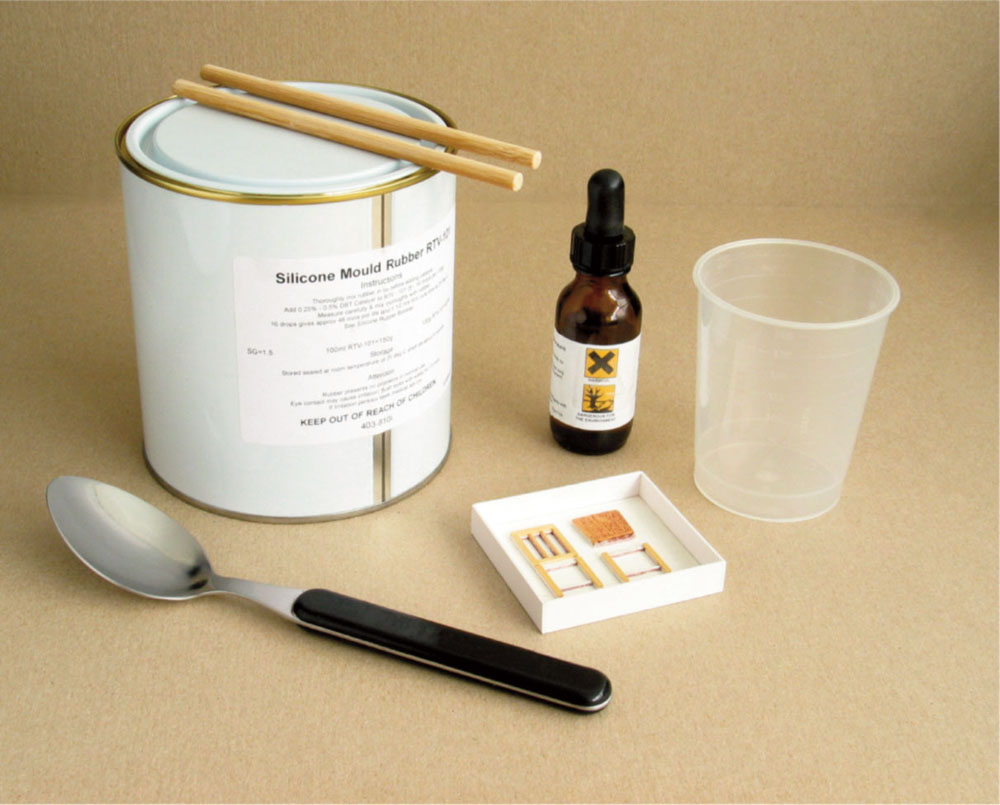
Preparing to make a mould, showing a tin of silicone with the catalyst, measuring beaker, mixing sticks, spoon and prepared prototype.
5. The moment has now come to mix the silicone. The type used here is called RTV 101 and was supplied by the specialist sculpture outlet, Tiranti. This can be a moment of slight anxiety at first, not being sure how things will turn out and not wishing to waste an expensive material, but if all the steps are covered there’s not a lot that can go wrong. The catalyst has to be dosed into the silicone as directed by the product information, but there is often quite a bit of leeway. Nowadays catalysts for silicone are usually supplied in dropper bottles and the directions are very clear as to how many drops are needed per 100ml of silicone (there is no need to dose by weight). In this case, the tin states that between eight to sixteen drops are needed per 100g of silicone (1g in weight will approximate 1ml in volume). It is advisable to aim for the middle. Less will mean a slightly longer ‘pot life’ (meaning the amount of time one has to work before the product starts setting) and often a longer overall setting time. More will have the opposite effect. The worst that could happen is that by adding too much catalyst each time you might run out of it.
You will need a calibrated beaker to measure the amount of silicone (available from suppliers of silicones or from craft shops). It is not a good idea to tip the can and pour the silicone into the beaker because this will lead to a mess. Using a large spoon and ladling the silicone like honey is preferable. This type of silicone has a long pot life so taking the time to make sure both components are thoroughly mixed is not a problem. Because the mixture can be quite viscous a strong spoon or thick wooden stick is needed. When mixing any form of synthetic compound it’s important that these are clean, because chemicals such as paint or varnish remaining from their last use could affect the curing process. Estimating how much silicone is needed to fill a particular area is simple. 1ml of the liquid will occupy 1 cubic centimetre space, so, for example, if the mould measures 10 × 10cm and has to be filled to a height of 1cm, 100ml of silicone is needed. The size of the prototype taking up space within that is minimal in this case and will not make much of a difference.
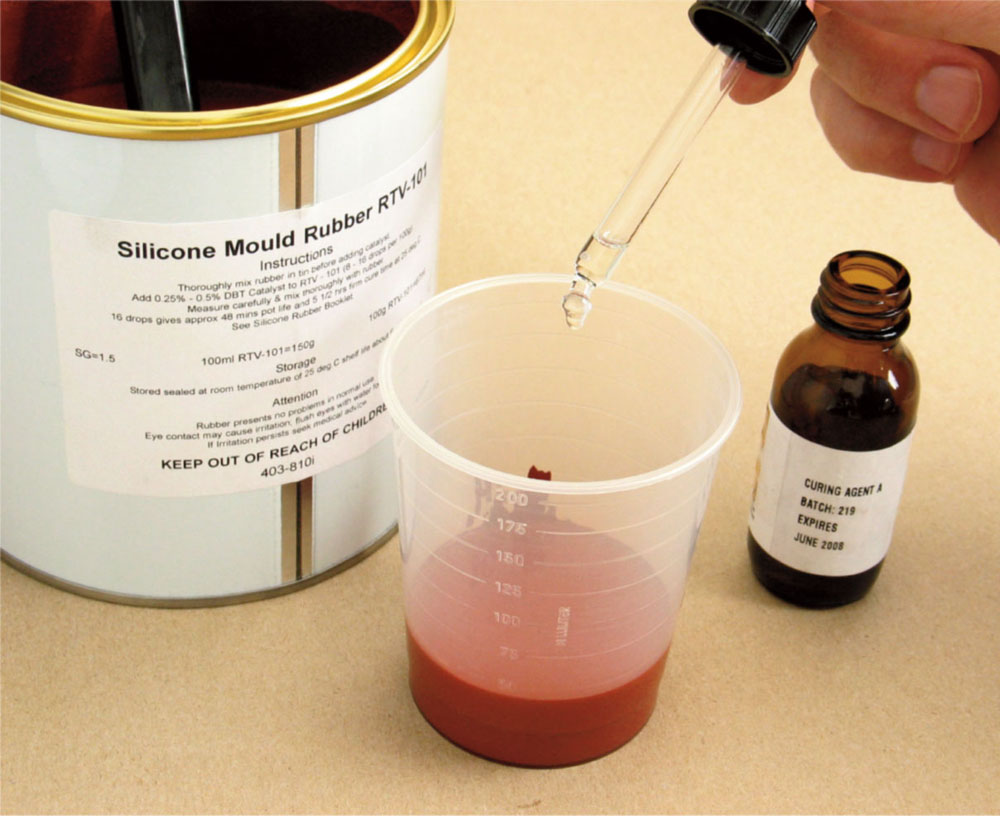
Adding catalyst to a measured amount of silicone.
6. There is no right or wrong way to pour silicone rubber (that is, whether one should pour from the centre outwards or otherwise), because it will remain a liquid for maybe a few hours and that will be ample time for any trapped air bubbles to rise to the surface. However, one could take the precaution of pouring just enough in to coat the form and leaving it for five minutes before pouring in the rest. Unless the deadline is tight, it’s always best to choose a silicone with a long curing time. When the mould is filled to the appropriate level, leave it overnight and it should be ready in the morning. When the surface is completely dry to the touch, it is usually ready for ‘de-moulding’. A word of caution is necessary here though. At times, for whatever reason, the exposed surface of the silicone may be hard while the underneath parts may still be curing. This shouldn’t normally happen, but it does occur from time to time. The mould walls should be dismantled and separated from the silicone block very carefully at first to check this. If the sides of the exposed block seem a lot softer than the top, the set-up should be left, preferably for another day, before separating the mould from the prototype.

Pouring the mixture onto the prototype.
7. The whole mould wall can now be dismantled and the silicone block eased off the prototype. Building this on a plastic base will have helped because this will flex to ease the parting. It is worth trying to preserve the prototype just in case another mould has to be made from it – if many duplicates need to be cast, having two or three moulds to use at once will obviously make the task much quicker.
8. Before filling with resin, the interior of the mould can be lightly brushed with vaseline. This is not strictly necessary between silicone and polyurethane resin, but it does help to make the mould last longer. Minute fragments of silicone will come away with each casting, making the mould more ragged each time. Using vaseline, or an appropriate mould release agent, can help to minimize this. It should be used very thinly to preserve the surface detail.
The resin can now be mixed. As before, use a small calibrated beaker, dosing out first a small measure of one part followed by an equal measure of the other. The parts of this chair will need only a miniscule amount, so mixing too much is unavoidable. It is always a good idea to think of another use for the excess, such as another larger mould if you have it. Mixing has to be done quickly because you may only have a few minutes to pour it before it starts to thicken. As before, always use something clean for this. Usually the two parts of the resin will have a slightly different colour and consistency, so stir just as long as is necessary for the mixture to become one clear colour (perhaps stirring for a few more seconds for good measure).
Next, drip just enough of the resin onto the mould so that it covers the forms, then, using the wire (or a cocktail stick), make sure that it has filled every part. Look for air bubbles which might be trapped in tight corners and tease them out. Then, just as quickly, take a smooth edge of plastic or metal and run it along the flat of the mould with just a little pressure. This should push excess resin to the side, leaving the parts to be cast filled only to the lip. The parts of the chair will therefore come out suitably flat and can be sanded if necessary.
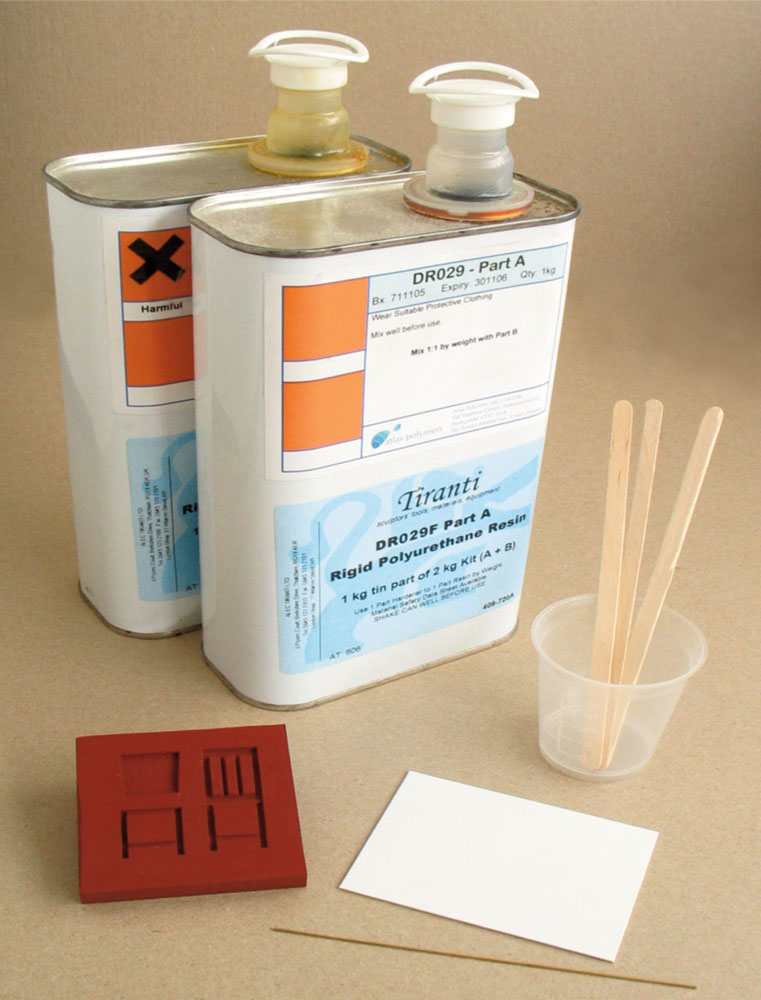
Preparing for casting, showing two-part polyurethane resin, a clean calibrated beaker and mixing sticks, mould, plastic scraper and wire.

The two resin parts are slightly different in colour, helping one to judge when they are mixed.
9. The resin used here is DRO 29 and is also supplied by Tiranti. This type starts clear, as we have seen (which is an advantage for locating air bubbles), but it sets off-white. As the resin starts to set, milky streaks will appear and from this point it will no longer be workable. Resin sets by means of a chemical reaction between the two parts and this generates heat. This will hardly be noticeable when mixing very small amounts, but the more resin mixed the hotter the mixture becomes. This also means that larger amounts of resin will start to harden at a quicker rate because the heat generated will accelerate the setting. If casting something like a block, the middle will set very quickly because the heat is concentrated there, while the edges will remain liquid. It may appear at first as if something has gone wrong, but one just needs to wait until each part has set. A good indication is to scrape the thin film of resin that may have been left on the mould surface. If this is no longer tacky and can be peeled off almost as a skin, the other parts are ready to be removed.
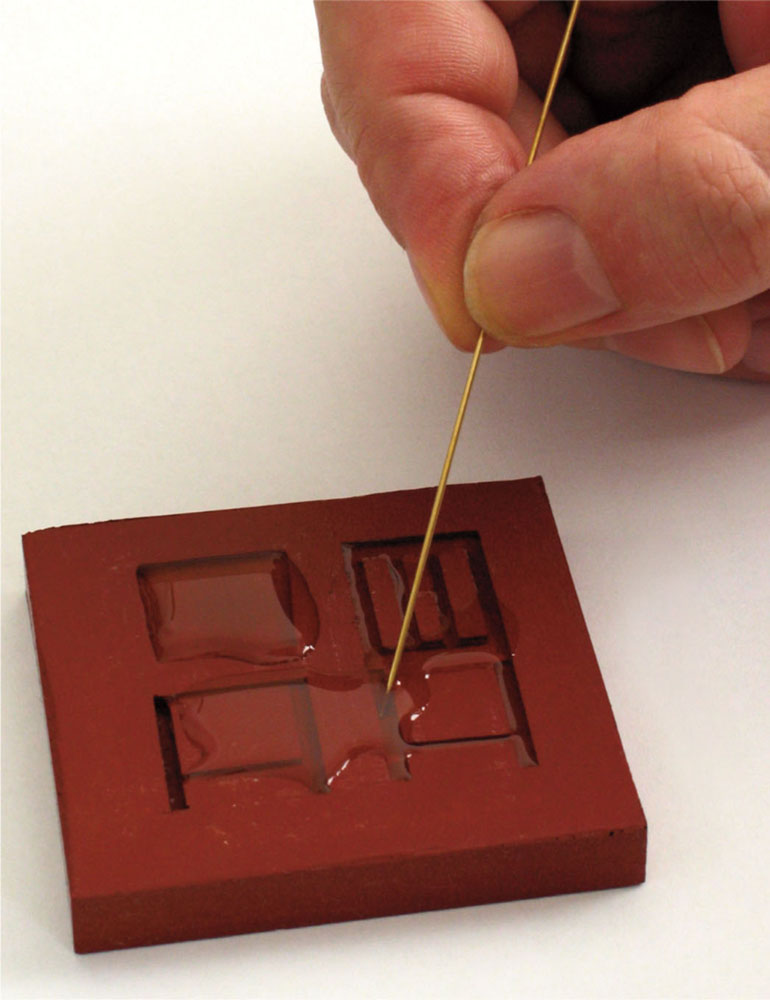
Air bubbles are quickly teased out using a piece of wire.

Excess resin is cleanly scraped away before setting starts.
10. One can choose to take a resin cast out of the mould while parts of it are still a bit rubbery, or it can be left there until the whole is more rigid. The advantage of the first approach is that unwanted edges are much easier to trim in this ‘green’ state before full hardening is completed. The pieces will bend as you prise them out, but the plastic already has a ‘memory’, meaning that the pieces are likely to straighten themselves out again if left flat. If, for example, you intend to use a flat casting, such as the ornamental strip to wrap round a column shape, this should be done while the plastic is still in this flexible state. Double-sided tape will hold the piece in place and it can be bound with masking tape for good measure. This will have to be left for at least a few days before the resin has totally set in this position.

Another example – casting panelled doors, showing the mould, castings and painted examples.
11. The line of completed chairs featured at the start were painted with matt Humbrol enamel (specially formulated for painting on plastic) and then either given a dark wash or skimmed with coloured pencil to emphasize the grain. Acrylic will also usually work.
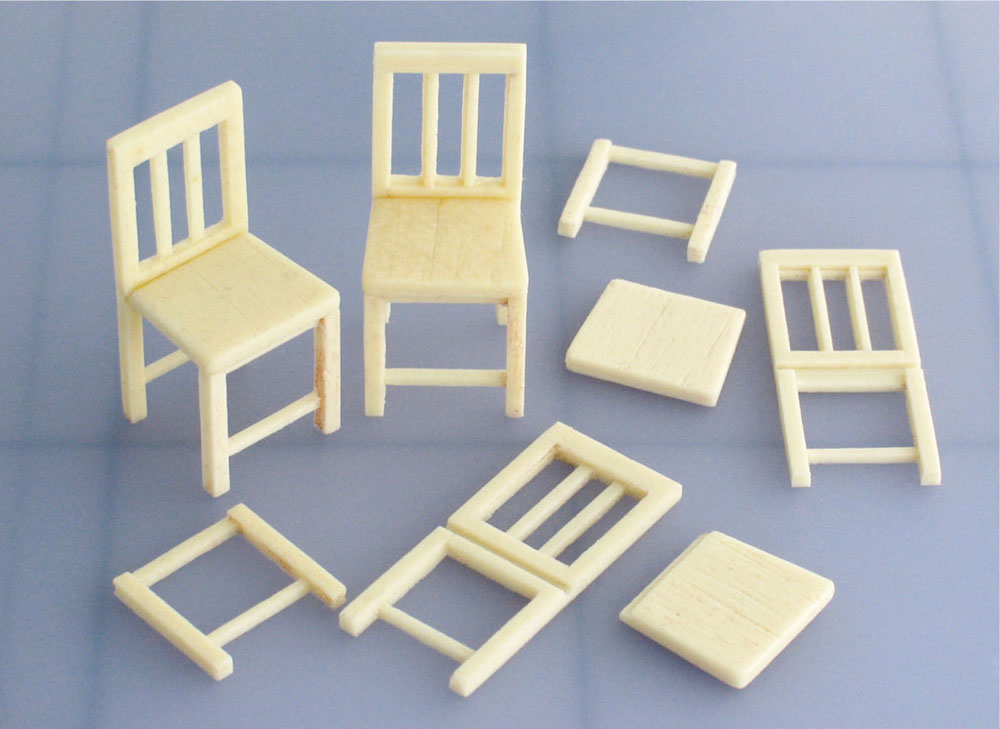
The chair components cast, trimmed and being assembled.
Example 2: casting rocks using Gelflex and plaster
The rock formation shown here is a more solid, robust form. Although silicone rubber and polyurethane resin would still be good choices for reproducing it, there are cheaper and quicker alternatives. Again, for this type of form only a simple one-part mould is needed, so the process will be very similar as for the previous example but the materials will be different.
Super Sculpey is the ideal choice for making the prototype for forms like this one which are rounded and have to be modelled rather than constructed. It is meant for baking in a domestic oven at around 130°C so it will withstand the hot Gelflex, hardening in the process. It is better though to harden it a little first before the mould is poured and to brush very lightly with vaseline to ensure that the Gelflex doesn’t stick to the polymer clay. More information on working with Sculpey can be found in Chapter 5, ‘Modelling’.
Because the form to be reproduced here has no slender parts, plaster can be used to make the casts. Standard plaster of Paris would just about be strong enough, but I have chosen a much harder, finer casting plaster. Although it costs a little more it is still a lot cheaper than using resin.

Sealing the bottom edge of the Sculpey form ready for moulding.
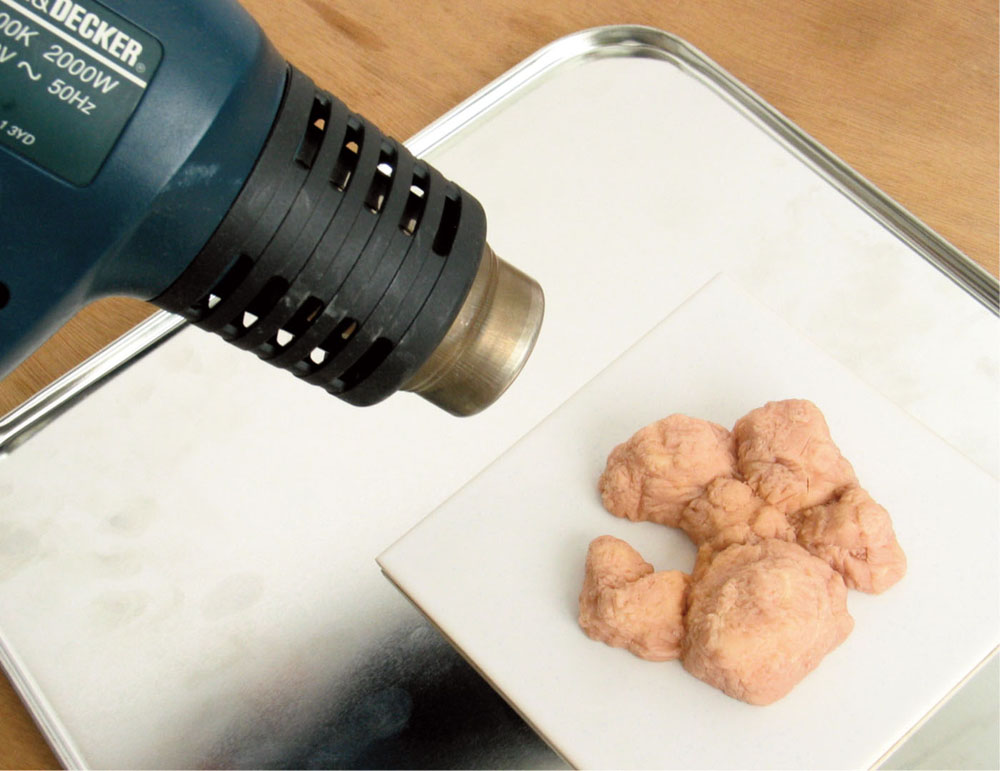
Hardening the surface using a heat gun.
The process
1. The form has been modelled in Super Sculpey on a ceramic tile. The methods for modelling it are explained in more detail in Chapter 5, ‘Modelling’. A tile has been used in this case because a base of cardboard or plastic would buckle with the heat.
2. When ready, the form has to be heated a little to harden it and the simplest way is to use a heat gun. This tool is similar to a hairdryer but a great deal hotter. The gun should be kept in motion over the work, no closer than about 10cm, for about half a minute for something of this size. The reason is just to make the surface a little tougher, not to bake the whole thing through, so it shouldn’t need very long. The alternative if you haven’t got a heat gun is to use a domestic oven, as directed on the product. Both form and tile are put in the centre of a preheated oven for about ten minutes. If, after removing from the oven and cooling, 5. the Sculpey form detaches itself from the tile it should be tacked down again with double-sided tape. As little air as possible should be trapped underneath the form, because this will expand under the hot Gelflex and pepper the mould with air bubbles as it cools. For this reason, the edge of the form was sealed again with fresh Sculpey. This small amount doesn’t need to be hardened. Care was taken to remove any excess and to make the seal as smooth as possible.
3. A film of vaseline can then be brushed very lightly over the surface, trying not to obscure any finer details. This is a precaution, which is not always necessary because Gelflex will normally release itself from anything smooth, but it may help.

Covering with a thin coat of vaseline. A low wall of bricks at this point allows for easier access.
4. Gelflex will also need a mould wall to contain it and Lego can be used in the same way (see step 4 in Example 1). There will be some sticking of the Gelflex to the plastic because it slightly melts the surface but not enough to cause a problem.
5. The Gelflex can be heated up while doing this, but it needs to be watched and stirred constantly. Special heaters, similar to those used in batik for melting wax, are available but these are expensive instruments. With care, a normal saucepan can be used on a controllable heat source such as a small electric hotplate. A milk saucepan is ideal because it will have a pouring lip. Gelflex can be cut into smaller portions with a strong knife. It may seem logical to cut it into very small cubes to melt faster but this hardly makes a difference. What counts is the contact between the Gelflex and the bottom of the saucepan. As it melts it should be moved around constantly, preferably with the other end of a wooden spoon. This type of blue Gelflex, which is the harder of two varieties, will turn slightly green when it overheats and this should be avoided by constant stirring. The pan should also be taken off the heat momentarily if this happens.
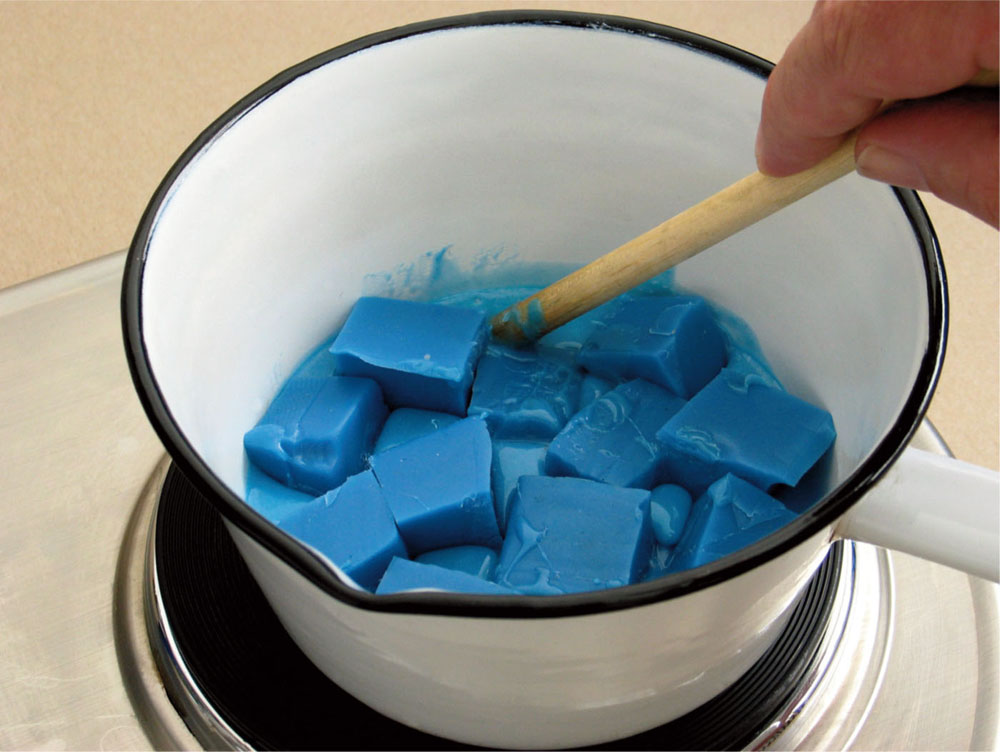
Gelflex being melted in the pan. This needs to be carefully watched and stirred constantly.
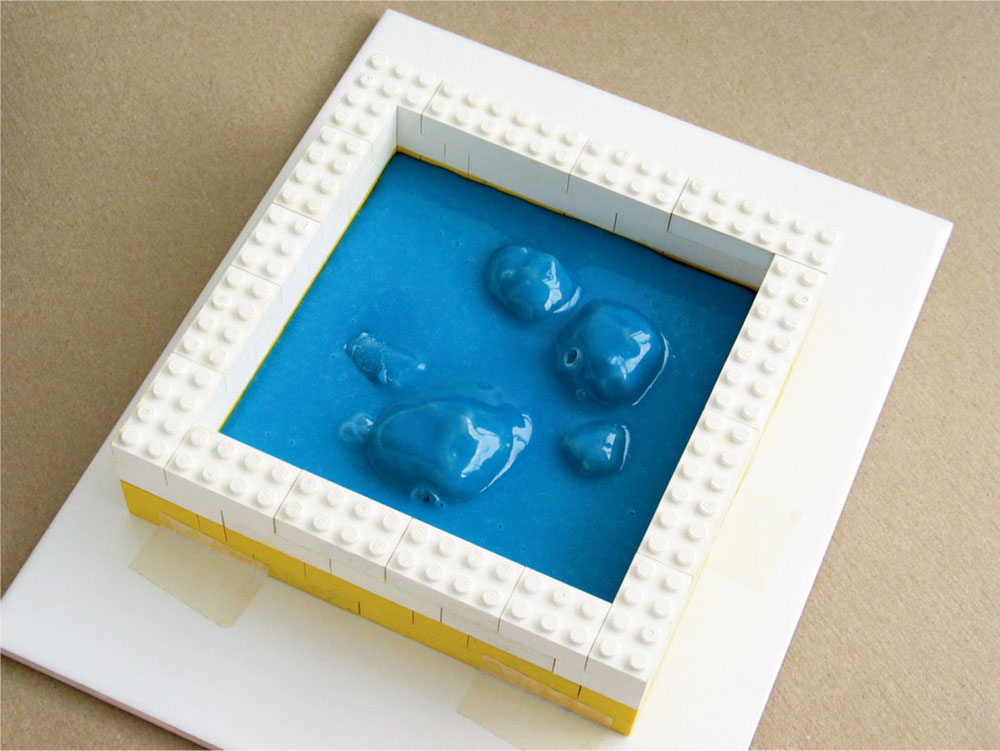
6. When the Gelflex is thoroughly liquid one should turn off the heat and wait for a little while, still stirring constantly, before pouring. This is because Gelflex will melt at 150°C but should be poured at 140°, as recommended in the directions for use. Pouring should be done quickly, which is different from the method used with silicone. This is because Gelflex will immediately start setting on contact with the cold prototype and will not work its way into detail in the same way as silicone. It is really only suitable for forms that have a minimum of surface detail or where absolute accuracy may not matter, as is the case here. In this case, the pouring was done in two stages, which proved effective. The first was to make sure that if any air was going to force itself from underneath (expanding with the heat), it would have a chance of escape. Gelflex can be poured in layers, the next melting and fusing with the previous if it is hot enough. Once the mould has cooled (which may take an hour for a block of this size), it can be removed and made ready for the plaster.
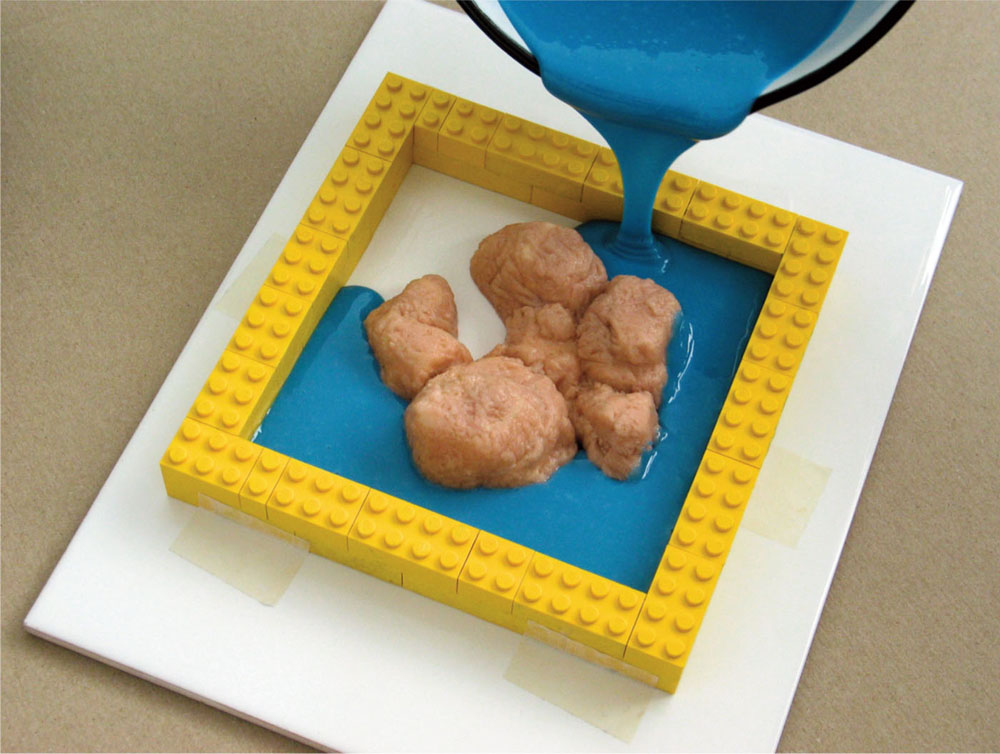
Making the first pour to surround the form.
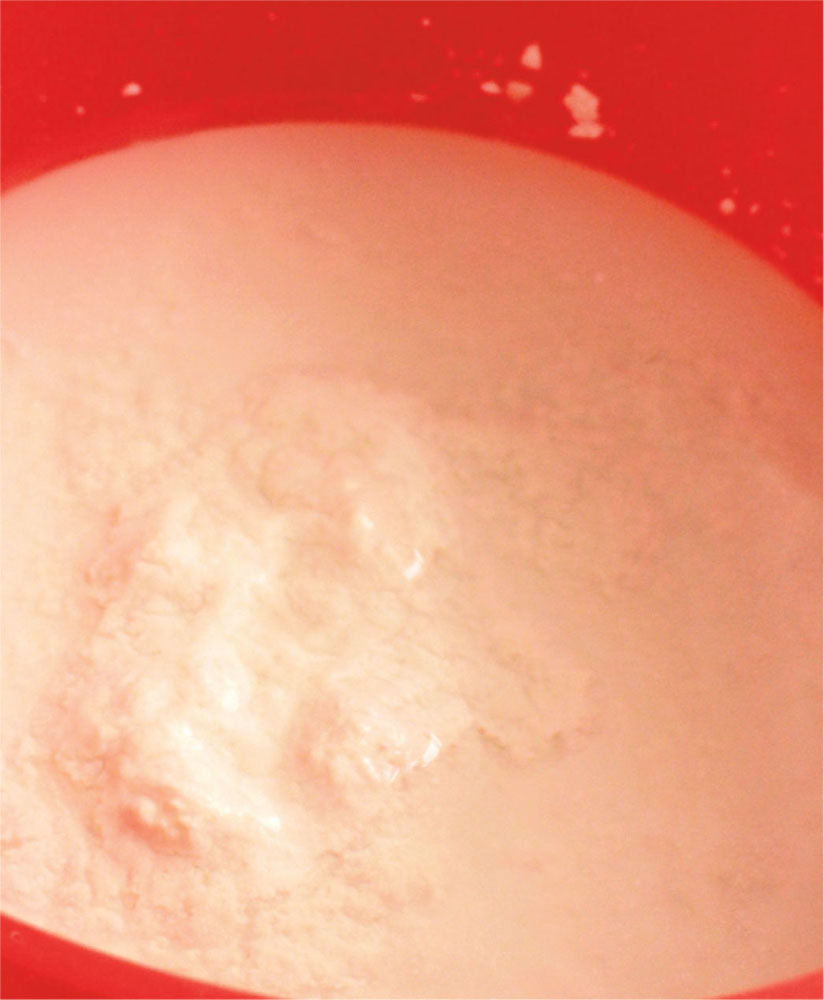
7. First some water is put into a container. The rubber mixing cups sold in decorating shops make the best containers because the top can be squeezed together to make a spout when pouring. Instead of having to clean them afterwards, the remaining plaster can be left to dry and cracked off. It is always better to dispose of unused plaster like this anyway, because flushing wet plaster down the sink could eventually clog the pipes. Estimating the amount of water one should start with to reach the right amount of plaster needed is never easy, but one can usually assume that the volume will increase by about the same again once the plaster is added. In this case a fine, hard casting plaster called Basic Alpha was used. It is always a good idea to sift the plaster first with a spoon to break up its compactness if it has been lying around for a while. The plaster can then be sprinkled steadily into the water, allowing it to absorb the water as it sinks. This should be continued until the water appears mostly filled with plaster, barring the top surface. It should then be thoroughly stirred until the mixture is even, knocking the pot a few times while doing this to help trapped air to escape. It is best to err on the thick side when mixing plaster rather than making it too thin.
Even if it appears at first too thick to pour it will loosen and flow better when agitated, whereas if it is too thin the cast could be quite weak. Stirring can provide a good indication. If you stir it with a little vigour and the mixture continues moving a little after you’ve stopped it is definitely too thin. Adding more plaster to a mix already stirred usually results in lumps and it may be better to start again. Incidentally, although the ‘by eye’ method is usually the simplest, most plasters come with directions stating the optimal plaster/water ratio if this fails to work.
After the plaster has been poured into the mould it should be tapped again to help air bubbles rise to the surface. Basic Alpha can be ‘de-moulded’ in as little as twenty minutes. The plaster will still be setting but will already be strong enough to be taken out.
The mould can be poured in stages.
A good plaster/water ratio is usually obtained by continuing to sprinkle plaster into the water until the water appears almost filled.
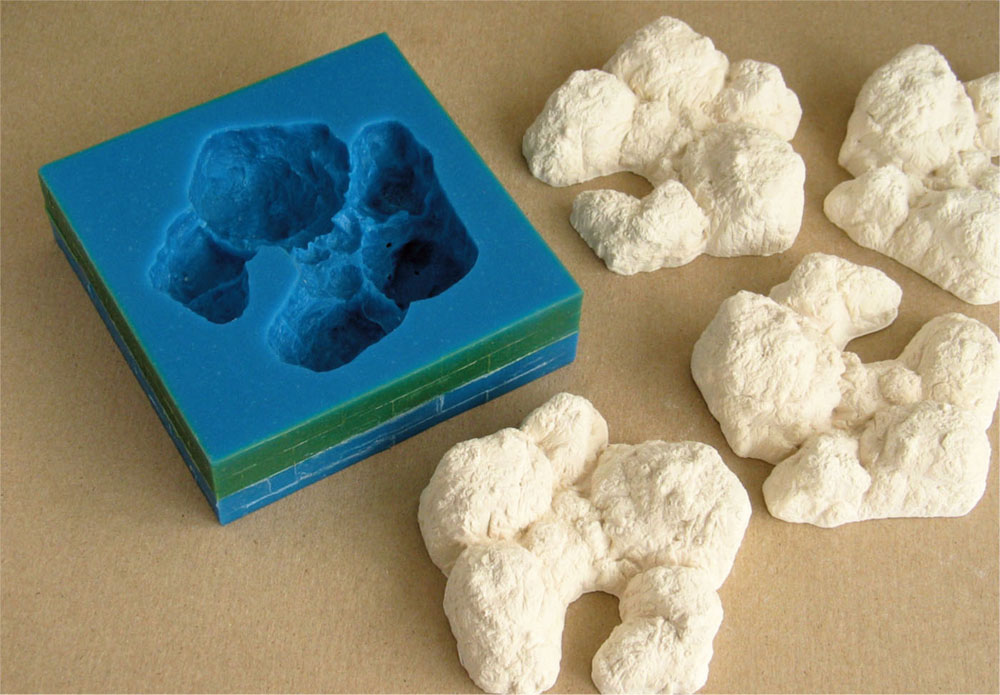
The Gelflex mould together with unpainted castings.
Example 3: a two-part mould
So far, relatively simple forms have been considered which have included at least one flat side. Only simple one-part moulds were necessary for these. For the slightly more involved process of making a two-part mould for a form seen from both sides, there are a number of good books which can provide more detail, but the basics are outlined here.