Chapter 5 Styling a Recipe Book
Chapter Objectives
Chapter Learning Objectives
Style text with a gradient.
Apply corner options to frames.
Import text from other file formats.
Format text with styles.
Import text from other applications.
Create and format tables.
Create table and cell styles.
Create a table of contents.
Chapter ACA Objectives
For full descriptions of the objectives, see the table on pages 270–276.
DOMAIN 2.0
PROJECT SETUP AND INTERFACE
2.1, 2.4, 2.5
DOMAIN 4.0
CREATING AND MODIFYING DOCUMENT ELEMENTS
4.2, 4.3, 4.4, 4.5, 4.6, 4.7, 4.8
You are becoming a seasoned InDesign user, so the project for this chapter focuses on learning to work smarter instead of harder. You will learn how to import text from other documents and quickly format it with paragraph and character styles. You’ll format objects with object styles so you no longer need to write down all the settings, such as those for effects, in order to apply them to another object. Using tables, you’ll format text in table format. Finally, you’ll create a table of contents. All these new skills add up to make longer, more complex documents easier to build.
Setting Up the Recipe Book
![]() ACA Objective 2.1
ACA Objective 2.1
![]() Video 5.1
Video 5.1
Introducing the Recipe Book Project
![]() Video 5.2
Video 5.2
Setting Up the Project File
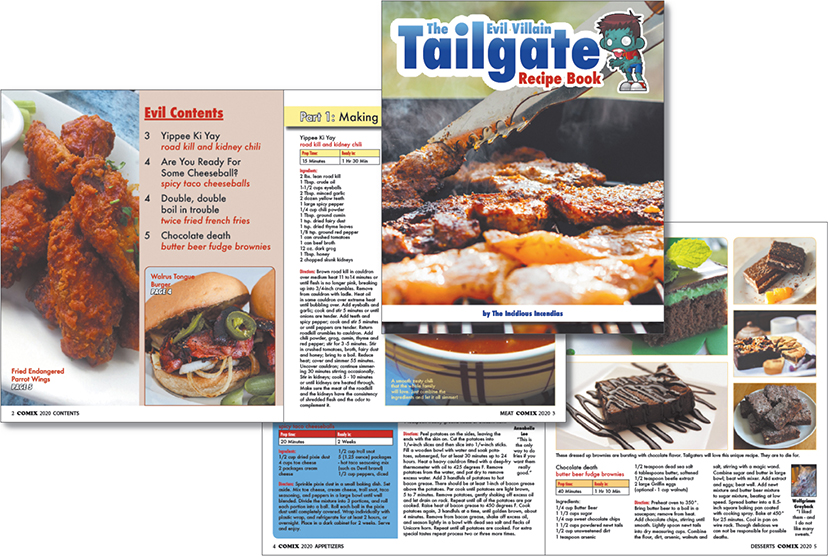
InDesign allows you to create beautiful artwork, pages, and designs. By using master pages and styles, you can create beautiful designs faster and more efficiently. The theme for this chapter is to teach you skills that make the production side of design easier. You already learned a little about styles in the magazine cover project (Chapter 4), but in this chapter you’ll really put them to work. With the help of styles, formatting text, tables, and objects becomes quick and easy, so you can spend more time on graphic design (Figure 5.1).
Note
This chapter supports the project created in Video Lesson 5. Go to the Project 5 page in the book’s Web Edition to watch the entire lesson from beginning to end. Please refer to Appendix C, “Adjusting Master Pages,” for detailed steps on the process demonstrated in Video 5.2.
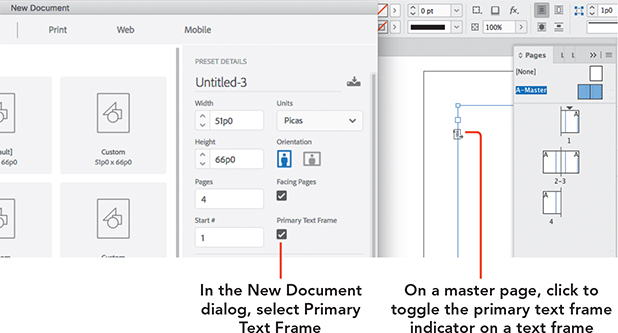
Create, set up, and save the new document the same way you have in earlier chapters, but this time use the New Document dialog settings described in Video 5.2, including setting up the master pages. Then customize the cover page as shown in Video 5.3.
Deleting Unused Color Swatches
![]() Video 5.3
Video 5.3
Adding an Image & Creating Swatches
In Video 5.3, unused color swatches are removed from the document using the Delete Selected Swatch/Groups button in the Swatches panel (Figure 5.2).
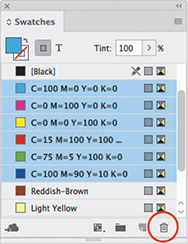
When you delete color swatches that are applied to objects, InDesign doesn’t leave those objects without any color applied. Instead, you can choose what color is applied to those objects (Figure 5.3):
If you’d like objects to take on another existing swatch, select Defined Swatch and then choose a swatch from the Defined Swatch menu.
If you’d like objects to keep their colors, choose Unnamed Swatch. This allows objects to keep the colors they’re using, but without using named swatches.
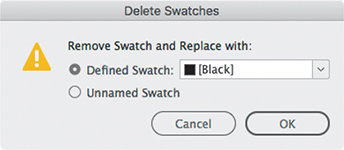
Figure 5.3 Delete Swatches dialog
The second option is better if you’ve selected multiple colors that are applied to objects and you don’t want to apply the same color to all the objects.
Styling Text with Gradient Swatches
![]() ACA Objective 2.5
ACA Objective 2.5
![]() Video 5.4
Video 5.4
Adding Title Text and Effects
In Chapter 2, you were introduced to gradients and working with the Gradient panel. Gradients are blends between two or more different colors or shades. For text set in larger font sizes, such as a book title, styling text with a gradient can help draw attention to it.
Tip
You can create a gradient from the Swatches panel menu by choosing New Gradient Swatch.
Earlier you applied a gradient to a frame, but you can also apply a gradient to all or some of the text in a text frame. To apply a gradient to text (Figure 5.4):
Do one of the following:
To affect all text in the frame, use the Selection tool to click the text frame.
To affect a range of characters, use the Type tool to select the text you want to edit.
Click the Fill box or the Stroke box in the Swatches panel or Control panel, and click the Formatting Affects Text icon.
Select the gradient swatch in the Swatches panel.
To adjust the gradient, open the Gradient panel and set the options as needed.
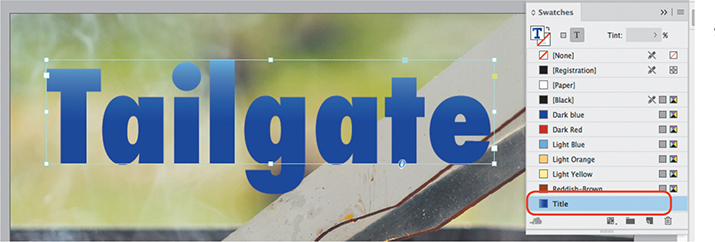
Figure 5.4 Applying a gradient fill to all the text in a text frame
When you want to apply or edit a gradient applied to text, keep the following in mind:
Avoid applying a gradient to small body text, because that makes small text harder to read. It’s best to apply gradients to large display text (headings and titles), especially those with thick character shapes.
To edit a gradient applied to text, remember to select that text before changing gradient settings. If a gradient is applied to only some text in a frame, you’ll need to select that text with the Type tool before editing the gradient settings.
If you want to change only the angle of an applied gradient, you don’t have to open the Gradient panel. Instead, drag the Gradient tool over the selected text at the angle you want. You will need to use the Gradient panel if you want to enter a specific value for the angle, such as 36 degrees.
As with colors, when you edit a gradient applied to a selected text frame, remember to select the Formatting Affects Text icon to make sure your edit will affect the text and not the containing frame.
 ACA Objective 4.2
Aligning Text Vertically in a Frame
![]() Video 5.5
Video 5.5
Finishing the Front Cover
You’ve already learned how to apply centered alignment to a paragraph. But how can you center text vertically in one step? You can do that using the Text Frame Options dialog.
To center text vertically in a frame (Figure 5.5):
Use the Selection tool to select a text frame.
Choose Object > Text Frame Options.
In the Vertical Justification section, select Center from the Align menu.
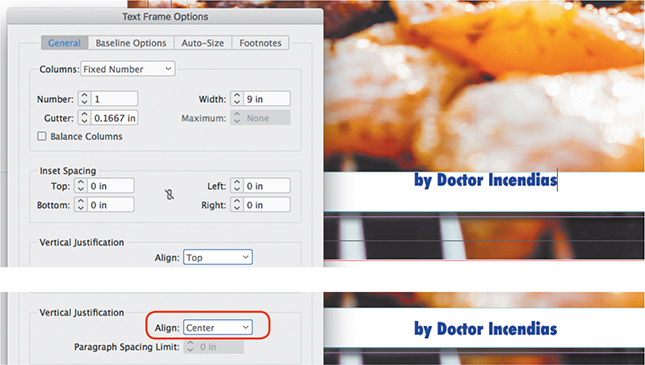
Figure 5.5 Vertically center text in a frame by choosing the Center option in the Text Frame Options dialog.
Note
Horizontal alignment is in the Paragraph panel because it’s a paragraph attribute, whereas vertical alignment is in the Text Frame Options dialog because it’s a text frame attribute.
Styling Corners
![]() ACA Objective 4.4
ACA Objective 4.4
![]() Video 5.6
Video 5.6
Adding Master Pages, Images, and Object Styles
Corner options enable you to change the appearance of design elements that contain sharp corners, such as rectangles, polygons, or starbursts. For instance, you can round those sharp corners, as demonstrated in the recipe book project.
Applying Corner Options
To apply corner options:
Select the design element with the Selection tool.
Choose Object > Corner Options.
If you want all corners to use the same settings, click the Make All Settings the Same icon
 to select it. For this example from the cookbook, the icon is off because the upper-left and upper-right corners are set differently than the rest (Figure 5.6).
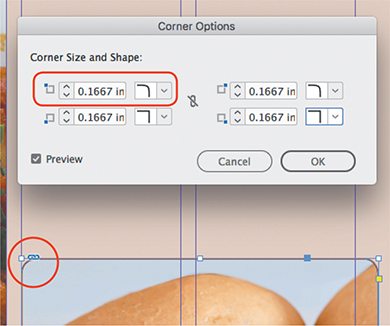
Figure 5.6 Applying rounded corners to the top corners Enter the Corner Size amount, and select an option from the Shape menu. Select Preview to see the changes, and click OK when you’re satisfied.
Working in Live Corner Mode
In the previous examples, you adjusted corner options by entering settings in the Corner Options dialog. Live Corner mode allows you to adjust the corner options with the mouse.
To edit corner options in Live Corner mode (Figure 5.7):
If necessary, choose View > Extras > Show Live Corner.
Using the Selection tool, select the frame. In Live Corner mode, a small yellow box appears in the upper-right corner of the frame’s edge.
Click the yellow box, and drag the yellow diamonds inward to change the corner size.
To change the corner radius, drag the diamond.
To adjust an individual corner, Shift-drag the diamond.
To change the shape of the corners, Alt-click (Windows) or Option-click (macOS) a diamond. Note that this changes all of the corners.
To change the shape of an individual corner, Shift-Alt-click (Windows) or Shift-Option-click (macOS) a diamond.
Click outside the frame to exit Live Corner mode.
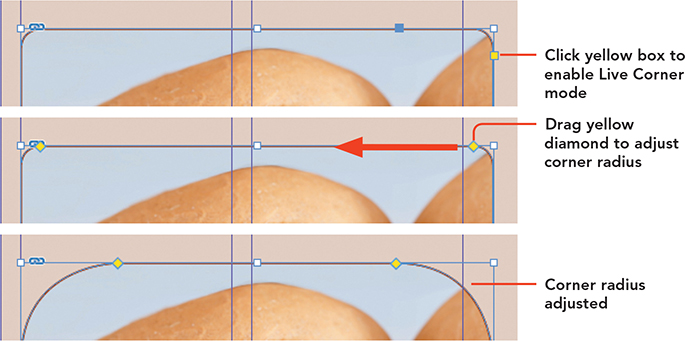
Figure 5.7 Editing corner shape and size in Live Corner mode
Formatting Faster with Styles
![]() ACA Objective 4.6
ACA Objective 4.6
![]() Video 5.7
Video 5.7
Adding Text and Images to the Recipe Pages
![]() Video 5.8
Video 5.8
Using Character and Paragraph Styles to Refine the Layout
You’ve had some practice creating and applying paragraph and character styles, and in Video 5.6 you’re introduced to object styles. By now you have hopefully noticed that in InDesign, a style is simply a way to let you apply a specific named combination of formatting settings in one click. But how do you manage and take full advantage of styles?
Deciding to Use Styles
![]() Video 5.9
Video 5.9
Applying Character and Paragraph Styles
You probably noticed that saving a combination of settings as a style takes longer than just applying those settings. That overhead of time and effort might make you ask: When is it worth using styles? The answer is that it’s worth using styles when you would answer yes to at least one of the following questions:
Does a particular format involve a specific combination of many options to set? Applying a style in one click is obviously faster than locating and correctly applying several options that might be spread across multiple panels. And you don’t have to remember the exact specifications for each format in your design, because a style remembers the settings completely and exactly.
Will you apply the same formatting settings to many instances throughout the document? The longer the document, the more time styles save when you can apply one-click formatting. And when formatting needs to be updated, styles save time again, because instead of having to hunt down every instance of a specific combination of settings, you simply edit the style and every applied instance updates to match the new style definition. For example, if you created and applied a style to all the section headings in a 500-page book, it would take you just a few seconds to change the font size from 12 points to 14 points for every heading across all 500 pages, simply by editing the style you applied to the headings.
Will the document be exported to a structured format such as CSS (such as a web or EPUB document) or XMP? Because a style tags (marks) an object or selected text, you can use styles to apply structure that can be translated to a structured document format.
If you answered yes to any of those questions, the time saved by using styles will far outweigh the time you spend setting up styles. Styles help you apply complex formatting faster, maintain design consistency and reduce formatting mistakes, and contribute to production speed and efficiency.
Understanding Style Types
This is a good time to review the different types of styles you’ve encountered so far, and their intended uses:
Paragraph styles format text at the paragraph level, so a paragraph style always affects an entire paragraph even if you selected only one word or simply clicked an insertion point in a paragraph (Figure 5.8). A paragraph style applies up to the next return character or the end of a text story (whichever comes first), so a paragraph style will continue across line break characters that aren’t paragraph return characters.
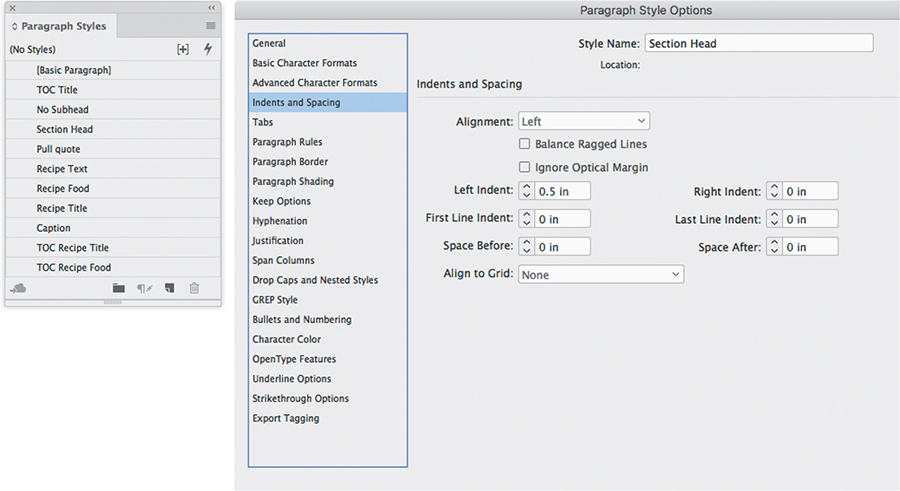
Figure 5.8 Paragraph styles listed in the Paragraph Styles panel, and options you can include when you create or edit a paragraph style Character styles format one or more characters of text (Figure 5.9). The main reason to use a character style is when you need to format text that’s shorter than a paragraph, such as formatting important names with a blue fill color. Expect to use character styles much less often than paragraph styles, because paragraph styles can handle most general text formatting needs—such as your overall document type specifications, spacing between paragraphs, indents, and differentiating common text elements such as titles, headings, body text, page numbers, and lists.
Note
Don’t apply a character style to an entire paragraph; there’s no advantage to that. If an entire paragraph requires the same formatting, it’s better to define and apply a paragraph style. Character styles are for ranges of text shorter than a paragraph.
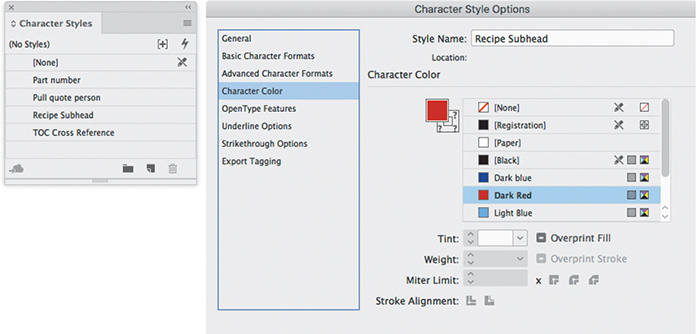
Figure 5.9 Character styles listed in the Character Styles panel, and options you can include when you create or edit a character style Object styles format the graphics attributes of any selected objects, such as corner options, fill and stroke options, and effects such as drop shadows. When applied to a frame, an object style can affect the frame and the content inside the frame (such as text) (Figure 5.10).
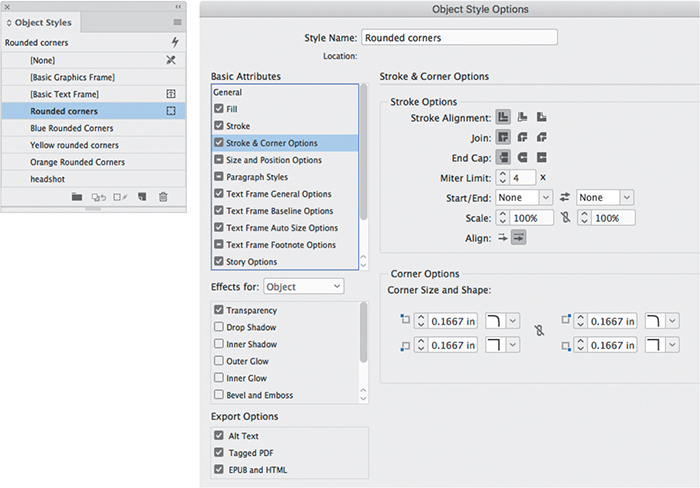
Figure 5.10 Object styles listed in the Object Styles panel, and options you can include when you create or edit an object style Table styles format the components of a table, such as the appearance of header, footer, and body rows; columns; and the border around a table (Figure 5.11). You will see table styles used later in this chapter.
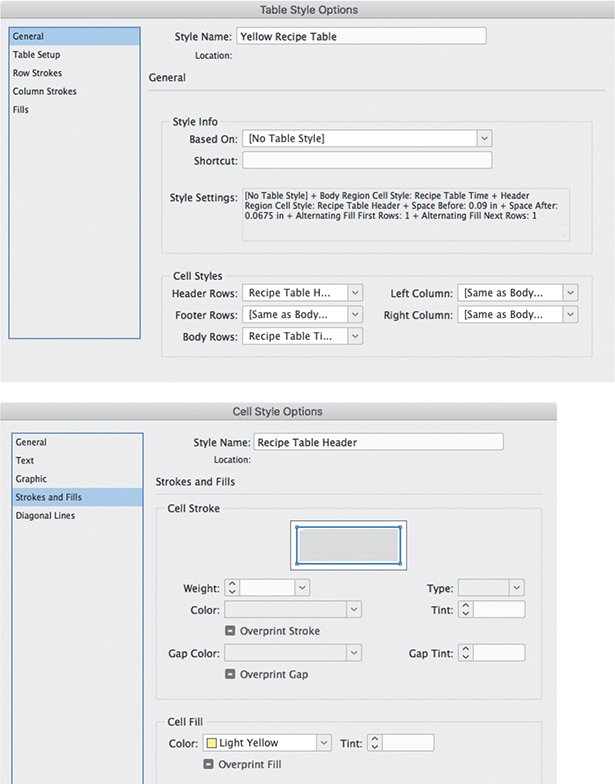
Figure 5.11 Options you can include in table styles and cell styles Cell styles format the graphics attributes of a selected table cell as well as the text attributes of text in the cell. You will see cell styles used later in this chapter.
Using Styles
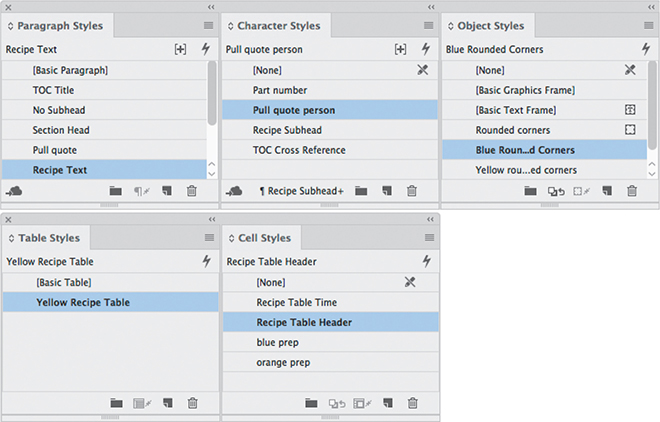
Styles generally work the same way whether you are applying a paragraph style, a character style, an object style, or as you’ll soon see, a table or cell style (Figure 5.12). The only differences you’ll encounter are related to the natural differences among text, objects, and tables. For example, a paragraph style can include a font setting because paragraph styles are for text; an object style naturally doesn’t have a font setting, but it can have a frame fitting option, because an object style can be applied to a frame.
Tip
If you have experience using Cascading Style Sheets (CSS) for web design, you already have a sense of how InDesign styles work. Many of the principles and concepts are similar.
Creating a Style
You can create a style in two ways: Jump in and start setting options, or select something that is already formatted in the way you want and base the style on that. Because design is exploratory and iterative, chances are you’ll usually create your styles the second way. After experimenting and trying out different design ideas, you’ll produce a nice example that you can then use as the basis to define a style.
To create a new style based on a formatted object:
Select the object or text. For a paragraph, use the Type tool to click anywhere within the paragraph.
In the panel for the type of style you’re creating, Alt-click (Windows) or Option-click (macOS) the Create New Style button at the bottom of the panel (Figure 5.13).
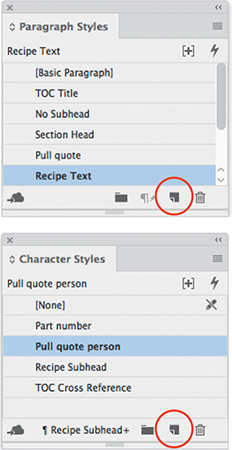
Figure 5.13 The Create New Style button in two different style panels The reason for adding the Alt or Option key is that it opens a dialog in which you can name the style and adjust its settings right away. If you don’t add the Alt or Option key, a new style is added to the panel using a default name that requires an extra step to rename, and if you want to edit the style you have to then double-click its name in the panel.
For Name, enter a descriptive name for the style.
Select Apply Style to Selection to ensure that the paragraph style you are creating is also applied to the object you selected in step 1. (Apply Style to Selection may not be available for all style types.)
Deselect Add to CC Library, and click OK.
Applying a Style
After you create a style, it’s immediately available for you to start formatting design elements instantly.
To apply a style:
Select the object or text you want to format. For a paragraph, use the Type tool to click anywhere within the paragraph.
In the panel containing the style you want, click the style name in the list.
Updating a Style
Design is an iterative process, so it’s natural to want to refine styles as you work on a document. It’s easy to edit a style, and once you do, all of the applied instances of that style are updated right away.
To edit a style:
In the panel containing the style, double-click the style name, change the settings in the style options dialog, and click OK.
Sometimes you override a style (apply formatting that isn’t part of the style definition) and you realize that the override looks better than the style. (See “Overriding a Style” later in this chapter.) Instead of having to remember what you did so that you can edit the style to match, in one step you can simply redefine the style to include the current overrides.
To redefine a style:
Select the text or object that contains a style override.
In the panel for that style, the style should be selected, and the style panel should indicate the override for that style with a plus sign (+).
Choose Redefine Style from the panel menu (Figure 5.14) for that style type (such as the Paragraph Style panel menu or the Object Style panel menu).
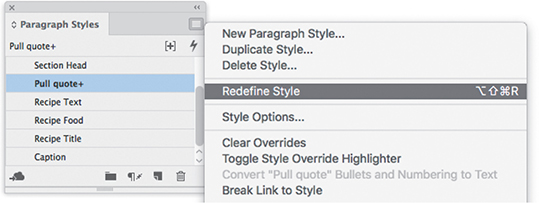
Figure 5.14 Updating a style definition based on an override
Deleting a Style
You can delete a style in the same way that you’ve deleted items in lists in other panels.
To delete a style:
In the panel containing the style, select the style and click the Delete Selected Style/Groups button, or drag the style to that button (Figure 5.15).
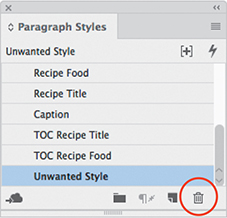
Figure 5.15 Delete Selected Style/Groups button In the dialog that appears, select another style (or None) from the And Replace With menu. This determines how objects should be reformatted after you delete a style that was applied to them.
Click OK.
Tip
To keep the current object settings when deleting an object style that is applied to design elements, choose [None] as the replacement style and select Preserve Formatting in the Delete Object Style dialog.
Common Style Options
Some useful style options are available to you in most or all of the style types available in InDesign.
Basing One Style on Another
One style can be based on another to save time and reduce complexity. For example, the only difference between a body text paragraph style and a bullet list paragraph style might be the indents and the bullet character; they otherwise share all other attribute settings, such as font, size, and leading. You can define all of those attributes in the body text style, and then instead of starting from scratch to define the bullet list style, start by basing the bullet list style on the body text style using the Based On option (Figure 5.16). Then the only settings for you to change in the bullet list style would be the indents and the bullet character.

Using a Style as Part of Another Style
Some styles can be used as part of other styles. You’ve already seen how a character style can be used as part of a paragraph style, in the Drop Caps and Nested Styles panel in the Paragraph Styles dialog. Later in this chapter you’ll work with table styles and table cell styles, and in those, a paragraph style can be used as part of a cell style definition, and a cell style can be used as part of a table style definition.
Overriding a Style
You should be using a style for any group of formatting options that you’ll use multiple times in a document. But when you want to apply a slight variation on a style and you’ll use that variation only once in a document, there’s usually no need to create a style for that. You can just apply the closest style and then manually apply the formatting that’s different. The style panel will display a plus sign (+) next to the style name (Figure 5.17), showing that there’s an override applied to the style.
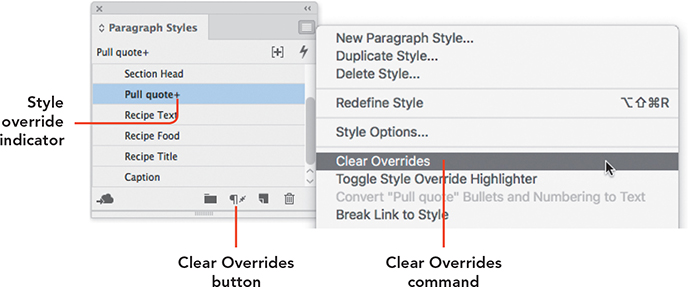
You can remove overrides that are applied to a styled text or object to make them conform exactly to the applied style. Some style panels have a Clear Overrides button ![]() ; otherwise, there is a Clear Overrides command on the style panel menu.
; otherwise, there is a Clear Overrides command on the style panel menu.
Tip
Here’s a shortcut for clearing overrides: With the object or text with the overrides selected, Alt-click (Windows) or Option-click (macOS) a style name. You’ll see the plus sign disappear from the style name in its panel.
Grouping Styles
In some list panels, such as the Swatches panel, you can organize items by grouping them. In those panels, groups appear as folder icons. You can group styles too.
To group styles:
In a style panel, click the Create New Style Group button (Figure 5.18), or choose Create New Style Group from the panel menu.
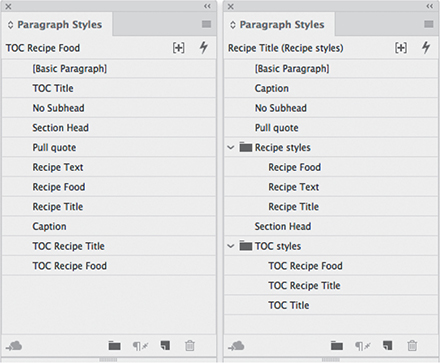
Figure 5.18 Before and after using groups to organize a long list of styles Drag any style names from the list and drop them into the new style group.
Double-click the style group name, edit the name, and then press Enter or Return.
Tip
To name a style group when you create it, Alt-click (Windows) or Option-click (macOS) the Create New Style Group button.
Controlling How Object Styles Affect Existing Formatting
In the Object Style Options dialog, each option has next to it a check box (Figure 5.19) that controls whether that formatting attribute will alter the selected object when you apply the style:
A check mark means the attribute will be applied to the object using the settings in the style. For example, if you apply an object style where the fill color is set to blue and it’s checked, when you apply the style to objects their fill color will always be set to blue whether they have a fill or not.
A dash means that the existing object settings for that attribute will be left unchanged. For example, if you apply the style example above to a rectangle that already has a fill, the style will not change the existing fill setting.
An empty box means the attribute settings will be removed from the object (such as setting Drop Shadow to None).
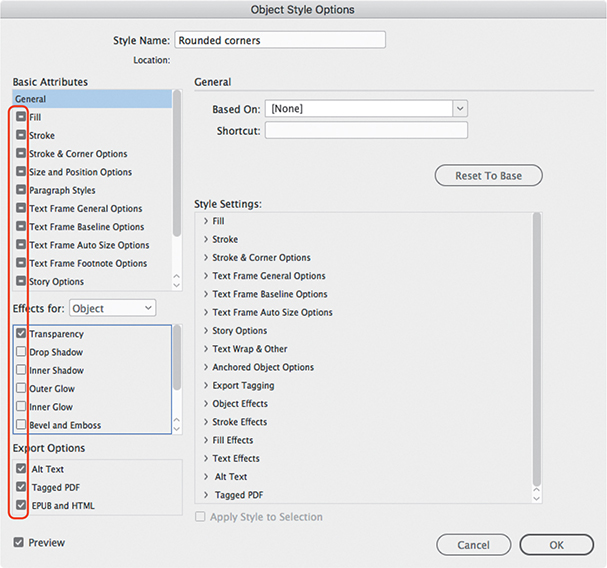
Figure 5.19 Check boxes next to style attribute names control whether an object’s existing attributes will be changed by the style.
To change how an attribute will apply, click the check box to cycle it through the check mark, dash, and empty box states.
Tip
To quickly toggle between ignoring all basic attributes except one and selecting all basic attributes except one, Alt-click (Windows) or Option-click (macOS) the selection box.
Nesting Text Styles
Sometimes a paragraph isn’t just a simple block of text; it may have differently formatted parts. For example, the first sentence of each paragraph might need to be bold. It would be a lot of work to manually format the different parts of a paragraph, but fortunately you don’t have to do that because InDesign provides nested styles. A nested style lets you apply different character styles to multiple parts of a paragraph; it’s called a nested style because character styles are nested within the definition of a paragraph style.
For example, in the cookbook, each recipe starts with a heading in which the first part of the paragraph is formatted differently from the rest. How does InDesign know where to change the styles? You can tell InDesign which character should mark the end of the first character style. In the recipe heading, the style ends at the colon character (:). Of course, this works only if you use that character consistently in paragraphs in which that style is applied. The recipe headings do that, so their nested style works.
You can use a nested style to create the recipe heading on page 3 of the cookbook (Figure 5.20), which is shown in Video 5.8.
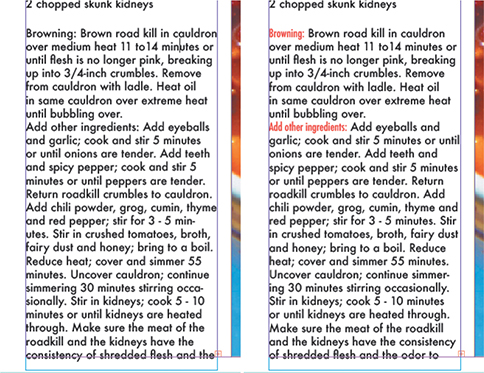
To create a nested style for the recipe heading:
Double-click the Recipe Text style in the Paragraph Styles panel. The Paragraph Style Options dialog opens (Figure 5.21).
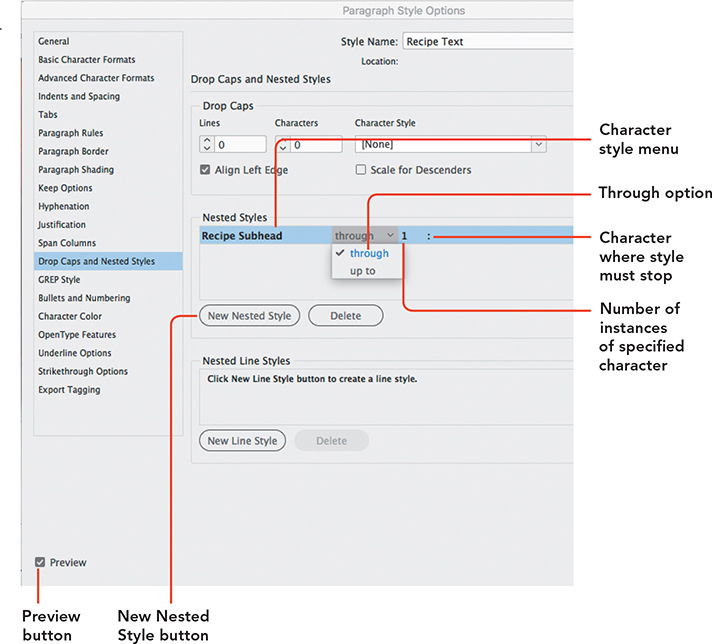
Figure 5.21 Creating a nested style that automatically applies the Recipe Subhead character style to the run-in head Select the Drop Caps and Nested Styles pane.
Select Preview to see the changes you make in your document.
Click New Nested Style under Nested Styles.
Select Recipe Subhead from the character style menu.
Select Through to ensure that the character style applies to the colon character as well.
Note that if you select Up To, the character style would stop just before the colon character.
Leave the number of instances to encounter set to 1, as you want to apply the character style only through the first colon in the text.
The menu at the end defines the item that controls when to stop applying the character style. There is a long list of predefined items; however, the colon character isn’t listed.
Instead of selecting from the menu, click where it says Words, and type a colon character.
Click OK to close the Paragraph Style Options dialog.
Congratulations! You have just created your first nested style. Figure 5.20 shows how the nested style would work in a paragraph that starts with a different number of words that end in a colon; feel free to experiment with different combinations of nested style settings and paragraph wording. You can see how flexible and powerful nested styles can be.
Adding Text from Other Applications
![]() ACA Objective 2.4
ACA Objective 2.4
![]() Video 5.7
Video 5.7
Adding Text and Images to the Recipe Pages
You’ve typed text into newly created text frames in InDesign, added placeholder text, and copied and pasted text. But the most common workflow for text is similar to how you’ve already worked with graphics: Receive the text for your design projects as documents in common text- and word-processing document formats, and then use the Place command to import them into your InDesign document. This workflow provides the most flexibility in production. Clients and writers can format text in a word processor, and InDesign can preserve the formatting, reducing the amount of formatting you have to do in InDesign. The Place command also provides advanced options that let you customize how formatted text imports into InDesign, especially when formats in the text document aren’t consistent with the formats in the InDesign document.
Supported Text Formats
Text can be typed into InDesign or imported from a range of native text-editing applications, such as Microsoft Word. Additionally, text can be imported from TXT and RTF file formats.
The most commonly used file formats for text import are:
Microsoft Word (DOCX, DOC): You can use the style formatting provided in the Word document, map it to InDesign styles, or remove any style formatting during import.
Rich Text Format (RTF): An alternative export format supported by most text-editing programs, RTF retains style formatting, such as headings. When your client works with an unsupported text-editing application, you can ask them to export the text from their application as RTF.
Text Only or Plain Text (TXT): This file format strips out all the styles applied to the text. As with RTF, this is an export format a client could use if they are unable to supply DOCX.
Microsoft Excel (XLSX, XLS): Excel spreadsheets contain mostly numerical data. For example, the financials in an annual report might be supplied as an XLSX file. This text may be imported as tabbed text or in table format.
Importing Text and Tables
![]() ACA Objective 2.4
ACA Objective 2.4
You might remember that when you were importing graphics, you could either create a frame first and place the graphic into it or choose the Place command first and then drag to define the size of the frame into which the graphic would be imported. It works the same way when importing text. You have already seen how to import text into an existing frame, so let’s quickly review that for comparison.
To import text into an existing placeholder text frame:
Select the text frame.
Choose File > Place, and navigate to the location of the text file.
Select the file, and then click Open. The text flows into the selected frame.
To import text and create a text frame on the fly:
With no object selected, choose File > Place and navigate to the location of the text file.
Select the file, and then click Open.
With the loaded Place icon
 , drag on the page to create the text frame and insert the text (Figure 5.22).
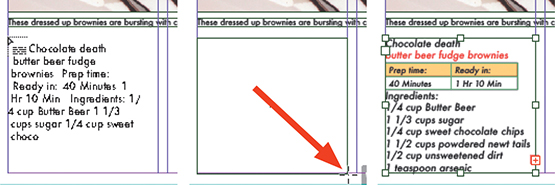
Figure 5.22 Creating a frame while placing a text file
Tip
To insert imported text into an existing text story, use the Type tool to click an insertion point in the story, and then choose the Place command.
Customizing Imported Word or RTF Files
![]() ACA Objective 4.3
ACA Objective 4.3
Because RTF, DOCX, and DOC files can contain style information such as header styles, you might want to adjust how you import these files into your InDesign document. In some cases, you might opt to strip out any formatting your client has applied. In other cases, it might speed up the text formatting process to import text with formatting.
To change the import options when placing text files:
Choose File > Place.
Select Show Import Options at the bottom of the Place dialog (Figure 5.24).
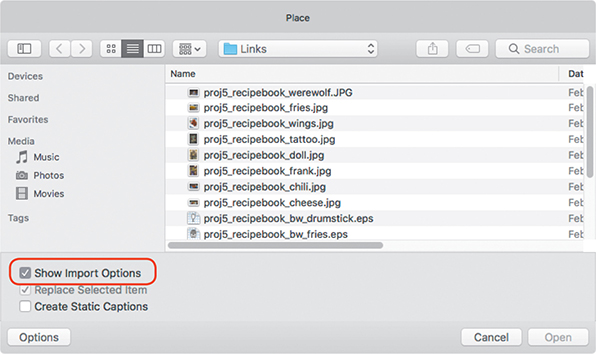
Figure 5.24 The Show Import Options check box Navigate to the text file, select it, and click Open.
In the Import Options dialog (Figure 5.25), enter the settings to apply when importing the text. The Import Options dialogs for Rich Text and Microsoft Word files are similar.
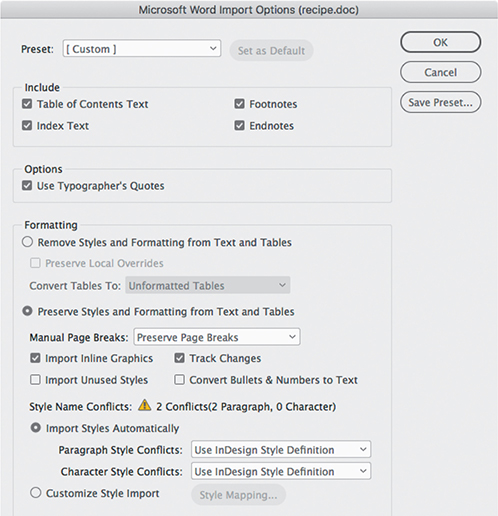
Figure 5.25 The Microsoft Word Import Options dialog Select the Remove Styles and Formatting from Text and Tables option to clear any formatting applied in the text file before adding it to InDesign. This means you are in total control of the formatting once the text is added to your design.
Select the Preserve Styles and Formatting from Text and Tables option to bring in all the formatting, including any inline graphics. This will add color swatches to the Swatches panel, as well as styles to the Paragraph Styles and Character Styles panels.
Click OK to add the text to the document.
Tip
You can place Microsoft Excel documents, which makes it easy to import tables and spreadsheets. When you select an Excel document in the Place dialog, make sure Show Import Options is selected so that you can control how the data imports. For example, InDesign can place an Excel spreadsheet as a table or as tab-delimited text.
Using Tables
![]() ACA Objective 4.8
ACA Objective 4.8
![]() Video 5.10
Video 5.10
Adding and Styling a Table
![]() Video 5.11
Video 5.11
Guided Page Layout
Tables provide an easy way to format content in a tabular or grid format, such as a restaurant menu, a bus schedule, and sports statistics. While many tables are text, you can also add graphics to table cells.
Some facts about tables:
Tables consists of rows, columns, and cells (Figure 5.26).

Figure 5.26 A table with a header row, four body rows, and three columns A table header row is the top row of the table, and it typically contains column titles; most tables use this.
A table footer row is the bottom row of a table; not all tables use this.
Header and footer rows are generally formatted differently from the rest of the table (body rows). Additionally, they repeat themselves when a table is long and breaks across multiple text frames, columns, or pages.
Tables are not standalone objects. Tables always appear inline with text, either as part of a story or in a standalone text frame.
You edit tables using the Type tool.
You can add tables to your designs in various ways, which are covered in this section:
Import Excel spreadsheets, or Word documents containing tables.
Create a new table at a text insertion point in a story.
Create a table in a new standalone text frame.
Convert text to tables, based on a delimiter character for columns and rows, such as a tab character or an end of paragraph marker.
 ACA Objective 4.4
Creating Tables
![]() Video 5.8
Video 5.8
Using Character and Paragraph Styles to Refine the Layout
Creating a table from scratch works best if you are going to enter (type) all the data in yourself. To create a new inline table:
Using the Type tool
 , click to set the insertion point for the table. You will usually want to click at the beginning of an empty paragraph.
Choose Table > Insert Table.
Tip
Instead of clicking in each cell with the Type tool to set the text insertion point, press the Tab key to move the insertion point to the next cell in the table. Press Shift-Tab to navigate to the previous cell.
Tip
To more easily see where you insert the table, ensure you view the document in Normal screen mode and choose Type > Show Hidden Characters.
In the Insert Table dialog, enter the initial number of Body Rows and Columns you want in the table (Figure 5.27).
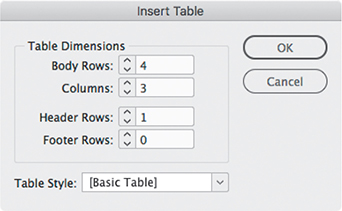
Figure 5.27 Setting up the Table Options dialog If you want Header or Footer Rows, enter the number of rows as well. Click OK.
Click in any table cell with the Type tool to set the insertion point and enter the text for that cell. Repeat this process for each cell.
To add a new table in a separate text frame:
Choose Edit > Deselect All to make sure nothing is selected on the page.
Choose Table > Create Table.
In the Create Table dialog, enter the initial number of Body Rows and Columns you want in the table.
If you want Header or Footer Rows, enter the number of rows as well. Click OK.
The table settings are loaded into the pointer
 . Drag to set the size of the text frame that will contain the table, as you would when creating a text frame on the fly (see “Importing Text and Tables” earlier in this chapter). When you release the mouse, the text frame fills with the number of rows and columns specified in step 3.
Adjusting Column Widths and Row Heights
You can change the width of the table columns.
Tip
To change the width of just the two columns on either side of a column divider, Shift-drag the divider.
To adjust the width of a column numerically:
Using the Type tool, click the top edge of a column to select the column.
To show the Table panel, choose Window > Type & Tables > Table.
In the Table panel, enter a value in the Column Width field (Figure 5.28). You can also set the column width in the Control panel.

Figure 5.28 Selecting a column and changing the column width Tip
You can also select a range of cells, such as a column, columns, or rows, by clicking in one cell with the Type tool and then dragging across the cell ranges you want to select.
To adjust the width of a column with the mouse:
Position the pointer over the right edge of a column. When a double arrow appears, drag left or right. The overall table width increases or decreases as you adjust the column width.
To make multiple contiguous columns the same width:
Using the Type tool, click the top edge of the first column to select the column.
Shift-click the top of the last column of the range of columns to select.
Choose Table > Distribute Columns Evenly (Figure 5.29). You can also right-click (Windows) or Control-click (macOS) the selected columns and select Distribute Columns Evenly from the context menu that appears.
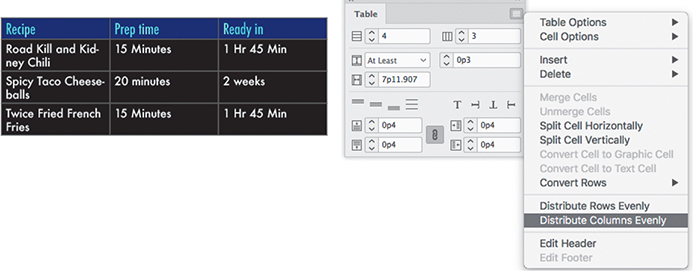
Figure 5.29 Distributing columns evenly Tip
Another way to set the same column width for multiple columns is to select a range of columns and enter the column width amount. Each selected column will take on the width value entered.
Tip
To set the same row height for multiple rows, select a range of rows by clicking the left edge of the first row and then Shift-clicking the last row. In the Table panel or Control panel, enter a new Row Height value.
Tip
To see the hidden overset text in a cell, choose Edit > Edit in Story Editor.
To change the height of a row, use the same techniques as those for changing the width of a column, but in the following ways:
Select a row by clicking the left edge.
In the Table panel or Control panel, enter a Row Height value.
When adjusting row height with the Type tool, drag the top edge of a row.
Editing and Formatting a Table
![]() ACA Objective 4.8
ACA Objective 4.8
You can enhance the design of tables by applying settings such as fill and stroke color, borders, and various types of spacing and alignment to rows, columns, and individual table cells. When you first work with tables, the number of options can seem overwhelming, and they’re in several panels and dialogs. Follow these guidelines to understand where to edit different aspects of a table:
If the table options you want are not active, use the Type tool to click in the table or select the cells, rows, or columns you want to edit.
Commands for selecting table elements are on the Table > Select submenu. These commands provide a quick and easy way to select a cell, a row, a column, or an entire table. If you like using keyboard shortcuts, it’s useful to learn the shortcuts on the Table > Select submenu.
Commands for editing tables are in the Table menu, in the panel menu of the Table panel, and in the context menu that appears when you use the Type tool to right-click (Windows) or Control-click (macOS) a table.
The Table panel and the Control panel display table options when a table or table element is selected.
If you can’t find the way to format a specific part of the table, look in both the Table > Table Options submenu and the Table > Cell Options submenu.
If you have text that you’d like to format as a table and it contains rows of items separated by a delimiter character (such as a comma or tab), you can easily convert it to a table. Select the text and choose Table > Convert Text to Table.
You can create table styles and cell styles, which speed table production the way you have seen styles accelerate other work in InDesign. You’ll find the Table Styles panel and the Cell Styles panel on the same Window > Styles submenu as the Paragraph Styles, Character Styles, and Objects Styles panels, because they work the same way (see “Formatting Faster with Styles” earlier in this chapter). Because tables generally contain mostly text, you can include paragraph styles in the style definitions for cell styles. For example, in the cookbook, the Recipe Table Header cell style uses the Recipe Text paragraph style to format cell text (Figure 5.30).
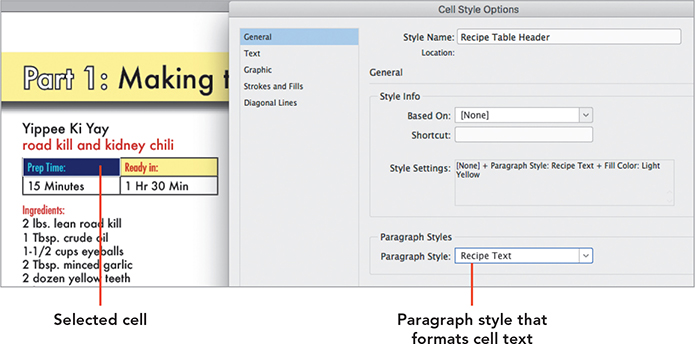
Figure 5.30 How paragraph styles are used in a cell style Tip
With the insertion point in a cell, press the Esc key to toggle between selecting that table cell and the text in the cell.
Using the Content Conveyor
![]() ACA Objective 4.4
ACA Objective 4.4
As a design-intensive document becomes longer, you might need to start reusing elements such as logos, standard graphics, and pre-styled blocks of text. The traditional way to reuse elements is by using the Edit > Copy and Edit > Paste commands in most applications, which moves a selection into and out of the Clipboard, respectively. However, copying and pasting can be tedious, and it’s limited because you can transfer only one selection at a time.
The Content Conveyor is like a supercharged version of the Clipboard. You can move text and graphics items onto it, you can keep multiple items on it, and you can choose which items to drop into a different page or document.
Although the Clipboard is useful for a single transfer of content, the Content Conveyor really comes into its own when you have to move a lot of stuff to other pages or documents. For example, say you completed a catalog for a line of men’s clothing and you now want to create the catalog for the same company’s women’s clothing, reusing a large number of the company’s seasonal graphics that you used in the first document. You can use the Content Conveyor to select and load just the items you need from the first document, and then switch to the second document and drop off those items on their new pages.
To add page items to the Content Conveyor:
Select the Content Collector tool
 . The Content Conveyor appears (Figure 5.31).
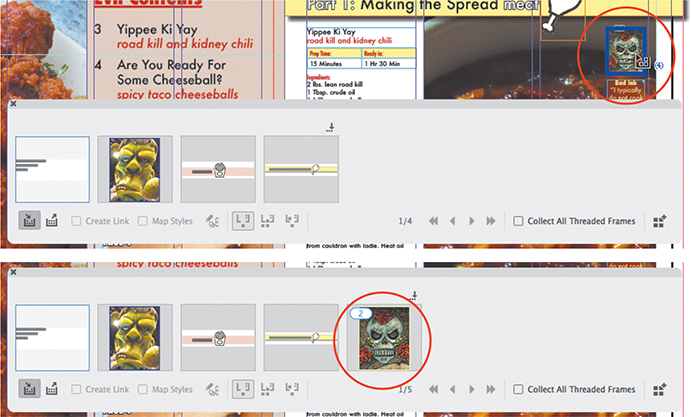
Figure 5.31 Clicking an object with the Content Collector tool adds it to the Content Conveyor. With the Content Collector tool, click each object you want to add to the conveyor.
Note that if you want to add an object that’s inside a group or frame, its containing group or frame will be added; you may want to remove the object from the group or frame.
To transfer items from the Content Conveyor to a page:
In the Content Conveyor, click the Content Placer button
 (Figure 5.32).
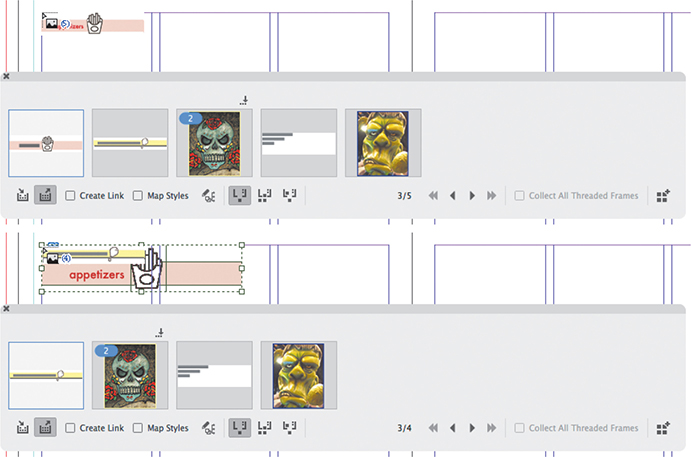
Figure 5.32 Click the Content Placer button to load the pointer with the Content Conveyor items that you want to add back to a page. Different options are enabled in the Content Conveyor as it’s switched to a mode for adding items to a layout. The pointer changes to a loaded Place icon containing the items on the Content Conveyor; it will work the same way as if you had selected multiple files on disk to place.
Go to a page that needs the items on the Content Conveyor; the page can be in a different document.
If the item loaded in the Place icon isn’t the one you want to add to the layout, click the Previous or Next button in the Content Conveyor to switch to another item. You can also press the left arrow or right arrow key.
Position the pointer at the upper-left corner of the area on the layout where you would like to add the current item, and then click or drag to place the item on the layout.
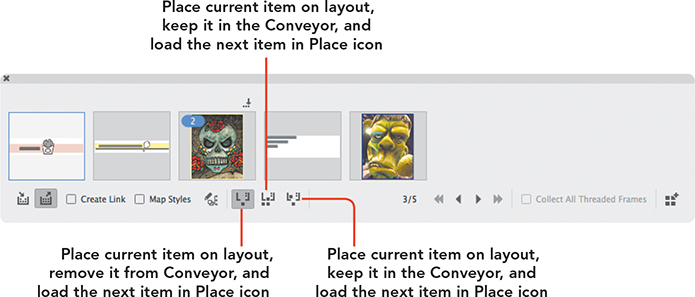
When you use the Content Placer tool, the Content Conveyor provides three buttons (Figure 5.33) that change how the Content Placer works. For example, use the first button if you want to place each item only once (because it will remove items from the Conveyor as you place them), the second button if you want to place multiple instances of each item, and the third button if you want to be able to place any item at any time.
Note
The Content Conveyor appears only when the Content Collector tool is selected, so the Content Conveyor isn’t listed as a panel on the Window menu.
The Content Collector has additional advanced features that aren’t covered in this book, but you typically won’t need them unless you maintain different versions of a document linked to the same content.
Designing Page 5 On Your Own
![]() ACA Objective 4.1
ACA Objective 4.1
![]() Video 5.12
Video 5.12
Designing Page 5 on Your Own
Page 5 of the recipe book is a page you can design any way you want. Realistically, though, if you were given an assignment to create a page for a publication with an existing set of styles and design guidelines, like the recipe book, your job would actually be to create a new page design that’s still visually consistent with the rest of the document. Draw your inspiration in part from the pages that are already designed, and put your own spin on it.
Video 5.12 mentions several features and tips you haven’t seen yet, such as:
The Gap tool helps you adjust the spaces between objects in your layout. Position the Gap tool over any empty areas—between objects, or between an object and the page edge. Drag to adjust the size of the gap (Figure 5.34). To reposition the two objects defining a gap, Alt-drag (Windows) or Option-drag (macOS) the Gap tool. To change the size of the gap, Control-drag (Windows) or Command-drag (macOS) the Gap tool.

Figure 5.34 Control space between objects using the Gap tool. Placing multiple images. You can select multiple image files in the Place dialog. When you click Open, all selected images are loaded into the Place icon (Figure 5.35), and each time you click or drag you’ll place one of those images on the layout, which is similar to how the Content Placer works. Press the left arrow or right arrow key to choose which image to place, or press Esc to unload an image without placing it. If you press Esc again until no more images are loaded in the Place icon, InDesign returns you to the tool you were using before you chose the Place command.
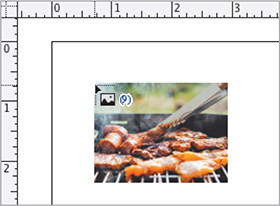
Figure 5.35 Nine graphics files were selected in the Place dialog, so they’re loaded one by one into the Place icon to add to the layout. Gridify. You can interactively create a grid of rectangle frames by pressing the arrow keys as you drag the Rectangle Frame tool (Figure 5.36), the Rectangle tool, or a Place icon loaded with multiple graphics. The up arrow and down arrow keys control the number of rows in the grid, and the left arrow and right arrow keys control the number of columns in the grid.

Figure 5.36 When multiple graphics files are loaded in the Place icon, press arrow keys to create a grid of them. Tip
If you drag multiple images from the desktop or another application and drop them in the InDesign document window, they’ll be loaded into the Place icon as if you had used the Place command to select those images.
Creating a Table of Contents
![]() ACA Objective 4.7
ACA Objective 4.7
![]() Video 5.13
Video 5.13
Creating the Table of Contents
A table of contents (TOC) is generally part of the front matter of a publication. Tables of contents most commonly list the different headings used throughout a publication—for example, the recipe titles and subtitles, or the chapter titles and the subheadings used within those chapters. As an exercise, find a book that has a table of contents in it, maybe even the one you are reading right now. Can you see a relationship between the table of contents text and the headings used throughout the book?
The key to building a table of contents is to use paragraph styles for any heading or other text you want to include in the TOC. For example, if you have styles called Heading 1 and Heading 2 and apply them to those heading levels in your document, you can tell InDesign to include those two styles in the TOC. The resulting table of contents will be a hierarchical list of paragraphs tagged with the Heading 1 and Heading 2 styles.
You’ll also use paragraph styles to format the resulting TOC. Typically, you design a set of styles that control how the TOC text appears. These two uses of styles in a TOC can be a little confusing, so let’s clarify: You’ll select one set of paragraph styles that tells the Table of Contents feature which paragraphs to include, and you’ll select another set of paragraph styles to format the text generated for the table of contents (Figure 5.37).
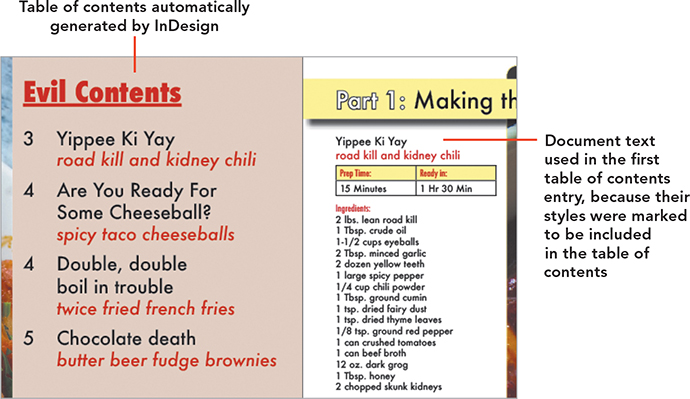
Before you define a table of contents:
Consistently apply paragraph styles to the text in your design project, especially titles and headings, because the table of contents relies on this formatting to create it.
Create a dummy layout for the table of contents design.
Create paragraph styles for the title of the table of contents as well as for the different levels.
Determine which text from your document must be included in the table of contents, and check which paragraph styles are applied to that text. Jot down the style names, as well as the level of importance they have. For example, for a recipe book, you might consider the different types of recipes—such as appetizers, entrees, or desserts—as the top level (Level 1) in the table of contents, and under each of these you could list the names of the different recipes (Level 2).
Record which paragraph styles are used to format text from your document that must appear in the TOC. These are the styles you will include in your TOC style.
Defining the Table of Contents Style
Once you’ve created the styles to format the table of contents text and determined which text needs to be added to it, you are ready to define the table of contents style. The table of contents style determines the included text, the hierarchy, and the formatting of the final table of contents.
To define a table of contents style:
Choose Layout > Table of Contents Styles.
Click New. The New Table of Contents Style dialog opens.
Click More Options to expand the dialog (Figure 5.38).
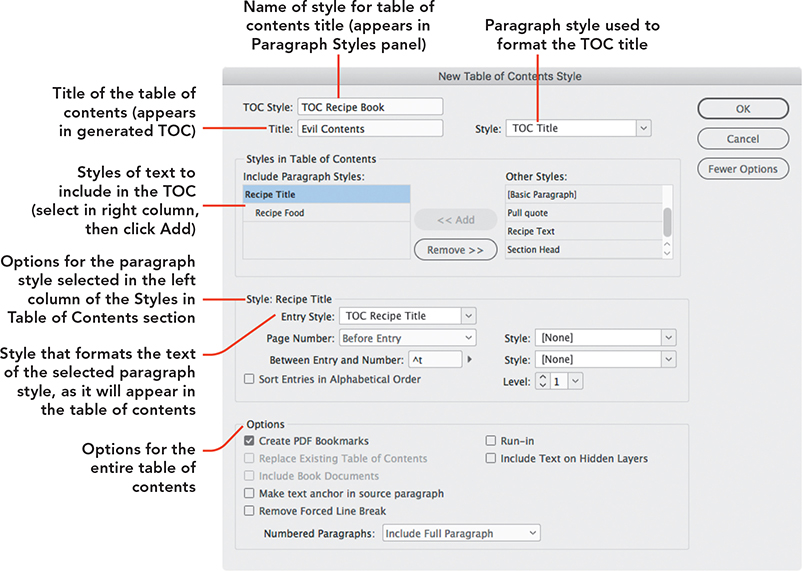
Figure 5.38 New Table of Contents Style dialog Enter a descriptive name for the table of contents style in the TOC Style field.
Type the title that will appear at the top of the table of contents (such as “Contents”) in the Title field, and select a paragraph style from the Style menu to format the text. If the list doesn’t already contain a style that will work for the TOC title, choose New Paragraph Style from the list to define a new paragraph style.
You are now ready to add some of the styles used in your project to the Include Paragraph Styles list under Styles in Table of Contents.
Under Other Styles, select a style you want to include in the TOC, and click Add. Repeat this step for each style that needs to be added. The styles will appear under Include Paragraph Styles.
With all the styles added, you can now set the formatting and levels for each of the included paragraph styles.
Select the style in the Include Paragraph Styles list, and select the hierarchy from the Level menu.
The level determines the order of the text in the table of contents. Level 1 is the top level, and Level 2 styles follow the Level 1 text.
From the Entry Style menu, select the paragraph style that formats the text in the table of contents.
From the Page Number menu, customize the page numbers to be used with each entry. Use the Between Entry and Number field and the Style menus to further customize the placement and look of the page numbers.
Repeat steps 7–9 for each style in the Include Paragraph Styles list.
Select Create PDF Bookmarks to automatically create navigation bookmarks that appear in Adobe Acrobat Reader’s Bookmarks pane.
Click OK, and then click OK again.
Flowing the Table of Contents Text
With the table of contents style defined, you are now ready to add the table of contents text to the contents page in your project.
To add a table of contents to your document:
Choose Layout > Table of Contents.
Select your table of contents style from the TOC Style menu.
Click OK.
Click or drag with the loaded text icon to create a text frame filled with the table of contents text (Figure 5.39), or click an empty placeholder frame set aside earlier to contain the table of contents.
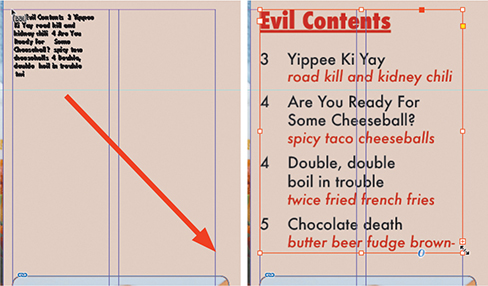
Figure 5.39 Adding the automatically generated table of contents text to the document
Updating a Table of Contents
Tip
To ensure that the table of contents text is the latest and greatest, update the table of contents before you convert an InDesign file to PDF or package it for the printer.
As you make changes to your InDesign documents, remember that the table of contents you might have generated earlier does not update automatically. Headings that are included in the table of contents may have changed as part of client change requests, or they may appear on different pages after additional text inserts or cuts.
To update a table of contents:
Using the Type tool, click to place the text insertion point anywhere inside table of contents text.
Choose Layout > Update Table of Contents.
