Malware Detection
Detecting the presence of malicious software or “malware” within acquired images is often misunderstood, and many times consists of simply running an antivirus scanning application across an acquired image mounted as a volume. However, the prevalence of the “Trojan Defense” and the incorrect classification of a number of incidents are pushing the need for analysts at all levels to truly understand the nature and characteristics of malware. The purpose of this chapter is to provide analysts and responders with an understanding of malware characteristics, as well as a thorough detection process, so that the analysis to detect the presence of malware (or the lack thereof), as well as whether it actually executed (as opposed to the file simply being on the system), can then lead to an accurate determination and resolution of the incident.
Keywords
Malware; characteristics
Information in This Chapter

Introduction
If you own or use a computer, at some point malware is just going to be a part of your life. This is especially true for system and network administrators, who are often responsible for managing and maintaining hundreds of systems. However, this is also true for small businesses, which are often without the benefit of a dedicated system administrator, and even home users. We all know friends and family who have suffered the frustration of having systems infected with malware; in most cases, the complaints are about how the system has slowed down or about annoying pop-ups and messages that appear on the screen. What most folks don’t realize is that the truly insidious malware is what we aren’t seeing on the screen: the key loggers; the malware that grabs the contents of web browser form fields whenever we log into our online banking account; or the Trojan that captures your keystrokes when you order something online, before the data is encrypted and sent to the server on the other end of the web browser session.
The presence of malware on a system can have a significant impact on an organization. For example, the presence of malware may indicate a violation of acceptable use policies within that organization, in addition to potentially exposing the organization to risk in the eyes of compliance and regulatory bodies. Further, understanding the nature of the malware (based on the identification of the malware through the analysis of associated artifacts) can help an organization address business issues, such as reporting and notification.
This chapter is not about malware reverse engineering; there are extremely high quality books available that address that topic far better than I ever could, such as Malware Analyst’s Cookbook[1]. The purpose of this chapter is to provide analysts and responders with an understanding of malware characteristics in order to aid in detecting suspicious and malicious files within an acquired image; if not the malware itself, then indications of malware having executed on the system. We will discuss various techniques for performing a thorough examination for malware and malware artifacts, as well as provide a checklist of these techniques.
Malware Characteristics
While I was a member of an emergency computer incident response services team, I began to notice that, as a team, we were receiving calls regarding, as well as responding to a good number of malware infection incidents. As such, I felt that it would be valuable, and indeed important, to develop a framework for not only better understanding malware in general but also to come up with a way for all of the consultants on our team to respond intelligently and speak authoritatively about malware, and be able to explain what they were seeing to our customers. After all, as consultants we were approaching the problem from a technical perspective: which systems were infected, what network traffic was being observed, etc. However, the customer was coming at the problem and concerned about the issue from a business perspective: how does this affect me from a legal or compliance perspective, what data was stolen (if any), and where did it go? During some examinations, this will be the primary target of your analysis; during others, the malware will be a secondary artifact, installed on a system following a compromise. As such, I wanted to develop a framework that allowed our consultants (and others) to easily address the situation and bridge the technology-business gap. Customers very often aren’t so much concerned with the technical aspects of the malware as they are with what data may have been exposed as a direct (or indirect) result of the infection, what risk they may be exposed to, and what issues they may have with respect to compliance and regulatory bodies.
What I came up with (and blogged about several times at http://windowsir.blogspot.com) were four simple malware characteristics that could be used to understand, respond to, and eradicate malware, as well as answer the customer’s questions. These characteristics are the initial infection vector (how the malware got on the system); the propagation mechanism (how the malware moves between systems, if it does that); the persistence mechanism (how the malware remains on the system and survives reboots and when the user logs out); and artifacts (what traces the malware leaves on a system as a result of its execution) that you can look for during an examination. I’ve found that when understood and used by responders (either consultants that fly in or on-site IT staff) these characteristics also provide a framework for locating malware on a system, as well as collecting information about a malware sample found on a system.
For the types of cases where malware is likely to play a role (e.g., intrusion incidents), most customers want to know things like what data, if any, was exposed, as well as if the malware was specifically targeted to their organization. Developing a more complete picture of malware and the effects on its ecosystem (not just the system it’s installed on, but the entire infrastructure) can guide us in answering those questions. Understanding how the malware behaves allows us to understand its capabilities. For example, some malware behaves differently if it finds that it’s in a virtual environment or depending upon the version of Windows it’s running on. There is also malware that will install itself differently on systems depending upon the level of privileges available. Knowing things like how malware gets on a system or how it communicates off of the system (if it does) helps us understand where else we should be looking for artifacts; subsequently, we learn more about the malware when these artifacts are found (or when they’re not found! see Chapter 1) and ultimately provide better answers to our customers.
It’s important for everyone to understand the characteristics of malware. If you think back to Chapter 1, we talked about convergence—the fact that no one area of computer/digital forensic analysis is really as separate from others as we might think. When law enforcement officers (LEOs) have to deal with an issue of contraband (often called “illicit”) images or fraud, it’s very likely that someone will ask about or make the claim that malware (a Trojan) was responsible for the observed activity, or at least contributed to it. As such, LEOs are no longer simply dealing with cataloguing contraband images, as they now have a malware investigation to complete. As such, turning to those who address malware detection and user activity analysis issues on a regular basis would likely provide a great deal of assistance and expertise.
That being said, let’s go ahead and take a look at the four malware characteristics in greater detail.
Initial infection vector
Not to be circular, but the initial infection vector is how the malware initially infected or made its way onto a system or infrastructure. There are a number of ways that systems can be infected; the user opens or double clicks on an email attachment that is really a malicious document, clicks on a link to a malicious or infected web site, other browser “drive-bys,” etc. Systems can also be infected when removable storage devices (thumb drives, their iPod, etc.) that are infected are connected to their systems. Peer-to-peer (P2P) file sharing infrastructures are other popular means by which systems can get infected. The more interconnected we become, and the more devices that we have that can be updated and synchronized by connecting them to our computer systems, the more we are open to infection from malware.
Another prevalent infection mechanism is social networking sites, such as MySpace and Facebook. In their book Cybercrime and Espionage, Will Gragido and John Pirc mentioned a quote reportedly attributed to the infamous bank robber, Willy Sutton; when asked why he robbed banks, Mr. Sutton reportedly replied “because that’s where the money is.” Well, this provides us a glimpse as to why those who spread malware use email and target social media/networking sites—if they’re looking to infect a large number of systems, then they have to go where the users are, and in particular where they can find massive numbers of users. If the goal is to create masses of infected systems (for botnet activity, collecting user’s personal data, etc.), then casting as wide a net as possible would likely be the best way to achieve your goal. The motivations of the malware authors are often predicated by the predilections of their target prey or “user community,” in that the vast majority of users like to browse the web, click links, use email, open email attachments, etc.
Speaking of email and attachments, the February 2011 Symantec.cloud MessageLabs Intelligence report (found online at http://www.symanteccloud.com/globalthreats/overview/r_mli_reports) indicated that “malicious PDF files outpace the distribution of related malicious attachments used in targeted attacks, and currently represent the attack vector of choice for malicious attackers.” Didier Stevens (whose blog can be found at http://blog.didierstevens.com/) has spent considerable effort writing tools to detect malicious contents in PDF files, and his tools have even been included in online malware analysis sites, such as VirusTotal (found online at http://www.virustotal.com). These demonstrate not only that those who proliferate malware gravitate to using infection vectors that tend to be “popular” (i.e., applications may be targeted not so much because they are vulnerable to exploit, but because they are so widely used) but also that the security community will often follow suit in providing appropriate and novel detection mechanisms.
Targeting users isn’t the only way to gain access to systems. Vulnerable Internet-facing applications and servers are discovered and exploited through scanning. For example, vulnerable web servers (as well as applications running on those servers) can provide access to systems through such means as SQL injection attacks. Systems can also be exploited via functionality inherent to the operating system, such as automatically executing the commands in an autorun.inf file on a USB thumb drive that is inserted into or connected to the system. In short, there are more vectors that allow malware to infect a system than simply getting a user to click a link or open a file.
The initial infection vector of malware is important to understand, as it is very often one of the questions that the customer wants answered: “How did this malware originally get on my system or into our infrastructure?” For some, this information is needed in order to clearly establish a “window of compromise,” that is, what was the initial infection vector, when did the initial infection occurs, therefore how long have we been infected? Identifying the initial infection vector can also be used to find gaps in protection or detection mechanisms or user awareness training.
The initial infection vector can also help determine if the malware infection is a targeted attack. In some instances, a malware infection is simply opportunistic, such as when a user (coincidentally) visits a compromised web site infected with a downloader; the downloader gets on the user’s system through a vulnerability or misconfiguration in their browser, and then downloads additional malware. For example, about two years ago, a friend of mine contacted me for advice because his laptop was infected with malware. It seemed that his son (a fourth grader) was doing homework, which required that students go to the National Geographic web site and complete a task. As it turned out, the site had been compromised and every visit to the web site using a Windows system (apparently, regardless of the actual web browser used) resulted in an infection. The intent of such attacks is to infect any and all visitors to the site. However, some infections occur when a user is sent an email with an attachment or link that is designed to be interesting to them, and appears to come from a known, trusted source. These types of attacks are often preceded by considerable open-source intelligence collection, and target victims are selected based on their employer and projects that they may be working on or know something about. These attacks are referred to as “spear phishing,” during which specific individuals are sought to launch an attack against. As such, the answer to the question of “was this a targeted attack?” would be yes.
Propagation mechanism
Once malware has infected an infrastructure, there is generally some means by which that malware moves to other systems. This may be via network-based vulnerability exploitation (such as with Conficker), making use of operational business functionality by writing to available network shares, or by parsing the user’s Address Book or Contact List and sending out copies of itself or other malware to everyone listed with an email address.
Malware’s propagation mechanism can be particularly insidious when it takes advantage of the day-to-day operational business infrastructure within the organization in order to spread, such as writing to existing network shares. Many organizations have home directories for users as well as file shares that users will access or be automatically connected to when they login, and if the malware writes to these shares, the user systems may end up being infected. When the malware propagates using the infrastructure in this manner, it makes incident response and malware eradication efforts difficult. The affected functionality is most often required and critical to business operations, and taking that infrastructure offline for an indeterminate amount of time is simply not an acceptable response measure. Additionally, taking some systems offline for “cleaning” without understanding how they were infected in the first place may result in the systems becoming re-infected shortly after connecting them back to the network, making effective eradication and cleanup procedures impossible. Without understanding the infection or propagation method used, it is impossible to take appropriate measures—such as installing patches, making configuration changes, or modifying permissions—in order to prevent re-infection.
Depending on which system(s) you’re looking at within an infrastructure, the propagation mechanism (how the malware moves between systems) may appear to be the initial infection vector. In some instances, malware may initially make its way into an infrastructure as a result of a browser “drive-by” or as an email attachment. This initial infection may then be described as a “Trojan downloader,” which in turn downloads a worm that infects systems within the infrastructure through some vulnerability or other mechanism. If you’re looking at the fifth or tenth system infected by the worm within the infrastructure, the initial infection vector for that system would appear to be the worm. However, if you missed “patient 0” (the originally infected system), you would not be able to “see” how the infrastructure was originally infected.
In other instances, the propagation mechanism may, in fact, be the same as the initial infection vector, in that the means by which the malware infected the first system was also used to infect subsequent systems. An example of this may be when an employee takes their laptop home and it becomes infected with a network worm while attached to the home wireless network. When the employee then brings the laptop back to the office and connects it to the network, the worm propagates using the same method as the initial infection vector.
The propagation mechanism needs to be identified and understood, not simply because it impacts the infrastructure but also because the manner in which the malware spreads to other systems may impact and lead to the infection of other, external organizations, such as vendors and business partners, or even customers. In the case of malware that spreads through email attachments, customers may also be impacted. At the very least, this can bring undue attention to an organization, negatively impacting the brand image of that organization, and possibly even exposing vulnerabilities within that infrastructure to public scrutiny.
Another reason the propagation mechanism needs to be understood is that this mechanism will very likely play an important role in the response to the incident. Depending upon the situation, patches may need to be applied or configuration modifications may need to be made to devices or to the infrastructure itself. As such, correctly understanding the propagation mechanism so that it can be addressed as part of an overall security response plan will ensure that resources are correctly applied to the issue.
Persistence mechanism
Jesse Kornblum pointed out in his paper Exploiting the Rootkit Paradox (found on the web at http://jessekornblum.com/publications/ijde06.html) that malware most often wants to remain persistent on the infected system. (In his paper, he was specifically referring to rootkits, but the concept applies to malware in general.) What use is a Trojan or backdoor that disappears and is no longer accessible after the system is rebooted, particularly if this happens regularly? As such, most malware has some mechanism that allows it to be automatically restarted when the system is rebooted, when a user logs in, or via some other trigger. Again, this is a general statement, as some malware has been identified that takes advantage of the fact that the system itself must remain online and is unlikely to be rebooted; therefore the malware doesn’t employ what would be defined as a “traditional” persistence mechanism. Instead, an attacker uses some vulnerability or identified technique to inject the malware into the server’s memory; should the system be taken offline or rebooted for some reason, the attacker hopes that they can re-infect the system using the same or a similar method. In this case, the malware remains persistent in memory as long as the server remains online and functioning. However, our discussion in this chapter focuses on detecting malware within an acquired image, so some form of persistence mechanism is assumed.
Perhaps one of the most popular malware persistence mechanisms employed by malware authors is to make some use of the Registry, using what’s commonly become known as an “autostart” mechanism. While the Registry contains a great deal of configuration and user tracking information, it also contains a considerable number of locations from which applications can be automatically started, without any interaction from the user beyond booting the system, or possibly logging in. For example, when a Windows system is booted, Windows services are started, and entries within the “Run” key in the Software hive are parsed and launched, and a number of other Registry keys and values are also parsed. The Registry can also be modified to ensure that the malware is launched even if the system is started in Safe Mode.
When a user logs in, the “Run” key within the user’s hive is parsed, and the applications launched, with no error checking or notification to the user if something fails. I’ve seen malware launch via the dynamic linked library (DLL) Search Order “issue,” so that the malware launches when the Windows Explorer shell loads in the user context (this was discussed in detail on the Mandiant blog post found online at https://www.mandiant.com/blog/malware-persistence-windows-registry/). There are a number of autostart mechanisms that can be engaged to launch malware when a user takes a specific action, such as launching a command prompt, running a specific program, or launching any graphical user interface (GUI)-based application.
Not all persistence mechanisms reside within the Registry, however. In fact, once analysts become aware of the Registry as a source for malware persistence, it’s just their luck that the very next case involves malware that uses a persistence mechanism that does not reside within the Registry. Some malware may be identified as a file infector, for example, and therefore doesn’t need to use the Registry to maintain persistence on an infected system. Instead, such malware would infect executable files or data files, so that the malware would be run whenever the executable was launched, or the data file accessed.
An example of malware whose persistence mechanism that does not require the Registry was originally identified as “W32/Crimea” (the write up can be found online at http://home.mcafee.com/VirusInfo/VirusProfile.aspx?key=142626) in July 2007; this malware was placed on a system as a DLL, and persistence was achieved by modifying the import table (within the header of the portable executable (PE) file) of the file imm32.dll (a legitimate Windows “PE” file) to point a function in the malicious DLL. As such, any process that loaded imm32.dll became infected.
One means for malware to remain persistent on a system that really came to light in the summer of 2010 had originally been documented by Microsoft as normal system behavior in 2000. Nick Harbour, a malware reverse engineer for the consulting firm Mandiant, was the first to publicly describe this specific issue in an M-unition blog post titled “Malware Persistence without the Windows Registry” (the blog post can be found online at http://blog.mandiant.com/archives/1207). In particular, a malicious DLL was added to the C:\Windows directory and named “ntshrui.dll,” which also happens to be the name of a legitimate DLL and shell extension that is found in the C:\Windows\system32 directory. However, unlike other shell extensions listed in the Registry, this shell extension does not have an explicit path listed for its location, and when Explorer.exe launches to provide the user shell, it uses the established and documented DLL search order to locate the DLL by name only (no other checks, such as for MD5 hash or digital signature verification, are performed), rather than following an explicit path. As such, the Explorer.exe process starts looking in its own directory for the DLL first and finds and loads the malicious DLL. In this way, the malware relies on how the system operates, rather than adding a key or value to the Registry as its persistence mechanism.
Yet another persistence mechanism to consider is Windows Scheduled Tasks functionality. Scheduled tasks allow administrators to run tasks or “jobs” at designated times, rather than every time the system is booted or when a user logs in. For example, if you use Apple products such as iTunes, Safari, or QuickTime on your Windows system, you can expect to see a scheduled task that launches the software update application on a weekly basis. As such, it’s relatively easy to get malware on a system and schedule it to run at specifically designated times. Methods for determining which scheduled tasks had launched, and their exit status, for various versions of Windows were discussed in Chapter 4.
Yet another example of a persistence mechanism that does not rely on the Registry is to use other startup locations within the file system. For example, the Carberp Trojan, which at one point was reportedly replacing Zeus/ZBot as the preeminent malware for stealing a user’s online banking information, does not appear to use the Registry for persistence. The Symantec write up for one variant of this Trojan (which can be found online at http://www.symantec.com/security_response/writeup.jsp?docid=2010-101313-5632-99&tabid=2) indicates that the malware remains persistent by placing an executable file in the “\Start Menu\Programs\Startup” folder within a user’s profile, which causes the file to be launched when the user logs onto the system. Further, on September 23, 2011, Martin Pillion wrote a post titled “Malware Using the Local Group Policy to Gain Persistence” to the HBGary blog (the blog and Martin’s post don’t seem to be available online at the time of this writing) which described the use of the Windows Local Group Policy (the article specifically addresses Windows 7) functionality for running scripts during specific events (Logon, Logoff) as a persistence mechanism. In the article, Martin stated that this was particular due to the fact that the Microsoft AutoRuns tool (updated to version 11 on September 20, 2011 and found online at http://technet.microsoft.com/en-us/sysinternals/bb963902; at the time of this writing, version 11.7 is available) reportedly did not check these locations.
Additionally, malware doesn’t have to be or reside on a system in order to remain persistent on that system. In networked environments, “nearby” systems can monitor infected systems and ensure that the malware spread to those systems is running. This is a particularly insidious approach to use, as many organizations only perform detailed monitoring at their network perimeter and egress points. Unusual or suspicious traffic seen at the perimeter will lead back to the systems that are communicating out of the infrastructure; however, the systems that are ensuring that malware is running on those systems will likely not be seen by the monitoring. Therefore, IT staff will respond to the systems identified via egress monitoring, “clean” or even re-provision those systems, which (depending on the method used) may become re-infected shortly after being placed back on the network. This sort of approach ensures that the malware remains persistent on the infrastructure as a whole, rather than focusing on persistence on a specific host. In order to detect this sort of “lateral movement” within an infrastructure, IT staff and responders need to ensure that the Windows Event Logs are configured to record login attempts (both successful and failed), configured to a size such that events are not quickly overwritten, and that the Event Log records are actually retrieved and reviewed prior to being destroyed. Means for analyzing Windows Event Logs were discussed in Chapter 4.
When analyzing Windows Event Logs for indications of lateral movement within the infrastructure, what responders should typically look for are network logins for accessing resources; on Windows XP and 2003 systems, these events appear in the Security Event Log with event ID 540, type 3, and on Windows 7, they appear in the same Event Log with event ID 4624, again as a type 3 login. These events would typically then be followed by and event ID 7035 event, indicating that a particular service was sent a start command. In the case of lateral movement, that service might be PSExec, XCmdSvc, or ATSvc. The first two services allow for remote code execution, and the third allows for the creation of scheduled tasks. Descriptions of security events for Windows 7 and Windows 2008 R2 can be found in Microsoft Knowledge Base (MS KB) article 977519, found online at http://support.microsoft.com/kb/977519.
The purpose of this section has not been to list all possible persistence mechanisms; instead, my goal has been to open your eyes to the possibilities for persistence on Windows systems. One aspect of this has been obvious over time—that is that responders will continue to learn from intruders and malware authors as they identify and use new persistence mechanisms. As Windows systems provide more functionalities to the user and become more complex, new persistence mechanisms are invariably discovered and employed; as such, the goal for responders and analysts is to recognize this and keep malware’s need for persistence in mind, as understanding that there is a persistence mechanism in the first step to identifying that mechanism.
Artifacts
Artifacts are those traces left by the presence and execution of malware, which are not themselves specifically used by the malware to maintain persistence. Malware persistence mechanisms appear to be similar to artifacts, and based on this definition, can be considered to be a subset of the more general “artifacts” description. However, the best way to look at this is that persistence mechanisms are artifacts used for a specific purpose, while the more general use of the term applies to other artifacts not specifically used for persistence. For example, some malware creates or modifies Registry keys or values in order to remain persistent on an infected system, whereas that same malware may also create Registry values to maintain configuration information, such as servers to contact, values for encryption keys, or even bits of code to run.
That being said, not all artifacts are directly created by the malware itself; some artifacts are created as a result of the ecosystem in which the malware exists (remember when we talked about “indirect artifacts” in Chapter 1). I know, you’re asking yourself, “what?” That’s just a fancy way of saying that some artifacts aren’t created by the malware, but are instead created as a result of the malware’s interaction with the infected host. For example, some malware creates a Windows service in order to ensure its persistence; as a result, when the service is launched, Windows will create subkeys under the HKLM\System\CurrentControlSet\Enum\Root key that refer to the service name, prepended with “Legacy_*,” as illustrated in Figure 6.1.
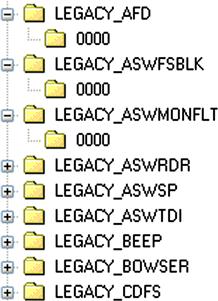
This is an interesting artifact, but how is it useful? Well, several analysts have noted that the LastWrite time for the “Legacy_*\0000” keys closely approximates to the last time that the service was launched, while the LastWrite time for the “Legacy_*” (again, where the “*” is for the service name) closely approximates to the first time that the service was launched. This information was developed largely through observation and testing and has been extremely useful in determining when a system was initially infected.
Another example of artifacts created by the operating system is Prefetch files, specifically as a result of application prefetching performed by the operating system.
Prefetch files are found in the C:\Windows\Prefetch directory on Windows systems where application prefetching is enabled; by default, Windows XP, Vista, Windows 7 and 8 have application prefetching enabled by default (Windows 2003 and 2008 are capable of application prefetching, but this functionality is not enabled by default). Details regarding the creation and analysis of these files were covered in Chapter 4, but suffice to say here that Prefetch files have provided useful indications of malware being executed, even after that malware has been deleted from the system.
Malware artifacts can also be based on the version of Windows that the malware infects/installs itself on, or based on the permissions under which the malware is installed. There is malware, for example, that when it infects a system via a user account with Administrator privileges, it uses the Run key in the Software hive for persistence, and files may appear in the C:\Windows\Temp directory; however, if the account through which the system is infected is a normal user (lower privilege account), the malware will use the Run key in the user’s hive for persistence and write files to the Temp directory in the user profile. As such, when an analyst looks at the entries in the Run key within the Software hive, they won’t see anything that would indicate an infection by that particular malware and should also be sure to check (all of) the user profiles.
Another important aspect of malware artifacts to keep in mind is that if you’re aware of artifacts specific to various malware families, and if you employ an analysis process that “casts a wide net” in looking for anomalies, you’re very likely going to find indications of malware that is not detected by AV applications. For example, a new variant of malware may not be detected by the installed AV product, but an analyst looking at the StubPath values in the “Installed Components” subkeys (within the Software Registry hive) may find that an entry points to a file within the Recycle Bin (on Windows 7, “$Recycle.Bin”). Earlier in this chapter, I mentioned finding memory scraping malware used to collect credit card track data from back office POS server systems. One of the components of the malware was a Perl script “compiled” via Perl2Exe; when this component was launched, the various modules compiled into the executable code were extracted as DLL files and written to a Temp folder on the system, and when it finished executing, these files were not removed. Using this artifact information, we had a running log of how many times and when the malware had executed.
Understanding the characteristics that we’ve discussed so far when attempting to locate malware within an acquired image can often have a significant impact on your examination. For example, some families of malware may have different file names or propagation mechanisms associated with each variation within the family, but there will also be characteristics that are consistent across all variants. For example, while the malware family known as “Conficker” (family description found online at http://www.microsoft.com/security/portal/Threat/Encyclopedia/Entry.aspx?name=win32%2fconficker) had differences across all variants, the malware had a consistent persistence mechanism, using a random name for a Windows service that started as part of svchost.exe. As such, Conficker infections could be determined by locating the persistence mechanism, and from there locating the DLL file that comprised the infection. Understanding these characteristics, in particular the persistence mechanism and artifacts, can also assist in helping to locate malware that is not identified by AV scanning applications, as locating the artifacts can lead you to the malware itself.
Detecting Malware
Detecting malware within an acquired image is perhaps one of the most amorphous and ethereal tasks that an analyst may encounter. Many analysts have cringed at receiving instructions to “find all of the bad stuff,” because the question remains, how do you go about doing this effectively, and in a timely manner? The answer to that is simple—you don’t, and you can’t. After all, isn’t “bad” a relative term? Without context, a good deal of effort can be dedicated to finding something that is actually normal activity, or isn’t the “bad” thing you’re looking for. I know of one analyst who was told to “find bad stuff,” and found hacker tools and utilities, as well as indications of their use. After reading the report, the customer stated that those tools were actually part of the employee’s job, which was to test the security of specific systems within the infrastructure. Sometimes, we have to take a moment to get a little context and find out just what “bad” is, so that we have a better understanding of what to look for.
The goal of detecting malware within an acquired image should be one of data reduction. Malware authors are sometimes lazy, but they can also be very insidious, and take great pains to protect their files from detection. There are a number of techniques that malware authors can and do use to hide their programs from detection, even going so far as to make their programs look as much like a normal Windows program as possible. Malware authors will use specific techniques (giving the file a “normal” looking name, placing the file in a directory where such a file would be expected to be found, etc.) to hide their programs, sometimes even based on the techniques used by analysts to detect these files.
Given the challenge of finding one (or a small number) of well-disguised files within an acquired image containing thousands of files, the best approach that an analyst can take is to use a thorough, documented process to reduce the number of files that need to be analyzed to a more manageable number. Having a documented process allows the analyst, as well as other analysts, to see exactly what was done, what worked, and what needs to be done to improve the process, if anything. The following sections of this chapter lay out some steps that an analyst can use as a methodology and include in their analysis process in order to detect the presence of malware within an acquired image, or provide a thorough process for ensuring that malware does not exist with an image. However, while each section will describe that particular step thoroughly, this is not intended to be an all inclusive list. Some of these steps are sure to be familiar, while others may be new, but given enough time, someone will very likely come up with additional steps.
Log analysis
One of the first steps in detecting malware within an acquired image is to determine what AV application, if any, was already installed and/or run on the system. If the system did have AV installed, the analyst would need to determine if it was running at the time that the system was acquired (or when the incident occurred; some malware actually disables AV and other security products on Windows systems) and when that application was last updated. This can be done easily by examining logs generated by AV applications; many maintain logs of updates, as well as the results of regularly scheduled and on demand scans. Some AV applications even write their events to the Application Event Log; however, in some cases, this may be a configurable option, and may be disabled, or simply not enabled; therefore, if you check the event sources for the various Application Event Log records and do not see an indication of an AV application (McAfee AV products use the source “McLogEvent”), do not assume that one hasn’t been installed.
One of the first things I will usually look for on a Windows system is the log file for the Microsoft Malicious Software Removal Tool (MRT). MRT is a targeted microscanner that is installed in the background on Windows systems, and is updated with signatures on an almost monthly basis. The term “microscanner” refers to the fact that MRT is not a full-blown AV application, but is instead intended to protect Windows systems from very specific threats. MS KB article 890830 (found on the Microsoft Support site at http://support.microsoft.com/kb/890830) provides information about installing and running MRT (there are command line switches that can be used to run scans), as well as an up-to-date list of the threats that MRT is intended to detect. MRT logs the results of its scans to the file mrt.log, which is located in the C:\Windows\debug directory. The log contains information such as the version of MRT run (usually following an update), when the scan started, when the scan completed, and the results of the scan. An example of an entry from the MRT log file retrieved from a Windows XP SP3 system appears as follows:
Microsoft Windows Malicious Software Removal Tool v3.15, January 2011
Started On Wed Jan 12 21:50:26 2011
Engine internal result code=80508015
Microsoft Windows Malicious Software Removal Tool Finished On Wed Jan 12 21:51:29 2011
This information can be very useful to an analyst, particularly when claims are made of particular malware being found on a system; for example, I’ve received a number of images along with the statement that the systems had been infected with Zeus. According to KB article 890830, detection of Win32/Zbot (also known as “Zeus” or “Wnspoem”) was added in October 2010. If an analyst receives an acquired image and there is a suspicion that this particular malware had infected the system, then this is one artifact that can be used to determine whether there were any indications of particular malware on the system. As I include AV log analysis as part of my methodology for these types of examinations, I document my findings with respect to when MRT was updated, and what I find in the mrt.log file. This helps address issues of what malware may or may not be on the system.
Tip
MRT Registry Key
Whenever MRT is updated, the “Version” value of the Microsoft\RemovalTools\MRT Registry key in the Software hive is updated with a globally unique identifier (GUID) that indicates the version of MRT, as illustrated in Figure 6.2.

This GUID can be looked up in MS KB article 891716 (found on the web at http://support.microsoft.com/kb/891716), and used in conjunction with key LastWrite time to determine when MRT was last updated and which threats it should detect.
Later versions of Windows (starting with Vista) tend to have Microsoft’s Windows Defender application installed, although this program can also be installed on Windows XP. Windows Defender is a program that reportedly protects Windows systems from pop-ups, spyware, and “unwanted programs.” As such, it may also be worthwhile to examine the application logs, as well, to see if there are any indications of unusual or suspicious activity.
During an examination, you may find that other AV applications may have been installed and run on the system. Check the Registry, “Program Files” directory, and even the Prefetch files for indications of these applications and their use. Often, both home user and corporate employee systems may have AV applications installed; home user systems may have freely available AV scanners installed, and corporate systems will likely have an enterprise-scale commercial AV scanner installed and as such, you may need to determine if the logs are maintained on the local system or in a central location. I have received a number of hard drives and acquired images which indicate that shortly after an incident or malware infection was suspected, the administrator logged into the system and either updated the installed AV and ran a scan, or installed and run an AV application. Like other examiners, I’ve also clearly seen where more than one AV scanner was run on the system. What you would want to do is locate the logs (if possible) from these scans and determine what, if anything, these scanners may have found. Even if the administrator installed the AV application, ran a scan, and then deleted the application, you may still be able to find indications of scan results in the Application Event Log.
So why is it so important to determine which AV applications have already been run on a system? Within the information security industry, and specifically within the digital forensics and incident response (DFIR) community, it’s understood that just because a commercial AV scan didn’t find any malware on a system, that doesn’t definitively indicate that there was no malware on the system. As such, many of us rely on a methodology, rather than one specific commercial AV application, in order to attempt to detect malware within an acquired image. Along those lines, what an analyst does not (and I mean NOT) want to do is hinge their findings on one AV scan, and in particular, one done using the same AV application that had been installed on the system. And to answer the question that just popped into your mind, yes, I have seen reports that have indicated that no malware was found on a system based on a single AV scan, and when the analyst went back and checked later, they found that the AV application they used was the same version and malware signature file as what had been installed on the system. What is the point of redoing something that was already done, especially when it didn’t provide findings of any significance?
As such, the first step of any malware detection analysis should be to determine what, if any, anti-malware or -spyware applications were already installed on the system, what were the versions of these applications, and when they were last updated. The version of the application itself can be very important, as AV vendors have stated that the reason why known malware hadn’t been detected on a customer’s infrastructure was that while the signature file was up to date, the scanning engine itself was out of date and was not properly utilizing the signatures.
Once this information has been documented, determine if there are any logs available, and if so, examine them for any indication that malware had been detected. I’ve had a number of opportunities to examine systems onto which malware had originally been detected and quarantined by the AV application when it was first introduced to the system. The intruder later returned to the system and uploaded a new version of the malware that the AV application did not detect, but used the same file name for the new version of the malware. As such, a search for the file name originally detected by the AV application turned up the version of the malware that the AV application didn’t detect.
I’ve analyzed a number of systems that had multiple AV applications installed. In some cases, AV application was installed and later disabled (perhaps the license expired), and then another application was installed. In other cases, once an issue was reported, an IT administrator was installed and ran one or more (I’ve seen indications of up to three different scanners being run, in addition to the installed AV product) AV products prior to making the system available for acquisition and analysis. Documenting this information as part of your analysis can be very important, as it can help the customer understand their IT protection process and identify any gaps. Also, if you intend to perform your own AV scans (discussed later in this chapter), it wouldn’t necessarily be a good idea to run the same AV product and version as was already run on the system. Think about it—what would be the point or advantage in reporting that you’d run the same AV product against the system as was already installed on the system, and then billing the customer for that “work?” Finding and documenting the protection mechanisms already installed on the system can help you understand what the system should have been protected against, as well as help direct your analysis efforts.
I’ve also seen instances in which an AV application detected the presence of malware, but that application had been specifically (however unintentionally) configured to take no action other than to record the detection event. As such, the logs (as well as the Application Event Log) provided clear indication that there was in fact malware on the system (including the full path to the files) but that it hadn’t so much as quarantined by the AV application. In one instance, the AV application logs indicated that the creation and subsequent deletion of malware files (presumably, after the intruder was done with them) had been detected, but again, no action other than to record these events had been taken. This proved to be extremely valuable information that provided insight into other actions taken by the intruder. In other instances, AV scanning applications have additional functionality beyond the traditional signature-based detection. For example, McAfee AV products can detect and/or block (that is to say that they can be configured to detect but not block) suspect actions, such as trying to run an executable file from a Temp directory, or from a web browser cache directory. So, while malware itself may not be explicitly detected by an AV product, the actions taken to download and install that malware may be detected, and possibly even prevented or simply inhibited.
Dr. Watson logs
Another source of potentially valuable data is the Dr Watson log file. Dr Watson is a user-mode debugger found on Windows XP (but not Windows 7) that launches and generates a log file when an error occurs with a program. This log file (drwtson32.log) is located in the “All Users” profile, in the \Application Data\Microsoft\Dr Watson\ subdirectory, and when subsequent application errors occur, data is appended to the file. The appended data includes the date, the application for which the error occurred and a list of loaded modules for the application, and a list of the processes that were running at the time of the error. I’ve looked to the information in this file to not just help determine if malware had been installed on the system but also reviewed the list of processes (as well as modules loaded in the “offending” or crashed process) to see if the malware process was running at the time that the information in the log was captured. This has been very useful when attempting to verify the “window of compromise” (how long the system had been compromised) during data breach investigations.
AV scans
Once you’ve determined and documented which, if any, AV applications had been installed and/or run on the system prior to acquisition, another step you may decide to do is to mount the image as a volume on your analysis workstation and scan it with other AV products. Not all AV applications seem to be created equal; in some instances, I’ve run multiple big name AV applications across a mounted image and not found anything. Then after running a freely available AV application, I got a hit for one of the files associated with the malware, and was able to use that as a starting point for further investigation. So it doesn’t hurt to use multiple AV applications in your detection process.
Mounting an acquired image is relatively straightforward, using a number of freely available tools. For example, the ImDisk virtual disk driver (found on the web at http://www.ltr-data.se/opencode.html/#ImDisk) installs as a Control Panel applet and allows you to mount Windows images new technology file system (NTFS) or file allocation table (FAT) read-only on your Windows system. AccessData’s FTK Imager version 3.1.3 (found on the web at the AccessData web site at the URL http://accessdata.com/support/product-downloads) includes the capability to mount acquired images as read-only volumes, as well. As mentioned in Chapter 3, the vhdtool.exe utility (available from Microsoft) will allow you to convert a copy of your image to a Virtual Hard Drive (VHD) file and mount it read-only on your Windows 7 or 8 system. Regardless of the tool used, the purpose is to make the file system within the image accessible as a drive letter or volume (albeit in read-only mode) on your analysis system.
Once you’ve mounted the image as a volume, you can scan it with AV scanners in the same manner as you would a “normal” file system. Many AV products allow scans to be configured to only be run against specific volumes or drive letters (some even allow you to scan specific directories), making it relatively simple and straightforward to scan only the mounted volume(s). If you do not have access to commercial AV products, there are a number of free AV products available for download and use (be sure to read the license agreement thoroughly!!), several of which are simply limited (in the sense that they provide scanning but not other capabilities, such as real-time monitoring) versions of the full commercial AV products. For example, there is a free version of the AVG AV scanner available at http://free.avg.com, and you have the option to upgrade to a full version of the application that provides additional protection, while downloading files or chatting online. Other AV products such as Eset (producer of the NOD32 AV product, available at http://www.eset.com) provide a limited time trial version of their software; again, be sure that you read and understand the license agreement before using any of these options.
There are a number of other AV products available for use, and many (such as Microsoft’s Defender product, mentioned earlier in this chapter) are freely available, while other vendors provide limited time trial versions of their full, professional products. This part of the chapter is not intended to provide a breakdown or “shootout” between the various available products, but to instead demonstrate that there are options available. The point is that it’s always better to run a scan using an AV product that had not been installed on or run on the system, and it’s not usually a bad idea to run multiple AV scans using disparate products.
One free, open-source AV product that is very useful and includes a portable (run from a thumb drive) version is ClamWin (illustrated in Figure 6.3), found on the web at http://www.clamwin.com.
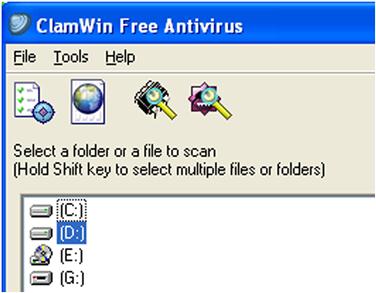
ClamWin can be installed on, updated, and run from a thumb drive, making it a useful option for using amongst multiple systems, without having to install the full application on your analysis system.
Another option available, particularly when specific malware variants are suspected, is microscanners. These are not general-purpose AV scanning products, but are instead targeted scanners to look for specific malware variants. One such product is McAfee’s AVERT Stinger product, available online at http://www.mcafee.com/us/downloads/free-tools/how-to-use-stinger.aspx. Downloading the file and running it on your analysis system open the user interface (UI) as illustrated in Figure 6.4.

If you click on the purple “List Viruses” button in the Stinger UI (Figure 6.4), a dialog listing all of the malware that the microscanner is designed to detect will be listed. Again, while not as comprehensive as a more general AV product, microscanners offer a useful capability. At the same time, don’t forget other scanner products, such as those specifically designed to detect spyware and adware, as these can provide some useful coverage, as well. Finally, be sure to document the applications that you do use, as well as their versions and results. Both pieces of information will help demonstrate the thoroughness of your detection process.
AV write ups
There’s something that I think is worth discussing with respect to malware write ups from AV vendor companies. These write ups provide descriptions and a wealth of information about the malware that these companies have found, been given access to, and analyzed. However, there’s very often a gap when it comes to what incident responders and forensic analysts need to know about malware, and what’s provided by the AV companies. This gap is due in large part to the fact that AV companies are not in the business of supporting incident responders; rather, they’re in the business of supporting their business. Now, don’t take this as an indictment of AV companies, because that’s not what I’m doing. What I am saying here is that malware write ups from AV companies are a good resource, but should be considered within that context, as sometimes they are not complete and do not provide a comprehensive or completely accurate picture of the malware. For example, there is malware that infects files that are “protected” by Windows File Protection (WFP), but often there is no reference to WFP or the fact that it was subverted in the malware write up. While WFP is not intended as a security or AV mechanism and is easily subverted (code for this is available on the Internet), this fact is important to know as it may help us detect the malware where the AV product fails, as AV products are most often based on signatures within the malware files themselves, and not on specific artifacts on the system. Another aspect of malware write ups that can be confusing is that there’s often no differentiation between artifacts produced by the malware infection, and those produced by the ecosystem (operating system, installed applications, etc.) that the malware infects. One example of this is the MUICache key within the Registry; several years ago I found a number of malware write ups that stated that the malware added a value to this key when it infected a system, when, in fact, the value was added by the operating system based on how the malware was executed in the test environment. Another example is the ESENT key within the Registry on Windows XP systems. When someone asked what this key was used for, Google searches indicated that there were malware samples that modified this key when executed. It turned out that Windows XP systems were mistakenly shipped with a checked (or debug) version of the esent.dll file, and the key itself (and all of its subkeys and values) was a result of that debug version of the DLL being deployed on production systems. As such, it wasn’t the malware infecting the system that caused the Registry modifications as much as it was the result of the debug version of the DLL. This could be confusing when an analyst was examining a Windows Vista or Windows 7 system and found the malware in question, but did not find a corresponding ESENT key within the Registry.
Digging deeper
Windows systems contain a lot of executable files, many of which are completely legitimate, and it’s neither productive nor efficient to examine each and everyone of those files to determine if it’s malicious. While these files can be hashed and comparisons can be run, this method of identifying “known good” files can be cumbersome, particularly on Windows systems, as software installations and system patches tend to change a number of files, so that while they are still completely legitimate, they may trigger false positives in the hash comparison tool that you’re using. Also, system administrators and home users rarely maintain an accurate set of system file hashes for you to use as a baseline for comparison.
There are a number of other techniques available to analysts, beyond log analysis and AV scans, that allow us to perform some significant data reduction and narrow the field of interesting files quite a bit. We can use these techniques to help us detect malware within an acquired image that would be missed by other detection means. We’ll discuss several of these techniques throughout the rest of this chapter, but there are a couple of things that should be clear. First, this should not be considered a complete list; I will attempt to be comprehensive, but there may be techniques discussed in which you may find limited value, and you may have your own techniques. Second, these techniques will be discussed in no particular order; do not assume that a technique presented first is any more valuable than another. Finally, whichever techniques you decide to use should be included in a documented malware detection process. A sample checklist is provided as an MS Word document along with the additional materials provided with this book (the link to these materials can be found online at http://windowsir.blogspot.com/p/books.html).
Packed files
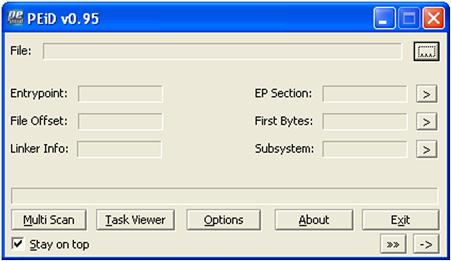
Compression or “packing” is a means for reducing the size of a file, but more importantly, PE files can be packed to hide their true nature and to “hide” from AV scanners. However, it is uncommon—albeit not unheard of—for legitimate files to be packed. Therefore any packed files found during a scan would bear closer inspection. One tool that is freely available for checking for packed files is PEiD (version 0.95 was available at the time of this writing; as of April 4, 2011, the project appears to have been discontinued). The PEiD UI is illustrated in Figure 6.5.
Choosing the Multi Scan button on the PEiD UI allows you to run a scan of files within a directory, as well as recurse through subdirectories, and only scan PE files, as illustrated in Figure 6.6.
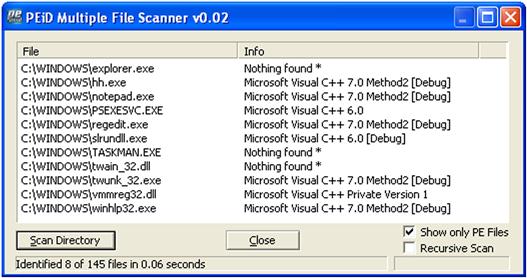
PEiD also supports command-line switches (be sure to read the readme text file that comes as part of the distribution), but the difference from other command line interface (CLI) tools is that running application via command line switches sends the output to GUI dialogs, as seen in Figure 6.6. Without an option for redirecting the output to files, PEiD cannot effectively be incorporated into batch files. Regardless, this is still an invaluable tool to have available.
If you would prefer a CLI tool, you might consider the Yara project, found online at http://code.google.com/p/yara-project/. Yara started out as an open-source project to help identify and classify malware samples, but the author’s (Victor Manuel Alvarez of Hipasec Sistemas) work has expanded the project. While it remains open source and based on Python, a Windows executable file is available for download, making it much more accessible to a wider range of users. Yara is a rules-based scanner, in which users can define their own sets of rules, based on strings, instruction patterns, regular expressions, etc., in order to detect and classify malware. The Google Code site for the Yara project includes a wiki page with sample rules files for packers as well as a limited set of rules to detect some malware. The packers rules are based on some of the same signatures used by PEiD, which means that those rules can be used to run PEiD functionality (packer scans) from a batch file, using a command similar to the following:
In the above Yara command, the file “packer.txt” is simply a file that contains a limited number of rules for detecting packers, available on the Yara project wiki (i.e., copy and paste the rules into a file). The book Malware Analyst’s Cookbook contains several “recipes” (i.e., Python scripts) for converting ClamAV (Note: This is not the ClamWin AV product discussed earlier in this chapter and is instead available at http://www.clamav.net.) AV signatures and the full set of PEiD packer signatures to Yara rules files. If you work with or encounter malware at all, having a copy of the Malware Analyst’s Cookbook available can be quite valuable.
Digital signatures
Examining executable image files for valid digital signatures using a tool such as sigcheck.exe (available from the SysInternals site on MS TechNet) is a valuable approach for detecting malware. This is an excellent technique to use, in that an analyst can scan systems for executable files that do not have digital signatures as illustrated in Figure 6.7.
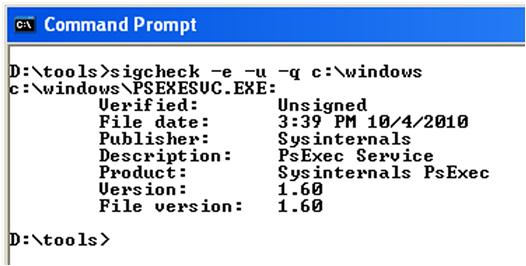
As with many CLI tools, simply typing “sigcheck” at the command prompt will display the syntax for the various command line switches. Figure 6.7 illustrates a scan of just the C:\Windows directory, looking for unsigned executable files, regardless of their extension. CLI tools are very useful in that they can be very easily included in batch files in order to facilitate scanning and processing of the results. For example, adding appropriate switches will tell sigcheck.exe to recurse through subdirectories, and send the output to comma-separated value (.csv) format, which is suitable for ease of analysis. This is illustrated in the following command line:
However, it’s worth noting that like many methods used by responders and analysts, someone is going to find out about them and find a way to use that method against the responders and analysts. In June 2010, malware known as “StuxNet” was publicly mentioned and described, and one of the notable aspects of the malware was that it contained a valid digital signature. On July 16, 2010, a post to the Microsoft Malware Protection Center (MMPC) blog titled “The StuxNet Sting” (found online at http://blogs.technet.com/b/mmpc/archive/2010/07/16/the-stuxnet-sting.aspx) stated that the StuxNet malware files had been signed with a valid digital signature belonging to Realtek Semiconductor Corp. This digital signature quickly expired, but other examples of the StuxNet malware that were discovered were found to use other valid signatures. As with other techniques, scanning for valid digital signatures should not be considered as “silver bullet” solution, but should instead be considered as part of an overall detection process.
Windows File Protection
WFP is a process that runs in the background on Windows XP and 2003 (WFP was not something that was carried over to Vista systems and beyond) systems and monitors for file change events that occur on the system. When such an event is detected, WFP determines if the event is related to one of the files it monitors, and if so, WFP will replace the modified file from a “known good” version in its cache, which in many instances is the C:\Windows\system32\dllcache directory. A more comprehensive description of WFP can be found online at http://support.microsoft.com/kb/222193.
Many times, an attacker will get malware on a system that temporarily disables WFP and replaces or infects a “protected” file, after which WFP is re-enabled. WFP does not poll or scan files, but instead “listens” and waits for file change events, so once it has been re-enabled, the modified file goes undetected. Sometimes, only the file that does not reside in the cache is modified, and other times, analysts have found that both the file in the cache as well as the one in “runtime” portion of the file system (i.e., the system32 directory) were modified.
One means for detecting attacks where only the noncached copy of a “protected” file was modified is to compute cryptographic one-way MD5 hashes of all of the files in the cache directory, and then locate the noncached copies of those files, hash them, and compare the hashes. I wrote an application called “WFP Checker” several years ago (2008) that does exactly that, and writes its output to a comma-separated value (.csv) formatted file so that it can be easily viewed in a spreadsheet program or easily parsed via a scripting language. The UI for WFP Checker (following a scan of a mounted volume) is illustrated in Figure 6.8.
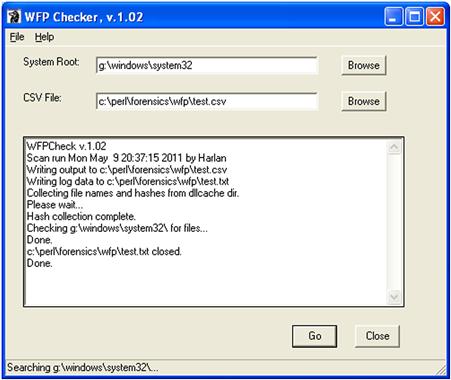
WFP Checker is a pretty straightforward tool for scanning live systems for indications of “protected” files that have been modified in the manner described earlier in this section. Keep in mind, however, that following hashing the files in the dllcache directory, only those corresponding files in the system32 directory are hashed and compared (it should be noted that depending on the source of the files, cached copies may be maintained in other directories). Some application installers may place files in other directories, and in order to maintain a relatively low “noise” level (I didn’t want to introduce more data to be analyzed) and reduce false positives, the rest of the volume is not searched. As you can see in Figure 6.6.wfp1, a log file of the application’s activity is maintained along with the output file.
Alternate data streams
Alternate data streams (ADSs) are an artifact associated with the NTFS file system that have been around since the implementation of NTFS itself. ADSs were originally meant to provide compatibility with the Macintosh Hierarchal File System (HFS), providing the ability to store resource forks for files shared between Windows NT and Mac systems. ADSs have been covered in great detail in other resources [2], but suffice to say, ADSs can be particularly insidious based on how they can be created and used, and the fact that an analyst may be unaware of or unfamiliar with them. Windows systems contain all of the necessary native tools to create and manipulate ADSs, as well as launch executables and scripts “hidden” in ADSs; however, until recently, Windows systems did not contain any native tools for locating arbitrary ADSs created within the file system. By “until recently,” I mean to say that it wasn’t until Vista was released that the “dir” command, used with “/r” switch, could be used to view arbitrary ADSs. There are also a number of third party tools that you can add to your system or toolkit that will allow you to view ADSs, including Frank Heyne’s command line lads.exe (available from heysoft.de), streams.exe (available from Mark Russinovich’s site at Microsoft), and the GUI-based alternatestreamview.exe, available from nirsoft.net. Any of these tools can be run against a mounted image file, but keep in mind these artifacts are specific to NTFS. If the file system of the imaged system is FAT based, there’s really no point in checking for ADSs.
So why are ADSs an issue? Well, there are a number of files on systems; in many cases, thousands of files. Even when an acquired image is loaded into a commercial forensic analysis application (several of which will highlight ADSs in red font), ADSs may not be immediately visible to the analyst without digging within the directory structure. As we’ve mentioned, they’re definitely not easy to detect on the live system, as the native tools for doing so are very limited. Therefore, while ADSs are simple and were never intended for malicious purposes, like anything else, they can be particularly insidious if an analyst or system administrator simply isn’t familiar with them, and doesn’t even know to look for them.
On September 20, 2011, an interesting post regarding the creation of “stealth ADSs” appeared on the Exploit-Monday.com web site (the post can be found online at http://www.exploit-monday.com/2011/09/stealth-alternate-data-streams-and.html). The post outlines, in part, how to add an ADS to a file, which was first created using specific names (i.e., NUL, CON; part of the device namespace in Windows). These files can be created by appending “\\?\” to the file path. The author of the post found that neither streams.exe (available from Microsoft at http://technet.microsoft.com/en-us/sysinternals/bb897440) nor the use of “dir/r” (command line switch available on Windows starting with Vista) included the capability of detecting ADSs “attached” to these files, unless the file path was specifically prepended with “\\?\.” The blog post also illustrated how Windows Management Instrumentation could be used to launch executables from within these “stealth ADSs,” illustrating the risk associated with this capability. Michael Hale Ligh (also known as “MHL,” one of the coauthors of The Malware Analyst’s Cookbook) quickly followed with a blog post of his own (found online at http://mnin.blogspot.com/2011/09/detecting-stealth-ads-with-sleuth-kit.html) which illustrated the use of tsk_view.exe (see his blog post for a link to the tool) to detect these stealth ADSs.
PE file compile times
Another check that we can run against individual files (this may take a little bit of programming to automate) is take advantage of metadata embedded within PE files in order to attempt to detect suspicious files. The compile date is a 32-bit value (the number of seconds since December 31, 1969, at 4:00 pm) which is a time date stamp that the linker (or compiler for an object file) adds to the header of a PE file, as illustrated in Figure 6.9.
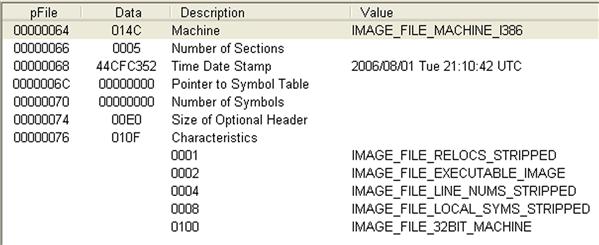
As illustrated in Figure 6.9, the compile date appears as “2006/08/01 Tue 21:10:42 UTC.” The created and modified time stamps within the file’s metadata are often modified (referred to as “timestomped”) in order to disguise the malicious file and make it blend in with legitimate operating system and application files. While the compile time stored in the PE header could be similarly modified (using a hex editor, for example), it is not often seen in practice. Therefore, comparing the compile time from the PE header with the created and modified times from the file metadata and looking for anomalies may allow you to identify malware.
On “normal,” uninfected systems, the PE files provided by Microsoft will generally be from the installation medium and have the dates of when the original operating system (OS) binaries were compiled. There are a number of PE files, of course, that may be updated by patches and Service Packs, and will subsequently have compile dates associated with when the patches were built. However, consider this example—in November 2009, a malware author creates a PE (.exe or.dll) file, and shortly thereafter, deploys it to compromised systems. As part of the infection mechanism, the file metadata times are “stomped”—in this case, the file times are copied from a file known to be on all Windows systems. This is usually done to hide the existence of the file from responders who only look at those times. One file from which malware authors seem to prefer to copy file times, noted by malware analysis conducted by AV vendors and reverse engineers, is kernel32.dll, found in the system32 directory. So, if the compile time of the suspicious PE file is relatively “recent” (with respect to your incident window), but the creation time of the file is before the compile time, you may have found a suspicious file.
You might also find suspicious files by considering the executable file’s compile time in isolation. For example, if the values were all zeros, this might indicate that the malware author directly edited the values. Another example of a suspicious compile time might be one that predates modern versions of Windows, such as anything before 1993.
As with other techniques, you may find that you’ll have a number of possible false positives. For example, legitimate system files on Windows systems get updated through the Windows Update mechanism, but may have creation dates from the original installation media (consider the discussion of file system tunneling from Chapter 4). Consider that these may be false positives and not explicit indicators of malware infections. As such, be sure to correlate your findings from other techniques.
Master boot record infectors
A great deal of malware runs from within the file system of the infected system itself, that is, the malware or a bootstrap mechanism for the malware exists some place within the file system. The malware may be an executable PE file on the system (it may be encrypted), or instead of the malware itself, a downloader may exist on the system that, when activated, downloads the latest and greatest malware and launches it. However, malware has been seen to exist on the disk, albeit originate from outside the active volumes; these are often master boot record (MBR) infector malware.
Perhaps the first known MBR infector was known as “Mebroot.” According to the Symantec write up (found online at http://www.symantec.com/security_response/writeup.jsp?docid=2008-010718-3448-99) this MBR infector was first written in November 2007 and later modified in February 2008. Once this malware was discovered, analysts determined just how insidious it was, in that an MBR infector allows the malware author to infect a system very early during the boot process, before most protection mechanisms have been initiated. In particular, artifacts of a Mebroot infection included the finding that sectors 60 and 61 of the disk (on many, albeit not all systems, the MBR is found at sector 0 and the first partition begins at sector 63) contained kernel and payload patcher code, respectively, and that sector 62 contained a preinfection copy of the MBR. Now, this may not be the case for all variants of Mebroot, but it is important to note that on a normal Windows system these sectors are usually full of zeros (and more importantly do not contain copies of the original MBR!).
About two months after the Symantec description of Mebroot was published, an article titled “MBR Rootkit, A New Breed of Malware” appeared on the F-Secure blog (found online at http://www.f-secure.com/weblog/archives/00001393.html) and provided some additional information about Mebroot. Then, in mid-February 2011, another article titled “Analysis of MBR File System Infector” was posted to the F-Secure blog (the article can be found online at http://www.f-secure.com/weblog/archives/00002101.html), which described yet another bit of malware named “Trojan:W32/Smitnyl.A,” that modifies or infects the MBR. The description of Smitnyl.A includes such artifacts as a copy of the original MBR copied to sector 5, and the infector payload starts at sector 39. According to the description, there is also apparently an encoded executable located in sector 45.
So how does this help us, as forensic analysts, in detecting the presence of MBR infectors in an acquired image? Well, one check that we can run programmatically (which is a fancy way of saying “we can write code to do this for us”) is to determine where the first partition starts (we can confirm this by running mmls.exe from the TSK tools against the image), and then to run from sector 0 to that sector (usually—though not always—63) and locate any sectors that do not contain all zeros.
Let’s take a look at an example; Figure 6.10 illustrates the output of mmls.exe (one of the Sleuthkit tools) run against an acquired image of a Windows system.

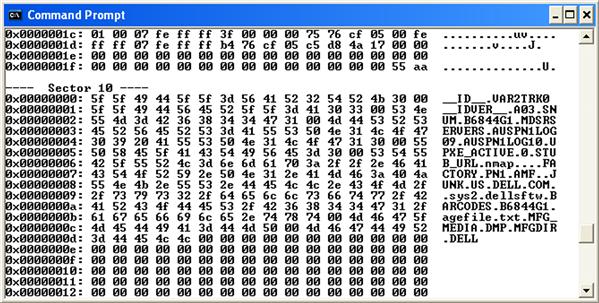
As we can see in Figure 6.10, the first 63 sectors are “Unallocated,” and the first NTFS partition for this system (in this case, the C:\volume) starts at sector 63. Sample Perl code to check the sectors with a raw/dd format image for any content other than zeros might look like the following:
When I ran the above code against an image that I had already checked manually (by opening the image in FTK Imager and tabbing through sectors 0 through 63 in the hex view pane), I found that as expected, sectors 0, 10, and 63 contained something more than zeros. At this point, I’ve reduced the amount of data I need to look at (data reduction through coding is a wonderful thing) from a total of 64 sectors to just one, as sector 0 contains the MBR and sector 63 contains the beginning of the C:\volume. Running this same code against a system infected with either of the discussed MBR infectors would produce markedly different results, but still only have to dig into about half a dozen (as opposed to 64) sectors.
However, our coding doesn’t need to stop there … and because this really rocks, I didn’t stop with just the above sample code. I ended up writing mbr.pl, a Perl script that provides much more functionality than the above sample code (the code for mbr.pl is a bit too lengthy to list here) which not only tells the analyst which 512 byte sectors are nonzero, but will also provide other capabilities. For example, we can see just the sectors that contain something other than zeros using the following command line:
If we want to see more, we can remove the “-s” switch (stands for “summary”) and have the script print out the nonzero sectors in a hex editor-like format, as illustrated in Figure 6.11.
Finally, the script also allows us (via the “-d” switch, for “dump”) to dump the raw contents of the 512 byte sectors to files on the disk. This allows us to run diff commands on the sectors, or generate MD5 or ssdeep hashes for the sectors; the raw sectors or the hashes can be uploaded to sites like VirusTotal for a modicum of analysis. Further, file hashes generated using Jesse Kornblum’s ssdeep.exe (freely available online from http://ssdeep.sourceforge.net/) can be compared to determine if any of the hashes are similar, as some MBR infectors (albeit not all) will copy the original MBR to another sector.
Other checks can be added to this code; for example, we could check the first two bytes of the sector for “MZ,” which is just a quick and dirty check for the possibility that the sector is the beginning of a PE file. The mbr.pl script is provided as part of the materials associated with this book.
Registry analysis
Earlier in this chapter, we discussed persistence mechanisms and malware artifacts, and how both can be found in the Registry. In Chapter 5, we discussed various tools and techniques for parsing data from the Registry, and we can use those to detect the presence of malware on systems. Registry analysis can be an extremely important and revealing technique when looking for the presence of malware in an image. For example, as new variants of Conficker were released, they weren’t immediately detected by installed AV products on a good number of systems, but one thing did remain constant across the variants; the malware used a random service name, running as part of the svchost.exe process, as its persistence mechanism. In many instances, within malware families that use the Registry for persistence, there is some consistency across the family.
In addition to persistence mechanisms, malware will many times also have other artifacts that you can look for, that will indicate the presence of malware when AV scanner applications do not do so. Consider some of the artifacts discussed earlier in this chapter as well as Chapter 5, such as values beneath the MUICache key, Prefetch files, processes listed in the Dr Watson log file, etc.; these (and others) can provide indications of malware on a system that may be missed by AV products.
Additionally, you may want to check locations within the Registry that provide indications that programs have executed. For example, consider the AppCompatCache value within the System Registry hive, first discussed publicly by Andrew Davis (of the consulting firm Mandiant) on April 17, 2012 (the blog post can be found online at https://www.mandiant.com/blog/leveraging-application-compatibility-cache-forensic-investigations/). Be sure to read the white paper linked to in the article, as it describes how this value is implemented on various versions of Windows, as well as how analysts can use this information during an investigation. Corey Harrell has also posted several articles to his blog (http://journeyintoir.blogspot.com) in which he describes how he has used the data from this value to further his own examinations. The RegRipper appcompatcache.pl plugin can parse data extracted from this value for Windows systems from XP through Windows 8, although the compatibility with Windows 8 systems is still somewhat in beta (due to a limited amount of test data being available). Another Registry location to check for indications of program execution is the AppCompatFlags subkey values from the Software and user NTUSER.DAT hives. If the subkeys contain values, they can provide information about programs that have executed on the system, as described in the Microsoft Developer Network (MSDN) article posted online at http://msdn.microsoft.com/en-us/library/bb756937.aspx.
Internet activity
Many analysts look to a user’s Internet activity in order to determine web sites that they’ve visited, often as part of a wider examination. However, the same technique can be used in order to check for the presence of malware, as well as potentially identify the source of the malware (from whence it came). Many times, when an intruder gets malware onto a system, they do so with elevated privileges; for example, if the intruder gains Administrator-level access to a system, they can use those privileges to create a Scheduled Task or a Windows service, both of which will run with elevated, System-level privileges. If the malware running with elevated privileges uses the WinInet API (also used by Internet Explorer) in order to communicate off of the system, there will be artifacts of this communications, including entries in the Temporary Internet Files (TIF) index.dat file for the “Default User” user.
On November 15, 2006, Robert Hensing (a Microsoft employee who used to lead their incident response team) posted to his TechNet blog (found online at http://blogs.technet.com/b/robert_hensing) about malware “hiding” in the “Default User” user profile. Robert had seen some of the same odd entries in a user profile’s web history that I’d seen during examinations, and had gone so far as to test his theories by launching Internet Explorer as a Scheduled Task (so that it would run with System-level privileges). After surfing to several sites using this “super IE,” Robert then found web history in the “Default User” profile. It’s also important to note that Robert had actually posted to his blog much earlier (January 27, 2005, with a post titled “Anatomy of a WINS server hack”) with respect to finding the artifact of content in the TIF directory in the “Default User” profile.
An analyst has a number of means available to parse the Internet history from within an image. I have found that ProDiscover (both the IR and Basic editions; I mention these two specifically as they are the ones to which I have access) is very good at parsing this data; simply open the project file and navigate to your image via the Content View. Navigate through the tree to the user profile directory and then right click to reveal the drop-down menu illustrated in Figure 6.12.
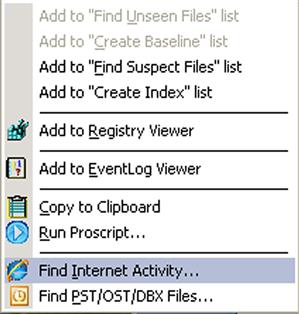
Select “Find Internet Activity…” and allow the application to populate the Internet History Viewer, as illustrated in Figure 6.13.
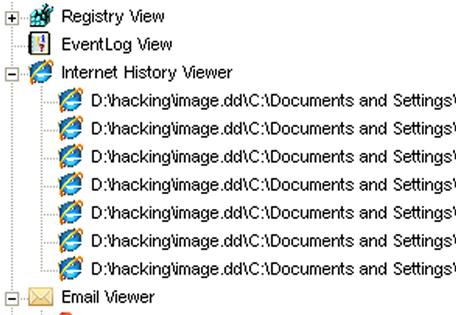
Christopher Brown released ProDiscover (Incident Response Edition) 6.10.0.1 on May 5, 2011, and one of the updates that he included in this version is the ability for ProDiscover to also parse Internet history from the Chrome and Firefox browsers. (Note: ProDiscover version 8.2 was available at the time of this writing.)
I have also seen Internet history for the LocalService account during analysis, and in a manner similar to what Robert was able to demonstrate, have been able to trace these artifacts back to malware that was making use of the WinInet API and was installed as a Windows service, running under the LocalService account. Examination of the malware indicated that it did, in fact, use the WinInet APIs, and testing of the malware in a lab environment illustrated that the malware did communicate off of the infected system through the use of HTTP requests.
Another way to quickly check for the potential presence of this type of malware artifact is to navigate to the TIF directories for the profiles in question and quickly check to see if the index.dat files contain any entries. You can do this by checking the size of the file and seeing if it contains all zeros (I’ve seen this before), or extract strings from the files. As we will discuss in more detail in Chapter 7, you can also use a Perl script that uses the Win32::UrlCache module to parse the contents of the index.dat file. The method or tool you use to perform a check like this is really up to you, as the examiner, but the important point of this section is to understand that Internet history is not something that we normally expect to see in association with the “Default User” or “LocalService” user profiles on a Windows system, and as such, this is something worth checking for, and something I do for most cases that are suspected to involve some type of malware.
Additional detection mechanisms
In addition to the various detection techniques we’ve discussed so far, there are a number of other locations within an image that you can look for indications of a malware infection, for example, looking for unusual Scheduled Tasks, either the actual.job files in the Tasks directory or listed in the Scheduled Tasks log file (SchedLgU.txt) for Windows XP and 2003, and the Microsoft-Windows-TaskScheduler/Operational Event Log on Windows Vista systems and beyond (discussed in Chapter 4).
We’ve discussed malware that uses a Windows service as a persistence mechanism and other artifacts associated with services. Another place you might want to look is to examine the System Event Log (discussed in detail in Chapter 4) for indications of services being started (event ID 7035) with a user security identifier (SID), rather than a system SID. Services are usually started by LocalService (SID: S-1-5-19) or NetworkService (SID: S-1-5-20) or similar accounts (depending upon their configuration), so services (particularly the PSExecSvc service) started by a user account are definitely worth a closer look. Also, services usually start when the system is booted; services that are started hours or days after a system start may also indicate something suspicious.
Another location within the file system that you may find indications of malware includes Temp directories, either the Windows Temp directory (C:\Windows\Temp) or the Temp directory within the user profile. Further, the Tasks folder (C:\Windows\Tasks) is often used to store malware or a location from which to conduct operations, as this is one of the “special” Windows folders in which the true contents are not visible when viewed via Windows Explorer. The same is true for the Fonts (C:\Windows\Fonts) folder, as well as the Recycle Bin. With these folders, the true contents can be seen via the command line, using the “dir” command.
As with many of the techniques that we’ve described so far in this chapter, none of them provides us with 100% guaranteed detection of malware. However, we can correlate the output from multiple techniques and use these techniques to perform data reduction and address the potential for malware being on the system you’re analyzing. Remember that there are no silver bullets in information security and digital forensics, but by automating the use of multiple techniques to look for different artifacts of malware, from different perspectives, the goal is to provide enough coverage to minimize the chance of the malware avoiding detection. We should never expect to completely eliminate the possibility of a system being infected, but what we can do is continually improve our process and checklist, and perform as complete and thorough of an assessment as we can.
Seeded sites
Not long ago, an excellent question was posed in an online forum as a hypothetical event. Essentially, someone is found to have contraband images and videos on their system, potentially as a result of using a P2P sharing network. During the examination of the system, several instances of malware are found, and the claim is made that the purveyor of the contraband materials purposely “seeded” his site with malware in order to provide his customers with a plausible excuse, and that this was actually part of the “contract” for accessing the site.
Given something like this (and you’d think that this will be something that we’d need to address), what could an analyst do to address the issue? As we’ve discussed in this chapter, running an AV scan on a system and locating files identified as malware is simply one step of several in the process of addressing the “Trojan Defense.” Once the malware files have been identified, the game isn’t over. Just because malware files were found on a system, it doesn’t immediately follow that those files were responsible for downloading the contraband. The first thing that an analyst would want to do is determine and document where the malware files are located within the file system, particularly with respect to the contraband files. Were the files identified as malware found in the P2P download directory, or were they located in the web browser cache directory? This can be a very important factor, as the presence of malware on a system does not immediately lead to that malware being responsible for populating the system with contraband images.
A next step would be to determine if the malware had ever actually executed. After all, just because the malware files were located on the system doesn’t mean that the “Trojan Defense” can effectively be employed (the operative word being “effectively”). If the malware files were written to the file system, but the malware was never executed (and this fact can be proven), then the defense is nullified. What are the file times for the malware files? What are other artifacts of the identified malware? Does the malware modify Registry keys or values when run? Are other files created as a result of the malware executing? What is the malware’s persistence mechanism (i.e., “Run” key, Windows service), and does that mechanism exist on the system? Remember, the absence of an artifact where one is expected is itself an artifact. As such, the analyst may be able to build a thorough case demonstrating that while the malware files were found on the system, there were no indications that the malware had actually been executed, and completely obviate the “Trojan Defense.”
Finally, did the identified malware have the capability to download contraband, as well as the functionality to place the contraband within the file system where they were found? This may require a modicum of reverse engineering skill to determine, but sometimes it’s as simple as opening the malware.exe or.dll file in a tool such as PEView (found on the web at http://www.magma.ca/~wjr/) and looking at the Import Address Table in order to see if it imports any DLL functions that allow for network or off-system communications (remember our discussion in this chapter regarding the WinInet APIs). Determining whether the identified malware could have downloaded contraband files may simply be an additional step to further address the “Trojan Defense.” In one malware examination, I was able to locate actual indications of off-system communications after our malware reverse engineer succeeded in running the malware and providing me with unique strings that were specific to the malware. I ended up locating several instances of the keywords within the pagefile extracted from the system, and examining the surrounding bytes, was able to see HTTP GET request headers and responses, which included time stamps.
Summary
Detecting malware on a system can be difficult, and detecting potential malware within an acquired image even more so. However, this is something analysts in law enforcement, as well as in the public and private sectors have to deal with, and as such, need the knowledge, skills, and process in order to accomplish this task. AV scanning applications may prove insufficient for this task, and analysts may have to look for artifacts of a malware infection, rather than the malware itself, in order to locate the malware. As such, it is important for analysts to understand the characteristics of malware in order to understand the types of malware artifacts that may be present on a system, as well as where and how to locate those potential. Analysts should always document their activities, and developing a checklist of malware detection techniques can be very valuable, particularly when the analyst fills that checklist in with the results of each technique, or a statement or justification for not using the technique.
In the next chapter, we will walk through the process of creating a timeline of system activity for analysis; this is a technique that can be used in order to determine a great deal of additional information about not just the infection vector used to get the malware on the system but also actions that occurred in association with the malware following the infection. This analysis technique has a number of other uses, and as such deserves a chapter of its own.