Registry Analysis
The Windows Registry is a veritable treasure trove of data that can be valuable, or even critical, to an investigation. As such, analysts need to have some familiarity with the Registry, and what can be found within the various hive files. Other resources have provided considerable background information on the Registry itself, as well as what can be found within the Windows XP Registry hive files. Every new version of Windows brings a new application-level structure to the Registry, and this information needs to be explored, documented, and understood.
Keywords
Registry; hive
Information in This Chapter

Introduction
The Registry is a key component of every Windows system, and as Windows systems have become more complex, progressing from Windows 2000 to XP and on to Windows 7 and 8, the value of the Registry as a source of forensic data has likewise increased. As such, what is available to an analyst through analysis of the Registry needs to be better understood. As the versions of Windows have progressed, each new version has brought with it new data that can be critical to an investigation. As applications come to rely more on the Registry, and the “user experience” is monitored and optimized, even in part by the Registry, more useful data is available to be incorporated into an examination.
The Windows Registry has always been a central component, not just of Windows systems, but of the forensic analysis of those systems. The Registry contains a great deal of configuration information that can significantly impact your analysis. For example, a Registry single value can determine whether or not file last accessed times are updated through normal user activity, or if files automatically bypass the Recycle Bin when the user simply selects the file and hits the “Delete” key, or if application Prefetch files (see Chapter 4) are created, or which domain name service (DNS) server the system will use for name resolution. All of these like very basic aspects or configuration settings for a Windows system, but each one can have a significant impact on your analysis. If the user’s Recycle Bin folder is empty, do you assume that they emptied it, or do you check the NukeOnDelete value? A single Registry value can tell you which volumes, if any, are being monitored for the creation of Volume Shadow Copies (VSCs, see Chapter 3), or if the Internet Explorer (IE) browser history gets automatically cleared when the user closes the application.
The Registry also records a great deal of user activity. For example, on Windows 7 systems, if the user clears the IE browser history, an entry gets created in the user’s hive file with the date and time that they cleared it. The user’s UserAssist subkeys (discussed in detail later, in the User Hives section) provide something of a record of the applications that the user has launched via the Windows Explorer shell, and when they last launched that application. The Registry also records information about folders, devices, network resources, and files the user accessed, and in some cases, when they accessed each of the files. Much of this recorded information persists well after the user removes the application that they launched. For example, I have analyzed systems and found that the user installed an application, ran it multiple times, and deleted that application; all of these actions, from launching the setup routine to launching the uninstall routine, and everything in between, was recorded right there in the Registry. All of this can be very valuable to an examiner, and provide a great deal of context and granularity to the examination.
In this chapter, we will not be discussing the Registry in detail, as other resources have already laid the groundwork on this subject. Details of the Registry are covered in Ref. [1] and even more so in Ref. [2]. Much of what was covered in these two books (particularly the binary structure of the Registry, as well as Registry analysis techniques and tools) applies across all versions of Windows, including Windows 7 and 8. Ligh et al. [3] provide considerable information regarding how the Registry can be a valuable forensic resource when analyzed in conjunction with or as part of Windows physical memory and malware analysis. With this considerable treatment of the topic, there is really no significant value in repeating what’s already been said; as such, in this chapter, we will assume that the reader (that’s you) has a basic understanding of the Registry—where the hives are located within the file system, the difference between a “key” and a “value” some of the tools used to collect information from the Registry (including but not limited to RegRipper), etc.—and focus on information available in the Registry that is specific to Windows 7.
Also, I’d like to take something of a different approach in this chapter; rather than providing a list of keys or values of interest, I’d like to discuss the Registry in terms of addressing analysis questions through case studies or investigative processes. Many resources leave it up to the analyst to flip back and forth between the various pages, trying to track information between hives; instead, I think it may be useful to present all of the components of a case study together. Hopefully, this approach will be valuable to analysts.
Finally, one of the questions I hear continually from the community after the release of a new version of Windows is, “what’s new?” I’m not really sure how it is useful to provide a long list of what’s “new”—new file paths, new Registry keys and values (and data), new data structures, etc.—that no one is going to ever be able to remember. For example, I hear the question, “what’s new in Windows 8?” fairly often, and in many cases, the folks asking that question may not yet have done a deep analysis of a Windows 7 system, so where do I start? The fact is that each version of Windows, with different service packs and applications installed, presents both its own challenges and its own opportunities. While some folks have conducted research into specific artifacts associated with, for example, the use of the Photos tile on the Windows 8 desktop, I would suggest that it’s far more important (and beneficial) to build on your analysis process than it is to focus on any one particular artifact, or set of artifacts. With this chapter, my hope is to develop an appreciation for the value of the Windows Registry as a forensic resource so that more analysts will include it in their analysis process, and share their findings with others.
Registry analysis
All of the information presented and discussed in the first two chapters of the book Windows Registry Forensics applies across all versions of Windows, particularly the analysis concepts, the binary structure of the Registry (including key and value cells), and the tools that can be used to extract and view information from the Registry, such as RegRipper (available online from http://windowsir.blogspot.com/p/books.html). This book also covers the use of RegRipper in some detail, including how to set it up, how to use it, and even how to create your own plugins for extracting and translating information of interest from the Registry. As such, there’s really no need to repeat content and graphics of what the Registry “looks like” with respect to the native Registry Editor or files on the system, or when the hive file is opened in another, nonnative viewer, such as the MiTeC Windows Registry Recovery (WRR) tool (which can be found online at http://www.mitec.cz/wrr.html). Other tools for extracting and viewing information from Registry keys and values, or monitoring accesses to the Registry on a live system (such as Process Monitor, found online at http://technet.microsoft.com/en-us/sysinternals/bb896645) work equally well on Windows XP, Windows 7, and Windows 8 systems.
As an example, the information from Chapter 3 of Windows Registry Forensics regarding using tools such as pwdump7.exe in order to extract and view the password hashes in the security accounts manager (SAM) hive applies equally as well to Vista, Windows 2008, and Windows 7. However, it is important to keep in mind that the LAN Manager password hash field will (in most cases) say “no password” or “blank” (depending upon the tool used), as the “NoLMHash” value (discussed in MS KB article 299656, found online at http://support.microsoft.com/kb/299656) exists and is set to “1” by default on those versions of the Windows operating system.
Instead, the approach I’d like to take in this chapter is to address analysis questions through case studies, or investigative steps that you can take to answer some common questions when it comes to Registry analysis. In several instances (albeit not all), these case studies will correlate data from multiple hive files, so it makes sense to present the information all together in a single process flow, rather than spreading that information across multiple chapters.
Registry nomenclature
Before we begin our discussion of Registry analysis and dive into some case studies, one thing I think is important to reiterate is Registry nomenclature. Many analysts may not completely understand the names of various objects within the Registry, or why they’re important. Figure 5.1 illustrates a fairly standard view of the Registry on a live system via the native Registry Editor tool.
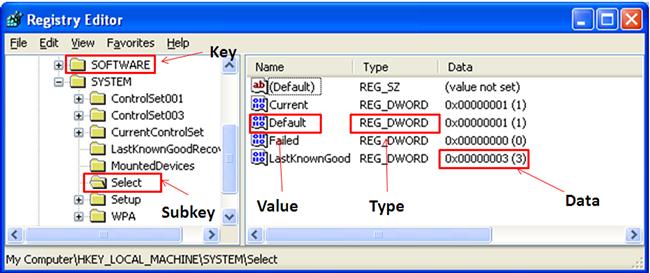
As you can see in Figure 5.1, the Registry is made up of keys, values, and value data. It is important for analysts to understand the differences between these various objects, as they have different properties associated with them. For example, Registry keys (the folders visible in the left-hand pane in Figure 5.1) contain subkeys and values, and also have a property referred to as the LastWrite time. This is a 64-bit FILETIME (a description of the FILETIME object can be found online at http://support.microsoft.com/kb/188768) time stamp that refers to the last time the key was modified in some way. This can include the key being created (creation or deletion being the extreme form of modification), or subkeys or values within the key being added, deleted, or modified. This is an important distinction, as Registry values do not have LastWrite times; however, some Registry values may contain time stamps within their data that refer to some other function or action having occurred. The value of the Registry key LastWrite times, as well as time stamps recorded within the data of various values will be discussed through case studies in this chapter, and are also discussed in Chapter 7.
The registry as a log file
Microsoft refers to the “structured storage” file format (known as “common object model (COM) structured storage” or “object linking and embedding (OLE) structured storage”; the format used for Word documents up to and including MS Office 2003, as well as Jump List and Sticky Notes files on Windows 7, and the binary format specification can be found online at http://msdn.microsoft.com/en-us/library/dd942138(v=prot.13).aspx) as a “file system within a file,” and if you think about it, the same thing can be said about a Registry hive. Keys are often viewed as “folders,” as they contain other keys as well as values. As such, values can then be viewed as “files,” with the value data comprising the file contents. Taking this a step further, we can view a Registry hive file as a log file, as various system and user activity is recorded within the hive files, along with modifications to time stamps (i.e., Registry key LastWrite times). This is important to keep in mind, as some of the most valuable data can be derived from the Registry when combining value data with available time stamps, much like one would do when conducting log file analysis.
All that being said, I think we’re ready to take a look at some of the analysis that can be done through the Registry.
USB device analysis
Tracking the use of USB devices—in particular, thumb drives or external drive enclosures (also referred to as “wallet” drives)—can be a very important aspect of an investigation. For example, determining that a specific removable device was connected to a system, along with information such as who was logged into the system at the time, and what data was accessed during that time period, may provide indications that an employee copied sensitive corporate data onto that device. Alternately, combining information about external device connection with events relating to a malware infection may not only identify a thumb drive as the source of the infection, but also which specific device introduced the malware. Windows 7 and 8 systems record a great deal of information with respect to USB devices that users connect to those systems, most of which is stored in the Registry. Starting with the Registry, an analyst may discover some very interesting information with respect to devices that were connected to a Windows 7 system. For example, it may be possible to not only discover which types of devices were connected to the system, but also to uniquely identify those devices (via a unique instance identifier, or serial number) and determine when the devices were connected to the system. In order to do this, however, we need to not only extract information from multiple locations within a hive file, but we also need to look to information within multiple hive files (System, Software, and NTUSER.DAT). What we will do in this section is walk through a couple of examples of connecting devices to a Windows 7 system, and extracting the information and artifacts of those connections for analysis.
In our first example, we will start with a thumb drive. In this case, I used a 1 gigabyte (GB) thumb drive that I purchased at Best Buy several years ago. The device has a “Geek Squad” logo on it, as well as a “U3 Smart” logo (I removed the U3 components from the device a while back).
The Geek Squad thumb drive had never been connected to my target Windows 7 system before. I connected it to the system at approximately 8:13 am eastern daylight time (EDT) (equates to 12:13 pm UTC), and disconnected approximately 40 minutes later. Then I reconnected the thumb drive to the same Windows 7 system at approximately 9:14 am EDT (approximately 1:14 pm UTC), and used Forensic Toolkit (FTK) Imager version 3.0.0.1442 to extract the System and Software hive files, as well as the NTUSER.DAT from my user profile, from the system. I then shut the system down.
So the first place to start looking for information about the device is in the USBStor keys within the System hive. This has long been known as an initial location where information about USB removable storage devices (thumb drives, “wallet” drives, and as we’ll see later in the System hive section, other devices recognized as removable storage) is maintained. The full path to this key on a live system is:
In this case, we’ll be looking at the subkey beneath the ControlSet001 key. Following the path and looking at the subkeys beneath the USBStor key, we see an entry for the Geek Squad device, which is illustrated in Figure 5.2.
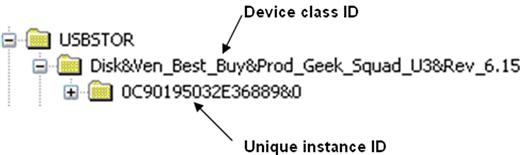
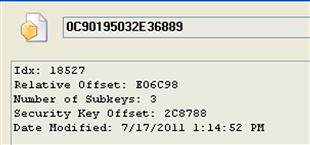
As you can see in Figure 5.2, immediately beneath the USBStor key we see the device instance identifier (device class ID, or just “device ID”) for the device, and then immediately beneath that key we see the unique instance ID key for the device itself. This unique instance ID is, in fact, the serial number maintained in the device descriptor (not the storage section) of the Geek Squad thumb drive.
If we view the relevant Registry keys with WRR, we can right click on the device ID and choosing Properties, we can see the LastWrite time for the device ID key, as illustrated in Figure 5.3.
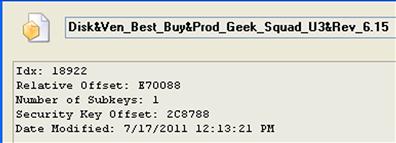
From Figure 5.3, we see that the LastWrite time of the device ID key correlates to the time that the device was first connected to the system since the last time the system was rebooted. What this means is that after the system is booted, a device can be (and in this case, was) connected to the system multiple times; the LastWrite time of the device ID key correlates to the first time that the device was connected to the system following the most recent reboot. Prior to the system being shut down, the device can be disconnected and reconnected multiple times, but the LastWrite time of this key will—in most cases—reflect when the device was first connected during that boot session. However, this may not always be the case; some analysts have reported finding cases where multiple devices had been connected to a Windows system, and all of the devices listed beneath the USBStor key had the same LastWrite time. There is speculation within the community that this anomaly may be the result of a Service Pack or patch having been installed, or of a Group Policy Object (GPO) that modifies the access control list (ACL) on the keys; further analysis of the system itself (perhaps using the TLN creation techniques discussed in Chapter 7 of this book) would be recommended.
At this point, we also have the unique instance ID (or serial number) of the device, which can uniquely identify the device. I say “can,” simply because there is no guarantee that each and every USB thumb drive with a serial number has (or must have) a unique serial number. Some analysts have reported seeing several devices from the same manufacturer, all with the same serial number. Further, some devices do not have serial numbers within their device descriptors and are assigned a unique instance ID by the Windows system to which they’re connected. We can tell the difference between a serial number and a unique instance ID assigned by the operating system, as the one assigned by the operating system has an “&” as the second character. As you can see in Figure 5.2, our example serial number listed in the figure (0C90195032E36889&0) has an “&” as the second to last character, but a unique instance ID assigned by the operating system will have an “&” as the second character. This allows the device to be uniquely identified on that system. The algorithm used to create a unique instance ID for a device that does not have a serial number is not publicly available but is important for analysts to know and understand the distinction in unique instance IDs.
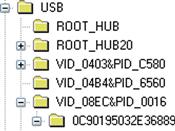
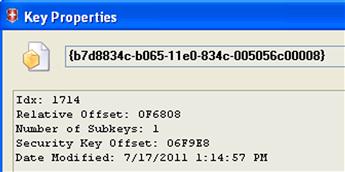
Next, we navigate to the Enum\USB subkey within the same ControlSet, and locate the subkey whose name is the serial number (or unique instance ID) of the device in question. The key for the device we’re interested in, visible in WRR, is illustrated in Figure 5.4.
Right clicking on the key named for the unique instance ID (in this example, the serial number for the device) and selecting Properties, we can see the LastWrite time of the key, illustrated in Figure 5.5.
The LastWrite time of the unique instance ID/serial number key correlates to the last time that the device was connected to the system. This finding appears to be fairly consistent across Windows systems.
Next, we need to navigate to the MountedDevices key at the root of the System hive, and within the values, locate the volume globally unique identifier (volume GUID) that contains the device serial number within its data. In our example, the data for the volume GUID “\??\Volume{b7d8834c-b065-11e0-834c-005056c00008}” contains the device unique instance ID (i.e., serial number), as illustrated in Figure 5.6.
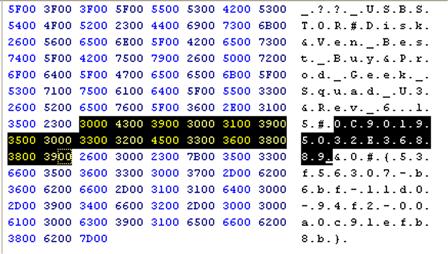
As you can see in Figure 5.6, the device serial number is selected within the value’s binary data. Also within the data, we can see the device ID (“Ven_Best_Buy&Pord_Geek_Squad_U3”), as well. Now, as it turns out, the MountedDevices key also contains a value named “\DosDevices\F:,” which contains the same data as the volume ID value seen in Figure 5.6. This tells us that the device had been mapped to the F:\ volume on the system; this information can be very useful during an examination (for mapping to file paths, volumes listed in Windows shortcuts/shell link (LNK) files and jump lists, etc.). What this also indicates is that no other device had been mapped to the F:\ volume after the Geek Squad device was removed from the system; had another device been connected and mounted as the F:\ volume, we would likely see another device’s information in the data, as opposed to that of the Geek Squad device.
This is a good time to mention that you may find indications of a variety of other types of volumes within the MountedDevices key. For example, TrueCrypt and PGPDisk volumes can be seen listed here, as well, as illustrated in Figure 5.7.
As you can see, the value names for these volumes appear listed a bit differently, beginning with “#” rather than “\??\Volume.” The use of TrueCrypt and PGPDisk volumes may be part of legitimate business practices; forensic analysts will often use both of these methods to protect data being stored or shipped. However, it may also indicate specific attempts to hide data.
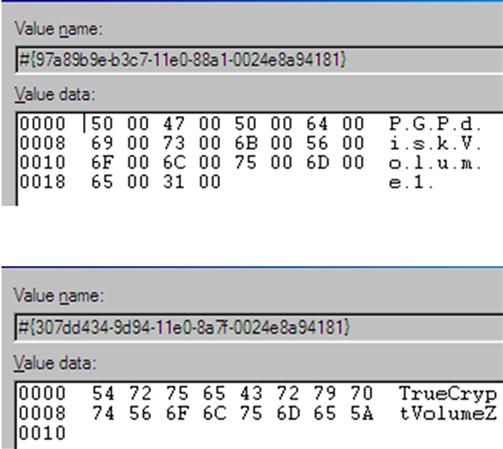
Now we can navigate to the Software\Microsoft\Windows\CurrentVersion\Explorer\MountPoints2 key within the NTUSER.DAT hive file for a user, and locate the subkey with the same name as the volume GUID (“{b7d8834c-b065-11e0-834c-005056c00008}”). Right clicking that key and choosing “Properties” we can see that the LastWrite time for that key corresponds to the last time that the device was connected to the system, as illustrated in Figure 5.8.
The information illustrated in Figure 5.8 not only allows us to see when the device was last connected to the system but also under which user context it was connected.
By now, you should be able to see that there is a great deal of information available within the Windows 7 Registry regarding USB thumb drives. Starting with the ControlSet00x\Enum\USBStor subkeys (where “x” refers to the ControlSet marked as “current” within the Select key) in the System hive, we can determine the device class and unique instance IDs of devices connected to the system. We can use the unique instance ID to then map to the MountedDevices key (at the root of the System hive) and determine the volume GUID, and possibly the drive letter to which the device was mounted. Then using this information, we can determine both when the device was first connected during the most recent boot session (LastWrite times from USBStor and DeviceClasses subkeys), as well as when the device was last connected to the system (LastWrite time from USB subkey in the System hive, and MountPoints2 subkey in the NTUSER.DAT hive).
Interestingly enough, there’s even more information available about USB-connected devices in the Windows 7 Registry. For instance, continuing with our previous example and navigating to the “Microsoft\Windows Portable Devices\Devices” key in the Software hive, we see a subkey named as follows:
WPDBUSENUMROOT#UMB#2&37C186B&0&STORAGE#VOLUME#_??_USBSTOR#DISK&VEN_BEST_BUY&PROD_GEEK_SQUAD_U3&REV_6.15#0C90195032E36889&0#
The LastWrite time for this key (viewed via WRR) correlates to the first time that the device was connected to the system during the most recent boot session. Also, the key has value named “FriendlyName,” whose data is “Test.”
Next, if we navigate to the “Microsoft\Windows NT\CurrentVersion\EMDMgmt” key within the Software hive, we see a key named as follows:
_??_USBSTOR#Disk&Ven_Best_Buy&Prod_Geek_Squad_U3&Rev_6.15#0C90195032E36889&0#{53f56307-b6bf-11d0-94f2-00a0c91efb8b}TEST_1677970716
Information available online indicates that the EMDMgmt key is associated with ReadyBoost, a technology available beginning with Vista systems (and included in Windows 7 and 8) that allows the system to use a USB-connected device as a source of RAM. Within the name of the key, we can see the device ID, the unique instance ID, and the word “TEST” is actually the name of the FAT16 volume on the device. As with the Devices key discussed previously, the LastWrite time on this key appears to correlate to the first time that the device was connected to the system during the most recent boot session. In addition, the key contains several values, as illustrated in Figure 5.9.
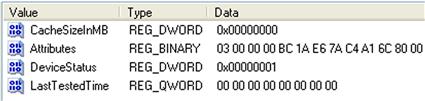
As you can see in Figure 5.9, the available values could potentially provide some valuable information, in particular the “LastTestedTime” value. If this value and the “CacheSizeInMB” value were populated with nonzero data, this might indicate that the device was used as a ReadyBoost drive, and provide information regarding when it was last tested. If nothing else, this key and its values provide an additional indication of certain devices that had been connected to the system, even if they hadn’t been tested by ReadyBoost.
Another piece of information available from the EMDMgmt key, particularly for USB hard drive enclosures (“wallet drives”) is the volume serial number for the mounted volume. Now, this is not the drive or disk signature seen in the MountedDevices key. A volume serial number is used to identify a volume and is changed whenever the volume is formatted.
As an example, I have a SimpleTech 500-GB drive that I had attached to my Windows 7 system at one point; the EMDMgmt subkey for the device is “RIG___ST500_1354504530.” The volume name is “ST500,” and I can view the volume ID using the following command:
If I open the Windows calculator tool (calc.exe) and switch to the scientific view, I can convert the value from the EMDMgmt subkey (i.e., “1354504530”) from decimal to hexadecimal; when I do this, I get “50BC1952.”
Remember, I said that the volume serial number is not the same thing as the drive signature; these are often confused, or considered to represent the same artifact. A drive signature is a 4-byte value stored at offset 0×1B8 within the master boot record (MBR). A volume serial number is a unique value assigned by Windows to a volume when the volume is formatted. The drive signature for the wallet drive in question, which is available via the MountedDevices key, is “23 48 3D D4.” I verified this by plugging the device back into the system, and then viewing the physical disk via FTK Imager; I saw the drive signature within the 4 bytes starting at offset 0×1B8 (440 in decimal) within the drive MBR.
The process for tracking “wallet” or external drives (also referred to as “drive enclosures”) on Windows 7 systems is just a bit different. As an example, I connected a Seagate FreeAgent GoFlex external USB drive to my Windows 7 system (the serial number written on the label was NA02VNHQ), and as you’d expect, an entry was created in both the USBStor key as well as the USB key within the System hive. The keys that were created are illustrated in Figure 5.10.
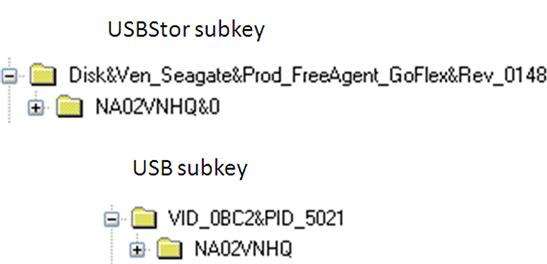
As you can see in Figure 5.10, the unique instance ID subkey for the device is, in fact, the serial number of the device. Also, as with thumb drives, the LastWrite time of the unique instance ID key beneath the USB key correlates to the last time the device was connected to the system.
The biggest difference between drive enclosures and other USB removable storage devices is that we do not use the unique instance ID to determine the volume ID from the MountedDevices key. Remember, this should allow us to then determine which user may have had access to the device. Instead, we have to use the drive or disk signature, which is the 4 bytes located at offset 440 (0×1B8) within the MBR of the drive. As I have access to the drive, I can use a hex editor or forensic analysis software the view the disk signature, as illustrated in Figure 5.11.

With the disk signature (which is set by the operating system whenever the drive is formatted), we can then parse the contents of the MountedDevices key using the mountdev.pl RegRipper plugin and find the volume GUID for the drive enclosure, which appears as follows:
Once we have this information, we can then parse the contents of the MountPoints2 key within the user’s NTUSER.DAT hive using the mp2.pl RegRipper plugin, in order to determine when the device was last connected to the system. In this case, that information appears as follows:
As it turns out, this is not only the same LastWrite time for the unique instance ID key found beneath the USB key, it’s also the last time I actually plugged the device into the system, although this time is displayed in Coordinated Universal Time (UTC). As with other USB removable storage devices, the first time that the device was connected to the system can be found by examining the Windows Event Logs (as discussed earlier in this chapter) or the setupapi.dev.log file.
Thumb drives and external “wallet” drives (those in drive enclosures) are not the only devices that can be attached to Windows systems. Other devices may be connected, including smartphones and even devices capable of capturing video and still images, such as the Apple iTouch. This can be particularly important during an exam if images are found to contain EXIF metadata (see Chapter 4), and the analyst finds that a device (smart phone, iTouch, digital camera) of the type identified in that data had also been connected to the system. In order to demonstrate what these devices might “look like” to an analyst examining the Registry from an acquired image from a Windows system, I connected an Android smart phone (Motorola Backflip) and an Apple iTouch to a Windows 7 system, disconnected them, repeated the connection–disconnection process later, and then finally rebooted the system. In order to view artifacts from this activity, I extracted the Registry hive files from the system and parsed them using RegRipper, or more specifically, the command line tool, rip.pl. Using the usbstor.pl plugin, we see the following:
C:\tools>rip.pl -r f:\system -p usbstor
Disk&Ven_Motorola&Prod__MB300&Rev__001 [Wed Jul 20 13:24:27 2011]
Now, this device was first plugged into the Windows 7 system at 9:24 am, July 20, 2011 EST. This can be verified by examining the setupapi.dev.log file, as well as the Windows Event Log, as mentioned previously in this chapter. We also know that the LastWrite time on the device ID and unique instance ID keys do not specifically correlate to when the device was last connected to the system; in this case, the LastWrite times correlate to the first time the device was connected to the system during the most recent boot session, but only because this was the first time that the device had been connected to the system.
Something else interesting is that I don’t see any indication of the Apple iTouch in the output from the usbstor.pl plugin. However, using the usbdevices.pl plugin, we see the following:
C:\tools>rip.pl -r f:\system -p usbdevices
Launching usbdevices v.20100219
Apple iPod [VID_05AC&PID_129E\b9e69c2c948d76fd3f959be89193f30a500a0d50]
This shows us that the Apple iTouch is identified as an iPod, with unique instance ID (or serial number) “b9e69c2c948d76fd3f959be89193f30a500a0d50.” During testing, the iTouch was last connected to the system at 11:02 am, July 11, 2011 EST, and the LastWrite time for the unique instance ID, when viewed via WRR, is “7/20/2011 3:02:37 PM,” which correlates to the last time the device was connected to the Windows 7 system, expressed in Universal Coordinated Time (UTC).
Using the mountdev.pl plugin to examine the MountedDevices key within the System hive, we see the following:
C:\tools>rip.pl -r f:\system -p mountdev
Get MountedDevices key information from the System hive file.
Device:_??_USBSTOR#Disk&Ven_Motorola&Prod__MB300&Rev__001#TA538029DP&0#{53f5630
This indicates that the smart phone was mounted to the system with the volume GUID “{5d3e6180-b2c7-11e0-8563-005056c00008}.” The iTouch, however, does not appear to have been recognized as a removable storage device, and does not appear to have been mounted as a volume. Using the devclass.pl plugin to look at the devices mounted as disks indicates the following:
C:\tools>rip.pl -r f:\system -p devclass
ControlSet001\Control\DeviceClasses\{53f56307-b6bf-11d0-94f2-00a0c91efb8b}
As mentioned previously in this chapter, the smart phone was first connected to the system at 9:24 am, July 20, 2011 EST. We also know from previous discussions that the LastWrite time for the device key listed under the DevicesClasses disk device subkey will tell us when the device was first connected during the most recent boot session; in this case, Wed Jul 20 13:24:27 2011 (UTC).
With the volume GUID for the smart phone, we can now run the mp2.pl plugin against the NTUSER.DAT hive file extracted from the system, in order to parse the MountPoints2 key. Running the plugin, we see the following:
C:\tools>rip.pl -r f:\ntuser.dat -p mp2
Software\Microsoft\Windows\CurrentVersion\Explorer\MountPoints2
Again, as discussed previously in this chapter, the LastWrite time for the volume GUID key for the smart phone (i.e., Wed Jul 20 15:11:34 2011 (UTC)) indicates (and does in fact correlate to) when the device was last connected to the system.
We can then use the port_dev.pl plugin to parse the contents to the “Microsoft\Windows Portable Devices\Devices” key from the Software hive, and when we do, we see the following:
C:\tools>rip.pl -r f:\software -p port_dev
Microsoft\Windows Portable Devices\Devices
LastWrite: Wed Jul 20 12:56:48 2011 (UTC)
Device: DISK&VEN_MOTOROLA&PROD__MB300&REV__001
The output of the port_dev.pl plugin indicates key LastWrite times that correlate to the first time that each device was connected to the system during the most recent boot session. It also indicates that the smart phone had been mapped to the F:\ volume, which is not something that we got from the contents of the MountedDevices key (from the System hive), as another device (not part of the testing) had been connected to the system and mounted as the F:\ drive after the smart phone had been disconnected from the system. This can be determined by comparing the two sets of output and their associated time stamps.
Finally, the EMDMgmt key (full path within the Software hive is Microsoft\ Windows NT\CurrentVersion\EMDMgmt) contains a subkey named “_??_USBSTOR# Disk&Ven_Motorola&Prod__MB300&Rev__001#TA538029DP&0#{53f56307-b6bf-11d0-94f2-00a0c91efb8b}_946156644” which corresponds to the smart phone (including the device model and serial number). Again, the EMDMgmt key is specific to ReadyBoost, and this device was not tested for its suitability for ReadyBoost functionality. However, the EMDMgmt key does provide indications of devices that had been connected to the system, which can be particularly useful when a user deletes some of the other Registry keys in an attempt to hide their activities.
As we began this section on USB device analysis, I mentioned a couple of checklists for this type of analysis that Rob Lee had created. Hopefully, you took the time to download those checklists and take a look at them. Regardless, I put together similar checklists based on the information provided in this section, including where within the Registry to look for specific pieces of information, and where appropriate, which RegRipper plugin can be used to retrieve and display that information. These checklists are included with the materials associated with this book, and can be found online at http://windowsir.blogspot.com/p/books.html.
System hive
Many times, Registry analysis may not involve multiple keys or hives, but will instead involve just a single hive, or even just a single key. As one would think, the System hive maintains a great deal of information regarding the system, including devices that have been attached, services and drivers that should (or should not) be running, etc. As such, analysts may find a good deal of very useful information within the System hive. So far in this chapter, we’ve already discussed some of the information available that can be used to determine when USB devices had been connected to the system, and we also included references to the MountedDevices key in that discussion.
Again, in this chapter, I do not want to provide a voluminous list of keys and values; instead, my goal is to present possible solutions to questions commonly posed as such, we will not be going through each hive, a key at a time. Instead, we will focus on providing solutions.
Services
Analyzing available services can be an important part of investigations for a number of types of incidents, include compromises, data breaches, and even malware infections. Windows services serve as a great persistence mechanism for malware (something that will be discussed in more detail in Chapter 6), as many services start automatically when the system is started (no user login or other interaction required), and services often run with elevated privileges. An attacker may compromise a system and leave a backdoor running as a Windows service, knowing that if the service is set to start when the system boots, that backdoor will be available as long as the system is running. As such, analyzing the available services may prove to be fruitful.
When you open the System hive in WRR, locate the “current” ControlSet, and expand the “services” key, you’ll likely see a great number of subkeys; not all of these are actually services. Many of the subkeys you’ll see are for device drivers installed with the operating system or with applications. As you click your way down through the available services (I’ll stop on BITS, or “Background Intelligent Transfer Service”), you’ll see the values for each key, with information similar to what is illustrated in Figure 5.12.
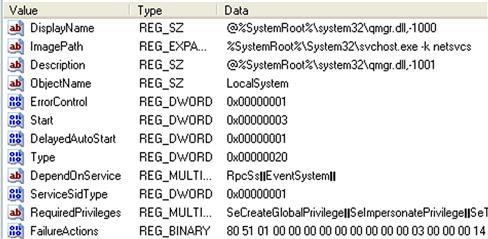
From these values, you can see considerable information, including the Start value. In this case, a value of 3 indicates that the service is set to a Manual start—i.e., on demand, usually via some user- or application-initiated action. Other services may have a Start value of 2, indicating that they are set to an Automatic start when Windows boots. We can also see the DisplayName (previous versions of Windows, particularly XP, actually had names and description fields in the Registry, rather than references to strings in dynamic link library (DLLs)), and the ImagePath, which can be used to help identify suspicious services.
More information about the various values and their meaning can be found in MS KnowledgeBase article 1030000, found online at http://support.microsoft.com/kb/103000.
There is also more information regarding Windows services available in the System hive. If we navigate to the Enum\Root key within the appropriate ControlSet, we’ll see a number of subkeys whose names all start with “LEGACY_.” You should recognize the remaining portions of the names as being the same as some of the services and drivers we saw listed beneath the “services” key. These keys are created automatically by the operating system as part of normal system function. Many of the LEGACY_* keys will also have a subkey named “0000,” as illustrated in Figure 5.13.
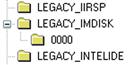
In this case, the LEGACY_IMDISK (ImDisk is a virtual disk driver available online from http://www.ltr-data.se/opencode.html/#ImDisk) key illustrated in Figure 5.13 refers to a legacy driver; we can see this listed in the Class value beneath the “0000” subkey. Now, the really interesting thing is that the LastWrite time for the LEGACY_IMDISK is “Tue Jan 4 11:35:45 2011 (UTC)” (extracted using the RegRipper legacy.pl plugin), which correlates to the first time that the device driver was launched, and the LastWrite time for the LEGACY_IMDISK\0000 key is “Wed Jan 5 16:50:32 2011 (UTC),” which refers to the last time the device driver was launched. Not only can this be very useful during malware and data breach investigations (particularly when you need to identify a “window of compromise,” or how long the system has been compromised), but the really interesting thing is that the ImDisk driver is no longer installed on the system. After installing it and using it briefly, I uninstalled the driver, yet the “LEGACY_” key for that driver persisted on the system. This information can clearly be extremely useful during an investigation.
Bluetooth
Along with all manner of devices, a means of connecting those devices that is becoming more and more ubiquitous is Bluetooth. We already have Bluetooth headsets that connect to our smart phones, and we can connect our smart phones to our vehicles via Bluetooth. I’ve also seen a number of laptop systems that come with Bluetooth radios installed, and when Windows 7 (in particular) is installed, certain components are installed from the installation media without requiring any input from the user.
I ran across a case not long ago where I found an unusual Prefetch file (see Chapter 4 for details on Prefetch files) whose name started with “fsquirt.exe.” As I was doing my research on this apparent issue (I didn’t know if this was a legitimate application or malware), I found a good bit of information at the Microsoft web site (found online athttp://msdn.microsoft.com/en-us/library/windows/hardware/dn133848(v=vs.85).aspx) that describes fsquirt.exe as the MS Bluetooth File Transfer wizard. As I dug further in my research, I found that some users would connect to their smart phones and play music from their smart phone through their computer speakers. However, this file transfer wizard intrigued me, and I eventually found a system with a Bluetooth radio and fsquirt.exe, and I launched the wizard. The wizard allows the user to select files that they want to transfer to the device that they’ve connected to (via Bluetooth) via a common file selector dialog (see the User hives section that addresses the ComDlg32 key later in this chapter), which means that files that are selected, or at least the directory that the user chooses, will very likely show up beneath this key. See Chapter 8 for more information on the use of Bluetooth as a means of data exfiltration.
If you’re analyzing an image of a system, and don’t have access to the system itself, it’s still pretty simple to tell if the system had a Bluetooth radio; however, your results can vary depending upon the drivers used. The RegRipper bthport.pl plugin will check for the Registry key referenced in the above MSDN article (i.e., HKLM\System\ControlSet00x\services\BTHPORT\Parameters\Devices), and extract the device IDs (media access control (MAC) addresses) and names for any devices seen by the Bluetooth radio, albeit not necessarily connected. An entry to the ForensicArtifacts.com web site (found online at http://forensicartifacts.com/2012/10/bluetooth-connected-device-artifcacts-broadcom-widcomm/) includes information specific to Broadcom/Widcomm drivers; those artifacts are found in the Software hive. I have not written a RegRipper plugin for these artifacts, as I have yet to see a system with these artifacts, and I don’t have access to any test data that includes these Registry keys.
Software hive
As the Software hive contains information regarding installed software, as well as the system-wide configuration of that software (the user’s hive will contain user-specific settings), analysis of this hive can prove to be very valuable during an examination.
Application analysis
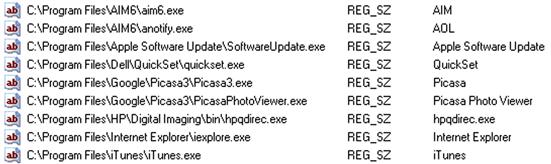
Many times, analysts want to know what applications are installed on the system in order to begin the process of determining user activity, to see what applications the user may have had access to, to determine if there was a violation of corporate acceptable use policies, or to tie specific activities to an application. The simplest way to start going about this is to check the available keys at the root of the Software hive, as illustrated in Figure 5.14.
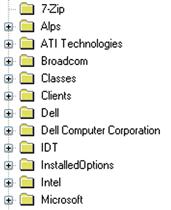
As you can see from Figure 5.14, the system in question has the 7-Zip archive utility installed, as well as some Broadcom, Dell, and Intel applications. This information can provide the analyst with some indications of installed applications.
Next, the Uninstall key (the key path is “\Microsoft\Windows\CurrentVersion\Uninstall” within the Software hive) should also be examined. The subkeys beneath the Uninstall key may appear to be GUIDs or readable names, and many will contain values that provide information regarding installation date, install path and source, as well as the string used to uninstall the application. As with those keys at the root of the Software hive, the Uninstall keys are most often the result of applications that are installed via an installation package, such as the Microsoft installer. Applications that are simply executable files copied to a directory do not generally create installation or uninstall keys, although some will leave traces in the Registry once they have actually been executed. One such example is the MS SysInternals utilities; these tools have an end-user license agreement (“EULA”) that must be accepted before the tool will run, and running the tool will create an entry in the Registry for that tool.
Applications installed via a Microsoft installer package (a file that ends in “*.msi”) are logged or recorded in the Software hive in the path “\Classes\Installer\Products.” Each subkey beneath the Products key has a name with a long sequence of hexadecimal characters, and the ProductName value will tell you the name of the product that was installed. The msis.pl RegRipper plugin will extract this information for you, and sort the various installed packages by their key LastWrite times (which correlates to the package installation date/time). An example of this information collected from one Windows 7 system appears as follows:
Thu Apr 21 16:51:24 2011 (UTC)
VMware Player;C:\Users\harlan\AppData\Local\Temp\vmware_1303404464\vmware player.msi
Wed Apr 13 18:54:38 2011 (UTC)
ActivePerl 5.8.9 Build 829;F:\tools\ActivePerl-5.8.9.829-MSWin32-x86-294280.msi
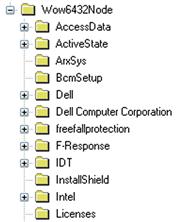
These are not the only places that an analyst should look for installed applications. On 64-bit Windows 7 systems, 32-bit applications may appear beneath the WOW6432Node key at the root of the Software hive, as illustrated in Figure 5.15.
In addition, the analyst should also check the root of the NTUSER.DAT hive for indications of installed applications, and the Uninstall key within the user hive (key path is “\Software\Microsoft\Windows\CurrentVersion\Uninstall”) should also be examined. These keys will contain information regarding application data specifically installed by and available to a particular user.
Yet another way for an analyst to gather information regarding applications on a system is through what I have referred to as “file extension analysis.” This technique has proven itself to be useful for finding not only installed applications (in the sense that the application had an installer, such as an MSI file, or a setup.exe file) but also for stand-alone applications (that do not necessarily appear in the Registry) that the user has associated with certain file types. We want to start by accessing the Software hive, navigating to the Classes key, and looking at each of the subkeys that starts with a “.”, as illustrated in Figure 5.16.
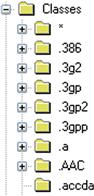
From each of these file extensions, we can determine considerable information. For example, if we open each of the keys (as illustrated in Figure 5.16) and look for the “Default” value, for most of them we’ll see what type of file the extension refers to; for example, the “Default” value for the .3g2 key is “WMP11.AssocFile.3G2.” If we then go to the “Classes\ WMP11.AssocFile.3G2” key and then navigate to the “shell\open\command” subkey, we’ll see that the command used to access or execute files that end in the .3g2 extension appears as follows:
What this tells us is that the files ending in the .3g2 extension are associated with the Windows Media Player, and when the user double-clicks one of these files, the Windows Media Player will open automatically to run the file.
The way you would find this information on a live system is by opening a command prompt and typing the command “assoc.” A lot of file extensions would go flying by, so let’s say that you just wanted to see just one … say “.jpeg”. So you’d type the command “assoc | find “.jpeg””, and you’d see “.jpeg=jpegfile” returned. Then you’d type the command “ftype jpegfile” and see something similar to the following:
%SystemRoot%\System32\rundll32.exe "%ProgramFiles%\Windows Photo Viewer\ PhotoViewer.dll", ImageView_Fullscreen %1
This is great information, but it’s for a live system. In order to determine similar information from an acquired image, you’d want to run the assoc.pl RegRipper plugin against the Software hive from the system, using the following command:
The assoc.pl plugin processes information from the Software hive in a manner similar to running the “assoc” and “ftype” commands mentioned above. You will also want to check the keys at the root of the user’s USRCLASS.DAT hive file, as well. I had installed the Google Chrome browser in my Windows 7 system, and the “Default” value for the “.https\shell\open\command” appears as follows:
Also at the root of my USRCLASS.DAT file is a key named “.shtml,” and the “Default” value is “ChromeHTML”; mapping back to the Software hive, the value for the “Classes\ChromeHTML\shell\open\command” is the same as what appears above, indicating that if I double-click a file the ends in “.shtml” (or “.https”), the file will be opened via the Chrome browser.
From an analyst perspective, this is great information, as it provides indications of applications installed on the system. However, it also helps us answer another question; many times I will see a question in lists and online forums similar to, “does anyone know what application uses a file with this extension?” Many times, this question is a result of some analysis that has already been performed, and the analyst has apparently run across an unfamiliar file. In cases such as this, searching via Google may provide a number of possible solutions, but analysis of the Registry from the system that is being examined will likely provide the most accurate information.
Finally, another means for seeing what applications the user may have accessed involves examining the contents of the UserAssist subkeys, which is discussed in detail in the User hive section later in this chapter. This can be a valuable avenue of investigation, as the contents of these keys persist even though the application itself may have been uninstalled or deleted.
NetworkList
Windows systems have always maintained information regarding network connections, including wireless access points (WAPs) to which the system (usually a laptop) has connected. Tools used to manage these connections maintain historical information regarding the connections, and we can often see these within the user interface for the application. As you might expect, this information is maintained in the Registry, and on Vista and Windows 7, there is considerable information available to the analyst.
To start examining this data, we first have to navigate to the following Registry key within the Software hive:
Beneath this key, you will usually see two subkeys; Managed and Unmanaged. “Managed” refers to connections for which the system is managed by a domain controller; “Unmanaged” refers to connections for which the system is not managed by a domain controller. Beneath both of these keys, you will find subkeys with names that are a long series of letters and numbers; what we’re looking for is the values within each of these subkeys. An example of these values is illustrated in Figure 5.17.

From the available values, you can see how they can be valuable. For example, the “Description” and “FirstNetwork” values refer to the service set identifier (SSID) of a WAP. The “DefaultGatewayMac” value is the MAC address of the WAP, which we can use in WiFi geolocation mapping.
Tip
WiFi Geolocation Mapping
Over the years, there have been a couple of databases compiled for use in WiFi geolocation; that is, providing a mapping between wireless router MAC addresses (usually compiled via “wardriving” or submissions) and the coordinates (latitude and longitude) of the physical location of the router. Some of these services focused primarily on mapping major metropolitan areas. One such service that is publicly available can be found at WiGLE.net. In order to access the information available at WiGLE.net, I wrote a Perl script (macl.pl is available with the materials associated with this book) that would take a MAC address, or list of addresses, and provide various output formats. As an example of what the script can do, I extracted the MAC address of a wireless router from the Registry of one of my systems, and after passing MAC address as one of the arguments to the script, was able to obtain coordinates for where the WAP is located. One of the script options is to provide the output as a URL for Google Maps. The map location for the wireless router in question is illustrated in Figure 5.18.

As you can see, information such as this can be extremely useful to law enforcement for mapping locations of devices used by suspects or missing individuals. I’ve heard that analysts in private industry have also used similar techniques and found former employees who visited a competitor’s location (presumably with their company-issued laptop) prior to resigning their employment and going to work for that competitor. The time stamp information associated with the connection to the WAP near the competitor’s site was then used as a basis to determine what the employee accessed (files, databases, etc.) prior to giving notice.
One thing to keep in mind, however, is that over time, open access to databases such as WiGLE.net may change or be disabled, requiring license payment and/or some sort of access token to be used via an application programming interface (API). As such, the macl.pl code may stop working; however, other resources may be used to obtain geolocation information once the MAC address of the wireless routers have been obtained from the Registry. As it is, the macl.pl script requires that you already have an account set up at WiGLE.net, and that you provide your username and password when running the script. Other options for performing geolocation lookups for WAPs may be available; for example, in July 2011, Elie Bursztein posted to his blog (located online at http://elie.im/blog/privacy/using-the-microsoft-geolocalization-api-to-retrace-where-a-windows-laptop-has-been/) that he’d developed a means for performing geolocation of WiFi router MAC addresses using the Microsoft Live API, and that he would be giving a presentation on the topic at the upcoming BlackHat Briefings conference in Las Vegas, NV, in August 2011. The white paper and PDF of the presentation slides can be found online at https://www.blackhat.com/html/bh-us-11/bh-us-11-archives.html#Bursztein.
Finally, we can use the “ProfileGuid” value to map to the appropriate profile in the “NetworkList\Profiles” key. The data for the ProfileGuid value should correspond to one of the available profiles beneath the Profiles key. The values for the profile identified in Figure 5.17 are illustrated in Figure 5.19.
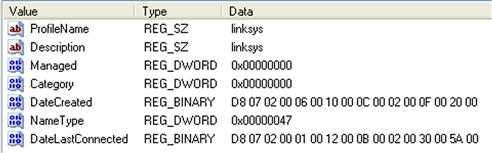
As we can see in Figure 5.19, the “ProfileName” and “Description” values should match the “Description” and “FirstNetwork” values that we saw in Figure 5.17. The “NameType” value refers to the type of connection of the profile, where 0×47 is a wireless network, 0×06 is a wired network, and 0×17 is a broadband (a.k.a., 3G) network (as indicated by the MS TechNet blog post located online at http://blogs.technet.com/b/networking/archive/2010/09/08/network-location-awareness-nla-and-how-it-relates-to-windows-firewall-profiles.aspx). The “DateCreated” and “DateLastConnected” values are 128-bit SYSTEMTIME structure, a description of which can be found online at http://msdn.microsoft.com/en-us/library/ms724950(v=vs.85).aspx. These values refer to when the profile was created (the system first connected to the network) and when the system was last connected to the network; however, according to Microsoft, these time stamps can be “either in UTC or local time, depending on the function that is being called.”
NetworkCards
All versions of the Windows operating system also maintain information about network interface cards (NICs) within the Registry. For example, a quick look in the Software hive (“HKLM\Software”) at the “\Microsoft\Windows NT\CurrentVersion\NetworkCards” key shows two subkeys (named “12” and “8,” respectively), one of which contains the values illustrated in Figure 5.20.

The ServiceName value illustrated in Figure 5.20 is the GUID for the NIC, and the Description value is what is seen when you type “ipconfig/all” at the command prompt on a live system; in fact, it’s actually listed after “Description” in the output of the command. We can then go to the System hive, and navigate to the “ControlSet00n\services\Tcpip\Parameters\Interfaces” key (where “n” is the number of the ControlSet identified as current), and locate the subkeys named for the ServiceName value we found beneath the NetworkCards key. This key will contain a great deal of pertinent network settings and information that refers to the interface, such as whether dynamic host configuration protocol (DHCP) was enabled (or the interface had a hard-coded IP address), the DHCP server, default gateway, etc. This information can be useful, particularly when attempting to identify the system being analyzed in association with other external sources, such as network packet captures, firewall/web server/network device logs.
Scheduled tasks
Vista, Windows 7, Windows 8, and Windows 2008 R2 systems manage Scheduled Tasks a bit differently from previous versions of Windows. Starting with Windows Vista, Microsoft introduced Task Scheduler 2.0, which stored information regarding scheduled tasks in the Registry’s Software hive beneath the following key (note that these Windows versions ship with a number of default tasks):
The XML files that contain the scheduled task settings and instructions are located in the C:\Windows\System32\Tasks folder (and subfolders; refer to Chapter 4 for a detailed discussion of Scheduled Task information maintained within the file system). Most of the human-readable information regarding scheduled tasks within the Registry is found beneath the Tree subkey, as illustrated in Figure 5.21.
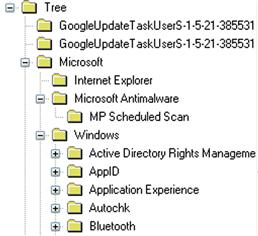
On a default installation of Windows 7, most of the scheduled tasks will have keys listed beneath the Tree\Microsoft\Windows subkey. For each scheduled task, there will be an “Id” value which contains a GUID, and an index value. The values for the Microsoft\Windows\Registry\RegIdleBackup task are illustrated in Figure 5.22.

We can then use the GUID value to navigate to the TaskCache\Tasks key, and locate the subkey with the ID GUID as its name. Beneath this key, you will find the values illustrated in Figure 5.23.

Most notable are the Path and Hash values. The Path value clearly provides the path to the scheduled task file. The Hash value is a bit more interesting, as the hash is of the XML task file itself and used to verify the integrity of that file. Bruce Dang (of Microsoft) gave a presentation at the 27th Chaos Communications Congress (the video of which is available online at http://www.vimeo.com/18225315), during which he discussed Microsoft’s efforts in analyzing the Stuxnet malware. During that presentation, Bruce stated that the hash algorithm used at the time to identify changes in the scheduled task files was the cyclic redundancy code (CRC)-32 algorithm, for which it is very easy to generate collisions. Analysis of the malware determined that one of the vulnerabilities it would exploit was to modify a scheduled task and pad the file so that when the Task Scheduler verified the task’s hash prior to running it, the hash would match what was stored in the Registry. According to Bruce, Microsoft decided to replace the algorithm with the secure hash algorithm (SHA)-256 algorithm; this fix appears to have been provided in security update MS10-092, found online at http://support.microsoft.com/kb/2305420. Note that the KnowledgeBase article states that any Scheduled Tasks that have already been corrupted by malware may be validated following the installation of this security update; as such, the article recommends that the actions associated with the tasks be verified, which is excellent advice.
One piece of advice if you’re going to watch Bruce’s video while at work; wear headphones, or don’t play it at work. Some of the language used in the video is not appropriate for a work environment.
User hives
As with other Registry hives, there are some similarities between keys and values found in the user profile hives on the more familiar (to analysts) Windows XP systems and newer Windows 7 and 8 systems. Some keys and their values remain relatively unchanged; one such key is the ubiquitous Run key, as the path and use (in both the Software and NTUSER.DAT hives) has remained essentially the same. Some keys have changed slightly; for example, beneath the “Software\Microsoft\Windows\CurrentVersion\Explorer\ComDlg32” key on Windows 7 and 8 we no longer find the familiar LastVisitedMRU (most recently used) and OpenSaveMRU keys we were used to from Windows XP. Instead, we find other keys, as illustrated in Figure 5.24.

As you can see from Figure 5.24, there are some new keys, as well as some keys with different names. Instead of values beneath the keys illustrated in Figure 5.24 containing ASCII strings within their data, as of Windows Vista, the values are binary data types that contain Unicode strings in some cases; in others, the value data contains shell items (shell items were discussed earlier in this chapter). The data beneath the CIDSizeMRU and FirstFolder keys contain Unicode strings, while the values in the subkeys beneath the OpenSavePidlMRU key contain shell items. The data beneath the LastVisitedPidlMRU and LastVisitedPidlMRULegacy keys contain Unicode strings followed by shell item ID lists. The RegRipper comdlg32.pl plugin is capable of parsing the contents of these keys from both XP and Vista and above systems.
What I hope to do in the rest of the chapter is discuss some of the keys that are new to Windows 7, and different from Windows XP. In many cases, the keys that are new as of Windows 7 persist on Windows 8; Windows 8 contains a number of new Registry artifacts of its own. Have no illusions, I will not be able to address every new key and every change, as something like that is simply beyond the scope of this book. Instead, I will try to address some of the significant changes that are important to analysts and investigators. I will focus primarily on those keys and values associated with the operating system itself, as it is impossible to address every possible application. So, please consider this a start, but I hope one in which you find significant value.
WordWheelQuery
With Windows XP, searches that the user ran via the Search functionality accessed via the Start menu appeared in the ACMru key within the user’s hive. When Vista was deployed, analysts found that searches performed by the user were no longer maintained in the Registry, but were instead stored in a file. Shortly after the release of Windows 7, analysts found that user searches were again stored in the Registry, this time in the following key:
The values within this key are stored in Unicode format, and maintained in an MRU list, as illustrated in Figure 5.25.

As with other MRU list keys, the LastWrite time for the key in questions corresponds to when the most recent search was conducted. As illustrated in Figure 5.25, the search terms are stored as binary values, with the actual terms listed in Unicode. As such, item “1” (the byte sequence “70 00 72 00 6F 00 67 00 72 00 61 00 6D 00 00 00”) indicates that the user searched for the term “program.” When viewing the Properties for the WordWheelQuery key via WRR, we see that the LastWrite time for the key is “3/13/2010 1:34:03 PM,” which indicates the date and time (in UTC format) that the user searched for item 1. We know this because the first 4 bytes (or DWORD) in the MRUListEx value (“01 00 00 00”) indicate that the value named “1” was the most recent search term. The RegRipper wordwheelquery.pl plugin will assist in enumerating this information.
Shellbags
When conducting research on Windows forensic analysis, you may see mention of “Shellbags,” and wonder exactly what this refers to. “Shellbags” are a set of Registry keys and values that, on Windows XP, store user-specific preferences for Windows Explorer display options. One of the nice things about Windows systems is that when you open Windows Explorer to a particular file path and position and size the window that you have open, Windows “remembers” these settings, so that the next time you go to that directory or folder, you are presented with the same settings. This information is maintained in the Registry hives within the user profile. This way, if you log into a system as “userA,” you would likely have different settings than if you logged in using another account. An example of how this Registry information can affect a system, from a user perspective is available in MS KnowledgeBase article 813711 (found online at http://support.microsoft.com/kb/813711); this article describes a situation in which changes in size, view, icon and position of folders is not remembered on Windows XP systems. As such, these settings can be said to contain user preferences for displaying certain information, settings the user would have had to set within the Windows XP shell.
On Windows 7 (and presumably on Windows 8), the information recorded in the shellbags artifacts are a bit different. Instead of recording the view settings each time that a folder is opened, modified and then closed, “Windows 7 remembers one size and location for all your folders and libraries” (this is quoted from the Windows 7 Help and Support file, under “Folders: Frequently Asked Questions”). Regardless, it appears that on Windows 7 and 8 systems, the shellbags artifacts provide considerable insight into resources that a user has accessed.
On Windows XP systems, the shellbags artifacts are located in the NTUSER.DAT Registry hive file. Within the NTUSER.DAT hive, the path to the keys that we’re interested in is “Software\Microsoft\Windows\ShellNoRoam\BagMRU.” Beneath this key is a tree of subkeys whose names are numbers; that is, 0, 1, 2. These keys are nested, and this is what allows paths to the resources (folders, etc.) to be developed from the information within these keys. Most of these keys will have values that are also numbered (i.e., the names are 0, 1.), as well as an MRUListEx value (that tells us which of the values was “most recently used”), and a NodeSlot value. Each of the numbered values contains a “shell item,” or a binary “blob” of data that means something specific to the operating system, and of which there are a number of different types. Some shell items contain nothing more than a volume letter or a GUID that points to a Control Panel or virtual folder, while other shell items refer to folders within the file system. Various shell items can contain a good bit of additional metadata, as well, include (but not limited to) time stamps.
The NodeSlot value within the BagMRU subkeys points to a subkey beneath the “Software\Microsoft\Windows\ShellNoRoam\Bag” key path. So, if one of the subkeys beneath the BagMRU key contains a NodeSlot value whose data is 0×02, then this value points to the “Software\Microsoft\Windows\ShellNoRoam\Bag\2” key, and additional information may be found within the Shell subkey. Specifically, on Windows XP systems (and I haven’t seen this on any other versions of Windows), if there is a value within the “Software\Microsoft\Windows\ShellNoRoam\Bag\2\Shell” subkey (keeping with our example) whose name begins with “ItemPos,” that value invariably contains a number of concatenated shell items that, when parsed, amounts to a directory listing. This information can be very valuable to an examiner.
On Vista systems and above, the shellbags artifacts are located in the USRCLASS.DAT Registry hive file, found in the “AppData\Local\Microsoft\Windows” folder within each user profile. Within the USRCLASS.DAT hive, the path to the shellbag artifacts is “Local Settings\Software\Microsoft\Windows\Shell\BagMRU,” and as with the BagMRU subkeys on Windows XP, the numbered subkeys are nested, and when parse appropriately will build complete paths to the resource accessed by the user. As with Windows XP, the number values beneath the subkeys contain shell items of various types. Interesting enough, or perhaps to be expected, shell items under Windows XP can be very different than those under other versions of the operating system, while the shell items under Vista are similar to those under Windows 7 and 8. A notable difference on Vista systems and above, however, is that the NodeSlot value within the BagMRU subkeys does not have the same value as it does with Windows XP systems. I have yet to find corresponding values, based on the NodeSlot value beneath the BagMRU subkeys, that contain listings of files embedded in shell items.
Analysts can access the information within the shellbags artifacts through the use of the Windows shellbag parsers, such as the sbag.exe tool, available online from http://tzworks.net/prototype_page.php?proto_id=14.
Using the sbag.exe tool is quite simple; it’s a command line interface (CLI) tool and requires only the path to the hive file of interest. The tool is easily able to distinguish between the various versions of Windows and parse the appropriate key paths. Therefore, you can easily dump the shellbags information from a hive file extracted from an acquired image using the following command:
With the amount of information that can be available, it’s a good idea to redirect the output to a file. The output of the tool produces 10 pipe-separated columns which include the bag number (i.e., “NodeSlot”), LastWrite time of the key being parsed, the path, embedded creation, modification and access times, and the full path for the folder accessed. The pipe-separated output can be opened in Excel for analysis; a portion of output from sbag.exe, open in Excel, is illustrated in Figure 5.26.

This information can be very valuable to an analyst, illustrating access to specific resources, along with the date and time that those resources had been accessed. For example, the parsed shellbag information can illustrate access to zipped archives and folders that no longer exist on the system, removable storage devices, and even network shares. As with other artifacts located in the Registry, the shellbags provide indications of access to resources that persist after the resource (i.e., folder) is no longer available.
Some interesting artifacts I’ve found in USRCLASS.DAT hives from Windows 7 systems are file names, as you can see illustrated in Figure 5.26. Specifically, fau-1.3.0.2390a.zip, ProDiscoverRelease6800Basic.zip, and Shadow_analyser_beta_U52.zip are visible listed in the figure. This is interesting because the available information regarding the BagMRU keys is that the data within the values refers to folders. However, keep in mind that when a user views the contents of a zipped archive in Windows Explorer on Windows Vista and above, the zipped archive is viewed as a folder.
Also, if you run sbag.exe against an NTUSER.DAT hive file from a Windows 7 system, you may see files listed beneath a key with a name that appears as follows:
This key (and ones like it) appears to contain information (via the key’s values) about icons available on the desktop, which can include … well, any file. From the NTUSER.DAT from a Windows 7 system, I found references to “{CLSID_RecycleBin},” “Crimson Editor SVN286.lnk,” and “Google Chrome.lnk.” On a Windows XP system, I found references to a considerable number of PDF files. Information such as this can be correlated with the contents of the user’s RecentDocs key, and perhaps application (image viewer) MRU lists in order to determine where particular files that the user accessed were located.
MenuOrder
In November 2011, Kurt Aubuchon posted to his blog (the article can be found online at http://kurtaubuchon.blogspot.com/2011/11/start-menu-and-ie-favorites-artifacts.html) that on most versions of Windows, if a user rearranges the contents of their Start Menu, and/or their Favorites menu or Favorites Center for the IE web browser, this information will be recorded in the user’s NTUSER.DAT Registry hive file. This information will be recorded in the key path “Software\Microsoft\Windows\CurrentVersion\Explorer\MenuOrder” key, beneath the “Start Menu2” and “Favorites” subkeys, respectively. Beneath the various subkeys will be a value named “Order,” whose binary data is one or more shell items to reference the files listed in the respective folders.
This information can be very valuable to an analyst. For example, on one system, I found that a user had the Cain password cracking utility referenced in their Start Menu. All that was available was a shell item that referenced file named “Cain.lnk”; it did not contain the contents of the shortcut file, it only referenced the name of the file. However, this provided an indication of potentially malicious intent by the user, as well as an indication that the user had perhaps not been completely truthful with respect to the software they downloaded from the Internet and installed on their system (in violation of corporate acceptable use policies).
The RegRipper.pl menuorder.pl plugin will parse and display any information listed beneath these keys.
MUICache
The MUICache key first came to my attention several years ago when I was looking into some interesting malware artifacts; specifically, one antivirus vendor indicated in several write-ups that malware was creating entries beneath these keys. This was not, in fact, the case—instead what was happening was that the entry was being created by the operating system as a result of how the malware was being executed for testing.
On Windows 7 systems, the MUICache key is located in the USRCLASS.DAT hive within the user profile, in the path “Local Settings\Software\Microsoft\Windows\Shell\MuiCache.” The values beneath this key, specifically ones that do not begin with “@”, appear to provide indications of applications that had been run on the system. An example of the partial contents of an MUICache key is illustrated in Figure 5.27.
As you can see Figure 5.27, the MUICache key contains a list of applications that have, at some point, been run on the system by the user. However, since each program entry is a value, there is no time stamp information associated with when the program may have been executed. The value of this key during an investigation is that the running of the program can be associated with a particular user, even after the program itself has been removed (deleted or uninstalled) from the system. Further, comparing visible values beneath the MUICache key from USRCLASS.DAT hives in VSCs can provide a time frame during which the user ran the program. Finally, on more than one occasion, I’ve found indications of oddly named programs beneath this key that, when the program file was found and examined, turned out to be malware.
The RegRipper muicache.pl plugin will display a subset of the values listed in the MUICache key for Windows XP, as well as Vista, and above systems.
UserAssist
The purpose and use of the UserAssist subkeys have been discussed at length in a number of resources; suffice to say at this point that the contents of this key provide some very valuable insight into user activity, as the key appears to be used to track certain user activities that occur via the shell (Windows Explorer). When users double-click icons to launch programs, or launch programs via the Start menu, this activity is documented in the UserAssist subkeys, along with a date and time of the most recent occurrence of the activity, and the number of times the user has performed that activity. Each subsequent time the user performs the activity, the time stamp and counter are updated accordingly. The value names beneath the subkeys are “encrypted” using a Rot-13 (“rotate 13”) translation cipher, which can be easily decrypted. The RegRipper userassist.pl plugin decrypts the value names beneath the subkeys and parses the time stamps and count (number of times the activity has occurred) from the binary data. Didier Stevens’ UserAssist tool (found online at http://blog.didierstevens.com/programs/userassist/) does this, as well. In order to run the RegRipper plugin on an NTUSER.DAT file within an image mounted as a volume, simply use the following command line:
The output from this command would appear at the command prompt (you would need to redirect the output from STDOUT to a file in order to save it), and an excerpt of a sample output appears as follows:
As you can see, the information is presented sorted in order of occurrence with the time stamps listed in UTC format. The applications launched are followed by their run count in parentheses.
The information from the UserAssist keys can be used to demonstrate access to the Date Time Control Panel applet, installing or launching applications, etc. Most often, it’s a good idea to include what you find in the UserAssist subkeys with other data, such as information from the RecentDocs key, in order to corroborate and validate your findings. In this way, you may find that a user launched MSWord, created a document, and metadata (file metadata was discussed in Chapter 4) from within the document may correlate back to the user.
Photos
As I mentioned, Windows 8 brings with it some new Registry artifacts. On March 8, 2013, Jason Hale posted his findings regarding the use of the Photo tile on the Windows 8 desktop to view image files (the blog post can be found online at http://dfstream.blogspot.com/2013/03/windows-8-tracking-opened-photos.html). In his post, Jason described that when a user views image files via the Photos tile on the Windows 8 desktop, Registry values are recorded within a very long key path in the user’s USRCLASS.DAT hive file. I’ll leave the key path in the blog post, but I do think that the values created beneath each subkey are very interesting; there’s a file path (can show if the image was viewed from external media), a LastUpatedTime (appears to indicate when the file is opened), and a Link value that, according to Jason, contains a stream that follows the Windows shortcut binary format, minus the first 16 bytes from the documented format.
This information can be correlated with other sources within both the Registry and the file system, in order to assist the examiner in performing a more comprehensive analysis. The RegRipper photos.pl plugin was written specifically to parse and display most of the value data (with the notable exception of the Link value data) within the keys.
Since this blog post, Jason has published several other blog posts that address other artifacts specific to Windows 8 systems. For example, on September 9, 2013, he published an article regarding the Search Charm History from Windows 8 and 8.1 that is well worth reading.
Information from the UserAssist subkeys may also correlate to other activity that the analyst has available that is separate from the system being examined. For example, information from the UserAssist subkeys may indicate that the user launched the Terminal Server Client, and the Terminal Server Client key, as well as the Jump Lists for the application (discussed in Chapter 4), would provide indications of which system the user had attempted to connect to. The Windows Event Logs on the remote system might indicate that the user successfully logged in, and network device logs might provide additional information regarding the connection, such as correlating information regarding the date and time of the connection, total number of bytes transferred.
Another great thing about the contents of the UserAssist subkey information is that it persists beyond activity associated directly with applications. Let’s say that a user downloads and installs an application, runs it a couple of times, then deletes the application and any data files created. Weeks or even months after the deleted files are overwritten and unrecoverable, the information within the UserAssist subkeys is still available. I once performed an examination in which this was precisely the case. We were able to determine that the user had installed Cain & Abel, a password recovery tool available online from http://www.oxid.it/cain.html. The user had installed and run the tool to collect password information, viewed several of the output files, and then deleted the application files themselves.
Virtual PC
When a Windows 7 system (Professional, Ultimate, or Enterprise) has VPC and XPMode installed, a user may be using it to run legacy applications from the special Windows XP environment. On a Windows 7 system with XPMode installed, I wanted to run an application that I could not run in Windows 7, so I ran it from the Windows XP environment. Once installed in the XPMode environment, the application appeared on the Windows 7 Start menu under “Windows XP Mode Applications.” A reference to the application also appeared in “Software\Microsoft\Virtual PC” key path within the NTUSER.DAT hive, as illustrated in Figure 5.28.
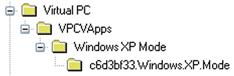
Beneath the final key in the path (“c6d3bf33.Windows.XP.Mode”), several values were added, as illustrated in Figure 5.29.
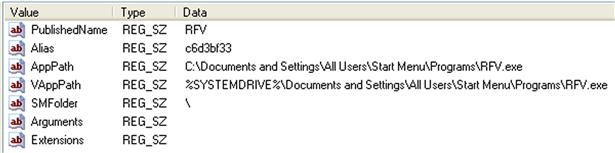
The AppPath value visible in Figure 5.29 illustrates where the application executable file is located within the XPMode environment. This information can be very useful, as it can also be correlated with information found beneath the UserAssist subkeys, in order to determine how many times the user accessed the application, and the most recent time and date that they did so.
TypedPaths
A Registry key that is new to Windows 7 is the TypedPaths key, found in the user’s hive file, in the path, Software\Microsoft\Windows\CurrentVersion\Explorer\TypedPaths. Values within this key are populated when the user types a path into the Windows (not Internet) Explorer Address Bar, as illustrated in Figure 5.30.
The first value added is named “url1,” and as each new value is added, that value appears to be named “url1” and previous values are “pushed down.” As such, the LastWrite time of the TypedPaths key would correlate to when the “url1” value was added to the list.
Additional sources
As you can see from this chapter so far, a great deal of potentially valuable information can be retrieved from the Registry on a Windows 7 system. However, while we’ve focused on information that can be derived by analyzing an image acquired from a system, most of what we’ve discussed so far has involved what would correlate to the Registry visible via the Registry Editor on a live system. As it turns out, Windows 7 has much more Registry data available, if you know where to find it and how to access it. Knowing the structure of Registry keys and values, we can search the pagefile, unallocated space, and even the unallocated space within hive files for additional information.
RegIdleBackup
Earlier in this chapter, we discussed Registry keys associated with Scheduled Tasks. Figure 5.23 illustrates a task named “RegIdleBackup,” which is a default task that ships with Windows 7. If we locate the file for that scheduled task and open it in Notepad, we’ll see that the task backs up the SAM, Security, Software, and System hives to the C:\Windows\System32\config\RegBack folder every 10 days. So whenever you acquire an image from a Windows 7 system, you should expect to find backups of the Registry hives, and on an active system, those backups should be no more than 10 days old. The information may be very helpful to the analyst, possibly showing historical Registry information, or showing keys that were deleted from the hive file after the last backup was made.
Volume shadow copies
In Chapter 3, we discussed how to access VSCs within images acquired from Vista and Windows 7 systems. Using these mounting techniques, multiple previous versions of the Registry hives (including the NTUSER.DAT and USRCLASS.DAT hives) can be accessed and parsed using tools such as RegRipper (and the associated rip.pl/.exe command line tool) in order to retrieve historical data from those hives. This technique can be added to analysis in order to search previous versions of hive files for earlier versions of data, or for keys and values that were subsequently deleted from the Registry. Information such as this may prove to be extremely valuable to the analyst or the investigator.
Virtualization
As discussed in Chapter 1, virtualization is available to a much greater degree on Windows 7 systems than in previous versions of the operating system. For example, not only is VPC freely available for download and installation on several versions of Windows 7, but a special virtual environment called “XPMode” can also be installed on those versions. This special version of Windows XP not only allows the user to more easily run legacy applications that may not run on Windows 7, but users can also access and interact with the Windows XP environment. For example, a user can access the XPMode virtual machine as “XPMUser” and install applications, surf the web, and none of that activity will appear within the host Windows 7 environment.
In addition to XPMode, users can create and use other virtual guest systems within VPC. Users may do this in order to hide their illicit activities within the virtual guest system; if the virtual system is run via VPC, then analyzing that virtual hard drive (.vhd) file would be essentially no different from analyzing an image acquired from a physical system; these systems would have their own Registry files. The same is true for VMWare.vmdk files, as well. Virtual systems can prove to be extremely valuable sources of information.
Memory
Beyond these sources, and beyond the scope of this chapter (memory analysis is a chapter, or perhaps even a book unto itself), Registry information may be available in Windows memory, either in a dump of physical memory or in a hibernation file (which is essentially a frozen-in-time snapshot of memory) and is accessible using the open source Volatility framework, which can be found online at http://code.google.com/p/volatility/. Brendan Dolan-Gavitt (a.k.a, “moyix”; his blog is located online at http://moyix.blogspot.com/) has done considerable work in locating and extracting Registry data from memory and his work is incorporated in the Volatility framework. One of the key aspects of accessing Registry data within memory is that there are several volatile keys, which are keys that exist only in memory and not on disk. In fact, the structures that identify volatile keys themselves only exist in memory. While this is not usually an issue, as many volatile keys are created and used for legitimate purposes by the operating system (such as the “CurrentControlSet” key within the System hive), it is possible that a volatile key could be created and used for malicious purposes (i.e., Registry-based mutex indicating that the system was infected with a particular bit of malware, temporary staging area for stolen data). As such, looking for available Registry information should be part of an analyst’s investigative process whenever they have a memory dump or hibernation file available. If you are interested in information regarding memory analysis specifically for malware analysis, be sure to consult the Malware Analyst’s Cookbook.
Tools
Before we close out this chapter, I wanted to make a couple of comments regarding tools. Throughout this chapter, I’ve mentioned a number of RegRipper plugins, and specific information regarding RegRipper and how to go about creating plugins can be found in Windows Registry Forensics. However, it’s worth mentioning again here that there are two ways to go about listing the available plugins, which hive each is intended to be run against, and a brief description of what each plugin does.
The first way to do this is to use rip.pl (or the “compiled” Windows executable, rip.exe) with the appropriate switches. For example, typing “rip.pl –l” at the command prompt will list all of the available plugins in order, in a table format. An example of this format is illustrated as follows:
180. winzip v.20080325 [NTUSER.DAT]
Get WinZip extract and filemenu values
181. win_cv v.20090312 [Software]
Get & display the contents of the Windows\CurrentVersion key
182. wordwheelquery v.20100330 [NTUSER.DAT]
Gets contents of user's WordWheelQuery key
Adding the “-c” switch to the previous command tells rip.pl to format the output in a comma-separated value format, suitable for opening in Excel, as illustrated in the following command:
The other way to view the available plugins is to use the GUI-based Plugin Browser, illustrated in Figure 5.31.
After selecting the directory where the plugins are located, you will see each plugin listed beneath the “Browse” tab, and as each plugin is selected (by clicking on the plugin name), the plugin information (i.e., name, version, hive, and the short description are all included in the code for each plugin) will appear to the right. The Plugin Browser is part of the RR.zip archive that contains the tools that are part of the Windows Registry Forensics book, and can be found online at http://windowsir.blogspot.com/p/books.html.
Another tool that definitely deserves attention is the “Registry Decoder.” In September 2011, Andrew Case released the Registry Decoder (the announcement for the release of the tool can be found online at http://dfsforensics.blogspot.com/2011/09/announcing-registry-decoder.html), which is an open source (Python) project that was initially funded by the National Institutes of Justice, and was released to the public.
The Registry Decoder consists of two components; the online acquisition component safely acquires copies of Registry hives from live systems by using the System Restore Point functionality on Windows XP, or the Volume Shadow Service on Vista and Windows 7. Creating the Restore Point or VSC ensures that there is a current, read-only copy of the hives that are not in use by the operating system. The second component provides a GUI for offline analysis of Registry hives. Figure 5.32 illustrates the results of a plugin run across a Windows 7 Software hive file loaded into the Registry Decoder.
The Registry Decoder allows an analyst to create a case and load multiple hive files (including those extracted from VSCs) and process those hives (i.e., run searches, “diff” hives, run plugins across all of the “mounted” hives, generate reports). Registry Decoder can process acquired images, Registry hives, and even acquired databases. Once the information is loaded, the tool performs a one-time preprocessing of all of the information, and generates databases and metadata files that contain all of the information needed for analysis. Andrew was interviewed by Ovie Carroll regarding the Registry Decoder, and you can listen to the interview, which contains a great deal more information regarding the tool, in September 26, 2011 CyberSpeak podcast (found online at http://cyberspeak.libsyn.com/cyber-speak-sep-26-2011-registry-browser).
Both components of the Registry Decoder can be downloaded from http://code.google.com/p/registrydecoder/.
Summary
The Registry contains a great deal of forensically valuable data, and understanding what is available, as well as how to access and interpret it, can provide a great deal of context and additional (perhaps even critical) investigative detail to an analyst. While the Registry does contain a great deal of information, it cannot be used to answer every question; for example, analysts have asked in online forums where records of file copy operations are maintained in the Registry, and the simple answer is that they aren’t. However, the good news is that there are a great number of questions that can be answered through Registry analysis, but there is so much information that no one resource can be written to document it all. As further research and analysis is conducted, new artifacts are discovered and cataloged, and often the best approach, beyond referencing resources such as this book (as well as the other books and resources mentioned in this chapter), is to collaborate with other analysts, and conduct some of your own research.
Again, all of the materials associated with this book can be found online via http://windowsir.blogspot.com/p/books.html.