Email and Web surfing may be the most popular Internet activities, but the world’s most gigantic network has many other uses. The general idea is always the same, though: letting one computer reach out and touch another.
Mac OS X offers a few features that embrace the more literal aspects of that notion. For example, you can turn your Mac into a Web server—an actual living Web site that anyone on the Internet can visit. This chapter also explores various advanced methods of manipulating your own Mac from the road, including remote access technologies like long-distance file sharing, FTP, SSH, and virtual private networking (VPN).
Note
Most of these technologies are designed for full-time Internet connections (cable modem or DSL, for example). If you have a dial-up modem, these features work only when you’re actually online. Still, they may occasionally be useful anyway. You could always get online, call up a friend and say, “Check out my Web site right now—here’s the current IP address” or call someone back home to say, “I have to grab a file off my hard drive. Could you make the Mac on my desk go online?”
Using the Sharing pane of System Preferences, you can turn your Mac into a Web site (or server), accessible from the Web browsers of people on your office network, the Internet at large, or both.
This feature assumes, of course, that you’ve already created some Web pages. For this purpose, you can use Web design programs (Apple’s Pages, for example) or save documents out of TextEdit or Word as Web pages. Or you could let Mac OS X build Web pages for you using iPhoto or Image Capture.
After you provide your friends and coworkers with your Mac’s Web site address, they can view your Web pages, graphics, and documents in their own Web browsers. And whenever you’re online, your Web site is also available to anyone on the Internet—but you don’t have to pay a penny to a Web-hosting company.
Tip
Web sharing is also an easy and efficient way to share your Mac files with Windows PCs, either those on your office network or those on the Internet. No special software or translation is required
Mac OS X’s Web Sharing feature isn’t some feeble junior version, either. Inside Mac OS X is Apache, one of the strongest and most popular Unix Web server programs—precisely the same one that drives 60 percent of the Internet’s commercial Web sites.
The bottom line: If you build it, they won’t necessarily come. But you’ll have the capacity to handle them if they do.
Here’s how you turn your Mac into a low-budget Web site:
Put the HTML documents, graphics, and files you want to publish into your Home→Sites folder.
Every account’s Home folder has a Sites folder, and therefore the Mac can actually serve up lots of Web sites at once.
Your Web site’s home page, by the way, won’t appear unless it’s named index.html. (Apple has already put an index.html document into your Sites folder, just to give you the idea; feel free to replace it.) And the other files you put in Sites aren’t accessible unless they’re linked from your index.html page.
Open System Preferences; click Sharing. Turn on the Web Sharing checkbox (Figure 22-1).
Figure 22-1. Use the Sharing System Preferences pane to make designated folders on your hard drive available to anyone on your network. Note that your Mac’s IP address, shown here in underlined type, works only when people connect from across the local network. It probably won’t work from across the Internet; see the box on the facing page. Also note the line below the Computer Name box. That’s your Mac’s Bonjour name, which is a bit friendlier than its IP address.
You’ve just made the contents of your Sites folder available to anyone who connects to your Mac.
Send your network address to your friends and coworkers.
People on your local office network can use your Mac’s Bonjour name to connect. It appears at the top of the Sharing pane, as shown in Figure 22-1. For example, your colleagues can type http://office-mac.local/~chris into their Web browsers, where office-mac.local is your Mac’s Bonjour name.
If other people will be connecting from the Internet, you need to figure out your public IP address; as noted in the box on The IP Address Mess: Port Forwarding, that might be your router’s IP address, not your Mac’s.
Your Mac Web site’s address might be, for example, http://111.222.3.44/~chris/ (the number is your public IP address, and the name should be your short user name). Don’t forget the final slash. Tell your friends to bookmark it so they won’t have to remember all that.

You’ve just put your Mac-based Web page on the Internet for all to see—that is, all who know your secret Web address. Maybe you’ll want to distribute the address only to other people on your office network, using your tiny Web site as a distribution source for documents. Or maybe you’ll want to go whole-hog, hosting an e-commerce Web site (read on).
The instructions above show you how to create a Web site in your Home→Sites folder. In other words, they guide you through the process of creating a personal Web site.
But if you have an Administrator account (Chapter 12), you can also put your Web pages into the main hard drive window’s Library→WebServer→Documents folder. This is your Mac’s main Web site folder, and its address is simply, for example, http://111.222.3.44/. That is, it’s just your public IP address, no user name needed. (Here again, if people will be connecting from across your office network, they can replace the IP number with your Mac’s Bonjour name.)
Working with this primary Web site folder is only slightly different from the personal ones described above. Because you’re now working inside an official Mac OS X system folder, you must mind your permissions. Using the File→Get Info command, you should set up the permissions of any folders and documents inside the Library→Web-Server→Documents folder (an Images folder, for example) as described on The Get Info method.
That way, you can ensure that you’re in control of which visitors are allowed to do what with your Web documents.
Here’s a handy secret: If there isn’t a document whose name is index.html in your Sites folder (or Library→WebServer→Documents folder), then visitors see, in their browsers, a handy list of the files that are in that folder (see Figure 22-2).
This is a terrific convenience: It offers a quick, simple way for you to make a bunch of documents available for downloading. All your visitors have to do is click one of these file names. It downloads immediately, no matter what kind of computer your Web visitor is using.
Tip
This has nothing to do with Web sharing, but it’s kind of cool: You can see the contents of any folder on your Mac, just by typing its folder pathname into a Web browser’s address bar. For example, to see what’s in your Documents folder, type file:///Users/chris/Documents/ into Safari’s address bar. You get a tidy list like the one shown in Figure 22-2, revealing what’s in that folder. Click a link to open it. (If you’re using Safari, you open a Finder window revealing the folder’s contents instead.).
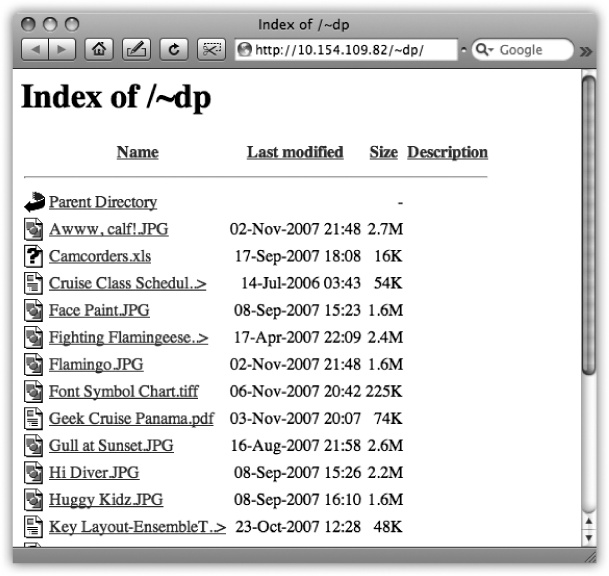
Figure 22-2. Here’s a great way to make files available to other people on your network or collaborators across the Internet. Just put your files into the Sites or Library→WebServer→Documents folder and make sure nothing is named index.html. The Parent Directory link takes you to the folder that contains this one—in this case, the Library→WebServer→Documents folder.
As noted above, Apache is the most popular Web-serving software in the world. As you can well imagine, it’s powerful, reliable—and very technical. It is, after all, a Unix program.
You can read more at any of these sources:
The Apache manual. To open it up, type http://localhost/manual/ into your browser’s address bar. You won’t get far reading this thing if you haven’t spent some time at a technical college, but at least you’ll know what you’re up against.
Apache: The Definitive Guide. A book from O’Reilly.
MacOSXHints.com. Dozens of Mac OS X fans have posted specific Apachetweaking tips and tricks at www.macosxhints.com.
Note, too, that you can get yourself an attractive graphic front end for the various Apache settings, either in the form of Tenon’s iTools program ($350) or the free Webmin (www.webmin.com/osx.html). They still require an understanding of the technical aspects of Web hosting, but at least you’re spared having to type out Unix commands to make your changes.
FTP sites (file transfer protocol) store pieces of software that can be accessed from the Internet. If you’ve heard of FTP at all, it was probably under one of two circumstances—either you’ve downloaded software from an Internet FTP site, or you’ve created and maintained your own Web site.
Hooking into an FTP site generally requires an FTP client program that runs on the kind of computer you use (Mac, Windows, or whatever). On Mac OS X, popular FTP client programs include the shareware programs Transmit, Fetch, Interarchy, and Captain FTP, and the free RBrowser (which is available from the “Missing CD” page at www.missingmanuals.com).
Using these programs, Web designers, for example, can view a list of all the text and graphics documents, sitting there on an Internet-connected computer somewhere, that make up their Web pages. The effect is shown in Figure 22-3.
When they want to update one of those pages, they add it to this list; to delete a Web page, they remove it from this list.
If you’re just going to look at and download files (but not upload or delete any), you don’t even need a special FTP program. You can get to the files much more directly using one of these two methods:
Any old Web browser will work. Open Safari, for example, and type ftp://ftp.apple.com (or whatever the address is) into the address bar. A dialog box asks for an account name and password, if they’re required. Once you’re in, you switch to the Finder and see the contents of the FTP site as a window full of standard file icons. (In other browsers, you may see the list of the FTP site right in the browser window.)
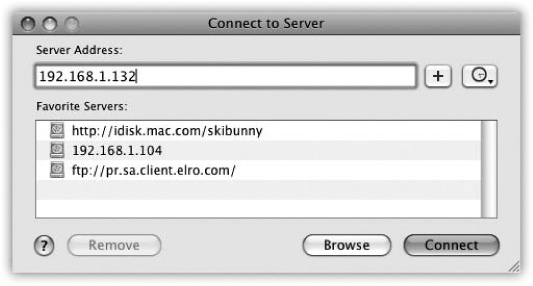
Using the Finder’s Go→Connect to Server command, you can mount read-only FTP volumes right on your desktop, much like a public iDisk.
In the Connect to Server dialog box, just enter the address of the file server you would like to mount—ftp://ftp.apple.com, for example. You’ll soon see the ftp.apple.com icon appear on your desktop, looking just like your other disks. Open it up and drag out whatever you want to download.
Thanks to Mac OS X and its Wonder Unix, you can also turn your own Mac into an FTP site. Once again, the key is the Sharing pane of System Preferences; this time, turn on the File Sharing checkbox, click Options, and click “Share files and folders using FTP.” Click OK.
Tip
It’s best not to share your files over the Internet using FTP. Your name and password wind up being sent unencrypted, meaning that a snooper could intercept them.
FTP is fine for sharing files over your home or office network. But for Internet use, turn on Remote Login in System Preferences→Sharing. Then other people can connect to your Mac, and browse its files, either using ssh (if they’re tech-savvy) or a program like the free CyberDuck. Just change the program’s protocol from FTP to either SFTP or SCP.

Figure 22-3. Top: To access your Mac OS X machine from across the Internet, fire up a program like RBrowser and use the address ftp://111.222.33.4 (or whatever your public IP address is). Bottom: Once you’re looking at an FTP server’s contents, you can drag files from your desktop into the list. Copy them to your Mac by dragging them out of the list onto your desktop, or open them by double-clicking.
At this point, you, or other people you trust, can connect to your FTP server by running an FTP program like RBrowser (see Figure 22-3) or just typing ftp://111.222.33.4 (or whatever your IP address is) into their Web browsers.
You can also connect to your Mac’s regular File Sharing feature (Chapter 13) from over the Internet. This feature is a blessing to anyone who travels, whether with a laptop or to a branch office, because you’ll never be up the creek without a paddle if you discover that you left an important file at home.
The easiest way to go about it is to use Back to My Mac, which is one of Apple’s MobileMe services.
If you’d rather spend time than money, though, you can set up a remote file-sharing system on your own. Start by setting up the home-base Mac for file sharing, as directed in Chapter 13; then figure out your Mac’s public IP address, as described in the box on The IP Address Mess: Port Forwarding.
Finally, once you’re on the road, go online and proceed like this:
Choose Go→Connect to Server.
The Connect to Server dialog box appears, as shown in Figure 22-4.
Type in the public IP address of the Mac to which you want to connect, and then click Connect (or press Return).
See the box on The IP Address Mess: Port Forwarding for a discussion of public vs. private IP addresses.
Enter your name and password, and then click Connect.
From here, it’s just as though you were connecting to another computer on your office network (Chapter 13), although it’s a good bit slower. But when you’re in Hong Kong and need a document from your Mac in Minneapolis, you may not care.
Are you a geek? Take this simple test at home. Do you get excited about Mac OS X’s ability to permit SSH access?
If you answered “What’s SSH?” or “I’m already being quiet,” then the following discussion of Unix remote control may not interest you. To be sure, SSH is not a program with a graphic user interface (icons and menus). You operate it from within a program like Terminal by typing commands, exactly as described in Chapter 16.
If you’re willing to overlook that little peccadillo, though, SSH (Secure Shell) is an extremely powerful tool. It lets you connect to your Mac from anywhere—from across the network or across the Internet. And once you’re connected, you can take complete control of it, copying files, running commands, rearranging folders, or even shutting it down, all by remote control.
Here’s how you go about using SSH:
Set up your Mac by opening the Sharing panel of System Preferences, and then turning on the Remote Login checkbox.
You’ve just told the Mac it’s OK for you (or other people with accounts on your machine) to connect from the road. Quit System Preferences.
Go away.
You can move to another machine on the network, or another computer on the Internet (if you’ve dealt with the port-forwarding issue described on Web Sharing). Once you’re online with that other machine, you can contact your home-base machine from within a program like Terminal.
Tip
It doesn’t have to be Terminal, and it doesn’t have to be a Mac. You can get SSH client programs for almost any kind of computer.
For pre–OS X Macs, for example, you can try MacSSH or NiftyTelnet SSH, both of which you can download from this book’s “Missing CD” page at www.missingmanuals.com. For Windows, try Putty (www.puttyssh.org).
At the prompt, type ssh -l chris 111.222.3.44. Press Return.
Instead of chris, substitute your short account name (as you’re known on the Mac you’re tapping into), and replace the phony IP address shown here with your real public address. (If your Mac back home has a domain name unto itself, such as macmania.com, you can type that instead of the IP address. And if you’ve turned on port forwarding, use your cable modem/DSL box’s IP address.)
If all goes well, the ssh command acknowledges your first successful connection by displaying a message like this: “The authenticity of host ‘111.222.3.44 (111.222.3.44)’ can’t be established. RSA key fingerprint is d9:f4:11:b0:27:1a:f1: 14:c3:cd:25:85:2b:78:4d:e7. Are you sure you want to continue connecting (yes/ no)?” (This message won’t appear on subsequent connections.) You’re seeing SSH’s security features at work.
Type yes and press Return.
Now you see one more note: “Warning: Permanently added ‘111.222.3.44’ (RSA) to the list of known hosts.” You’re then asked for your account password.
Type your account password and press Enter.
You’re in. Issue whatever commands you want. You can now conduct a full Unix Terminal session as described in Chapter 16—but by remote control.
One of the most common uses of SSH is quitting a stuck program. Maybe it’s a program that doesn’t respond to the usual Force Quit commands—maybe even the Finder or Terminal. Or maybe, having just arrived in Accounting on the fifth floor, you realize that you accidentally left your Web browser, open to Dilbert.com, up on your screen in clear view of passersby.
In any case, you’d fire up Terminal and proceed like this (what you type is shown in bold; the Mac’s responses are in normal type):
home-mac:~ chris$ssh 172.24.30.182The authenticity of host '111.222.3.44 (111.222.3.44)' can't be established. RSA key fingerprint is d9:f4:11:b0:27:1a:f1:14:c3:c d:25:85:2b:78:4d:e7. Are you sure you want to continue connecting (yes/no)?yesWarning: Permanently added '172.24.30.182' (RSA) to the list of known hosts. chris@111.222.3.44's password:fisheggsLast login: Thu Apr 22 17:23:38 2010 Welcome to Darwin! office-mac:~ chris$top -u
The top -u command, as described in Chapter 16, displays a list of running programs. After a block of memory statistics, you might see a list like this:
294 top        6.5% 0:01.10 1  16   26   276K   416K   652K  27.1M
293 bash       0.0% 0:00.03 1  12   15   168K   856K   768K  18.2M
292 login      0.0% 0:00.01 1  13   37   140K   408K   492K  26.9M
291 Terminal   0.0% 0:05.50 3  60  115  2.99M  5.41M  6.59M   149M
287 HotKey     0.0% 0:00.34 4 151   78   760K  2.24M  2.67M  96.5M
283 Finder     0.0% 0:02.04 2  89  162  3.95M  17.1M  15.5M   165M
282 SystemUISe 0.9% 0:01.51 2 241  327  3.03M  7.85M  8.54M   158M
281 Dock       0.0% 0:00.24 2  77  132   780K  10.7M  2.80M   139M
As you can see, the Finder is process number 283. If that’s the stuck program, then, you could quit it like so:
office-mac:~ chris$ kill 283Or if you’re sure of the program’s exact name, just use the killall command with the program’s name instead of its process ID. To handle a stuck Finder, you would type this:
office-mac:~ chris$ killall FinderEither way, the Finder promptly quits (and relaunches in a healthier incarnation, you hope). You could also, at this point, type sudo shutdown -h now to make your Mac, elsewhere on the network, shut down. (Terminal doesn’t type any kind of response.)
If you ended your SSH session by shutting down the other Mac, you can just close the Terminal window now. Otherwise, type exit to complete your SSH session.
Tip
Want a quicker, dirtier method of doing ssh that doesn’t even require knowing the other machine’s IP address? OK: Open Terminal. Choose Shell→New Remote Connection. In the list of connection types, choose ssh/ftp/telnet. Every Bonjour-enabled Mac on your network shows up; click one and then click Connect to connect!
After reading the previous pages, you might assume it’s a piece of cake for businesspeople to connect to their corporate networks across the Internet from wherever they happen to be: their homes, hotel rooms, or their local Starbucks. But even though the steps on the preceding pages work fine if you’re dialing into your home machine, they’ll probably fail miserably when you want to connect to a corporate network. There’s one enormous obstacle in your way: Internet security.
The typical corporate network is guarded by a team of steely-eyed administrators for whom Job Number One is preventing access by unauthorized visitors. They perform this job primarily with the aid of a super-secure firewall that seals off the company’s network from the Internet.
So how can you tap into the network from the road? One solution is to create a hole in the firewall for each authorized user—software that permits incoming Internet traffic only from specified IP addresses like your Mac’s. Unfortunately, this setup isn’t bulletproof, security-wise. It’s also a pain for administrators to manage.
Back in the dial-up modem days, you could dial directly into the corporate network, modem-to-modem. That was plenty secure, but it bypassed the Internet, and therefore wound up being expensive. (Want proof? Try this simple test: Make a call from the Tokyo Hilton to the Poughkeepsie Sheet Metal home office. Have a look at your hotel bill when you check out.)
Fortunately, there’s a third solution that’s both secure and cheap: the Virtual Private Network, or VPN. Running a VPN allows you to create a super-secure “tunnel” from your Mac, across the Internet, and straight into your corporate network. All data passing through this tunnel is heavily encrypted; to the Internet eavesdropper, it looks like so much undecipherable gobbledygook.
And it’s free—whether you’re accessing the Internet via your home DSL, a local ISP number from a hotel, or wirelessly from your stool at Starbucks.
Remember, though, that VPN is a corporate tool, run by corporate nerds. You can’t use this feature without these pieces in place:
A VPN server. This is a big deal. If your tech department tells you they don’t have one, then that’s that—no tunneling for you.
If they do have one, then you’ll need to know the type of server it is. Mac OS X’s VPN software can connect to VPN servers that speak PPTP (Point to Point Tunneling Protocol), L2TP/IPsec (Layer 2 Tunneling Protocol over IP Security), or Cisco IPSec. Most corporate VPN servers work with at least one of these protocols.
You’ll also need to know the Internet address of your VPN server (for example, vpn.ferrets-r-us.com).
An account on the remote network that allows VPN access. Your remote network can be set up in many different ways, but in every case, you’ll still need to confirm with your network administrator that your account on it allows VPN access.
All necessary account information. Make sure you have all the scraps of connection information you’ll need to dial in. That would include your user (account) name, at the very least. You may also need an Windows Domain name; VPN servers are often part of Microsoft Windows Server networks, which won’t let you in until you know this domain name.
Some networks also may require that you type in the currently displayed password on an RSA SecurID card, which your administrator will provide. This James Bond-ish, credit card–like thing displays a password that changes every few seconds, making it rather difficult for hackers to learn “the” password. (If your network doesn’t require a SecurID card, you’ll need a standard password instead.)
Finally, if your office offers L2TP connections, you’ll need yet another password called a Shared Secret to ensure that the server you’re connecting to is really the server you intend to connect to.
If you’re lucky, your company’s network geek has provided you with a VPN settings file, a little double-clickable icon that automatically opens the Network pane of System Preferences and fills in the blanks for you. If not, you can do all that manually:
Open System Preferences. Click Network. Click the
 button below the list of connections at the left side.
The “Select the interface” sheet appears.
From the pop-up menu, choose VPN.
Now a new pop-up menu appears, called VPN Type; you’re supposed to choose either L2TP (Layer 2 Tunneling Protocol), PPTP (Point to Point Tunneling Protocol), or Cisco IPsec (IP Security). Find out which system your company’s network uses.
Choose the type of VPN from the VPN Type pop-up menu. Type a name for this connection (it can be anything you want). Click Create.
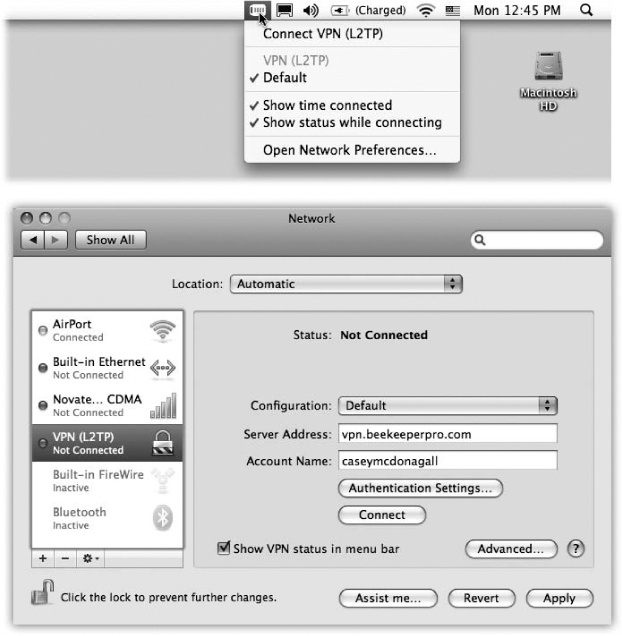
You return to the main Network pane, where the settings boxes for your VPN are waiting (Figure 22-5).
Fill in the server address and account name. Click Authentication Settings to specify your password and other security settings.
Here, for example, is where you indicate that you have one of those SecurID cards.
Click OK. Turn on “Show VPN Status in menu bar.”
That checkbox makes the VPN menulet appear; it’s your ticket to getting connected (Figure 22-5, top).
Tip
If you always connect to the same VPN, you can turn on VPN on Demand. It autoconnects you to your corporate VPN every time you direct your Web browser to a Web site, file server, or resource that requires the VPN connection, saving you some steps.
To set this up, click Advanced. (You can see this button in Figure 22-5.) Click VPN on Demand; click . Enter the corporate VPN domain. You’re good to go—as long as you’ve got your network geek’s permission. (Some of them get antsy about VPN on Demand, since it could be a security risk if your laptop is stolen.)
Close System Preferences. You’re ready to connect.
Connect the way you normally do—via cable modem, DSL, office network, modem, AirPort, or whatever. Once you’re online, choose your VPN’s name from the VPN menulet. You’ll be asked for your credentials: your password, for example, or the code displayed on your SecurID card.
If all goes well, several status messages go by. The last one says, “Connected To” and gives the IP address of the network equipment you’ve reached out and touched.
At this point, you’re connected to the corporate network. You can perform the same network-related tasks you could if you were actually in that office: Check your email, view internal corporate Web pages, access internal FTP servers, make printouts on laser printers thousands of miles away, and so on.
You generally can’t browse things, though. That is, depending on your network, you might not be able to use your Sidebar to view a list of the other computers on the office network, or see a list of networked printers.
In this case, to access these services, you must know their IP addresses. For example, to connect to a shared folder on another computer, choose Go→Connect to Server, type its network address, and press Return.
Tip
To connect to a shared folder on a Windows machine, the address looks like this: smb://111.222.33.4/sales-docs. Of course, you’d substitute the correct IP address for the dummy one shown here, and insert the actual name of the shared folder. (You can also use its DNS name instead of the IP address, if you know it, like this: smb://big-blue-server.ferret-lan.com/sales-docs.)
When you’re finished accessing the remote network, choose Disconnect from the VPN menulet. (Accessing other Web sites can be slow while you’re on a VPN.)
For all the wonders of VPN, here are some possible complications:
If you’re using a router at home (a little box that shares one cable modem or DSL box with several computers), it might not be able to handle the tunneling protocols, or it might not have that feature turned on. Check the router’s manual, or ask its manufacturer for more information. For example, the first-generation (silver) AirPort base stations can’t handle VPNs at all.
If the corporate network doesn’t seem to like your name and password, you might need to add your NT domain name and a backwards slash to the beginning of your account name (like this: dom01\msmith) before trying again.
If you’re able to make the connection but experiencing trouble reaching services by their DNS names (for example, big-blue-server.com), your Mac could be having difficulty finding the right DNS server. Working with your network administrator, open the Network pane of System Preferences. Click VPN, then click Advanced, and then DNS; enter the desired DNS server addresses in the DNS Servers box. Click OK, then Apply, and then try the VPN connection again.
If you’re still having problems using the VPN, look at the logs (automatically kept technical records) for clues to share with your network administrator. To view these records, open the Console program (in Applications→Utilities). Click Show Log List, expand the /var/log section, and click ppp.log.