As you’re certainly aware by now, Mac OS X’s resemblance to the original Mac operating system is only superficial. The engine underneath the pretty skin is utterly different. In fact, it’s Unix, one of the oldest and most respected operating systems in use today. The first time you see it, you’d swear that Unix has about as much in common with the original Mac OS as a Jeep does with a melon (see Figure 16-1).
What the illustration at the bottom of Figure 16-1 shows, of course, is a command line interface: a place where you can type out instructions to the computer. This is a world without icons, menus, or dialog boxes. The mouse is almost useless here.
Surely you can appreciate the irony: The brilliance of the original 1984 Macintosh was that it eliminated the command line interface that was still the ruling party on the computers of the day (like Apple II and DOS machines). Most nongeeks sighed with relief, delighted that they’d never have to memorize commands again. Yet here’s Mac OS X, Apple’s supposedly ultramodern operating system, complete with a command line! What’s going on?
Actually, the command line never went away. At universities and corporations worldwide, professional computer nerds kept right on pounding away at the little C: or $ prompts, appreciating the efficiency and power such direct computer control afforded them.
You’re forgiven if your reaction to the idea of learning Unix is, “For goodness’ sake—can’t I finish learning one way to control my new operating system before I have to learn yet another one?”
Absolutely. You never have to use Mac OS X’s command line. In fact, Apple has swept it far under the rug, obviously expecting that most people will use the beautiful icons and menus of the regular desktop. There are, however, some tasks you can perform only at the command line, although fewer with each release of Mac OS X.
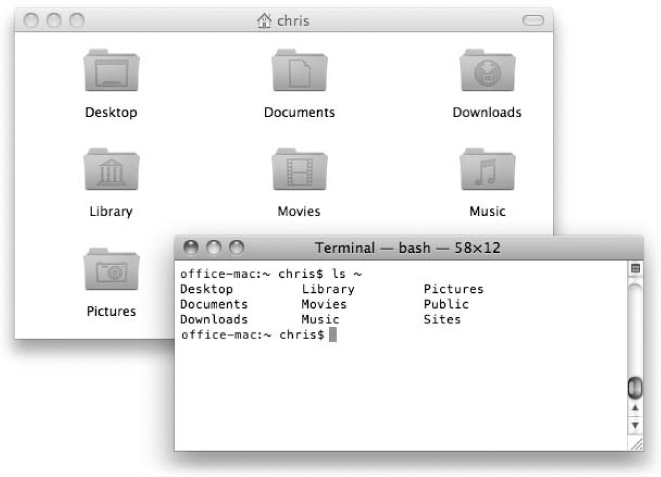
Figure 16-1. Top: What most people think of when they think “Macintosh” is a graphic interface (GUI)—one that you control with a mouse, using icons and menus to represent files and commands. Bottom: Terminal offers a second way to control Mac OS X: a command line interface, which you operate by typing out programming commands.
For intermediate or advanced Mac fans with a little time and curiosity, however, the command line opens up a world of possibilities. It lets you access corners of Mac OS X that you can’t get to from the regular desktop. It lets you perform certain tasks with much greater speed and efficiency than you’d get by clicking buttons and dragging icons. And it gives you a fascinating glimpse into the minds and moods of people who live and breathe computers.
If you’ve ever dabbled in Excel macros, experimented with AppleScript, or set up a Mac on a network, you already know the technical level of the material you’re about to read. The Unix command line may be unfamiliar, but it doesn’t have to be especially technical, particularly if you have some “recipes” to follow like the ones in this chapter.
Note
Unix is an entire operating system unto itself. This chapter is designed to help you find your footing and decide whether or not you like the feel of Unix. If you get bit by the bug, see Appendix D for sources of additional Unix info.
The keyhole into Mac OS X’s Unix innards is a program called Terminal, which sits in your Applications→Utilities folder (see Figure 16-2). Terminal is named after the terminals (computers that consist of only a monitor and keyboard) that still tap into the mainframe computers at some universities and corporations. In the same way, Terminal is just a window that passes along messages to and from the Mac’s brain.
The first time you open Terminal, you’ll notice that there’s not much in its window except the date, time and source of your last login, and the command line prompt (Figure 16-2).
For user-friendliness fans, Terminal doesn’t get off to a very good start; this prompt looks about as technical as computers get. It breaks down like this:
OfficeMac: is the name of your Mac (at least, as Unix thinks of it). It’s usually the Mac’s Computer Name (as it appears in the Sharing pane of System Preferences), but it’s occasionally the name your Mac goes by on the Internet.
Figure 16-2. On the Web, Mac OS X’s Terminal is one of the most often-discussed elements of Mac OS X. Dozens of step-by-step tutorials for performing certain tasks circulate online, usually without much annotation as to why you’re typing what you’re typing. As you read this chapter, remember that capitalization matters in Terminal, even though it doesn’t in the Finder. As far as most Unix commands are concerned, Hello and hello are two different things.
~ indicates what folder you’re “in” (Figure 16-2). It denotes the working directory—that is, the currently open folder. (Remember, there are no icons on the command line.) Essentially, this notation tells you where you are as you navigate your machine.
The very first time you try out Terminal, the working directory is set to the symbol ~. That tilde symbol is important shorthand; it means “your own Home folder.” It’s what you see the first time you start up Terminal, but you’ll soon be seeing the names of other folders here—OfficeMac: /Users or OfficeMac: /System/Library, for example. (More on this slash notation on Title Bar.)
Note
Before Apple came up with the user-friendly term folder to represent an electronic holding tank for files, folders were called directories. In this chapter, you’ll encounter the term directory almost exclusively. In any discussion of Unix, “directory” is simply the correct term.
Besides, using a term like “working folder” within earshot of Unix geeks is likely to get you lynched.
chris$ begins with your short user name. It reflects whoever’s logged into the shell (see the box on the facing page), which is usually whoever’s logged into the Mac at the moment. As for the $ sign, think of it as a colon. In fact, think of the whole prompt shown in Figure 16-2 as Unix’s way of saying, “OK, Chris, I’m listening. What’s your pleasure?”

Unless you’ve fiddled with Terminal’s preferences, the insertion point looks like a tall rectangle at the end of the command line. It trots along to the right as you type.
An enormous number of programs have been written for Unix. And thanks to thousands of open-source developers—programmers all over the world who collaborate and make their work available for the next round of modification—much of this software is freely available to all, including Mac OS X users.
Each Unix command generally calls up a single application (or process, as geeks call it) that launches, performs a task, and closes. Many of the best-known such applications come with Mac OS X.
Here’s a fun one: Just type uptime and press Enter or Return. (That’s how you run a Unix program: Type its name and press Return.) On the next line, Terminal shows you how long your Mac has been turned on continuously. It shows you something like: “13:09 up 8 days, 15:04, 1 user, load averages: 1.24, 1.37, 1.45”—meaning your Mac has been running for 8 days, 15 hours nonstop.
You’re finished running the uptime program. The $ prompt returns, suggesting that Terminal is ready for whatever you throw at it next.
UP TO SPEED: bash, Terminal, and Shells
One Unix program runs automatically when you open a Terminal window: bash. It’s Apple’s chosen shell for Mac OS X 10.6.
A shell is a Unix program that interprets the commands you’ve typed, passes them to the kernel (the operating system’s brain), and then shows you the kernel’s response.
In other words, the shell is the Unix Finder. It’s the program that lets you navigate the contents of your hard drive, see what’s inside certain folders, launch programs and documents, and so on.
There are actually several different shells available in Unix, each with slightly different command syntax. All the popular ones—like tcsh, ksh, and zsh—come with Mac OS X. (You can choose among them as your default shell using, of all things, the Accounts pane of System Preferences. Click the  , enter your Administrator password, and then Control-click
or right-click your account name in the list; choose Advanced Options. There, on the Advanced Options panel, you’ll find the Login Shell box, where you can make the change.) But on a clean installation of Snow Leopard, Terminal comes set to use bash.
bash evolved from the original sh shell, which was named the Bourne shell after its inventor. bash got its name, then, as the Bourne Again Shell (get it?).
You can open additional Terminal windows (100 or more, depending on how many other programs are running) by choosing File→New ShellWindow. Even slicker, Terminal lets you open multiple sessions in tabs (just like with Safari) by choosing File→New Tab.
Each window and tab runs independently of any others. For proof, try opening several windows and then running the cal command in each.
Try this one: Type cal at the prompt, and then press Return. Unix promptly spits out a calendar of the current month.
OfficeMac:~ chris$ cal
   September 2009
Su Mo Tu We Th Fr Sa
       1  2  3  4  5
 6  7  8  9 10 11 12
13 14 15 16 17 18 19
20 21 22 23 24 25 26
27 28 29 30

OfficeMac:~ chris$
This time, try typing cal 4 2010, cal -y, or cal -yj. These three commands make Unix generate a calendar of April 2010, a calendar of the current year, and a calendar of Julian days of the current year, respectively.
Tip
The mouse isn’t very useful at the command line. You generally move the cursor only with the ← and → keys. (The Delete key works as it always does.)
You can use the mouse, however, to select text from anywhere in the window (or other programs) and paste it in at the prompt. You can also use the mouse to drag an icon off your desktop into the Terminal window, as shown in Figure 16-3.
If you can’t see any icons for your files and folders, how are you supposed to work with them?
You have no choice but to ask Unix to tell you what folder you’re looking at (using the pwd command), what’s in it (using the ls command), and what folder you want to switch to (using the cd command), as described in the following pages.
Here’s one of the most basic navigation commands: pwd, which stands for print working directory. The pwd command doesn’t actually print anything on your printer. Instead, the pwd command types out, on the screen, the path Unix thinks you’re in (the working directory).
Try typing pwd and pressing Return. On the next line, Terminal may show you something like this:
/Users/chris/Movies
Terminal is revealing the working directory’s path—a list of folders-in-folders, separated by slashes, that specifies a folder’s location on your hard drive. /Users/chris/Movies pinpoints the Movies folder in Chris’s Home folder (which, like all Home folders, is in the Users directory).
The ls command, short for list, makes Terminal type out the names of all the files and folders in the folder you’re in (that is, your working directory). You can try it right now: Just type ls and then press Return. Terminal responds by showing you the names of the files and folders inside in a list, like this:
Desktop   Downloads Movies    Pictures  Sites
Documents Library   Music     Public
In other words, you see a list of the icons that, in the Finder, you’d see in your Home folder.
Note
Terminal respects the limits of the various Mac OS X accounts (Chapter 12). In other words, a Standard or Administrator account holder isn’t generally allowed to peek further into someone else’s Home folder. If you try, you’ll be told, “Permission denied.”
You can also make Terminal list what’s in any other directory (one that’s not the working directory) just by adding its pathname as an argument. Arguments are extra pieces of information after the command that refine how the command should run. (Remember the calendar example? When you wanted the April 2010 calendar, you typed cal 4 2010. The “4” and “2010” parts were the arguments—that is, everything you typed after the command itself.)
To see a list of the files in your Documents directory, then, you could just type ls /Users/chris/Documents. Better yet, because the ~ symbol is short for “my home directory,” you could save time by typing ls ~/Documents. The pathname “~/Documents” is an argument that you’ve fed the ls command.
As part of a command’s arguments, you can sometimes insert option flags (also called switches)—modifying characters (or short phrases) that affect how the command works, just like option settings do in GUI applications. In the calendar example, you can type cal -y to see a full-year calendar; the -y part is an option flag.
Option flags are almost always preceded by a hyphen (-), although you can usually run several flags together following just one hyphen. If you type ls -al, both the -a and -l flags are in effect.
Here are some useful options for the ls command:
-a. The unadorned ls command even displays the names of invisible files and folders—at least by the Finder’s definition. The Unix shell uses its own system of denoting invisible files and folders, and ignores the Finder’s. That doesn’t mean you’re seeing everything; files that are invisible by the Unix definition still don’t show up.
You can use one of the ls command’s flags, however, to force even Unix-invisible files to appear. Just add the -a flag. In other words, type this: ls -a. Now when you press Return, you might see something like this:
.                            Desktop                 Music
..                           Documents               Pictures
.CFUserTextEncoding          Downloads               Public
.DS_Store                    Library                 Sites
.Trash                       Movies
-F. As you see, the names of invisible Unix files all begin with a period (Unix folk call them dot files). But are these files or folders? To find out, use ls with the -F option (capitalization counts), like this: ls -aF. You’re shown something like this:
./                             Desktop/                  Music/
../                            Documents/                Pictures/
.CFUserTextEncoding            Downloads/                Public/
.DS_Store                      Library/                  Sites/
.Trash/                        Movies/
The names of the items themselves haven’t changed, but the -F flag makes slashes appear on directory (folder) names. This example shows that in your home directory, there are 12 other directories and two files.
-G. Here’s a fascinating flag that makes ls display color-coded results: blue for directories, red for programs, normal black-on-white type for documents, and so on.
-R. The -R flag produces a recursive listing—one that shows you the directories within the directories in the list. Listing all of the home directory could take several pages, but if you type ls -R Movies, for example, you might get something like this:
Bad Reviews.doc  Old Tahoe Footage 2 Picnic Movie 2  Reviews.doc
./Old Tahoe Footage 2:
Tahoe 1.mov   Tahoe 3.mov   Tahoe Project File
Tahoe 2.mov   Tahoe 4.mov
./Picnic Movie 2:
Icon?      Media      Picnic Movie 2 Project
./Picnic Movie 2/Media:
Picnic Movie 1 Picnic Movie 3 Picnic Movie 5
Picnic Movie 2 Picnic Movie 4 Picnic Movie 6
In other words, you’ve got two subdirectories here, called Old Tahoe Footage 2 and Picnic Movie 2—which itself contains a Media directory.
Tip
As you can tell by the cal and ls examples, Unix commands are very short. They’re often just two-letter commands, and an impressive number of those use alternate hands (ls, cp, rm, and so on).
The reason has partly to do with conserving the limited memory of early computers and partly to do with efficiency: Most programmers would just as soon type as little as possible to get things done. User-friendly it ain’t, but as you type these commands repeatedly over the months, you’ll eventually be grateful for the keystroke savings.
Now you know how to find out what directory you’re in, and how to see what’s in it, all without double-clicking any icons. That’s great information, but it’s just information. How do you do something in your command line Finder—like switching to a different directory?
To change your working directory, use the cd command, followed by the path of the directory you want to switch to. Want to see what’s in the Movies directory of your home directory? Type cd /Users/chris/Movies and press Return. The $ prompt shows you what it considers to be the directory you’re in now (the new working directory). If you perform an ls command at this point, Terminal shows you the contents of your Movies directory.
That’s a lot of typing, of course. Fortunately, instead of typing out that whole path (the absolute path, as it’s called), you can simply specify which directory you want to see relative to the directory you’re already in.
For example, if your Home folder is the working directory, the relative pathname of the Trailers directory inside the Movies directory would be Movies/Trailers. That’s a lot shorter than typing out the full, absolute pathname (/Users/chris/Movies/Trailers).
If your brain isn’t already leaking from the stress, here’s a summary of the three different ways you could switch from ~/(your home directory) to ~/Movies:
cd/Users/chris/Movies. That’s the long way—the absolute pathname. It works no matter what your working directory is.
cd ~/Movies. This, too, is an absolute pathname that you could type from anywhere. It relies on the ~ shorthand (which means “my home directory,” unless you follow the ~ with another account name).
cd Movies. This streamlined relative path exploits the fact that you’re already in your home directory.
Tip
Actually, there’s a fourth way to specify a directory that involves no typing at all: dragging the icon of the directory you want to specify directly into the Terminal window. Figure 16-3 should make this clear.
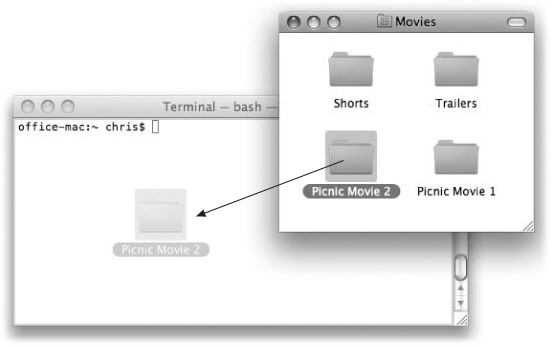
Figure 16-3. This may be the quickest way of all to identify a directory or file you want to manipulate: Don’t type anything. When you drag icons directly from the desktop into a Terminal window, the icon’s pathname appears automatically at the insertion point. Terminal even adds backslashes to any special characters in these pathnames for you (a necessary step known as escaping the special characters; see page 619).
So now you’ve burrowed into your Movies directory. How do you back out?
Sure, you could type out the full pathname of the directory that encloses Movies—if you had all afternoon. But there’s a shortcut: You can type a double period (..) in any pathname. This shortcut represents the current directory’s parent directory (the directory that contains it).
To go from your home directory up to /Users, for example, you could just type cd .. (that is, cd followed by a space and two periods).
You can also use the dot-dot shortcut repeatedly to climb multiple directories at once, like this: cd ../.. (which would mean “switch the working directory to the directory two layers out.”) If you were in your Movies directory, ../.. would change the working directory to the Users directory.
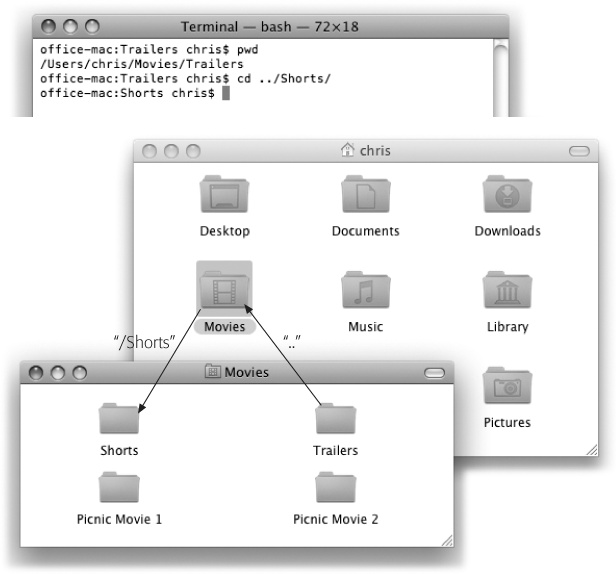
Another trick: You can mix the .. shortcut with actual directory names. For example, suppose your Movies directory contains two directories: Trailers and Shorts. Trailers is the current directory, but you want to switch to the Shorts directory. All you’d have to do is type cd ../Shorts, as illustrated in Figure 16-4.
By now, you might be thinking that clicking icons would still be faster than doing all this typing. Here’s where the typing shortcuts of the bash shell come in.
You know how you can highlight a file in a Finder window by typing the first few characters of its name? The tab-completion feature works much the same way. Over time, it can save you miles of finger movement.
It kicks in whenever you’re about to type a pathname. Start by typing the first letter or two of the path you want, and then press Tab. Terminal instantly fleshes out the rest of the directory’s name. As shown in Figure 16-5, you can repeat this process to specify the next directory-name chunk of the path.
Some tips for tab completion:
Capitalization counts.
Terminal adds backslashes automatically if your directory names include spaces, $ signs, or other special characters. But you still have to insert your own backslashes when you type the “hint” characters that tip off Tab completion.
Figure 16-5. Top: You type cd /U and then press Tab. Second from top: Terminal finishes the directory name Users for you. Third from top: You type c and then press Tab. Bottom: Terminal finishes the homedirectory name, chris. You can also use tab completion to specify file names, as when you type ls -l Movies/R and then press Tab; Terminal finishes the name Reviews.doc.
If it can’t find a match for what you typed, Terminal beeps.
If it finds several files or directories that match what you typed, Terminal beeps; when you press Tab again, terminal shows you a list of them. To specify the one you really wanted, type the next letter or two and then press Tab again.

You may find yourself at some point needing to run a previously entered command, but dreading the prospect of re-entering the whole command. Retyping a command, however, is never necessary. Terminal (or, rather, the shell it’s running) remembers the last 500 commands you entered. At any prompt, instead of typing, just press the, ↑ or ↓ keys to walk through the various commands in the shell’s memory. They flicker by, one at a time, at the $ prompt—right there on the same line.
Wildcards are special characters that represent other characters—and they’re huge timesavers.
The most popular wildcard is the asterisk (*), which means “any text can go here.” For example, to see a list of the files in the working directory that end with the letters te, you could type ls *te. Terminal would show you files named Yosemite, BudLite, Brigitte, and so on—and hide all other files in the list. If the wildcard matches any directories, you’ll also see the contents of those directories as well, just as though you’d used ls with each of the full directory names.
Likewise, to see which files and directories begin with “Old,” you could type ls Old* and press Return. You’d be shown only the names of icons in the working directory called Old Yeller, Old Tahoe Footage, Olduvai Software, and so on.
If you add the asterisk before and after the search phrase, you find items with that phrase anywhere in their names. Typing ls *jo* will show you the files named Mojo, johnson, Major Disaster, and so on.
A hyphen (-) after the cd command means “Take me back to the previous working directory.” For example, if you changed your working directory from ~/Movies/Movie 1 to ~/Documents/Letters, simply enter cd - to change back to ~/Movies/Movie 1. Use cd - a second time to return to ~/Documents/Letters. (Note the space between cd and the hyphen.)
You already know that the tilde (~) character is a shortcut to your home directory. But you can also use it as a shortcut to somebody else’s home directory simply by tacking on that person’s account name. For example, to change to Miho’s home directory, use cd ~miho.
The bash shell offers dozens of special keystroke shortcuts for navigation. You may recognize many of them as useful undocumented shortcuts that work in any Cocoa application, but even more are available (and useful) in Terminal:
Keystroke | Effect |
|---|---|
Control-U | Erases the entire command line you’re working on (to the insertion point’s left). |
Control-A | Moves the insertion point to the beginning of the line. |
Control-E | Moves the insertion point to the end of the line. |
Control-T | Transposes the previous two characters. |
Esc-F | Moves the insertion point to the beginning of the next word. |
Esc-B | Moves the insertion point to the beginning of the current word. |
Esc-Delete | Erases the previous word (defined as “anything that ends with a space, slash, or most other punctuation marks; periods and asterisks not included”). You have to hold down Esc as you press Delete; repeat for each word. |
Esc-D | Erases the word, or section of a word, following the insertion point. |
Esc-C | Capitalizes the letter following the insertion point. |
Esc-U | Changes the next word or word section to all uppercase letters. |
Esc-L | Changes the next word or word section to all lowercase letters. |
The previous pages show you how to navigate your directories using Unix commands. Just perusing your directories isn’t particularly productive, however. This section shows you how to do something with the files you see listed—copy, move, create, and delete directories and files.
Tip
You’re entering Serious Power territory, where it’s theoretically possible to delete a whole directory with a single typo. As a precaution, consider working through this section with administrator privileges turned off for your account, so that you won’t be able to change anything outside your home directory—or to be really safe, create a new, test account just for this exercise so even your personal files won’t be at risk.
Using the Unix command cp, you can copy and rename a file in one move. (Try that in the Finder!)
The basic command goes like this: cp path1 path2, where the path placeholders represent the original file and the copy, respectively.
To duplicate a file called Thesis.doc, you would type cp Thesis.doc Thesis2.doc. (That’s just one space between the names.) You don’t have to call the copy Thesis2—you could call it anything you like. The point is that you wind up with two identical files in the same directory with different names. Just remember to add a backslash before a space if you want to name the copy with two words (Thesis\ Backup, for example).
Tip
If this command doesn’t seem to work, remember that you must type the full names of the files you’re moving—including their file name suffixes like .doc or .gif, which Mac OS X usually hides. Using the ls command before a copy may help you find out what the correct, full file names should be. Or you may just want to use the Tab-completion feature, making Terminal type the whole name for you.
To copy the same file into, say, your Documents folder instead, just change the last phrase so that it specifies the path, like this: cp Reviews.doc ~/Documents/Reviews2.doc.
To copy something into another directory without changing its name, just use a pathname (without a file name) as the final phrase. So to copy Reviews.doc into your Documents folder, for example, you would type cp Reviews.doc ~/Documents.
You can even copy several files or directories at once. Where you’d normally specify the source file, just list their pathnames separated by spaces, as shown in Figure 16-6.

Figure 16-6. The first argument of this command lists two different files. The final clause indicates where they go.
You can also use the * wildcard to copy several files at once. For example, suppose you’ve got these files in your iMovie Projects directory: Tahoe1.mov, Tahoe2.mov, Tahoe3.mov, Tahoe4.mov, Script.doc, and Tahoe Project File. Now suppose you want to copy only the QuickTime movies into a directory called FinishedMovies. All you’d have to do is type cp *mov ../FinishedMovies and press Return; Mac OS X instantly performs the copy.
If you wanted to copy all those files (not just the movies) to another directory, you’d use the * by itself, like this: cp * ../Finished Movies.
Unfortunately, if the iMovie Projects directory contains other directories and not just files, that command produces an error message. The Unix cp command doesn’t copy directories within directories unless you explicitly tell it to, using the -R option flag. Here’s the finished command that copies everything in the current directory—both files and directories—into FinishedMovies: cp -R * ../FinishedMovies.
Here’s one more example: a command that copies everything (files and directories) with Tahoe in its name into someone else’s Drop Box directory: cp -R *Tahoe* ~miho/Public/Drop\Box.
Now that you know how to copy files, you may want to move or rename them. To do so, you use the Unix command mv almost exactly the same way you’d use cp (except that it always moves directories inside of directories you’re moving, so you don’t have to type -R).
The syntax looks like this: mv oldname newname. For example, to change your Movies directory’s name to Films, you’d type mv Movies Films. You can rename both files and directories this way.
To rename a file and move it to a different directory simultaneously, just replace the last portion of the command with a pathname. To move the Tahoe1 movie file into your Documents directory—and rename it LakeTahoe at the same time—type this: mv Tahoe1.mov ~/Documents/LakeTahoe.mov.
All the usual shortcuts apply, including the wildcard. Here’s how you’d move everything containing the word Tahoe in your working directory (files and directories) into your Documents directory: mv *Tahoe* ~/Documents.
You can follow the mv command with any of these options:
-i. Makes Terminal ask your permission before replacing a file with one of the same name.
-f. Overwrites like-named files without asking you first. (Actually, this is how mv works if you don’t specify otherwise.)
-n. Doesn’t overwrite like-named files; just skips them without prompting.
-v. Displays verbose (fully explained) explanations on the screen, letting you know exactly what got moved.
Tip
If you use a combination of options that appear to contradict one another—like the -f, -i, and -n options—the last option (farthest to the right) wins.
By the way, the mv command never replaces a directory with an identically named file. It copies everything else you’ve asked for, but it skips files that would otherwise wipe out folders.
In the Finder, you make a new folder by choosing File→New Folder. In Terminal, you create one using the mkdir command (for make directory).
Follow the command with the name you want to give the new directory, like this: mkdir ‘Early iMovie Attempts’ (the single quotes in this example let you avoid having to precede each space with a backslash).
The mkdir command creates the new directory in the current working directory, although you can just as easily create it anywhere else. Just add the pathname to your argument. To make a new directory in your Documents→Finished directory, for example, type mkdir ~‘/Documents/Finished/Early iMovie Attempts’. (The first quote comes after the ~, so that it preserves that character’s special meaning by not escaping it.) Thanks to Spotlight’s constant eye on file activity, the new directory appears immediately in the Finder.
Tip
If there is no directory called Finished in your Documents directory, you just get an error message—unless you use the -p option, which creates as many new directories as necessary to match your command. For example, mkdir -p ‘~/Documents/Finished/Early iMovie Attempts’ would create both a Finished directory and an Early iMovie Attempts directory inside of it.
To create a new, empty file, type touch filename. For example, to create the file practice. txt in your working directory, use touch practice.txt.
And why would you bother? For the moment, you’d use such new, empty files primarily as targets for practicing the next command.
Unix provides an extremely efficient way to trash files and directories. With a single command, rm, you can delete any file or directory—or all those that you’re allowed to access with your account type.
The dangers of this setup should be obvious, especially in light of the fact that deletions are immediate in Unix. There is no Undo, no Empty Trash command, no “Are you sure?” dialog box. In Unix, all sales are final.
The command rm stands for “remove,” but it could also stand for “respect me.” Pause for a moment whenever you’re about to invoke it. For the purpose of this introduction to rm, double-check that administration privileges are indeed turned off for your account.
To use this command, just type rm, a space, and the exact name of the file you want to delete from the working directory. To remove the file practice.txt you created with the touch command, for example, you’d just type rm practice.txt.
To remove a directory and everything in it, add the -r flag, like this: rm -r Practice-Folder.
If you’re feeling particularly powerful (and you like taking risks), you can even use wildcards with the rm command. Now, many experienced Unix users make it a rule to never use rm with wildcards while logged in as an administrator, because one false keystroke can wipe out everything in a directory. But here, for study purposes only, is the atomic bomb of command lines, the one that deletes everything in the working directory: rm -rf *.
Tip
Be doubly cautious when using wildcards in rm command lines, and triply cautious when using them while logged in as an administrator.
If you’re using Time Machine, you have a safety net, of course. But why tempt fate?
Just after the letters rm, you can insert options like these:
-d deletes any empty directories it finds, in addition to files. (Otherwise, empty directories trigger an error message.)
-f squelches any attempts to get your attention, even if there’s a problem, like a permission error or nonexistent file. The command proceeds, full speed ahead.
-i (for interactive) makes the Mac ask for confirmation before each deletion.
-P securely overwrites the file three times. (It’s an alternative to the srm command described next.)
srm is a command line version of the Finder’s Secure Empty Trash function (Emptying the Trash I: Quick and Easy). It lets you choose just how thoroughly Mac OS X scrubs the hard drive spot where the deleted file once sat.
The srm utility lets you specify three general levels of deletion:
Simple. The -s flag tells srm to perform a simple secure removal, overwriting the deleted material with random data just once. It’s faster than the Finder’s Secure Empty Trash, but not as thorough.
Medium. The -m flag designates medium level, which overwrites the unwanted data seven times with various types of random and not-so-random data. This is similar to what you get when you use the Finder’s Secure Empty Trash command, and it’s thorough enough to meet U.S. Department of Defense security requirements.
Strong. If you don’t specify either -s or -m, srm will perform a strong secure removal. That entails recording over the spot where the deleted file sat 35 times, each time using a different string of data as specified by the Gutmann algorithm. (And what is the Gutmann algorithm? A series of data patterns that make recovery of an erased file almost impossible. More than you ever wanted to know is at http://www.cs.auckland.ac.nz/~pgut001/pubs/secure_del.html).
The bottom line: To make sure no one ever, ever reads that poem you typed out for your cat one lonely, bleary-eyed evening, type srm “My Twinkie.doc”. That will be the end of it, and neither the CIA nor Norton Utilities will ever know what it was.
You can make rm or srm less risky by prefacing it with the echo command. It makes Terminal type out the command a second time, this time with a handy list of exactly what you’re about to obliterate. If you’ve used wildcards, you see the names of the files that will be affected by the * character. If you type echo rm -r *, for example (which, without the echo part, would normally mean “delete everything in this directory”), you might see a list like this:
rm -r Reviews.doc Tahoe Footage Picnic Movie Contract.doc
Once you’ve reviewed the list and approved what Terminal is about to do, then you can retype the command without the echo portion.
Mac OS X comes with nearly 1,400 Unix programs like the ones described in this chapter. How are you supposed to learn what they all do?
Fortunately, almost every Unix program comes with a help file. It may not appear within an elegant, gradient-gray Snow Leopard window—in fact, it’s pretty darned plain—but it offers much more material than the regular Mac Help Center.
These user-manual pages, or manpages, hold descriptions of virtually every command and program available. Mac OS X, in fact, comes with manpages on almost 7,500 topics—over 40,000 printed pages’ worth.
Alas, manpages rarely have the clarity of writing or the learner-focused approach of the Mac Help Center. They’re generally terse, just-the-facts descriptions. In fact, you’ll probably find yourself needing to reread certain sections again and again. The information they contain, however, is invaluable to new and experienced Unix fans alike, and the effort spent mining them is usually worthwhile.
To access the manpage for a given command, type man followed by the name of the command you’re researching. For example, to view the manpage for the ls command, enter: man ls.
Tip
The -k option flag lets you search by keyword. For example, man -k applescript produces a list of all manpages that refer to AppleScript, whereupon you can pick one of the names in the list and man that page name.
Now the manual appears, one screen at a time, as shown in Figure 16-7.
Figure 16-7. To move on to the next man screen, press the space bar. To go back, press the ↑ key or the B key. To close the manual and return to a prompt, press q. You can also search for a certain phrase by typing a / (to produce the “find what?” prompt); thereafter, type n to find the next occurrence.
A typical manpage begins with these sections:
Name. The name and a brief definition of the command.
Synopsis. Presents the syntax of the command, including all possible options and arguments, in a concise formula. For example, the synopsis for du (disk usage) is as follows: du [-H | -L | -P] [-a | -s | -d depth] [-c] [-h | -k | -m | -g] [-x] [-I mask] [file …].
That line shows all the flags available for the du command and how to use them.
Brackets ([ ]) surround the optional arguments. (All the arguments for du are optional.)
Vertical bars called pipes (|) indicate that you can use only one item (of the group separated by pipes) at a time. For example, when choosing options to use with du, you can use either -H, -L, or -P—not two or all three at once.
The word file in the synopsis means “type a pathname here.” The ellipsis (…) following it indicates that you’re allowed to type more than one pathname.
Description. Explains in more detail what the command does and how it works. Often, the description includes the complete list of that command’s option flags.
For more information on using man, view its own manpage by entering—what else?—man man.
Tip
The free program ManOpen, available for download at www.missingmanuals.com, is a Cocoa manual-pages reader that provides a nice looking, easier-to-control window for reading manpages.
Or why not just use Dashboard? Download the *NIX Manual widget (from this book’s “Missing CD” page at www.missingmanuals.com, for example). It provides an equally attractive interface to the manpages.
Sometimes Terminal shoves a little bit of user manual right under your nose—when it thinks you’re having trouble. For example, if you use the mkdir command without specifying a pathname, mkdir interrupts the proceedings by displaying its own synopsis as a friendly reminder (subtext: “Um, this is how you’re supposed to use me”), like this: usage: mkdir [-pv] [-m mode] directory…
If you spend endless hours staring at the Terminal screen, as most Unix junkies do, you’ll eventually be grateful for the preference settings that let you control how Terminal looks and acts. In fact, Terminal lets you manage your preferences in an ingenious way.
Instead of having a single set of options saved (as with other applications), Terminal manages your options as named settings groups, allowing you to quickly apply different settings to different windows at any time using the Inspector window (Shell→Show Inspector).
You can also save the layout of entire groups of windows, each with their own settings in effect, into a single configuration, allowing you to recreate those layouts in an instant.
Note
Snow Leopard Spots: If you choose Window→Split Pane (⌘-D), you wind up splitting your Terminal window into an upper pane and a lower pane. That can be handy when you keep certain scripts running all the time. The two panes mirror the same command, but now you can scroll to different positions within each pane, keeping tabs on different parts of the same output at the same time. (The other Snow Leopard enhancement in Terminal is a new standard font, which is definitely prettier than the old one.)
Configure your settings using Terminal’s Preferences panel (Figure 16-8), which you get to by choosing Terminal→Preferences (of all places).

Figure 16-8. To access the Terminal Inspector, choose Terminal→Show Inspector (or press ⌘-I). This window shows all your Terminal saved settings. To apply any to an existing window, just select the window and then a setting.
The Startup tab lets you configure what Settings or Window group Terminal should use to open (in case you want something other than the default). This tab also gives you another way to switch from bash to a different default shell. (Where it says “Shells open with,” choose “command (complete path)” and then type /bin/bash for bash, or /bin/tcsh for tcsh. New Terminal windows will then open with that shell.)
This tab is the heart of Terminal’s preferences management. On the left: a list of settings categories. On the right: the options for the currently selected category. Terminal comes with several preconfigured settings, and you can add and remove these and your own using the  and
and  buttons below the list. (To restore all the options for the prepackaged settings to their original state, select Restore Defaults from the
  menu.)
To see your changes reflected instantly in a Terminal window, make sure the window you’re watching is using the same setting you’re modifying.
Here’s where you control what the insertion point looks like, along with choices of fonts and colors.
Title. Turn on the elements you’d like the current Terminal window to display in the title bar. Remember, your preferences can be different for each setting group; you might therefore want the windows’ title bars to identify the differences.
Window Size. The Dimensions boxes affect the width in characters (columns) and height in lines (rows) of new Terminal windows. (Of course, you can always resize an existing window by dragging its lower-right corner. As you drag, the title bar displays the window’s current dimensions.)
Color. Not only can you set the background color, but you also can set its opacity as well, making your Terminal windows translucent—a sure way to make novices fall to their knees in awe. Just drag the slider to the right and watch the background of the active window nearly disappear, like the Cheshire Cat, leaving only text.
Scrollback. As your command line activity fills the Terminal window with text, older lines at the top disappear from view. So that you can get back to these previous lines for viewing, copying, or printing, Terminal offers a scrollback buffer, which sets aside a certain amount of memory—and adds a scroll bar—so that you can do so. Terminal stores the data in this buffer very efficiently, so you should have no problem keeping this at its default unlimited setting. However, if you do get the crazy urge to display all 1.6 million lines from the manpages, you just might run out of memory if you don’t set a limit.
Startup. Enter a command here (for example, cal -y), and each time you open a new window, you’ll see its output and then get a new prompt. (If you just want the output without a new prompt, check “Run inside shell.”)
When the shell exits. When you’re finished fooling around in Terminal, you end your session either by closing the window, or more properly, by typing exit (or pressing Control-D) at the prompt. The “When the Shell Exits” setting determines what happens when you do that.
Prompt before closing. Shell commands can take some time to complete. In some cases, when you attempt to close a Terminal window before its work is finished, Terminal asks you if you’re sure you want to cancel the process and lose your work. The options here let you configure when you want to be prompted, if ever, and even which processes you don’t want Terminal to warn you about.
These controls let you choose keyboard shortcuts that help you navigate your Terminal window, or that send strings of canned text to the shell. As your Unix prowess grows, these shortcuts become more useful.
Tip
For some Unix geeks, the non-Unixy location of the Control key has been frustrating enough to keep them from using Macs. They use that key constantly and would rather not have to rewire their brains to handle the changed location.
But this problem is easily remedied. In System Preferences, in Keyboard & Mouse, the Modifier Keys button lets you swap the Control and Caps Lock keys’ functions, allowing the confused pinkies of Unix-heads to once again find their way.
Once you’ve gone to town with Terminal settings, you might end up with a mosaic of windows spread across your display (or displays)—your main Terminal window, a couple of man (user-manual) windows, a top window showing all the running programs, and so on. You gotta love it: Each window has its own color scheme and title to reflect what it’s doing, and all the windows are sized perfectly to contain their text output.
It would be a shame to lose all of that when you quit Terminal. Fortunately, you won’t have to, thanks to Window Groups.
Choose Window→Save Windows as Group and name the group. You’ll be able to recreate your masterpiece when you return to Terminal by selecting that group name from Window→Open Window Group. (Of course, your original output won’t be there, but any commands you’ve configured to run at startup will display their new output.)
The Window Groups Preferences tab is just a place to view these groups and delete any you no longer need. Using the pop-up menu, you can also export these groups as files to import into other machines (or other accounts).
When you use Terminal to connect to other computers across a network—a common Terminal task—you use commands like ssh and ftp in conjunction with the other computers’ names or IP addresses. For example, you might type ssh bertha.acmeco.com or ssh 192.168.43.76.
The trouble is, these IP names and addresses are hard to remember—and the numbers may change. To make connecting easier, Terminal can use the magic of Bonjour—a networking feature in which Macs announce their presence to the network, using their plain-English names. Bonjour lets you browse other Macs on your network just as you’d browse them in the Finder (Chapter 13).
To get started, choose File→New Remote Connection. Continue as shown in Figure 16-9.
Tip
Even if the remote machine isn’t running Bonjour, you can still add its address to the Server list manually by clicking the button below it. Likewise, all command lines entered in the bottom field get added to the pop-up menu beside it, allowing you to quickly reconnect without having to browse at all.

Figure 16-9. From the left side, choose the service you want; from the right, choose from a list of machines whose Remote Login and FTP checkboxes are turned on in the Sharing panel of System Preferences. Type your account name into the User box. As you adjust the connection options, the box at the bottom shows the Unix command you’re building. Click Connect to open a new Terminal window and send that command inside it.
After you’ve used Terminal awhile, you may feel ready for a few of these power tips:
You can switch among your various Terminal windows by pressing ⌘-1, ⌘-2, and so on (up to ⌘-9). You’ll be able to identify the windows easily if you choose to include the Command key in the title bars. (Use the Window section of the Settings Preference pane.)
You can select blobs of text, just as in Microsoft Word or TextEdit. To select a single rectangle of text anywhere in the window, Option-drag through it. To select multiple rectangles, Option-⌘-drag. You can then copy and paste just those selected blobs.
Most people are used to thinking of Unix applications as programs you run from within Terminal. Many, though, appear in the Finder as regular old icons—and you can open them by double-clicking, just as you would a traditional Mac OS X program. This trick isn’t very useful for commands that require flags. But for some, like cal, clicking provides a quick way to run the program, especially if you keep it in your Dock.
To double-click a Unix program, though, you first have to find it—and that may not be easy. Mac OS X’s Unix directory structure is labyrinthine indeed.
But why not ask Terminal where the program is? You can do exactly that using the which command: which cal, for example. Terminal responds with /usr/bin/cal, telling you that cal resides in the /usr/bin directory.
To get there, use the open command in Terminal, like this: open /usr/bin. A window opens in the Finder; inside, you’ll find the cal icon. Drag the icon to the right side of the Dock.
From now on, when you click that Dock icon, a new Terminal window opens, automatically displaying this month’s calendar. You’ve shaved several precious seconds off the time it would have taken you to open iCal.
Permissions is a largely invisible, but hugely important, Mac OS X and Unix feature. The behind-the-scenes permissions setting for a file or folder determines whether or not you’re allowed to open it, change it, or delete it. Permissions are the cornerstone of several important Mac OS X features, including the separation of user accounts and the relative invulnerability of the operating system itself.
POWER USERS’ CLINIC: The Termination of .term Files?
The ability to save different sets of windows settings is actually nothing new to Terminal. In earlier versions, you could export a .term file that stored a window’s (or window group’s) settings. Opening the .term file opened a new window (or window group) with those settings.
In today’s Terminal, you get easier management for these settings and a different way of storing them. Instead of using a separate file for each setting, Terminal now saves them all in the single com.apple.Terminal.plist file (in ~/Library/ Preferences).
If you had any .term files in the standard location (~/Library/ Application Support/Terminal) when you first opened Snow Leopard’s Terminal, they still appeared in the Inspector—but Terminal no longer reads them.
Instead, upon Terminal’s very first launch, those files’ settings are copied into the new com.apple.Terminal.plist file. That’s why, after the first time you open Terminal, adding additional .term files to ~/Library/Application Support/ Terminal doesn’t make them appear in the Inspector. To do that, double-click the .term files in the Finder; Terminal imports them.
Double-clicking a .term file still opens a Terminal window using those settings. But if that’s what you want, why be so passé? Instead, double-click the newer .terminal files you get by exporting either your window or window groups settings.
You’ll find the Export command on the menu of both the Settings and Window Groups tabs of the Preferences panel.
As you know from Chapter 13, you can get a good look at the permissions settings for any file, folder, or disk by highlighting it and choosing File→Get Info in the Finder. But even there, you’re not seeing all the permission settings Unix provides, and every now and then, you might want to. Suppose, for example, that you’re a teacher in charge of a computer lab containing 25 Macs. On each computer, you’ve created Standard accounts (see Chapter 12) for five students, for a total of 125 student accounts.
Soon after the students start using the lab, you notice a bit more giggling and frantic typing than you’d expect from students researching Depression-era economics. You nonchalantly stroll to the end of the room and do a quick about-face at one of the desks. Aha—iChat! Horribly depressed by the comments you read there regarding your fashion sense, you vow to keep students from using that application ever again.
You have several options:
Delete iChat from the Applications folder. Unfortunately, the Computer Club meets in your classroom after school, and its members routinely use iChat to communicate. (Talking out loud, after all, is so 20th century.)
Use Parental Controls. You can open System Preferences, click Accounts, and click Parental Controls. You’d then click to configure Finder & System, select Some Limits, and turn off the iChat checkbox from the list of allowable applications. Repeat 124 times. (Though it is nice that Screen Sharing lets you do this remotely.)
Buy, install, and configure Mac OS X Server. Then you can create and configure workgroups with any permission settings you want. (Apple offers a four-day training course if you get stuck.)
Use Terminal. Go to a Mac, fire up Terminal, and type a quick command to turn off iChat’s execute permissions for Standard account holders. (This process won’t affect the Computer Club, because its members all have Administrator accounts.) Repeat only 24 times.
In fact, if walking to each machine is too much work, you can even use the ssh technique described in Chapter 22 to run the command remotely from a single machine, while seated in the comfort of your own teacher’s chair.
This, of course, is by far the best solution. It’ll take several pages to work through this example. But in the process, you’ll learn an amazing amount about Terminal and the Unix underpinnings of Mac OS X.
Note
The original Unix permission system has been around longer than disco, and still serves well in Mac OS X. But Leopard introduced a secondary permission system to help make some of its new features work. These Access Control Lists (ACLs) provide much finer control of permissions, allowing you, for example, to assign multiple owners and groups to a single file. ACLs are also behind the file-sharing permissions described on Spotlight-Menu Tips.
Not all files, or even most files, on your Mac use ACLs. But when they’re present, the ACL permissions override the file’s Unix permissions. For details on ACLs, download this chapter’s free appendix, “Access Control Lists,” from the “Missing CD” page at www.missingmanuals.com.
In general, when you double-click a file icon in the Finder, it opens either as a program or opens into a program (if it’s a document).
But most Mac OS X application icons in the Finder are really folders posing as single files. Inside the folder, or package, are all the files that application depends on to run, including the actual application file itself, the one that opens when you double-click the package icon. If you turn off the execute permission for that inner nugget, you prevent it from running—and, as in this classroom example, you can turn it off for certain kinds of account holders and not others.
To inspect the permissions for iChat, open the Applications folder. Control-click the iChat icon. From the shortcut menu, choose Show Package Contents. A new Finder window opens, revealing the contents of the iChat application package.
Open the Contents→MacOS folder; inside you find the individual iChat program file. (Nobody would ever bother opening iChat by double-clicking this icon, but it’s possible.) You could inspect its permissions by highlighting the inner iChat icon, choosing File→Get Info, and then expanding the Sharing and Permissions section.
The Unix way is faster. In Terminal, just use the ls command like this:
ls -l /Applications/iChat.app/Contents/MacOS
The -l flag produces a long list—an expanded display showing extra information about each item in the directory, in this case its single iChat file. Terminal’s response is something like this:
total 10616
-total 4424
-rwxr-xr-x  1 root  wheel  5844848 Jul 28 22:28 iChat
Thanks to the -l option, the first line displays the grand total size on disk of all the loose files in the directory: 4424. (It’s measured in 512-byte blocks. If you also included the -k flag, you would see this measurement in kilobytes. Remember that part of the reason Snow Leopard occupies so much less disk space is that many of its system files are compressed on the disk. That’s why the “on disk” size and actual size of a folder’s contents don’t always add up.)
Next you see the name of the one inhabitant of the MacOS directory: iChat. (If there were more, you would see each item on its own line.) But what is -rwxr-xr-x? Is Terminal having a meltdown?
Not at all; you’re just seeing more Unix shorthand, listed in what are supposed to be helpful columns. Figure 16-10 breaks down the meaning of each clump of text.
Type. The first character of the line indicates the file type—usually d (a directory), l (a symbolic link—the Unix version of an alias), or, as in this case, a hyphen (a file).
File mode. Rammed together with the type (like this: rwxr-xr-x) is a string of nine characters. It indicates, in a coded format, the actual access permissions for that item, as described in the next section.
Owner. Terminal’s response also identifies the account name of whoever owns this file or directory, which is usually whoever created it. Remember, root means that Mac OS X itself owns it. That’s why even administrators generally aren’t allowed to delete directories that bear “root” ownership.
Group. After the owner comes the name of the group that owns this file or directory. “Wheel,” as in “big Wheel,” indicates the group with the highest powers (administrators are not part of this group); the “admin” group contains all administrators.
Pathname. At the end of the line (following the file’s size and date) comes the path of this file or directory, relative to the listed directory.
To understand the coded nine-character file-mode section, you need a good grasp of the topics covered in Chapter 13. There you’ll find out that as you create new files and directories, you can specify who else is allowed to see or make changes to them. In fact, you can specify these permissions for three different categories of people: the owner (usually yourself), your group, and everyone else.
The file-mode column is made of three subcolumns (Figure 16-10), which correspond to those same three categories of people: owner, group, and everybody else.

Figure 16-10. If you look very closely and move your nose right up against the screen, you’ll see that the file-mode column isn’t just a string of random letters—it’s three distinct sets of information that tell you who’s allowed to do what.
Within each sequence, three characters describe the read (r), write (w), and execute (x) permissions that this person or group has to this file or directory (more on these concepts in a moment). A hyphen (-) means, “Nope, this person isn’t allowed this kind of access.” In Figure 16-10, you can see that, if you were the owner of this file, you could do anything you want to it—because there are no hyphens.
There’s an x in the other columns, too, meaning that anyone can execute (launch) this file. Since there’s also a w in the owner column, that user (root) could, in theory, even make changes to the file (although there would never be a reason to do so).
The three forms of access—read, write, and execute—have slightly different meanings when applied to files and directories:
Read access to a file means someone can open and read it. (In the case of a program like iChat, the system needs to “read” the file on your behalf in order to run it.) Read access to a directory (folder), on the other hand, just means someone using Terminal can see a list of its contents using a command like ls.
Write access to a file means someone can modify and save changes to it. Write access to a directory means someone can add, remove, and rename any item the folder contains (but not necessarily the items within its subdirectories).
Note
Turning off write access to a certain file doesn’t protect it from deletion. As long as write access is turned on for the folder it’s in, the file is still trashable.
To protect a certain file from deletion, in other words, you must also worry about the access settings of the folder that encloses it.
Execute access, when applied to an application, means people can run that particular program. (In fact, Unix distinguishes applications from ordinary files by checking the status of this setting.)
Of course, you can’t very well “run” a directory. If this x bit is turned on for a directory, it’s called the searchable bit (as opposed to the execute access bit), and it means you can make it the working directory, using the cd command. You still can’t see what’s in the folder if you don’t also have read permissions, but you’re welcome to read or copy a file in it as long as you know its full pathname.
Back to the task of keeping iChat from launching. The x in every user category tells you that anyone can run this program. Your mission, should you choose to accept it, is to change these settings so that one class of account holder can run iChat (Admin), but not another (Standard).
As you’ve seen, every file’s set of permissions identifies both an owner and a group. The group that owns the iChat file is wheel, but as you would expect, the Admin class of users is part of the admin group (though not part of wheel). If you want to allow only administrators and anyone else in the admin group to run the program, then you need to also change its group to admin.
You just have to make sure that no other account holders—Standard ones—are also part of the admin group. That’s easy enough to find out.
To find out what Unix groups you belong to, type id in Terminal and press Return. On the next line, Terminal types out a list of items beginning with your account name—that’s your user ID (your uid)—followed by the name of your primary group (your gid). Next are the names of all the groups that include your account. (The Mac refers to accounts and groups by number, which are listed here.) If you have an Administrator account, it’s probably something like uid=506(chris) gid=20(staff) groups=20(staff),401(com.apple.sharepoint.group.1),204(_developer),100(_lpoperator),98(_lpadmin),81(_appserveradm),80(admin),79(_appserverusr),61(localaccoun ts),12(everyone).
But you want to find what groups incorporate Standard account holders. To determine what groups someone else’s account belongs to, type id casey (or whatever the account name is). You’ll probably see that Casey doesn’t belong to the admin group. And, in fact, that’s true for all Standard account holders. (If you prefer a little less output, the groups command used similarly will show you only the group names.)
All right then: The admin group contains only Admin users. As far as permissions are concerned, then, Standard account holders fall into the everyone else category.
You just need to turn off iChat’s execute permissions for everyone else and change iChat’s group to admin to complete your task. Doing so allows only the file’s owner (root) and members of its group (admin) to execute the file (that is, to open the program). All other account holders, meaning Standard account holders, are out of luck. They’ll actually have to pay attention in class.
The Unix command for changing file modes (permissions) is chmod (for change mode). Here’s the command you use on the iChat file:
chmod o-x /Applications/iChat.app/Contents/MacOS/iChat
And here’s how to understand it.
The command line begins, naturally, with the chmod command itself, and ends with the pathname of the iChat file.
In between are three characters that make up the three parts of a mode-change clause: o-x.
The first character, o, represents the class of user that the change affects. In this spot, you can type u to symbolize the file’s owner, g for its group, o for other (everyone else), and a to indicate all three classes at once.
The second character represents the operation to perform, which in most cases is either to add a permission (use the symbol) or remove one (use the sign).
The final character specifies which permission to change: r for read, w for write, or x for execute.
The complete chmod command provided above, then, says, “Remove the execute permissions for others,” which is precisely what you want to do.
If you actually try the chmod command described above, however, you get only an error message (“Operation not permitted”).
Only the owner of an item can change its permissions. And you’re not iChat’s owner; root is (that is, Mac OS X itself).
So how do you solve the problem? One solution would be to turn on the root account as described on Putting It Together, and then log on as root. But that’s a hassle, and turning on the root account always entails a security risk.
Instead, you could open the Get Info window for the iChat application file, make yourself the owner, and then type in your name and password to prove you’re an administrator. Then open Terminal, use the chmod command now that you’re the file’s owner, return to the Finder, open Get Info again, and change the file’s permissions back to root.
For a Unix guru, that’s an awful lot of steps for something that should take only a few keystrokes. As it turns out, the final possibility is quick and easy, which explains its popularity in Unix circles. It’s the sudo command.
sudo is a cool command name. Technically, it’s short for superuser do, which means you’re allowed to execute any command as though you’d logged in with the root (superuser) account—but without actually having to turn on the root account, log out, log back in again, and so on.
It’s also a great command name because it looks as though it would be pronounced “pseudo,” as in, “I’m just pretending to be the root user for a moment. I’m here under a pseudonym.” (In fact, you pronounce it “SOO-doo,” because it comes from superuser do. In the privacy of your own brain, though, you can pronounce it however you like.)
If you have the root account—or can simulate one using sudo—you can override any permissions settings, including the ones that prevent you from changing things in the Applications directory (like iChat).
Now you’re ready to change the permissions of that infernal iChat application file. To use sudo, you must preface an entire command line with sudo and a space. Type this:
sudo chmod o-x /Applications/iChat.app/Contents/MacOS/iChat
Taken slowly, this command breaks down as follows:
sudo. “Give me the power to do whatever I want.”
chmod. “Change the file mode…”
o-x. “…in this way: remove execute permission for others…”
/Applications/iChat.app/Contents/MacOS/iChat. “…from the file called iChat, which is inside the Applications→iChat.app→Contents→MacOS folder.”
The first time you run sudo, you’re treated to a stern talking-to that means business: “WARNING: Improper use of the sudo command could lead to data loss or the deletion of important system files. Please double-check your typing when using sudo. Type ‘man sudo’ for more information.
“To proceed, enter your password, or type Ctrl-C to abort.”
In other words, sudo is a powerful tool that lets you tromp unfettered across delicate parts of Mac OS X, so you should proceed with caution. At the outset, at least, you should use it only when you’ve been given specific steps to follow, as in this chapter.
Now sudo asks for your usual login password, just to confirm that you’re not some seventh-grader up to no good. If you are indeed an administrator, and your password checks out, sudo gives you a 5-minute window in which, by prefacing each command with sudo, you can move around as though you’re the all-high, master root account holder. (If you don’t use sudo again within a 5-minute span, you have to input your password again.)
The last step, then, is to change the iChat’s group to admin.
The Unix command for changing a file’s group ownership is chgrp (for change group), and it will do the deed:
sudo chgrp admin /Applications/iChat.app/Contents/MacOS/iChat
By this point, you should be able to guess that this command allows you (with sudo) to change the group ownership to admin of the file /Applications/iChat.app/Contents/MacOS/iChat.
Now whenever anyone who isn’t an administrator tries to open iChat, its icon bounces just once in the Dock before dying painlessly.
To restore its original permissions, use the same commands, but in the chmod command, replace the with a , like this:
sudo chmod o+x /Applications/iChat.app/Contents/MacOS/iChat
Then rerun the chgrp command, but replace admin with wheel:
sudo chgrp wheel /Applications/iChat.app/Contents/MacOS/iChat
Note
Apple has these default permissions set for a reason: utmost security. While your changes won’t immediately let the bad guys in, it’s best not to leave these permissions in place unless you really need them. In any case, whenever you run the Mac’s Repair Permissions function (either automatically, which happens each time you install a Mac OS X update, or manually, using Disk Utility), iChat returns to its original permissions settings. You have to rerun the command if you want its protections in place.
It could happen to you. You’ve got yourself a folder filled with hundreds of files—downloaded photos from your digital camera, for example. Most are pretty crummy, but the ones you took in Tahoe (which therefore have Tahoe in their file names) are spectacular. You want to protect those files from deletion without having to turn on the Locked checkbox (Locked Files: The Next Generation) of every file individually.
Here again, you could operate in the Finder, just like ordinary mortals. You could use Spotlight to round up all files with Tahoe in their names, highlight them in the search results window, choose File→Get Info, and then turn on Locked for all of them at once. But doing it the Unix way builds character.
When you turn on a file’s Locked checkbox, Mac OS X turns on an invisible switch known to Unix veterans as the user immutable flag. Not even the superuser is allowed to change, move, or delete a file whose user immutable flag is turned on.
The command you need to change such flags is chflags—short for change flags, of course. You can follow the chflags command with three arguments: its own option flags, the file flags, and the pathname of the file whose flags are being changed. In this case, the flag you care about is called uchg (short for user changeable; in other words, this is the immutable flag).
To protect all the Tahoe shots in one fell swoop, then, here’s what you’d type at the prompt:
chflags uchg ~/Pictures/*Tahoe*
The asterisks are wildcards that mean “all files containing the word Tahoe in their names.” So in English, you’ve just said, “Change the immutable flag (the Locked checkbox setting) for all the Tahoe files in my Pictures folder to ‘locked.’”
Tip
To unlock a file, thus turning off its uchg flag, just add the prefix “no,” like this: chflags nouchg ~/ Pictures/*Tahoe*.
To view the results of your handiwork right in Terminal, issue this command: ls -lO ~/Pictures (or any other path to a folder containing locked items). That’s the familiar ls (list) command that shows you what’s in a certain directory, followed by an -l flag for a more complete listing, and an -O flag that produces a “flags” column in the resulting table.
In any case, Terminal might spit out something like this:
total 830064
-rw-r-r-1 chris  chris  -    158280000  Jun 16 20:05 Sunset.jpg
-rw-r-r-1 chris  chris  uchg  58560000  Jun 16 20:05 NewMoon.jpg
-rw-r-r-1 chris  chris  uchg 107520000  Jun 16 20:05 Tahoe.jpg
-rw-r-r-1 chris  chris  uchg 107520000  Jun 16 20:05 Tahoe.jpg
The fourth column, the product of the -O flag, lists any file flags that have been set for each file. In this case, three of the files are listed with uchg, which represents the user immutable (locked) flag. (The hyphen for the first listed file means “no flags”—that is, not locked.)
Back at the school computer lab, you’re still grumpy. The students leave piles of file and folder icons splattered across all the Macs’ desktops, and you’ve had enough. Not only is it a sign of laziness and disorganization, but the icons cover the desktop picture of the hallowed school mascot: the southern hairy-nosed wombat.
You’ve warned them enough, and now it’s time for action: No World of Warcraft at lunchtime unless the desktops are clean in 15 minutes!
As you finish writing the new rule on the whiteboard, you turn to face the students’ Mac screens—and you’re stunned. The full, uncluttered image of your beloved marsupial gazes back from the Macs’ displays; the offending icons are gone. How could that be? There hasn’t even been time for the students to select all the icons and drag them to the Trash!
Apparently the students weren’t as lazy as you thought: They’ve been learning the Way of the Terminal. What they actually did was sweep all those icons under the rug, Unix style, with this command:
chflags hidden ~/Desktop/*
They manipulated another file flag, called the hidden flag. The command turns on the hidden flag for all files (indicated by the asterisk) in the Desktop folder—and so their icons disappear. The actual file is still there; but you just can’t see it in the Finder anymore.
Of course, you’re not about to let some punk kids pull one over on you. In your copy of Terminal, you deftly type chflags nohidden ~/Desktop/* to bring the icons back.
The students have 13 minutes left to really clean their desktops.
So far, you’ve read about only a handful of the hundreds of Unix programs that are built into Mac OS X and ready to run. Yes, ls and sudo are very useful tools, but they’re only the beginning. As you peruse beginner-level Unix books and Web sites (see Appendix E), for example, you’ll gradually become familiar with a few more important terms and tools.
Here’s a rundown of some more cool (and very safe) programs that await your experimentation.
Tip
If you don’t return to the $ prompt after using one of these commands, type q or, in some cases, quit, and then hit Return.
Mac OS X and Windows aren’t the only operating systems that come with a basic calculator accessory; Unix is well equipped in this regard, too.
When you type bc and hit Enter, you get a copyright notice and then…nothing. Just type the equation you want to solve, such as 2+2, or 95+97+456+2-65, or (2*3)+165-95*(2.5*2.5), and then press Return. On the next line, bc instantly displays the result of your calculation.
(In computer land, * designates multiplication and / represents division. Note, too, that bc solves equations correctly; it calculates multiplication and division before addition and subtraction, and inner parentheses before the outer ones. For more bc tricks and tips, type man bc at the prompt.)
Mac OS X offers no shortage of ways to cut the cord on a program that seems to be locked up or runnning amok. You can force quit it, use Activity Monitor, or use kill.
The kill program in Terminal simply force quits a program, as though by remote control. (It even works when you SSH into your Mac from a remote location, as described in Chapter 22.) All you have to do is follow the kill command with the ID number of the program you want to terminate.
And how do you know its ID number? You start by running top—described in a moment—whose first column shows the PID (process ID) of every running program.
Tip
Unless you also use sudo, you can kill only programs you “own”—those running under your account. (The operating system itself—root—is always running programs of its own, and it’s technically possible that other people, dialing in from the road, are running programs of their own even while you’re using the Mac!)
When you hear Unix fans talk about kill online, they often indicate a number flag after the command, like this: kill -9. This flag is a “noncatchable, non-ignorable kill.” In other words, it’s an industrial-strength assassin that accepts no pleas for mercy from the program you’re killing.
If you check top and find out that BeeKeeper Pro’s process ID is 753, you’d abort it by typing kill 753 and then pressing Return. If it still appears to be breathing, add the -9 flag like this: kill -9 753, which should deliver the fatal blow. You might even need to rerun the command until you receive output similar to kill: 753: no such pid, telling you that indeed, that process is no more; please hold your fire.
What operating system would be complete without a way to launch programs? In Mac OS X’s version of Unix, the command is easy enough: open -a, as in open -a Chess. The -a flag allows you to specify an application by name, regardless of where it is on your hard drive, exactly the way Spotlight does it. You can even specify which document you want to open into that program like this: open -a Preview FunnyPhotoOfCasey.tif.
Tip
The -e flag opens any text document in TextEdit (or whatever your default text editor may be), like this: open -e Diary.txt. This shortcut saves you from having to specify TextEdit itself.
The real utility of this command might not be apparent at first, but imagine doing something like this in the Finder: Select from a folder of hundreds of HTML files those that contain the word “Sequoia” in their file names and preview them all with the OmniWeb browser, regardless of what application they’re actually associated with. You could do it with the help of the Spotlight command, but that would take quite a few steps. In Terminal, though, you just switch to that directory (using the cd command) and type open -a OmniWeb *Sequoia*. Done!
Of course, you may not often bother simply launching programs and documents this way. Nevertheless you can see how useful open can be when you’re writing automated scripts for your Mac, like those used by the launchd command scheduler program (Utilities: Your Mac OS X Toolbox).
The ps (process status) command is another way to get a quick look at all the programs running on your Mac, even the usually invisible ones, complete with their ID numbers. (For the most helpful results, use the -e and -f flags like this: ps -ef. For a complete description of these and other flags, type man ps and hit Return.)
It’s perfectly easy to shut down your Mac from the  menu. But using shutdown with its -h flag (for halt) in Terminal has its advantages. For one thing, you can control when the shutdown occurs, using one of these three options:
Now. You can safely shut down by typing shutdown -h now. (Actually, only the root user is allowed to use shutdown, so you’d really type sudo shutdown -h now and then type in your administrator’s password when asked.)
Later today. Specify a time instead of now. Typing sudo shutdown -h 2330, for example, shuts down your machine at 11:30 p.m. today (2330 is military time notation for 11:30 p.m.).
Any time in the next 100 years. To make the machine shut down at 5:00 p.m. on December 9, 2010, for example, you could type sudo shutdown -h 1012091700. (That number code is in year [last two digits]:month:date:hour:minute format.)
Tip
Once you set the auto-shutdown robot in motion, you can’t stop it easily. You must use the kill command described earlier to terminate the shutdown process itself. To find out shutdown’s ID number in order to terminate it, look for the pid number in the output of the shutdown command, or use the top or ps command.
There are still more useful flags. For example:
Using the -r flag instead of -h means “restart instead of just shutting down,” as in sudo shutdown -r now.
You can use shutdown to knock all connected network users off your machine without actually shutting down. Use the -k flag, like this: sudo shutdown -k now.
One of the most powerful uses of shutdown is turning off Macs by remote control, either from across the network or across the world via Internet. That is, you can use SSH (described in Chapter 22) to issue this command.
You know how Mac OS X can create compressed .zip archive files?
Terminal lets you stuff and combine files in these formats with the greatest of ease. To compress a file, just type gzip, a space, and then the pathname of the file you want to compress (or drag the file directly from the desktop into the Terminal window). When you press Enter or Return, Mac OS X compresses the file.
“Tarring” a folder (combining its contents into a single file—a tarball, as Unix hepcats call it) is only slightly more complicated. You have to specify the resulting file’s name, followed by the actual directory pathname, like this: tar -cf Memos.tar /Users/chris/ Memos. Add the -z flag if you want to tar and compress the folder: tar -czf Memos. tar.gz /Users/chris/Memos.
To combine and compress files using zip, just specify a name for the zip file and the names of the items to zip, like this: zip StaffordLake.zip Stafford* (which would cram all files in the working directory whose name begins with Stafford into a single archive).
To zip a folder, include the -r flag as well: zip -r Memos /Users/chris/Memos.
In any case, if you switch to the Finder, you see that the file or folder you specified is now compressed (with the suffix .gz), combined (with the suffix .tar), or both (with the suffix tar.gz or .zip).
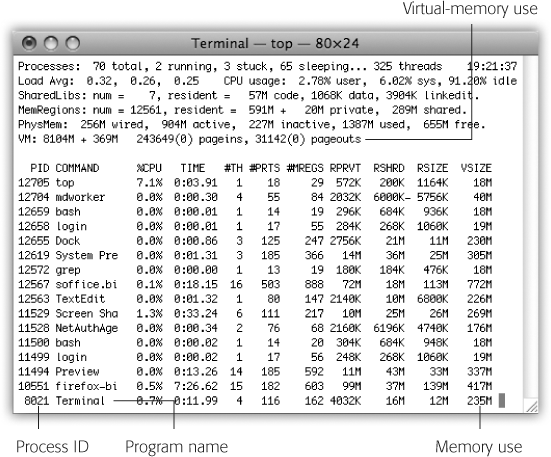
Figure 16-11. The top display remains onscreen, automatically updating itself as you work, until you type q to quit the program. The plain-English program names are in there somewhere.
Unfortunately, the command line zip utility doesn’t handle extended attributes properly (see the next page), so stick with tar and gzip if you want to create guaranteed Mac-friendly archives. The best format is a gzipped tarball, which the Finder will properly open with a double-click. (If you only gzip a file without tarring, the Finder won’t preserve any extended attributes when opening it.) You can also use these utilities to open combined and compressed files, but they can easily overwrite existing items of the same name if you’re not careful. Use the Finder or StuffIt Expander to eliminate that worry.
When you type top and press Return, you get a handy table that lists every program currently running on your Mac, including the obscure background ones you probably never even knew existed (Figure 16-11).
You also get statistics that tell you how much memory and speed (CPU power) they’re sucking down. In Snow Leopard, you get a new line that shows the amount of data moved to and from the network as well as the amount read or written to disk (since you last started your Mac). In this regard, top is similar to Activity Monitor, described on Utilities: Your Mac OS X Toolbox.
The xattr command lets you see and manage the extended attributes (EAs) of your files—the invisible metadata that describes all kinds of characteristics of every file, from the exposure of a digital camera shot to the tempo of a song in iTunes. (Chapter 3 has much more on metadata and searching for it.)
Running xattr * lists any EAs in your working directory. If you ran it in your ~/ Downloads folder, the command might look like this:
MacChris:Downloads chris$ xattr  *
GoogleEarthMac.dmg: com.apple.diskimages.fsck
GoogleEarthMac.dmg: com.apple.diskimages.recentcksum
GoogleEarthMac.dmg: com.apple.metadata:kMDItemWhereFroms
GoogleEarthMac.dmg: com.apple.quarantine
MacPorts-1.8.0-10.6-SnowLeopard.dmg: com.apple.diskimages.fsck
MacPorts-1.8.0-10.6-SnowLeopard.dmg: com.apple.diskimages.re-
centcksum
MacPorts-1.8.0-10.6-SnowLeopard.dmg: com.apple.
metadata:kMDItemWhereFroms
MacPorts-1.8.0-10.6-SnowLeopard.dmg: com.apple.quarantine
NeoOffice-3.0-Intel.dmg: com.apple.metadata:kMDItemWhereFroms
NeoOffice-3.0-Intel.dmg: com.apple.quarantine
Only three files are listed, but each of their EAs gets its own line. What you’ll find in common to all of these files is that they hold a “com.apple.quarantine” EA.
You know how, the first time you open a program on your Mac, you get the dialog box shown in Figure 12-15 (Five Mac OS X Security Shields)? Now you know how the Mac knows that this is the first time you ran it: That detail was stored as one of its extended attributes.
If you really can’t stand those messages, you could use another Unix command to prevent the nag box from appearing. For example, before installing NeoOffice, you could simply remove the quarantine EA from its downloaded disk image file using the xattr command’s -d flag, like this:
xattr -d com.apple.quarantine NeoOffice-3.0-Intel.dmg
You can also use the ls command to see EAs. When you use just the -l flag with ls, files with EAs show an @ sign at the end of the permission codes:
MacChris: Downloads ls -l NeoOffice-3.0-Intel.dmg
-rw-r--r--@ 1 chris staff 167536744 Mar 28 11:58 NeoOffice-3.0-Intel.dmg
To see what those EAs are, add the @ flag:
MacChris:Downloads chris$ ls -l@ NeoOffice-3.0-Intel.dmg
-rw-r--r--@ 1 chris  staff  167536744 Mar 28 11:58 NeoOffice-3.0-Intel.dmg
com.apple.metadata:kMDItemWhereFroms             196
com.apple.quarantine           74
Aliases in Unix have nothing to do with traditional Macintosh icon aliases. Instead, Unix aliases are more like text macros, in that they’re longish commands you can trigger by typing a much shorter abbreviation.
For example, remember the command for unlocking all the files in a folder? (It was sudo chflags -R nouchg [pathname]. To unlock everything in your account’s Trash, for example, you’d type sudo chflags -R nouchg ~/.trash.)
Using the alias command, however, you can create a much shorter command (unlock, for example) that has the same effect. (The alias command takes two arguments: the alias name you want, and the command it’s supposed to type out, like this: alias unlock=‘sudo chflags -R nouchg ~/.trash’.)
The downside is that aliases you create this way linger in Terminal’s memory only while you’re still in the original Terminal window. As soon as you close it, you lose your aliases. When you get better at Unix, therefore, you can learn to create a .bash_profile file that permanently stores all your command aliases. (Hint: Open or create a file called .bash_profile in your home directory, and add to it one alias command per line.)
One way to create and edit text files containing aliases (and to perform other command-related tasks) is to use nano, a popular text editor that’s an improved version of the pico editor (see Figure 16-12). In fact, if you try to run pico, nano opens instead.
As you’ll discover just by typing nano and pressing Return, nano is a full-screen Unix application. You enter text in nano much as you do in TextEdit, yet nano is filled with features that are especially tailored to working with Unix tasks and commands.
Nor is nano the only text editor that’s built into the Unix under Mac OS X. Some Unix fans prefer the more powerful and complex vim or emacs, in the same way that some people prefer Microsoft Word to TextEdit.
Used all by itself, the date command simply displays the current date and time. However, you can use its long list of date “conversion specifications” (enter man date to see all of them) to format the date string in any conceivable way. Begin the string with a and then enter the formatting you like, mixing in any regular text as well, like this:
office-mac:~ chris$ date +"I can't believe it's already week %V
of %Y, here in the %Z time zone. But what do you expect on a %A
at %l:%M %p?"
I can't believe it's already week 23 of 2010, here in the PST
time zone. But what do you expect on a Wednesday at 8:21 PM?
GEM IN THE ROUGH: Eliza, I Have Issues with My Mother
Therapy, whether it’s about your frustrations with your Mac or any other subject, is expensive. Still, it feels good to talk to someone about whatever’s bothering you—and Mac OS X is ready to listen.
Hidden in the emacs text-editing program is a fully unlicensed automated psychoanalyst named Eliza. To enter her office, open Terminal, type emacs and press Return. After the introductory screen has appeared, press Shift-Esc, type xdoctor, and then press Return.
“I am the psychotherapist,” Eliza begins. “Please, describe your problems. Each time you are finished talking, type RET twice.” (She means, “Press the Return key twice.”)
As you can see from this illustration, she isn’t exactly Sigmund Freud. But she’s very entertaining, and surprisingly responsive.
When your session is finished, press Control-X and then Control-C to exit Eliza and emacs.
The grep program is a filter, a powerful program designed to search data for text that matches a specified pattern. It can pass on the processed result to another program, file, or the command line itself.
You specify the text pattern you want grep to search using a notation called regular expressions. For example, the regular expression dis[ck] searches for either disk or disc. Another example: To search for lines in a file containing the addresses from 200 to 299 Redwood Way, you could tell grep that you’re looking for ″\<2[0-9][0-9] Redwood Way″.
One terrific thing about grep is that its search material can be part of any file, especially plain text files. The text files on your Mac include HTML files, log files, and—possibly juiciest of all—your email mailbox files. Using grep, for example, you could search all your Mail files for messages matching certain criteria, with great efficiency and even finer control than with Spotlight.
Now that Spotlight’s on the scene, you might wonder why you would need to use the Unix find command. Well, for one, find takes file searching to a whole new level. For example, you can find files based on their permissions, owner name, flag settings, and of course any kind of name pattern you can think of using regular expressions.
Also, like with most other Unix commands, you can “pipe” the find command’s list of found files straight into another program for further processing. You might do this to change their names, convert them to other formats, or even upload them to a network server.
Perhaps best of all, since you can run find with sudo, you can look for files existing anywhere on your hard disk, regardless of directory permission settings.
To find all the files in your home directory with “Bolinas” in their names, for example, you would use this command:
find ~/ -name '*Bolinas*'
Or, to ignore capitalization:
find ~/ -iname '*Bolinas*'
And this command searches for all the locked files in your home directory:
find ~/ -flags uchg
If you have a soft spot in your heart for Spotlight, you’ll be happy to see the mdfind command in Terminal. It performs the same kinds of searches, finding by metadata like music genre or exposure data for photos.
To find all reggae songs, for example, try:
mdfind 'kMDItemMusicalGenre == "Reggae"'
To find all photos you shot with the flash on:
mdfind 'kMDItemFlashOnOff == "1"'
The mdls command reveals all the metadata for a particular file, like the IMG_3033. jpg picture in this example:
ongaku:Photos$ mdls IMG_3033.JPG
kMDItemAcquisitionMake         = "Canon"
kMDItemAcquisitionModel        = "Canon PowerShot S3 IS"
kMDItemAperture                = 4.65625
kMDItemBitsPerSample           = 32
kMDItemColorSpace              = "RGB"
kMDItemContentCreationDate     = 2007-06-30 14:51:07 -0700
kMDItemContentModificationDate = 2007-06-30 14:51:07 -0700
kMDItemContentType             = "public.jpeg"
You can find more about constructing your queries here: http://developer.apple.com/mac/library/documentation/Carbon/Conceptual/SpotlightQuery/Concepts/QueryFormat.html.
launchd is a multitalented Unix program responsible for launching system programs, during startup or anytime thereafter. Part of its job is triggering certain commands according to a specified schedule, even when you’re not logged in. People can use launchd to trigger daily backups or monthly maintenance, for example. You can program your unattended software robot by editing simple property list files.
Mac OS X comes set up to run launchd automatically; it’s the very first process that starts up when the Mac does. It launches all your other startup items, in fact. (If you open the Activity Monitor program in your Applications→Utilities folder, you’ll see it listed among the administrator processes that your Mac is running all the time.)
In fact, launchd comes with three under-the-hood Unix maintenance tasks already scheduled: a daily job, a weekly job, and a monthly job. They come set to run at 3:15 a.m. (the first two), and 5:30 a.m. If your Mac isn’t generally turned on in the middle of the night, these healthy jobs may never run.
You can either leave your Mac on overnight every now and then or, if you’re feeling ambitious, change the time for them to be run. A glance at man launchd.plist shows you how. (Hint: It involves using sudo nano and editing the three com.apple.periodic property list files in /System/Library/LaunchDaemons—but be careful not to mess with anything else in there!)
FTP (and its relative, telnet) aren’t exclusively Unix programs, of course. Techies from all walks of operating-system life have used telnet for years whenever they want to tap into another computer from afar, and FTP to deliver and download software files. Details on FTP are in Chapter 22.
The Unix syntax and vocabulary presented in this chapter is all well and good, and it’ll give you the rosy glow of having mastered something new. But it still doesn’t entirely explain why Unix gives programmers sweaty palms and dilated pupils.
The real power of Unix comes down the road—when you start stringing these commands together.
Suppose, for example, you want to round up all the TIFF image files related to your Yosemite project, scale them to a common size, convert them to JPEG files, and copy them to an FTP site. How would you go about it?
You could, of course, use Spotlight to search for all TIFF files that have “Yosemite” in their names. But what if your images were named otherwise but kept in folders with Yosemite in their names? You would have to find those folders first, and then the TIFF files within them.
You could perform the next step (scaling and converting the image) either manually or by a preprogrammed script or Automator workflow, using a program like Photoshop or even iPhoto. Once the images were all done, you’d need to collect them and then use your favorite FTP program to upload them to the server.
If you’ve mastered Unix, though, you could shave 12 minutes off of your workday just by changing to an empty working directory (in this example, ~/Stage) and typing this as one long line:
find ~ -type f -ipath '*yosemite*tif' -print0 | xargs -0 sips
-Z 250 -s format jpeg --out ~/Stage && ftp -u ftp://ftp.coast-
photo.com/Incoming *
Even after almost 50 pages of Unix basics, that mass of commands probably looks a tad intimidating. And, indeed, if you’ve never programmed before, even the following breakdown may make your eyes glaze over. Nevertheless, pieces of it should now look familiar:
find ~ -type f -ipath ′*yosemite*tif′ -print0 |. This segment searches your home directory (~) for files (-type f) whose pathnames (-ipath, meaning “capitalization doesn’t matter”) contain the word Yosemite and end in tif. Remember, the asterisks here are wildcard characters. The command so far makes a list of all matching files, which it keeps in its little head.
The -print0 command formats this list of found files’ pathnames, separating them with the null character (a special character programmers use to indicate where one string of text ends and another begins) instead of the usual spaces. It lets the command work with pathnames that contain spaces, a common occurrence on Macs (but a rarity in Unix). You’ll see how it does this shortly.
Then comes the pipe (the vertical bar), which you can use to direct the results (output) of one command into the input of another. In this case, it sends the list of found pathnames on to the next command.
xargs -0 sips -z 250 -s format jpeg --out ~/Stage &&. xargs is an argument builder. In this case, it builds an argument from the list of files it received from the find command and provides it to sips for processing. In other words, xargs hands a list of files to sips, and sips runs the same command on each one.
POWER USERS’ CLINIC: X11
If you’ve ever poked around in your /Applications/Utilities folder, you might have spotted the program called X11.
No, it’s not the code name of a top-secret project Apple forgot to remove before shipping Snow Leopard. X11 is another name for the X Window System, a GUI that came to being on Unix systems at about the same time the Macintosh was introduced. (“GUI” stands for graphic user interface, and it means “icons, windows, and menus like you’re used to—not typing commands at a prompt.”)
More importantly, X11 lets your Mac run many of the Unix GUI applications, both free and commercial, that have become available over the years.
Getting X11 to work right with Mac OS X used to require some fiddling. But in Snow Leopard, you can run it without fuss. X11 comes with several “X” programs, which are found in /usr/X11/bin. Your shell knows about this directory, and Terminal knows about X11, so you can run these applications like any other command.
To launch the X11 clock, for example, start in Terminal. Type xclock and press Return. After a moment, the X11 icon appears in your Dock—and a small clock window appears beside your other windows, just like any normal program.
(As you’ll discover, X11 programs are more visually pleasing than Unix code. But they have not, ahem, been designed by Steve Jobs.)
To stop the X application, you can close its window, or press Control-C in Terminal. (No new prompt appears while the X application is running.)
Many other X applications come with Snow Leopard; in Terminal, type ls /usr/X11/bin to list them. Some interesting ones to try are xterm, xcalc, glxgears, and xman. You can even add more X applications by downloading and compiling source code (a daunting task for anyone new to Unix), or through a “ports” system like MacPorts (www.macports.org), which provides software packages “ported” to Mac OS X for easier installation.
The -0 flag tells xargs that the pathnames are separated by the null character. (Otherwise, xargs would separate pathnames at each space character, which would choke sips.)
For each file it gets, sips first scales the image’s largest dimension to 250 pixels, and its other dimension proportionally. (That way, any image will fit into a 250 x 250-pixel box on a Web page, for example.)
sips then sets the format (-s format) of the image to JPEG and saves it, with the correct .jpg extension, in the ~/Stage directory.
The double ampersands (&&) at the end of this fragment tell the shell to run the next command only when it’s successfully finished with the previous one. (If it fails, the whole thing stops here.) So, once sips is done with each file it gets from xargs, the shell moves on to this:
ftp -u ftp://ftp.coast-photo.com/Incoming*. The ftp utility included with Snow Leopard can upload and download files with a single command. In this case, the command uploads (-u) every file from the working directory (as specified by the asterisk—that is, all of the sips- processed files) to the Incoming directory of the coast-photo.com FTP site.

Note
As written, this command works only if you don’t need a password to get into the FTP site. Otherwise, build your FTP account name and password into its address like this: ftp://chris:password@ftp.coast-photo.com/Incoming.
When you press Return or Enter after this gigantic command, Mac OS X scans all the directories inside your home directory, rounds up all the Yosemite-related images, scales them, converts and renames them, and then uploads each to the FTP directory.
Once you’ve gained some experience with Unix commands and programs like these, you’ll find it fairly easy to adapt them to your own tasks. For example, here’s a more versatile command that searches a directory called Projects for all TIFF files modified after 6:00 that morning, converts them to thumbnail-sized JPEGs, plops them into the images directory of your FTP-accessible Web server, and then moves them all to your Backup directory:
cd ~/Stage && find ~/Projects -type f -iname *tif -newermt 6:00
-print0 | xargs -0 sips -Z 128 -s format jpeg --out ~/Stage &&
ftp -u ftp://carlos:birdie@ftp.coast-photo.com/htdocs/images *
&& mv * ~/Backup/
Tip
You don’t have to type out that entire command line every time you need it; you can save the whole thing as a .command file on your desktop that runs when double-clicked.
First, create a new plain text document; you can use TextEdit. Type in the entire command you want to memorialize. Save the document with a name ending with .command—for example, ProcessImages.command. (Documents with this extension appear with a spiffy icon in the Finder.)
Next, make that file itself executable by using the chmod command. If, for example, you want only the owner of the ProcessImages.command file, you would type: chmod u+x ProcessImages.command.
With just a few more keystrokes, you could modify that command to collect some files, lock them, and place copies of each in every account holder’s home directory, as well as several different servers at the same time. What’s more, it emails you a report when it’s done. Using launchd, you could even configure this routine to trigger itself automatically every day at 11:00 p.m. Considering the hundreds of Unix programs included with Mac OS X and the thousands of others available on the Internet, the possibilities are limitless.
For some guidance in picking up your Unix career from here, see Appendix E.