CHAPTER 3 GRILLED MEATS
Meat is utterly central to the Argentinian diet. And beyond that, raising meat and cooking it at gatherings are defining parts of the culture. During our travels in Argentina, we couldn’t help but notice the ubiquity of grilled beef—perched all over grills from fine dining restaurants to roadside stops, and at the center of every meal.
What left an even deeper impression on us was the harmony and connection between the land and animals and the butchers and cooks. In the countryside, vast pastures produce what seem to be the happiest cattle, as well as inspire the most wonderful, spontaneous cooking. Locals build small fires with whatever wood is around, then hoist up the meat to be grilled or roasted to perfection.
At our restaurant and at home, we try to be thoughtful about the way we use meat. We do our best to source it from places that treat the animals well and raise them healthfully, and to actually think about the meat we prepare from start to finish. Not every cut merits the same seasoning, technique, or time. Is it a leaner cut that needs quick searing at high temperatures and some richer accompaniments? Is it a stronger-flavored meat that can stand up to equally pungent herbs and flavorings? Will what we add to the dish enhance the grilled meat or detract from it? After all, a recipe is equal parts ingredients and how you treat them.
You can’t really have a restaurant that serves fire-cooked meats without some fan favorites on the menu like rib-eye steaks and pork chops. And we do love these cuts. But we also like to buy and cook cuts that aren’t as high in demand or common to find on menus. An animal only has so many tenderloins and ribs, after all, so working with the other cuts is really a way to honor that animal. It also challenges us as chefs: what fun it is to hear our guests say “Wow!” to something they had never tried before.
One thing that’s interesting about meat is that you really will never eat the same piece twice. The animals differ subtly, and at times greatly, from farm to farm and diet to diet, and at times even the same cut can differ from one end of the animal to the other. For example, the fat patterns and content of a rib-eye at the shoulder end of the animal will be different from those at its tail end. When you incorporate meats into a meal and how much meat you serve can also vary each time you come to the table. But using the techniques in this chapter, you can achieve consistency in how meats turn out and the level of flavor you impart to them.

with onion marinade
This is one of those recipes that will make you look like an incredible cook for very little effort. Because of skirt steak’s relatively loose grain, it soaks up marinade incredibly well and is one of the few meats we ever marinate before grilling.
There are a few tricks, though, to making skirt steak the best it can be. First, you want to transfer the meat straight from the refrigerator to the grill. This will prevent the inside from overcooking by the time the outside is well seared. Second, honor the variations in a skirt steak’s thickness. From end to end, there will be thicker parts requiring more prolonged heat, and you should adjust the placement and time on the grill accordingly. Third, ideally you should serve skirt steak somewhere between medium-rare and medium. At rare, the muscle fibers haven’t had their full chance to break down, and the meat can be slightly chewy. And finally, always slice skirt steak against the grain; the lines of muscle fiber are particularly easy to find on this cut (they run across the width of the steak).
SERVES 4
Onion Marinade
½ medium yellow onion, coarsely chopped
1 small garlic clove, peeled
¼ cup plus 1 tablespoon extra-virgin olive oil
2 tablespoons water
Skirt Steak
2 pounds skirt steak, silver skin trimmed away
1 teaspoon kosher salt
¼ teaspoon freshly ground black pepper
Smoked sea salt, homemade or store-bought, for finishing
Chimichurri, for serving (optional)
To make the onion marinade, combine the onion, garlic, ¼ cup of the oil, and water in a blender; blend until smooth. Put the skirt steak in a large resealable plastic bag or baking dish and pour in the onion mixture, coating both sides. Cover or wrap the meat well so the onion scent does not permeate your refrigerator; chill for at least 4 hours and up to 24 hours.
Prepare a grill to medium-high heat.
Remove the steak from the marinade and season both sides with the kosher salt and pepper. Transfer the meat to the grill and let cook until one side is well seared, 3 minutes. Flip and cook for 2 minutes more, for rare to medium-rare. At this point, remove the steak from the grill and let rest for 2 minutes to allow the carryover heat to give it a more even doneness. Finally, return the steak to the grill and cook for 1 minute more per side (this guarantees this thin cut of steak will be served hot). (Add another minute of cooking on the second side for medium doneness.) Remove the skirt steak from the grill and let rest 1 to 2 minutes before slicing and serving.
Cut each steak with the grain into three sections. Turn each piece to slice against the grain at a 45-degree angle. Slice into ¼-inch pieces on a slight bias against the grain. You should get about 5 slices per cut piece, about 15 slices total. Transfer the meat to a warmed plate. Garnish with the remaining 1 tablespoon oil and smoked sea salt and serve with the chimichurri.
with “Black Gold”
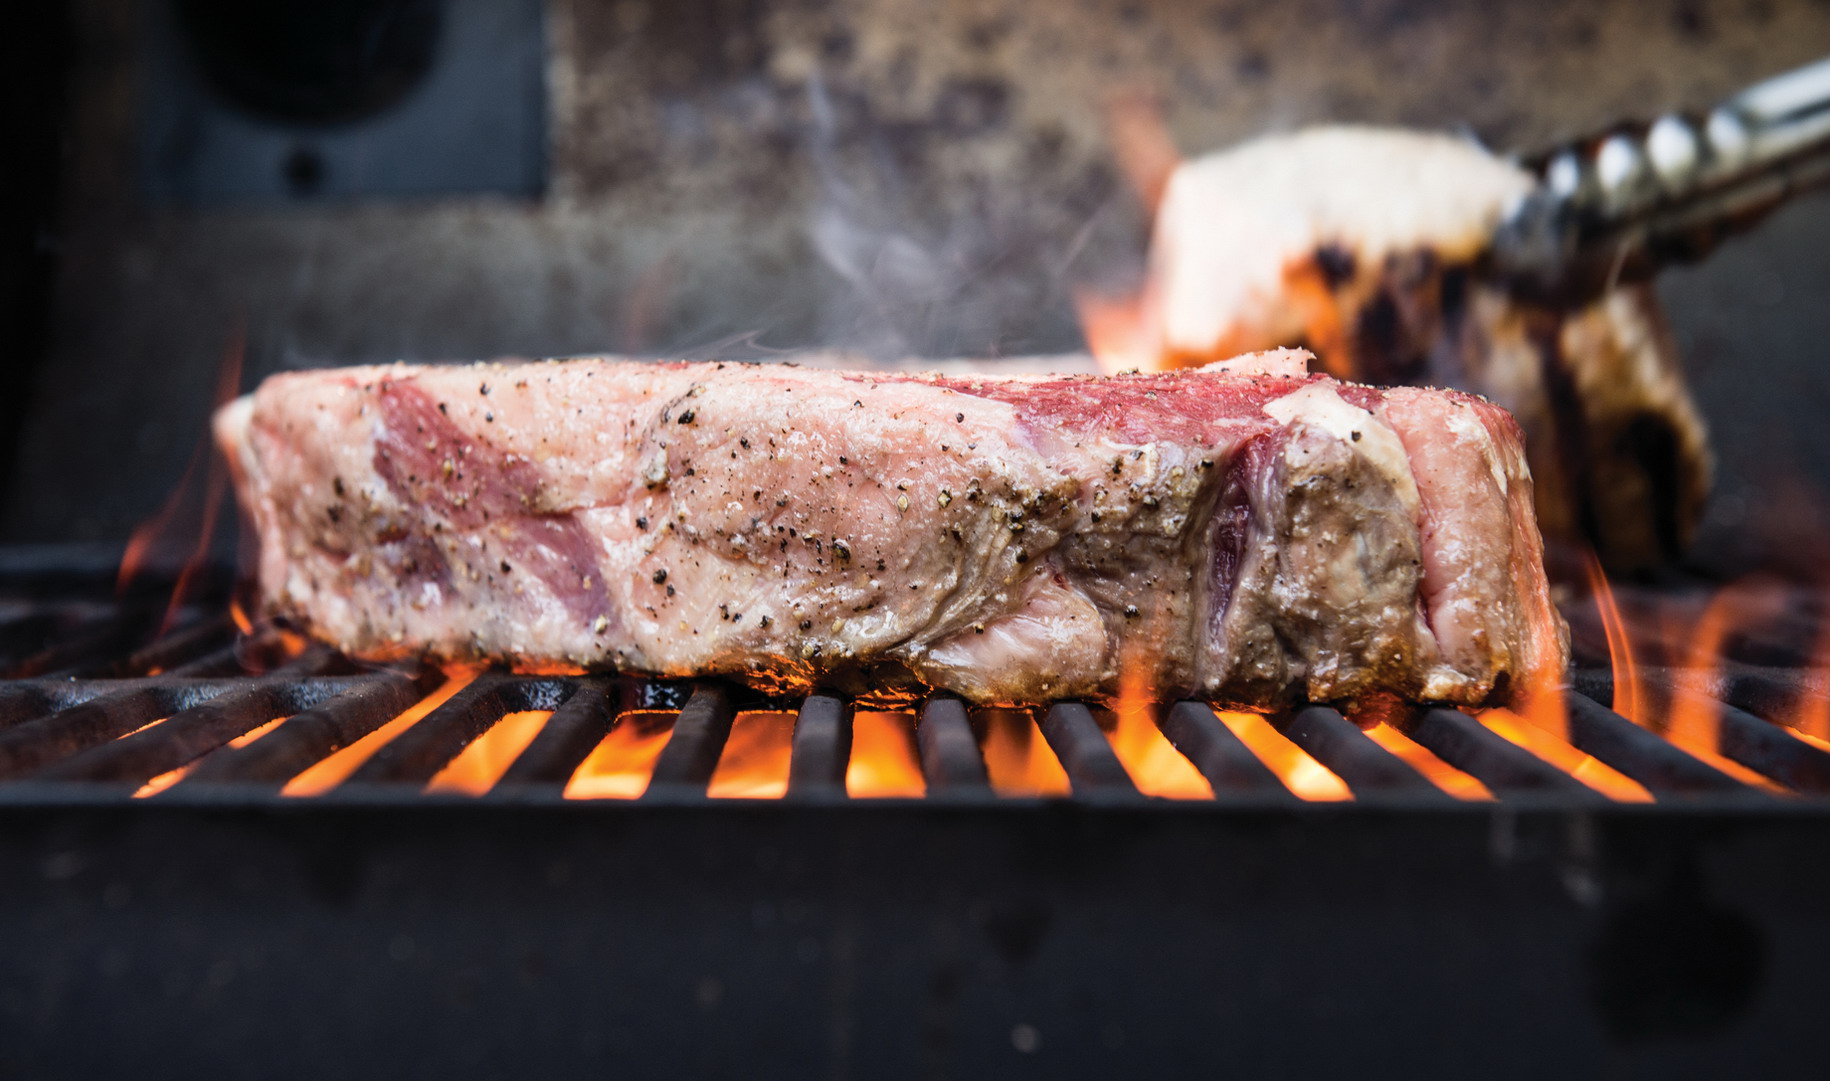
Grilling rib-eye steak this way is an act of love: this is a splurge cut that takes a while to cook, so it’s worth spending the extra time and effort to season it ahead of time, baste it while it grills, and really nurse the searing of the outside to get a deeply caramelized exterior and juicy, tender interior. Ideally, you want to season a large steak heavily at least 2 hours before cooking. This allows the flavorings to penetrate more deeply into the flesh, so that they won’t fully fall away as the fat renders on the grill. To be sure the pieces are evenly seasoned, we garnish with flaky finishing salt after cooking.
Practice makes perfect when it comes to checking a rib-eye for doneness, but you can use our timing below as a reliable starting point. With a steak as thick as this recipe calls for (or any steak thicker than 1¼ inches), bring the meat to room temperature before grilling to help the heat penetrate through. (For steaks any thinner, we take them straight from the fridge to the grill.) Keep in mind that the parts nearest the bone typically will be the most rare, and the edges may cook more quickly. We always feel that the bone should be the chef’s treat—it’s the source of the tastiest meat.
SERVES 2 TO 4
1 (2¼-pound) bone-in beef rib-eye steak
2 tablespoons extra-virgin olive oil
Kosher salt and freshly ground black pepper
¼ cup “Black Gold”, for basting
Flaked sea salt, for garnishing
At least 2 hours, or up to 24 hours, before cooking, rub the rib-eye with the oil and season lightly with the salt and pepper. Store in the refrigerator until 1 hour before serving; let come to room temperature.
Prepare a grill to medium-high heat.
Remove the rib eye and season again with kosher salt and pepper. Transfer to the grill and cook on one side until well caramelized, 5 to 8 minutes. If flare-ups happen, move the rib-eye to a new area of the grill to avoid the flames. Begin basting. Flip the steak and repeat on the other side for rare doneness. For medium-rare doneness, flip the steak back over to the first side and cook an additional 3 minutes. For medium doneness, flip again and cook 3 minutes more.
Transfer the steak to a platter or cutting board and let rest for 5 to 8 minutes before slicing and serving. Brush with a fresh tablespoonful of “Black Gold,” and sprinkle with sea salt.

The flanken-style rib is a very traditional cut of beef that you see all over the grills of Latin America. As you probably know if you’ve ever eaten braised short ribs, they’re fatty, rich, and intensely flavored. When they’re cooked on the grill, the meat develops a wonderful intensity but without the gelatinous consistency and very rich sauce. The result is a bit chewier; the meat takes more effort to eat but in a satisfying way. The teeth act as juicers to extract every last drop of flavor.
There are a few differences between grilling and serving a short rib versus grilling and serving a steak. First, you don’t need to serve as much short rib as you do steak. And second, you want to take your time when grilling. Cook short ribs slowly and at low temperatures, taking the doneness to medium-well in order to break down some of the tough connective tissue and render some of the fat.
This is a great cut for basting with “Black Gold” in order to continuously impart more flavor while grilling.
SERVES 4
3 pounds flanken-style (or cross-cut) beef short ribs, cut to 1-inch thickness (across the bone)
½ cup extra-virgin olive oil, plus more for garnishing
Kosher salt and freshly ground black pepper
1 cup “Black Gold”, for basting (optional)
Flaked sea salt, for garnishing
At least 2 hours or up to 24 hours ahead, rub the short ribs with ¼ cup of the oil and season with kosher salt and pepper; refrigerate until ready to grill.
Prepare a grill to medium-low heat.
Remove the short ribs from the refrigerator and apply another 2 tablespoons of the oil and more kosher salt and pepper. Transfer the ribs to the grill and cook low and slow until well caramelized on one side, about 15 minutes. If flare-ups happen, move the ribs to another area of the grill to avoid the flames. Flip and repeat on the other side. (If you will be basting the meat with “Black Gold,” this is a good time to start.) The ribs should be cooked to at least a medium-plus temperature (the meat and tendon should be shrunken and pulling away from the bone, and the outer layer should be completely caramelized). Transfer to the cooler edge of the grill and let rest for about 4 minutes before serving. Serve whole, or cut between the small bones to separate the ribs. Garnish with the remaining 2 tablespoons oil and sea salt to taste.

with chanterelle mushroom stroganoff
Some people love veal for its flavor and tenderness and the fact that it’s a little less fatty than cuts like a beef rib-eye. Others disdain it for being a little less intense in flavor than beef. We like to pair something with it that adds to the meat’s impact without diminishing its delicateness.
Our answer is a stroganoff sauce, a version that is light-bodied, satisfying, and made from scratch. The sauce calls for veal stock, which is delicious when it’s homemade but also something you can buy if in a hurry, as well as shallot and madeira for sweetness and tang. The sauce is intentionally thin, ideal for keeping the dish from becoming too rich (and for potentially serving over some egg noodles). Here it’s made with golden chanterelles, but morels would be a delicious seasonal alternative, and button or shiitake mushrooms also work perfectly well.
Keep in mind that, because of its leanness, veal tends to dry out if overcooked. But if you play your cards right atop the grill, it’s one of the most tender meats you can buy.
SERVES 4
Chanterelle Mushroom Stroganoff
3 tablespoons unsalted butter
½ cup minced shallots
1 pound chanterelle mushrooms
Kosher salt and freshly ground black pepper
1 cup madeira (or substitute marsala)
2 teaspoons fresh thyme leaves
3 cups brown veal or beef stock, homemade or store-bought
1 cup heavy cream or crème fraîche
Grilled Veal Chops
4 (12-ounce) bone-in veal chops
2 tablespoons extra-virgin olive oil
2 tablespoons kosher salt
2 teaspoons freshly ground black pepper
¼ cup dill sprigs, for garnish
To make the stroganoff, in a medium-large nonreactive saucepan over medium-high heat, melt the butter. Add the shallots and cook, stirring with a wooden spoon, until they just begin to brown in places, 2 to 3 minutes. Stir in the chanterelles and cook for a couple of minutes; season with salt and pepper. If the mushrooms continue to release considerable moisture, continue to cook, stirring occasionally, until all the moisture has evaporated and they begin to sizzle in the butter. Add the madeira and decrease the heat to maintain a simmer. Add the thyme leaves and cook until the madeira is reduced by about two-thirds, about 5 minutes. Add the veal stock and continue to cook until reduced by half, 12 to 15 minutes more. Stir in the cream. Bring the sauce to a simmer and cook for 2 minutes more. Taste and adjust the seasoning, if necessary. Keep warm until ready to serve.
To grill the veal chops, prepare a grill to medium-high heat.
Remove the chops from the refrigerator and brush with oil; season with salt and pepper. Grill until the first side turns golden brown, 4 to 5 minutes. Flip the chops and repeat on the other side. The veal chops should be close to the desired doneness (medium). Turn the chops so that they are vertical on the grill and facing bone side down (you may need to lean the chops on each other to keep them standing), and cook for 1 to 2 minutes more. Flip chops so the bone is facing up and repeat.
Transfer the veal to four plates and let rest for about 4 minutes. Drizzle with the stroganoff sauce, making sure to distribute the chanterelles among the servings, and garnish with the dill.

with spring crudités and anchoïade
In Argentina and Uruguay, grilled sweetbreads is one of the most common, unpretentious dishes there is. Every restaurant with a parrilla serves its own smoky grilled version. Our take features the sweetbreads as an embellishment to a plate of baby vegetable crudités for a more refined dish, but the elements couldn’t be more rustic.
Naturally tender, flavorful, and rich, veal sweetbreads (technically, the thymus and pancreas of a calf) need very little done to them, but while grilling, you can baste them with “Black Gold” or Herbed Salmuera for added flavor. As with any dish, you want contrast and variety when serving sweetbreads. The crisp spring vegetables are just that, providing an antidote to the offal’s natural richness. A garlicky, vinegary anchoïade—a Provençal anchovy dip that goes great with grilled meats and chilled vegetables alike—delivers juiciness and brightness.
You can scale this dish up and serve it for a party on a large platter. Use any leftovers the next day to make a really good tossed salad.
SERVES 4
1 pound veal sweetbreads, soaked overnight in ice water
2 tablespoons extra-virgin olive oil
Kosher salt and freshly ground black pepper
4 breakfast radishes, trimmed
8 baby new potatoes
4 baby carrots, trimmed and peeled
4 baby artichokes, trimmed, stems peeled
24 small cauliflower florets
8 snap peas or snow peas, stemmed, fibrous strings peeled away
12 thin asparagus spears, woody stems snapped off
2 hard-boiled eggs (see Note)
12 green olives, such as Castelvetrano and/or Lucques
4 caper berries
1 cup Anchoïade
Prepare a grill to medium-low heat.
Remove the sweetbreads from the water and pat dry. Drizzle with oil and season generously with salt and pepper. Transfer the sweetbreads to the grill. Let cook until deep golden brown on one side, 20 to 25 minutes. (If they cook too quickly or are charring, move to a cooler section of the grill.) Flip and repeat on the other side. Remove and let rest for 4 to 5 minutes.
Meanwhile, blanch those vegetables that you prefer to eat cooked rather than raw (we blanch the potatoes, artichokes, cauliflower, and asparagus). Bring a medium pot of water to a boil over high heat and set a bowl of ice water next to the stove. Season the boiling water with a small fistful of salt (2 to 3 tablespoons) and add the vegetables, one kind at a time, until they are just cooked through to your liking. Using a slotted spoon, quickly transfer them to the ice water to stop the cooking; drain and pat dry if needed.
Slice the sweetbreads into ½-inch-thick medallions. Divide among four plates or serve on one large platter. Surround the sweetbreads with the vegetables, eggs, olives, and caper berries, and drizzle with the anchoïade. Serve any remaining anchoïade on the side for dipping.
MAKES ABOUT 1½ CUPS
1 (2-ounce) tin oil-packed anchovy fillets
2 tablespoons red wine vinegar
1 large clove garlic
½ teaspoon freshly ground black pepper
1 cup extra-virgin olive oil
In a food processor or blender, combine the anchovies, vinegar, garlic, and pepper; pulse to chop. Slowly stream in the oil and continue processing. Transfer to a bowl and serve at room temperature or store, covered, in the refrigerator for up to 1 week. To serve, bring to room temperature.

Even if you buy the most expensive, well-raised, and fanciest butcher pork chop there is, it is dangerously easy to end up with a dry, flavorless piece of meat. We always brine ours before grilling, because a brine locks in the juiciness even when the chops are cooked to a medium or medium-well doneness.
Other secrets to juiciness are buying bone-in chops—because the bone can help protect the meat from overcooking—and choosing loin parts that are as close to the shoulder end of the animal as possible. As you move in that direction, the chops tend to have more fat mixed with their meat, which typically leads to more flavor and overall moisture.
Our brine uses maple syrup, which, aside from being delicious with pork and thyme and all the other flavors in this dish, helps the meat caramelize on the outside while it grills.
SERVES 4
4 (14- to 16-ounce) bone-in pork loin chops (each about 1½ inches thick)
2 tablespoons extra-virgin olive oil
Kosher salt and freshly ground black pepper
Maple syrup, preferably Grade B, for drizzling (optional)
Arrange the pork chops in a baking dish, plastic storage container, or 1-gallon plastic bag so that they fit snugly; pour the maple brine over them to cover completely. Cover and refrigerate for at least 24 hours and ideally up to 48 hours.
Remove the pork chops from the brine and discard the brine.
Prepare a grill to medium-high heat.
Rub or brush the pork chops with oil and season with salt and pepper, being sure to season the bones as well. Cook on the grill, undisturbed, just long enough for the pork to pick up some color and grill marks, 4 to 5 minutes for medium doneness. Flip and repeat on the other flat side. (If flare-ups happen during this phase of cooking, shift the chops to an area that’s not flaring up, then shift back after the flames subside.) Shift the pork chops to a cooler portion of the grill. Turn each onto its rounded, fatty edge, either propping the chops against each other to cook them all together or taking turns holding them up with tongs. Cook until the fatty edge is golden and crispy, about 3 minutes, then repeat the same technique on the other narrow side (the bone side).
Test for doneness by checking the firmness of the meat next to the bone. If it still has some give at the bone but is firmer around the edges, then it’s ready to come off the grill. Remove and let rest for 4 to 5 minutes before serving. Drizzle lightly with maple syrup, if desired.
During our travels in Argentina, we noticed that “chorizo” is used as a generic name for sausage that ranges very much in flavor and ingredients. Some are mild with a simple base of beef, pork fat, and salt, while others are heavily spiced and seasoned. Ours combines beef and pork like the classic, as well as garlic, oregano, and various types of chile. We give ours a little Italian influence and flavor by adding toasted fennel seed, and we balance out the spiciness with a touch of maple syrup. Our spice mixture makes quite a bit more than you will need, but if you make it once and store it, you can use it as a spice on so many dishes. Try sprinkling the chorizo spice on burgers, shrimp, pork chops, or fish before grilling, or use it as a blackening spice before sautéing or roasting any meat.
Grinding your own meat is fun and the results are delicious, but you can also buy it preground and mix in the seasonings at home. If stuffing it into casings seems daunting, form the meat into patties, like burgers, for grilling. Extras keep perfectly well in the freezer.
MAKES 25 TO 30 LINKS
2½ pounds pork shoulder, cut into 1-inch cubes (or whatever size fits through your meat grinder)
1 pound beef chuck, cut into 1-inch cubes
1 pound pork fatback, cut into 1-inch cubes
2 tablespoons kosher salt
4.5 grams (about ¾ teaspoon) pink salt (also known as Insta Cure No. 1 or sodium nitrite) (optional, see Note)
1 teaspoon finely grated or minced garlic
7 tablespoons Chorizo Spice
⅓ cup red wine
3 tablespoons maple syrup, preferably Grade B
About 10 feet of hog casings, rinsed
Extra-virgin olive oil, for grilling
Making sure that the meat stays very cold while you work with it, separate the leaner-looking meat from the fattier meat and the fatback. In the bowl of a standing mixer, toss the lean meat with the kosher salt, pink salt, garlic, and chorizo spice; refrigerate for at least 8 hours and up to 24 hours. (The fattier meat and fatback stays in the refrigerator.)
Chill the components of a meat grinder in the refrigerator or freezer before grinding the meat. Make sure the meat mixture is also as cold as possible without being frozen. Grind all the lean meat, then return to the bowl and refrigerate. Then grind all of the fat and fattier meat pieces together.
Combine the lean, seasoned meat with the wine and maple syrup. Using the stand mixer with the paddle attachment, beat on medium speed for 5 minutes. Add the fatty mixture and beat just until well incorporated, about 1 minute.
In a skillet, fry up a small patty of the sausage mixture in order to taste it; adjust any seasonings if necessary and remix just long enough to incorporate any additions.
Thread the hog casings onto a sausage stuffer, leaving a small length of casing untied at the end of the tube so air can escape. Fill the canister with the sausage mixture and pack it in, a handful at a time, pressing out the air bubbles with your fingers to be sure there is very little air packed in with the sausage. Pipe the meat into the casings, coiling it into one large coil on a baking sheet as you work. Afterward, section off the sausages into 5- or 6-inch links, twisting one link in one direction, then the next in the opposite direction, to seal the ends. For best results, refrigerate for 2 days before cooking (though these can be stored up to 5 days in the refrigerator or for 1 month in the freezer). This helps give the casing a better snap, and dries out the sausage slightly to help prevent its contents from exploding during cooking.
When ready to serve, prepare a grill to medium heat and be sure to carefully oil the grate.
Lightly oil the sausages and transfer to the grill; let cook until grill marks have formed on one side, 3 to 5 minutes. Turn and repeat on the other side. Transfer to a cooler section of the grill and cook until the sausages feel firm and the meat is cooked through, 2 to 3 minutes more. Remove from the grill and let rest for 2 to 3 minutes before serving or slicing.
Note The pink salt used as a preservative in this recipe is optional. Since our sausages are fresh—not smoked or hung at temperatures above refrigeration level—it is not required. Curing salt is antimicrobial, enhances flavor, and it preserves the pink color in the sausage to keep it from turning grayish when cooked. But curing salt is also potentially toxic if not handled within the proper ratios. If you are going to use it, be sure to weigh out the measurement.
• Make sure there is plenty of water in the casing to help glide the casing easily over the stem of the machine and avoid tearing or sticking.
• Each link should be full but not too tightly packed. Remember, the casing will naturally attach itself to the meat while it sits in your refrigerator, so while it shouldn’t be saggy, it doesn’t have to be perfectly tight and fitted.
• To seal off the links while they’re still strung together, twist one link clockwise, then spin the next link counterclockwise to seal. This will prevent them from coming undone.
• If you notice any major air pockets in the links once they’re sealed off, poke them with a pin. The casing will seal itself back up.
MAKES ABOUT 4 CUPS
1½ cups ground ancho chile
¾ cup Hungarian sweet paprika
⅓ cup smoked sweet Spanish paprika (also called pimentón dulce)
¼ cup onion powder
¼ cup dried marjoram
¼ cup toasted fennel seed
¼ cup cayenne pepper
¼ cup ají amarillo powder (see Note)
3 tablespoons dried oregano
3 tablespoons freshly ground black pepper
1 teaspoon freshly grated nutmeg
In a small bowl or medium jar, combine the ancho, both paprikas, the onion powder, marjoram, fennel seed, cayenne, ají chile, oregano, black pepper, and nutmeg; stir well to blend. The spice mix can be stored in an airtight container for up to 6 months.

Another sausage that is ubiquitous around Argentina, Uruguay, and other parts of South America, traditional morcilla (or blood sausage) has less of the crumbly, meaty texture than might come to mind when you think of sausage. Instead, the filling is wetter, jammier, and all-around sweeter—almost like a pudding inside a casing—and the pork blood is bulked up with grains or potatoes, onions or apples, or nuts and dried fruits. For ours, we went with more of a meaty consistency, and cherry-picked all our favorite spices and seasonings from European and South American blood sausages. We mirror the South American version in our use of nuts, sweet spices, and raisins, but we add savory spices for balance.
This morcilla is delicious served on a roll with chimichurri; in Argentina this style of sandwich is called a morcipán. Or you can serve it simply with Dijon mustard, mashed potatoes, and roasted or grilled apples, playing off the sausages’ sweetness.
MAKES 20 TO 25 LINKS
2 tablespoons neutral-flavored vegetable oil
4 cups diced yellow onions
About 2 cups water
2½ pounds pork shoulder, cut into 1-inch cubes (or whatever size fits through your meat grinder)
¼ cup plus 2 tablespoons Morcilla Spice
3 tablespoons kosher salt
5 grams (about 1 teaspoon) pink salt (see Note)
1 pound pork fatback, cut into 1-inch cubes
4 cups fresh pork blood
½ cup red wine vinegar
⅔ cup toasted chopped walnuts
½ cup chopped golden raisins
⅓ cup chopped fresh flat-leaf parsley leaves
2 teaspoons chopped fresh oregano
About 15 feet of hog casings, rinsed
Extra-virgin olive oil, for grilling
In a large pan over medium heat, combine the vegetable oil and the onions; cook, stirring occasionally, until softened and lightly caramelized, about 15 minutes. When the onions start to stick or the pan starts to get dark, deglaze with ¼ cup water at a time, continuing to cook until it evaporates, until you’ve used about 2 cups. Transfer the onions to a baking sheet and spread them into a single layer; refrigerate until completely chilled.
Chill the components of a meat grinder and a stand mixer (bowl and paddle attachment) in the refrigerator or freezer before grinding the meat. Toss the pork shoulder with the morcilla spice, kosher salt, and pink salt, and chill until ready to grind. (Keep the pork fatback in the refrigerator.)
Grind the pork shoulder, then refrigerate. Grind the fatback, then refrigerate separately. Strain the blood through a fine-mesh strainer.
In the chilled bowl of a stand mixer fitted with the chilled paddle attachment, mix the ground seasoned pork shoulder on medium-high speed for 5 minutes. Turn the mixer off and scrape down the sides of the bowl and the paddle; turn the machine to low speed and slowly pour in the blood and the vinegar. Once the liquid is incorporated, increase the speed to medium and add the reserved onions, walnuts, raisins, parsley, and oregano. Mix well until fully incorporated, about 2 minutes, then add the fatback, a handful at a time. Mix until well incorporated and the mixture forms a thick paste, about 5 minutes.
In a skillet, cook a small patty of the sausage mixture in order to taste it, and adjust the seasoning if necessary.
Thread the hog casings onto a sausage stuffer, leaving a small length of casing untied at the end of the tube so air can escape. Fill the canister with the sausage mixture and pack it in, a handful at a time, pressing out the air bubbles with your fingers to be sure there is very little air packed in with the sausage. Pipe the meat into the casings, coiling it into one large coil on a baking sheet as you work. Afterward, section off the sausages into 5- or 6-inch links, twisting one link in one direction, then the next in the opposite direction, to seal the ends.
Heat a large stockpot of water to 185°F. Set a large bowl of ice water next to the stove. Maintain the temperature of the water over low heat while gently lowering in as many sausages as can fit in the pot. Poach the sausages for 8 minutes, until just cooked through, then remove and transfer to the ice water. Repeat as needed until all the sausages are poached and chilled. Refrigerate for up to 5 days before grilling.
When ready to serve, prepare a grill to medium heat and be sure to carefully oil the grate.
Lightly oil the sausages, and season lightly with kosher salt. Grill until grill marks have formed on one side, 3 to 5 minutes. Turn and repeat on the other side. Transfer to a cooler section of the grill and cook until the sausages feel firm and the meat is heated through, 2 to 3 minutes more. Remove from the grill and let rest for 2 to 3 minutes before serving or slicing.
MAKES 1¼ CUPS
1 cup Hungarian sweet paprika
¼ cup ají amarillo powder (see Note)
3 tablespoons dried oregano
3 tablespoons ground cumin
2 tablespoons ground ginger
2½ tablespoons ground coriander
1½ tablespoons freshly ground black pepper
1½ tablespoons freshly ground white pepper
1½ tablespoons freshly grated nutmeg
1½ tablespoons dried thyme
In a medium bowl or large jar, combine the paprika, ají chile, oregano, cumin, ginger, coriander, black and white pepper, nutmeg, and thyme. The spice can be stored in an airtight container for up to 6 months.

with celery, cilantro, charred orange, and cumin-chile oil
For those nights when you want to be liberated from the grill while the festivities are going on, this lamb loin can be finished in advance and served chilled or at room temperature. It’s light enough to serve on the hottest summer nights, but the easy-to-find components (like celery, an unsung favorite of ours) make it friendly for year-round eating.
Think of the charred orange as a trick up your sleeve. The burning sugars of the orange lend a crème brûlée–like sweetness, making the orange amazing on everything from sweetened yogurt to a smoky Old-Fashioned.
SERVES 4
1 (12-ounce) boneless lamb loin
1 tablespoon kosher salt
½ teaspoon freshly ground black pepper
2 tablespoons unsweetened cocoa powder, plus about 1 teaspoon more to garnish plates
¼ cup Orange-Chile Oil
2 tablespoons soy sauce (gluten-free if desired)
2 tablespoons unseasoned rice vinegar
½ teaspoon cumin seeds
3 oranges
Flaked sea salt, for garnishing
1 large rib celery, sliced thinly on a diagonal
6 chives, sliced into 2-inch pieces
1 cup cilantro leaves
Coat the lamb loin with the kosher salt, pepper, and cocoa powder, rubbing with your fingers to help the spices adhere. Wrap and refrigerate for at least 4 hours and up to 24 hours.
Prepare a grill to high heat. Meanwhile, to make the cumin-chile oil, in a small bowl, whisk the Orange-Chile Oil with the soy sauce and vinegar. In a small pan over medium heat, toast the cumin seeds until fragrant and starting to pop, about 1 minute. Remove and add to the chile-soy mixture.
Using a sharp knife, cut away the orange rinds and reserve the fruit.
While the grill is at its hottest, grill the lamb and the oranges: Unwrap the lamb loin and place it on the hottest part of the grill (if it’s a gas grill), or—if using coals—set a metal cooling rack directly atop the coals and place the lamb loin on top. Cook for about 1 minute, until seared, then flip and cook the other side for 1 minute. (If your lamb loin is more round than oblong, give it a one-quarter turn every 30 seconds so that it cooks evenly.) Remove the loin from the heat (it will still be rare to medium-rare) and wrap it tightly in fresh plastic wrap to allow it to keep cooking while you grill the orange. At this point, you can store the cooked, wrapped lamb loin up to 3 days.
To finish the dish, place the oranges on the hottest part of the grill and cook, rotating until charred—and almost burnt—around the outside, 4 to 8 minutes. Remove from the heat and let rest until cool enough to handle; slice into ½-inch-thick rounds.
To serve, divide the orange slices among four plates. Unwrap the lamb loin and slice it into ¼-inch medallions; divide among plates. Garnish each slice with a light sprinkling of sea salt. Garnish with the celery, chives, and cilantro leaves. Drizzle the toasted cumin-chile oil over the meat and vegetables, stirring between each spoonful to properly distribute all of its ingredients. Sprinkle a small amount of cocoa across each plate and serve.
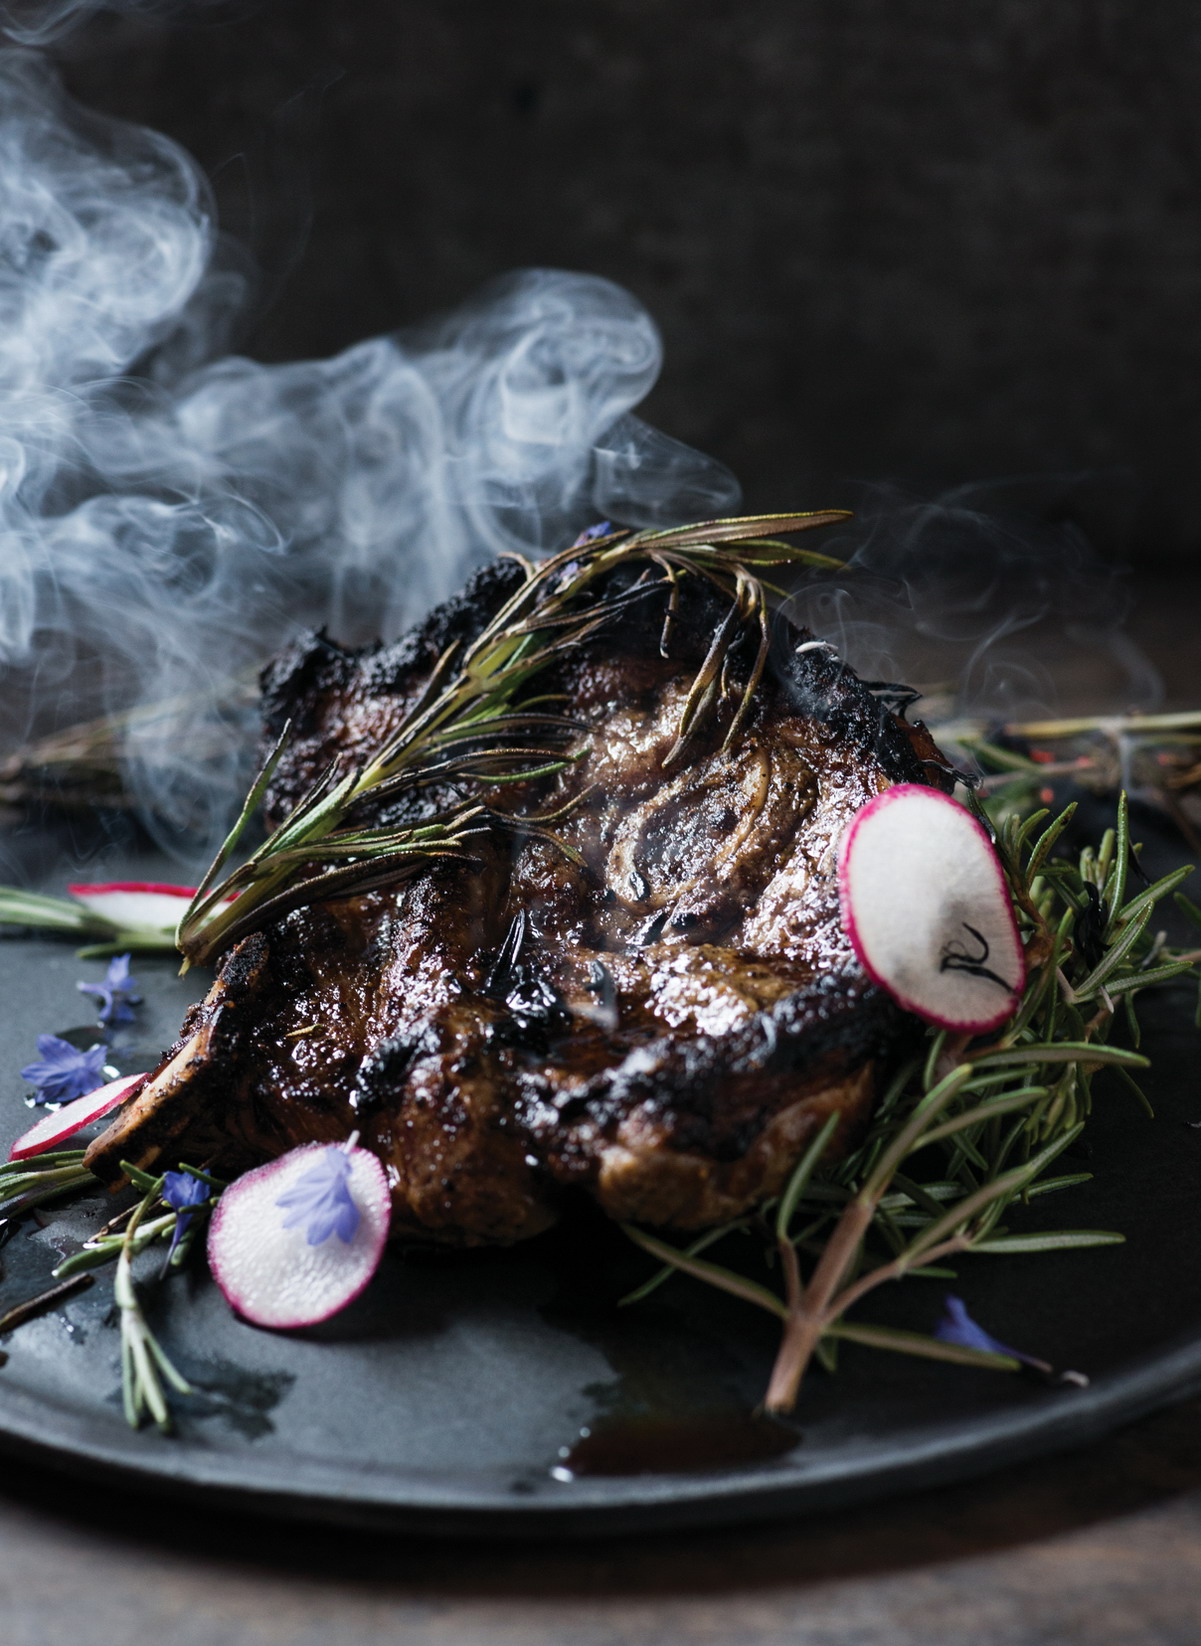
with rosemary marinade
This is a cut for the carnivorous person who doesn’t mind eating around a bone, or eating a little bit of fat, and really just enjoys the flavor of lamb. Lamb and rosemary go hand in hand, and because the shoulder has a bigger flavor, we amped up the rosemary flavor, too, applying it in a few different ways. The dish starts with a rosemary marinade, and the grilled chop is set atop a bed of fresh rosemary to release the herb’s aromas. At Ox, we also send this out to the table garnished with a smoking sprig of rosemary lit from the fire.
This is an inexpensive cut relative to other cuts of lamb, so it’s a great option for scaling up for larger groups.
SERVES 4
½ cup extra-virgin olive oil
½ yellow onion, chopped
1 clove garlic
Leaves from 2 sprigs rosemary, plus more sprigs for garnishing (optional)
1 teaspoon kosher salt, plus more to taste
1 teaspoon freshly ground black pepper, plus more to taste
4 (12-ounce) bone-in lamb shoulder chops, about 1 inch thick
Thinly sliced radishes, for garnish (optional)
Edible flowers, for garnish (optional)
In a blender, combine the oil, onion, garlic, rosemary, salt, and pepper; puree until smooth.
Generously coat the lamb chops with the marinade and chill, covered or wrapped tightly, for at least 4 hours and up to 24 hours. Before grilling, let the meat come up to room temperature, about 30 minutes.
Meanwhile, prepare a grill to medium heat.
Season the lamb chops with more salt and pepper and transfer to the grill. Cook, turning once, until both sides are golden brown and the meat is cooked to medium or medium-well, about 12 minutes total. Remove and let rest for 5 minutes before cutting or serving. Serve on a bed of rosemary sprigs and garnished with radish and flowers, if desired.
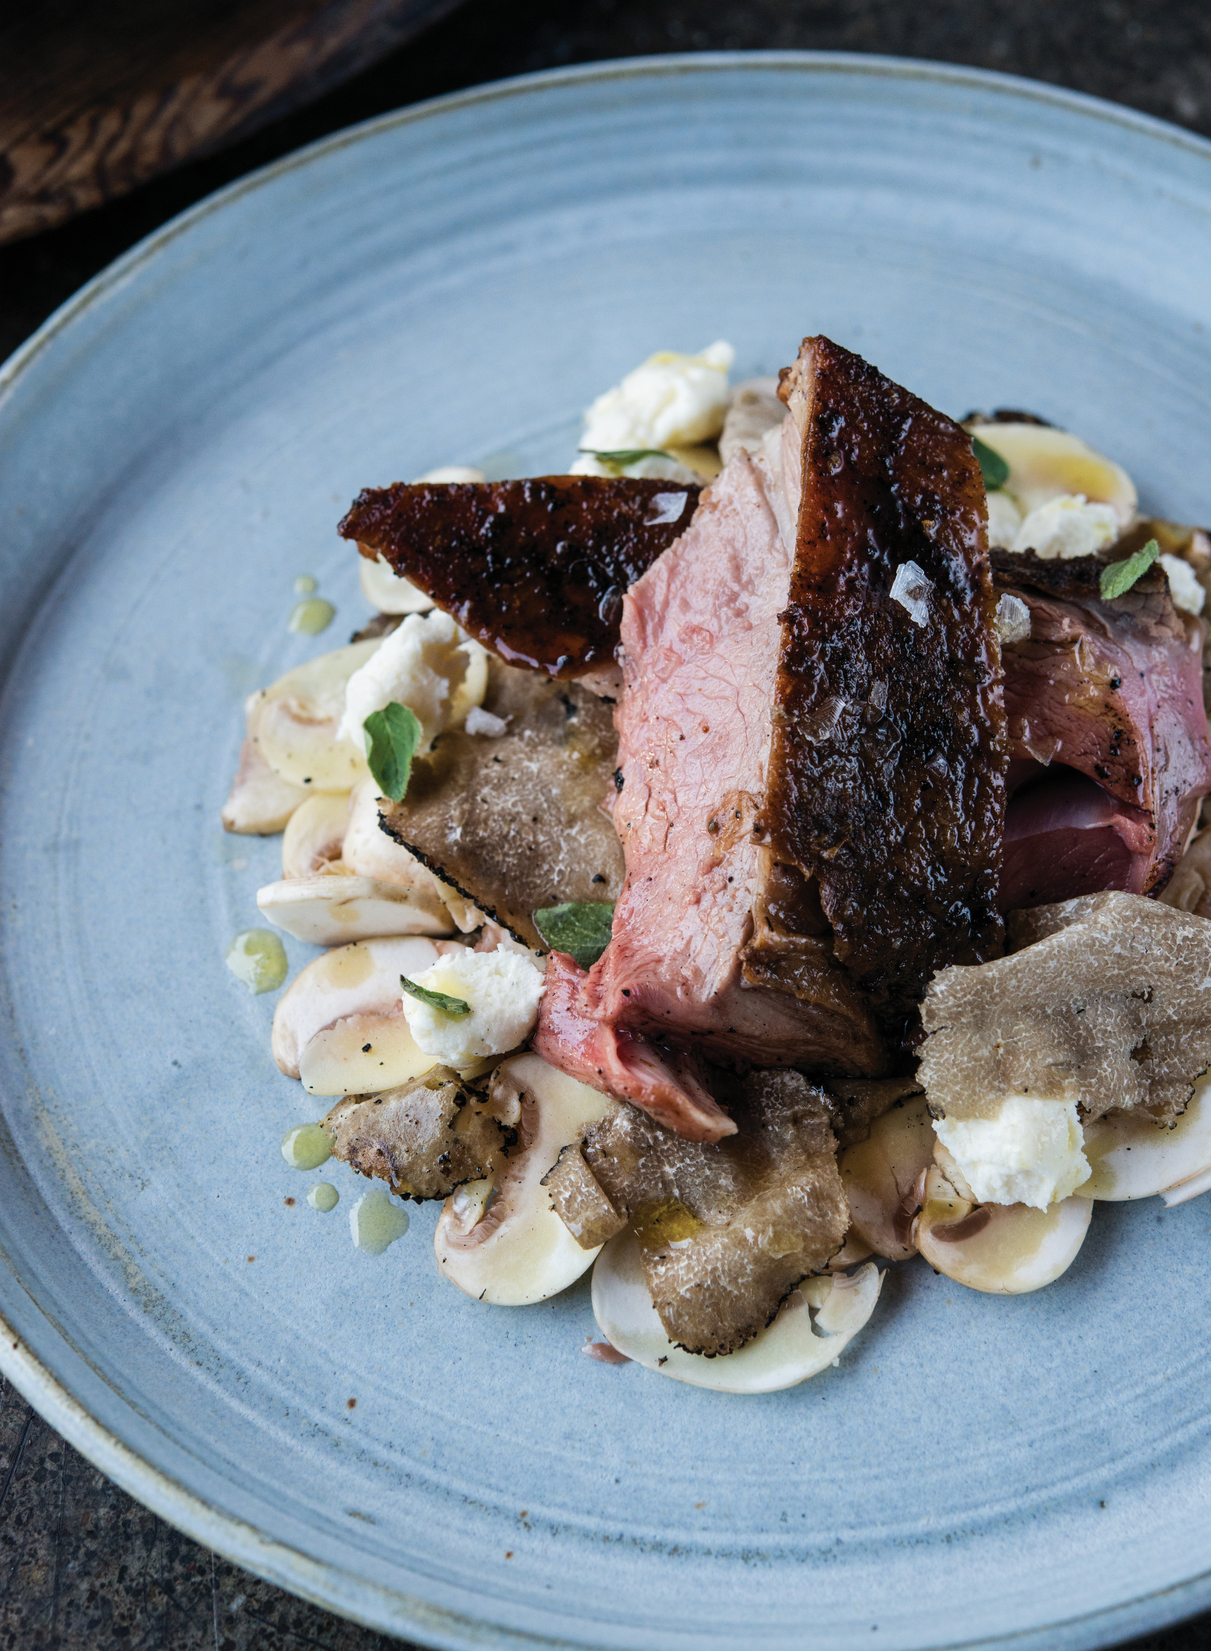
with white truffle, button mushroom, and fresh ricotta salad
This recipe is another case in which a large bone-in cut and slower cooking helps to develop flavors effortlessly. The goat is seasoned simply and basted while it cooks with an herbed salmuera—a simple water-based brine that’s often used to baste fire-cooked meats in South America. We sometimes substitute a little beer for some of the water.
Served atop a mushroom salad, the goat meat releases its juices and they become a component of the salad’s dressing. The warmth of the meat helps to release the fragrant aroma of the shaved truffle.
SERVES 6 TO 8
Goat Leg
1 (6-pound) bone-in leg of goat
Kosher salt and freshly ground black pepper
4 cups Herbed Salmuera
White Truffle and Button Mushroom Salad
1½ pounds button mushrooms, as fresh and white as possible
¼ cup fresh lemon juice
½ cup extra-virgin olive oil
2 tablespoons fresh oregano leaves
1 cup ricotta, homemade or store-bought
2 ounces fresh white truffle (or substitute a couple of teaspoons truffle oil or truffle salt)
Flaked sea salt and freshly ground black pepper
Prepare a grill to medium-low heat, banking the coals to one side for indirect grilling (if using a gas grill, only light one side).
Season the goat leg all over with kosher salt and pepper and place it over the cooler side of the grill so that the flat side is facing down (the side that is less meaty and closer to the bone; it may appear to have a seam running down it). Let cook for 15 to 20 minutes until just barely browned. If the meat has not taken on any color at all at this point, move it a bit closer to the heat. It should be slowly and lightly browning but not charring or taking on dark or heavy grill marks. Baste with the salmuera, beginning on the top, raw side of the meat. Then, using a kitchen towel, flip the leg to briefly baste the bottom side. Continue cooking on the flat side, basting every 10 to 15 minutes. After about 1½ hours, when the first side is a deep golden brown, flip the leg to begin cooking on its rounded, meatier side. Continue to baste every 10 to 15 minutes, for another 1½ hours or so, until a thermometer inserted into the thickest part registers 125°F to 130°F for medium-rare or 140°F for medium-well. You will be able to tell the leg is close to ready when you see the meat on the smaller end (the shank) begin to pull away from the bone, after about 3 hours. Carefully remove the meat from the grill and let rest in a warm spot for 20 to 25 minutes.
Meanwhile, prepare the mushroom salad. Thinly slice the button mushrooms about ⅛ inch thick and transfer to a bowl with the lemon juice, olive oil, and oregano; toss gently, then mound onto a serving platter. Garnish with small pieces of the ricotta. Using a truffle slicer or mandoline, slice the truffle thinly over the entire salad. Finish with a generous sprinkling of sea salt and black pepper.
Thinly slice the goat meat against the grain and season with sea salt; fan the slices out atop the salad. If you have any truffle left, slice it over the goat meat and serve.
with sage-roasted grapes
We strive to put every potential ingredient in our kitchen to good use, and marinating proteins in whey—the seasoned liquid left over from making ricotta—was a use-it-all-up experiment gone right. Because of the salt and vinegar contained in the ricotta and the lactic acid that occurs naturally in the milk, a whey brine helps tenderize lean quail meat and bring forth its inherent flavor and sweetness. The naturally occurring sugars also help its outermost layer to caramelize on the grill.
Birds go beautifully with stronger herbs like marjoram, rosemary, sage, and lavender. In this case, we cook some sage in butter to give it a delicious nutty flavor without the medicinal quality sage can have when raw. We roast some grapes to release their juices and form an effortless sauce, which we then enrich with butter and verjus (the pressed juice of unfermented grapes, which you can find in specialty shops or online). If needed, you can substitute unsweetened white grape juice for the verjus, but the sauce will turn out a touch sweeter.
Try this preparation with other similar proteins, like chicken thighs or breasts, or even pork tenderloin or chops.
SERVES 4 AS A STARTER OR 2 AS A MAIN DISH
Whey-Brined Quail
4 quail, glove-boned (or partially deboned) by your butcher
2 cups whey (see Homemade Ricotta)
2 tablespoons extra-virgin olive oil
Kosher salt and freshly ground black pepper
Sage-Roasted Grapes
3 tablespoons cold unsalted butter, cut into ½-inch cubes
8 fresh sage leaves
1½ cups seedless red grapes (8 ounces)
¾ teaspoon kosher salt
¼ teaspoon freshly ground black pepper
¼ cup white verjus
Sugar (optional)
Prepare the quail by bending their wings at the joints and tucking the wings behind their necks. Take a thin knife and cut a small slit on one of the inside “ankles” of each quail, cutting right behind the bone and all the way through the outside skin. Take the other leg and push its “ankle” through the hole, so that the quail looks like it’s crossing its legs at the ankle. This will prevent the legs from splaying open as the quail cook.
Put the quail into a large resealable plastic bag or a plastic storage container and pour in the whey; refrigerate for at least 8 hours and up to 12 hours. Remove the quail, discarding the whey, and rinse quickly, just enough to rinse the whey from the skin; pat dry with paper towels.
Preheat the oven to 400°F and set a rack in the center. Prepare a grill to medium heat.
To prepare the grapes, warm an oven-safe sauté pan over medium heat. Melt 2 teaspoons of the butter in the pan, then add the sage leaves. Cook until the leaves and the butter start to brown lightly and become aromatic, about 3 minutes. Add the grapes, salt, and pepper, swirling them around the pan to coat. Transfer the pan to the middle rack of the oven and roast until the grapes just start to wrinkle, 8 to 10 minutes. Remove the pan and let sit at room temperature.
Brush the quail with the oil and season both sides with salt and pepper. Be sure to carefully oil the grate, then place the quail breast side down on the hot grill. Cook for 2 minutes, then flip and cook 2 minutes more.
Return to the breast side, rotating the angle about 70 degrees to get a nice crosshatch mark; cook for about 2 minutes. Flip one final time and cook until the quail are just cooked through but still pink, 3 minutes more. Test for doneness by making a small cut in the center of the back and checking the breast from the inside. The meat should be barely pink in the center yet firm. Remove from the grill and keep warm.
Quickly finish the sauce by placing the sauté pan back on the stove over medium heat. Add the verjus and bring to a simmer, then reduce the heat to maintain the simmer (do not boil). Add the remaining butter, one small knob at a time, swirling the pan constantly to help the butter emulsify into the sauce. Taste and adjust the seasoning, if necessary. If the grapes are particularly tart, add a pinch or two of sugar (the sauce should be both sweet and sour).
Spoon the sauce over the grilled quail and serve immediately.

with grilled figs, manouri cheese, and lentil chimichurri
If you’ve been to a backyard barbecue, chances are you’ve been served some burnt chicken. This is common and even understandable, because prolonged, direct contact between flames and delicate, fatty chicken skin can easily lead to flare-ups and over-blackening. The two tricks to tender, juicy chicken are indirect heat and a willingness to wait.
The indirect heat method used here is one of the foundations of open-fire cooking in South America. Seasoned cooks there know exactly how far away to position different cuts and meats from the coals for optimum results. That’s why we turn chicken skin-side-up so that the skin never even touches the grate of a grill, and yet the skin and outermost layer of the meat still crisps and browns beautifully.
You can make and serve this chicken on its own, of course, but we love the fruit and cheese accompaniments when figs are in season. Along with the creamy manouri cheese and herbaceous lentil chimichurri, the sweet figs are the ideal contrast to the bird’s smoky flavor and crispy skin. Likewise, you can serve the accompanying salad on its own as a light meal.
If figs are not in season, try peeled, seeded pears, fresh apricots, or thin slices of delicata squash.
SERVES 4
½ cup lentils du Puy (French green lentils), rinsed and picked through
¼ cup extra-virgin olive oil
Kosher salt and freshly ground black pepper
1½ cups Chimichurri
1 (4- to 5-pound) chicken
8 fresh firm-ripe figs, halved lengthwise
1 (3-ounce) wheel manouri cheese (or substitute a block of halloumi, cut ¾ inch thick)
Put the lentils in a small pot and add enough water to cover by about 1 inch. Cover the pot and bring to a boil over medium heat (you will see steam start to escape from the lid). Decrease to a simmer and cook until the lentils are just tender, about 18 minutes; drain. Add 1 tablespoon of the oil to the lentils and season with salt and pepper. Spread the lentils out on a flat dish and refrigerate until cool. Transfer to a small bowl and combine with the chimichurri; taste and adjust the seasoning, if necessary. Store covered at room temperature until ready to use.
Prepare a grill to medium heat, building the fire—or turning on the gas—on one side of the grill and leaving the other side open for indirect-heat cooking. (If using charcoal, start with a larger batch since you need it to last a little over an hour.)
To butterfly the chicken, place the chicken breast-side-up on a cutting board. Working from the tail end, insert a sturdy, sharp knife into the body cavity and make a straight cut through the ribs along one side of the backbone. Turn the chicken around on the cutting board so that the neck side is facing you (leave it breast-side-up). Starting at the neck cavity, cut along the same side of the backbone in order to connect to the previous cut and split the bird open down its back (but leaving the backbone attached on one side). Turn the chicken over so that the breast side is now against the cutting board. Carefully splay the legs open and apply strong pressure onto the inner cavity with your palms to flatten the bird as much as possible. Season the inner cavity with a generous amount of salt and pepper, then gently flip the chicken and season the skin side, being sure to season under the legs and wings, too.
Transfer the chicken, breast side up, onto the grill in an area that is next to the coals but not directly atop them. Cover the grill, either with its own lid or by placing a large metal bowl over the chicken. Cook for 5 minutes, keeping watch for any flare-ups, until you hear sizzling sounds and the underside of the bird begins to brown lightly. (If flare-ups do happen, move the bird a little farther from the heat and cover it again. If it is not beginning to brown after 5 minutes, move it closer to the coals.) Cook for another 10 minutes, then rotate the bird 180 degrees, keeping the breast side up. Continue to grill, rotating the bird every 15 minutes but never turning it over onto its skin side, until the chicken is just cooked through, 1 to 1¼ hours. To test for doneness, make a small cut where the thigh meets the breast and be sure the juices run clear; keep cooking if you see any pink. Remove from the grill and let rest for 15 minutes before carving.
Meanwhile, brush the manouri cheese and figs with some of the remaining oil and season with salt and pepper. Transfer the cheese and the figs, cut side down, onto the hottest area of the grill. Cook just until grill marks form, about 3 minutes; turn and repeat on the remaining sides. Gently remove from the grill and keep warm.
To serve the cheese and figs, place the grilled cheese wheel on a large round plate. Distribute the figs atop and around it, then spoon half of the lentil chimichurri on top.
To carve the bird, place it, breast side up, on a cutting board. Remove the legs at the thigh. Separate the thighs from the legs, and separate the two breasts by cutting down in between them through the chest plate. Cut each breast in half horizontally, just under the wing. Pile the pieces onto a large plate or platter and serve with a small bowl of the remaining lentil chimichurri.

with cilantro-peanut relish and watermelon
To get your hands on a turkey’s butt (also known as a turkey tail), you sort of have to know someone. This might mean making a special order from your butcher, but it’s not at all expensive and at least one of the more interesting orders they’ll get all day. What we like about this part of the bird is its high skin-to-meat ratio. There is a bit of bone, but it’s similar to that of a rib, and fun to nibble around.
We love what happens to this part of the turkey after hours of low and slow cooking. Though the method does require patience, the turkey meat begins to taste a lot like pork—taking on a gelatinous quality similar to that of a pork trotter. If you don’t have 2 to 3 hours to see this recipe through—or if you can’t make it to a butcher to score turkey butts—an easy substitute would be bone-in, skin-on chicken thighs. Cook them 35 to 45 minutes as directed, then skip the long indirect-heat cooking.
Served with fresh watermelon, this dish has a juiciness, coolness, and freshness that helps cut through the fattiness of the poultry skin. It all pairs inexplicably well with the cilantro-peanut relish, which isn’t really spicy but is definitely zesty due to a bit of yellow mustard.
SERVES 6 TO 8
8 (6- to 8-ounce) turkey butts or tails (about 4 pounds total) (or substitute 4 pounds bone-in, skin-on chicken thighs)
2 tablespoons extra-virgin olive oil
Kosher salt and freshly ground black pepper
1 small seedless watermelon
Put the turkey butts in a resealable 1-gallon bag and pour in the maple brine; refrigerate for at least 12 hours and up to 24 hours. Remove from the brine and pat dry with a clean kitchen or paper towel.
Prepare a grill to medium-low heat.
Rub the turkey butts with the oil and season with salt and pepper. Transfer to the grill and cook, turning the butts to a new side every 5 to 6 minutes, until golden brown with light spots of char all over, 35 to 45 minutes total. If flare-ups occur at any time during this phase, move the butts to a different spot on the grill to avoid the flames.
Shift the turkey butts to the outside edges of the grill, where the heat is less direct (if using chicken thighs, skip this step). Let cook until the meat is ultratender and the skin is well browned, 2 to 2½ hours more.
When ready to serve, peel and cut the watermelon by slicing off both ends, turning the watermelon onto one of the cut sides and removing the skin with a knife. Cut the flesh into ¾-inch by 3-inch rectangles; season with salt and pepper. Spread out the watermelon pieces on a serving platter, then place the grilled turkey butts on top. Drizzle each piece of turkey with a heaping tablespoon or more of the cilantro-peanut relish, then drizzle the rest of the relish on the watermelon.
MAKES JUST OVER 2 CUPS
1 cup raw skinless peanuts
2 cups tightly packed cilantro leaves
1 cup extra-virgin olive oil
¼ cup lemon juice, preferably from Meyer lemons
Finely grated zest of ½ lemon, preferably Meyer lemon
2 teaspoons yellow mustard
1 teaspoon finely grated or minced garlic (from about 1 small clove)
2 teaspoons kosher salt
1 teaspoon freshly ground black pepper
Preheat the oven to 325°F. Spread the peanuts in a single layer on a flat baking dish or small baking sheet and roast until lightly browned and aromatic, 14 to 18 minutes. Let cool to room temperature; coarsely chop and transfer to a small bowl.
Finely chop the cilantro and add it to the bowl with the peanuts. Add the oil, lemon juice and zest, mustard, garlic, salt, and pepper; mix well with a fork. Let rest at room temperature until ready to use. Serve within an hour or two, before the peanuts lose their crunch and the cilantro turns brown from the acid.
with sesame-chile oil
Squab is a decadent little game bird that features a delicious ratio of crispy skin to rosy, succulent meat. Here we brush it with a spicy and nutty-flavored chile oil to counterbalance its sweet dark-meat flavor.
As is the case when grilling many birds, butterflying the squab before grilling it helps all of its parts to cook evenly. But unlike our butterflied chicken recipe, which cooks skin-side-up, the squab should cook with its skin against the grill, giving the skin a chance to crisp while the meat cooks through. Squab is best cooked rare to medium-rare. Beyond that, the meat can take on a toughness and even a liverlike flavor.
While the sesame-chile oil will seem very spicy if you taste it on its own, once you brush it onto the birds, the flavoring mellows. Don’t be afraid to drizzle a bit more onto the birds after grilling. Sesame-chile oil is very versatile: drizzle it over steamed greens, stir-fried vegetables, or fried eggs for heat and nuttiness, or rub it onto other poultry, meat (especially pork belly), or fish before grilling or roasting.
SERVES 4
1 cup neutral-flavored vegetable oil
2 tablespoons red pepper flakes
¼ cup toasted sesame seeds (see Note)
2 cloves garlic
2 teaspoons kosher salt
2 tablespoons toasted sesame oil
Butterflied Squab
4 squab, about 1 pound each
Kosher salt
To make the sesame-chile oil, in a small pot over medium heat, heat the vegetable oil until a deep-fry thermometer registers 225°F. Remove from the heat and add the red pepper, sesame seeds, garlic, and 1 teaspoon salt. Let cool to room temperature, then transfer to a blender with the sesame oil. Blend at low speed until the mixture forms a gritty paste. Keep stored in the refrigerator for up to 2 weeks.
To butterfly the squab, place them one at a time on a cutting board, breast side up. Entering from the tail end, insert a sturdy, sharp knife into the body cavity. Pressing the knife against the backbone, cut straight down through the ribs along the backbone. Rotate the bird so the neck side is now facing you (it should still be breast-side-up). Insert a knife into the neck cavity and cut along the same side of the backbone in order to connect to the previous cut. This should split the bird open down its back (do not remove the backbone). Turn the bird over so that the breast side is now facing down. Carefully splay the legs open and apply pressure on the inner cavity with your palms to flatten the bird as much as possible.
Season the inner cavity of the squab with salt, then rub about 1 teaspoon of the sesame-chile oil onto the flesh and bone. Turn the squab over and season the skin side with salt, making sure to season under the legs and wings, too. Drizzle ½ teaspoon of the sesame-chile oil onto the skin and rub it in, but try to avoid using too many of the solid particles at the bottom of the bowl (they may burn with prolonged contact with the grill).
Prepare a grill to medium-high heat and set up for indirect-heat cooking. (If using a gas grill, prepare one side to medium-high and leave the other side off. If using charcoal, bank the coals slightly to one side.)
Place the squab, skin side down and breast toward the heat, onto the grill in an area that is close to the heat but not directly over it. Cook until the skin in the breast area starts to turn golden brown, 4 to 5 minutes. (If the skin has not begun to brown after 5 minutes, inch it closer to the hot side and keep an eye out for flare-ups while the fat renders. If flare-ups occur, temporarily move the squab to another area of the grill to avoid the flames.) Rotate the bird 180 degrees so that the legs are now facing the heat. Cook until the skin is golden brown and crispy (including the skin under the legs) but the meat is still rare or medium-rare, 5 to 7 minutes. Turn the squab over, skin side up, and place it directly on the hottest part of the grill. Brush more of the chile oil, this time including the sesame seed paste, onto the skin side, and cook about 3 minutes more, until the breast bones are warmed through.
To serve, lay the squab skin-side-down. Cut the bird in half vertically between the two breasts so that there is one breast and one leg per piece. Then separate each half by cutting between the breast and the thigh. Drizzle with some of the sesame-chile oil, making sure to stir well and bring up some of the solids when you do. Serve with extra sesame-chile oil on the side. Encourage your guests to pick up and eat the birds with their hands, and offer wet napkins with lemon wedges for cleaning up afterwards.

with brandied cherries
Much like bacon, duck skin is at its best when deeply browned and as crisp as a cracker. But the meat beneath the skin is at its best when cooked medium-rare and juicy. The secret to achieving both is the same on the grill as it is in a pan: render the fat over low heat. This simple method—and equally simple accompaniments—makes for an elegant and impressive main course.
Fruit is a classic pairing with duck, as its sweet-and-sour qualities help cut the richness of the skin and savoriness of the flesh. Adding rice vinegar, a liquor, and a bit of sugar to the cherries serves to intensify those qualities. The end result is a juicy preserve that beautifully complements not only duck breast but also pork, foie gras, or a bowl of vanilla ice cream.
SERVES 4
1 cup large fresh sweet cherries, stemmed and pitted
¼ cup sugar
3 tablespoons unseasoned rice vinegar
2 tablespoons brandy
1 teaspoon kosher salt
Freshly ground black pepper
Duck
2 large (12- to 16-ounce) duck breasts, preferably Moulard, silver skin carefully trimmed away
Kosher salt and freshly ground black pepper
To make the brandied cherries, in a large nonreactive skillet, combine the cherries, sugar, vinegar, and 1 tablespoon of the brandy; bring to a boil over medium-high heat. Reduce the heat to medium and simmer until the sauce has thickened slightly, about 3 minutes. Add the remaining 1 tablespoon brandy, the salt, and a pinch of pepper. Bring back up to a simmer, then remove from the heat. Serve slightly warm but not hot, or cool and refrigerate for up to 3 weeks. Rewarm before serving.
Prepare a grill to medium-low heat.
Using a small, sharp knife, score the skin of the duck by making ⅛-inch-deep cuts along the skin every ⅛ inch down the length of the breast (do not cut through to the flesh). Season both sides of each breast generously with salt and pepper and place, skin side down, on the grill. Grill until the skin is crispy and a deep, even golden brown, 10 to 12 minutes. If flare-ups occur while the fat renders, temporarily remove the duck breasts and pat the skin sides with a paper towel to absorb any excess fat. Place the breast back on the grill but in another spot that isn’t flaring up. Flip and grill until the outside of the breast is just barely cooked, about 1 minute for medium-rare. Remove and let rest in a warm spot 2 to 3 minutes.
To serve, place the duck breast-skin-side down on a cutting board. Using a sharp knife, slice against the grain into ¼- to ½-inch pieces. Fan out the slices, drizzle the breasts or the plate with the warm cherry sauce, and serve immediately.
