Chapter 10
Colorful & Creative
Recipes
Blueberry Embed Round Bars
Approximately 8 bars
This soap utilizes fresh blueberries and a high percentage of mango butter. Blueberries, a well-known superfood, are brimming with antioxidants that aid in fighting free radicals. Mango butter is rich in unsaponifiables, which means that many parts of this butter remain to moisturize the skin, and the high percentage of oleic acids make it a great humectant. The thin ring of activated charcoal really makes the blueberry embed pop!
Stage 1:
Make the Blueberry Embed
Mold and Special Tools
- Mini round silicone column mold
- Powder duster
Lye-Water Amounts
- 0.7 ounce lye (5% superfat)
- 1.1 ounces distilled water
- 1⁄2 teaspoon sodium lactate (optional)
Oil Amounts
- 1.5 ounces palm oil (30%)
- 1.5 ounces coconut oil (30%)
- 1.5 ounces olive oil pomace (30%)
- 0.5 ounce sweet almond oil (10%)
Essential Oil
- 0.1 ounce juniper berry essential oil
Colorant and Additive Amounts
- 10 whole blueberries*
- 1 teaspoon ultramarine blue dispersed into 1 tablespoon sweet almond oil
- 1 teaspoon titanium dioxide dispersed into 1 tablespoon sweet almond oil
- 1 teaspoon activated charcoal
*Thaw first if using frozen.
Note: This beautiful design requires that the embeds cure for 48 hours before using them in the base soap, so plan ahead.
Safe Soaping!
- Wear proper safety gear the whole time.
- Work in a well-ventilated space.
- No distractions (keep kids and pets away).
Make the Soap Mixture
- 1. Add the lye to the water (never the other way around) and stir gently until all of the lye is dissolved. If using sodium lactate, add it to the lye-water and stir to combine. Set the mixture aside to cool until it becomes clear.
- 2. Melt the palm oil in its original container, mix it thoroughly, and measure into a bowl large enough to hold all of the oils and the lye-water with room for mixing. Melt and measure the coconut oil and add it to the bowl. Add the olive oil pomace and sweet almond oil.
- 3. Add the blueberries to the oils, and stick-blend for 30 seconds on high. Try to get the blueberry skins as pureed as possible, with no chunks left.
- 4. When the oils and the lye-water are between 110° and 120°F (43–49°C), add the lye-water to the oils, pouring it over a spatula or the shaft of the stick blender to minimize air bubbles. Tap the stick blender a couple of times against the bottom of the bowl to release any air that may be trapped in the blades. Do not turn on the stick blender until it is fully immersed. Stick-blend for 10 seconds, or until thin trace is achieved.
Mix and Pour
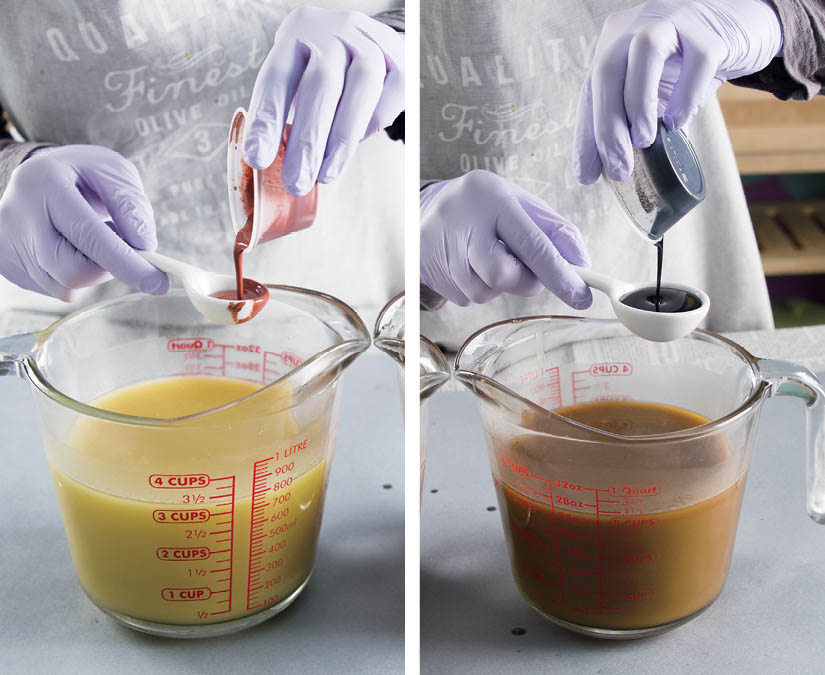
- 5. Add to the batter: 2 teaspoons ultramarine blue dispersion, 1⁄2 teaspoon titanium dioxide dispersion and all of the juniper essential oil.
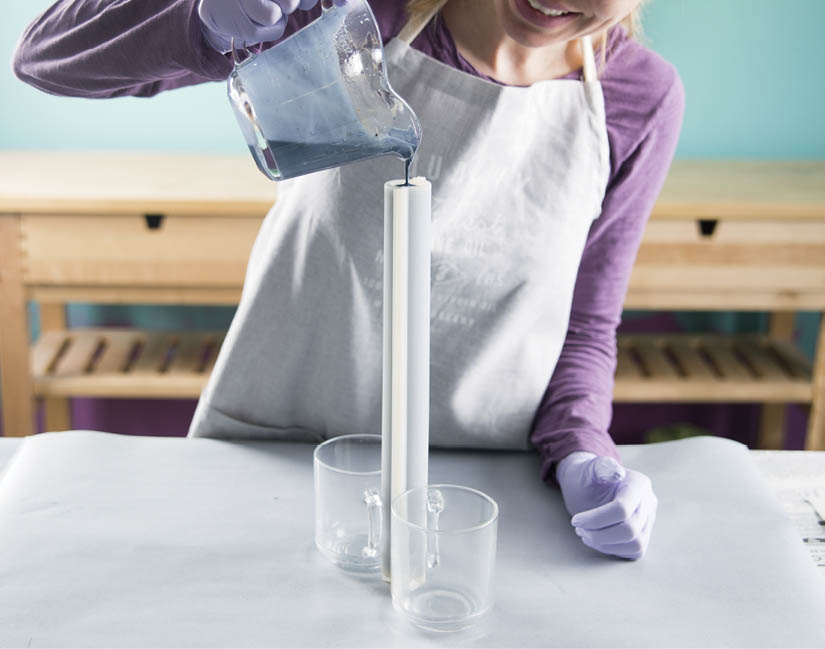
- 6. Use a whisk to combine the colors and essential oil, and pour the batter into the silicone round mold. Prop the mold up with mugs or something similar to keep it stable. Let the soap sit for 24 to 48 hours before attempting to unmold. If sodium lactate was not used, allow the soap to cure for up to a week before unmolding.
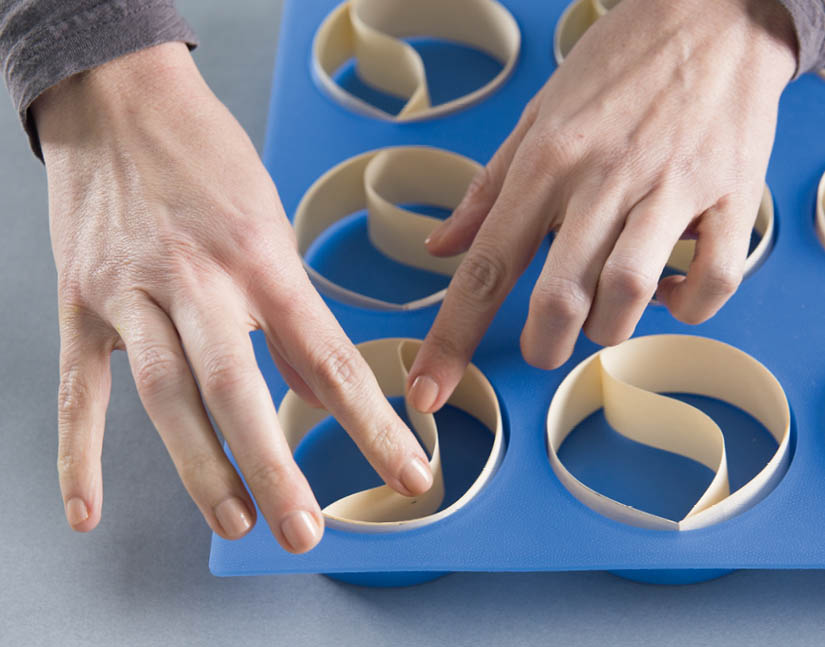
- 7. Place the unmolded soap on a newspaper or paper towel. Use the powder duster to sprinkle activated charcoal over the soap log.
- 8. Rub the powder along the log to spread the color evenly. Cover the entire outside of the embed, and gently tap it on its end to remove any loose powder.
Stage 2:
Make the Background Soap
Mold and Special Tools
- Silicone column mold
- Two easy-pour containers
Lye-Water Amounts
- 2.6 ounces lye (5% superfat)
- 6.2 ounces distilled water
- 2 teaspoons sodium lactate (optional)
Oil Amounts
- 4.8 ounces palm oil (25%)
- 4.8 ounces coconut oil (25%)
- 1.9 ounces mango butter (10%)
- 2.9 ounces olive oil pure (15%)
- 4.8 ounces canola oil (25%)
Essential Oil Blend
- 0.5 ounce anise essential oil
- 0.5 ounce litsea essential oil
Colorant and Additive Amounts
- 1 teaspoon titanium dioxide dispersed into 1 tablespoon olive oil pure
- 1 teaspoon ultramarine blue dispersed into 1 tablespoon olive oil pure
- 1 blueberry embed soap (made 24–48 hours ahead of time)
Make the Soap Mixture
- 1. Add the lye to the water (never the other way around) and stir gently until all of the lye is dissolved. Add the sodium lactate to the lye-water and stir to combine. Set the mixture aside to cool until it becomes clear.
- 2. Melt the palm oil in its original container, mix it thoroughly, and measure into a bowl large enough to hold all of the oils and the lye-water with room for mixing. Melt and measure the coconut oil and add it to the bowl. Add the mango butter to the hot oils and stir until melted. If needed, place the oils and butter in the microwave in 10-second bursts until melted. Add the olive oil pure and canola oil.
- 3. When the oils and the lye-water are between 110° and 120°F (43–49°C), add the lye-water to the oils, pouring it over a spatula or the shaft of the stick blender to minimize air bubbles. Tap the stick blender a couple of times against the bottom of the bowl to release any air that may be trapped in the blades. Do not turn on the stick blender until it is fully immersed. Stick-blend for 20 seconds, or until thin trace is achieved.
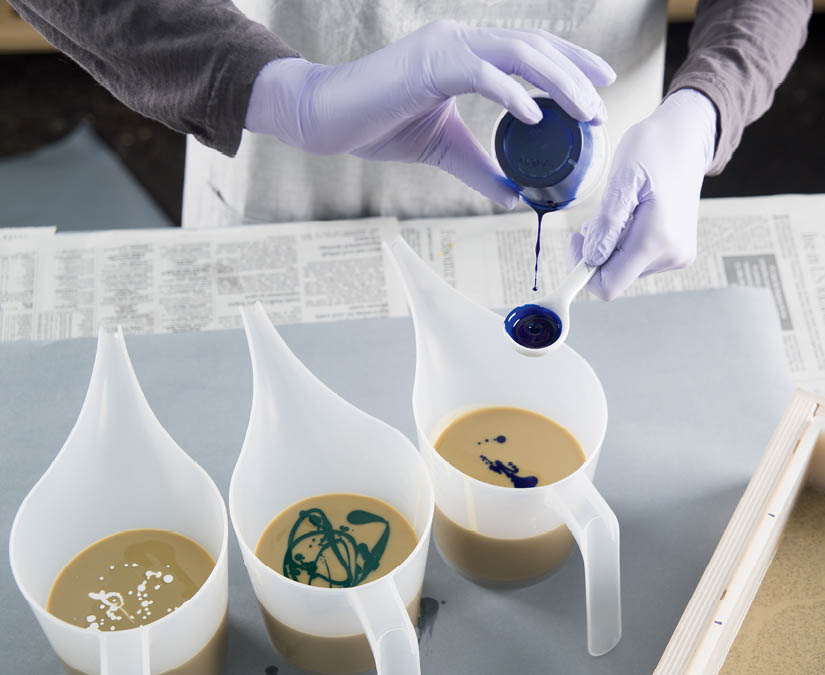
- 4. Split the batter in half. Add the following colorants to each container:
- Container A: 1 teaspoon titanium dioxide dispersion, half of the essential oil blend
- Container B: 1 teaspoon ultramarine blue dispersion, 1⁄2 teaspoon titanium dioxide dispersion, half of the essential oil blend
Pour Soap and Add Embed
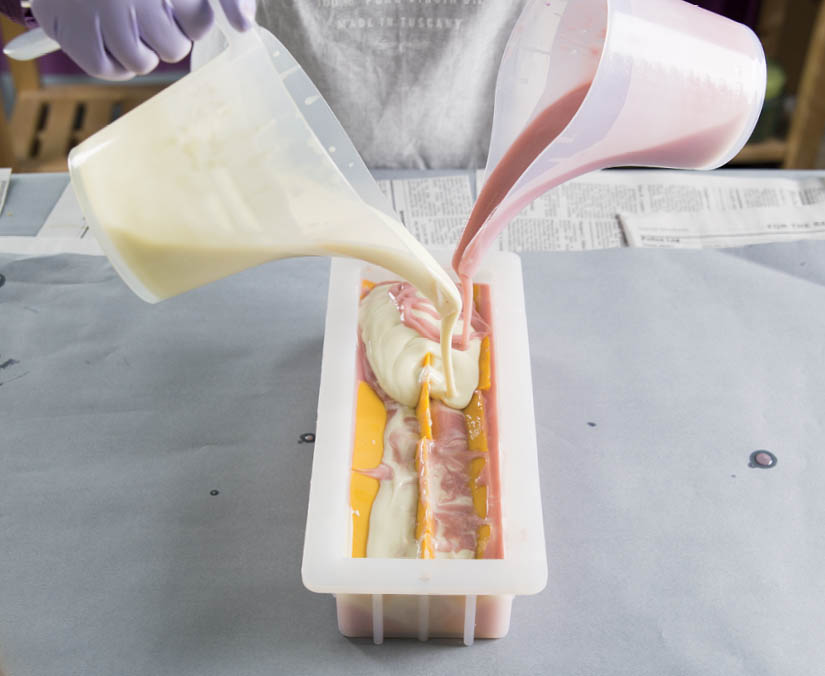
- 5. Simultaneously pour the blue and white batter into the mold until all of the batter is used.
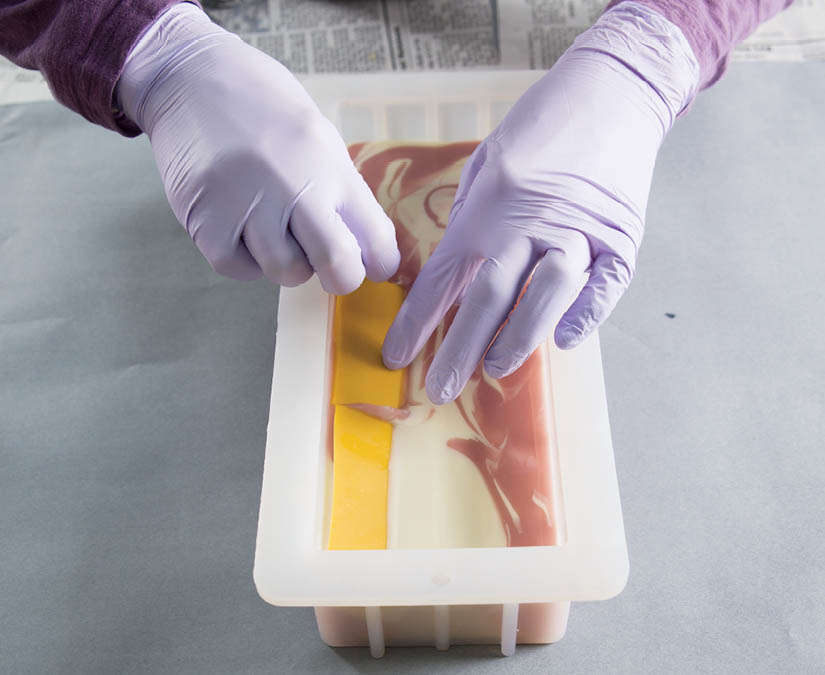
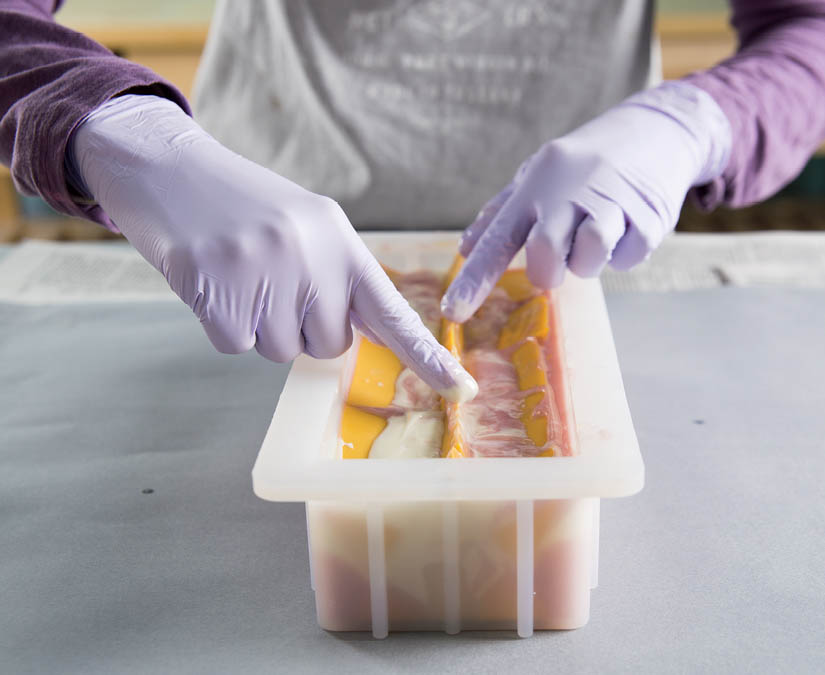
- 6. Insert the blue soap embed straight into the soap batter, off-centered. Make sure it is not touching the sides of the mold.
Finishing Steps
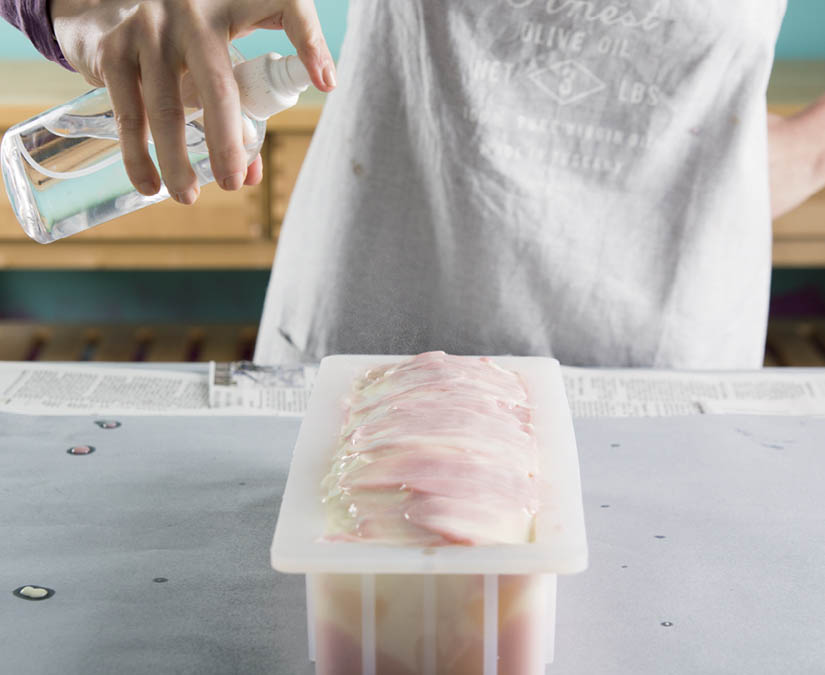
- 7. Spritz the top of the mold with 99% rubbing alcohol to help avoid soda ash. Because this soap doesn’t have very much surface area to “breathe,” it needs to remain in the mold for at least 72 hours before you attempt to unmold it.
- 8. Once the soap is unmolded, cut it into bars. The activated charcoal tends to smear when first cut. To clean the bars up, let them dry out for about 2 days, then use the back of a knife to gently scrape off a very thin layer of soap. This should leave the lines looking clean and crisp.
- Allow the bars to cure in a well-ventilated area for 4 to 6 weeks before using, turning them every few days to ensure that they cure evenly.
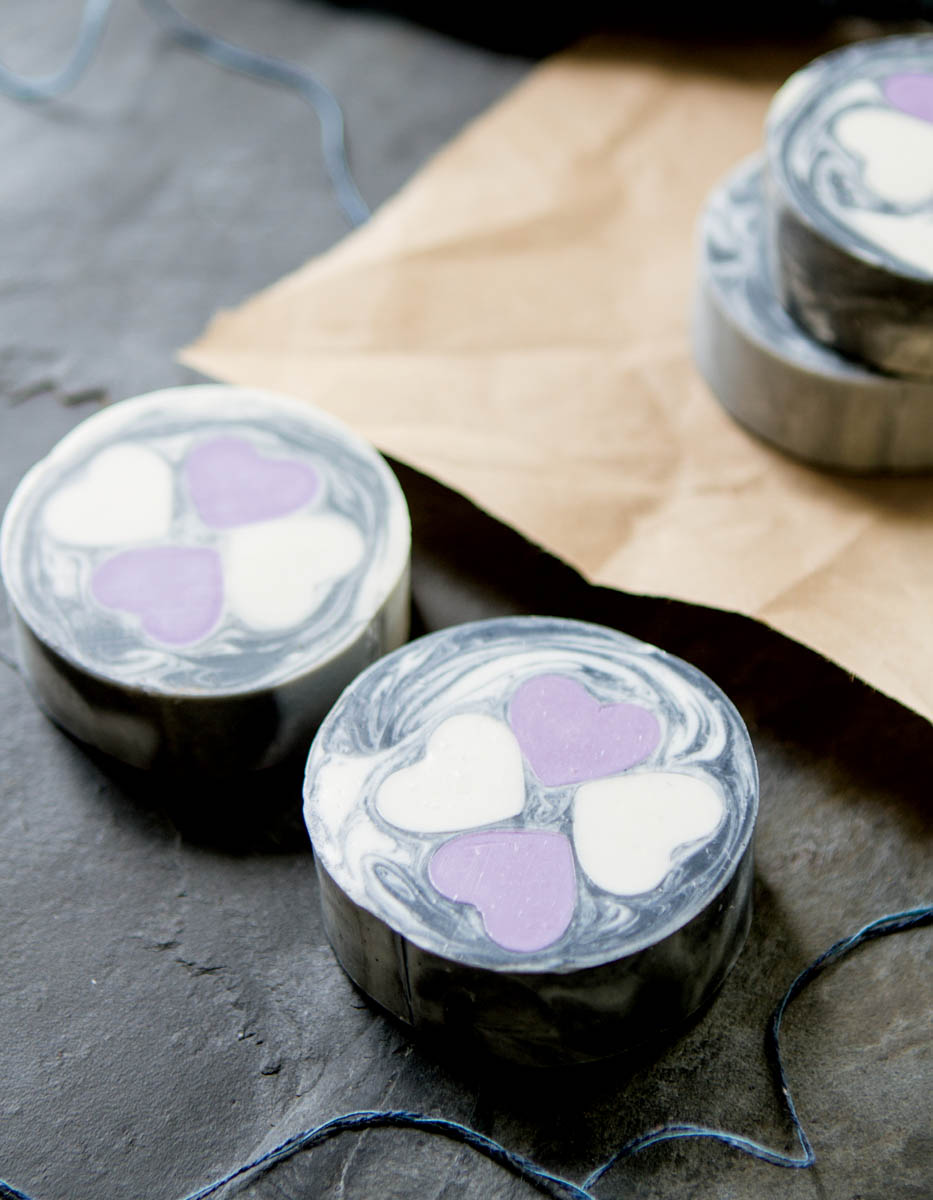
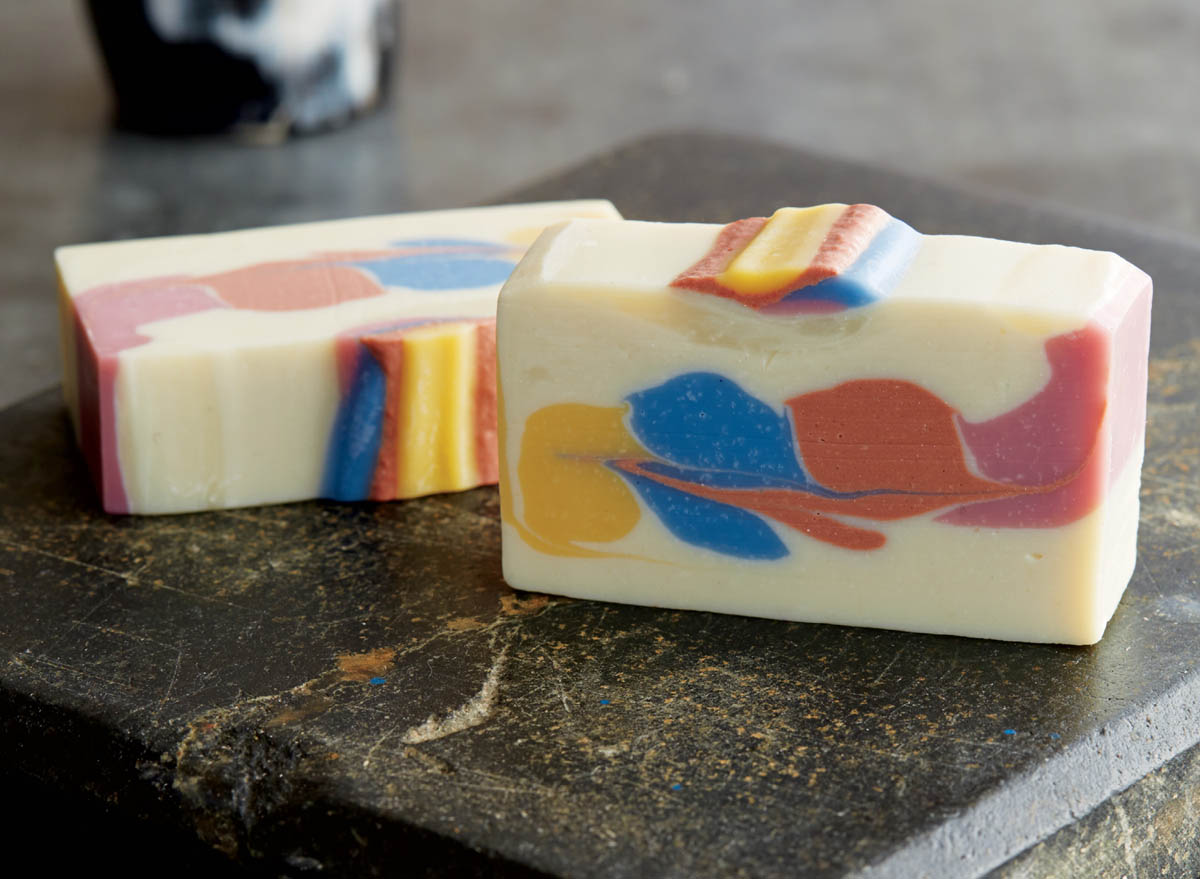
Charcoal Hearts Round Bars
Approximately 8 bars
A ring of activated charcoal and a pattern of fun, colored embeds provide a striking contrast in this soap. The two-step process of creating embeds and a separate base soap is worth it for the stunning effect of the hearts against the swirled background.
Stage 1:
Make Soap Embeds
Mold and Special Tools
- 4 silicone heart embed molds
- Cup or mug large enough to hold 4 molds upright
Lye-Water Amounts
- 2.1 ounces lye (5% superfat)
- 5.3 ounces distilled water
- 2 teaspoons sodium lactate (optional)
Oil Amounts
- 8.8 ounces lard (55%)
- 2.4 ounces coconut oil (15%)
- 4.8 ounces olive oil pomace (30%)
Essential Oil Blend
- 0.8 ounce juniper berry essential oil
- 0.2 ounce clary sage essential oil
Colorants
- 2 teaspoons titanium dioxide dispersed into 2 tablespoons olive oil pomace
- 1 teaspoon ultramarine violet dispersed into 1 tablespoon olive oil pomace
- 1 teaspoon ultramarine pink oxide dispersed into 1 tablespoon olive oil pomace
Note: This beautiful design requires that the embeds cure for 48 hours before using them in the base soap, so plan ahead.
Safe Soaping!
- Wear proper safety gear the whole time.
- Work in a well-ventilated space.
- No distractions (keep kids and pets away).
Make the Soap Mixture
- 1. Add the lye to the water (never the other way around) and stir gently until all of the lye is dissolved. If using sodium lactate, add it to the lye-water and stir to combine. Set the mixture aside to cool until it becomes clear.
- 2. In a bowl large enough to hold all the oils and the lye-water solution with room for mixing, measure out the lard and coconut oil. Microwave until both oils are liquid and clear. Measure out olive oil pomace, and combine with the melted oils.
- 3. When the oils and the lye-water are between 110° and 120°F (43–49°C), add the lye-water to the oils, pouring it over a spatula or the shaft of the stick blender to minimize air bubbles. Tap the stick blender a couple of times against the bottom of the bowl to release any air that may be trapped in the blades. Do not turn on the stick blender until it is fully immersed. Stick-blend for 10 seconds. Add all of the essential oil blend, and whisk to combine.
Color and Pour
- 4. Divide the batter equally between two containers. Add the colorants as follows:
- Container A: 1 tablespoon titanium dioxide dispersion
- Container B: 2 teaspoons titanium dioxide dispersion, 2 teaspoons ultramarine violet dispersion, 2 teaspoons ultramarine pink dispersion
- 5. Balance the embed molds and make sure they are well supported (putting them in a container works well). Carefully pour the white batter into two of the molds (not next to each other) and the purple batter into the remaining ones.
- 6. Allow the soaps to harden for at least 48 hours before attempting to unmold. If needed, you can also put the hardened soaps in the freezer for 30 minutes to help ease the unmolding process.
Stage 2:
Make the Base Soap
Mold
Lye-water Amounts
- 2 ounces lye (5% superfat)
- 4.9 ounces distilled water
- 1 teaspoon sodium lactate (optional)
Oil Amounts
- 3.6 ounces olive oil pomace (24%)
- 3.8 ounces coconut oil (25%)
- 0.9 ounce cocoa butter (6%)
- 6.8 ounces lard (45%)
Essential Oil Blend
- 0.2 ounce clary sage essential oil
- 0.5 ounce juniper berry essential oil
Colorant and Additive Amounts
- 1 teaspoon activated charcoal dispersed into 1 tablespoon olive oil
- 1 teaspoon titanium dioxide dispersed into 1 tablespoon olive oil pure
- 4 heart embeds (made 24–48 hours ahead)
Make the Soap Mixture
- 1. Add the lye to the water (never the other way around) and stir gently until all of the lye is dissolved. Add 1 teaspoon sodium lactate to the lye-water and stir to combine. Set the mixture aside to cool until it becomes clear.
- 2. In a bowl large enough to hold all the oils and the lye-water solution with room for mixing, measure out the olive oil pomace. In a separate container, measure out and melt the coconut oil, cocoa butter, and lard. Once they are completely melted, combine with the olive oil in the large bowl.
- 3. When the oils and the lye-water are between 110° and 120°F (43–49°C), add the lye-water to the oils, pouring it over a spatula or the shaft of the stick blender to minimize air bubbles. Tap the stick blender a couple of times against the bottom of the bowl to release any air that may be trapped in the blades. Do not turn on the stick blender until it is fully immersed. Stick-blend for 15 seconds, or until very thin trace is achieved.
Color and Pour
- 4. Split the batter into two equal portions. Add the following to each container:
- Container A: 1 tablespoon titanium dioxide dispersion, half of the essential oil blend
- Container B: 1 tablespoon activated charcoal dispersion, half of the essential oil blend
- 5. Stick-blend each container for 5 seconds to incorporate the color and essential oils.
- 6. Simultaneously pour both soap batters into the silicone column mold, moving the containers around slightly to mix the colors (a horseshoe pattern works well). Use all of the batter for this step.
- 7. Insert the soap hearts one at a time into the soap batter, with the pointed end of each heart facing the center of the mold and touching to form a clover pattern.
- 8. Spritz the top of the soap with 99% rubbing alcohol to help avoid soda ash. Let the soap set for 48 to 72 hours before attempting to unmold.
- 9. Once unmolded, cut into bars. Allow the bars to cure in a well-ventilated area for 4 to 6 weeks before using, turning them every few days to ensure that they cure evenly.
Almond Milk Confetti Bars
Approximately 20 bars
Almond milk is full of nourishing vitamins E and B, which benefit dry skin. Elemi essential oil has been traditionally used to rejuvenate the skin, while rosemary is said to restore mental alertness. The delicate colors are visually enticing and the creamy lather of this soap in the shower is divine.
This recipe is soaped at cooler temperatures to prevent gel phase and keep the soap beautifully neutral (rather than brown) in color. Embedding soap shreds in this soap ensures that no soap goes to waste! You can use scraps or batches that didn’t turn out how you planned, or create brightly colored soaps just for this recipe.
Materials
Mold and Special Tools
- 5-pound wooden mold with sliding bottom with silicone liner
- Multi-pour sectioning tool
Lye-Water Amounts
- 7.6 ounces lye (5% superfat)
- 18.1 ounces almond milk, frozen into cubes
- 5 teaspoons sodium lactate (optional)
Oil Amounts
- 11.6 ounces palm oil (21%)
- 13.8 ounces coconut oil (25%)
- 14.9 ounces olive oil pure (27%)
- 13.8 ounces rice bran oil (25%)
- 1.1 ounces castor oil (2%)
Essential Oil Blend
- 1.9 ounces elemi essential oil
- 0.6 ounce rosemary essential oil
Colorant and Additive Amounts
- 2 teaspoons ultramarine violet dispersed into 2 tablespoons rice bran oil
- 1 teaspoon titanium dioxide dispersed into 1 tablespoon rice bran oil
- 5 cups finely shredded leftover soaps in various colors
Safe Soaping!
- Wear proper safety gear the whole time.
- Work in a well-ventilated space.
- No distractions (keep kids and pets away).
Make the Soap Mixture
- 1. Measure the frozen almond milk into a heat-safe container. Place the container in a cold-water bath. Slowly and carefully pour about 1 tablespoon of the lye flakes over the almond milk. Stir for 2 minutes, then add another tablespoon. The more slowly the lye is added, the less the milk will discolor. Add 1 tablespoon at a time until all of the lye is dissolved and the cubes are melted. If using sodium lactate, add it to the lye-water and stir to combine. Set aside and allow the mixture to come to room temperature.
- 2. Melt the palm oil in its original container, mix thoroughly, and measure into a bowl large enough to hold all of the oils and the lye-water with room for mixing. Melt and measure the coconut oil and add it to the bowl. Add the olive oil pure, rice bran oil, and castor oil.
- 3. Once the oils are under 90°F (32°C), and the lye-milk mixture is between 60° and 70°F (15.5–21°C), slowly and carefully pour the lye into the oils. The natural fats in the almond milk may cause a few “floaties” in the lye-water. That is normal, and the chunks will be incorporated with the stick blender.
Mix and Pour
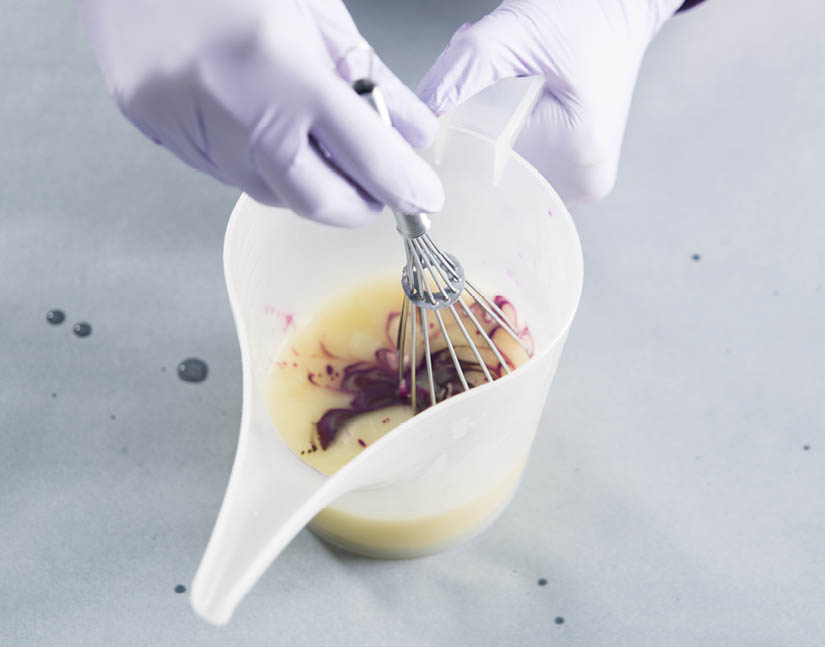
- 4. Stick-blend the mixture for about 50 seconds, or until very thin trace is achieved. Portion out about 20 ounces of soap batter into a long-spouted, easy-pour container. Add all of the dispersed ultramarine violet to this container and stir with a whisk. To the large container of soap, add all of the dispersed titanium dioxide and stir it in with a whisk.
- 5. Stick-blend each container for 5 seconds to completely incorporate the colorants. Add two-thirds of the essential oil to the white batch of soap and the remaining one-third to the purple batch of soap and whisk to combine.
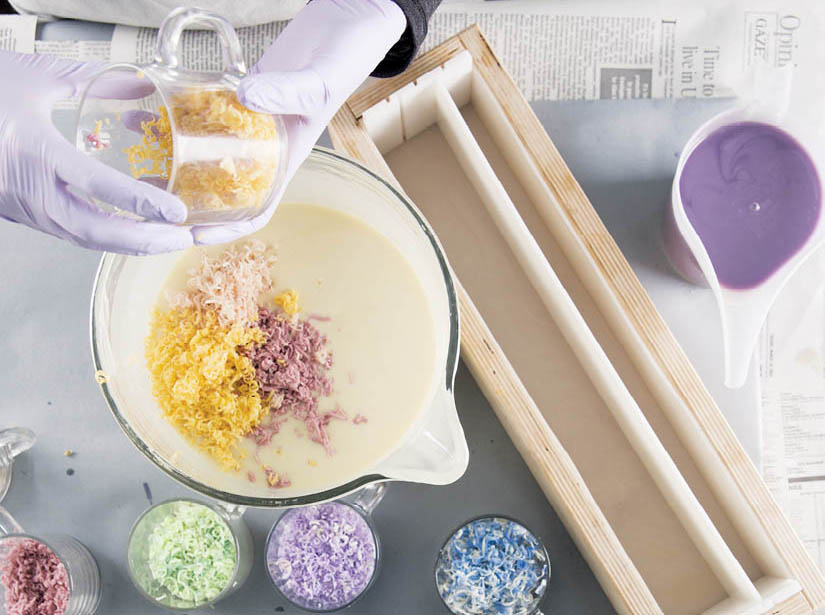
- 6. Using a single long divider, section the mold into two parts, about one third and two thirds of the total space. Add the shredded soap “confetti” to the white batch and stir it in with a spatula.
- 7. Simultaneously pour the purple soap into the small side of the mold and the white confetti soap into the larger side. Tap the mold firmly on the table to release any bubbles. Pull the center divider straight up and out of the soap.
Final Steps
- 8. Spritz the soap with 99% rubbing alcohol, and place the entire mold in the freezer. Leave the soap in the freezer for about 8 to 12 hours, then allow it to thaw for another 24 hours before attempting to unmold.
- 9. Once unmolded, cut the soap into bars and allow them to cure in a well-ventilated area for 4 to 6 weeks before using, turning them every few days to ensure that they cure evenly.
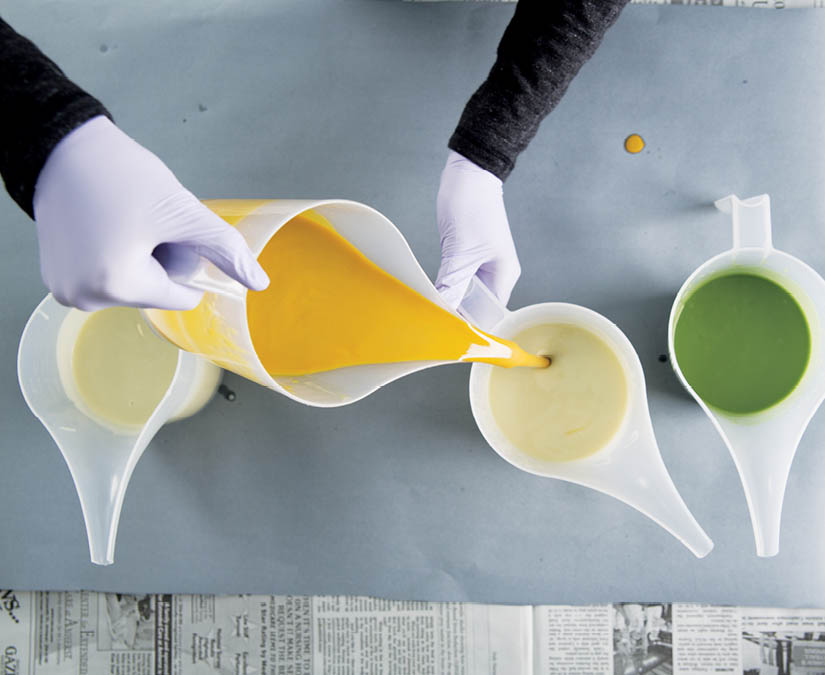
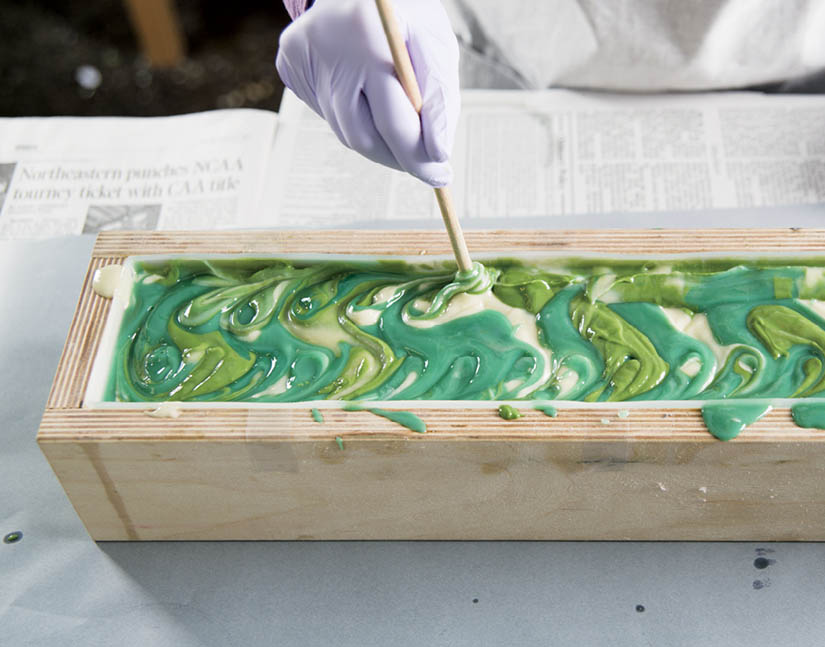
Tussah Silk Double Pour
Approximately 16 bars
This luxurious bar incorporates real silk fibers, which create a rich lather and leave skin feeling smooth and soft. You may not want to make another batch of soap without silk after trying this one. The recipe also features green tea seed oil, a nourishing and exotic oil. A 20 percent water discount makes unmolding this soap from the dividers easier.
Materials
Mold
- Vertical wood mold with dividers
Lye-Water Amounts
- 6.1 ounces lye (5% superfat)
- 11.6 ounces distilled water (20% water discount)
- 4 teaspoons sodium lactate (optional)
Oil Amounts
- 11 ounces palm oil (25%)
- 11 ounces coconut oil (25%)
- 2.2 ounces avocado oil (5%)
- 8.8 ounces canola oil (20%)
- 2.2 ounces green tea seed oil (5%)
- 8.8 ounces olive oil pure (20%)
Essential Oil Blend
- 1.2 ounces lavender 40/42 essential oil*
- 0.8 ounce palmarosa essential oil
Additive Amounts
- 1 pinch tussah silk fibers
- 2 teaspoons titanium dioxide dispersed into 2 tablespoons avocado oil
- 1 teaspoon green chrome oxide dispersed into 1 tablespoon avocado oil
- 1 teaspoon ultramarine blue dispersed into 1 tablespoon avocado oil
*Regular lavender essential oil will work, but this variety has been specifically blended to last in cold-process soap.
Note: You may want a pouring buddy for this. If you do ask someone to pour one side of the soap while you pour the other side, make sure they fully suit up for safety, including gloves and goggles.
Safe Soaping!
- Wear proper safety gear the whole time.
- Work in a well-ventilated space.
- No distractions (keep kids and pets away).
Make the Soap Mixture
- 1. Measure out the water. Take a small pinch of tussah silk and pull it into individual strands. Spread the silk over the surface of the water (it will float). Add the lye to the water (never the other way around), directly over the silk fibers. Heat is essential to help the silk fibers dissolve. Stir gently until all of the lye and most of the fibers dissolve.
- If using sodium lactate, add it to the lye-water and stir to combine. Set the mixture aside to cool until it becomes clear. It is normal to have very small strands of silk floating in the lye-water.
- 2. Melt the palm oil in its original container, mix thoroughly, and measure into a bowl large enough to hold all of the oils and the lye-water with room for mixing. Melt and measure the coconut oil and add it to the bowl. Add the avocado oil, canola oil, green tea seed oil, and olive oil pure.
- 3. When the oils are between 90° and 100°F (32–38°C) and the lye-water is between 130° and 135°F (54–57°C), add the lye-water to the oils, pouring it over a spatula or the shaft of the stick blender to minimize air bubbles. Tap the stick blender a couple of times against the bottom of the bowl to release any air that may be trapped in the blades. Do not turn on the stick blender until it is fully immersed. Stick-blend for 30 seconds, or until very light trace is achieved.
Mix and Pour
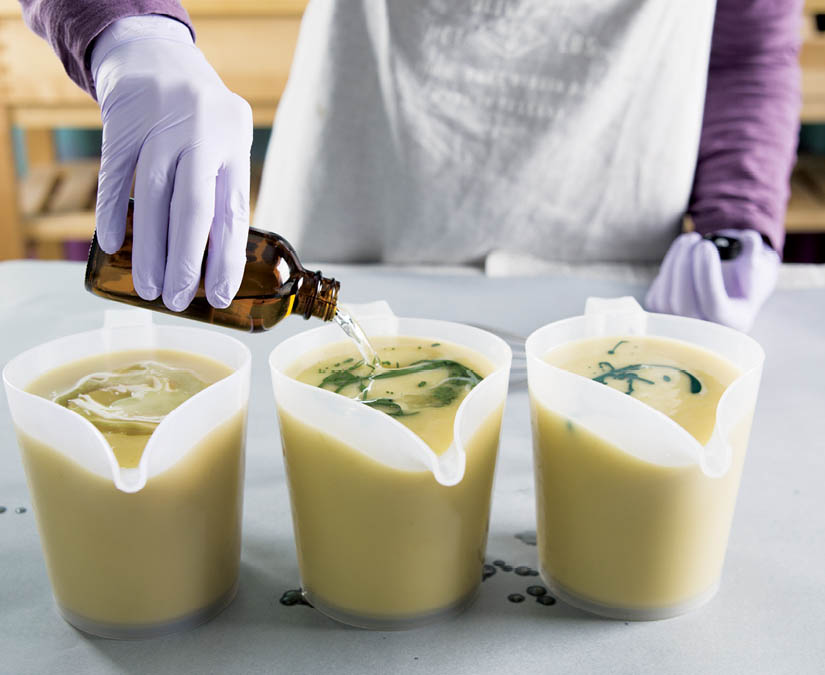
- 4. Add the essential oil blend, and whisk to combine. Split the batter into four equal containers.
- 5. Add the following colors to the containers, and stick-blend each for 5 seconds, moving from lightest to darkest to keep from mixing colors.
- A: 2 teaspoons titanium dioxide dispersion
- B: 2 teaspoons titanium dioxide dispersion
- C: 1 teaspoon green chrome oxide dispersion
- D: 1 teaspoon ultramarine blue dispersion
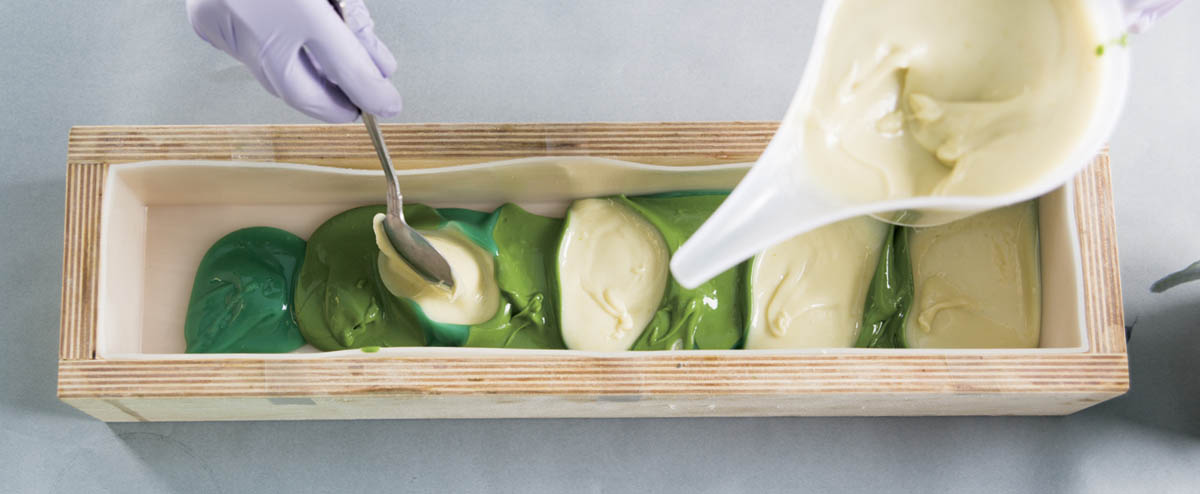
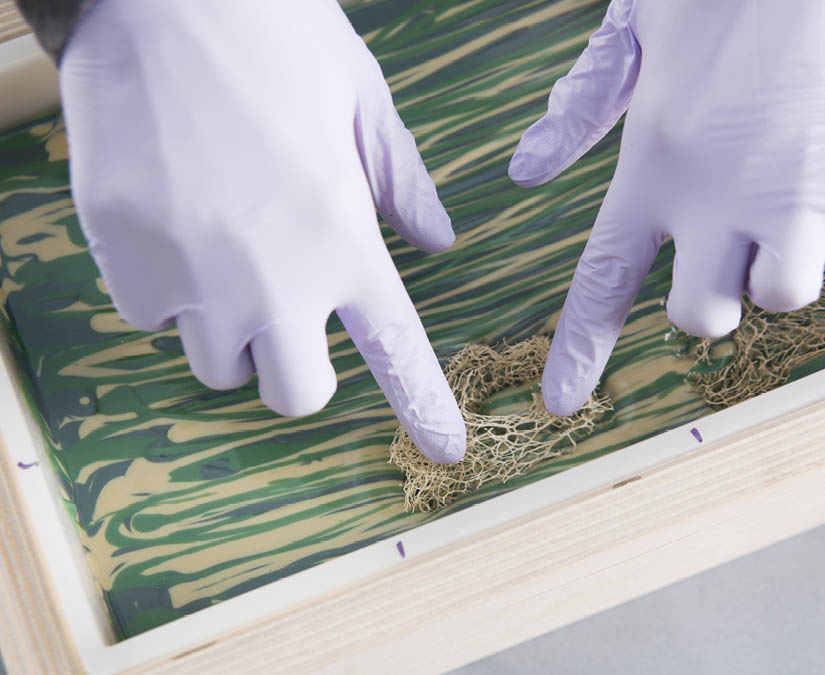
- 6. Simultaneously pour all of the green soap and one of the white soaps into a larger pouring container, allowing the colors to mix.
- 7. Simultaneously pour all of the blue soap and the remaining white soap into a larger pouring container, allowing the colors to mix.
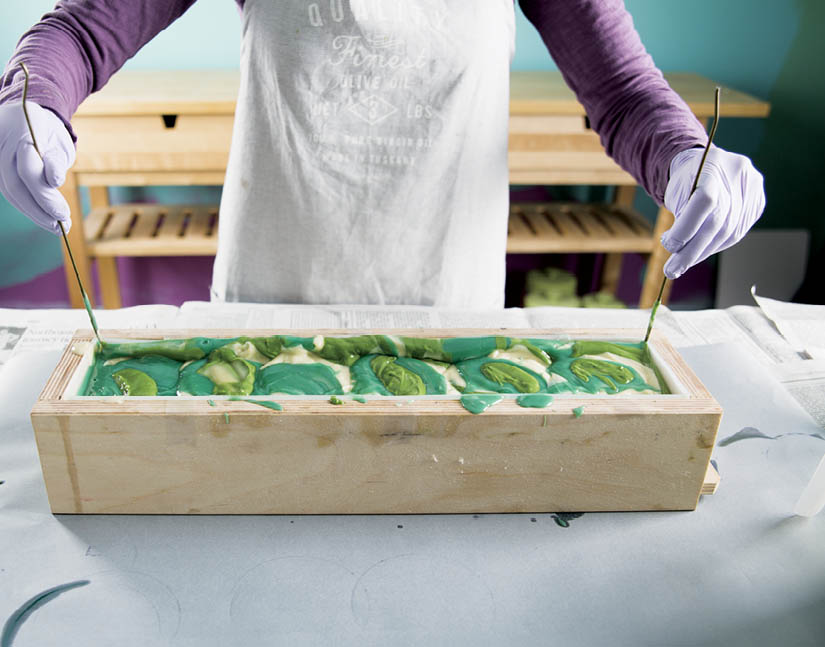
- 8. Simultaneously pour both batches of soap into the mold, with the green mix on one side of the divider, and the blue mix on the other.
- 9. Pull the center divider straight up and out of the mold.
Final Steps
- 10. Lightly spritz the top of the soap with 99% rubbing alcohol to help avoid soda ash.
- 11. Allow the soap to set for at least 48 hours before attempting to unmold. To unmold, first remove the four wing nuts from the front of the mold. Slide off the wooden front, and pull out the entire soap log with the plastic side panels attached. Carefully slide the side panels off the soap; never pull it back and away from the soap, or it will tear.
- 12. Because the soap wasn’t able to breathe inside the mold, allow it to sit in the open for at least 24 hours before attempting to cut it into bars. Once the soap is dry enough, cut into 1-inch bars. Allow the bars to cure in a well-ventilated area for 4 to 6 weeks before using, turning them every few days to ensure that they cure evenly.
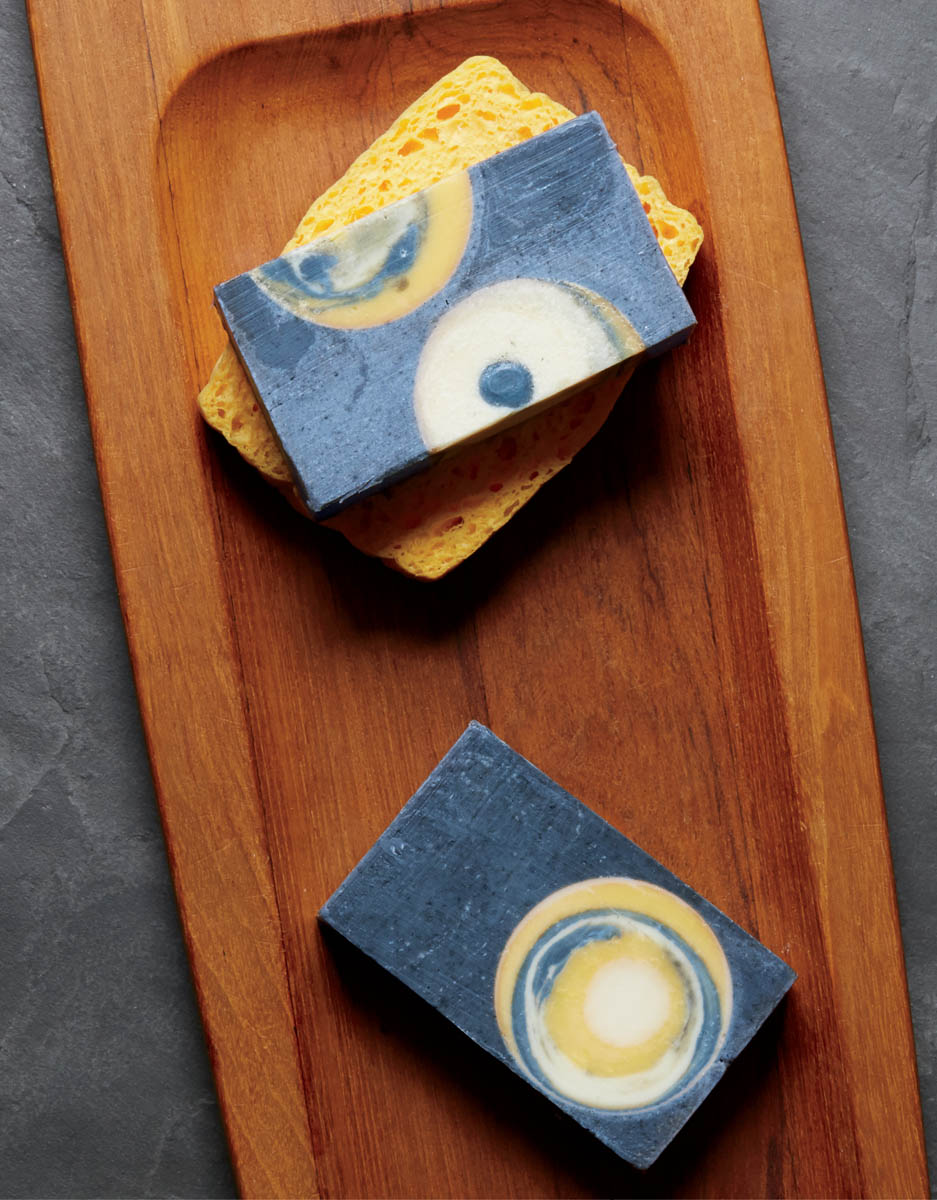
Indigo-Annatto Negative-Space Funnel Pour
Approximately 20 bars
This negative embed technique provides plenty of options for shapes and sizes of embeds, so you are not limited by the type of mold. For this particular soap, a length of simple PVC plumbing pipe was cut into small pieces to create the negative space. The funnel-pour inside the negative space features bright yellow from the annatto infusion, creating a dramatic contrast with the dark blue-gray of the indigo. Indigo shows a much more beautiful blue color when a hot gel phase is achieved (see What Is Gel Phase?).
Stage 1:
Make the Base Soap
Mold and Special Tools
- 5-pound wooden mold with sliding bottom with silicone liner
- 7 pieces 1-inch-diameter PVC pipe, each piece 5 inches long, rubbed inside and out with mineral oil or cyclomethicone
- 7 rubber bands (8” circumference, 1⁄4” width)
- Heating pad
Lye-Water Amounts
- 4.7 ounces lye (5% superfat)
- 11.5 ounces distilled water
- 1.5 tablespoons indigo powder
- 1 tablespoon sodium lactate (highly recommended)
Essential Oil Blend
- 1 ounce lemongrass essential oil
- 0.5 ounce rosemary essential oil
Oil Amounts
- 3.5 ounces avocado oil (10%)
- 8.8 ounces canola oil (25%)
- 8.8 ounces rice bran oil (25%)
- 8.8 ounces coconut oil (25%)
- 5.3 ounces shea butter (15%)
Colorant
- 1 tablespoon alkanet root powder dispersed into 1 ounce sunflower oil
- 1 teaspoon titanium dioxide dispersed into 1 tablespoon sunflower oil
Note: Allow yourself two separate days in addition to curing time to create this unique pattern.
Safe Soaping!
- Wear proper safety gear the whole time.
- Work in a well-ventilated space.
- No distractions (keep kids and pets away).
Prepare the Mold
- It’s important to lubricate the molds with a substance that will not saponify when the raw soap touches it; mineral oil is fine or use cyclomethicone (liquid silicone).
- Place the seven lubricated PVC tubes in the silicone-lined mold, spacing them evenly so they are not touching the sides of the mold or each other.
- Next, stretch rubber bands around the mold and the PVC tubes. The bands must be tight enough to secure the tubes to the floor of the mold so no soap can seep in.
Make the Soap Mixture
- 1. Add the lye to the water (never the other way around) and stir gently until all of the lye is dissolved.
- 2. Add the indigo powder, and whisk in. The powder can sometimes be difficult to combine, but keep stirring until it is all incorporated. If using sodium lactate, add it to the lye-water and stir to combine. Set the mixture aside to cool.
- 3. In a bowl large enough to hold all the oils and the lye-water solution with room for mixing, measure out the avocado oil, canola oil, and rice bran oil. In a separate container, measure out and melt the coconut oil and shea butter. Once they are completely melted, combine with the other oils.
- 4. In order to bring out the best color for the indigo powder, the soap must go through a hot gel phase, meaning that the oil temperature needs to be at least 120° to 130°F (49–54°C), and the lye-water around the same. If needed, microwave the entire oil mixture in 15-second bursts to achieve this temperature. Stir the lye-water to incorporate any indigo that may have settled.
- Gently pour the lye-water into the oils over a spatula or the shaft of the stick blender to minimize air bubbles. Tap the stick blender a couple of times against the bottom of the bowl to release any air that may be trapped in the blades. Do not turn on the stick blender until it is fully immersed. Stick-blend for 20 seconds, or until very thin trace is achieved.
Color and Pour
- 5. Add all of the dispersed alkanet root powder, and the essential oil blend. Stick-blend for about 1 minute.
- Split off approximately 12 ounces of batter into an easy-pour container. Add all of the titanium dioxide, and stick-blend for 5 seconds.
- 6. Pouring from at least 6 inches above the bowl, pour the whitened soap batter into the dark batter in a spiral pattern, using it all.
- 7. Pour the soap batter into one corner of the mold, allowing the batter to fill the mold on its own. If the batter builds up around the tubes instead of flowing, tap the mold gently on the table to settle the soap.
- 8. Place the mold on a heating pad, and insulate and cover. Leave the heating pad on medium heat for approximately 30 minutes, checking on it often for overheating (signs of this will include cracking, bubbling, or the soap rising). Turn off the heating pad, and leave covered for 24 hours. Do not unmold the soap.
Pull the Tubes
- 9. Slowly and gently pull out each PVC tube from the base soap. Do not twist the tube, or you can tear the soap. Use one hand to grasp the tube and pull straight up, while the other hand pushes against the soap to avoid it lifting up. If the columns do not release, allow the soap to set another 24 hours and try again.
Stage 2:
Do the Funnel Pour
Mold
- 5-pound wooden mold with sliding bottom with silicone liner
Lye-Water Amounts
- 2.9 ounces lye (5% superfat)
- 7.3 ounces distilled water
- 2 teaspoons sodium lactate (optional)
Oil Amounts
- 5.5 ounces canola oil (25%)
- 2.2 ounces avocado oil (10%)
- 5.5 ounces rice bran oil (25%)
- 5.5 ounces coconut oil (25%)
- 3.3 ounces shea butter (15%)
Essential Oil Blend
- 0.7 ounce lemongrass essential oil
- 0.3 ounce rosemary essential oil
Colorant and Additive Amounts
- 1 teaspoon titanium dioxide dispersed into 1 tablespoon avocado oil
- 2 tablespoons annatto infusion*
- 1 teaspoon black oxide dispersed into 1 tablespoon avocado oil
*See instructions on infusing herbs.
Make the Soap Mixture
- 1. Add the lye to the water (never the other way around) and stir gently until all of the lye is dissolved. If using sodium lactate, add it to the lye-water and stir to combine. Set the mixture aside to cool until it becomes clear.
- 2. In a container large enough to hold all of the oils and lye-water with room for mixing, measure out the canola oil, avocado oil and rice bran oil. In a separate container, measure out and heat the coconut oil and shea butter in 20-second bursts until clear and melted. Add these to the other oils.
- 3. When the oils and lye-water are between 110° and 120°F (43–49°C), add the lye-water to the oils, pouring it over a spatula or the shaft of the stick blender to minimize air bubbles. Tap the stick blender a couple of times against the bottom of the bowl to release any air that may be trapped in the blades. Do not turn on the stick blender until it is fully immersed. Stick-blend for 25 seconds, or until light trace is achieved.
- 4. Split the soap batter into three equal batches. Add the colorants as follows.
- Container A: 1 tablespoon titanium dioxide dispersion and one-third of the essential oil blend
- Container B: All of the annatto infusion and one-third of the essential oil blend
- Container C: 3⁄4 teaspoon black oxide dispersion and one-third of the essential oil blend
- 5. Whisk all of the containers to incorporate the essential oil and colors.
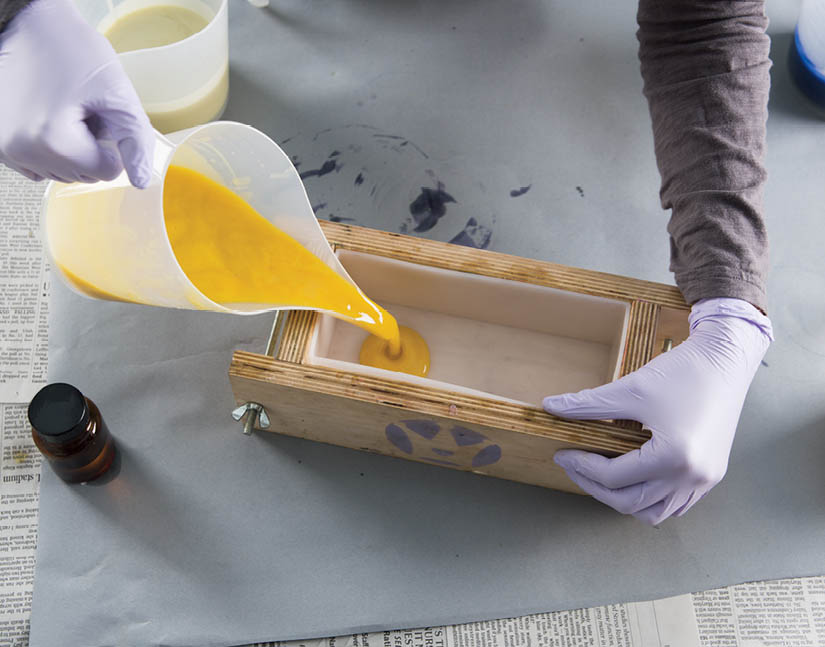
Pour the Soap
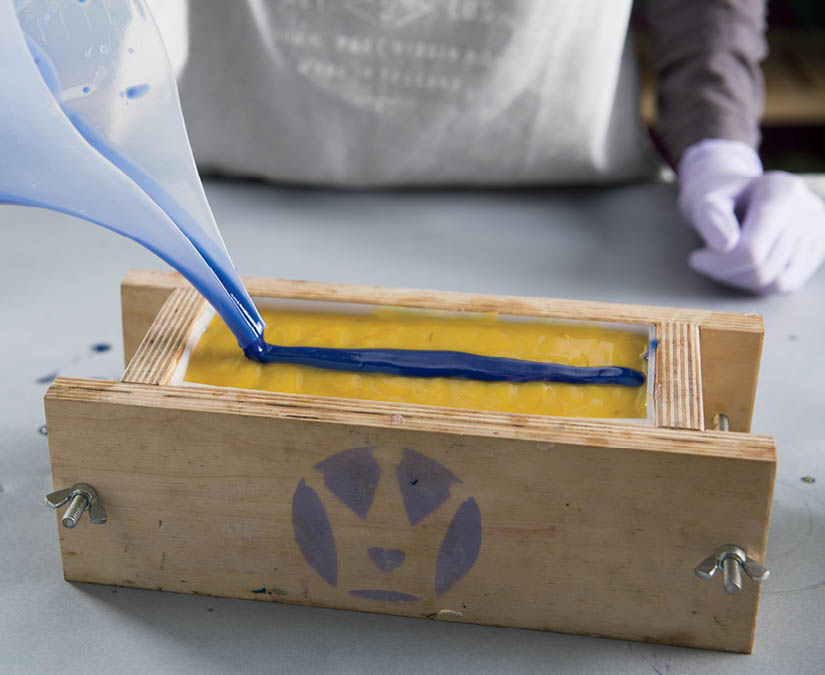
- 6. Starting with the white soap (Container A), pour the batter into the holes left by the cylinders. From at least 6 inches above the mold, pour a thin, steady stream for a count of 3 into each hole.
- 7. Repeat step 6 with the orange soap (Container B), pouring directly into the center of the white batter. Pour from high up so that the orange soap breaks through the white soap.
- 8. Repeat step 6 with the black soap (Container C). Continue the pattern in that order — white, orange, black — until all of the soap is used or the holes are filled.
Final Steps
- 9. Allow the soap to set for at least 48 hours before attempting to unmold. To remove the sliding bottom, turn the entire mold on its side and pull the bottom out.
- 10. This recipe uses a different cutting technique to best highlight the design. Cut the log into 3-inch-wide slices. Cut each slice in half horizontally, to expose a cross section of the multicolored circles.
- 11. Allow the bars to cure in a well-ventilated area for 4 to 6 weeks before using, turning them every few days to ensure that they cure evenly.
Cow Milk In-the-Pot Swirl
Makes 12 bars
Cow milk contains large quantities of vitamin B12 and vitamin D, both of which promote healthy skin. The circular bars from this mold fit perfectly in the hand, and the beautiful spiral-poured swirl adds interest to the bars. The cow milk is added at thin trace to help keep a beautifully neutral color. Burned milk equals brown soap. However, if you neglect to lightly warm the milk, it will cool down the solid oils and result in an accelerated trace.
Materials
Mold and Special Tools
- 12-bar round silicone mold placed on a cutting board for easy transportation
- Chopstick or similarly sized swirling tool
Lye-Water Amounts
- 4.3 ounces lye (5% superfat)
- 6.9 ounces distilled water
- 1 tablespoon sodium lactate (optional)
Oil Amounts
- 5 ounces palm oil (15%)
- 5 ounces coconut oil (15%)
- 1.3 ounces avocado oil (4%)
- 2.6 ounces meadowfoam oil (8%)
- 2.6 ounces sweet almond oil (8%)
- 16.5 ounces olive oil pure (50%)
Essential Oil Blend
- 1 ounce lime essential oil
- 0.2 ounce basil essential oil
- 0.5 ounce lavender 40/42 essential oil*
Colorant and Additive Amounts
- 4 ounces cow milk, lightly warmed to around 90°F (32°C)
- 1 teaspoon titanium dioxide dispersed into 1 tablespoon avocado oil
- 1 teaspoon yellow oxide dispersed into 1 tablespoon avocado oil
- 0.2 ounce orange 10x essential oil
- 1 teaspoon green chrome oxide dispersed into 1 tablespoon avocado oil
*Regular lavender essential oil will work, but this variety has been specifically blended to last in cold-process soap.
Safe Soaping!
- Wear proper safety gear the whole time.
- Work in a well-ventilated space.
- No distractions (keep kids and pets away).
Make the Soap Mixture
- 1. Add the lye to the water (never the other way around) and stir gently until all of the lye is dissolved. If using sodium lactate, add it to the lye-water and stir to combine. Set the mixture aside to cool until it becomes clear.
- 2. Melt the palm oil in its original container, mix it thoroughly, and measure into a bowl large enough to hold all of the oils and the lye-water with room for mixing. Melt and measure the coconut oil and add it to the bowl. Add the avocado oil, meadowfoam oil, sweet almond oil, and olive oil pure.
- 3. When both the oils and the lye-water are between 110° and 120°F (43–49°C), add the lye-water to the oils, pouring it over a spatula or the shaft of the stick blender to minimize air bubbles. Tap the stick blender a couple of times against the bottom of the bowl to release any air that may be trapped in the blades. Do not turn on the stick blender until it is fully immersed. Stick-blend for 30 seconds, or until very light trace is achieved.
- 4. Slowly add the warmed milk to the batter, and stick-blend again for 5 seconds. The soap will be very thin still, but should be uniform in appearance.
Color and Swirl
- 5. Divide the batter equally into four easy-pour containers and add the colorants as follows:
- Container A: half of the titanium dioxide dispersion
- Container B: half of the titanium dioxide dispersion
- Container C: 1 teaspoon yellow oxide dispersion and 0.2 ounce orange 10x essential oil
- Container D: 1⁄2 teaspoon green chrome oxide dispersion
Divide the essential oil blend evenly among the containers, and whisk to combine. Stick-blend each container for only about 2 seconds to blend in the color.
Note: This soap most likely will not gel, but if you are soaping in a hot room, be sure to run a fan over the soap. Gelling the soap will scorch the milk, producing an unpleasant odor and turning the sugars in the milk brown.
- 6. Pour half of the yellow batter (Container C) into Container A, pouring from at least 6 inches above the container to allow the yellow to penetrate deep into the white. Pour the other half into Container B.
- 7. Pour half of the green batter (Container D) into Container A, again pouring from up high so the colors mix. Pour the other half into Container B.
- 8. When you are finished, you should have two containers holding all the soap batter, with the green and yellow batter equally divided between the two white batches.
- 9. Using a chopstick, swirl the batter in both containers in a figure eight pattern, just once. Don’t over stir! Place the mold on a cutting board so it can easily be moved when full.
- 10. Using a spiral motion, pour the batter into each cavity of the mold.
Final Steps
- 11. Spritz the soaps with 99% rubbing alcohol to help avoid soda ash. Allow the soap to set for 48 to 72 hours before attempting to unmold. A trick for unmolding this type of mold is to place the entire tray in the freezer for 4 to 24 hours, and unmolding the bars while they are frozen to avoid tearing.
- 12. Once unmolded, allow the soaps to cure in a well-ventilated area for 4 to 6 weeks before using, turning them every few days to ensure that they cure evenly.
Aloe Vera Hanger Swirl
Approximately 20 bars
This recipe contains leaves from the aloe vera plant, which the ancient Egyptians called the “Plant of Immortality.” Aloe vera has many skin benefits and is used in numerous ways for its soothing and moisturizing properties. Aloe contains choline, which is added to skincare products to help with skin elasticity. This design technique uses a wire hanger to create a fun pattern. Every bar will be unique due to the random spoon-plop technique. Whether you swirl a lot or swirl a little is up to you!
Materials
Mold and Special Tools
- 5-pound wooden mold with sliding bottom with silicone liner
- Hanger swirling tool
- 3 large spoons
- Chopstick or similarly sized swirling tool
Lye-Water Amounts
- 7.5 ounces lye (5% superfat)
- 13.1 ounces distilled water
- 11⁄2 tablespoons sodium lactate (optional)
Oil Amounts
- 13.7 ounces coconut oil (25%)
- 5.5 ounces deodorized cocoa butter (10%)
- 22 ounces olive oil pure (40%)
- 11 ounces rice bran oil (20%)
- 2.7 ounces castor oil (5%)
Essential Oil Blend
- 0.7 ounce cedarwood essential oil
- 1.8 ounces lavender 40/42 essential oil*
Colorant and Additive Amounts
- 3 ounces aloe vera leaf, puréed until smooth
- 2 ounces commercial aloe vera liquid
- 1 teaspoon titanium dioxide dispersed into 1 tablespoon rice bran oil
- 1 teaspoon green chrome oxide dispersed into 1 tablespoon rice bran oil
- 1 teaspoon hydrated chrome green oxide dispersed into 1 tablespoon rice bran oil
*Regular lavender essential oil will work, but this variety has been specifically blended to last in cold-process soap.
Safe Soaping!
- Wear proper safety gear the whole time.
- Work in a well-ventilated space.
- No distractions (keep kids and pets away).
Make the Soap Mixture
- 1. Add the lye to the water (never the other way around) and stir gently until all of the lye is dissolved. If using sodium lactate, add it to the lye-water and stir to combine. Set the mixture aside to cool until it becomes clear.
- 2. Melt the coconut oil in its original container, and measure into a bowl large enough to hold all of the oils and the lye-water with room for mixing. Add the cocoa butter to the hot oil. Stir until melted. Measure out olive oil pure, rice bran oil, and castor oil, and add to the hot oil in the large bowl. If the oils become cloudy when the cold oils are added, heat the entire mixture in the microwave until they become clear again. Usually this is around 100°F (38°C).
- 3. When both the oils and lye-water are between 110° and 120°F (43–49°C), add the lye-water to the oils, pouring it over a spatula or the shaft of the stick blender to minimize air bubbles. Tap the stick blender a couple of times against the bottom of the bowl to release any air that may be trapped in the blades. Do not turn on the stick blender until it is fully immersed. Stick-blend for about 15 seconds, or until thin trace is achieved.
- 4. Add the aloe puree and liquid, and pulse for 5 seconds.
- 5. Divide the batter equally into three containers. Color the containers as follows:
- Container A: 1 tablespoon dispersed titanium dioxide
- Container B: 2 teaspoons dispersed green chrome oxide
- Container C: 1 tablespoon dispersed hydrated chrome green oxide
- 6. Divide the essential oil blend evenly among the three containers. Stir the essential oils in well with a whisk, moving from the lightest container to the darkest.
Pour and Swirl
- 7. Using a large spoon or spatula, plop scoops of soap into the mold one color at a time in a random pattern until all of the batter is used up. Tap the mold on the table after every few passes to release any air bubbles.
- 8. Insert the wire swirling tool against one long side of the mold. Slide it across the bottom of the mold approximately 3⁄8 inch (1 cm), then lift straight up to just below the surface of the soap. Without breaking the surface, move the tool horizontally 3⁄8 inch (1 cm), then straight to the bottom of the mold. Repeat across the entire mold.
- 9. Insert the end of a chopstick or skewer about 1⁄4 inch into the soap batter, starting in a corner. Move the tool in a loop-the-loop pattern across the top.
Final Steps
- 10. Tamp the mold one more time to release any remaining air bubbles. Spritz the top of the soap with 99% rubbing alcohol, then cover it. Allow it to set for 48 hours before attempting to unmold. To remove the sliding bottom, turn the entire mold on its side and pull the bottom out.
- 11. Once unmolded, cut the soap with a sharp knife in 1-inch slices. Allow the bars to cure in a well-ventilated area for 4 to 6 weeks before using, turning them every few days to ensure that they cure evenly.
Potato Patch Layered Soap
Approximately 12 bars
Potatoes are one of the most widely used roots in the world, and are staples in kitchens everywhere. This unique soap, which utilizes real potato puree, is reminiscent of potatoes in a garden. Potatoes are starchy vegetables that some say enhance the skin’s natural glow and radiance, and impart moisture to dry skin.
Materials
Mold
- 10-inch silicone loaf mold
Lye-Water Amounts
- 3.9 ounces lye (5% superfat)
- 7.7 ounces distilled water
- 1 tablespoon sodium lactate (optional)
Oil Amounts
- 3.4 ounces palm oil (12%)
- 7 ounces coconut oil (25%)
- 1.4 ounces shea butter (5%)
- 0.8 ounce palm kernel flakes (3%)
- 14 ounces olive oil pure (50%)
- 1.4 ounces avocado oil (5%)
Essential Oil Blend
- 1.1 ounces lavender 40/42 essential oil*
- 0.4 ounce tea tree essential oil
Colorant and Additive Amounts
- 8 ounces uncolored, unscented rebatch soap base, grated **
- 3⁄4 teaspoon ultramarine pink oxide and 1⁄4 teaspoon ultramarine violet oxide dispersed into 1 tablespoon avocado oil (purple blend)
- 1 small potato, peeled
- 1⁄2 teaspoon brown oxide dispersed into 11⁄2 teaspoons avocado oil
- 1 teaspoon ground walnut shells dispersed into 1 tablespoon avocado oil
- 2 teaspoons titanium dioxide dispersed into 2 tablespoons avocado oil
*Regular lavender essential oil will work, but this variety has been specifically blended to last in cold-process soap.
**You can find grated rebatch in online craft and soaping supply vendors, or you can grate a block of rebatch into smaller pieces to make it easier to melt.
Note: Allow yourself two separate soaping days — one to create the embeds (plus time to cure) and one for the background soap.
Safe Soaping!
- Wear proper safety gear the whole time.
- Work in a well-ventilated space.
- No distractions (keep kids and pets away).
Make the Rebatch Embeds
Put the shredded rebatch in a double boiler and melt over high heat for about 15 minutes. Mix in 2 to 4 tablespoons water, depending on the consistency of the soap, until it is the texture of dry mashed potatoes.
Add 11⁄2 teaspoons of the purple blend and mix throughout the rebatch. With gloved hands, roll the rebatch into small “potato balls” while it is still warm and pliable. Set the embeds aside to dry for 24 hours.
Prepare the Potato
Boil the potato in distilled water for about 20 minutes or until it is soft. Combine 2 ounces of the cooked potato and 1 ounce of the potato water, blend until smooth, and set aside to cool.
Make the Soap Mixture
- 1. Add the lye to the water (never the other way around) and stir gently until all of the lye is dissolved. If using sodium lactate, add it to the lye-water and stir to combine. Set the mixture aside to cool until it becomes clear.
- 2. Melt the palm oil in its original container, mix thoroughly, and measure into a bowl large enough to hold all of the oils and the lye-water with room for mixing. Melt and measure the coconut oil and add it to the bowl. Add the shea butter and palm kernel flakes to the hot oils, and stir until melted. If needed, heat in microwave in 10-second bursts. Add the olive oil pure and avocado oil.
- 3. When the oils are between and 95–100°F (35–38°C) and the lye-water is between 130° and 135°F (54–57°C), add the lye-water to the oils. Pour the lye-water over a spatula or the shaft of the stick blender to minimize air bubbles. Tap the stick blender a couple of times against the bottom of the bowl to release any air that may be trapped in the blades. Do not turn on the stick blender until it is fully immersed. Stick-blend for 20 seconds, or until very thin trace is achieved.
- 4. Add the potato-water slurry and the essential oil to the soap. Stick-blend for about 10 seconds, until the potato-water slurry is fully incorporated.
Pour the Base
- 5. Pour about 21⁄2 cups of the soap batter into the first easy-pour container. Add 1⁄2 teaspoon of the brown oxide dispersion, and all of the walnut shell dispersion. Stick-blend for 5 seconds, then add half of the essential oil. Hand-stir this in, and pour entire mixture into the mold.
Add the Embeds
- 6. Drop the “potato balls” directly into the brown soap in the mold in a random pattern.
- 7. Add 11⁄2 tablespoons of the titanium dioxide mixture to the remaining batter. Pouring low to the soap, gently pour the white batter over top of the brown layer.
Final Steps
- 8. Spritz the soap with 99% rubbing alcohol, then cover, and allow the soap to set for at least 48 hours before attempting to unmold.
- 9. Cut the soap into bars and allow them to cure in a well-ventilated area for 4 to 6 weeks before using, turning them every few days to ensure that they cure evenly.
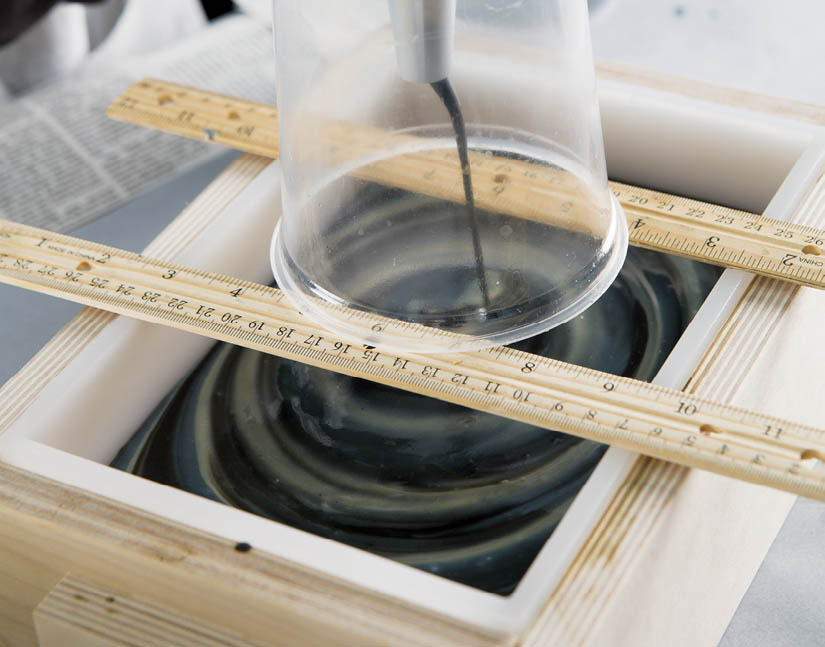
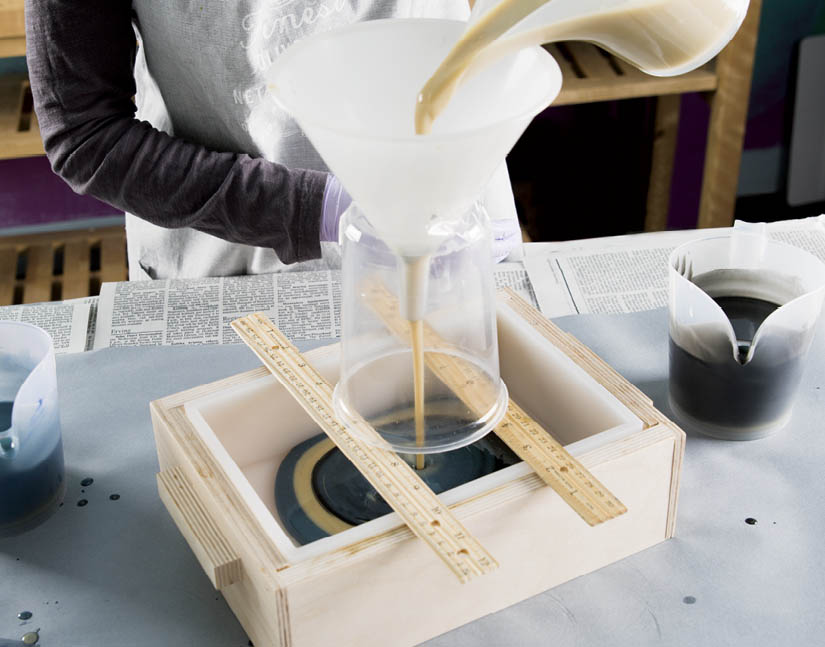
Black Tea Funnel Pour
Makes 9 bars
The rich, invigorating properties of black tea make it a great addition to your soap. Black tea contains tannins, which some studies have shown to improve blood circulation. When lye reacts with black tea, it creates an odd smell and color, but don’t worry; the final soap won’t be affected. Start with a thin trace to ensure that the pour spreads as far as possible, making beautiful layers.
Materials
Mold and Special Tools
- 9-bar birchwood mold and liner
- 2 rulers
- Large (32 ounces) funnel
- 32-ounce plastic yogurt container or deli container (at least 5 inches tall)
Lye-Water Amounts
- 4.5 ounces lye (5%)
- 5.5 ounces distilled water
- 1 tablespoon sodium lactate (optional)
Oil Amounts
- 8.3 ounces coconut oil (25%)
- 1.7 ounces shea butter (5%)
- 1.7 ounces avocado butter (5%)
- 14.8 ounces olive oil pure (45%)
- 6.6 ounces canola (20%)
Essential Oil Blend
- 1.1 ounces balsam Peru essential oil
- 0.4 ounce bay laurel essential oil
Colorants and Additives
- 1 bag English breakfast or other black tea
- 5.5 ounces distilled water
- 1 teaspoon ultramarine blue dispersed into 1 tablespoon canola oil
- 1 teaspoon titanium dioxide dispersed into 1 tablespoon canola oil
- 1 teaspoon black oxide dispersed into 1 tablespoon canola oil
Safe Soaping!
- Wear proper safety gear the whole time.
- Work in a well-ventilated space.
- No distractions (keep kids and pets away).
Prepare the Tea
Add the teabag to 5.5 ounces of boiling distilled water, and steep for 10 minutes. Remove the teabag, and allow the tea to cool to room temperature before soaping.
Prepare the Mold
- 1. Use a sharp blade to cut a hole in the center of the plastic deli cup, large enough to support the funnel, and insert the end of the funnel into the hole. Tape the funnel in place.
- 2. Place the silicone liner in the mold. Lay the two rulers flat over the center of the mold. Balance the container on the rulers so that the funnel is aimed at the center of the mold.
Make the Soap Mixture
- 1. Add the lye to the water (never the other way around) and stir gently until all of the lye is dissolved. If using sodium lactate, add it to the lye-water and stir to combine. Set the mixture aside to cool until it becomes clear.
- 2. Melt and measure the coconut oil into a bowl large enough to hold all the oils and the lye-water solution with room for mixing. Add the shea and avocado butters to the hot coconut oil, and stir until they are melted. If needed, heat in 10-second bursts in the microwave, stirring between bursts, until the butters melt. Add the olive oil pure and canola oil to the hot oils.
- 3. When both the oils and the lye-water are between 110° and 120°F (43–49°C), add the lye-water to the oils, pouring it over a spatula or the shaft of the stick blender to minimize air bubbles. Tap the stick blender a couple of times against the bottom of the bowl to release any air that may be trapped in the blades. Do not turn on the stick blender until it is fully immersed. Stick-blend for 30 seconds, or until thin trace is achieved.
- 4. Add the black tea and essential oils to the batter. Stick-blend for 5 seconds to combine.
Color and Pour
- 5. Divide the batter equally into three easy-pour containers. Add the following colorants to the containers, and whisk the colors to combine.
- Container A: 2 teaspoons ultramarine blue dispersion
- Container B: All of the titanium dioxide dispersion
- Container C: 11⁄2 teaspoons black oxide dispersion
- 6. Pour the blue soap batter (Container A) in a slow, steady stream directly into the funnel. Count out loud to 5, and stop pouring. Repeat this process with the white (Container B), then the black batter (Container C), and repeat the pattern — blue, white, black — until all of the batter is gone. If needed, whisk the soap before pouring to help loosen it.
- 7. Once all of the soap is poured, gently tap and wiggle the mold on the counter to settle the soap. (It has a tendency to pool in the center of the mold under the funnel.)
Final Steps
- 8. Spritz the soap with 99% rubbing alcohol to help avoid soda ash. Allow the soap to set for 48 to 72 hours before attempting to unmold. If it seems to be sticking to the liner, let it sit for another 24 hours, or place it in the freezer for 4 to 24 hours before trying again.
- 9. Once unmolded, use a sharp knife to cut the soap into bars. Allow the bars to cure in a well-ventilated area for 4 to 6 weeks before using, turning them every few days to ensure that they cure evenly.
Rosé & Champagne Peaks
Makes 9 bars
The beautiful swirls and high toppings of this soap will wow everyone who sees it. Champagne and rosé wine contain antioxidants that promote healthy skin. Egyptian geranium has a roselike scent that matches the look of this soap quite nicely. It is strong, so it can be used at a lower than typical rate and still smell fantastic. The alcohol needs to be reduced and frozen before using it, so plan extra time for that process.
Stage 1:
Make the Embeds
Mold and Special Tools
- Small 9-ball silicone mold
- Spare mold to stabilize the 9-ball mold and hold excess soap
- Cheese grater
Lye-Water Amounts
- 0.7 ounce lye (5% superfat)
- 1.6 ounces distilled water
- 1⁄4 teaspoon sodium lactate (highly recommended)
Oil Amounts
- 0.8 ounce cocoa butter (15%)
- 2.8 ounces coconut oil (55%)
- 1.5 ounces olive oil pomace (30%)
Colorants
- 1⁄4 teaspoon ultramarine pink oxide dispersed into 1 teaspoon olive oil pomace
- 1⁄4 teaspoon burgundy oxide dispersed into 1 teaspoon olive oil pomace
Essential Oil
- 0.3 ounce Egyptian geranium
Note: This beautiful design takes two separate soaping days, so plan ahead before making. If you don’t care to make the embeds (see photo), you can skip that step, as shown above.
Safe Soaping!
- Wear proper safety gear the whole time.
- Work in a well-ventilated space.
- No distractions (keep kids and pets away).
Make the Soap Mixture
- 1. Add the lye to the water (never the other way around) and stir gently until all of the lye is dissolved. If using sodium lactate, add it to the lye-water and stir to combine. Set aside until clear.
- 2. In a bowl large enough to hold all the oils and the lye-water solution with room for mixing, measure out the cocoa butter and coconut oil. Heat in the microwave in 20-second bursts until completely melted. Add the olive oil pomace.
- 3. When the oils and the lye-water are both between 110° and 120°F (43–49°C), add the lye-water to the oils, pouring it over a spatula or the shaft of the stick blender to minimize air bubbles. Tap the stick blender a couple of times against the bottom of the bowl to release any air that may be trapped in the blades. Do not turn on the stick blender until it is fully immersed. Stick-blend for 10 seconds or until thin trace is achieved. Add the essential oil, and whisk to combine.
Color and Pour the Embeds
- 4. Add 3⁄4 teaspoon of the ultramarine pink oxide dispersion and 1⁄8 teaspoon of the burgundy oxide dispersion, and whisk to combine.
- 5. Set the 9-ball mold in the spare mold to stabilize it and pour the batter into the openings.Gently tap the mold on the table to release any air pockets. Pour the remaining soap into the spare mold. Allow soap to harden for 24 hours, then pop the soaps out of their molds.
- 6. Shred the excess soap with the cheese grater, and set aside to use in the final steps.
Stage 2:
Make the Base Soap
Mold
- 10-inch silicone loaf mold
Lye-Water Amounts
- 5.4 ounces lye (5% superfat)
- 12 ounces rosé wine (4 ounces reduced, per instructions)
- 12 ounces champagne (4 ounces reduced, per instructions)
- 6.2 ounces distilled water
- 1 tablespoon sodium lactate, highly recommended
Oil Amounts
- 1.2 ounces castor oil (3%)
- 3.2 ounces meadowfoam oil (8%)
- 4 ounces sweet almond oil (10%)
- 8 ounces rice bran oil (20%)
- 13.6 ounces olive oil pure (34%)
- 10 ounces coconut oil (25%)
Essential Oil
- 0.9 ounce Egyptian geranium essential oil
Colorant and Additive Amounts
- 2 teaspoons titanium dioxide dispersed into 2 tablespoons sweet almond oil
- 1 teaspoon ultramarine pink oxide dispersed into 1 tablespoon sweet almond oil
- 1⁄4 teaspoon black oxide dispersed into 1 teaspoon sweet almond oil
- Shredded pink soap (made at least 1 day ahead)
- 9 soap ball embeds (made at least 1 day ahead)
Prepare the Wine-Lye Solution
- 1. Before using the wine and champagne, you must remove as much of the alcohol as possible. Combine 12 ounces of rosé and 12 ounces of champagne in a pot, bring to a boil, then reduce heat to simmer for 15 minutes, stirring constantly. Remove from heat.
- 2. Once the wine mixture has cooled, measure out 8 ounces, and discard the remainder. Add the 6.2 ounces of distilled water to the wine, pour into an ice cube tray, and freeze completely.
- 3. Measure the lye into a dry container. Place the ice cubes in a separate heat-safe bowl.
- 4. Sprinkle or scoop about 1 tablespoon of the lye flakes into the bowl of frozen cubes. Slowly and carefully stir the lye around the cubes, which will begin to melt. After the first spoonful of lye dissolves, add another tablespoon, and stir to combine. Continue this process slowly; it should take about 10 minutes. If you add the lye too fast, the mixture may boil over.
- 5. Once all of the lye is added and the cubes are melted, add the sodium lactate and stir to combine. Set aside. Note that the solution will remain cloudy instead of clearing as typical lye-water does.
Make the Soap Mixture
- 1. In a bowl large enough to hold all the oils and the lye solution with room for mixing, measure out the castor oil, meadowfoam oil, sweet almond oil, rice bran oil, and olive oil pure with room for mixing. Heat the coconut oil in its original container, and add the needed amount to the liquid oils.
- 2. Add the lye solution to the oils, pouring it over a spatula or the shaft of the stick blender to minimize air bubbles. Tap the stick blender a couple of times against the bottom of the bowl to release any air that may be trapped in the blades. Do not turn on the stick blender until it is fully immersed. Stick-blend for 20 seconds, or until thin trace is achieved.
- 3. Divide the soap into three equal parts and whisk in the colorants as follows.
- Container A: 1 tablespoon titanium dioxide dispersion
- Container B: 1 tablespoon titanium dioxide dispersion
- Container C: 1 teaspoon titanium dioxide dispersion, 1 tablespoon ultramarine pink dispersion, 1⁄16 teaspoon black oxide dispersion
- 4. Divide the essential oil equally among the containers. Going from lightest to darkest, stick-blend each container for 2 seconds to combine the essential oil and color. If needed, blend further using a spatula or whisk.
Pour and Swirl
- 5. Set aside Container A. Begin pouring batter from Containers B and C in random, lengthwise pours from various heights above the mold (from right over the batter to 6 inches or more above). Repeat this process until all of the batter from Containers B and C is used.
- 6. Insert the handle of the spoon into a corner of the mold at a slight angle. Move the spoon up and down in a figure eight pattern down the length of the mold.
Peak and Embed the Top
- 7. Stick-blend the remaining white batter for 5 seconds to bring it to a very thick trace. Once it is thick enough to hold a peak, add 1⁄4 cup of the shredded pink soap to the batter, and stir to incorporate the shreds. Pour this carefully on top of the soap.
- 8. Using the back of a spoon, pull up the soap from the outer edges to form a peak in the center. If the soap isn’t stiff enough to hold its form, let it set a few minutes and try again.
- 9. Once the top of the soap is sufficiently peaked, insert the round pink embeds. All of them should fit if spaced about 1⁄4 inch apart.
Final Steps
- 10. Spritz the soap with 99% rubbing alcohol. Sprinkle the entire surface with the remaining pink soap shreds.
- 11. Allow the soap to harden for 48 hours before attempting to unmold. To cut this soap, turn it on its side to avoid dragging the soap shreds through the bars. Let bars cure for 4 to 6 weeks before using, turning them every few days to ensure that they cure evenly.
Coconut Milk Sideways Swirl
Approximately 20 bars
This soap has a wonderfully creamy lather, and the sideways hanger swirl and bright colors add lots of visual interest. Thick, rick coconut milk contains lots of vitamins, especially B vitamins, which moisturize skin and promote skin elasticity. It also contains high amounts of sugar, which can heat up soap, so this soap goes into the freezer after it is made. The soap discolors to a light tan if it gets hot and goes through gel phase (see What Is Gel Phase?). Clear some freezer space before you begin the soaping process.
Materials
Mold
- 5-pound wooden mold with sliding bottom with silicone liner
- Multi-pour sectioning tool
- Wire hanger and plastic straws to make swirling tool
Lye-Water Amounts
- 7.6 ounces lye (5% superfat)
- 9 ounces distilled water, frozen into cubes*
- 9.1 ounces coconut milk, frozen into cubes*
- 5 teaspoons sodium lactate (optional)
Oil Amounts
- 11 ounces palm oil (20%)
- 13.2 ounces coconut oil (24%)
- 1.6 ounces avocado butter (3%)
- 3.9 ounces apricot kernel oil (7%)
- 2.8 ounces green tea seed oil (5%)
- 2.8 ounces refined hemp seed oil (5%)
- 19.8 ounces olive oil pure (36%)
Essential Oil Blend
- 2.2 ounces lime essential oil
- 0.3 ounce rosemary essential oil
Colorants
- 2 teaspoons titanium dioxide dispersed into 2 tablespoons avocado oil
- 1 teaspoon ultramarine blue oxide dispersed into 1 tablespoon avocado oil
- 1 teaspoon ultramarine pink oxide dispersed into 1 tablespoon avocado oil
- 1 teaspoon brick red oxide dispersed into 1 tablespoon avocado oil
- 1 teaspoon yellow oxide dispersed into 1 tablespoon avocado oil
*The water and coconut milk can be frozen separately or combined before freezing.
Safe Soaping!
- Wear proper safety gear the whole time.
- Work in a well-ventilated space.
- No distractions (keep kids and pets away).
Make the Soap Mixture
- 1. Put the coconut milk cubes and ice cubes in a heat-safe container. Slowly sprinkle approximately 1 tablespoon of lye over the frozen cubes. Carefully stir the lye with the cubes for 1 to 2 minutes. Add another tablespoon of lye to the mixture, and continue stirring. Repeat this process until all of the lye is dissolved and the cubes are melted. If using sodium lactate, add it to the lye-water and stir to combine.
- The mixture may have an odd smell or slight color to it, which is normal as the lye reacts with the coconut milk. To avoid scorching the milk, keep the lye solution under 100°F (38°C). Because the lye is saponifying the fats in the coconut milk, it is normal for there to be some chunks and texture in the lye-water.
- 2. Melt the palm oil in its original container, mix it thoroughly, and measure into a bowl large enough to hold all of the oils and the lye-water with room for mixing. Melt and measure the coconut oil and add it to the bowl. Add the avocado butter to the hot oils and stir until melted. If needed, heat the oils further until the butter is completely melted. Add the apricot kernel oil, green tea seed oil, hemp seed oil, and olive oil pure.
Note: When buying canned coconut milk, check the ingredient list. Avoid thickeners such as guar gum or carrageenan and added sugars, as additives can react differently with the lye and speed up trace.
- 3. When the oils are between 90° and 95°F (32–35°C), add the lye solution to the oils, pouring it over a spatula or the shaft of the stick blender to minimize air bubbles. Tap the stick blender a couple of times against the bottom of the bowl to release any air that may be trapped in the blades. Do not turn on the stick blender until it is fully immersed. Stick-blend for 20 seconds, or until very thin trace is achieved.
- 4. Add all of the essential oil, and whisk to combine.
Add Colorants
- 5. Divide the soap into two 20-ounce containers and four 10-ounce containers. Reserve one of the 20-ounce containers until step 10 and add the colorants to the remaining containers as follows.
- Container A (20 ounces): 11⁄2 teaspoons titanium dioxide dispersion
- Container B (10 ounces): 1⁄2 teaspoon ultramarine blue oxide
- Container C (10 ounces): 11⁄2 teaspoons ultramarine pink oxide
- Container D (10 ounces): 1⁄4 teaspoon brick red oxide, 1⁄2 teaspoon yellow oxide, 11⁄2 teaspoons titanium dioxide
- Container E (10 ounces): 1⁄2 teaspoon yellow oxide
- Stick-blend each container, moving from lightest to darkest (skip the uncolored one), for about 2 seconds, just enough to blend the color without thickening the trace.
Pour and Swirl
- 6. Pour the contents of Container A into the silicone-lined mold. Tamp the mold on the table to smooth out the soap. Insert the multi-pour sectioning tool into the mold, creating four equal sections.
- 7. Pour the yellow oxide batter (Container E) into one of the outside sections, putting the spout as close to the white layer as possible. Pour very slowly and gently to avoid breaking through the bottom layer. Save about 1 tablespoon of the batter for step 12.
- 8. Repeat step 7 with the rest of the colors. Pour blue next to the yellow, then orange, then red. It may be necessary to loosen each one before pouring by whisking the batter gently.
- 9. Once all of the colors are poured, remove the dividers. Slowly pull straight up on each divider until clear of the soap. Don’t forget to remove the end pieces.
- 10. Add 11⁄2 teaspoons of titanium dioxide dispersion to the batter set aside in container B. Stick-blend for just a couple of seconds — it needs to be very thin. Pour this layer low and slow over a spatula so you don’t break through the colored layers.
- 11. Insert the wire swirling tool tight along the side of the mold closest to you, right to the bottom. Push along the bottom to the opposite side of the mold. Drag the tool up the wall 1⁄2 inch, and pull it straight toward you. Slide it up the wall 1⁄2 inch, and push it in a straight line to the other wall again, and repeat once more. Lift the tool straight up the edge of the wall and out of the mold.
- 12. Once you are happy with the texture on top, it is time to add more color! Use a spoon to drizzle thin lines of color down the center of the peaks. Layer the colors on top of each other.
Final Steps
- 13. Spritz the soap with 99% rubbing alcohol, and place the entire mold in the freezer for 8 to 12 hours. Remove from the freezer, and let stand for 48 hours at room temperature before attempting to unmold.
- 14. Once unmolded, cut the soap into bars, and allow to cure in a well-ventilated area for 4 to 6 weeks before using, turning them every few days to ensure that they cure evenly.
Pale Ale with Cocoa Powder
Approximately 9 bars
This soap is for beer-lovers who would like to actually bathe in beer, or for soap connoisseurs who appreciate the silky-smooth lather that beer adds to the batch. There are numerous options to show off your artistic talents with the cocoa powder swirl — either use this design or create your own pattern for more personalized soaps. To avoid air bubbles on the surface, make sure to pour the first green layer at a thin trace to allow it to flow evenly around the cocoa powder swirls.
Stage 1:
Make the Cocoa Powder Swirl
Mold and Special Tools
- 6-inch silicone slab mold
- Swirl design traced onto a 6- by 6-inch piece of paper
- Squirt bottle
- Spare mold for extra soap batter (large enough to hold at least 8 ounces)
Lye-Water Amounts
- 1 ounce lye (5% superfat)
- 12 ounces pale ale (reduced per instructions)*
Oil Amounts
- 1.8 ounces palm oil (25%)
- 1.8 ounces coconut oil (25%)
- 0.4 ounce cocoa butter (5%)
- 0.4 ounce sweet almond oil (5%)
- 2.8 ounces olive oil pure (40%)
Colorants
- 2 teaspoons cocoa powder dispersed into 2 teaspoons sweet almond oil
- 1⁄4 teaspoon black oxide dispersed into 1 teaspoon sweet almond oil
*This makes enough for both parts of the recipe.
Safe Soaping!
- Wear proper safety gear the whole time.
- Work in a well-ventilated space.
- No distractions (keep kids and pets away).
Prepare the Pale Ale
Before using the ale, you must remove as much of the alcohol as possible. Bring 12 ounces of pale ale to a boil, then reduce heat and allow it to simmer for 10 minutes, stirring constantly. The amount of liquid that boils off will vary; you need 2.3 ounces of boiled ale for stage 1, and 4.1 ounces of ale for stage 2.
Remove the beer from the heat, and place it in the fridge to cool to between 40° and 55°F (4–13°C). (Beer has less sugar than wine, which creates a very hot reaction with lye; unlike wine, beer doesn’t need to be frozen first.)
Prepare the Mold
Create a design on a 6- by 6-inch piece of paper, drawn with dark, thick lines. Lay the paper under the silicone mold (not inside it), taping the edges to keep it from shifting. You should be able to see the lines clearly.
Make the Soap Mixture
- 1. Add the lye flakes to 2.3 ounces of the cooled pale ale (never the other way around), and stir gently until all of the lye is dissolved. Save the remaining ale for the second part of the recipe.
- 2. Melt the palm oil in its original container, mix it thoroughly, and measure into a bowl large enough to hold all of the oils and the lye mixture with room for mixing. Melt and measure the coconut oil and add it to the bowl. Add the cocoa butter to the hot oils. Stir until melted. If needed, heat the oils further until the butter and flakes are melted. Add the sweet almond oil and olive oil pure.
- 3. When the oils are between 95° and 100°F (35–38°C) and the lye mixture is between 125° and 130°F (52–54°C), add the lye mixture to the oils, pouring it over a spatula or the shaft of the stick blender to minimize air bubbles. Tap the stick blender a couple of times against the bottom of the bowl to release any air that may be trapped in the blades. Do not turn on the stick blender until it is fully immersed. Stick-blend for 10 seconds, or until very thin trace is achieved.
- 4. Add 3 teaspoons of the cocoa powder dispersion and 1⁄16 teaspoon of the black oxide dispersion. Stick-blend for 40 seconds, or until thick trace is achieved.
- 5. Pour the batter into a squirt bottle. Take a piece of plain paper, and create a test swirl. If the design squirts without dripping and holds its shape, it is ready to go. If the design spreads out, or drips as you try to squirt it, allow it to set for another minute and try again.
- 6. Trace the pattern with the soap. Squeeze lightly, as the design will become muddied if the lines are too thick.
- Once the entire pattern is traced, set the mold aside while you make the second part of the soap right away.
- 7. Because it is hard to stick-blend small amounts of soap, the stage 1 recipe is designed to make more soap than is needed. Pour the excess soap into a spare mold and allow it to cure for 4 to 6 weeks before using.
Stage 2:
Make the Main Soap
Lye-Water Amounts
- 3.4 ounces lye (5% superfat)
- 4.1 ounces distilled water, chilled
- 4.1 ounces previously reduced pale ale, chilled
- 2 teaspoons sodium lactate (optional)
Oil Amounts
- 6.2 ounces palm oil (25%)
- 5 ounces coconut oil (20%)
- 1.3 ounces cocoa butter (5%)
- 1.3 ounces sweet almond oil (5%)
- 3.8 ounces rice bran oil (15%)
- 7.5 ounces olive oil pure (30%)
Colorants
- 2 teaspoons titanium dioxide dispersed into 2 tablespoons sweet almond oil
- 2 teaspoons hydrated chrome green dispersed into 2 tablespoons sweet almond oil
Essential Oil Blend
- 0.5 ounce rosemary
- 0.5 ounce bergamot
Make the Soap Mixture
- 1. Add the lye slowly to the water and ale (never the other way around) and stir gently until all of the lye is dissolved. If using sodium lactate, add it to the lye solution and stir to combine. Set the mixture aside to cool until it becomes clear.
- 2. Melt the palm oil in its original container, mix it thoroughly, and measure into a bowl large enough to hold all of the oils and the lye solution with room for mixing. Melt and measure the coconut oil and add it to the bowl. Add the cocoa butter to the hot oils and stir until melted. If needed, heat the oils further until the butter and flakes are melted. Add the sweet almond oil, rice bran oil, and olive oil pure to the hot oils.
- 3. When both the oils and the lye-water are between 130°and 135°F (54–57°C), add the lye solution to the oils, pouring it over a spatula or the shaft of the stick blender to minimize air bubbles. Tap the stick blender a couple of times against the bottom of the bowl to release any air that may be trapped in the blades. Do not turn on the stick blender until it is fully immersed. Stick-blend for 25 seconds, or until thin trace is achieved.
- 4. Add all of the essential oil blend, and whisk to combine.
Coloring and Pouring
- 5. Pour off a little more than 1 cup (300ml) of the batter into an easy-pour container. Add to this container 1 teaspoon titanium dioxide dispersion and 2 teaspoons hydrated chrome green dispersion. Stick-blend for 5 seconds to combine the colors.
- 6. Carefully pour the green batter over a spatula, low and slow, over top of the brown swirls that were made earlier. Gently tap the mold on the counter to bring any bubbles to the surface.
- 7. Divide the remaining batter into two equal parts and add the colorants as follows:
- Container A: 1 teaspoon titanium dioxide dispersion, 2 teaspoons hydrated chrome green dispersion
- Container B: 11⁄2 tablespoons titanium dioxide dispersion
- 8. Whisk each container for 3 seconds to incorporate the colors.
- 9. Pour the green batter in a spiral pattern into the white batter. Pour from at least 6 inches above to help the green pour all the way to the bottom of the white soap.
- 10. Pouring over a spatula, carefully pour the swirled green and white soap over the green layer.
Final Steps
- 11. Spritz the top with 99% rubbing alcohol. Allow the soap to set for at least 48 hours before attempting to unmold.
- 12. Once unmolded, cut the soap into bars with a sharp knife. Allow them to cure in a well-ventilated area for 4 to 6 weeks before using, turning them every few days to ensure that they cure evenly.
Goat Milk Sunset Burst
Approximately 12 bars
Goat milk has long been a favorite ingredient in homemade soaps. It is particularly moisturizing and nourishing to the skin because of the caprylic and capric triglycerides it contains. The protein strands in goat milk are shorter and more readily absorbed by the skin than those in other milks. Goat milk also has naturally occurring lactic acid, as well as vitamins A, D, and B6
Stage 1:
Create the Embeds
Mold
- 6-cavity half-cylinder silicone mold
Lye-Water Amounts
- 2.4 ounces lye (5% superfat)
- 4.6 ounces distilled water
- 11⁄2 teaspoons sodium lactate (optional)
Oil Amounts
- 3.9 ounces palm oil (23%)
- 4.3 ounces coconut oil (25%)
- 1.7 ounces cocoa butter (10%)
- 0.9 ounce avocado oil (5%)
- 6.3 ounces olive oil pomace (37%)
Colorant and Additive Amounts
- 0.7 ounce goat milk powder dissolved in 1 ounce distilled water, per instructions
- 2 tablespoons annatto seeds in a sealable teabag
Essential Oil
Note: This beautiful design requires that the embeds cure for 48 hours before using them in the base soap, so plan ahead.
Safe Soaping!
- Wear proper safety gear the whole time.
- Work in a well-ventilated space.
- No distractions (keep kids and pets away).
Prepare the Oils
Melt the palm oil in its original container, mix it thoroughly, and measure into a bowl large enough to hold all of the oils and the lye-water with room for mixing. Melt and measure the coconut oil and add it to the bowl. Add the cocoa butter to the hot oils and stir to melt. Microwave in 10-second bursts if needed. Add the avocado oil and olive oil pomace.
Submerge the sealable teabag with annatto seeds in the oils. Place the oils in a double boiler over medium heat for 2 hours to allow the color to fully leach from the annatto seeds into the oils. Allow the oils to cool to between 100° and 105°F (38–40.5°C) and remove the teabag.
Prepare the Goat Milk
Warm 1 ounce of distilled water to between 90 and 100°F (32–38°C). Add the goat milk powder to the warm water and whisk well to combine. Skip this step if using fresh goat milk.
Note: To help avoid scorching, this recipe incorporates the goat milk by using a concentrated solution of powdered goat milk. This allows more milk to be added without having to add it directly to the lye. The concentrate is added at trace, when the lye is already reacting with the oils and is becoming less active. To use fresh goat milk, see step 1 for instructions.
Make the Soap Mixture
- 1. Add the lye to the distilled water (never the other way around) and stir gently until all of the lye is dissolved. If using sodium lactate, add it to the lye-water and stir to combine.
- To freeze 5.6 ounces of milk into cubes. Sprinkle the lye directly over the frozen cubes, and stir until all of the lye is dissolved. Do not add any distilled water. Continue soaping as normal, but skip adding milk in step 3.
- 2. When both the oils and the lye-water are between 100° and 105°F (38–40.5°C), add the lye-water to the oils, pouring it over a spatula or the shaft of the stick blender to minimize air bubbles. Tap the stick blender a couple of times against the bottom of the bowl to release any air that may be trapped in the blades. Do not turn on the stick blender until it is fully immersed. Stick-blend for 20 seconds, or until thin trace is achieved.
- 3. Add all of the goat milk and the essential oil to the batter, and whisk to combine. If using fresh goat milk, add only the essential oil.
- 4. Fill each cavity of the mold to the brim. Spritz with 99% rubbing alcohol and let set for 48 hours before attempting to unmold.
Cut the Embeds
- 5. Center three embeds flat-side down in the mold. There will be a 1-inch space left. Take a fourth embed, and cut a 1-inch-wide slice off the end. Place the small slice in the mold to be sure it fits.
- 6. Now there should be two whole embeds and one 2-inch-wide piece. Cut these into lengthwise quarters, so that each embed creates four long, skinny triangles.
- 7. Arrange the triangle soaps in three lines next to the half-circle soaps out of the mold to ensure they will fit perfectly. Cut the triangles as needed to make three complete rows of “rays.” Leaving them lined up in the correct rows makes it easier to place them when pouring.
Stage 2:
Make the Background Soap
Mold
- 10- inch silicone loaf mold
Lye-Water Amounts
- 3.4 ounces lye (5% superfat)
- 6.3 ounces distilled water
- 2 teaspoons sodium lactate (optional)
Oil Amounts
- 3.8 ounces palm oil (15%)
- 6.3 ounces coconut oil (25%)
- 1.3 ounces sweet almond oil (5%)
- 6.3 ounces rice bran oil (25%)
- 7.5 ounces olive oil pure (30%)
Essential Oil Blend
- 0.5 ounce bergamot
- 0.5 ounce lavender 40/42*
Colorant and Additive Amounts
- 1 ounce goat milk powder dissolved in 2 ounces distilled water, per instructions
- 2 teaspoons titanium dioxide dispersed into 2 tablespoons sweet almond oil
- 3 teaspoons ultramarine pink oxide dispersed into 3 tablespoons sweet almond oil
*Regular lavender essential oil will work, but this variety has been specifically blended to last in cold-process soap.
Prepare the Goat Milk
Warm 1 ounce of distilled water to between 90° and 100°F (32–37°C). Add the goat milk powder to the warm water, and whisk well to combine. Skip this step if using fresh goat milk.
Make the Soap Mixture
- 1. Add the lye to the distilled water (never the other way around) and stir gently until all of the lye is dissolved. If using sodium lactate, add it to the lye-water and stir to combine.
- To freeze 8.3 ounces of milk into cubes. In step 1, sprinkle the lye directly over the frozen cubes, and stir until all of the lye is dissolved. Do not add any distilled water. Continue soaping as normal, but skip adding milk in step 4.
- 2. Melt the palm oil in its original container, mix it thoroughly, and measure into a bowl large enough to hold all of the oils and the lye-water with room for mixing. Melt and measure the coconut oil and add it to the bowl. Add the sweet almond oil, rice bran oil, and olive oil pure.
- 3. When both the oils and the lye-water are between 95° and 100°F (35–38°C), add the lye-water to the oils, pouring it over a spatula or the shaft of the stick blender to minimize air bubbles. Tap the stick blender a couple of times against the bottom of the bowl to release any air that may be trapped in the blades. Do not turn on the stick blender until it is fully immersed. Stick-blend for 20 seconds, or until thin trace is achieved.
Color and Pour
- 4. Add the goat milk and the essential oil to the soap batter. Whisk to combine. If using fresh goat milk, whisk in the essential oil only.
- 5. Divide the soap in half and add the colorants as follows.
- Container A: 1 teaspoon titanium dioxide dispersion
- Container B: 1 teaspoon ultramarine pink oxide dispersion
Create the Sunbursts
- 6. Pour random lines of pink and white batter across the round embeds until the batter is almost even with the top of the embeds.
- 7. Lay the “rays” from the first row of embeds (stage 1, step 7) along one side of the soap. Insert the embeds with the base of the triangle touching, or almost touching the round embeds. Don’t let the embed touch the walls of the mold, or the final soap may split.
- 8. Repeat step 7 on the opposite side of the soap.
- 9. Insert the final row of embeds down the center of the soap.
- 10. Simultaneously pour pink and white batter across the embeds until you reach the top edge of the mold.
- 11. Stick-blend the remaining batter for 5 to 10 seconds, or until very thick trace is achieved. Spoon the batter onto the soap, raising it above the edges of the mold. Use the back of a spoon to smooth and shape the soap into a round peak.
Final Steps
- 12. Spritz the top of the soap with 99% rubbing alcohol, and allow it to set at room temperature for at least 48 hours before attempting to unmold. Cut into bars, and allow them to cure in a well-ventilated area for 4 to 6 weeks before using, turning them every few days to ensure that they cure evenly.
Dark Ale Loofah Bars
Makes 9 bars
This bold, beautiful soap is sure to be a favorite with both men and women. The fresh scent of spearmint and patchouli is perfectly blended so that even those with an aversion to patchouli will love it. The dark ale enhances the lather, while the walnut shell layer on the bottom and the loofah on top create an exfoliating bar. The beer needs to be prepared ahead of time, so plan an extra day when you make this recipe.
Materials
Mold
- 9-bar birchwood mold with silicone liner
- 3 squirt bottles
Lye-Water Amounts
- 4.5 ounces lye (5% superfat)
- 5.4 ounces distilled water, frozen in ice cubes
- 10 ounces dark ale (5.4 ounces reduced, per instructions)
- 1 tablespoon sodium lactate (optional)
Oil Amounts
- 1 ounce tamanu oil (3%)
- 1.7 ounces green tea seed oil (5%)
- 7.9 ounces rice bran oil (24%)
- 13.2 ounces olive oil pure (40%)
- 8.3 ounces coconut oil (25%)
- 1 ounce shea butter (3%)
Essential Oil Blend
- 0.7 ounce spearmint essential oil
- 0.8 ounce patchouli essential oil
Colorant and Additive Amounts
- 9 loofah slices, 11⁄2 by 2 inches across and 1⁄2 inch thick*
- 2 teaspoons titanium dioxide dispersed into 2 tablespoons green tea seed oil
- 2 teaspoons walnut shells
- 1 teaspoon hydrated chrome green dispersed into 1 tablespoon green tea seed oil
- 1 teaspoon ultramarine blue dispersed into 1 tablespoon green tea seed oil
*Loofah is a natural product, so the number of slices per piece will vary, but two loofah sponges should be enough.
Safe Soaping!
- Wear proper safety gear the whole time.
- Work in a well-ventilated space.
- No distractions (keep kids and pets away).
Prepare the Ale
Before using ale in soap, you must remove as much of the alcohol as possible. Bring the ale to a boil, then reduce heat and simmer for 10 minutes, stirring constantly. After the ale cools, measure out 5.4 ounces and freeze it into cubes.
Prepare the Loofah
If your loofah is flat instead of round, simply dunk the loofah in cold water to re-inflate and let fully dry before using in your soap. Although the divider set is not used in molding this soap, it will serve as a useful tool in figuring out the best layout for the loofah pieces, to get the most striking effect. Before beginning, put the divider set inside the silicone liner. Using a permanent marker, make a small mark on the top edge of the silicone liner where the edges of the dividers hit the walls. The marker can be easily removed with 99% rubbing alcohol when the project is finished.
Make the Soap Mixture
- 1. Measure out the needed amount of dark ale cubes and distilled water cubes. Sprinkle about a tablespoon of lye over the cubes, and stir gently. The lye will begin to melt the cubes. Stir for about a minute, then add another tablespoon of lye. Repeat the process, adding small amounts of lye and stirring, until all the lye has been added. Keep stirring the mixture until all of the lye chunks are dissolved.
- 2. If using sodium lactate, add it to the lye mixture and stir to combine. Set the mixture aside to cool.
- 3. In a bowl large enough to hold all the oils and the lye mixture with room for mixing, measure out the tamanu oil, green tea seed oil, rice bran oil, and olive oil pure. In a separate container, heat the coconut oil until liquid, and pour the hot oil over the shea butter. Stir this until the shea butter melts. Add the hot oil mixture to the liquid oils.
- 4. When both the oils and the lye mixture are between 110° and 120°F (43–49°C), strain the lye mixture as you add it to the oils, pouring it over a spatula or the shaft of the stick blender to minimize air bubbles. Tap the stick blender a couple of times against the bottom of the bowl to release any air that may be trapped in the blades. Do not turn on the stick blender until it is fully immersed. Stick-blend for 10 seconds, or until thin trace is achieved.
Mix and Pour
- 5. Add 1 tablespoon of the titanium dioxide dispersion and all of the essential oil blend. Whisk to combine. Pour off about 1 cup (300ml) of the batter into a small container. Add the walnut shells to this batch and stick-blend for 15 seconds.
- 6. Pour all of the thickened batter into the bottom of the silicone-lined mold.
- 7. Divide the remaining batter into three equal containers. Add the colorants to each container as follows, stick-blending in 2-second bursts to mix.
- Container A: remaining 1 tablespoon titanium dioxide dispersion
- Container B: 2 teaspoons hydrated green chrome dispersion
- Container C: 2 teaspoons ultramarine blue dispersion
- 8. Pour each container of soap into its own squirt bottle. Gently squirt long lines of each color over the brown layer of soap; squirt low to the soap to avoid breaking through the layer. Continue squirting alternating colors of soap across the surface until all of the batter is used.
- 9. Carefully squish each loofah into the soap, being mindful to stay between each of the markings, and leaving just about a 1⁄4 inch of loofah above the surface of the soap.
Final Steps
- 10. Spritz the surface of the soap with 99% rubbing alcohol to help prevent soda ash. This is a fairly soft recipe, so do not attempt to unmold it for 48 to 72 hours.
- 11. Before unmolding, use a knife to score the soap along the marks made previously. If the soap is sticking to the silicone liner when attempting to unmold, let it set another day.
- 12. Cut the soap into bars along the scoring lines. Allow the bars to cure in a well-ventilated area for 4 to 6 weeks before using, turning them every few days to ensure that they cure evenly.
Dandelion Zebra Stripes
Approximately 8 bars
Dandelions are not just a weed; the nourishing greens have long been used to treat a variety of ailments. The petals add a very soft, mild texture to the bars as well as giving a burst of color that really makes the stripes pop. The awesome zebra stripe technique was first created by Vinvela Ebony from Dandelion Seifee.
Materials
Mold and Special Tools
- 2-pound wooden mold with silicone liner
- 1 manila folder, cut to width of the mold, and 5 inches tall
- Chopstick or similarly sized swirling tool
Oil Amounts
- 2 ounces apricot kernel oil (8%)
- 3.5 ounces rice bran oil (14%)
- 3.8 ounces sunflower oil (15%)
- 9.5 ounces olive oil pure (38%)
- 6.3 ounces coconut oil (25%)
Lye-Water Amounts
- 3.4 ounces lye (5% superfat)
- 8.3 ounces dandelion infusion (10 ounces distilled water infused with 0.5 ounce whole dandelions)
- 2 teaspoons sodium lactate (optional)
Essential Oil Blend
- 0.4 ounce peppermint 2nd distilled essential oil
- 0.6 ounce lime essential oil
Colorant and Additive Amounts
- 1 teaspoon annatto seeds infused in 1 ounce sunflower oil*
- 2 heaping tablespoons dandelion petals
- 1 teaspoon titanium dioxide dispersed into 1 tablespoon sunflower oil
- 1 teaspoon ultramarine blue oxide dispersed into 1 tablespoon sunflower oil
*See how to make infused oils.
Note: Pick dandelions from a spot that has not been sprayed with chemicals, and rinse them well before using them in the soap.
Safe Soaping!
- Wear proper safety gear the whole time.
- Work in a well-ventilated space.
- No distractions (keep kids and pets away).
Prepare the Dandelion Infusion
Combine 1⁄2 ounce whole dandelions (stems, leaves, and petals) with 10 ounces distilled water in a pot and simmer over medium heat for 15 minutes, or until the water takes on a yellow tint. Strain the dandelions out of the water, and weigh out 8.3 ounces dandelion water. Set aside to cool to room temperature.
Make the Soap Mixture
- 1. Slowly add the lye to the cooled dandelion infusion (never the other way around), and stir until all of the lye is dissolved. The lye will turn the water a bright orange/yellow color. If using sodium lactate, add it to the lye-water and stir to combine. Set the mixture aside to cool.
- 2. In a bowl large enough to hold all the oils and the lye-water solution with room for mixing, measure out the apricot kernel oil, rice bran oil, sunflower oil, and olive oil pure. Microwave the coconut oil in 30-second bursts until melted, and combine with the other oils.
- 3. When the oils and the lye-water are between 110° and 120°F (43–49°C), add the lye-water to the oils, pouring it over a spatula or the shaft of the stick blender to minimize air bubbles. Tap the stick blender a couple of times against the bottom of the bowl to release any air that may be trapped in the blades. Do not turn on the stick blender until it is fully immersed. Stick-blend for 25 seconds, or until very thin trace is achieved.
- 4. Divide the batter into four equal parts and add the colorants and additives as follows.
- Container A: 1 tablespoon annatto infusion, 1 tablespoon dandelion petals, one-fourth of the essential oil
- Container B: 1 tablespoon annatto infusion, 1 tablespoon dandelion petals, one-fourth of the essential oil
- Container C: 2 teaspoons titanium dioxide dispersion, one-fourth of the essential oil
- Container D: 11⁄2 teaspoons ultramarine blue dispersion, one-fourth of the essential oil
Pour, Stripe, and Swirl
- 5. Stick-blend Container A for 20 seconds, then pour the batter into the mold. Whisk the remaining colors so as not to accelerate trace.
- 6. Angle the manila folder into the bottom layer of soap. You want to just touch the first layer of soap without pushing into it.
- 7. Pour a strip of white batter (Container C) across the manila folder, allowing it to run down the paper and across the first layer of soap.
- 8. Without moving the folder from its original position, pour a strip of blue batter (Container D) across the folder, allowing it to run down the paper and across the white layer.
- 9. Repeat steps 7 and 8, making five passes of each color before removing the folder. You should have about 1⁄4 cup of soap remaining in each container.
- 10. Whisk the remaining container of yellow soap (Container B) to loosen it. Pouring low and slow over the back of a spatula, cover the blue and white layers, using all the batter.
- 11. Pour the remaining blue batter in a wide line down the middle of the yellow soap.
- 12. Pour a thin line of white down the middle of the blue line, leaving a line of blue on either side.
- 13. Insert a chopstick about a 1⁄4 inch deep into the white line, about an inch from the end of the mold. Swirl the chopstick in a spiral pattern from the white line, to just inside the blue lines. Lift the chopstick out of the soap, wipe the excess soap off, and repeat the process, making spirals in the rest of the soap.
Final Steps
- 14. Spritz the top of the soap with 99% rubbing alcohol to help prevent soda ash.
- 15. Allow the soap to set for at least 4 to 5 days before attempting to unmold. This recipe utilizes many soft oils, so it takes longer than usual to set. If the soap is difficult to remove from the liner, allow it to set for another 24 hours before attempting to unmold again.
- 16. Once the soap is removed from the liner, turn it sideways to cut into bars to avoid dragging the blue and white lines through the yellow. Allow the bars to cure in a well-ventilated area for 4 to 6 weeks before using, turning them every few days to ensure that they cure evenly.
White & Red Wine Yin/Yang
Makes 12 bars
This unique soap style will get noticed. In Chinese philosophy, the concept of yin and yang is that opposite forces complement one another. This soap is a good example of that. The white and red wines work together to create beautiful black and pink hues in a nourishing bar that is full of antioxidants.
Stage 1:
Make the Main Soaps
White Wine Recipe
Mold and Special Tools
- 12-bar round silicone mold
- 2 manila folders to make the dividers
- 12 plastic drinking straws, cut in half
- Tape
Lye-Water Amounts
- 2.3 ounces lye (7% superfat)
- 8 ounces white wine (2.8 ounces reduced, per instructions)
- 2.8 ounces distilled water
- 1 teaspoon sodium lactate (optional)
Oil Amounts
- 2.6 ounces palm oil (15%)
- 3.4 ounces coconut oil (20%)
- 0.9 ounce meadowfoam oil (5%)
- 1.7 ounces sesame oil (10%)
- 2.6 ounces rice bran oil (15%)
- 6 ounces olive oil pure (35%)
Essential Oil
- 0.7 ounce lavender 40/42*
Colorants
- 1 teaspoon rose clay dispersed into 1 tablespoon distilled water
- 1 teaspoon activated charcoal dispersed into 1 tablespoon meadowfoam oil
*Regular lavender essential oil will work, but this variety has been specifically blended to last in cold-process soap.
Note: The wine must be prepared ahead of time, and the soap requires two days to make, so allow extra time for this recipe. This is a two-person design — you will need a buddy to hold down the dividers while you pour the soap.
Safe Soaping!
- Wear proper safety gear the whole time.
- Work in a well-ventilated space.
- No distractions (keep kids and pets away).
Red Wine Recipe
Lye-Water Amounts
- 2.3 ounces lye (7% superfat)
- 8 ounces red wine (2.8 ounces reduced, per instructions)
- 2.8 ounces distilled water
- 1 teaspoon sodium lactate (optional)
Oil Amounts
- 2.6 ounces palm oil (15%)
- 3.4 ounces coconut oil (20%)
- 0.9 ounce meadowfoam oil (5%)
- 1.7 ounces sesame oil (10%)
- 2.6 ounces rice bran oil (15%)
- 6 ounces olive oil pure (35%)
Essential Oil
- 0.7 ounce black pepper essential oil
Prepare the Mold
Place the mold on a cutting board. Cut the manila file folders into 12 strips, each 11⁄2 inches wide and 17 inches long. Make sure the cuts are straight, otherwise the soap will leak under the dividers. Repeat the following steps for each individual cavity:
- 1. Fold the strip in half. Wrap the strip around the inside circumference of one of the round cavities. There will be a little bit of overlap.
- 2. Grasp the inner layer of the paper, about 1 inch down from the folded end. Pull only that layer to the center of the mold. This should create the signature swirl of the yin/yang symbol.
- 3. Once you have a good yin/yang shape, carefully pinch each divider to remove it from mold, and secure the shape with tape. Place the divider back in the mold.
Prepare the Wines
Before using wine in soap, you must remove as much of the alcohol as possible. For each wine, pour 8 ounces into a small saucepan (do not combine them) and bring to a boil. Reduce the heat and allow the wine to simmer for 5 to 10 minutes. Remove the wines from the heat and place them in an ice bath or the fridge to cool to around 60°F (15.5 °C).
Make the Soap Mixture
- 1. Measure 2.8 ounces of the cooled, boiled white wine into a heat-safe container. Add 2.8 ounces of distilled water to the white wine. Slowly add the lye to the water-wine mixture (never the other way around), adding a little bit of lye at a time, and stir until each addition is dissolved. There is a strong, unpleasant smell that comes from mixing the lye with the wine, but it will fade in the soap, and is completely normal. Set the lye mixture aside until it cools to under 130°F (54°C). If using sodium lactate, add it to the lye-water and stir to combine.
- 2. Melt the palm oil and coconut oil in their original containers, and measure the melted oils into a bowl large enough to hold all of the batter with room for mixing. Measure the meadowfoam oil, sesame oil, rice bran oil, and olive oil pure into the container. If the oils go cloudy, microwave in 15-second bursts, stirring between each time. Try to keep the temperatures of both batches of oils within five degrees of each other for best results.
- 3. Repeat steps 1 and 2 with the recipe for red wine. At the end of this step, you should have a red wine-lye mixture, a white wine-lye mixture, and two separate containers of oils.
- 4. When the oils and the lye mixtures are all under 120°F (49°C), slowly add the red wine-lye mixture to one container of oils, and the white wine-lye mixture to the other container of oils. Tap the stick blender a few times on the bottom of the bowl to release any bubbles. Do not turn on the stick blender until it is fully immersed. Stick-blend the white wine batter first for 10 seconds. Next, stick-blend the red wine batter for 10 seconds. They should both be at a thin trace.
Color and Pour
- 5. To the white wine soap, add 11⁄2 teaspoons of the rose clay dispersion.
- To the red wine soap, add 1 tablespoon of the activated charcoal dispersion.
- 6. Add the lavender essential oil to the white wine soap and the black pepper essential oil to the red wine soap. Whisk the lighter soap first to incorporate the colorant and essential oil, then use the same whisk to mix the darker soap.
- 7. Have your buddy firmly press the paper dividers against the bottom of the mold while you carefully pour the black and pink soap batter at the same time into one cavity, black on one side of the divider, pink on the other. Keep the levels of the black and pink even. Repeat this process until all of the cavities are filled.
Safety note: Carefully watch how full you are filling the molds, remembering that the dividers are deeper than the mold itself. If you pour them too full, the soap will spill out when the divider is removed.
- 8. Remove the dividers very carefully. Pinch the divider at either end of the center divider, and quickly and carefully pull it straight up and out of the soap, right into the trash can. Repeat this process for each soap.
- 9. Insert two straws into each soap: one in the center of the bulge in the pink side, and one centered in the bulge in the black side.
- 10. Allow the soap to set for 24 hours before removing the straws.
- 11. Carefully remove the straws by twisting them, then pulling straight up and out of the soap. If the straw pulls out without taking the plug of soap inside with it, use a small chopstick or similar-sized tool to pull out the circle of soap. Do not remove the bars from the mold, or the “filling” soap will seep under the main soap.
Stage 2:
Fill in the Dots
Special Tools
- Mini mixer
- 2 droppers
- Spare mold that holds at least 6 ounces
Lye-Water Amounts
- 0.6 ounce lye
- 1.3 ounces distilled water
Oil Amount
Colorants
- 1⁄4 teaspoon rose clay dispersed into 3⁄4 teaspoon water
- 1⁄4 teaspoon activated charcoal dispersed into 3⁄4 teaspoon olive oil pure
Make the Soap Mixture
- 1. Slowly and carefully add the lye to the water (never the other way around) and stir until all of the lye is dissolved. Set aside to cool.
- 2. Measure and melt the coconut oil in a container large enough to hold both the oil and the lye mixture with room to stir. Using a tall, narrow container makes it easier to mix such a small amount of soap.
- 3. When the oil is between 90° and 95°F (32–35°C) and the lye-water is between 130° and 135°F (54–57°C), slowly and carefully add the lye-water to the oil. Stir with a mini mixer or a stick blender until it reaches trace. The recipes uses 100 percent coconut oil to ensure that it will trace quickly.
- 4. Once the soap has reached trace, divide the batter in half and add the colorants.
- 5. To one container, add 1⁄2 teaspoon of the rose clay dispersion; to the other, add 1⁄2 teaspoon of the activated charcoal dispersion. Stir each color in well.
- 6. Using a dropper, fill up the holes in the yin/yang soaps using opposite colors: pink soap batter in the black soap, and black soap batter in the pink soap.
- 7. Pour any excess batter into the extra mold.
- 8. Allow the soaps to set for 48 hours before attempting to unmold. Allow the bars to cure in a well-ventilated area for 4 to 6 weeks before using, turning them every few days to ensure that they cure evenly.