Chapter 2. Introduction to GIMP
In this chapter, we’ll take a look at the basics of using GIMP: what GIMP is, where to get it, and how to navigate its user interface. Then, I’ll cover the basics of actually using GIMP to create and edit images, as well as how to use GIMP’s array of brushes and filters, so that we’ll be ready to move on to more advanced GIMP features in later chapters.
About GIMP
GIMP is a powerful, free, open source image-editing package, with a wealth of tools for manipulating and painting graphics. GIMP first appeared in 1996 as the project of Spencer Kimball and Peter Matthis, students at the University of California, Berkeley. Originally, the acronym GIMP stood for General Image Manipulation Program. Later, this was redefined to stand for GNU Image Manipulation Program when, in 1997, GIMP became part of the GNU Project. Since then, GIMP has undergone significant (if sporadic) development, and its current feature set is comparable to that of commercial image-editing packages, like Adobe Photoshop. GIMP has tools for painting; manipulating colors; and working with selections, layers, paths, and channels. It also offers a wide variety of filters and plug-ins and supports numerous image formats.
GIMP is available for Linux, Mac, and Windows. Official builds for Linux and Mac OS X can be found at http://www.gimp.org/. You’ll find Windows builds at http://gimp-win.sourceforge.net/ and unofficial Mac OS X builds (with some useful extra plug-ins and filters) at http://gimp.lisanet.de/.
Why GIMP?
You might be wondering why I’ve chosen to cover GIMP in a book that is primarily about creating 3D art with Blender. The reason is that while Blender is a powerful 3D graphics application, we’ll need to do some 2D image editing throughout the book. For example, we’ll need to prepare reference images, create textures for models and alphas for sculpting brushes, and add some final tweaks to our final renders. Though Blender does have 2D painting tools within the UV Image editor, we really need something more capable and geared toward editing images.
GIMP is just such a tool, and it makes for an excellent companion application to Blender when creating 3D digital art. In Chapter 3, we will prepare (or even paint) our reference images in GIMP, using guides to align orthographic references and layers to create collages out of multiple images for quick reference. In Chapter 11, we will do some of our texture painting in GIMP, using layers to combine baked images with other elements, such as photos, and we’ll use GIMP’s painting tools to refine and add to textures we paint in Blender. Finally, in Chapter 14, we will do some touching up of our final renders in GIMP.
The GIMP User Interface
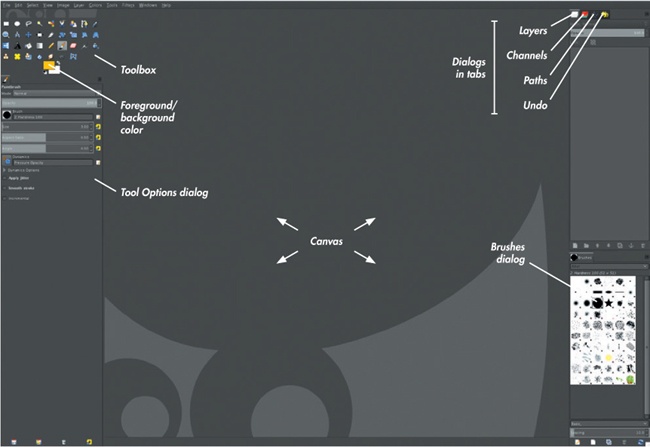
Like that of Blender, GIMP’s user interface is known for being a little unorthodox. Primarily, this is due to its default multi-window layout, where the canvas, Toolbox, and other dialogs are split into separate windows. This is easy enough to get used to, but for a tidier layout, switch to the non-blocking, single-window layout by enabling Single-Window mode in the Windows menu (see Figure 2-1). Most of the screenshots in this book use this layout, with extra dialogs added as needed.
The Toolbox
GIMP’s main tools are housed in the Toolbox (see Figure 2-1). Click the icon for each tool type to switch to that tool so that you can use it on the current layer on the canvas. GIMP offers the following tools (listed left to right, top to bottom in the Toolbox).
Selection. These tools let you make selections in order to restrict the areas of the current layer that you can paint, apply filters to, or copy and paste from (see Selections). The Rectangle and Ellipse Select tools let you make selections using particular shapes. Lasso Select lets you draw freehand selections. Magic Select automatically selects areas that are similar to the areas you click on the canvas, and Select by Color selects similar colors. Scissors Select lets you draw a rough outline around a selection by clicking to place a series of points; then GIMP tries to generate the best selection by detecting edges in the image. Foreground Select lets you define a rough foreground area by painting on it, and then it tries to generate a selection using the painted area as a guide.
Paths. This lets you draw paths using Bézier curves. The paths you create can be managed from the Paths dialog, and they can be used to generate selections or be “stroked” to create precise brushstrokes and different effects.
Color Picker. This lets you choose colors from the canvas by clicking them.
Zoom. Use this to zoom in and out of the canvas.
Move. This lets you move layers. By default, it moves the topmost visible layer under your cursor, but you can use the Tool Options dialog to set it to move the active layer instead (regardless of where you click).
Align. This offers several features for aligning layers and selections.
Crop. Use this to crop an image. You can also crop the image to a selection from the Image menu.
Transformation. These tools (including Rotate, Scale, Shear, Perspective, and Flip) will transform the current layer or selection.
Text. Create text on the canvas as a new layer. Text layers remain editable as strings of text (meaning you can edit an existing text layer with the Text tool) until you paint on or apply filters to them, at which point they are converted to pixels.
Bucket and Blend. Fill the canvas with solid colors or gradients.
Pencil, Paintbrush, Eraser, Airbrush, and Ink. These standard painting tools behave like their real-world equivalents. The Pencil makes sharp, pixelated marks on the canvas, while the Paintbrush makes smoother strokes. The Eraser erases, the Airbrush gradually adds color as you hold down the mouse, and the Ink tool makes flowing, calligraphic lines.
Clone, Heal, and Perspective Clone. These let you “clone” image data from one part of the canvas (the clone source) to another (wherever you paint) and are therefore useful for creating textures and filling in areas. The Heal tool is particularly useful, as it automatically blends together the boundaries of the newly cloned pixels with the original surroundings. CTRL-clicking on the canvas sets the clone source, after which you can stroke normally to clone pixels from the source to another area on the canvas.
Blur and Smudge. These let you blur or smudge pixels.
Dodge/Burn. This lets you selectively brighten (dodge) or darken (burn) areas of your image, which can be useful for modifying shadows and highlights on an image. Use these effects sparingly because it’s easy to be heavy-handed with this tool.
Cage Deform. This lets you draw a cage around part of an image and then freely transform it by adjusting the shape of the cage.
The two color swatches at the bottom of the Toolbox (see Figure 2-1) denote the current foreground and background colors. By default, most brushes paint with the foreground color, with the background color acting as an alternate color that you can quickly switch to by pressing X. (Some tools, such as the Gradient tool, use both foreground and background colors at the same time.) The two small icons at the upper right and bottom left of the color swatches allow you to switch between them and reset them to black and white, respectively.
The Canvas
The canvas is where GIMP displays currently open images. You can paint, make selections, and use all of GIMP’s other tools by clicking the canvas. Rulers down the left and top edges of the canvas show the position of the cursor with small arrows as you move around. Clicking and dragging out from these rulers creates vertical and horizontal guides that your cursor and selections will snap to by default. This snapping action can come in handy when lining up images for use as reference (as you’ll learn in Chapter 3). Along the bottom of the canvas are options for controlling the rulers’ units of measurement and the zoom level of the canvas.
Dialogs
Most of the information about your current tool and currently open images is available from GIMP’s dialogs. Some dialogs are visible by default when you start GIMP, with others found under Windows▸Dockable Dialogs.
Two of GIMP’s most important dialogs are the Tool Options and Layers dialogs. You can see both in Figure 2-1, Tool Options on the left below the toolbox, and the Layers dialog on the top right with the Channels, Paths, and Undo dialogs. The Tool Options dialog contains the options for the currently selected tool that define how it works. For example, in the case of the Paint Brush tool, the Tool Options dialog lets you adjust the brush opacity, shape, size, and aspect ratio, as well as allowing you to choose from GIMP’s brush dynamics options. The Layers dialog displays the layers that make up the current image and lets you toggle their visibility, lock them to prevent further editing, or edit their blend modes to change how they combine with other layers. The icons at the bottom of the Layers dialog let you add, delete, and duplicate layers, as well as create groups to organize layers. (We’ll cover working with and organizing layers in further detail when we discuss painting textures in Chapter 11.)
GIMP allows you to rearrange and reorganize dialogs as you wish. The default dialogs are already grouped and organized into tabs and columns down the sides of the main canvas when in Single-Window mode. To rearrange tabs, click and drag the icon at the top of the dialog either into another group of tabs or to the border between two areas of the UI to place the tab in its own row or column.
Using GIMP
Now we’ll explore how to actually use GIMP to create, paint, and edit images. In later chapters, we’ll look at much of this in more detail; for now, we’ll just look at the basics. As we go along, I’ll point to later chapters that go into each feature in more detail.
Creating an Image
Unlike Blender, GIMP does not open any default file at start-up. When you first start the program, you can either open an existing image (File▸Open) or create a new one (File▸New). When opening images, GIMP normally opens each image as a new file, but you can use File▸Open as Layers instead to open images as new layers within the current file.
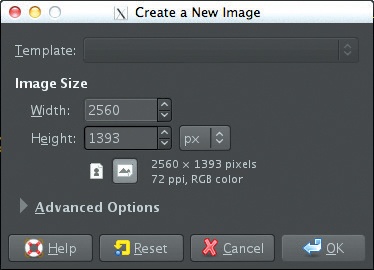
When you create a new file (see Figure 2-2), GIMP asks you what dimensions you want it to have in pixels and then creates a new, single-layer image with a white background that you can begin painting on.
Painting and Drawing
Painting and drawing are accomplished in GIMP simply by clicking and dragging strokes on the canvas, using one of the available drawing tools. Your stroke will be drawn using the current foreground color and the brush shape selected in the Tool Options dialog or the Brushes dialog.
Brushes and Brush Dynamics
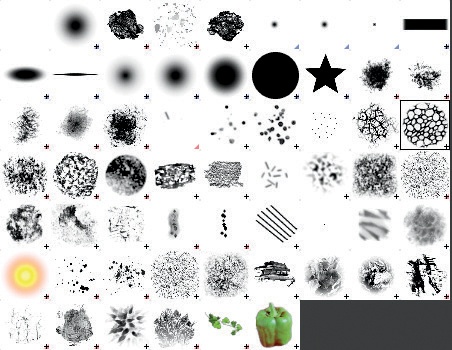
GIMP has a sophisticated brush engine that uses various inputs to determine the appearance of your strokes. In addition to any settings you apply in the Tool Options dialog, such as opacity or size, you can also choose from a variety of brush shapes in the Brushes dialog (see Figure 2-3). Your strokes will be drawn using the shape you select.
GIMP can also use information such as the speed at which you draw a stroke or the pressure input from a graphics tablet to affect the look of your stroke. These options are called Paint Dynamics in GIMP. You can choose different dynamics from the Tool Options dialog or create and edit your own in the Paint Dynamics Editor dialog. (We will examine this feature in more detail when creating our own brushes in Chapter 11.)
Filters
GIMP’s filters act as a procedural way to modify your images by applying an algorithm to the pixels of the current layer to create a new result. There are several filters, including ones for blurring and sharpening images, removing or creating noise, and distorting and deforming images. You will also find filters that apply artistic effects and ones that allow you to create completely new images and patterns from scratch.
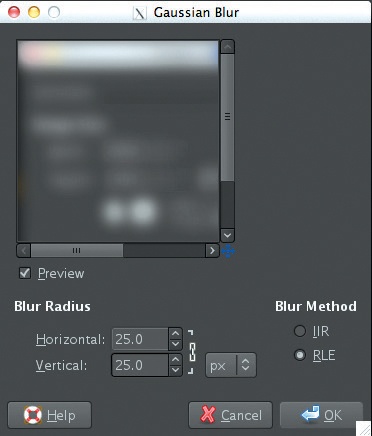
Choosing a filter from the Filters menu usually brings up a dialog with some options that adjust how the filter works. For example, if you select the Gaussian Blur filter, the dialog should contain options for the radius of the blur and the blurring method used, as well as a small preview (see Figure 2-4). Clicking OK in this dialog applies the filter to the whole image. (We will use some of these filters when painting textures in Chapter 11.)
Layers
As a layer-based image editor, GIMP lets you create an image from multiple layers composited on top of one another, combining elements from each. The Layers dialog shows you all the layers in your image and allows you to edit their ordering and how they are combined. By default, each layer replaces the one below it, with any transparent parts letting the layer underneath show through. However, you can also choose from several other ways to blend layers using the Layer Mode drop-down menu at the top of the Layers dialog.
When you paint on the canvas (or use any other tool or filter), your strokes are painted onto the active layer (highlighted in the Layers dialog). We’ll cover layers in more detail in Chapter 11.
Selections
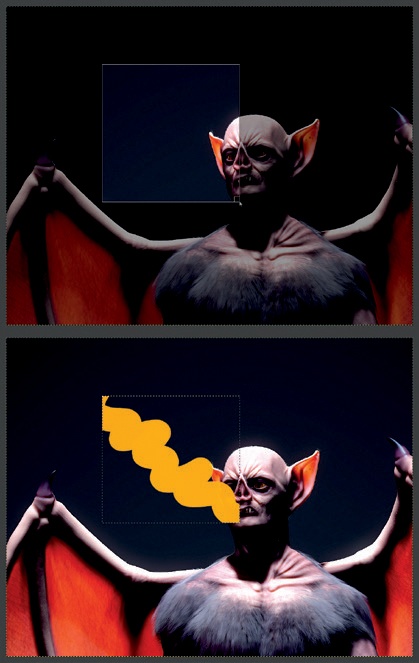
One way to restrict the pixels you paint on is to use GIMP’s selection tools. With these, you can draw out a selection you wish to work on within the current layer. Brushes, filters, and other tools will then affect only the selected pixels (see Figure 2-5). Selections come in handy when you want to work on an isolated part of an image. They also let you copy (CTRL-C) and paste (CTRL-V) parts of your image or split part of an image off into a new layer. We’ll cover these tools in more detail in Chapter 11.
To cancel a selection, click outside of it with a select tool. You can also invert it (CTRL-I), swapping the selected and unselected areas. You can add to or subtract from your current selection by holding the SHIFT or CTRL keys while dragging out a selection. In later chapters, we’ll look at other ways to work with selections using tools like GIMP’s Quick Mask feature.
Saving and Exporting
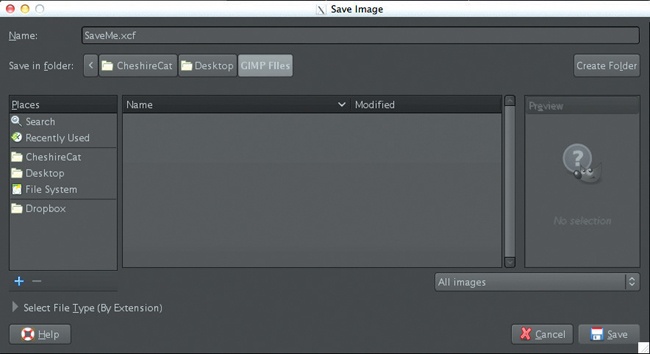
GIMP can open almost any image format, but once you have an image open, it distinguishes between saving an image (CTRL-S), which it does only in its native .xcf format, and exporting it (CTRL-E) to a more conventional image format, such as a JPEG or Targa. You can choose the image format to export to by adding the correct suffix to the file name (for example, .jpg for JPEG and .tga for Targa) or by selecting it manually from the list at the bottom of the Save dialog (see Figure 2-6).
When working on the textures and other images for the projects in this book, I both save and export my textures. Saving the .xcf file means I have my texture in a layered format that I can edit later, while exporting it to a normal image format such as .png or .tga gives me an image that I can open and use in Blender.
In Review
This chapter has offered a basic, high-level introduction to GIMP. We looked a little at GIMP’s history, what it does, and where you can get it. We also looked at the layout of GIMP’s UI and its available tools, and we covered the basics of how to work with images in GIMP. We explored the basics of working with tools, filters, layers, and selections and discussed saving, loading, and exporting.
In Chapter 3, we’ll prepare to work on the different projects in this book before we put GIMP and Blender to work in earnest.
