Chapter 11. Texture Painting
In the previous chapter, we used Blender to generate textures automatically; in this chapter, we’ll shift our focus to creating textures by hand. Using a mix of hand painting, working with photo textures, and utilizing the textures we created in Chapter 10, we’ll bring color and texture to the objects in our scenes. We’ll also cover creating such images as specular, hardness, and alpha maps, which we’ll use in Chapter 12 to influence other aspects of the materials we make, such as their shininess, smoothness, and transparency. We’ll look at creating both tileable textures that can be used on multiple objects and unique textures that are UV mapped to specific objects using a mix of both Blender and GIMP.
Let’s begin with a look at the tools available.
Texturing in Blender
In Blender, we can paint in 2D, using the UV Image editor, and we can paint directly on objects in 3D, using Texture Paint mode in the 3D Viewport. This gives us a great degree of flexibility in how we paint our models. The brushes work across both the UV Image editor and Texture Paint mode, making texturing with Blender straightforward and consistent.
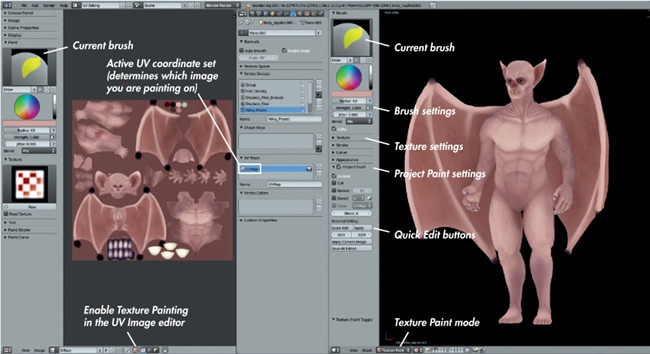
Once you select a mesh that has been unwrapped and assigned an image in the UV Image editor, you can switch to Texture Paint mode in the 3D Viewport. (Use the mode drop-down menu in the header, as shown in Figure 11-1.) By default, you’ll see the texture on your mesh and be able to paint on it using Blender’s texture brushes.
Blender offers several brush types that you can use to paint textures on your model:
Draw, Brush, and Texdraw. These all offer the same basic functionality, allowing you to paint directly on your mesh with the color specified by the color picker.
Clone. This brush allows you to clone texture information from one part of your model to another or from one UV coordinate set to another. With the Clone option turned off in the Project Paint settings (see Project Paint), the brush will take the texture information lying under the 3D Viewport cursor and copy it to where you paint, allowing you to clone from one part of the model to another within the same texture. With the Clone option turned on in the Project Paint settings, the brush will instead clone texture information from the same part of the mesh but from the texture assigned to a different UV coordinate set (the one chosen in the Project Paint settings).
Smear. This will smear your texture in the direction of the brushstroke. It can be used to blend colors and to smudge out mistakes.
Soften. This blurs the texture under your stroke, reducing noise and fine details.
These brush types can be duplicated and modified just like Blender’s sculpt brushes, allowing you to create a variety of brushes tailored to your needs. Also, as in Sculpt mode, you can apply textures to your brush using the Texture panel of the Tool Options region. The texture you apply will then multiply with your brushstrokes while you paint.
Project Paint
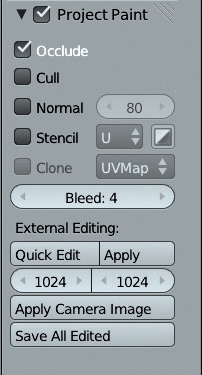
Blender has two ways to paint textures in Texture Paint mode. The older, legacy method, while useful, has significant limitations. The newer Project Paint method offers a more advanced set of tools, including ones that allow you to mask and clone textures using other UV coordinates and images and to paint only on surfaces visible from your viewpoint. When enabled, Project Paint gives you the options shown in Figure 11-2. I discuss these options below in the order in which they appear on the Project Paint panel.
Occlude. This prevents painting “through” the mesh onto surfaces behind visible ones.
Cull. This prevents painting on faces that face away from you.
Normal. This blends out the strength of your strokes depending on whether they are facing you (as with Cull, but with a smooth fade-out). You can control the limits of this fade out using the Angle setting to the right of the checkbox.
Note
The above options are on by default, but it can be useful to turn them off to quickly paint large parts of your model with a single stroke.
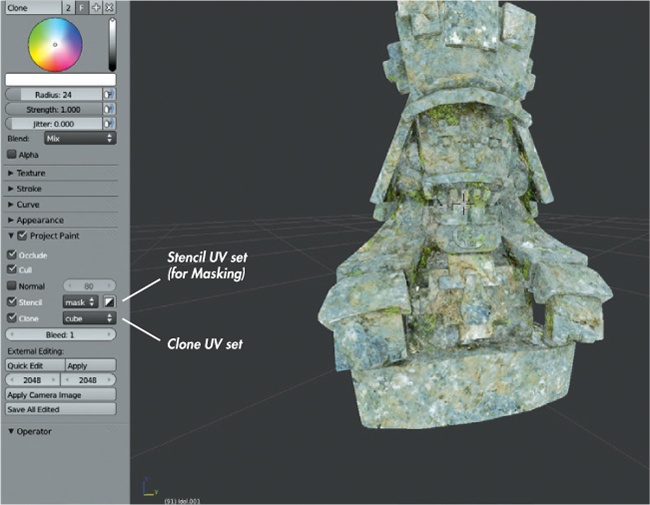
Stencil. This allows you to use an image mapped to the object’s UV coordinates (which can be a different set from the one you are painting on) to mask the effect of your brushstrokes. This setting can be used to restrict the area you are working on or to simplify adding texture to your model, as you’ll see later in this chapter. To the right of the stencil checkbox, you can select which UV coordinate set (and thus which image) to use for masking and whether to invert the mask.
Clone. This allows you to clone texture information from one UV map to another. (Your brushstrokes will clone to the image assigned to the active UV set from the one selected in the drop-down menu next to the checkbox for this option.) This setting lets you, for example, project your model onto a photo with one UV coordinate set and then clone that to another, more neatly laid out UV map for further texturing. (We’ll use this option later for the Jungle Temple.)
Bleed. This determines the amount Blender bleeds textures outward from the edges of the UV islands when you paint over a seam. This prevents seams from appearing in your texture, similar to the Margin setting for texture baking.
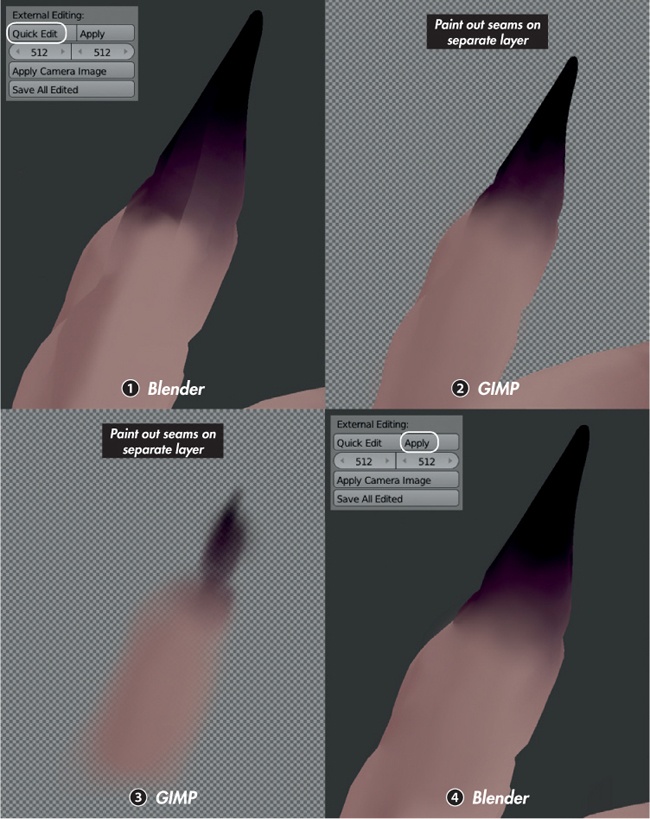
Quick Edit. This is very useful when texturing, particularly for cleaning up seams and texturing tricky areas where you might want the extra tools available to you in a 2D painting program like GIMP. Quick Edit takes a snapshot of your model from the current viewpoint and opens it in the image editor of your choosing. (To choose your image editor, open the File tab of Blender’s user preferences under Image Editor; then, simply set the path to GIMP or whatever image editor you wish to use.) You can then paint your texture in the image-editing program and save it. Clicking Apply in Blender will project that texture from the viewpoint it was originally taken from. (You don’t need to worry about moving the camera; Blender will remember that setting.) Later in this chapter, we’ll cover using this feature to fix seams.
Apply Camera Image. Like Quick Edit, this projects an image from the camera’s current viewpoint. It will bring up a drop-down menu of any images you have already opened in Blender for you to choose from, and it’ll then project your chosen texture onto your model.
Save All Edited. This saves any textures that you have edited while working in Texture Paint mode, though they must have already been saved once manually or Blender will not know where to save them. Generally, it’s better to remember to save manually anyway so that you can keep track of which textures you have worked on already.
Painting in the UV Image Editor
You can also paint textures in Blender’s UV Image editor. To do so, click the paintbrush icon in the header of the UV Image editor region. You can then paint on the current image in the UV Image editor using the same brushes as in the 3D Viewport. By using the 3D Viewport and UV Image editor side by side (as in Figure 11-1), you gain a lot of control when painting textures.
Note
Later we’ll render some of the projects in this book using Blender’s Cycles renderer, but while texture painting, it’s easier to leave the renderer set to Blender Internal. This is because Cycles can cause Blender to behave a little strangely when texturing objects with multiple UV coordinate sets.
Texturing in GIMP
While we can paint in 2D in Blender, GIMP offers a much wider array of painting tools, such as selections, masks, layers, and filters. This variety of tools makes GIMP (or another image editor, such as Photoshop) indispensable for working on textures. In particular, the ability to work with layers makes it much easier to create textures as nondestructively as possible, building up one layer and then adding details in a new layer over the top.
The ability to work in layers also allows you to combine baked textures with your hand-painted textures easily. For example, you can add an ambient occlusion texture over another layer of your texture map to add shadowing. GIMP also has a more advanced brush system, making it easier to paint detailed textures. (I covered the basics of painting in GIMP in Chapter 2, so we’ll cover only the more texturing-specific aspects of GIMP in this chapter.)
Creating Brushes for Texturing in GIMP
GIMP’s brushes are easy to edit and are capable of creating a wide variety of looks. When texturing, it can often be useful to create custom brushes that aid in quickly building up texture. In particular, when used as clone brushes or as paintbrushes, brushes with a speckled or grungy look are often useful in blending between different colors and textures.
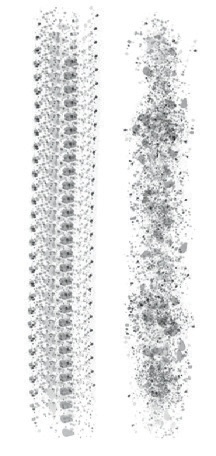
For example, let’s create a grungy-looking brush that will come in handy when texturing the Jungle Temple. Its effect can be seen on the right of Figure 11-5. To create it, we start with a photo texture from CGTextures (http://cgtextures.com/) and then refine it into a brush that can be exported as a default GIMP brush, which can be used again and again for texturing or painting in GIMP.
GIMP brushes are image files that are used to control the shape of a brush. RGB (color) images are used as is (more like a stamp than a brush) and will not inherit the brush color. Black-and-white images interpret black as the shape of the brush and white as transparent, and they take their color from the color you have selected in GIMP’s color picker. To create a GIMP brush, all we have to do is create a black-and-white image and save it in one of GIMP’s brush formats (.gbr or .gih—I’ll discuss the difference between these in a second).
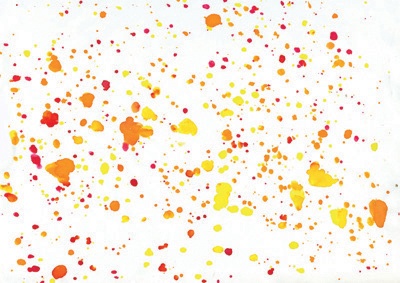
Start with a photo of some paint splatter from CGTextures (see Figure 11-3) and choose Colors▸Desaturate to convert the image to black and white, selecting the Luminosity option for desaturating the image in order to give more variation in brightness.
Next, identify a square area that might make a good brush and select that area with the Rectangular Select tool (R; press and hold SHIFT while dragging to make a square selection). Copy this area (CTRL-C) and paste it as a new image (CTRL-SHIFT-V), which you’ll soon save as a new brush.
While you’ve already desaturated the image, it’s still encoded using RGB colors, so switch to using black and white values with Image▸Mode▸Grayscale.
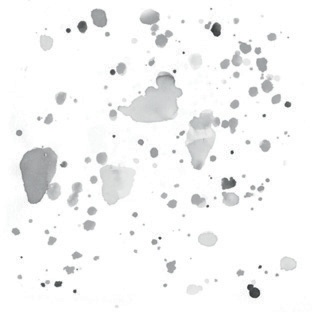
Next, make a few tweaks to the new image, painting out some of the splatter that clips the edge of the canvas. The texture is now ready to save, as shown in Figure 11-4.
Adding Variation to a Brush
You could stop here and export the brush as a .gbr brush file, but when used as a brush, it would simply repeat this one image over and over. To give the brush more variation, repeat the steps above, adding more layers to the brush image, and then save it as an animated .gih GIMP brush. This brush will use a different layer of the brush image each time it paints part of the stroke, making the stroke look more varied. To do this, take the following steps:
Select more regions of the original image and copy and paste them as new layers into the brush image (CTRL-V, then click New Layer in GIMP’s layers dialog). After doing this a few times, you’ll have five different layers with different splatters on them.
Export this as a .gih brush file to GIMP’s brushes folder[1] (select File▸Export, set the file type to .gih, and then click Save).
GIMP should give you a dialog that lets you define how your brush is set up. You can stick with the defaults if you have placed each “frame” of your brush on a different layer; just be sure to change the brush’s description to something helpful and check that the Cells setting is the same as the number of layers in your image. If you wish, you can adjust the default offset of the brush or the distance between each brush mark placed on the canvas when you make a stroke. For heavy, painterly brushes, choose a small value, but for this grungy-looking brush, a wider spacing is more appropriate—say around 40.
With these settings in place, click Export. Now if you click Refresh Brushes at the bottom right of the Brushes dialog, you should be able to select the new brush and start testing it out. Its effects at the moment are shown on the left in Figure 11-5.
You’ve created an animated brush with a few different shapes, but notice that they repeat quite frequently (left image of Figure 11-5). To fix this, you can tweak GIMP’s brush dynamics to vary the brush some more along the length of the stroke.
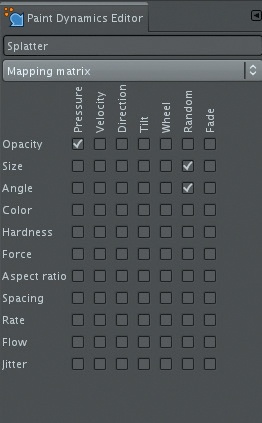
To tweak GIMP’s brush dynamics, open the Brush Dynamics dialog (Windows▸Dockable Dialogs▸Paint Dynamics and click New Dynamics, the second icon on the bottom left of the dialog). This opens the Paint Dynamics editor (see Figure 11-6), where you can use the mapping matrix (the large grid of checkboxes) to set the brush’s behavior. The top row of the mapping matrix lists all sorts of inputs that can be used to drive the brush’s behavior, and the left side of the matrix lists the brush settings these inputs can be used to affect. Set Pressure to affect the brush’s opacity and Random to affect the size and rotation of each brush mark. With these dynamics in place, you now get a nice random, grungy-looking brushstroke that you can use for all sorts of textures (see Figure 11-5, right line).
Texturing the Bat Creature
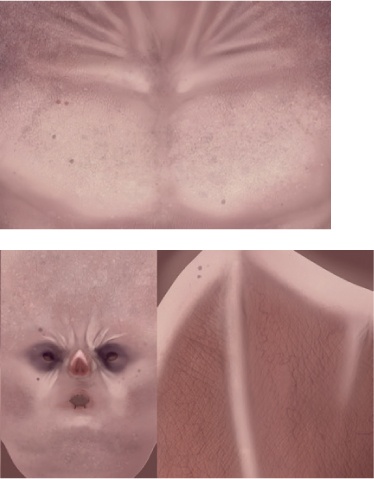
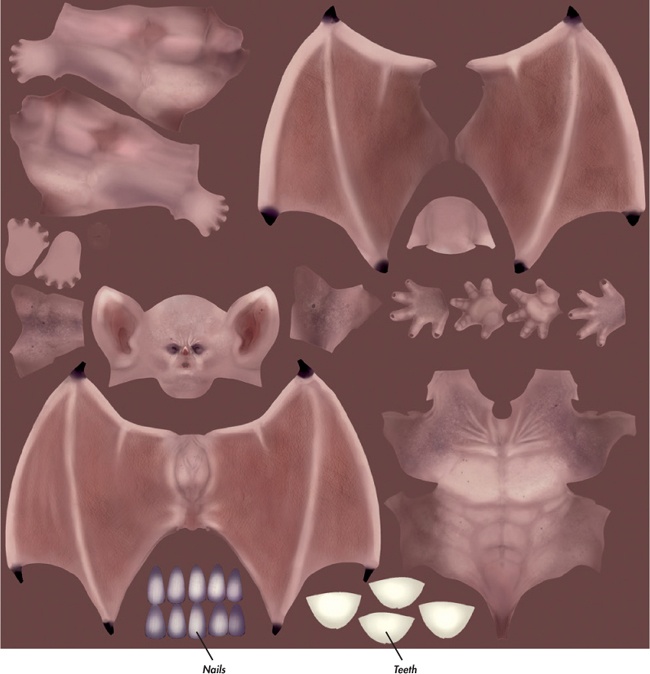
I wanted textures to make the Bat Creature look like a creature of the night: patchy, purplish skin and discolored nails, with some extra wrinkles, freckles, and veins to add some details on top of those I sculpted. To create them, I built up my textures in stages, first blocking in basic colors and then smoothing and refining them before adding the details.
I started by painting some flat colors in Blender’s Texture Paint mode. I then saved my work and opened it in GIMP for finer texturing—for example, I combined my painted texture map with the ambient occlusion map I baked in Chapter 10. I then used GIMP to manipulate and supplement the diffuse texture to create specular and hardness textures.
To begin blocking in my colors, I dropped into Edit mode and assigned a new blank image to the mesh for the Bat Creature (the mesh used for baking textures in Chapter 10, not the high-res sculpted mesh). The New Texture dialog lets us choose a color to fill the new image, so I set it to a muted pinkish purple—a sort of unhealthy skin color that might befit a denizen of the night.
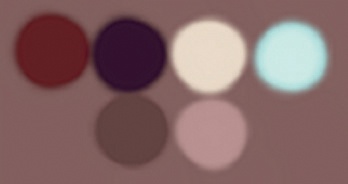
Next, I established an overall palette of colors for my texture in the UV Image editor, selecting an unused space not mapped to any part of the mesh (see Figure 11-7). I chose a darker purple for use in shadowed areas, like the area under the eyes; a lighter yellowish color for bony areas; a dark, saturated red for veins and areas with a lot of blood flow; and a darker and lighter version of the original base color to act as shadows and highlights. (We’re not painting lighting into our texture; I’m talking only about lighter and darker skin coloration in different areas.) I also chose a light contrasting color to act as a highlight in some areas. I painted a little of each onto my image so that I could color pick from them for use later, either in the UV Image editor or when painting in the 3D Viewport.
Materials and UI Setup for Painting
When in Texture Paint mode, Blender will by default show the texture you are painting on applied to your mesh in the 3D view, with Blender’s default solid shading. As with sculpting, however, we can use Blender’s GLSL Shading mode to display the texture in different ways by adding simple lights to the scene (see Chapter 13 for more on lighting) and a simple material to the mesh (see Chapter 12 for more on materials).
For the Bat Creature, I added a simple material to the bat object, which I named Body_TexturePaint. In the Textures tab of the Properties editor, I added a new texture to this material, set its type to Image, selected my painted image that I had already assigned to the object’s UVs, and set the mapping type for the texture to UV.
Adding a Light
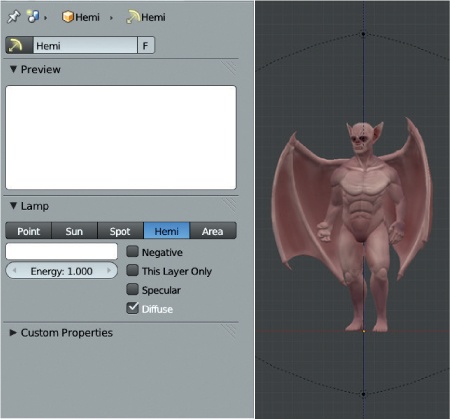
To make the object visible in GLSL Shading mode, we need to add a light, so in Object mode, I created a new Hemi lamp to light my object. Switching into Textured Viewport mode (make sure that shading is set to GLSL in the Display panel of the Properties region), I could see that this lit the Bat Creature from above only, so I duplicated the lamp and rotated it 180 degrees to light the object from below. Next, I decreased the intensity of the new duplicate to around 0.3 in the Lamp’s Object Data tab in order to leave a little difference between the lighting from above and below the character. I also turned off the specular component for the lamps (see Figure 11-8) so that my mesh wouldn’t look shiny.
Note
If you find painting in Blender becoming unresponsive, create a lower-res mesh to paint on by duplicating the sculpted mesh and applying the Multires modifier at a lower level. Because this lower-res mesh shares the same UV coordinates, you can paint on it and apply the textures to the higher-resolution model later.
Laying Out Basic Textures in Blender
I could now start laying out some basic textures on my model. Using the Standard brush in Texture Paint mode, I sampled from my palette of colors in the UV Image editor and then painted on my model in the 3D Viewport.
I began by using anatomical features as a guide for colors, making bony areas lighter and yellower; recessed areas, like the eyes, dark and purple; and the back darker. I made areas with a lot of blood flow or thin skin, like the wings and ears, redder and slightly highlighted some of the muscles on the torso and legs with lighter colors. I worked with Occlude turned on in Project Paint, but Normal and Cull turned off, as these settings allow you to paint smoothly on the mesh even at side-on angles. At this stage, the aim is only to establish a rough idea of the colors you want.
Switching to GIMP
With my basic colors laid out, I needed more advanced painting tools to start blending colors and adding details. Thus, it was time to move to GIMP. I saved my texture in Blender as a .tga image (press F3 in the UV Image editor to save the active image). I then loaded the saved image in GIMP and began cleaning up and smoothing out the colors I had painted in Blender, fixing artifacts and filling in awkward areas. This process is best done with the Paintbrush tool, using a relatively large, soft-edged brush to simply color pick (use CTRL-click to do this without switching away from the Paintbrush tool) from existing colors and blend areas together (see Figure 11-9). (Another way to blend colors is to use the Smudge tool and a grungy-looking brush, like the one we created earlier in this chapter, to blend back and forth between two areas, mixing their colors.)
To add detail to my texture, I incorporated the ambient occlusion map I baked in Chapter 10. Using File▸Open as Layers, I opened my baked ambient occlusion map as a new layer on top of my painted texture.
I cleaned up this layer a bit, as I had done for the rough diffuse color. For cleaning purposes, I used GIMP’s brushes and color picking, blending areas that didn’t look right with the Paint tool or using the Clone tool to fill in areas while preserving texture.
Layer Modes and Opacity
Initially, our ambient occlusion map is imported as a normal layer on top of the texture, completely replacing it. To rectify this, we can use GIMP’s layer-blending modes to find a more appropriate way to blend the two.
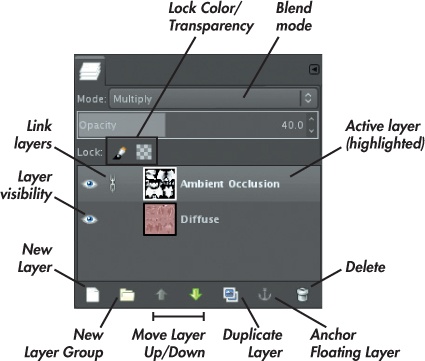
GIMP’s Layers dialog shows each layer in your image (see Figure 11-10, with the Ambient Occlusion layer selected and its blend mode set to Multiply). At the top of the dialog, a drop-down menu lets you choose the Selected Layers blending mode. Different blending modes have different effects: Normal lays one over the other, Multiply multiplies the values of each pixel in the two layers together, and Add adds them together. The Overlay mode causes the layer to brighten or darken the layers below it, depending on its value—dark values make areas darker, light values make them lighter, and mid-gray has no effect. Experiment with a variety of layer modes when combining images to find the one that works best. To combine the ambient occlusion map with my painted colors, I set the mode to Multiply.
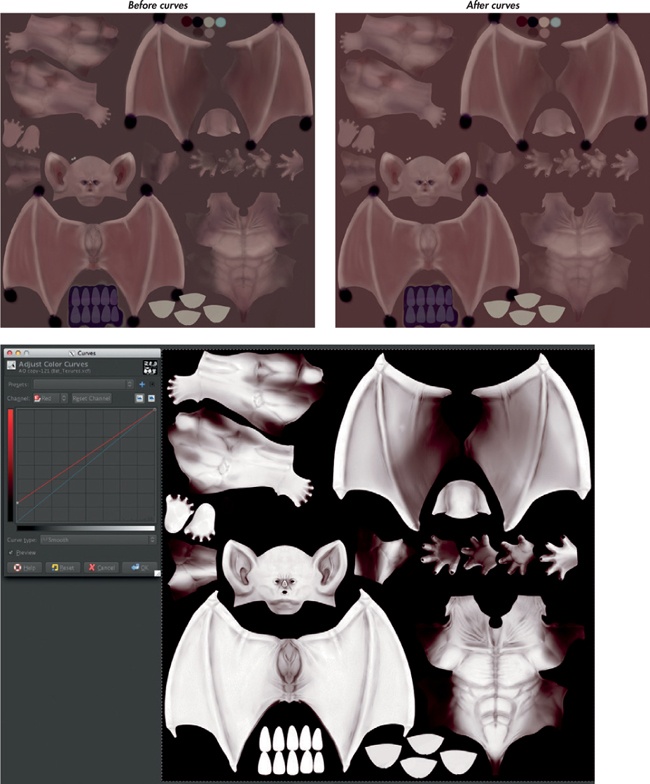
You can control how much one layer blends with another with the layer’s Opacity setting (see Figure 11-10). Because my Ambient Occlusion layer darkened the underlying texture quite a lot, I reduced its opacity to about 40 percent. The result of the ambient occlusion layer at this opacity is shown at the top left of Figure 11-11.
Adjusting Colors
GIMP has a variety of tools for manipulating the colors of an image, both from its wide array of filters and from the Colors menu. For example, you can adjust the exposure of an image—its hue and saturation—and the brightness of each channel using curves or sliders, among a wealth of other options.
At the moment, our texture for the Bat Creature looks rather gray because the black-and-white ambient occlusion texture is multiplied on top. To fix this, we can adjust the curves on the Ambient Occlusion layer to introduce some more red, making the shadows more saturated and redder. To do so, take the following steps:
Choose Colors▸Curves with the Ambient Occlusion layer selected, which brings up the Curves dialog.
Figure 11-11. Incorporating the ambient occlusion map into our texture. Top left: The ambient occlusion texture multiplied over the rough diffuse texture at 40 percent opacity, before any alteration. Bottom: Adjusting the colors of the ambient occlusion map with the Curves tool, to make it redder. Top right: The reddened ambient occlusion map multiplied over the diffuse texture at 40 percent opacity.This lets you modify the values of each channel (red, green, blue, and alpha) in an image using a curve function.
To add red to the darker portions of the image, select the red channel from the Channel dropdown menu, grab the bottom left point of the curve, and drag it upward (see Figure 11-11, bottom).
Click OK to apply the curves, and the ambient occlusion map now gives nice saturated crevices and shadowed areas to the skin (see Figure 11-11, top right).
Saving and Exporting Back to Blender
The texture isn’t finished yet, but it’s important to save often, and doing so can be a useful way to see how our current work-in-progress texture looks in Blender on the model. GIMP distinguishes between saving (CTRL-S) in its native .xcf format, which preserves layers and other information, and exporting images to other formats, such as .jpg or .tga (CTRL-E). We need to do both so that we have the GIMP file with all its layers available for further editing as well as an image that we can use in Blender.
First, I saved my image as a .xcf file, and then I exported it as a .tga image. To open this image in Blender, I selected my Bat Creature object, switched to Edit mode, and in the UV Image editor, used Image▸Replace Image to swap the old, roughly painted texture for the new one. (Remember to do this for the material, too—though if you used the same image for the texture as you applied to the mesh, it should update automatically.) You should then see your updated texture on your mesh. You could now start painting in Blender again, but I opted to stay in GIMP for the moment.
Adding Details
Back in GIMP, with our ambient occlusion now working well alongside our painted texture, we can start adding more details. I used a mix of hand painting and photographic textures.
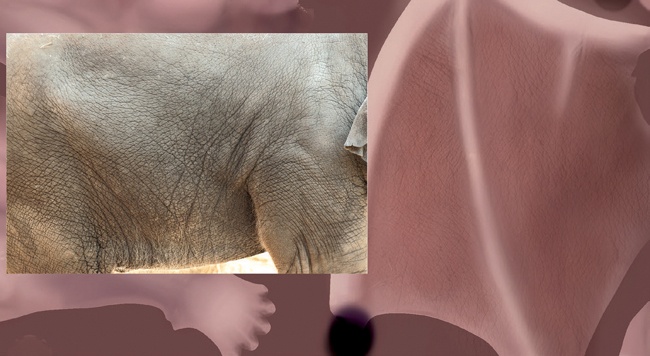
To start, it’s handy to build up some texture using photos, followed by adjusting and supplementing the existing texture with some hand painting. To that end, I grabbed some elephant-skin photos from CGTextures, with some wrinkles and skin texture that complemented my texture nicely. I opened them as layers in my texture image file and scaled them so that the scale of the wrinkles in the texture roughly matched those of the Bat Creature.
I used the Move tool to spread out the textures on my image, knowing that their precise placement wouldn’t be important for the time being. I then created a new layer (SHIFT-CTRL-N or Layer▸New Layer) and set its blending mode to Overlay. Next, by dragging the layer’s icon in the Layers dialog up or down, I placed it between my original color texture and my Ambient Occlusion layer in the layers stack.
Using the Clone tool (C), I first set the clone source (CTRL-click) to one of the skin textures, making sure it was selected in the Layers dialog first. Then, I switched to my new layer and began cloning the skin texture in various areas (see Figure 11-12). I frequently switched between the different skin textures to find areas that would suit the different parts of my creature’s skin. I also used the Flip (SHIFT-F) and Rotate (SHIFT-R) tools to flip and rotate the skin images to see whether they worked better in different orientations before cloning. To get at areas hidden by the skin images, I toggled their visibility using the eye icon in the Layers dialog or simply moved them to one side with the Move tool.
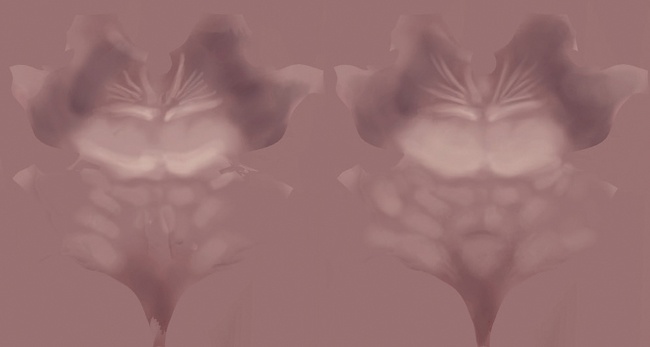
With a first layer of detail built up from photo images, I hid the photo textures and started working on some hand-painted details (see Figure 11-13). First, I added some veins to the wings on a new layer using the Paintbrush tool and a soft-edged brush. Next (on another new layer), I added some spots to the skin in areas like the shoulders, temples, and back in both darker and lighter colors. The Grunge brush I used earlier works well for this with the spacing (found in the Brushes dialog) turned up higher, as does a simple, small, hard-edged brush for painting specific spots. Keeping different kinds of details on different layers makes it easy to mix and combine them in different ways and comes in handy when creating specular and other kinds of maps.
Nails and Teeth
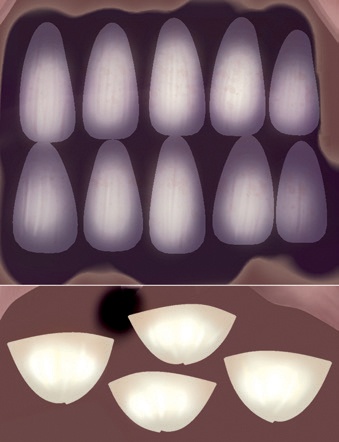
The nails and teeth of the Bat Creature are included in the same UV map as the body. For the nails, I painted a dark purplish color with some brighter yellowish highlights. For the teeth, I used a yellow color with some brown near where the teeth would meet the gums, as shown in Figure 11-14.
Fixing Seams
With my texture for the skin nice and detailed, I headed back to Blender to check that it worked okay and then started fixing any seams in the texture. To do this, I exported my skin texture from GIMP and replaced the old skin texture in Blender with the new exported version.
There were bound to be some artifacts in the texture along UV seams, where I had painted over the edges of a UV island in GIMP. To fix these, use Blender’s Quick Edit feature:
To fix a seam on one part of your model, navigate the 3D view to an angle where the seam is clearly visible.
To make sure that no shading is visible on screen, set the viewpoint display mode to GLSL and set the material to Shadeless in the Materials tab of the Properties editor.
In Texture Paint mode, set the Quick Edit resolution to 1024 and click Quick Edit from the Tool Shelf (see Figure 11-15 2). This opens a screenshot of that view in GIMP, which we can then start painting over.
For best results, scale up the screenshot in GIMP, using Image▸Image Size, and set the new size to 2048. Then, create a new transparent layer on which we will fix the seam (the reason for this will become clear shortly).
Using the Clone tool, start cloning from the layer below to cover the seam; the Grunge brush shape works well for this. (Turning on Sample Merged in the tool options will let you sample from all layers when you set the source, rather than having to switch layers first.)
With the seam painted out, disable the original layer, leaving only the newly painted layer that covers the seam. Use CTRL-E to export the image and save over the original exported image from Blender.
Back in Blender, click Apply to apply the painted-over image to your texture (see Figure 11-15 4). Because you saved only the areas of the image that covered the seam, only these areas are replaced. Repeat this process for any further seams on your model and then save the new fixed texture as a new image.
Reconciling Fixed Seams and Layered Images
This process fixed my seams, but because I fixed the texture in Blender, I had only a single-layer image as a result. To get back to a layered format, I opened the corrected image in GIMP as a new layer in my texture file, on top of my other layers. I wanted to be able to keep my old layers visible where possible, so I needed to mask this layer to show through only in those areas where I fixed the seams. To accomplish this, do the following:
Set the new fixed layer’s blend mode to Difference in the Layers dialog. The result of this blend mode is the difference between the colors on this layer and the pixels below, meaning that different areas look bright and unchanged areas remain black. Overall, it may look very dark at the moment because the differences are slight, but you’ll fix that shortly. You can use the result as the basis for a mask that shows only the fixed parts of the new layer.
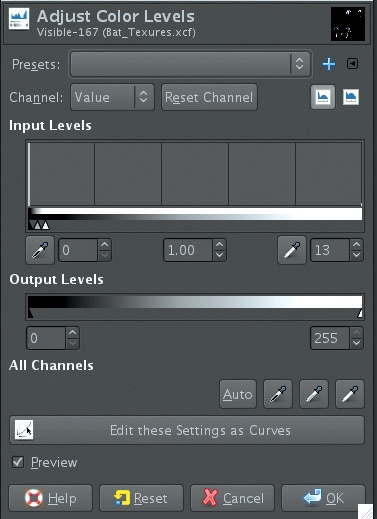
Right-click on the top layer in the Layers dialog and select New Layer from Visible. This creates a new layer that is a composite of all the layers below, merged into one. In our case, this is the difference between the fixed layer and the original layered image. Using the Levels tool (Colors▸Levels), you can increase the values of this layer to create something we can use as a mask. The Levels tool takes the current layer as the input and uses the settings you provide to adjust the values of the layer. You simply want to take any pixels that aren’t 100 percent black—areas where the fixed image differs from the original—and make them white. To do this, set the right-hand endpoint of the input gradient so that it’s close to the left-hand end by dragging it to the left (see Figure 11-16) and click OK.
The results may look slightly noisy and have some odd-looking colors, but the colors don’t matter because we’ll be using only the brightness of this layer as a mask. To smooth things out a bit, use the Gaussian Blur filter (Filters▸Blur▸Gaussian Blur) to blur the layer by about 10 pixels.
Next, copy this new merged layer and use it as a mask for the fixed texture. Press CTRL-A to select all and CTRL-C to copy the layer to the clipboard.
Figure 11-15. Exporting a screenshot to paint over in GIMP with Quick Edit: the area with a seam in Blender 1; the view exported from Blender to GIMP with Quick Edit and painted over on a new layer 2; the new layer on its own, which will be saved over the original export 3; and the exported image applied to the texture, back in Blender, using the Apply operator 4Disable the merged layer’s visibility in the Layers dialog and set the Blend mode for the fixed layer back to Normal. Then, to add a layer mask to the fixed layer, right-click on it and choose Add Layer Mask. Choose white as the color of the layer mask and then click Add to create it.
Press CTRL-V to paste in the mask we created from the merged layer as a “floating” layer—one you can continue working on and moving around before anchoring it and applying it to the layer you pasted it into. Since we don’t need to make any changes to it, press CTRL-H to anchor it.
Our fixed image is now masked so that only the areas that differ from the original texture show over the layers below. This more or less completes the creation of our diffuse texture (see Figure 11-17), so save the image as an .xcf file and export a new .tga image of the diffuse texture.
Layer Masks
A layer mask is a black-and-white image that determines how a layer in GIMP mixes with the layer below it. White areas are applied 100 percent if the overall opacity of the layer is also 100 percent (otherwise the two are multiplied together), black areas are completely masked out, and values in between blend between the two extremes.
When you add a mask to a layer (as we did above), it appears to the right of that layer’s thumbnail in the Layers dialog. To edit the new layer mask, click its thumbnail, and you can paint on it just as you would on a normal layer (except that it allows only black and white values, so tools and filters that work with RGB colors are not available).
Click the thumbnail for the layer to go back to painting normally (the thumbnail of the active layer or mask is outlined in white). You can apply the effect of a layer mask by right-clicking the layer in the Layers dialog and choosing Apply Layer Mask. This will apply the mask to the layer itself, making masked areas transparent.
Creating Specular and Hardness Textures
With our diffuse texture painted and the seams cleared up, it’s time to create our specular and hardness textures. The specular texture defines the color and intensity of our creature’s specular reflections: Dark areas will look matte, and bright areas will look shiny. The hardness map determines how soft the highlights are: Low values create soft, spreadout reflections, and high values create smaller, more intense highlights.
To create these textures, we can duplicate and modify the layers of the diffuse map. We’ll work in the same GIMP .xcf file to create these textures, which will give us ready access to the layers we’ve already created.
Layer Groups
To make it easier to manage creating specular and hardness textures, I used layer groups to organize my layers. Layer groups allow you to group layers and expand and collapse those groups in the Layers dialog, making it simpler to keep things organized. To create a layer group, right-click on a layer in the Layers dialog, and choose New Layer Group or click the folder icon at the bottom of the dialog. You can then drag other layers onto the group layer to assign them to the group. To organize my textures for the Bat Creature, I created three layer groups: one for the diffuse texture, one for my specular texture, and one for hardness (see Figure 11-18).
Specular Map
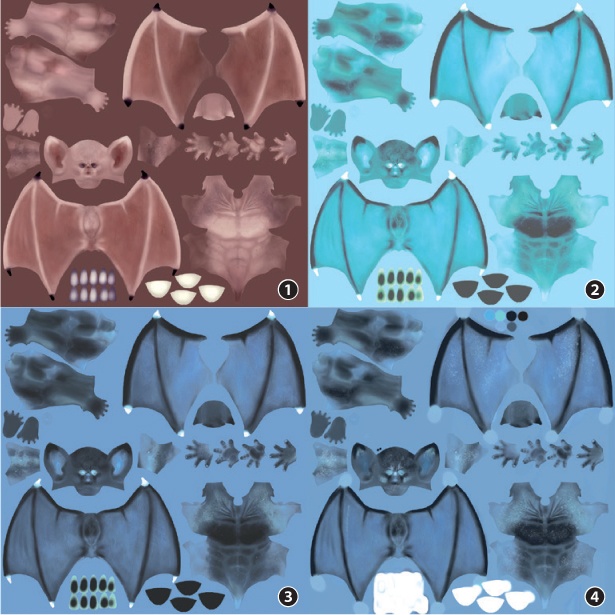
For the specular map, I first created a new layer from the visible layers (Layer▸New Layer from Visible) and placed it in the layer group for my specular map. I inverted the colors of the texture (Colors▸Invert) and then tweaked the levels (Colors▸Levels) to give the layer some more contrast. Next, I changed the color of the layer using Colors▸Hue and Saturation and shifted the Hue slider to give it a more bluish tint (see Figure 11-19 at 3). Although this already gave a pretty good specular texture, to get more variation, I duplicated the layers I created earlier for the diffuse map with speckles and spots on them and placed them in the layer group for the specular map, adjusting their colors appropriately.
Next, I started tweaking some areas to get the right level of specularity. For example, I wanted the lips and the area around the eye to look moist and shiny, and I wanted the torso and arms to look more matte and dry. I could have started painting over using a basic brush, but doing so would have lost a lot of the texture I’d already worked to create. Instead, I was able to preserve some texture by using a different Brush mode. The Brush mode can be set from the Tool Options dialog. Brush modes have the same options (normal, multiply, addition, and so on) that Blend modes for layers have. A good way to tweak the values in an image without losing detail is to use the paintbrush with the Brush mode set to Overlay and to use black to darken areas and white to brighten them.
In certain areas, I wanted to keep some texture while getting rid of very dark or light values, and here the Lighten Only and Darken Only brush modes came in handy. I used Darken Only and a midvalue color to get rid of overly bright areas without losing darker elements of the texture, and vice versa. Figure 11-20 shows the finished specular texture.
Hardness Map
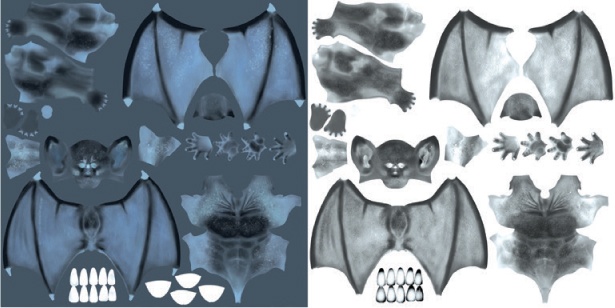
To create the hardness texture, I first made a New From Visible layer from the diffuse texture. (You can turn off the visibility of the specular texture layer group to make the diffuse texture visible again.) Next, I inverted the layer, adjusted the levels, and began tweaking by hand with the Paint tool, just as I did above. Because the hardness texture benefits from more variation, I created a new layer and painted in more speckles over the body (both lighter and darker ones). Figure 11-20 also shows the finished hardness texture.
Texturing the Eyes
With most of the texturing done, I moved on to texturing the eyes. For this I made a new image, which I painted by hand by taking the following steps:
Create a new image that is 1024×1024 pixels in size (File▸New Image). Then, to get a guide for the middle of the eye, create two guidelines through the middle of the image, horizontally and vertically. To do this, click Image▸Guides▸New Guide by Percent. To create guidelines for placing the pupil, repeat this once for the vertical guide and once for the horizontal one, each at 50 percent of the image’s height or width.
Fill the first layer with a yellowish color and then create a new layer for the iris. To get the correct shape, use the Ellipse Selection tool (E) and click and drag from the center of the image to draw out a circle. Holding down CTRL makes the selection expand from the center, and holding SHIFT constrains the selection to be circular.
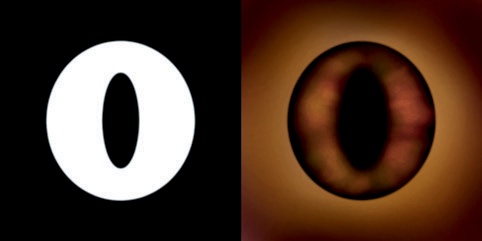
Draw out a circular outline for the outside of the iris and then subtract the pupil shape from the middle of the iris selection (hold down CTRL before clicking and dragging). This time, I created an elliptical shape to give the eye an evil look.
Feather (Select▸Feather, 20 Pixels) the selection to give the iris a more gradual transition into the rest of the eye. Then, convert the selection into a layer mask by right-clicking on the layer in the Layers dialog, selecting Add Layer Mask, and under Initialize Layer To, choosing Selection. This creates a layer mask with your selection that allows you to paint on the layer itself (select it in the Layers dialog first) without losing the shape of the iris (see Figure 11-21).
Fill the iris with black using the Fill tool and then use the Paint tool and a large, soft brush to add color. I began with a bright orange and then added elements of red, green, and purple to build up different colors (use low pressure if you have a tablet, or set the brush opacity low). I left the edges of the iris black.
Now add color around the outside of the eye (the sclera) on the layer below the iris. I painted a lighter yellow here and mixed it with a darker, reddish brown. I also filled the pupil with black on this layer. My eye texture now looked like Figure 11-21. I saved this texture as a .tga file.
Note
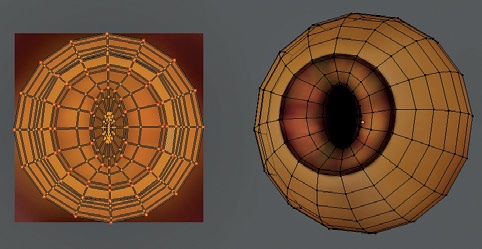
Because I decided to change the shape of the pupil slightly in my texture, I also tweaked the shape of the pupil on my model by selecting the pupil’s vertices and scaling them up on the z-axis. I slightly adjusted the UV map, too (see Figure 11-22).
Texturing the Jungle Temple
The textures for the Jungle Temple scene required a different approach. This project has a number of objects that require very similar textures, so texturing each one individually would be time consuming and unnecessary. Instead, I chose to use tileable, seamless textures to cover much of my scene and to supplement these with details in key places. Tileable textures allow a single texture to be used across multiple models.
Hardness vs. Roughness
For the Bat Creature, one of the texture types I created was a hardness texture, which will be used to define which areas of my materials have sharp, small specular reflections and which parts have blurry, more spread out specular reflections. To define these areas, the texture is mapped to the hardness value of the material’s specular shader. Dark areas of the texture then result in soft, blurry specular reflections, and bright areas result in sharp, hard specular reflections.
However, this is only the case when rendering in Blender Internal. When rendering with Cycles, materials are created differently (as we will see in Chapter 12). And instead of a hardness value, specular shaders now have something called a roughness value. This works in the opposite way to a hardness value, but defines roughly the same thing. For a roughness texture, bright areas denote soft, blurry reflections, and dark areas denote sharp reflections. Keep this in mind when creating your textures.
Creating Seamless Textures with GIMP
To create a seamless texture, the edges of the image must align with one another, and the features of the image must continue smoothly across the boundary. It helps to make sure that the texture doesn’t have features that repeat too obviously when tiled (large, distinctive features are easily noticed when they repeat often). We also want to make the image square so that we won’t have to scale an object’s UV coordinates when applying the seamless texture.
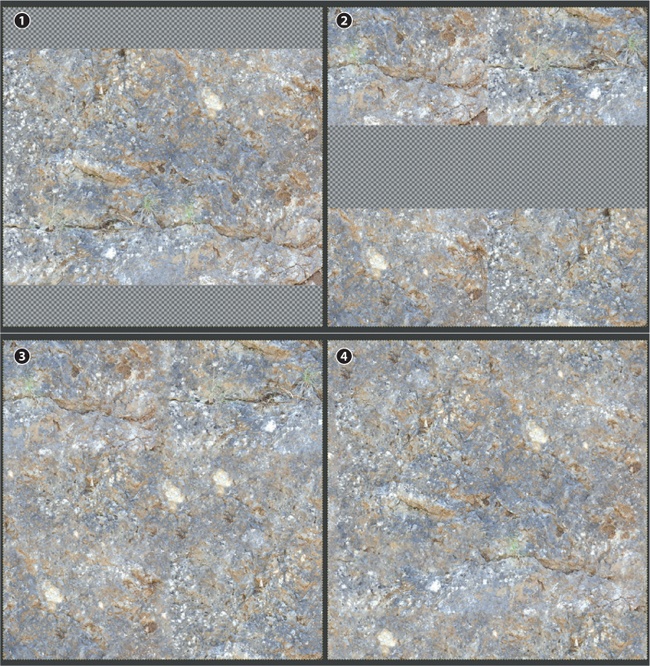
To create a seamless rock texture for the stone blocks of the walls and floors, I began with a rock texture from CGTextures. First, I increased the size of the image to make it square with Image▸Canvas Size. Next, I used Layer▸Add Alpha Channel to give the layer a transparent background, which we’ll fill shortly, and Layer▸Layer to Image Size to match the size of the layer to the image.
Now we have to fill in the remainder of the image and make its edges align with each other. To do this, I used the Offset tool and the Resynthesize filter. First, I offset the image by 50 percent on the x- and y-axes (Layers▸Transform▸Offset), choosing the x/2 y/2 option and clicking Offset. This shifted the image and repeated it, placing the edges against one another, as shown in Figure 11-23 at 2. The new edges now matched up because they were in the middle of the image previously.
To fix the areas where the edges met, I used GIMP’s Resynthesize feature to fill selected areas seamlessly. To create a selection, I used GIMP’s Quick Mask feature (CTRL-Q) to paint my selection directly with GIMP’s paint tools. Areas painted white are selected, while areas painted black are unselected. While working in Quick Mask mode, an image will be highlighted in red, but selected areas will appear as normal. I pressed CTRL-Q to enable quick masking and roughly painted a white stripe down the seams where the image edges met, and filled in the gap left in the middle. Then, I pressed CTRL-Q again to convert my quick mask to a selection.
Next, I used Filters▸Map▸Resynthesize to fill the selected area. I turned on Make Horizontally Tileable and Make Vertically Tileable, and kept the texture source as the current layer. After running the filter, I offset the image again by a different amount (a third in each direction) and resynthesized any remaining problem areas. The result is the texture shown on the right of Figure 11-23 at 4. This texture will now tile seamlessly.
Testing the Texture
To test the texture, create a duplicate of the image in GIMP (CTRL-D) and scale it way down (for example, to 512×512). Then, use Filters▸Map▸Tile to create a tiled version of the texture. If any areas show obvious repeats, remove them by going back to the full-size texture and selecting and resynthesizing any trouble spots. Once you’re happy with how the texture tiles, save it as a .tga file.
To test your texture in Blender, select an object and then assign the image to it in the UV Texture editor. Switch to Textured Viewport shading and set the shading type to Multitexture in the display panel of the Properties region so that you can see the image assigned to the object. You may need to scale the UVs up or down or tweak the texture a bit to get the best results.
Creating Additional Textures
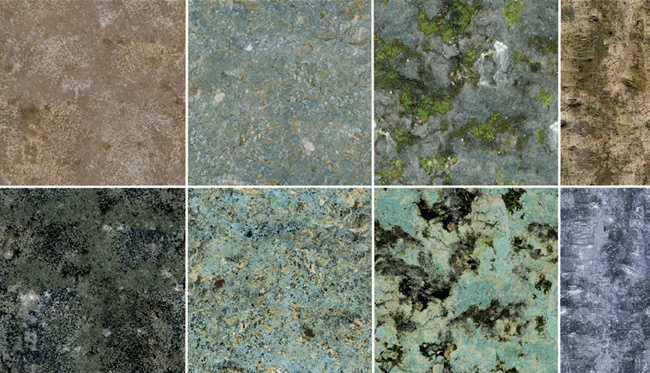
I repeated the process for producing a seamless texture to create a second rock texture, a bark texture for the trees, and a dirt texture for the ground, as you can see in Figure 11-24. I also created specular maps using the same techniques to modify and supplement the diffuse maps that I used for the Bat Creature. For the bark texture, I didn’t make the texture square since I would be wrapping it around the trunk of the tree. Instead, I opted for a narrow, tall texture. This results in a more efficient use of texture space, as the texture will repeat often along the length of the tree while only once around the circumference of the trunk.
To make different textures—like the two rock textures—work better together, you can use GIMP’s Hue-Saturation and Curves tools. By adjusting the hue and saturation of an image, you can make the overall coloration of one texture more similar to the other, and by using the Curves tool, you can brighten or darken the image to make the range of values of the two textures more similar. For example, the two rock textures in Figure 11-24 initially had quite different colors and levels of brightness, but I adjusted them to make them look more similar. This makes it much easier to blend these two textures later on when creating further textures and materials.
Texturing the Ground and Trees
To create textures for the ground and the trees in my scene, I made heavy use of Blender’s Project Paint tools to mix together the seamless textures I created in GIMP. This approach allowed me to quickly build up more unique textures by using the generic tileable texture I had already created as a starting point.
Ground Texture
While I now had a seamless texture for the ground, it wasn’t particularly unique or tailored to the scene. To create a more interesting ground texture, I chose to project the existing seamless texture to a unique unwrapped one and then to embellish it with some extra details. To accomplish this, take the following steps:
Create a second set of UV coordinates, unwrapping the floor mesh to fill the new UV space as well as possible. Then, add a new blank image to the new UV set.
Use the Clone tool to clone the seamless texture. I set the seamless soil texture as the image for the old UV coordinates and then selected my new set.
In Texture Paint mode, use the Clone brush to clone the seamless texture onto your new unwrap. (Make sure that you also have Clone turned on in the Project Paint options and that the old UV map is set as the source for the cloning.)
To mix in a second texture, replace the old UV coordinate sets image with a different soil texture and repeat the cloning process again, this time adding only some small patches.
Finally, repeat the process using a mossy rock texture to add some stony patches to the ground. The final texture is a lot more distinctive and diverse, as shown in Figure 11-25.
Tree Textures
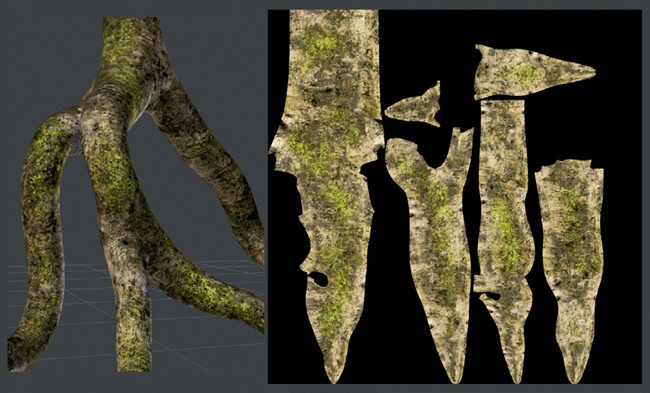
To modify the texture for the trees, I began with a seamless bark texture and then blended in mossy and muddy elements to make the texture more interesting (see Figure 11-26). This time, however, I projected the first seamless texture in Blender and then saved the image and switched to GIMP to add elements from other photographs. This let me use different brushes to clone together bits of different images and split my texture into layers while working. I then created specular and roughness maps for the tree from the diffuse map.
Texturing the Statue
For the statue in the Jungle Temple scene, I wanted the more hidden parts to look mossy and overgrown and the exposed parts to be bare rock. To accomplish this, I could have cloned in the mossy areas by hand, but instead, I chose to use the ambient occlusion map I baked earlier, which is already darker in the crevices, as a mask.
To do this in Blender, I duplicated the UV coordinate set for the statue and assigned the ambient occlusion texture to it. Then, I used this UV set as a mask layer for cloning a mossy texture over a rock texture, as follows:
Duplicate the original UV map twice by clicking the + icon in the UV Coordinates panel of the Object Data tab in the Properties editor. Rename each set so that you’ll know which is which. As the names for my sets, I chose Paint for my final painted texture, Mask for my mask image, and Cube. I would use the Cube UV set for projecting my seamless textures, so I reunwrapped the statue in Edit mode using the Cube Project option to give an unwrap with nice consistency between parts of the model.
Assign your seamless rock texture to the Cube UV set, scaling it to suit the details in the rock. Then, switch to your Paint UV set and use the Clone tool (make sure Clone is turned on in the Project Paint panel) to clone the rock texture from the Cube project UV set to the painted texture.
To mix in the second texture, use the Project Paint Stencil option. Switch to Edit mode and assign your ambient occlusion map to the Mask UV set by selecting the Mask UV set in the Object Data tab of the Properties editor. Then, assign a different rock texture to the Cube UV set, but this time use a moss-covered rock texture.
Now return to texture painting on the Paint layer (again selecting it in the Properties editor to make it the active UV set). Switch on Stencil in the Project Paint panel, choosing your mask UV set from the drop-down menu beside it. Then, with the Clone brush, paint the second rock texture over the original one. The effect of the brush is automatically masked according to the ambient occlusion map, allowing you to easily paint only on the exposed areas, as shown in Figure 11-27.
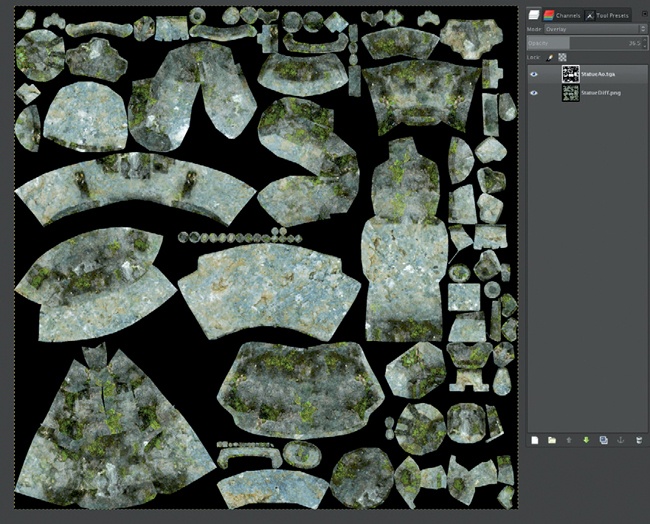
After saving the resulting image as a .tga file, I used the ambient occlusion map in GIMP to lighten the exposed areas of the texture by opening the painted texture and adding the ambient occlusion map over the top (using Open as Layer). Setting the ambient occlusion map’s blend mode to Overlay and reducing its opacity subtly lightened the exposed areas of the statue and darkened the crevices, as shown in Figure 11-28.
Texturing to Camera
When it came to the rocks and soil in the foreground of the Jungle Temple scene, tileable textures wouldn’t give quite the level of control I wanted. For this part of my scene, I opted to paint the textures for the ground and rocks as they appeared from the camera viewpoint. To do this, take the following steps:
Put the foreground rocks and soil on the same layer (use M to move objects to a different layer and P in Edit mode to part the selection from the current object if necessary).
Switch to Textured view (with the shading set to Single texture in the properties region) and assign your seamless textures to the UVs of your objects.
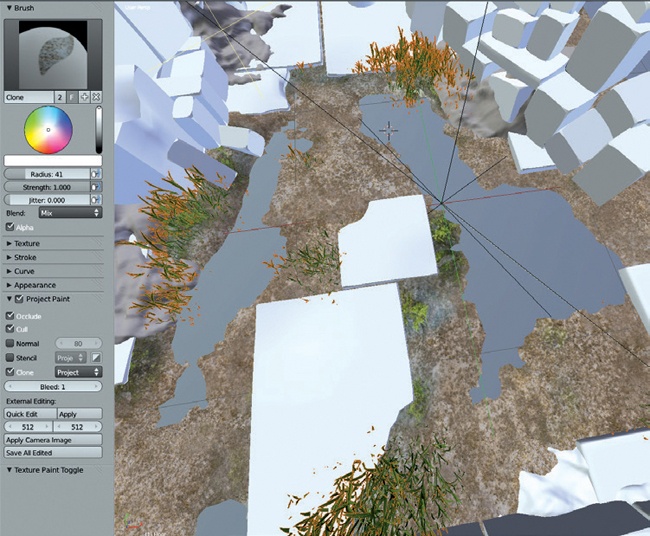
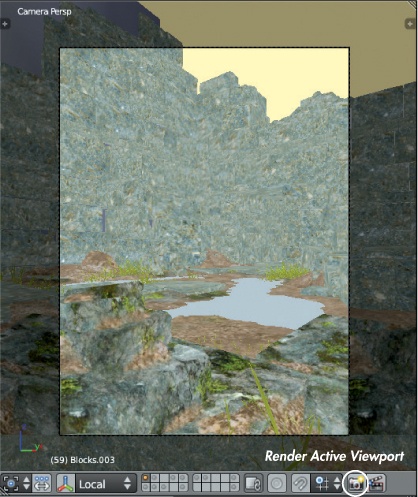
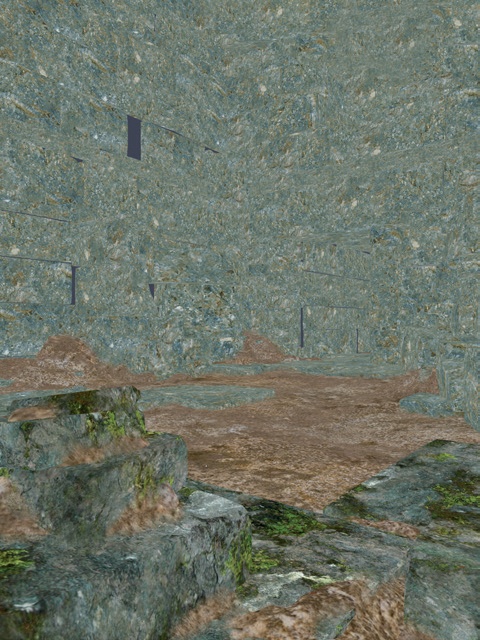
Use the Render Active Viewport button (the camera icon) in the 3D Viewport header to render the current view to an image (see Figure 11-29). Then, save this as a .tga image. (In order to be able to mix my rock textures together, I assigned my second rock texture to the stones and saved a second viewport render.)
Open these in the same document in GIMP (open the first normally and then open the second using Open as Layers). Next, begin blending the two by adding a new layer mask to the top layer and painting in black areas to let the layer below show through.
Then, to soften the boundaries between the mud and rock, create a new layer and mix them together slightly using the Clone tool and your Grunge brush (see Figure 11-30), saving the image as a .tga file.
Later on, this texture will be projected from the camera and used as part of the material for the foreground objects.
Texturing the Leaves
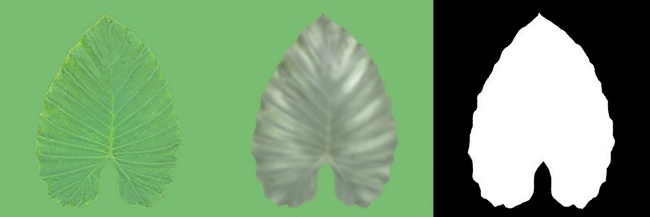
For the leaves in the Jungle Temple scene, I wanted to create three textures: one for the color of the leaves, one for the specular map, and one for their transparency. I would use the transparency (alpha) map to make the parts of the mesh that are not actually part of a leaf transparent, thus giving the leaves detailed outlines without using geometry. This is doubly important for the leaves I generated with IvyGen, as these are just flat planes.
Collecting the Leaf Images
I began by collecting leaf images that were roughly the shape I wanted. Then, I opened them in GIMP and selected the rough outline of the leaf with the Scissors tool, placing points around the edge of the leaf to trace its outline automatically. I could then refine this using Quick Masking and the Paintbrush tool with a hard-edged brush, painting with black or white to remove or add parts of the leaf selection. I used the leaf selection as a layer mask (Layers▸Mask▸Add Layer Mask and choosing Selection) to mask out the background of the leaf image.
Alpha Map
The next step was to create the alpha, color, and specular images. To create the alpha texture, I clicked the layer mask, pressed CTRL-A to select all, and pressed CTRL-C to copy the mask to the clipboard. Then, I clicked New Layer and pasted in the mask, now visible as a normal layer. Figure 11-31 shows the finished alpha map.
Diffuse Map
For the diffuse map, I added a uniform color background and got rid of any specular highlights in the photo to make it more suitable to use as a texture. For the background, I created a new layer and filled it with a green to match the leaf color so that when the material blended into transparency, there would be no color change around the edges. I duplicated the leaf image layer and placed it on top of this background.
To remove the specular highlights, I used the Dodge/Burn tool (SHIFT-D) set to burn (hold CTRL or change the settings in the Brush Tools palette) with a large, soft brush. I brushed lightly over the highlights to dim them (use a light pressure if you’re using a pressure-sensitive tablet, or simply set the Exposure setting of the Dodge/Burn tool down low if you’re using a mouse). To fix any areas that become oversaturated, I used the Paintbrush tool with a color from a good part of the texture. Then, I set the blend mode of the brush to Saturation and painted over any oversaturated areas to bring them in line with the rest of the texture. (Figure 11-31, left, shows the diffuse texture.)
Specular Map
For the specular color, I duplicated my masked leaf image and used the Hue-Saturation tool to desaturate it a bit. Then, I shifted the specular color slightly toward yellow. I also painted in some highlights on smooth areas of the leaf and then blurred the texture slightly. You can see the specular texture in Figure 11-31 (center).
This completed the textures needed for a single leaf, so I saved each as a .tga image and then saved an .xcf file with my layers. I used this single leaf as my texture for the leaves generated by IvyGen. For the rest of the leaves in my scene, I wanted to combine as many as possible into one image so that I wouldn’t have to manage too many textures. So I repeated the cutting-out process for as many leaf images as I needed, skipping the specular textures for the time being. Later, I combined all these leaves onto a single map so it would be easier to do the specular map afterward.
Combining Leaves onto a Single Texture
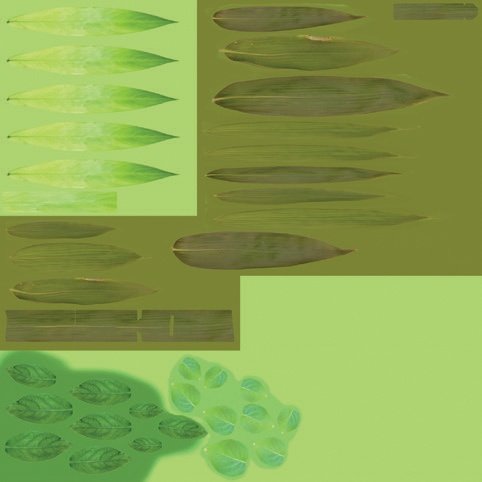
For most of the foliage in my scene, I packed all of the leaves onto the same UV map. (In Chapter 10, I baked a color map from the material color of the leaves to serve as a guide.) To make it easier to assemble all my leaves into one texture, I applied the layer masks that I had created earlier to the diffuse layer of each leaf texture. I then saved each of these leaves as images and opened them as layers on top of the guide image I baked in Chapter 10.
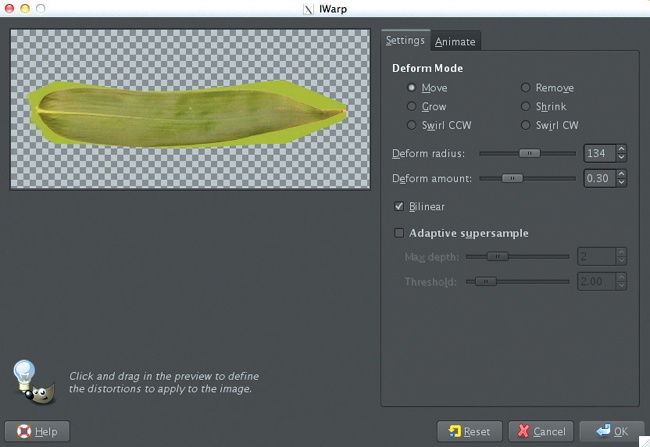
Next, I started arranging the leaves to fit the map, using the Move, Scale, and Rotate tools. After getting a leaf roughly in place, I used the IWarp tool (Filters▸Distort▸IWarp) to warp the leaves to more accurately fit the shapes I needed (see Figure 11-32). IWarp allows you to move pixels around your selection fluidly in order to reshape areas of an image. For the leaves, I used the Move Deform mode in IWarp to fit the outline of the leaves to the shapes I needed. I repeated this, duplicating some of the leaves to cover each space that needed a leaf texture. For the unwrapped stems, I cloned from the bigger leaves to fill in the whole region with a rough green texture. The diffuse texture for all the leaves combined into a single texture is shown in Figure 11-33. I then created the specular map for my grouped-together leaves the same way I did for the individual leaf.
To get an alpha texture again, I simply merged the leaf textures into one layer and then rightclicked the layer in the Layers editor and chose Alpha to Selection. Then, I created a new black layer and filled the selection with white to get my alpha image. Finally, I exported each of my diffuse, specular, and alpha passes as .tga images and saved the GIMP .xcf file, too. The combined leaf textures can be seen in Figure 11-31. This completed almost all of the textures for the Jungle Temple. I created any remaining ones in much the same way as those described already.
Texturing the Spider Bot
Texturing the Spider Bot was a bit simpler than texturing was for the other two images because this project relies largely on procedural materials. I made a UV texture that covered the body in order to take some of the hassle out of creating different materials later and to allow me to add some detail to the model.
Creating Three Textures
I began with my baked color map in GIMP and scaled it up to 4096×4096 pixels. Then, I opened my baked ambient occlusion map as a layer, scaled it to fit, and set its blend mode to Multiply at 40 percent opacity in order to add some subtle shadowing to the texture.
I needed to make three textures: diffuse, roughness, and specular. Because I wanted the body’s green areas to be shiny, I made the green area much darker for the diffuse texture and bright green for the specular texture. For the body’s white areas, I did the opposite: dark gray on the specular map to make it less shiny and light on the diffuse.
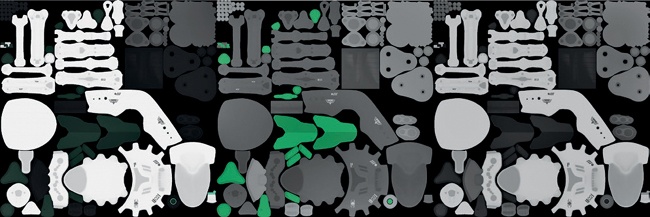
For the roughness map, I made the green areas (of the diffuse map) dark to give sharp, glossy reflections, and I made the white areas bright to give softer highlights. You can see the three textures in Figure 11-34. To keep my textures organized, I created separate layer groups for each of the diffuse, specular, and roughness maps, just as I did for the Bat Creature.
Adding Decals
To make things a bit more interesting, I decided to add some decals to the Spider Bot. To make decals, I drew a few simple designs using 2D curves in Blender and rendered these in black and white. Then, I opened these as layers over my existing texture file in GIMP.
To make the background of the decals transparent, I used Colors▸Color to Alpha and selected the background color as the color to remove. I selected individual decals and spread them out over the body by selecting them and then scaling, moving, and rotating them into place. (It can be easier to do this if you split up each decal onto its own layer by selecting it and pressing CTRL-SHIFT-L to float the selection and CTRL-SHIFT-N to convert it to a layer. Then, you can scale and rotate it independently of the other decals. Once it’s in place, you can merge the details back onto the same layer.)
To get a better feel for the placement of your decals, you can mark in roughly where you want them in Blender’s Texture Paint mode. Then, save the image as a guide to use in GIMP. Once I had the decals laid out, I set their opacity to 60 percent for the diffuse map.
To make the decals stand out, I worked them into the specular and roughness maps too. I duplicated my decal layer from the diffuse map and placed copies in my layer groups for the specular and roughness maps. For the specular map, I used Colors▸Invert to make the decals white, which would make them shinier on the eventual material. For the roughness map, I made the decals black once again to give them sharp reflections (see Figure 11-34).
With my textures complete, I saved a GIMP .xcf file with all my layer groups and then exported .tga files of my diffuse, specular, and roughness maps.
In Review
In this chapter, I’ve covered using both Blender and GIMP to create textures, starting with our baked textures as a foundation and building up layers of detail and different images. We’ve used Blender’s Texture Paint mode, cloned textures in both Blender and GIMP, and used seamless textures both on their own and as a basis for creating more distinctive textures.
For the Bat Creature, I built up my textures mainly by hand, blocking in simple colors in Blender and then refining these in GIMP, painting in extra details and supplementing them with elements from photographic textures, and then jumping back to Blender to clear up seams.
For the Jungle Temple, I created a variety of seamless textures, which formed a foundation for creating further textures for unique objects. By creating a range of tileable, reusable textures first, I achieved consistent textures across multiple elements in the scene and sped up the texturing process.
For the Spider Bot, I focused on creating relatively simple diffuse, specular, and roughness textures that I will later use to create some fairly complex materials. I used my ambient occlusion map and the solid color map I generated in Chapter 10 as a starting point and then created and added decals to embellish the design of the Spider Bot without crowding in too many details.
In Chapter 12, we’ll create materials for use by both Blender’s Internal renderer and the new Cycles renderer, using the textures created in this chapter as inputs. We’ll look at the different ways to apply textures when working with the two renderers and the similarities and differences in creating materials with the two render engines in mind.
[1] You can find this location or add a new location for brushes from GIMP’s preferences (File▸Preferences) under Folders▸Brushes.
