Chapter 10. Texture Baking
Having modeled, sculpted, retopologized, and UV unwrapped our models, we’re now ready to create textures and materials for them and then move on to lighting and rendering. In this chapter, we’ll focus on baking textures—creating procedural textures using the geometry, lighting, and materials of objects in our scene. For example, we’ll bake the normals of a high-poly sculpted mesh into a texture map or bake the shadows that a mesh receives in the cracks and grooves of its surface into a texture to mimic dirt and dust. Textures like these can then be used to aid in texturing and creating materials later.
In this chapter, we’ll discuss the various types of procedural texture maps that Blender is able to bake, their uses, and how to bake them. In Chapter 11, we’ll move on to combining these baked textures with hand painting and other techniques in GIMP and Blender, cleaning them up and combining them with other texture sources, such as photos. Then, in Chapter 12, we’ll cover how to plug all these kinds of maps into Blender’s materials system to create realistic materials for rendering our models with.
Images and Textures
First, a little terminology: The terms image and texture are often used interchangeably. In most circumstances, this is fine, but I shall try to avoid confusion here by explaining my terminology. An image, for our purposes, is a picture, perhaps in the form of an image file, like a .jpg or .tiff file or a file generated within Blender’s UV Image editor with no specific file type assigned to it yet.
A texture in Blender can be any kind of input used to affect the look of a material applied to an object. A texture can be an image, but a texture may also be procedurally generated or taken from a video, point cloud data, or something even more obscure. But because we frequently use images as the input for textures, it’s often convenient to refer to “an image used to affect a material’s diffuse color” as a diffuse texture for short.
In general, when I refer to baking textures, I mean an image used as a texture. As this would rapidly become tedious to read, I’ll often instead use the term texture more loosely—particularly as the process of baking images is so frequently referred to as texture baking.
The term map when used in the context of textures (such as texture map, diffuse map, and displacement map) refers to an image used for a UV unwrapped object—one in which each point on the object can be mapped to a point on the image.
In this book, I often talk about assigning an image or texture to an object. Assigning an image to an object is different from assigning a texture.
Assigning an Image
When I assign an image to an object, I link that image with the object’s active UV coordinate set. This causes the image to be displayed on the object when using the Textured Solid shading option in the 3D Viewport (found under Display in the 3D Viewport Properties region). It also means that when baking images, this will be the image that is baked to.
To assign an image to an object’s UV coordinates, select the object in the 3D Viewport and press TAB to enter Edit mode. Hit A to select all, then in the UV Image editor (I’m assuming here that the object has already been unwrapped), use the dropdown menu in the Editors header to select an image to assign to the active UV set.
To create a new image and assign that instead, use Image▸New Image to create a new image to bake to with the size and properties you specify.
Assigning Textures
Textures are assigned to materials, which are then assigned to objects or parts of objects. Textures are used to affect how an object will be rendered and also as inputs for some modifiers. To assign a material to an object, go to the Materials tab of the Properties editor to choose a material from the drop-down menu at the top of the tab or create a new material with the +New button. You can then assign textures to this material in the Textures tab in the same way.
Texture-Baking Controls
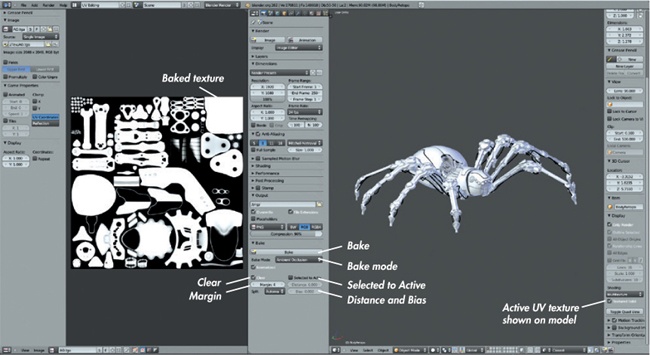
To bake a texture (technically, an image—from here on I will use the two terms less rigorously) in Blender, use the Bake panel in the Render tab of the Properties editor (shown in Figure 10-1). This contains all of Blender’s settings and tools for baking texture maps, including the following:
Bake. This button bakes images for the currently selected objects, using the bake settings you’ve defined.
Bake mode. These settings are used to set what kind of map you are baking.
Clear. This option clears the texture and replaces it with black before baking.
Margin. This option extends the baked textures out beyond the edges of the UV islands by the number of pixels you set to prevent seams showing on the mesh.
Selected to Active. This option enables baking from one mesh to another.
Distance and Bias. These settings determine how far Blender will look for the surface of the other mesh when baking from Selected to Active.
In order to bake a texture, Blender needs two inputs:
A mesh with UV coordinates that you want to bake textures for. This must be selected as the active object, and the UV coordinates you want to bake to must be the active set.
An image to bake the texture to, assigned to the object’s active UV coordinate set.
With these inputs in place, click Bake in the Bake panel to have Blender render the texture. Blender should render the map type dictated by the Bake Mode setting (see Figure 10-1) and take the following into account when baking:
Selected objects. Blender will bake textures for any selected objects that have UV coordinates with an image assigned to them. You can bake multiple textures at once, as well as baking multiple objects.
Other objects on currently visible layers. Unselected objects will not be baked, but when baking lighting or other maps that are affected by the selected object’s surroundings, Blender will take into account the other objects (meshes, lights, and so on) that are on the currently visible layers. To bake the lighting for an object in isolation, place it temporarily on its own layer, along with the lights you want to affect it.
Note
Baking is currently supported only when you use the Blender Internal renderer. If you don’t see any baking options, make sure that you have Blender Internal selected as your render engine from the Info Editor header (see Figure 10-1).
Texture Map Types
You can bake several different map types, some of which are more important than others. Here’s what Blender has to offer:
Full Render. This does a full render, including textures and lighting of your surface. The resulting texture is exactly how your model will look in your final render, mapped to the object’s UV coordinates.
Ambient Occlusion. This renders ambient occlusion for the object, taking into account any other visible, renderable objects on the currently active layers. Ambient occlusion is a selfshadowing effect that creates dark areas in the corners and crevices of objects. It’s useful both for mimicking the effect of more complex lighting, as well as for creating a rough map of areas where dirt and dust are likely to accumulate. This kind of map is often very useful when creating textures and materials (see Figure 10-2).
Shadow. This renders the shadows from lights in the scene into a map.
Normals. This takes the normal vector of the object’s surface at each point and records it as an RGB value. This is done in a variety of ways, depending on the normal space option you choose. Different normal spaces record the normals of the mesh relative to different coordinate systems. For example, the Camera option records them relative to the camera; World, according to world space; Object, according to the object’s local coordinates; and Tangent, according to the surface normal of the baked object itself.
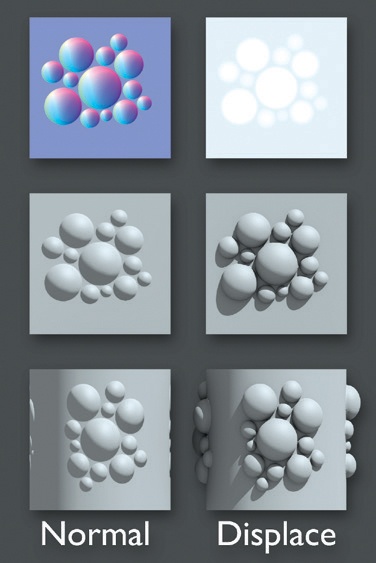
Of these, Tangent is probably the most important; it lets you bake the normals of one mesh to the surface of another by enabling the Selected to Active setting, selecting your source mesh (or meshes) and the target, and then baking. This renders the normals of the source mesh relative to the selected target mesh. This map can then be used to distort the surface normals of the mesh when it is rendered, giving the impression (when the map is applied as part of the object’s material) of having a lot of detail in the surface when in fact the underlying geometry can be much simpler. (See Figure 10-3 for an example of this effect.) Tangent space normal maps are particularly useful because the normals are recorded relative to the surface of the mesh itself, so they work even when the mesh is distorted from its original shape by modifiers or further editing, so long as the UV coordinates remain the same.
Textures. This bakes the diffuse color of any materials and colors applied to the mesh. This can be useful for baking procedural colors and textures into a UV map.
Displacement. This converts the distance between two meshes into a black-and-white image. Black represents negative displacement, mid-gray represents zero displacement, and white represents positive displacement. Use the Selected to Active option to bake from a source mesh (or meshes) to the active mesh.
The Displacement map is generally used as an alternative to normal maps, and this map can then be used as the input for the Displace modifier or the Displace setting of a material to deform a mesh into the shape of the source mesh (see Figure 10-3). Alternatively, a baked displacement map can be used as a bump map for a material. (Bump maps work like normal maps, giving the impression of surface detail by altering the shading of the surface, but they require only black and white input.)
Normal maps are a very efficient way to give the impression of detail, but they don’t affect the silhouette of the mesh or the casting of shadows because no real geometry is displaced. Displacement mapping creates real detail by deforming the mesh but requires you to subdivide the mesh to provide sufficient geometry to deform. In Figure 10-3, a group of spheres has been baked to a normal map (8 bit) and a displacement map (32 bit). These maps have then been applied to a plane and a cylinder. The normalmapped objects capture a lot of the shading with much lower polycounts, but they don’t affect the actual shape of the mesh or cast shadows. The displacement-mapped objects are much more realistic, but they have to be subdivided in order to capture all the details.
Alpha. This bakes the alpha transparency of the mesh to a texture. It’s useful for baking procedural values to an image texture.
Emission. This bakes the emission color and amount of a material into a texture. As with the texture map, this can be useful in baking procedural emission colors into an image texture.
Mirror Colors. This bakes the color of ray-traced reflections for a material into a texture. It’s useful for baking procedural values to an image texture.
Mirror Intensity. This bakes the amount of ray-traced reflection for a material into a texture and is useful for baking procedural values to an image texture.
Specular Colors. This bakes the color of specular reflections of a material into a texture and is useful for baking procedural values to an image texture.
Specular Intensity. This bakes the amount of specular reflection of a material into a texture. It’s useful for baking procedural values to an image texture.
Each kind of texture map has a purpose from time to time, but in this chapter, we’ll focus on ambient occlusion, texture, normal, and displacement maps most often. Of the texture maps, these maps are the most useful for use with painted textures and for rendering detailed final models.
Baking Textures for the Bat Creature
In the case of the Bat Creature, my aim was to create textures for the skin and to bake a displacement map for rendering the final model with a Displace modifier in order to capture all the details I sculpted earlier. In this section I’ll discuss how I baked maps for ambient occlusion and displacement to help with this. I’ll also cover baking a normal map as an alternative to displacement maps, one that renders a lot more quickly though at the cost of some accuracy in representing the fine details.
Baking Displacement from Sculpt to Final Mesh
Because I continued sculpting on the retopologized mesh, I could just render the final mesh directly. But this isn’t always desirable, because the Multires modifier can sometimes get corrupted and displaying its effects in the 3D Viewport can be slow and unwieldy. A better solution would be to bake a displacement map using either the high-poly sculpt, which can then be applied as part of a material, or the Subdivision Surface and Displace modifiers to reconstitute the high-poly details of the mesh only when it is rendered, leaving it simple and quick to work on in the 3D Viewport.
To bake the displacement for the Bat Creature, I first selected the body of the creature (the high-poly sculpt), duplicated it, and then applied the Multires modifier at level 3. This is the mesh I’ll use as the final body mesh for rendering. (I’ll add the hair that I created in Chapter 9 to the final scene as a separate object.) This captures most of the detail already, but I’ll use a displacement map to capture the highest resolution detail.
Next I needed to add a Subdivision Surface modifier to match the level of subdivision between the top level of the multires mesh and the new, soon-to-be displaced mesh. I added the modifier and set the number of subdivisions to 2.
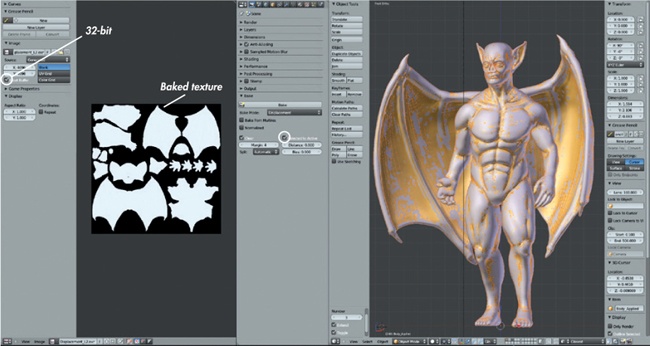
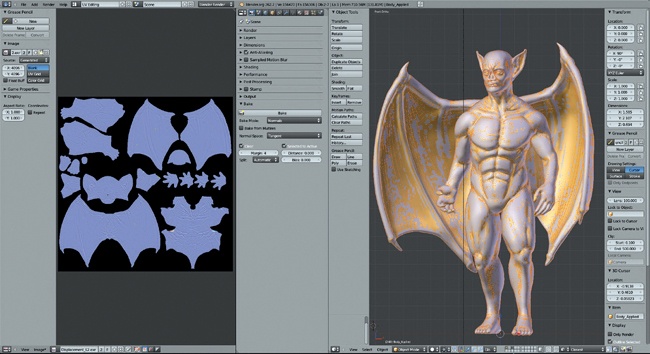
Then, in Edit mode, I selected the whole mesh, and in the UV Image editor, I added a new image for the displacement map to be baked to. This image needed to be a 32-bit float image in order to capture all of the details of the displacement without creating artifacts. I set its size to 4096×4096 pixels, more than enough to capture all the details of the sculpt. I selected the original multires mesh and my new final mesh. As shown in Figure 10-4, I made sure that Selected to Active was enabled and Normalize was unchecked, and I set the Margin setting to 4 to give a 4-pixel border around the UV islands, reducing the chance of artifacts around UV seams. (The other settings were left at their defaults.)
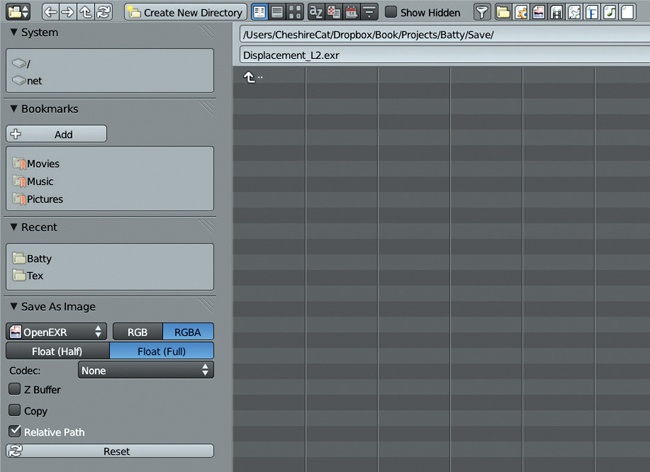
At this point I was ready to bake my texture, so I clicked Bake in the Bake panel and set Blender to work baking my texture. This baked the displacement between my high-poly sculpt and my subdivided final mesh into a displacement map holding all of the detail of the high-poly sculpt. Once finished, I saved this as a 32-bit OpenEXR image to preserve all the information present in the displacement map by pressing F3 while in the UV Image editor and setting the format (in the bottom left of the file browser editor) to EXR (see Figure 10-5). You can choose Float (Full) to use 32-bit values. Setting the Codec to ZIP will keep the file size a bit smaller.
Bit Depth and Textures
I’ve touched on bit depth briefly, but now I’ll explain it a bit further. Bit depth refers to the number of bits (that is, the length of a number in binary) that is used to store the red, green, blue, and alpha (RGBA) values for each pixel in an image. The more bits used to store each number, the more distinct levels there are, and the greater the range and subtlety of colors and brightnesses that can be stored in an image.
Most image formats (such as .jpg and .png) use 8-bit color, which is fine for simply displaying pictures on screen or even for storing simple diffuse textures. But if you plan on performing more complex manipulations on your images, such as using them for displacement maps or altering their colors and exposure, you’ll start to see artifacts appear.
For such demanding use cases, you can use higher bit depths (either 16 or 32 bit) for images, which give you a greater range of values to work with. Using higher bit depths will prevent ugly artifacts from appearing in your renders and displaced meshes. The OpenEXR (.exr) format is a good choice for saving high-bit-depth images. For low-bit-depth images, I generally use the Targa (.tga) format.
During the baking of texture maps, most types of textures can be saved in 8-bit formats. That said, displacement maps should almost always be saved as 32-bit images to avoid stepping artifacts when applying them to your models. Stepping artifacts can be seen in Figure 10-6; the input for a Displacement modifier has been baked in Blender and saved as both an 8-bit .tga file (applied using a displacement modifier, center) and a 32-bit OpenEXR image (right). The center image shows the artifacts that can result from using a displacement texture with insufficient bit depth.
Applying the Displacement Map
To make sure that the displacement map worked correctly (and to apply it to our model for use in our final renders), we can apply it to our duplicated model using the Displacement modifier. Having added a Subdivision Surface modifier to the duplicated body object, we have the geometry we need, so we can simply add a Displacement modifier to the object as well.
To assign the displacement map, we use the image we baked as input for a texture; this texture can then be assigned as the input for the displacement modifier. (Here, I’m using the more rigorous definitions that I discussed at the beginning of this chapter.)
The easiest way to create and modify a texture block is to add a material to the model, if you haven’t already (we created a MatCap material in Chapter 6 that we no longer require; we can either use this or create a new one), and then add a new texture to this material using the Textures tab of the Properties editor by clicking the +New button with an empty texture slot selected. Give the texture a useful name like Body_Displacement, then set the type of this texture to Image or Movie. In the Image panel that appears, open your displacement map.
Now return to the Modifiers tab and, in the Displacement modifier, use the texture dropdown menu to select the texture you just created. Leave Direction set to Normal and set Texture Coordinates to UV. A strength of 1.0 should give the correct amount of displacement. Adjusting the View Subdivision Levels setting on the Subdivision Surface modifier will let you see more or less of the detail generated by the displacement map.
Baking Normal Maps
While we won’t use one for our final renders, normal maps are a useful and quick-to-render alternative to displacement maps. They are frequently used in game engines because they are fast enough to use in real-time applications. They can also be used with the Blender Internal renderer to give the impression of extra detail without requiring such dense geometry.
The process of baking a normal map is very similar to baking a displacement map. First, you assign a new blank image to your duplicated mesh (it doesn’t need to be 32 bit). Then, select the sculpt first and then the duplicate. We don’t need to apply a Subdivision Surface modifier to the duplicate this time because the silhouette of our character is broadly fine and normal mapping doesn’t require extra geometry (it doesn’t physically displace the mesh). Next, from the Render tab of the Properties editor, set the Bake mode to Normals and Normal Space to Tangent, enable Selected to Active, and click Bake (see Figure 10-7).
The resulting map will be a bluish texture, with other colors denoting areas of the sculpt that face in different directions relative to the normals of the unsubdivided duplicate mesh. This texture may later be applied as part of the object’s material to give the effect of mimicking the surface forms of the sculpted mesh (see Figure 10-8). See Adding a Normal Map to learn how to apply normal maps as part of a material.
Baking Ambient Occlusion
In addition to the displacement map, we also want to bake our ambient occlusion map from our high-poly sculpt onto the final mesh. This process is simpler than producing the displacement map:
Select the sculpt and then the final mesh. Set the Bake mode to Ambient Occlusion.
Select Normalize to ensure that the ambient occlusion map uses the whole range between black and white to store the occlusion.
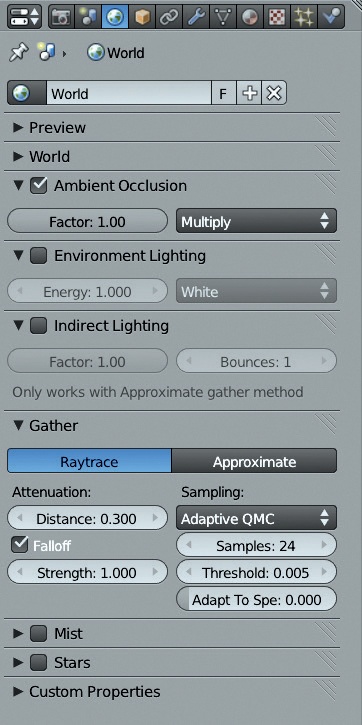
To get the best-quality ambient occlusion map, adjust Blender’s world lighting settings in the World tab of the Properties editor, which contains all the settings for ambient occlusion and environment lighting (see Figure 10-9). (See Chapter 13 for more on these settings.) Enable Ambient Occlusion (set to Multiply) from the Ambient Occlusion panel.
In the Gather panel, turn the Attenuation Distance down to 0.2 and enable Falloff and set it to 1.0. This causes only close-together geometry to cause shadowing and speeds up rendering.
Set the samples to 24 to reduce the noise in the results.
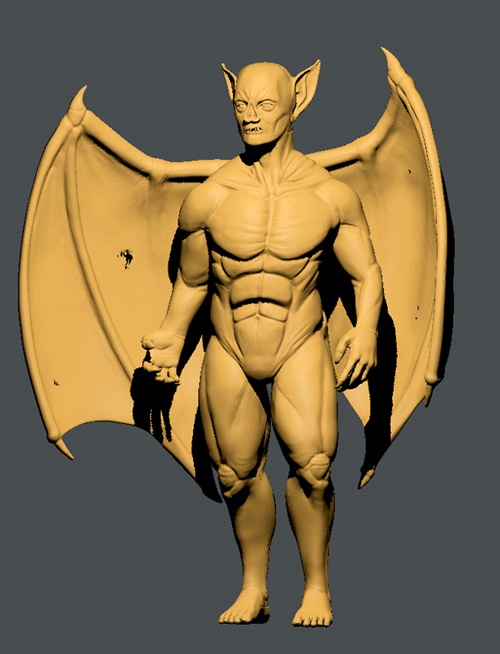
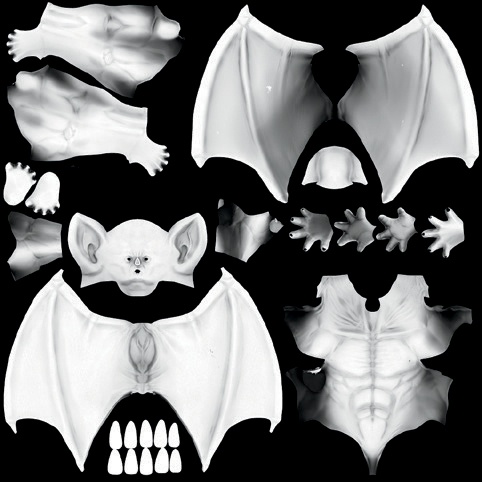
Having saved a displacement map externally, you can simply bake over the displacement map image, remembering to save it as something different once the ambient occlusion map is baked. Click Bake and let the ambient occlusion map render (see Figure 10-10).
To make sure that the ambient occlusion map came out okay, turn on Textured Solid in the Display panel of the Properties region in the 3D Viewport. This displays the texture assigned to the mesh on the model, allowing you to see the effect of the ambient occlusion map. When you’re happy with the bake, save it as a .tga image. (You don’t need to use a high-bit-depth format this time, as the ambient occlusion map will work fine with 8-bit color.) There may be one or two artifacts, but you can paint these out later in GIMP once you begin texturing.
Baking Textures for the Spider Bot
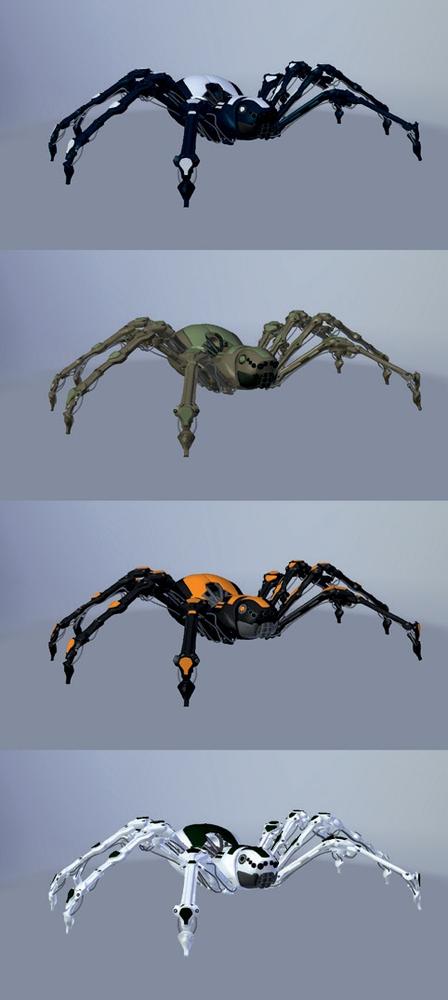
For the Spider Bot project, I didn’t need to bake displacement or normal maps; the point of retopology in this case was to eliminate the roughness from the sculpts and end up with the smooth forms the retopologized model now has. The model would still benefit from an ambient occlusion map, though, which will be useful during the texturing process. To save time when painting colors for the textures, it will also help to assign some basic materials with different colors to the parts of the model and then bake these colors into an image to serve as a guide when painting textures.
Baking Maps for Multiple Objects
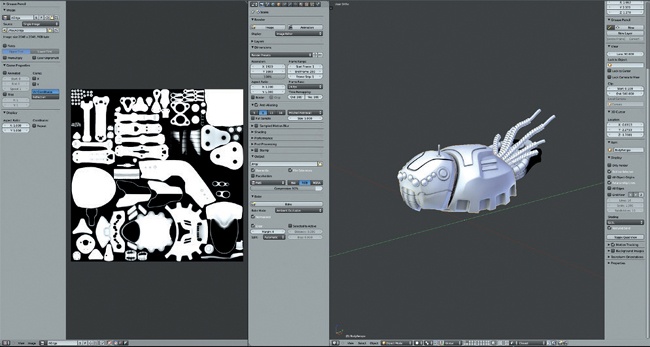
In Chapter 8, I packed the UV coordinates for most of the Spider Bot model onto a single UV grid so that I’d require fewer texture images later on. Next I needed to bake the maps for all of the objects together. To do this, first make sure they all have the same image assigned to their UV coordinates. If so, you could simply select all of the objects for the Spider Bot that share the same UV coordinates and click Bake to bake all of the selected objects at once.
But what if you want to be selective about which parts of the model are visible when baking different objects? Or if you wish to be able to correct parts without rebaking the entire model? By default, Blender will clear the texture every time you click Bake, preventing you from baking multiple times with different objects selected. To prevent this, turn off the Clear setting in the Bake panel, and Blender will replace only the parts of the image assigned to the selected objects. This will allow you to bake objects one at a time, in groups, or all at once, adding to the texture map as we go along.
This selective technique comes in handy for pieces like the legs. Because some of the leg components overlap slightly, if they were baked together, the overlapping areas would come out black when we bake our ambient occlusion map. And if we were to later re-pose the legs, these black regions might show through.
To avoid baking in shadows from overlapping objects that may not always be there, use Blender’s layers. Blender bakes objects only on the currently visible layers, so we can isolate the parts we want to include each time on a single layer and then bake them. To do so, take the following steps:
Select the objects you wish to bake and press M to bring up a menu that allows you to pick which layers the object should be visible on.
Select a new empty layer (check the layers icons in the 3D Viewport header to see which ones are occupied) and press ENTER to put the object on that layer.
Jump to the selected layer in the 3D Viewport, either with the selector in the header or using the keyboard shortcuts (1 through 0 on the keyboard for layers 1 to 10, ALT-1 through ALT-0 for layers 11 through 20).
Now select the mesh and bake the ambient occlusion map for that object alone, as shown in Figure 10-11.
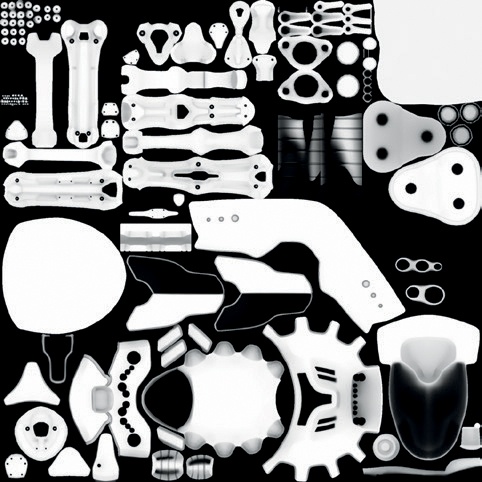
This selective process allows you to progress through each object in the model, baking the ambient occlusion as you see fit, whether for a single component or for small groups. For example, for the head section of the Spider Bot, I baked the antenna and extra parts of the head along with the head mesh and kept the wires at the back of the head/body segment on the same layer while baking (though I baked these separately). I baked the legs as individual pieces, isolating each type of leg part on its own layer before baking. The final bake after progressing over the whole model is shown in Figure 10-12.
For areas like the joints on the underside of the Spider Bot’s body, which share the same UV space, I couldn’t bake a proper UV map. Instead, I just filled that area with white in GIMP after I saved the image. (See the top right corner of the ambient occlusion map in Figure 10-12.)
Baking Diffuse Colors and Textures
In order to get a rough feel for the colors I wanted the Spider Bot to have and to bake these into a map to serve as a guide for the texture painting process, I needed to create some basic materials and assign them to the different parts of my model. These materials didn’t need to be complex; in fact, I needed only to adjust the diffuse color setting. (I’ll discuss more complex materials in Chapter 12.)
To create a few basic materials:
Go to the Materials tab of the Properties editor (with an object selected) and click the +New button to create a new material.
Click the name Material to rename it something more useful, like Basic_Fill_01, and then set the diffuse color to a mid-gray color.
Create more materials by duplicating this first one (click the + icon next to the material’s name) and set these to different colors.
When working with the new materials, I began by choosing three colors: one principal color for most of the model, a secondary color, and a highlight color for small details. I then started assigning these materials to the different objects that made up the Spider Bot using the Materials tab of the Properties editor, though it’s even easier to accomplish using an add-on called Material Utils.
Material Utils Add-On
The Material Utils add-on is a quick way to modify materials assigned to your models. It’s particularly useful for working with scenes that use a lot of materials or ones with multiple objects that share the same materials.
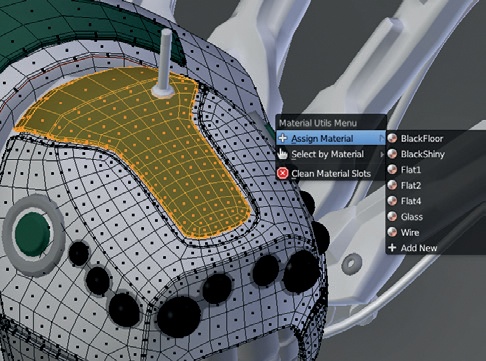
To enable the add-on, open Blender’s User Preferences Editor (you can bring this up by going to File▸User Preferences) and under Add-Ons, search for and enable Material Utils. This adds a new keyboard shortcut (Q), which brings up a menu that you can use in either Object or Edit mode to assign materials to meshes (see Figure 10-13). In Object mode, the add-on allows you to assign materials to an entire object (or to multiple objects if more than one is selected), while in Edit mode, it will assign a material only to the part of the mesh you have selected.
For the Spider Bot, I quickly applied the same material to every object in the model by selecting them all with A and then using Material Utils (Q) to assign one of my basic materials to all of them. Then, I began selecting individual pieces (and also dropping into Edit mode with TAB to select parts of meshes, as in Figure 10-13) and assigning other materials from the three I created. My overall goal was to keep one main color, one secondary color, and a highlight color for small or interesting parts of the model. For certain objects, like the wires and eyes, I created unique materials by first making the existing material datablock for that object unique (by clicking the number next to the materials name at the top of the Materials tab) and then adjusting it as necessary. After assigning materials, I began changing the diffuse colors of my materials in search of a combination that worked, as shown in Figure 10-14.
Baking a Texture Map
Having established my color scheme, I was able to bake the colors to a texture map. Using a texture to define the color of the objects, rather than different materials, allowed me to use fewer materials to render my model and simplified the process of tweaking materials later on.
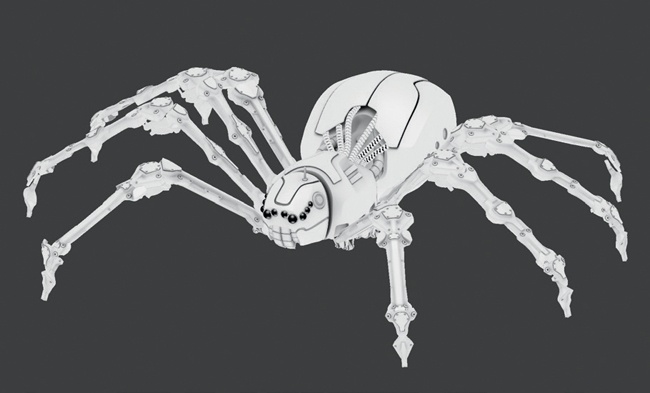
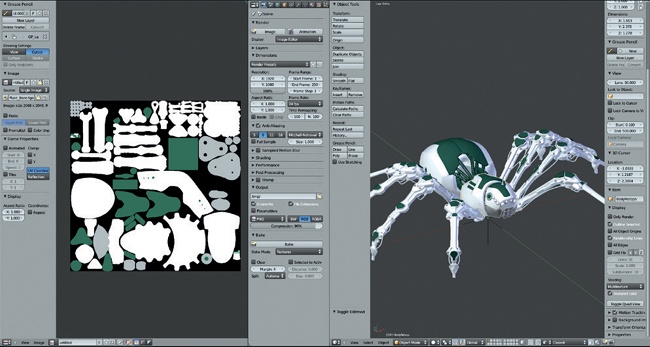
To bake the texture map, I returned to the Bake panel of the Render tab in the Properties editor, set the Bake mode to Texture, and then clicked Bake. This baked the colors of the various materials I assigned into a single texture (see Figure 10-15). Because there is no interaction between the meshes to consider this time (as there was when rendering ambient occlusion), I can bake the meshes all at once by selecting them all before baking.
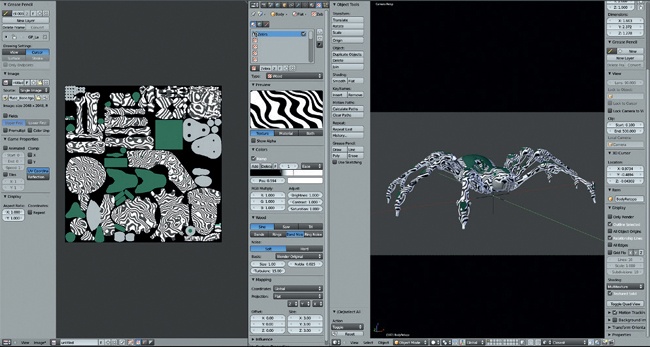
It’s worth pointing out here that you can bake more complex material colors and textures as well. For example, you can bake image textures into the UV unwrapped texture for an object or bake procedural materials into images. Figure 10-16 shows the result of adding a procedural wood texture to one of the flat materials for the Spider Bot before baking, which gives it a zebra-striped pattern.
Texturing the Jungle Temple
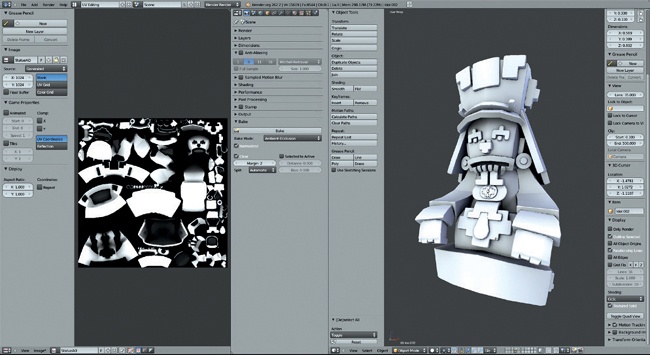
In the case of the Jungle Temple, most of my textures were tileable to some degree, or they were repeated on meshes in multiple locations. This meant that baking maps for things like ambient occlusion would be less effective because a map baked for a mesh in one location may not have quite the right effect when repeated in another. In the end, the only mesh I baked maps for was the statue (see Figure 10-17), for which I created an ambient occlusion map for the object by itself. I did this by putting the statue on its own layer while baking, just as I did for the parts of the Spider Bot model above.
General Tips for Baking Maps
Baking larger textures will allow you to capture more detail but will also take more time. When deciding what size textures to bake, consider how much detail your model has and how much will be present in the bake beforehand in order to optimize the resolution of the texture you use.
In general, a good rule of thumb to follow for displacement maps is that the size of the map in pixels need not be much bigger than the polycount of the mesh. So if you are baking about a 1M poly sculpt, a 1024×1024 pixel map will probably suffice. For other texture maps, consider the size that an object will appear in the final render. If an object will appear only a few hundred pixels high in the final render, its texture map should be about the same size. On the other hand, if an object appears close-up at a high resolution, then bigger textures will be needed.
In the case of particularly simple textures, like the flat colors we baked for the Spider Bot, you can make the image much smaller while baking and scale it up in an image editing program like GIMP later (making sure to increase the margin setting to prevent seams).
When creating images to bake to, set bit depths appropriately. Displacement maps require 32-bit images, while other texture types typically only require 8-bit (or 16-bit if you plan to manipulate them heavily). Blender can bake either 8- or 32-bit images, but remember the bit depth you end up with is also determined by the file format you save to. Use OpenEXR for high-bit-depth images and .tga or .png files for 8-bit images. Additionally, remember that GIMP can only edit 8-bit images (for now, that is—future versions are likely to incorporate support for high-bit-depth images), so if you plan on painting textures in GIMP, the extra depth is of little help.
When baking ambient occlusion or lighting, consider isolating the pieces you are baking on one layer to get more control over the results. And finally, it can be helpful to change the world settings (or settings for lamps if you’re baking lighting) to achieve higher-quality baked textures. (See Chapter 13 for more on world and lighting settings.)
In Review
In this chapter, we’ve discussed baking textures into images using Blender’s baking tools and the kinds of maps Blender will allow you to bake. I used these techniques to bake maps for my various projects: For the Bat Creature, I baked displacement and ambient occlusion maps, and for the Spider Bot, I baked ambient occlusion and some block colors to aid with texturing later. While I didn’t need to do a lot of texture baking for the Jungle Temple scene, I did create an ambient occlusion map for the statue.
In the next chapter, we’ll combine the textures we’ve baked with other ways of creating textures, from painting and cloning textures directly in Blender to painting in GIMP and combining photo textures to synthesize new ones.
