Weekends & Holidays
Feeding family and friends is the reason I became involved in the food world in the first place, and few things make me happier than putting something delicious in front of an appreciative—or just hungry!—recipient. When the weekends or holidays roll around, though, putting those smiles on people’s faces is almost all I think about! The spontaneity of weekday cooking, which can be a bit improvisational and free-form when it’s just Jade and me at the table, goes out the window for these more special meals. I even spend a bit of time with a pad and pencil planning and refining my menu before heading out to the store. These are meals I want to get just right.
I think of this as investment cooking, and not just because the raw ingredients might be a little fancier and pricier than your average weeknight recipe; I’m usually investing a fair amount of time, too, either in preparation or long, slow roasting or braising, or all of the above. The payoff, though, is so totally worth it, both in the satisfaction I feel when I see guests gathered at the table, and later on when I use all the delicious leftovers to make entirely new and entirely speedy meals all week long.
Weekends are also the time to get a jump on making gifts from my kitchen for celebrations throughout the year. They’re a way to send an important message to anyone I share them with: You mean the world to me.


SERVES 4
This is the quintessential Sunday night supper. Period.
1 pound small red potatoes, halved
3 leeks, white parts only, halved lengthwise, washed well, and cut into 1-inch pieces
4 tablespoons extra-virgin olive oil
2½ teaspoons kosher salt
¼ teaspoon crushed red pepper flakes
1 teaspoon chopped fresh thyme leaves, plus 4 whole sprigs
1 teaspoon chopped fresh rosemary, plus 2 whole sprigs
1 lemon, zested and halved
1 (4-pound) chicken, innards removed if included
1 whole head of garlic, cut in half through the equator
¾ cup low-sodium chicken broth
Preheat the oven to 450°F.
In a shallow braising pan or a large ovenproof skillet, toss together the potatoes, leeks, 2 tablespoons of the olive oil, ½ teaspoon of the salt, and the red pepper flakes. Spread evenly over the bottom of the pan.
In a small bowl, mix together the chopped thyme, chopped rosemary, 1 teaspoon lemon zest, the remaining 2 teaspoons salt, and the remaining 2 tablespoons olive oil. Pat the chicken dry with a paper towel. Gently slide your fingers under the skin along the breast, being careful not to tear the skin, and rub one-third of the seasoning mixture under the skin.
Rub the remaining seasoning all over the outside and inside of the bird. Stuff the cavity with the herb sprigs, lemon halves, and garlic. Tie the legs together, crossing the ankles, using butcher’s twine.
Place the dressed bird on top of the vegetables and place the pan in the oven. Roast for 55 to 60 minutes, adding the chicken broth to the bottom of the pan for the last 15 minutes of cooking. An instant-read thermometer should read 155°F in the thickest part of the thigh, and the potatoes should be fork-tender. Allow the chicken to rest for 15 minutes before carving and serving with the vegetables and pan sauce.
Making Memories
I am so fortunate to have grown up in a family that loved food and introduced me to cooking from a very young age. Spending time in the kitchen with your little ones is the perfect opportunity to teach them the basic cooking skills that will form the foundation of a lifelong love of cooking. I’ve always encouraged Jade to pull up a stool next to me when I cook, and she loves to help make dinner, snapping the ends off green beans, measuring out rice, setting the timer, and other tasks. Now that she’s a bit older I’m starting to let her use a child-size knife, and she loves to suggest dishes for us to try.
Getting kids involved in the prep work and menu-planning process is also a great way to help them expand their culinary horizons and break them out of the chicken-nugget and pasta-with-Parm rut.

SERVES 6 TO 8 (OR 4, WITH LEFTOVERS)
My aunt Raffy inspired this homey all-in-one dish made with lots of fragrant herbs. It has a deep, earthy flavor.
3 garlic cloves, peeled and finely chopped
1½ teaspoons chopped fresh thyme leaves
2 teaspoons chopped fresh rosemary leaves
2 teaspoons kosher salt
¼ teaspoon freshly ground black pepper
1 (5-pound) beef chuck roast
1 tablespoon extra-virgin olive oil
1 onion, cut into 8 wedges
1 medium fennel bulb, trimmed, cored, and cut into 8 wedges
1 cup dry red wine
½ cup low-sodium beef broth
1 cup marinara sauce, homemade or store-bought
½ pound small Yukon Gold potatoes (about 8)
Preheat the oven to 300°F.
In a small bowl, mix together the garlic, thyme, rosemary, salt, and pepper. Rub this mixture evenly all over the chuck roast.
In a Dutch oven or heavy stockpot, heat the olive oil over high heat. Reduce to medium high and add the roast, searing the meat on all sides until golden brown all over, about 4 minutes per side. Remove the roast to a plate and add the onion and fennel to the pot. Cook, stirring often, for 3 minutes or until fragrant.
Deglaze the pot with the red wine and the beef broth and simmer for 2 to 3 minutes, scraping up any brown bits that may have stuck to the bottom. Stir in the marinara sauce. Return the roast to the pot, nestling it into the vegetables. Cover with the lid and place in the oven for 2 hours and 30 minutes, turning the meat once about halfway through.
Remove the lid from the pot and scatter the potatoes around the meat. Return the pot to the oven, uncovered, and cook for another 30 minutes or until the potatoes are cooked through and the meat is tender. Allow the pot roast to rest for 30 minutes before serving.
Reheat the braised fennel and potatoes in the pan juices, then arrange on a platter. Slice the pot roast and serve alongside the vegetables. Spoon some of the pan juices over everything before serving.
Cook Once, Eat Three Times
I’ve often said that I inherited my love of food from my grandfather Dino, but a lot of what I know about entertaining I’ve learned from my aunt Raffy. She is an amazing host who manages to make putting together a gorgeous spread for twenty look like a walk in the park. And because she is so relaxed and welcoming, everyone who comes to her parties feels instantly at ease—just like family.
The heart of her menu is almost always a one-pot dish, something that can be scaled up or down, and preferably made in advance to be reheated as needed so she can spend the day as she likes. When the weather is cold, she’s likely to make a hearty stew or other beefy, rib-sticking dish, like a pot roast. It braises slowly on a bed of vegetables, and its flavor actually improves if made a day ahead of time; on the day of her get-together all she needs to do is slice the meat, puree some of the cooked vegetables and braising liquids to make a quick sauce, and return it all to the oven for a bit to heat through.
The real genius of meals like these, though, is that they provide the basis for additional meals all week long. I don’t think of them as “leftovers.” Instead, I regard them as an ingredient—precooked and seasoned to perfection—that can add substance and flavor to quick-and-easy weeknight meals. They give me a leg up when I need a next-to-instant sauce for pasta, topping for pizza, or addition to risotto that doesn’t come from a package.

Polenta Aplenty
Today we think of polenta as synonymous with cornmeal, but the dish was first made with barley, and later with grains like farro, millet, and buckwheat, as well as peas, chestnuts, and just about anything that could be ground into a coarse meal.
At Sauce restaurant in Manhattan, chef-owner Frank Prisinzano uses polenta as the base for the “plank,” which takes its inspiration from northern Italy. There, it’s traditional to ladle polenta directly onto a wood table, top it with meat sauce, and eat in communal fashion without plates. Frank’s version is only slightly less rustic: It’s served on a wooden plank and finished with a drizzle of olive oil and more Parmesan.
When buying polenta, look for medium or medium-coarse cornmeal (steer clear of the finely ground stuff that’s like flour in texture). Anything specifically labeled polenta is really just cornmeal in a different (more expensive) package. Instant polenta is par-cooked and is ready to serve in fifteen to twenty minutes. Expect to cook the coarse-ground grains for 40 minutes or longer.
MAKES ABOUT 3½ CUPS

At Sauce in New York City, chef-owner Frank Prisinzano serves this substantial ragù over a mound of polenta, a fun and rustic presentation for a winter dinner party. It’s an easy recipe to scale up, and it freezes well, so consider making a double or triple batch and storing the leftovers in the freezer.
1 tablespoon olive oil
1 pound coarsely ground beef
⅓ cup finely chopped carrot
⅓ cup finely chopped onion
⅓ cup finely chopped celery
¾ teaspoon kosher salt
¾ cup dry white wine
2 cups whole milk
1 cup unsalted beef broth
⅓ cup tomato paste
1 bay leaf
1 fresh sage sprig
½ cup freshly grated Parmesan cheese
Olive oil, for drizzling
Heat the oil in a heavy pot or Dutch oven over high heat. Add the ground beef and cook until all the liquid has evaporated and the meat starts to fry in its own fat.
Add the carrot, onion, celery, and salt to the pot. As the meat is frying, use a flat-bottomed wooden spoon to scrape the pan vigorously so the meat gets golden brown but doesn’t burn. When it starts to stick to the pan, reduce the heat to low and deglaze the pan with the white wine, again using your wooden spoon to scrape up all the brown bits from the bottom of the pan.
Add the milk, beef broth, and tomato paste to the pot and stir well to combine. Reduce the heat to low and simmer the Bolognese for 1 hour, until the meat is very soft and the sauce is beginning to thicken. Add the bay leaf and sage and simmer for an additional 30 minutes.
Mound the polenta on a platter or wooden board. Top with the Bolognese and sprinkle with the cheese. Drizzle with the olive oil and serve.
SERVES 4 TO 6

One well-seasoned meatloaf mixture takes on a completely different character when braised in milk or marinara, and the loaves lend a layer of depth and complexity to their sauces as they cook.
2 cups diced day-old bread, crust removed
2½ cups milk, at room temperature
2 small shallots, minced
2 garlic cloves, minced
1 large egg, at room temperature
½ cup freshly grated Parmesan cheese
¼ pound thinly sliced prosciutto di Parma, chopped fine
1 pound ground turkey
2 tablespoons chopped fresh flat-leaf parsley leaves
2 tablespoons extra-virgin olive oil
2 tablespoons (¼ stick) unsalted butter
¼ teaspoon kosher salt
1½ cups marinara sauce, homemade or store-bought
In a large bowl, combine the bread with ½ cup of the milk and break it up with your fingers. Mix well and allow the bread to soak for 5 minutes. Add the shallots, garlic, egg, Parmesan, and prosciutto and mix with a wooden spoon to distribute the prosciutto. Add the turkey and parsley and mix well. Divide the mixture equally into 2 oblong-shaped loaves.
Heat 2 medium skillets over medium-high heat. Add 1 tablespoon of the olive oil and 1 tablespoon of the butter to each pan. Place one loaf in each of the pans and cook them on all sides until golden brown all around, 10 to 12 minutes total.
Season the remaining 2 cups milk with the salt and add to one of the skillets. Bring to a simmer over medium-high heat. Add the marinara to the second skillet and bring to a simmer as well. Reduce the heat under both skillets to medium low, cover, and braise the meat loaves for about 25 minutes, carefully turning them about halfway through. They are done when an instant-read thermometer inserted in the center of each loaf registers 160°F. Transfer them to a cutting board and allow to rest for 10 minutes before slicing.
To serve, return the skillet with the milk sauce to medium heat and simmer until reduced by half, stirring occasionally. It will look slightly curdled, which is fine. When somewhat thickened, use an immersion blender to blend the sauce until emulsified and creamy. Transfer to a small pitcher. Reheat the marinara if necessary, using a wooden spoon to scrape up any brown bits from the pan, and transfer to a second pitcher. Serve the polpettone with their respective sauces.
MAKES 2 RACKS

2 racks of pork baby back ribs, membrane removed (about 5 pounds total)
2 tablespoons (packed) light brown sugar
2 teaspoons paprika
1 tablespoon kosher salt
SAUCE
1 tablespoon extra-virgin olive oil
1 small onion, diced
1 garlic clove, chopped
1- to 2-inch piece of ginger, peeled and chopped
4 plums (about 1 pound), pitted and chopped
⅛ teaspoon ground allspice
¾ cup apple cider vinegar
½ cup light brown sugar
½ teaspoon kosher salt
1 habanero chile pepper, halved
Preheat the oven to 300°F.
Place the ribs on two sheets of aluminum foil large enough to wrap around them and seal. In a small bowl, mix together the sugar, paprika, and salt. Rub the ribs evenly on all sides with the mixture. Bring the foil up and around the rubbed ribs and crimp closed. Place on a rimmed baking sheet and bake in the preheated oven for about 3 hours or until tender but not falling apart. Remove from the oven and allow them to cool slightly, about 30 minutes.
To make the sauce: Heat a medium saucepan over medium heat. Add the oil, onion, garlic, and ginger to the pan and cook, stirring often with a wooden spoon, until the onions are soft and fragrant, about 4 minutes. Add the plums and allspice and stir to coat with the flavors. Add the vinegar, sugar, salt, and habanero and stir to combine. Bring to a simmer and reduce the heat to low to maintain a gentle simmer. Simmer for about 20 minutes or until the plums are very soft. Remove the habanero. Using an immersion blender, puree the sauce until it is as smooth or as chunky as you like.
Preheat a grill to medium heat. Brush the ribs all over with the sauce. Oil the grill and place the ribs meat side down until lightly charred. Flip the ribs and cook on the other side. Brush both sides with more sauce and continue to cook until the sauce is thick and sticky and golden brown. Serve with more sauce on the side if desired.
Cook’s Note: Alternatively, you can brown the ribs under the broiler on high. Keep brushing the ribs every 4 minutes until the sauce is thick and sticky.

Summer Celebrations
There’s so much that’s fabulous about the Fourth of July. It’s a happy accident of American history that our Founding Fathers declared independence from the British during the summer, giving us a chance to celebrate our nation’s freedoms when the weather is at its best for being outside, and produce is nearing its peak. (Can you imagine if we celebrated the Fourth in January?)
When it comes to entertaining, though, it’s the perfect time to go old-school with steamed lobsters, an old-fashioned clambake, and all the trimmings.
A fire heats the rocks, and once it has burned down to embers, layers of seaweed and shellfish go on top and then get covered with a tarp or dampened burlap to trap the heat and steam. It’s a complicated operation that involves permits and shovels, and while it’s impressive, it’s also hard to control the cooking times with a great deal of precision.
I prefer to steam the lobsters separately to ensure that they don’t overcook for even a minute, and serve them with an herbed aioli. While they steam I cook the clams, sausage, and veggies together in a big pot, adding the ingredients in order from the longest to the quickest cooking, so everything comes out done to perfection. The broth in the pot may be the best part: briny, smoky from the sausage, infused with butter—just the thing to dip the clams in or even hunks of good bread. Pass around a platter of crostini while the shellfish is working, open a crisp white wine, and you have yourself a world-class seafood feast, no beach required.

SERVES 6
Traditionally, a clambake is cooked in a stone-lined pit dug in the sand. Here’s a much easier and superfast way to enjoy this summertime classic any time of the year. Make sure you use the freshest corn you can find, and feel free to substitute spicy andouille sausage for the kielbasa if you like dishes with some heat.
2 tablespoons extra-virgin olive oil
1 medium onion, halved and thinly sliced
1 teaspoon Old Bay seasoning
½ teaspoon kosher salt
2 cups dry white wine
1½ pounds small red bliss potatoes
1 pound smoked kielbasa, sliced into 1-inch pieces
4 ears of corn, shucked and sliced into thirds
2 pounds medium-size clams, such as littleneck or cherrystone, scrubbed well
2 tablespoons (¼ stick) unsalted butter
1 teaspoon smoked salt
2 lemons, cut into wedges
In a large stockpot, heat the oil over medium-high heat. Add the onion, Old Bay, and salt and cook, stirring occasionally, until the onion softens and begins to brown, about 8 minutes. Add ¼ cup of the wine and the potatoes, then cover and cook for 10 minutes.
Layer the sausage over the potatoes, then add the corn, clams, and the remaining 1¾ cups wine. Bring to a simmer, then cover and cook for 15 to 20 minutes, until all the clams have opened.
Using tongs, transfer the clams, corn, potatoes, and sausage to a large platter, discarding any unopened clams. Strain the liquid through a fine-mesh strainer into a bowl; add the butter to the bowl, swirling it until it melts and incorporates into the liquid. Divide the liquid among small bowls for dipping or pour it over the clambake, and sprinkle with the smoked salt. Serve with the lemon wedges.
SERVES 4

Why make a round pizza when this flag-themed rectangle is so much fun—and so much easier to cut into app-sized squares? You’ll have bites for veggie lovers, pepperoni fans, and plain cheese folks all from the same pie.
FOR THE SPINACH
2 tablespoons extra-virgin olive oil
2 garlic cloves, smashed and peeled
5 ounces baby spinach, chopped
½ teaspoon kosher salt
TO ASSEMBLE
2 tablespoons flour
1 pound pizza dough
1 tablespoons extra-virgin olive oil
¾ cup pizza sauce
2 cups shredded mozzarella cheese
1 tablespoon ricotta cheese
28 slices pepperoni
Preheat the oven to 500°F. Position a rack in the lower third of the oven.
Heat a medium skillet over medium-high heat. Add the oil and the garlic and cook until fragrant and lightly browned. Add the spinach and the salt and cook, stirring often, until the spinach is wilted, 1 to 2 minutes. Remove from the heat and drain the spinach in a fine mesh strainer. Set aside.
Sprinkle 1 tablespoon of flour on a clean work surface. Place the dough on top and sprinkle it with the remaining tablespoon of flour. Roll the dough out to a 15 × 10-inch rectangle. Drizzle the oil on a rimmed baking sheet and spread it evenly using a pastry brush. Transfer the dough to the prepared baking sheet.
Spread the sauce over the entire crust. Sprinkle with the mozzarella, creating a 5 × 4-inch rectangle in the upper left corner with slightly less cheese. Squeeze the liquid from the spinach and spread the spinach evenly over the upper left corner. Dot small clumps of ricotta cheese over the spinach to form the “stars.” Arrange the pepperoni over the remaining surface of the pizza in horizontal rows, slightly overlapping the slices to form the stripes.
Bake for 12 to 15 minutes or until the crust is golden brown and cooked though and the cheese is bubbly.


SERVES 4
If you have leftovers from this recipe, make lobster rolls for lunch the next day by mixing together the shellfish and aioli with some chopped celery and serving on hot dog buns.
Kosher salt
4 (1½-pound) lobsters
⅔ cup mayonnaise
2 tablespoons grated lemon zest
¼ cup fresh lemon juice (from 2 lemons)
2 teaspoons Dijon mustard
¼ teaspoon kosher salt
⅔ cup fresh flat-leaf parsley leaves, chopped
In a very large pot, bring 3 inches of well-salted water to a boil. Add the lobsters, cover tightly, and cook for 12 minutes or until they are bright red. Remove the lobsters from the pot (you can let them stand in the sink) and allow to cool slightly.
While the lobsters steam, in a medium bowl whisk together the mayonnaise, lemon zest and juice, mustard, and salt. Fold in the chopped parsley.
Serve the lobsters with a small bowl of the aioli for dipping.


Thanksgiving
People are often surprised to learn that I didn’t start celebrating Thanksgiving until I was well into my teens, even though I moved to the United States from Italy when I was seven. To my Italian parents, Thanksgiving was just another Thursday, and dinner was just another meal. To my brothers, sister, and me, the best part of the holiday was getting an extra two days off from school!
All that changed, though, when my aunt Raffy and my grandfather Dino married Americans. Buzz and Martha both loved Thanksgiving, and my grandfather loved having an excuse to gather the extended family together. Slowly but surely we began to incorporate American traditions into our own family celebrations, and now Thanksgiving is one of my favorite times of the year.
My Thanksgiving menus reflect all of this history and cross-cultural influences: American traditional with an Italian accent. I always try to include corn on the menu in some form as a nod to the first Thanksgiving, whether it’s a corn soufflé, spicy cornbread, or herbed polenta—the Italian version of mashed potatoes. And because the Thanksgiving table wouldn’t be complete without the tangy flavors of cranberry sauce, I top a winter greens salad with dried cranberries and orange segments in a sweet-tart balsamic vinaigrette. The centerpiece is, of course, turkey, but whether rolled and tied in the manner of porchetta or roasted with aromatic herbs, there’s always a hint of my Italian heritage at work.


SERVES 4 TO 6
Carving a turkey in front of your assembled friends and family is rarely a lot of fun. This boned, stuffed, and rolled breast, made in the style of stuffed and roasted pork, is tender on the inside and crispy on the outside. It’s also a dream to slice and serve. Note that the turkey breast is seasoned a day before roasting.
1½ teaspoons fennel seeds
2 teaspoon kosher salt
1 teaspoon orange zest
1 (3½-pound) boneless, skinless turkey breast, butterflied
¼ cup panko bread crumbs
¼ teaspoon crushed red pepper flakes
3 tablespoons extra-virgin olive oil
1 small fennel bulb, cored and cut into ¼-inch dice
1 shallot, minced
1 small apple, cored and cut into ⅓-inch dice
1 tablespoon chopped fresh rosemary leaves
The day before roasting: Begin by chopping ½ teaspoon of the fennel seeds. In a small bowl, combine them with 1¼ teaspoons of the salt and the orange zest. Rub both sides of the turkey with the salt mixture. Place the turkey breast in a gallon-size plastic storage bag and refrigerate overnight.
The day of roasting: Preheat the oven to 400°F. Remove the turkey breast from the refrigerator and allow it to come to room temperature for 20 minutes before cooking.
Meanwhile, in a 12-inch ovenproof sauté pan, toast the panko over medium heat, stirring with a rubber spatula until golden brown. Remove to a medium bowl and add the remaining teaspoon fennel seeds, the red pepper flakes, and ¼ teaspoon of the salt. Set aside.
To the same pan over medium-high heat, add 1 tablespoon of the olive oil. Add the diced fennel, shallot, apple, rosemary, and the remaining ½ teaspoon salt. Sauté until the fennel softens, about 5 minutes. Add to the bowl with the panko and toss to combine. Wipe out the pan and reserve to sear the turkey.
Place the butterflied turkey breast, opened, in front of you. Spread the fennel-panko filling evenly over the turkey. Roll up the turkey breast to maintain the shape. Tie with twine in 4 spots about 2 inches apart. Place the sauté pan over medium-high heat and add the remaining 2 tablespoons oil. Place the turkey breast in the hot pan and sear on all sides until golden brown, about 3 minutes per side. Place the pan in the preheated oven and roast for about 40 minutes or until an instant-read thermometer placed in the thickest part of the breast reads 155°F. Allow the porchetta to rest for 15 minute before slicing.
Breaking things up makes them more manageable 99 percent of the time, and it’s no different when it comes to tackling one of the most gargantuan tasks on any cook’s calendar, the Thanksgiving turkey.
Cooking a whole turkey is unwieldy, it monopolizes the oven for hours, and, worst of all, it often results in breast meat that’s dried out and overcooked (or dark meat that is less than completely done). To right this historical wrong, try cooking the breast separately from the legs.
Ask your butcher to portion the turkey for you, or, if you know your way around the anatomy of the bird, tackle it yourself. Cut the leg-and-thigh portions away from the carcass and then separate the drumstick from the thigh for four pieces in total. Next, remove the wings and set aside for another use. Finally, smooth the breast skin over the meat before cutting directly down along either side of the breastbone and along the ribs, freeing both breast fillets.
You can stuff and roll the breast, or rub it with flavorful seasonings and roast it whole (this page). Legs and thighs can be roasted, braised or, for the most decadent dish of all, slow cooked in duck fat then pan fried to crisp perfection.
SERVES 6 TO 8

If you are not a fan of turkey because it is too bland and dry, this is the holiday feast for you. Roasting the breast separately with an unctuous rub of herby duck fat ensures it will be moist and cooked to perfection. The drippings will also make the most decadent gravy you’ve ever tasted.
HERB-ROASTED TURKEY BREAST
½ turkey breast (about 3 pounds)
2 teaspoons finely chopped fresh thyme
2 teaspoons finely chopped fresh rosemary
¼ teaspoon crushed red pepper flakes
2 garlic cloves, finely chopped
3 tablespoons duck fat, warmed gently to a liquid
1 teaspoon kosher salt
DUCK FAT GRAVY
2 tablespoons all-purpose flour
3 tablespoons white wine
1 cup low-sodium chicken broth
For the turkey breast: Remove the turkey from the refrigerator 30 minutes before cooking. Preheat the oven to 400°F.
In a small bowl, mix together the thyme, rosemary, red pepper flakes, garlic, and duck fat. Season the turkey evenly with the salt and rub the herb mixture all over. Heat a medium skillet over medium-high heat. Sear the turkey breast, skin side down, until the skin gets crispy and golden brown, about 4 minutes. Flip the turkey and sear for another 4 minutes.
Transfer the breast to a rimmed baking sheet along with the duck fat from the pan. Roast for 35 to 45 minutes, flipping the breast every 15 minutes and basting with the juices. An instant-read thermometer should read 155°F when done. Transfer to a cutting board to rest for 10 minutes before slicing.
For the gravy: In a small saucepan, warm 4 tablespoons of the turkey drippings over medium heat. Whisk in the flour until a smooth paste forms. Add the wine and whisk until smooth. Slowly whisk in the chicken broth and continue to cook over medium heat, whisking often. Bring to a simmer and cook for 5 minutes. Strain if desired.
SERVES 4

Duck confit, which is duck legs braised and preserved in duck fat, is popular throughout France. Here’s how to use the same technique to produce sensationally crisp, decadent turkey legs. Leftovers are spectacular in stir-fries, grain salads, and risottos.
¼ cup kosher salt
1 tablespoon sugar
½ teaspoon freshly cracked black peppercorns
2 bay leaves, crushed
10 fresh thyme sprigs
Leaves from 2 fresh rosemary sprigs (stems discarded)
2 turkey legs (about 2½ pounds)
2 turkey thighs (about 2½ pounds)
4 (7-ounce) containers of duck fat
1 head of garlic, top third cut off and discarded, unpeeled
In a small bowl, mix together the salt, sugar, pepper, bay leaves, thyme sprigs, and rosemary leaves. Place the turkey legs and thighs in a 9 × 13-inch baking dish. With the tip of a knife, cut 4 slits around each leg and thigh. Sprinkle the salt mixture over all sides of the turkey. Cover with plastic wrap and refrigerate for at least 24 hours or up to 2 days.
Preheat the oven to 250°F. Remove the turkey from the refrigerator 30 minutes before starting to cook. In a large Dutch oven, warm the duck fat and head of garlic over medium heat. Meanwhile, rinse the turkey well to remove the excess salt mixture. Dry very well with paper towels.
Carefully add the turkey to the warmed duck fat. The fat should cover the meat. When you see the first bubble come to the surface of the oil, cover the pan and place in the oven for about 3½ hours or until the meat is extremely tender. Allow to cool to room temperature. Store the confit completely submerged in the fat in the refrigerator until ready to use or for up to a month.
To serve, preheat the oven to 425°F. Remove the turkey from the fat and scrape off as much excess fat as possible. Arrange the turkey on a rimmed baking sheet with 2 tablespoons of the duck fat and place in the oven for about 40 minutes, rotating every 15 minutes to crisp the skin evenly.

SERVES 4
The effort we all put into hosting the Thanksgiving meal shouldn’t stop paying dividends once we’ve said good-bye to the last guest and returned the good china and silver to their storage places. An overstuffed turkey sandwich is as much a part of the post-Thanksgiving game plan as watching football on TV; this one just happens to be spectacularly good.
½ cup cranberry sauce
1 tablespoon Dijon mustard
½ teaspoon chopped fresh rosemary leaves
8 slices brioche bread
8 thin slices Swiss cheese
6 ounces cooked turkey breast, sliced
4 large eggs, at room temperature
¾ cup heavy cream, at room temperature
⅛ teaspoon kosher salt
2 tablespoons extra-virgin olive oil
3 tablespoons confectioners’ sugar
In a small bowl, mix together the cranberry sauce, mustard, and rosemary. Lay out the slices of bread. Divide the mustard mixture evenly over the 8 slices of bread and spread almost to the edges. Divide the cheese slices among the bread. Divide the turkey among 4 of the cheese-topped slices of bread. Cover the turkey-topped halves with the cheese-topped halves to make 4 sandwiches.
In a medium bowl, whisk together the eggs, cream, and salt.
Heat a large skillet over medium heat. Add the oil to the pan and heat for 1 minute. Working with one sandwich at a time, dip both sides of the sandwich in the egg batter and place directly into the hot pan. Repeat with the remaining sandwiches. Cover with a lid and allow to cook for 3 to 4 minutes or until the first side is golden brown.
Remove the lid, flip each sandwich, and continue to cook on the remaining side until golden brown and the cheese is melted, approximately another 4 minutes. Cook in batches if needed. Sprinkle one side of each sandwich with confectioners’ sugar and serve warm.

If you’ve stood at the stove for hours on end, you know what a toll it can take on your back. Aches, pains, strains—it can all add up and make a food-centered holiday less festive. Fortunately, my sister, Eloisa, has just the cure to help get the kinks out, and it takes less than a minute.
It’s a yoga stretch called “heart opener” and it’s great to use when you’ve been stuck in one stressful posture for too long—in front of the stove, at your computer, wherever. Here’s how you do it:
Standing with your feet hip-distance apart, reach your hands behind you, then, one hand in a fist, clasp them together at the base of your back. Looking straight ahead, lift your clasped hands as high as you can behind you, pulling your shoulder blades together. Hold for five full breaths.
If you want more of a stretch, try bending forward, folding your body over your legs, and letting gravity pull your clasped hands behind and above you, toward the floor. Whether or not you opt for this extra stretch, you’ll end up feeling reinvigorated, refreshed, and ready to tackle that next course.
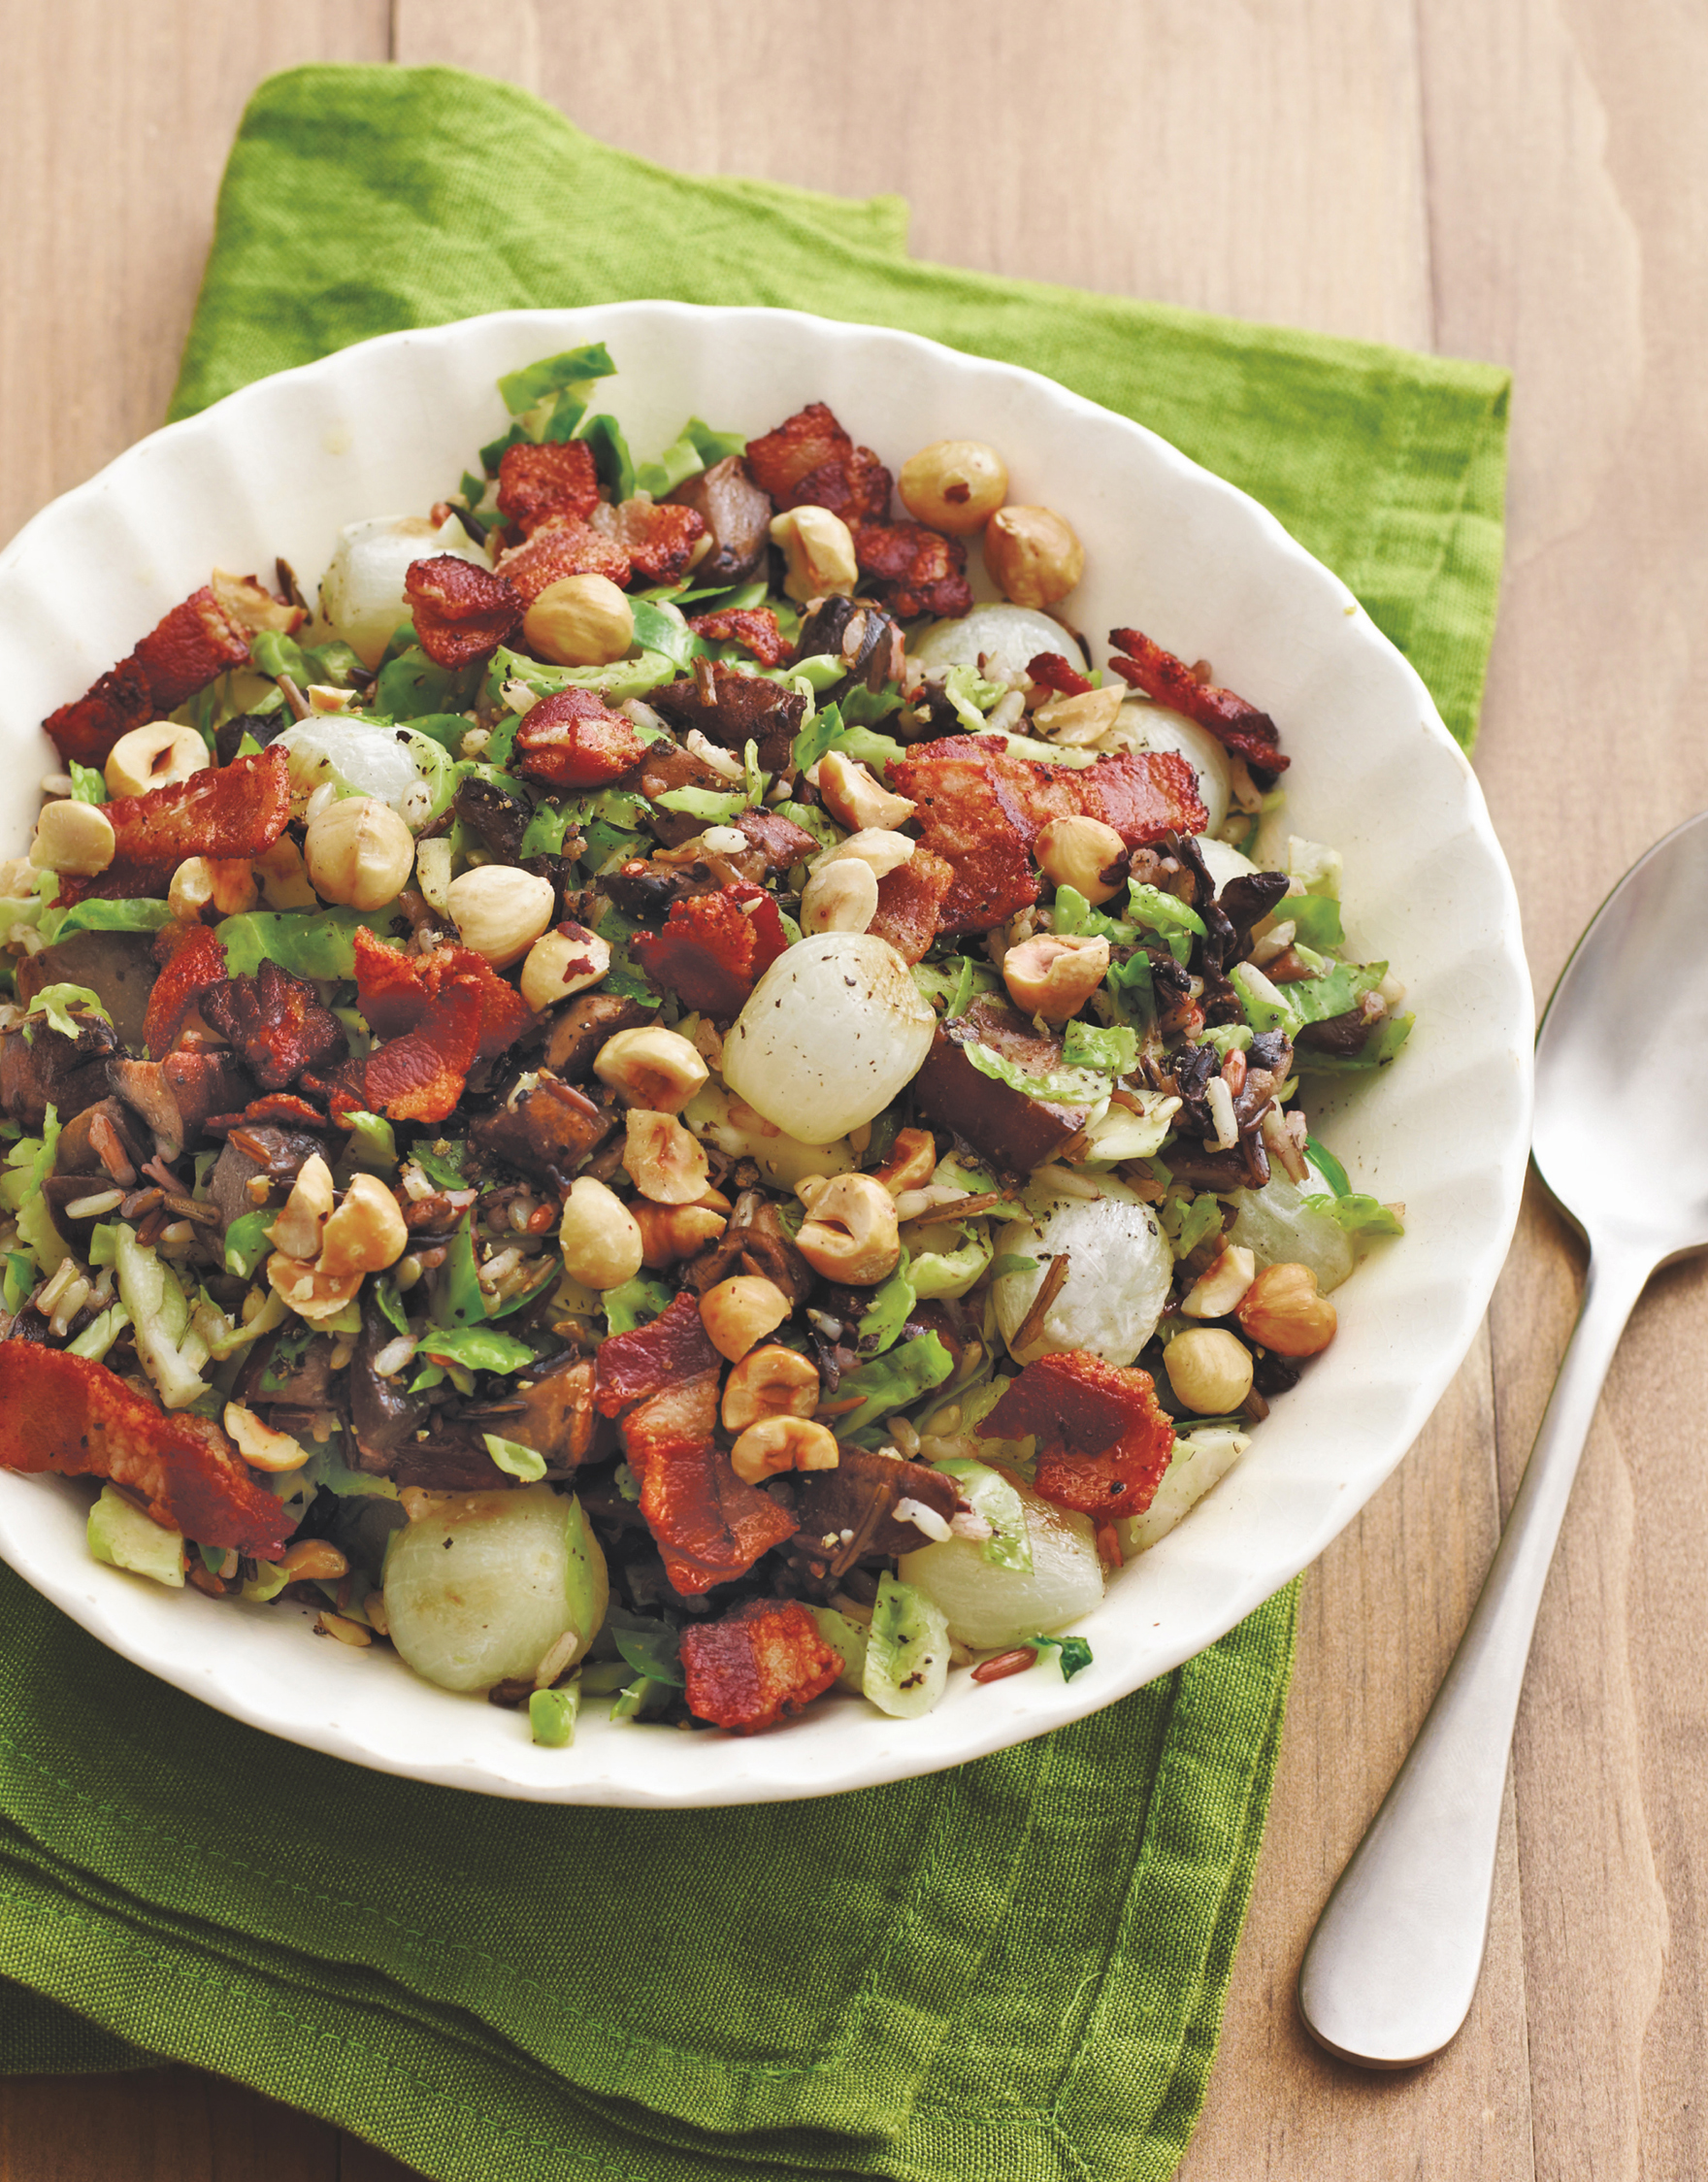
SERVES 8 TO 10
Holidays can be a tough time to please everyone, especially if you are trying to accommodate special dietary needs. This colorful, flavorful dressing just happens to be gluten-free, but it’s no compromise at all. Be sure to buy plain wild rice, not a pilaf or rice blend.
8 ounces applewood-smoked bacon slices, cut crosswise into ½-inch-wide strips
4½ cups low-sodium chicken broth
3 tablespoons chopped fresh thyme leaves
1¼ cups organic brown rice (I used Lundberg’s short-grain gluten-free; about 8.6 ounces)
1¼ cups wild rice (about 7.6 ounces)
6 tablespoons (¾ stick) unsalted butter
2 (10-ounce) bags pearl onions, blanched in boiling water for 2 minutes, then peeled
1½ pounds portobello mushrooms, dark gills scraped away and discarded, mushrooms coarsely chopped (7 to 8 cups of ¾-inch pieces)
1 pound Brussels sprouts, root ends trimmed and discarded, sprouts halved lengthwise, then thinly sliced crosswise (about 4 cups)
Kosher salt and freshly ground black pepper
¾ cup hazelnuts, toasted (see Cook’s Note), husked, and coarsely chopped (optional)
In a large heavy skillet over medium heat, cook the bacon until crisp. Using a slotted spoon, transfer the bacon to paper towels to drain. Discard all but 2 tablespoons of the drippings from the skillet; reserve the skillet with the drippings.
In a large heavy saucepan, combine the broth and 1 tablespoon of the thyme and bring to a boil over medium-high heat. Add the brown rice and return to a boil. Reduce the heat to medium low; cover and simmer for 10 minutes. Add the wild rice and bring to boil. Reduce the heat to medium low; cover and simmer until all the rice is tender (but still slightly chewy), about 40 minutes longer.
Meanwhile, add 1 tablespoon of the butter to the bacon drippings in the reserved skillet and heat over medium-high heat. Add the pearl onions and sauté until golden and tender, 7 to 8 minutes. Using a slotted spoon, transfer the onions to a small bowl and set aside. Add 2 tablespoons of the butter and the mushrooms to the skillet and sauté until the mushrooms are brown and tender, 7 to 8 minutes. Stir the Brussels sprouts into the skillet with the mushrooms and sauté until tender but still bright green, about 5 minutes; sprinkle generously with salt and pepper. Add the rice mixture, remaining 3 tablespoons butter, remaining 2 tablespoons thyme, and reserved pearl onions to the skillet and toss gently to blend. Season to taste with salt and pepper. Transfer the stuffing to a large bowl. Sprinkle with the bacon and hazelnuts, if desired, and serve.

SERVES 8
Pumpkin pie is the obvious choice for Thanksgiving, but why be obvious? Coloring a bit outside the lines is so much more enjoyable. Adding the slightly astringent, floral flavor of persimmon to this pie filling and brushing the crust with a bit of apricot preserves adds brightness, and persimmon slices just look cool.
CRUST
Vegetable oil cooking spray
1⅓ cups all-purpose flour
½ cup confectioners’ sugar
¼ teaspoon fine salt
8 tablespoons (1 stick) chilled unsalted butter, diced
3 tablespoons mascarpone cheese, chilled
2 to 3 tablespoons apricot preserves
FILLING
2 ripe Fuyu persimmons, trimmed, peeled, and cut into 1-inch pieces, or 1 cup persimmon pulp from 2 very ripe Hachiya persimmons (each 6 to 7 ounces; see Cook’s Note)
1 cup canned pumpkin puree (not pumpkin pie filling)
½ cup granulated sugar
⅓ cup mascarpone cheese, at room temperature
⅓ cup heavy cream, at room temperature
¼ teaspoon fine salt
1 teaspoon ground cinnamon
1 tablespoon cornstarch
3 large eggs, at room temperature
Confectioners’ sugar, for dusting
For the crust: Preheat the oven to 350°F. Lightly spray a 9-inch glass or ceramic pie dish with vegetable oil spray. In a food processor, blend the flour, confectioners’ sugar, and salt until combined. Add the butter and mascarpone cheese and blend until moist clumps form.
Gather the dough into a ball. Drop 2-inch pieces of dough over the bottom and sides of the pie dish. Using moist fingertips, press the dough together to form a smooth crust. Using the tines of a fork, prick the dough all over.
Bake the crust until the edges are browned and the center of the crust is pale golden, about 25 minutes. Transfer the crust to a work surface. Brush the bottom and sides of the crust with apricot preserves. Place on a wire rack to cool.
For the filling: In a food processor, combine the persimmon pieces or pulp and the pumpkin. Blend until smooth. Add the sugar, mascarpone cheese, cream, salt, cinnamon, cornstarch, and eggs. Blend until smooth. Pour the filling into the cooked crust.
Bake until slits or cracks appear around the edges and the center is set, about 35 minutes. Cool the pie on a wire rack. (If making one day ahead, bake and cool to room temperature. Cover loosely with plastic wrap and refrigerate.) Just before serving, dust the top of the pie with confectioners’ sugar. Cut into wedges and serve.
Cook’s Note: To remove the pulp from Hachiya persimmons, cut off the top of the fruit with a knife and scoop out the pulp with a spoon.

SERVES 10 TO 12

This cake keeps well for several days thanks to the apples and oil, which add moisture and prevent it from becoming dry as it sits. Serve a slice with hot cider for an afternoon pick-me-up.
Butter, for greasing the pan
All-purpose flour, for dusting
CAKE
3 medium green apples, such as Granny Smith, peeled, cored, and diced into ¼- to ½-inch pieces
1½ cups pure maple syrup
3 large eggs, at room temperature
¾ cup (packed) light brown sugar
¾ cup vegetable oil
1 tablespoon pure vanilla extract
3 cups all-purpose flour
1½ teaspoons baking powder
1½ teaspoons baking soda
1 tablespoon ground cinnamon
½ teaspoon ground nutmeg
½ teaspoon ground ginger
½ teaspoon fine sea salt
1 cup chopped walnuts
ICING
1 cup confectioners’ sugar
¼ cup heavy cream
4 ounces cream cheese, at room temperature
2 teaspoons pure vanilla extract
For the cake: Place a rack in the center of the oven and preheat the oven to 350°F. Liberally butter and flour a 10-inch fluted tube or Bundt pan. Set aside.
In a large bowl, mix together the apples, maple syrup, eggs, brown sugar, oil, and vanilla. In a separate medium bowl, whisk together the flour, baking powder, baking soda, cinnamon, nutmeg, ginger, and salt. In batches, mix the dry ingredients into the apple mixture. Stir in the walnuts.
Pour the mixture into the prepared pan. Bake until a cake tester or skewer inserted into the cake comes out clean, 55 to 60 minutes. Cool for 15 minutes and invert onto a wire rack to cool completely, about 1 hour.
For the icing: In a food processor, combine the confectioners’ sugar, cream, cream cheese, 3 tablespoons water, and the vanilla. Process until smooth, adding more water, 1 teaspoon at a time, until the icing is pourable. Spoon the icing over the cake and allow to set for 20 minutes before slicing.
Holidays and the entertaining associated with them just inevitably seem to add up to stress, no matter how well-intentioned you are. Here are some FAQs and strategies for keeping it all manageable.
Do you have any time-saving tips when preparing for a big holiday feast?
It’s all about organization. I always make lists about what needs to be done and when. The more time you spend planning ahead, even making some of the dishes ahead, the fewer extra trips to the store, last-minute emergencies, and pre-party meltdowns there will be, and that ultimately saves time. Do a little bit each day so you can complete each task efficiently. Make and roll out your piecrusts in advance. Set the table and lay out all your platters a day or two ahead. Blanch the vegetables and refrigerate in plastic bags.
I’m helpless at arranging centerpieces; any ideas for a festive holiday table?
I love to incorporate ingredients I am cooking with into my centerpieces…like baby pumpkins, herbs, pomegranates, and persimmons mixed with leaves, pinecones, and branches from my yard. Fill a few vases with kumquats and tealights or cordless string lights, to add unexpected sparkle.
I’m always worried about inviting guests who don’t know one another. Is there anything I can do to make sure people are mingling? How do you feel about assigned seating?
A well-stocked little bar cart that lets people assemble their own cocktails is always a good conversation starter. I also love making and serving infused vodkas—fennel, tangerine, or cranberry. As for assigned seating, I’m for it. People are sometimes anxious about sitting in the right place. The question that always comes up is, do you split up the couples or not? Here’s a fun solution: From a deck of cards, pull out one card for every guest, starting with the ace and continuing in ascending order. Then shuffle them and let everyone pick one. The ace sits at the head of the table, with number two to her left, and so on. It’s a random way of seating guests.
SERVES 6 TO 8

When I want to serve my guests something special and elegant, but I still have my eye on the clock, I turn to beef tenderloin, which cooks in just thirty minutes. What makes this version special is the red wine–rosemary compound butter; melt a little bit onto each slice of beef.
RED WINE–ROSEMARY BUTTER
½ cup dry red wine
1 fresh rosemary sprig
8 tablespoons (1 stick) unsalted butter, at room temperature
½ teaspoon kosher salt
BEEF TENDERLOIN
3 tablespoons olive oil
3 garlic cloves, minced
1 tablespoon finely chopped fresh rosemary leaves
1 tablespoon kosher salt
½ teaspoon freshly ground black pepper
1 (3-pound) center-cut beef tenderloin, trimmed and tied
For the butter: Place the wine and rosemary sprig in a small saucepan over medium heat. Bring the wine to a boil and then simmer until the wine has reduced to a syrup and measures approximately 2 tablespoons, about 20 minutes. Allow the wine to cool to room temperature and discard the herb sprig. Place the butter and salt in a food processor and pulse to combine. Add the wine and process the butter until smooth, about 1 minute.
Scrape the butter into a line on a large sheet of parchment paper. Fold the parchment over the butter and drag a clean spatula down along the line of butter to push it into a log. Twist both ends of the parchment to seal the ends and refrigerate the butter until ready to use, at least 1 hour.
For the tenderloin: Place an oven rack in the center of the oven and preheat the oven to 400°F.
In a small bowl, combine 2 tablespoons of the oil with the garlic, rosemary, salt, and pepper and rub all over the tenderloin. Heat the remaining tablespoon of oil in a large skillet over medium-high heat. Sear the tenderloin on all sides until browned, about 3 minutes per side.
Transfer the skillet to the oven and roast for 30 to 35 minutes or until an instant-read thermometer inserted into the thickest part of the meat reads 125°F, for medium rare. Remove from the oven and transfer the meat to a cutting board. Cover the roast loosely with foil and let it rest for 20 minutes.
To serve, slice the meat into ¼-inch-thick slices and arrange on a platter. Slice the butter into ⅛-inch-thick rounds and arrange across the warm meat slices.

SERVES 6
A seafood stew like this one is a typical offering for Christmas Eve dinner in Italian households everywhere. This variation on a traditional Spanish paella features whole-wheat pasta, giving it a wholesome Italian spin.
3 tablespoons extra-virgin olive oil
1 medium fennel bulb, cored and chopped
1 medium red bell pepper, cored, seeded, and diced
1 small onion, chopped
6 large garlic cloves, thinly sliced
Kosher salt and freshly ground black pepper
3 (8-ounce) bottles clam juice
1 (15-ounce) can diced tomatoes in juice
3 bay leaves
1 teaspoon smoked paprika
¼ teaspoon crumbled saffron threads
¼ teaspoon crushed red pepper flakes
8 ounces whole-wheat spaghetti, broken into 1-inch pieces
10 small littleneck clams, scrubbed
10 mussels, scrubbed and debearded
12 large shrimp, peeled and deveined
8 ounces halibut, cut into 1-inch cubes
⅓ cup chopped fresh flat-leaf parsley leaves
In a 5-quart saucepan or Dutch oven, heat the oil over medium-high heat. Add the fennel, bell pepper, onion, and garlic to the pan. Season with ¼ teaspoon each of salt and black pepper. Cook until the vegetables are just tender, about 5 minutes.
Add the clam juice, the tomatoes with juices, bay leaves, paprika, saffron, and red pepper flakes. Bring the mixture to a simmer.
Add the spaghetti and cook, uncovered and stirring occasionally, until almost tender, about 9 minutes.
Add another ¼ teaspoon each of salt and black pepper. Add the clams, mussels, shrimp, and halibut. Cover and cook until the clams and mussels open and the shrimp are pink and cooked through, 5 to 6 minutes. Discard the bay leaves and any unopened clams or mussels. Season with salt and pepper to taste. Mix in the parsley and serve.

Me and my brother Dino waiting for Santa
Buon Natale
In Italian families Christmas Eve is celebrated with the Feast of Seven Fishes, an observance that was originally intended as a form of fasting before the holiday, but is now an excuse to serve fish, shellfish, and other creatures of the sea in a variety of delicious ways. I still carry on this tradition, though with fewer courses, a salad, and, of course, a dessert or two. No matter what, dessert is always the Italian classic, struffoli.
Struffoli is a mixture of cooked dough balls and nuts bound with a flavored honey syrup that’s then formed into a towering cone or ring and decorated with candies and other goodies. While popular all over Italy, struffoli is made differently from region to region. In the northern part of the country, hazelnuts, a local product, are used. Italians from the south, where hazelnuts were more expensive, added little bits of cooked dough to the mixture as a way to extend the pricey nuts. For as long as I can remember I’ve gotten together with my aunt Raffy to make struffoli for our Christmas Eve dinner, and now I’m teaching Jade. I usually throw in a couple of extra desserts as well, since struffoli is more centerpiece than delicacy in my book!

MAKES 1
You can build the struffoli in a mound or ring; in Naples, where my family is from, an inverted glass is used as a base in order to form a tall pyramid. The glass is removed before the struffoli is served.
DOUGH
2 cups all-purpose flour, plus extra for dusting and dredging
2 teaspoons grated lemon zest
2 teaspoons grated orange zest
3 tablespoons sugar
½ teaspoon fine sea salt
¼ teaspoon baking powder
4 tablespoons (½ stick) unsalted butter, cut into ½-inch pieces, at room temperature
3 large eggs
1 tablespoon white wine
1 teaspoon pure vanilla extract
Canola oil, for frying
ASSEMBLY
1 cup honey
½ cup sugar
1 tablespoon fresh lemon juice (from 1 lemon)
1½ cups skinned hazelnuts, toasted (see Cook’s Note)
Vegetable oil cooking spray
Sugar sprinkles, candied almonds, or dragées, for decoration
Confectioners’ sugar, for dusting (optional)
For the dough: In a food processor, pulse together the flour, lemon zest, orange zest, sugar, salt, and baking powder. Add the butter and pulse until the mixture resembles coarse meal. Add the eggs, wine, and vanilla. Pulse until the mixture forms a ball. Wrap the dough in plastic wrap and refrigerate for 30 minutes.
Cut the dough into 4 equal-size pieces. On a lightly floured surface, roll out each piece of dough until ¼ inch thick. Cut each piece of dough into ½-inch-wide strips. Cut each strip of pastry into ½-inch pieces. Roll each piece of dough into a small ball about the size of a hazelnut. Lightly dredge the dough balls in flour, shaking off any excess.
In a large heavy saucepan, pour enough oil to fill the pan about a third of the way. Heat over medium until a deep-fry thermometer inserted in the oil reaches 375°F. (If you don’t have a thermometer, a cube of bread will brown in about 3 minutes at the desired temperature.) In batches, fry the dough until lightly golden, 2 to 3 minutes.
Transfer the dough balls to a paper towel–lined plate to drain. (The remaining rested and quartered dough can also be rolled on a floured work surface into ½-inch-thick logs and cut into equal-size ½-inch pieces. The dough pieces can then be rolled into small balls and fried as above.)
For assembly: In a large saucepan, combine the honey, sugar, and lemon juice over medium heat. Bring to a boil and cook, stirring occasionally, until the sugar is dissolved, about 3 minutes. Remove the pan from the heat. Add the fried dough and hazelnuts and stir until coated in the honey mixture. Allow the mixture to cool in the pan for 2 minutes.
Spray the outside of a small, straight-sided water glass with vegetable oil spray and place in the center of a round platter. Using a large spoon or damp hands, arrange the struffoli and hazelnuts around the glass to form a wreath or pyramid shape. Drizzle any remaining honey mixture over the struffoli. Allow to set for 2 hours (can be made 1 day in advance).
Decorate with sprinkles and candied almonds, and dust with confectioners’ sugar, if using. Remove the glass from the center of the platter and serve.
Cook’s Note: To toast the hazelnuts, preheat the oven to 350°F. Arrange the nuts in a single layer on a rimmed baking sheet. Bake until lightly toasted, 8 to 10 minutes. Cool completely before using. (Use this method also to toast walnuts, pecans, and almonds. The nuts are ready when you can just smell their aroma; do not leave the kitchen while they are in the oven, because they can easily burn!)
SERVES 4

Opening raw oysters takes a bit of finesse and elbow grease, but if you’re not up for the job, most fishmongers will shuck them for you; just purchase them right before you plan to serve and transport them carefully, as oysters can spoil quickly once opened.
¼ cup fresh lemon juice (from 2 lemons)
1 teaspoon pink or black peppercorns, crushed
2 teaspoons minced shallot
¼ cup cold prosecco
Pinch of coarse salt
24 fresh oysters on the half shell
In a small bowl, combine the lemon juice, peppercorns, and shallot. Allow to sit in the fridge for about an hour to let the flavors marry. Just before serving, stir the prosecco into the mignonette sauce. Season with a pinch of salt.
Arrange a half-dozen oysters on each of four serving plates. Spoon some of the mignonette onto each oyster or pass the sauce separately.
MAKES 50

While traditional Russian blini call for yeast, these small buckwheat pancakes use baking powder and eggs for quick leavening. Each one should be no more than two inches in diameter. Keep a batch of blini in your freezer and a bottle of Champagne in the refrigerator. For easy, last-minute entertaining, pick up some caviar, smoked salmon, or smoked trout and crème fraîche. Kids love blini with scrambled eggs on top. Reheat frozen blini in a 350°F oven for 8 to 10 minutes.
⅓ cup buckwheat flour
½ cup all-purpose flour
1 teaspoon baking powder
¼ teaspoon kosher salt
2 large eggs, at room temperature
⅔ cup milk, at room temperature
Vegetable oil cooking spray
In a medium bowl, whisk together the buckwheat flour, all-purpose flour, baking powder, and salt.
In a separate small bowl, whisk the eggs with the milk. Pour into the flour mixture and gently mix until there are just a few lumps remaining. Do not overmix.
Heat a medium sauté pan over medium heat. Lightly spray the pan with vegetable oil spray. Spoon the batter into the skillet by teaspoonfuls and spread to a small round with the back of the spoon. When bubbles rise to the surface of the pancake, flip gently and cook for about 1 minute longer on the other side, just to cook through.
Remove to a wire rack to cool and continue with the remaining batter. Serve warm or at room temperature.

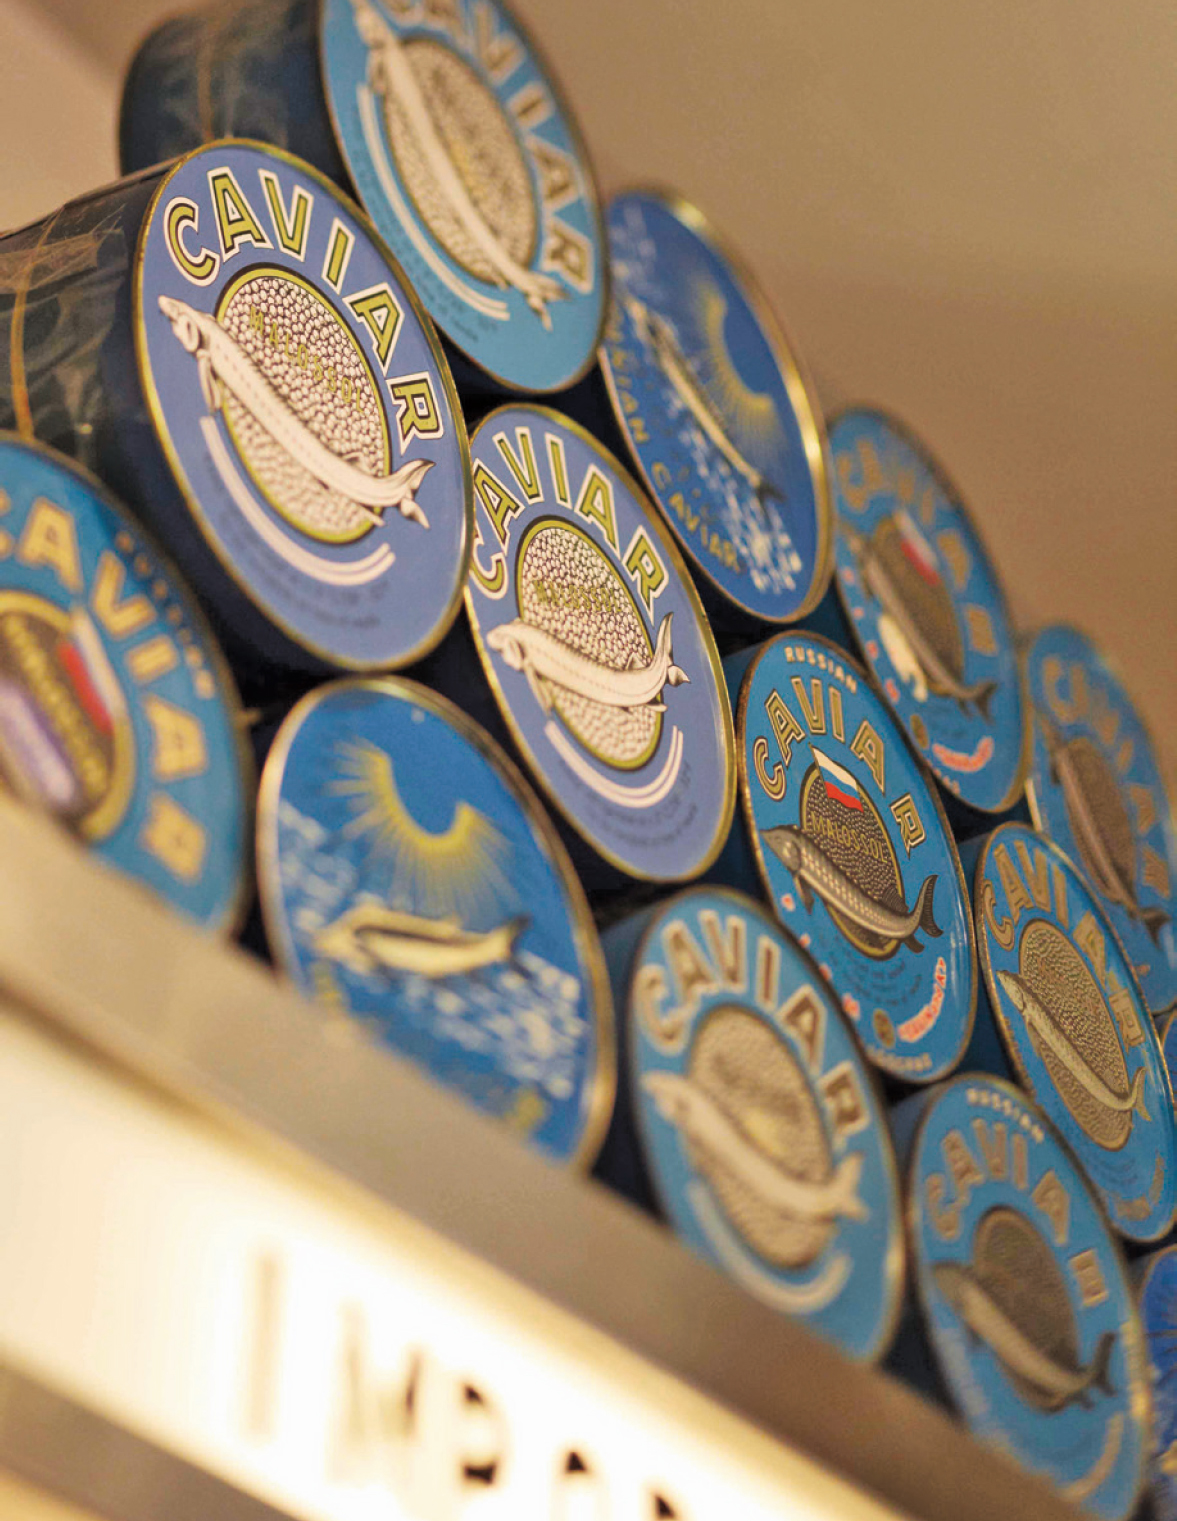
Go with the Roe
Caviar is one of those magical ingredients that can transform a dish or an occasion; just a strategic teaspoon or two elevates a dish to celebratory status. To learn what to buy, I went to the source: Russ & Daughters on Manhattan’s Lower East Side. Co-owner (and fourth-generation Russ descendant) Joshua Russ Tupper schooled me on the finer points of caviar, particularly American caviar. I was familiar with the three primary imported grades: sevruga, osetra, and beluga (which can no longer be legally imported to the United States as it comes from a threatened fish species). The differences in size and color of the roe are part of what determines its cost, with larger eggs being most prized.
Josh explained that one variety is the American Acipenser transmontanus, or white sturgeon. Transmontanus, with its rich brown color, is the best suited to eating just as is: Similar in flavor to osetra caviar, the large eggs are full of fresh salinity but not at all “fishy.” Since it’s also the most costly, make sure to serve it as simply as possible to let its flavor take center stage.
Paddlefish and hackleback are two more affordable wild American varieties that come from species whose harvesting is being monitored to control overfishing. The small gray eggs of paddlefish have a slightly stronger flavor that goes well with soft scrambled eggs. Hackleback roe is similar in size to the paddlefish, but the flavor is more delicate. It’s delicious on a canapé or dolloped onto pasta. Most affordable is trout roe, a beautiful bright orange roe similar to salmon roe but a bit sweeter and more refined. Use as a garnish on hors d’oeuvres.
SERVES 4 TO 6

Fresh pasta festooned with a spoonful of caviar has off-the-charts wow factor. It’s just right for New Year’s Eve.
Kosher salt
¼ cup extra-virgin olive oil
2 large shallots, minced
1 cup Champagne
1 pound fresh linguine
¾ cup crème fraîche
¼ cup chopped fresh chives
3 tablespoons capers, rinsed and drained
1 (50-gram) tin of good-quality caviar
Bring a large pot of salted water to a boil.
Heat a large sauté pan over medium-high heat. Add 2 tablespoons of the olive oil, the shallots, and 1 teaspoon salt. Reduce the heat to medium and cook the shallots for 3 to 4 minutes or until they are soft and translucent. Add the Champagne and bring it to a simmer. Let it simmer for 5 minutes.
Meanwhile, add the pasta to the boiling water and cook for 3 to 4 minutes. Drain the pasta, reserving ½ cup of the cooking liquid.
Whisk the crème fraîche into the Champagne mixture. Add the cooked pasta, chives, and capers and toss gently. Cook for an additional 3 minutes, mixing often and adding a splash of pasta water if the mixture gets too dry. Serve with a dollop of caviar on top of each portion.