Chapter 5. Flow Control
If you are a programmer, you may have read the last chapter — with
its claim at the outset that the Korn shell has an advanced
set of programming capabilities — and wondered where many features
from conventional languages are.
Perhaps the most glaringly obvious “hole” in our coverage
thus far concerns flow control constructs
like if, for, while, and so on.
Flow control gives a programmer the power to specify that only certain portions of a program run, or that certain portions run repeatedly, according to conditions such as the values of variables, whether or not commands execute properly, and others. We call this the ability to control the flow of a program’s execution.
Almost every shell script or function shown thus far has had no flow control — they have just been lists of commands to be run! Yet the Korn shell, like the C and Bourne shells, has all the flow control abilities you would expect and more; we examine them in this chapter. We’ll use them to enhance the solutions to some of the programming tasks we saw in the last chapter and to solve tasks that we introduce here.
Although we have attempted to explain flow control so that nonprogrammers can understand it, we also sympathize with programmers who dread having to slog through yet another tabula rasa explanation. For this reason, some of our discussions relate the Korn shell’s flow-control mechanisms to those that programmers should know already. Therefore you will be in a better position to understand this chapter if you already have a basic knowledge of flow control concepts.
The Korn shell supports the following flow control constructs:
-
if/else Execute a list of statements if a certain condition is/is not true.
-
for Execute a list of statements a fixed number of times.
-
while Execute a list of statements repeatedly while a certain condition holds true.
-
until Execute a list of statements repeatedly until a certain condition holds true.
-
case Execute one of several lists of statements depending on the value of a variable.
In addition, the Korn shell provides a new type of flow-control construct:
We will cover each of these, but be warned: the syntax is unusual.
if/else
The simplest type of flow control construct is the
conditional, embodied in the Korn shell’s
if statement. You use a conditional when you
want to choose whether or not to do something, or to choose among
a small number of things to do, according to the truth or falsehood
of conditions. Conditions test values of shell
variables, characteristics of files, whether or not commands run
successfully, and other factors. The shell has a large set of built-in
tests that are relevant to the task of shell programming.
The if construct has the following syntax:
ifconditionthenstatements[elifconditionthenstatements...] [elsestatements] fi
The simplest form (without the elif and
else parts, a.k.a. clauses)
executes the statements only if
the condition is true. If you add an
else clause, you get the ability to execute one set
of statements if a condition is true or another set of statements if
the condition is false. You can use as many elif
(a contraction of “else if”) clauses as you wish; they introduce
more conditions and thus more choices for which set of statements
to execute. If you use one or more elifs, you
can think of the else clause as the “if all
else fails” part.
Exit Status and Return
Perhaps the only aspect of this syntax that differs from that of conventional languages like C and Pascal is that the “condition” is really a list of statements rather than the more usual Boolean (true or false) expression. How is the truth or falsehood of the condition determined? It has to do with a general Unix concept that we haven’t covered yet: the exit status of commands.
Every Unix command, whether it comes from source code in C, some other language, or a shell script/function, returns an integer code to its calling process — the shell in this case — when it finishes. This is called the exit status. 0 is usually the “OK” exit status, while anything else (1 to 255) usually denotes an error.[61] The way ksh handles exit statuses for built-in commands is described in more detail later in this section.
if checks the exit status of the last statement in the list
following the if keyword.[62]
(The list is usually just a single statement.)
If the status is 0, the condition evaluates to true; if it is anything else,
the condition is considered false. The same is true
for each condition attached to an elif statement (if any).
This enables us to write code of the form:
ifcommand ran successfullythennormal processingelseerror processingfi
More specifically, we can now improve on the pushd function that we saw in the last chapter:
function pushd {       # push current directory onto stack
    dirname=$1
    cd ${dirname:?"missing directory name."}
    DIRSTACK="$dirname $DIRSTACK"
    print "$DIRSTACK"
}
This function requires a valid directory as its argument. Let’s look at how it handles error conditions: if no argument is given, the second line of code prints an error message and exits. This is fine.
However, the function reacts deceptively when an argument is given that isn’t a valid directory. In case you didn’t figure it out when reading the last chapter, here is what happens: the cd fails, leaving you in the same directory you were in. This is also appropriate. But then the third line of code pushes the bad directory onto the stack anyway, and the last line prints a message that leads you to believe that the push was successful.
We need to prevent the bad directory from being pushed and to print an error message. Here is how we can do this:
function pushd {                # push current directory onto stack
    dirname=$1
    if cd ${dirname:?"missing directory name."}   # if cd was successful
    then
        DIRSTACK="$dirname $DIRSTACK"
        print $DIRSTACK
    else
        print still in $PWD.
    fi
}
The call to cd is now inside an if
construct. If cd is successful, it
returns 0; the next two lines of code are run, finishing the
pushd operation. But if the cd
fails, it returns with exit status 1, and pushd
prints a message saying that you haven’t gone anywhere.
You can usually rely on built-in commands and standard
Unix utilities to return appropriate exit statuses, but what
about your own shell scripts and functions?
For example, we’d like pushd to return an appropriate
status so that it too can be used in an if statement:
if pushd some-directory
then
    what we need to do
else
    handle problem case
fi
The problem is that the exit status is reset by every command, so it “disappears” if you don’t save it immediately. In this function, the built-in cd’s exit status disappears when the print statement runs (and sets its own exit status).
Therefore, we need to save the status that cd
sets and use it as the entire function’s exit status.
Two shell features we haven’t seen yet provide the way.
First is the special shell variable ?, whose value
($?) is the exit status of the last command that
ran. For example:
cd baddir
print $?
causes the shell to print 1, while:
cd gooddir
print $?
causes the shell to print 0.
Return
The second feature we need is the statement return N, which causes the surrounding script or function to exit with exit status N. N is actually optional; it defaults to the exit value of the last command that was run. Scripts that finish without a return statement (i.e., every one we have seen so far) return whatever the last statement returned. If you use return within a function, it just exits the function. (In contrast, the statement exit N exits the entire script, no matter how deeply you are nested in functions.)
Getting back to our example: we save the exit status in both branches of
the if, so that we can use it when we’re done:
function pushd {                # push current directory onto stack
    dirname=$1
    if cd ${dirname:?"missing directory name."}   # if cd was successful
    then
        es=$?
        DIRSTACK="$dirname $DIRSTACK"
        print $DIRSTACK
    else
        es=$?
        print still in $PWD.
    fi
    return $es
}
The assignment es=$?
saves the exit status of cd in the variable
es; the last line returns it as the function’s exit status.
Exit statuses aren’t very useful for anything other than their intended purpose. In particular, you may be tempted to use them as “return values” of functions, as you would with functions in C or Pascal. That won’t work; you should use variables or command substitution instead to simulate this effect.
Advanced example: overriding a built-in command
Using the exit status and the return command, and taking advantage of the shell’s command search order, we can write a cd function that overrides the built-in command.
Suppose we want our cd function to print the old and new directories automatically. Here is a version to put in your .profile or environment file:
function cd {
        command cd "$@"
        es=$?
        print "$OLDPWD -> $PWD"
        return $es
}
This function relies on the search order for commands listed in the last chapter. cd is a non-special built-in command, which means that it’s found after functions. Thus, we can name our function cd, and the shell will find it first.
But how do we get to the “real” cd command? We need it to do the actual changing of directories. The answer is the built-in command named, oddly enough, command. Its job is to do exactly what we need: skip any functions named by the first argument, instead finding the built-in or external command and running it with the supplied arguments. In the Korn shell, using command followed by one of the special built-in commands keeps errors in that command from aborting the script. (This happens to be mandated by POSIX.)
Warning
The command built-in is not special. If you define a function named command, there’s no way to get to the real one anymore (except by removing the function, of course).
Anyway, back to the example. The first line uses command
to run cd. It then saves the exit status in es,
as we did earlier, so that it can be returned to the calling program or
interactive shell.
Finally, it prints the desired message and then returns the saved exit status.
We’ll see a more substantial “wrapper” for cd
in Chapter 7.
Pipeline exit status
The exit status for a single command is just a simple number, whose value,
as we’ve seen, is available in the special variable $?.
But what about a pipeline? After all, you can hook an
arbitrary number of commands together with pipes. Is the exit status
of a pipeline that of the first command, the last command, or
some command
in between?
By default, it is the exit status of the last command
in the pipeline.
(This is required by POSIX.)
The advantage to this behavior is that it’s well-defined. If a pipeline fails, you know that it was the last command that failed. But if some intermediate process in the pipeline failed, you don’t know about it. The set -o pipefail option allows you to change this behavior.[63] When you enable this option, the exit status of the pipeline is changed to that of the last command to fail. If no command fails, the exit status is 0. This still doesn’t tell you which command in a pipeline failed, but at least you can tell that something went wrong somewhere and attempt to take corrective action.
Interpreting exit status values
For ksh93, the exit status values for built-in commands and several exceptional cases have been regularized as follows:
| Value | Meaning |
| 1-125 | Command exited with failure |
| 2 | Invalid usage, with usage message (built-in commands) |
| 126 | Command found, but file is not executable |
| 127 | Command not found |
| 128-255 | External command exited with failure |
| ≥ 256 | Command died with a signal; subtract 256 to get signal number |
Signals are a more advanced feature; they are described in Chapter 8.
Combinations of Exit Statuses
One of the more obscure parts of Korn shell syntax allows you to combine exit statuses logically, so that you can test more than one thing at a time.
The syntax statement1
&&
statement2
means, “execute statement1, and if its exit
status is 0, execute statement2.” The syntax
statement1
||
statement2 is the converse: it means,
“execute statement1, and if its exit status is
not 0, execute statement2.”
At first, these look like “if/then” and “if not/then” constructs,
respectively. But they are really intended for use within
conditions of if constructs — as C programmers will
readily understand.
It’s much more useful to think of these constructs as “and” and “or,” respectively. Consider this:
ifstatement1&&statement2then ... fi
In this case, statement1 is executed. If it
returns a 0 status, then presumably it ran without error. Then
statement2 runs. The then
clause is executed if statement2 returns a 0
status. Conversely, if statement1 fails (returns a
nonzero exit status), statement2 doesn’t even run;
the “last statement” in the condition was statement1,
which failed — so the then clause doesn’t
run. Taken all together, it’s fair to conclude that the
then clause runs if statement1
and statement2 both succeeded.
Similarly, consider this:
ifstatement1||statement2then ... fi
If statement1 succeeds,
statement2 does not
run. This makes statement1 the last
statement, which means that the then clause
runs. On the other hand, if statement1
fails, statement2 runs, and whether
the then clause runs or not depends on the
success of statement2. The upshot is that
the then clause runs if statement1 or
statement2 succeeds.
As a simple example, assume that we need to write a script that checks a file for the presence of two words and just prints a message saying whether either word is in the file or not. We can use grep for this: it returns exit status 0 if it found the given string in its input, nonzero if not:
filename=$1
word1=$2
word2=$3
if grep $word1 $filename > /dev/null || grep $word2 $filename > /dev/null
then
    print "$word1 or $word2 is in $filename."
fi
To ensure that all we get is the exit status, we’ve redirected the output of both grep invocations to the special file /dev/null, which is colloquially known as the “bit bucket.” Any output directed to /dev/null effectively disappears. Without this redirection, the output would include the matching lines that contain the words, as well as our message. (Some versions of grep support a -s option for “silent,” meaning no output. POSIX grep uses -q, meaning “quiet,” for this. The most portable solution is to redirect output to /dev/null, as we’ve done here.)
The then clause of this code runs if either grep
statement succeeds. Now assume that we want the script to say
whether or not the input file contains both words.
Here’s how to do it:
filename=$1
word1=$2
word2=$3
if grep $word1 $filename > /dev/null && grep $word2 $filename > /dev/null
then
    print "$word1 and $word2 are both in $filename."
fi
A minor note:
when used with commands, && and ||
have equal precedence.
However, when used inside
[[...]] (discussed shortly),
&& has higher precedence than ||.
We’ll see more examples of these logical operators later in this chapter and in the code for the kshdb debugger in Chapter 9.
Reversing the Sense of a Test
Sometimes, the most natural way to phrase a condition is in the negative. (“If Dave isn’t there, then ...”) Suppose we need to know that neither of two words is in a source file. In most scripts, when such is the case, you will see code like this:
if grep $word1 $filename > /dev/null || grep $word2 $filename > /dev/null
then
    :  # do nothing
else
    print "$word1 and $word2 are both absent from $filename."
fi
The : command does nothing. The meaning, then, is
“if word1 or word2 are present in filename, do nothing; otherwise,
print a message.”
The Korn shell lets you do this more elegantly using the ! keyword
(introduced in POSIX):
filename=$1
word1=$2
word2=$3
if ! grep $word1 $filename > /dev/null &&
   ! grep $word2 $filename > /dev/null
then
    print "$word1 and $word2 are both absent from $filename."
fi
Condition Tests
Exit statuses are the only things
an if construct can test. But that doesn’t mean you can
check only whether or not commands ran properly. The shell provides
a way of testing a variety of conditions with the [[...]]
construct.[64]
You can use the construct to check many different attributes of a file (whether it exists, what type of file it is, what its permissions and ownership are, etc.), compare two files to see which is newer, do comparisons and pattern matching on strings, and more.
[[
condition
]]
is actually a statement just like any
other, except that the only thing it does is return an exit status
that tells whether condition is true. Thus it fits
within the if construct’s syntax of
if
statements.
String comparisons
The double square brackets ([[...]]) surround expressions
that include various types of operators. We
start with the string comparison operators, which are listed in
Table 5-1. (Notice that there are no operators
for “greater than or equal” or “less than or equal.”) In the table,
str refers to an expression with a string value, and
pat refers to a pattern that can contain wildcards
(just like the patterns in the string-handling operators we saw in the
last chapter).
Note that these operators compare the lexicographic values of
strings, so “10” < “2”.
| Operator | True if... |
str
| str is non-null. |
str
==
pat
| str matches pat. |
str
=
pat
| str matches pat (obsolete). |
str
!=
pat
| str does not match pat. |
str1
<
str2
| str1 is less than str2. |
str1
>
str2
| str1 is greater than str2. |
-n
str
| str is not null (has length greater than 0). |
-z
str
| str is null (has length 0). |
We can use one of these operators to improve our popd function, which reacts badly if you try to pop and the stack is empty. Recall that the code for popd is:
function popd {        # cd to top, pop it off stack
    top=${DIRSTACK%% *}
    DIRSTACK=${DIRSTACK#* }
    cd $top
    print "$PWD"
}
If the stack is empty, $DIRSTACK is the null string,
as is the expression ${DIRSTACK%% *}. This means that you
will change to your home directory; instead, we want popd to print
an error message and do nothing.
To accomplish this, we need to test for an empty stack, i.e., whether
$DIRSTACK is null or not. Here is one way to do it:
function popd {                 # pop directory off the stack, cd there
    if [[ -n $DIRSTACK ]]; then
        top=${DIRSTACK%% *}
        DIRSTACK=${DIRSTACK#* }
        cd $top
        print "$PWD"
    else
        print "stack empty, still in $PWD."
        return 1
    fi
}
Notice that instead of putting then on a separate line,
we put it on the same line as the if after a semicolon,
which is the shell’s standard statement separator character.
(There’s a subtlety here. The shell only recognizes keywords such as
if and then when they are at the beginning of
a statement. This is so you can type, for example, print if then else is neat
without getting syntax errors.
Newlines and semicolons separate statements. Thus, the then
on the same line as the if is
correctly recognized after a semicolon, whereas without the
semicolon, it would not be.)
We could have used operators other than -n.
For example,
we could have used -z and switched the code in the then
and else clauses. We also could have used:
if [[ $DIRSTACK == "" ]]; then
        ...
While we’re cleaning up code we wrote in the last chapter, let’s fix up the error handling in the highest script (Task 4-1). The code for that script is:
filename=${1:?"filename missing."}
howmany=${2:-10}
sort -nr $filename | head -$howmany
Recall that if you omit the first argument (the filename),
the shell prints the message highest: 1: filename missing.
We can make this better by substituting a more standard “usage” message:
if [[ -z $1 ]]; then
    print 'usage: highest filename [N]'
else
    filename=$1
    howmany=${2:-10}
    sort -nr $filename | head -$howmany
fi
It is considered better programming style to enclose all
of the code in the if-then-else,
but such code can
get confusing if you are writing a long script in which you need
to check for errors and bail out at several points along the way.
Therefore, a more usual style for shell programming is this:
if [[ -z $1 ]]; then
    print 'usage: highest filename [-N]'
    exit 1
fi
filename=$1
howmany=${2:-10}
sort -nr $filename | head -$howmany
The exit statement informs any calling program that needs to know whether it ran successfully or not. (You can also use return, but we feel that return should be reserved for use in functions.)
As an example of the == and != operators,
we can add to our solution for Task 4-2,
the shell script front-end to a C compiler.
Recall that we are given a filename
ending in .c (the source code file),
and we need to construct a filename that is the
same but ends in .o (the object code file).
The modifications we will make have to do with other types of
files that can be passed to a C compiler.
About C compilers
Before we get to the shell code, it is necessary to understand a few things about C compilers. We already know that they translate C source code into object code. Actually, they are part of compilation systems that also perform several other tasks. The term “compiler” is often used instead of “compilation system,” so we’ll use it in both senses.
We’re interested here in two tasks that compilers perform other than compiling C code: they can translate assembly language code into object code, and they can link object code files together to form an executable program.
Assembly language works at a level that is close to the bare computer; each assembly statement is directly translatable into a statement of object code — as opposed to C or other higher-level languages, in which a single source statement could translate to dozens of object code instructions. Translating a file of assembly language code into object code is called, not surprisingly, assembling the code.
Although many people consider assembly language to be quaintly old-fashioned — like a typewriter in this age of WYSIWYG word processing and desktop publishing — some programmers still need to use it when dealing with precise details of computer hardware. It’s not uncommon for a program to consist of several files’ worth of code in a higher-level language (such as C or C++) and a few low-level routines in assembly language.
The other task we’ll worry about is called linking. Most real-world programs, unlike those assigned for a first-year programming class, consist of several files of source code, possibly written by several different programmers. These files are compiled into object code; then the object code must be combined to form the final, runnable program, known as an executable. The task of combining is often called “linking”: each object code component usually contains references to other components, and these references must be resolved or “linked” together.
C compilation systems are capable of assembling files of assembly language into object code and linking object code files into executables. In particular, a compiler calls a separate assembler to deal with assembly code and a linker (also known as a “loader,” “linking loader,” or “link editor”) to deal with object code files. These separate tools are known in the Unix world as as and ld, respectively. The C compiler itself is invoked with the command cc.
We can express all of these steps in terms of the suffixes of files passed as arguments to the C compiler. Basically, the compiler does the following:
If the argument ends in
.cit’s a C source file; compile into a.oobject code file.If the argument ends in
.s, it’s assembly language; assemble into a.ofile.If the argument ends in
.o, do nothing; save for the linking step later.If the argument ends in some other suffix, print an error message and exit.[65]
Link all
.oobject code files into an executable file called a.out. This file is usually renamed to something more descriptive.
Step 3 allows object code files that have already been compiled (or assembled) to be reused to build other executables. For example, an object code file that implements an interface to a CD-ROM drive could be useful in any program that reads from CD-ROMs.
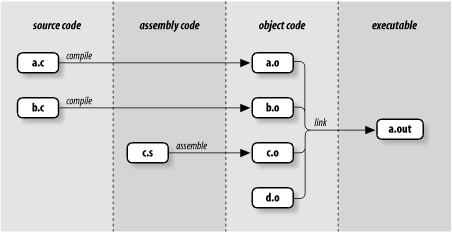
Figure 5-1 should make the compilation process clearer; it shows how the compiler processes
the C source files a.c and b.c, the assembly language file
c.s, and the already-compiled object code file d.o.
In other words, it shows how the compiler handles the command
cc a.c b.c c.s d.o.
Here is how we would begin to implement this behavior in a shell script.
Assume that the
variable filename holds the argument in question, and that
ccom is the name of the program that actually compiles a C source
file into object code. Assume further that ccom and as
(assembler) take arguments for the names of the source and object files:
if [[ $filename == *.c ]]; then
    objname=${filename%.c}.o
    ccom "$filename" "$objname"
elif [[ $filename == *.s ]]; then
    objname=${filename%.s}.o
    as "$filename" "$objname"
elif [[ $filename != *.o ]]; then
    print "error: $filename is not a source or object file."
    exit 1
fi
further processing ...
Recall from the previous chapter that the expression
${filename%.c}.o deletes .c from filename
and
appends .o; ${filename%.s}.o does the analogous
thing for files ending in .s.
The “further processing” is the link step, which we will see when we complete this example later in the chapter.
File attribute checking
The other kind of operator that can be used in conditional expressions checks a file for certain properties. There are 24 such operators. We cover those of most general interest here; the rest refer to arcana like sticky bits, sockets, and file descriptors, and thus are of interest only to systems programmers. Refer to Appendix B for the complete list. Table 5-2 lists those that interest us now.
| Operator | True if ... |
-e
file
| file exists |
-d
file
| file is a directory |
-f
file
|
file is a regular file (i.e., not a directory or other special type of file) |
-L
file
|
file is a symbolic link |
-r
file
| You have read permission on file |
-s
file
| file exists and is not empty |
-w
file
| You have write permission on file |
-x
file
|
You have execute permission on file or directory search permission if it is a directory |
-O
file
|
You own file (the effective UID matches that of file) |
-G
file
|
Your effective group ID is the same as that of file |
file1
-nt
file2
|
file1 is newer than file2 [a] |
file1
-ot
file2
| file1 is older than file2 |
file1
-ef
file2
| file1 and file2 are the same file |
[a]
Specifically, the | |
Before we get to an example, you should know that conditional
expressions inside [[ and ]] can also be combined using
the logical operators && and ||, just as we saw
with plain shell commands in Section 5.1.2, earlier in this chapter.
It’s also possible to
combine shell commands with conditional expressions
using logical operators, like this:
ifcommand&& [[condition]]; then ...
Chapter 7 contains an example of this combination.
You can also negate the
truth value of a conditional expression by preceding it with
an exclamation point (!), so that !
expr evaluates to
true only if expr is false.
Furthermore, you can
make complex logical expressions of conditional operators by
grouping them with parentheses.
(It turns out that this is true outside of the [[...]]
construct as well. As we will see in Chapter 8,
the construct (
statement list
)
runs the statement list
in a subshell, whose exit status is that of the last statement in
the list.)
Here is how we would use two of the file operators to embellish (yet again) our pushd function. Instead of having cd determine whether the argument given is a valid directory — i.e., by returning with a bad exit status if it’s not — we can do the checking ourselves. Here is the code:
function pushd {                # push current directory onto stack
    dirname=$1
    if [[ -d $dirname && -x $dirname ]]; then
        cd "$dirname"
        DIRSTACK="$dirname DIRSTACK"
        print "$DIRSTACK"
    else
        print "still in $PWD."
        return 1
    fi
}
The conditional expression evaluates to true only if the argument
$1 is a directory (-d) and
the user has permission
to change to it (-x).[66]
Notice that this conditional also handles the case where the
argument is missing: $dirname is null, and since the null
string isn’t a valid directory name, the conditional will fail.
Task 5-1 presents a more comprehensive example of the use of file operators.
Although this task requires relatively long-winded code, it is a straightforward application of many of the file operators:
if [[ ! -e $1 ]]; then
    print "file $1 does not exist."
    return 1
fi
if [[ -d $1 ]]; then
    print -n "$1 is a directory that you may "
    if [[ ! -x $1 ]]; then
        print -n "not "
    fi
    print "search."
elif [[ -f $1 ]]; then
    print "$1 is a regular file."
else
    print "$1 is a special type of file."
fi
if [[ -O $1 ]]; then
    print 'you own the file.'
else
    print 'you do not own the file.'
fi
if [[ -r $1 ]]; then
    print 'you have read permission on the file.'
fi
if [[ -w $1 ]]; then
    print 'you have write permission on the file.'
fi
if [[ -x $1 && ! -d $1 ]]; then
    print 'you have execute permission on the file.'
fi
We’ll call this script fileinfo. Here’s how it works:
The first conditional tests if the file given as argument does not exist (the exclamation point is the “not” operator; the spaces around it are required). If the file does not exist, the script prints an error message and exits with error status.
The second conditional tests if the file is a directory. If so, the first print prints part of a message; remember that the -n option tells print not to print a newline at the end. The inner conditional checks if you do not have search permission on the directory. If you don’t have search permission, the word “not” is added to the partial message. Then, the message is completed with “search.” and a newline.
The
elifclause checks if the file is a regular file; if so, it prints a message.The
elseclause accounts for the various special file types on recent Unix systems, such as sockets, devices, FIFO files, etc. We assume that the casual user isn’t interested in their details.The next conditional tests to see if you own the file (i.e., if its owner ID is the same as your effective User ID). If so, it prints a message saying you own it. (Real and effective User and Group IDs are explained in Chapter 10.)
The next two conditionals test for your read and write permission on the file.
The last conditional checks if you can execute the file. It checks to see if you have execute permission and that the file is not a directory. (If the file were a directory, execute permission would really mean directory search permission.)
As an example of fileinfo’s output,
assume that you do an ls -l of
your current directory and it contains these lines:
-rwxr-xr-x   1 billr    other        594 May 28 09:49 bob
-rw-r-r-     1 billr    other      42715 Apr 21 23:39 custom.tbl
drwxr-xr-x   2 billr    other         64 Jan 12 13:42 exp
-r-r-r-      1 root     other        557 Mar 28 12:41 lpst
custom.tbl and lpst are regular text files,
exp is a directory,
and bob is a shell script.
Typing fileinfo bob produces this output:
bob is a regular file.
you own the file.
you have read permission on the file.
you have write permission on the file.
you have execute permission on the file.
Typing fileinfo custom.tbl results in this:
custom.tbl is a regular file.
you own the file.
you have read permission on the file.
you have write permission on the file.
Typing fileinfo exp results in this:
exp is a directory that you may search.
you own the file.
you have read permission on the file.
you have write permission on the file.
Finally, typing fileinfo lpst produces this:
lpst is a regular file.
you do not own the file.
you have read permission on the file.
Arithmetic conditionals
The shell also provides a set of arithmetic tests.
These are different from character string comparisons
like < and >,
which compare lexicographic values
of strings, not numeric values. For example, “6” is greater than
“57” lexicographically, just as “p” is greater than “ox,”
but of course the opposite is true when they’re compared
as numbers.
The arithmetic comparison operators are summarized in Table 5-3. Fortran programmers will find their syntax slightly familiar.
| Test | Comparison | Test | Comparison |
-lt
| Less than |
-gt
| Greater than |
-le
| Less than or equal |
-ge
| Greater than or equal |
-eq
| Equal |
-ne
| Not equal |
You’ll find these to be of the most use in the context of the numeric variables we’ll see in the next chapter. They’re necessary if you want to combine numeric tests with other types of tests within the same conditional expression.
However, the shell has a separate syntax for conditional expressions that involve only numbers. (This syntax is covered in Chapter 6.) It’s considerably more efficient, as well as more general, so you should use it in preference to the arithmetic test operators listed above.
In fact, some of the ksh93 documentation considers
these numeric conditionals to be obsolete. Therefore, if you need to combine
[[...]] and numeric tests, do it using the shell’s
!, &&, and ||
operators outside the [[...]], instead of inside them.
Again, we’ll cover the shell’s numeric conditionals in the next chapter.
for
The most obvious enhancement we could make to the previous script is the ability to report on multiple files instead of just one. Tests like -e and -d only take single arguments, so we need a way of calling the code once for each file given on the command line.
The way to do this — indeed, the way to do many things
with the Korn shell — is with a looping construct.
The simplest and most widely
applicable of the shell’s looping constructs is the
for loop.
We’ll use for to enhance fileinfo soon.
The for loop allows you to repeat a section of code a fixed
number of times. During each time through the code (known as an
iteration), a special variable called a loop variable is
set to a different value; this way each iteration can do something
slightly different.
The for loop is somewhat, but not entirely,
similar to its counterparts in conventional languages like C and Pascal.
The chief difference is that the shell’s for loop doesn’t let
you specify a number of times to iterate or a
range of values over which to iterate; instead, it
only lets you give a fixed list of values. In other words,
with the normal for loop,
you can’t do anything like this Pascal-type code, which executes
statements 10 times:
for x := 1 to 10 do
begin
    statements ...
end
(You need the arithmetic for loop, which we’ll see in
Chapter 6, to do that.)
However, the for loop is ideal for working with
arguments on the command line and with sets of
files (e.g., all files in a given directory). We’ll look at an
example of each of these.
But first, here is the syntax for the for construct:
forname[inlist] dostatements that can use$name ... done
The list is a list of names. (If
in
list is omitted,
the list defaults to "$@", i.e., the quoted list of
command-line arguments, but we always supply the in
list for the sake of clarity.) In our
solutions to the following task, we show two simple ways to specify
lists.
In ksh93 there is an interesting interaction between the
for loop and nameref variables (see Chapter 4).
If the control variable is a nameref, then each element in the list of names
can be a different shell variable, and the shell assigns the nameref to each
variable in turn. For example:
$first="I am first"Initialize test variables $second="I am in the middle"$third="I am last"$nameref refvar=firstCreate nameref $for refvar in first second third ; doLoop over variables >print "refvar -> ${!refvar}, value: $refvar"Print referenced var, value >donerefvar -> first, value: I am first refvar -> second, value: I am in the middle refvar -> third, value: I am last $print ${!refvar}, $refvarShow final state third, I am last
The for loop is instrumental
for solving Task 5-2.
The command finger(1) can be used (among other things)
to find the names of users logged into a remote system; the command
finger @
systemname does this. Its output depends on
the version of Unix, but it looks something like this:
[motet.early.com]
Trying 127.146.63.17...
-User-    -Full name-       -What- Idle TTY -Console Location-
hildy    Hildegard von Bingen  ksh   2d5h p1  jem.cal (Telnet)
mikes    Michael Schultheiss   csh   1:21 r4  ncd2.cal (X display 0)
orlando  Orlando di Lasso      csh     28 r7  maccala (Telnet)
marin    Marin Marais          mush  1:02 pb  mussell.cal (Telnet)
johnd    John Dowland          tcsh    17 p0  nugget.west.nobis. (X Window)
In this output, motet.early.com is the full network name of the remote machine.
Assume the systems in your network are called fred, bob, dave, and pete. Then the following code would do the trick:
for sys in fred bob dave pete
do
    finger @$sys
    print
done
This works no matter which system you are currently logged into. It prints output for each machine similar to the above, with blank lines in between.
A slightly better solution would be to store the names of the systems
in an environment variable.
This way, if systems are added to your network and you
need a list of their names in more than one script, you need change
them in only one place. If a variable’s value is several words separated
by spaces (or TABS), for will treat it as a list of words.
Here is the improved solution. First, put lines in your
.profile or environment file
that define the variable SYSNAMES and make
it an environment variable:
SYSNAMES="fred bob dave pete"
export SYSNAMES
Then, the script can look like this:
for sys in $SYSNAMES
do
    finger @$sys
    print
done
The foregoing illustrates a simple use of for,
but it’s much more common to use for to iterate
through a list of command-line arguments. To show this, we can
enhance the fileinfo script above to accept
multiple arguments. First, we write a bit of “wrapper” code that does
the iteration:
for filename in "$@" ; do
    finfo $filename
    print
done
Next, we make the original script into a function called finfo:[67]
function finfo {
    if [[ ! -e $1 ]]; then
        print "file $1 does not exist."
        return 1
    fi
    ...
}
The complete script consists of the for loop code and
the above function.
Because the function must be defined
before it can be used,
the function definition must go first,
or else it should be in a directory listed in both
PATH and FPATH.
The fileinfo script works as follows: in the for statement,
"$@" is a list of all positional parameters.
For each argument, the body of the loop is run
with filename set to that argument. In other words,
the function fileinfo is called once for
each value of $filename as its first argument ($1).
The call to print after the call to fileinfo merely
prints a blank line between sets of information about each file.
Given a directory with the same files as the previous example,
typing fileinfo * would produce the following output:
bob is a regular file.
you own the file.
you have read permission on the file.
you have write permission on the file.
you have execute permission on the file.

custom.tbl is a regular file.
you own the file.
you have read permission on the file.
you have write permission on the file.

exp is a directory that you may search.
you own the file.
you have read permission on the file.
you have write permission on the file.

lpst is a regular file.
you do not own the file.
you have read permission on the file.
Task 5-3 is a programming task that exploits the other major
use of for.
Filenames in the old Microsoft MS-DOS system have the format FILENAME.EXT. FILENAME can be up to eight characters long; EXT is an extension that can be up to three characters. Letters are all uppercase. We want to do the following:
Translate letters from uppercase to lowercase.
If the extension is null, remove the dot.
The first tool we will need for this job is the Unix tr(1)
utility, which translates characters on a one-to-one basis.[68]
Given the arguments charset1 and charset2, it
translates characters in the standard input that are members of
charset1 into corresponding characters in charset2.
The two sets are ranges of characters enclosed in square brackets
([...]
in standard regular-expression form in the manner of grep,
awk,
ed, etc.). More to the point, tr [A-Z] [a-z] takes
its standard input, converts uppercase letters to lowercase,
and writes the converted text to the standard output.[69]
That takes care of the first step in the translation process. We can use a Korn shell string operator to handle the second. Here is the code for a script we’ll call dosmv:
for filename in ${1:+$1/}* ; do
    newfilename=$(print $filename | tr '[A-Z]' '[a-z]')
    newfilename=${newfilename%.}
    print "$filename -> $newfilename"
    mv $filename $newfilename
done
The * in the for construct is not the same
as $*. It’s a wildcard, i.e., all files in a directory.
This script accepts a directory name as argument,
the default being the current directory.
The expression ${1:+$1/} evaluates to the
argument ($1) with a slash appended if the argument is
supplied, or the null string if it isn’t supplied.
So the entire expression ${1:+$1/}* evaluates
to all files in the given directory, or all files in
the current directory if no argument is given.
Therefore, filename takes on the value of each filename
in the list. filename gets translated into newfilename
in two steps. (We could have done it in one, but readability would
have suffered.) The first step uses tr in a pipeline within
a command substitution construct. Our old friend print
makes the value of filename the standard input to tr.
tr’s output becomes the value of the command substitution
expression, which is assigned to newfilename. Thus, if
$filename were DOSFILE.TXT,
newfilename would become
dosfile.txt.
The second step uses one of the shell’s pattern-matching operators,
the one that deletes the shortest match it finds at the end of the
string. The pattern here is ., which means a dot at the end of
the string.[70]
This means that the expression ${newfilename%.} will
delete a dot from $newfilename only if it’s at the end of
the string; otherwise the expression will leave $newfilename
intact. For example, if $newfilename is dosfile.txt,
it will be untouched, but if it’s dosfile., the expression will
change it to dosfile without the final dot. In either case,
the new value is assigned back to newfilename.
The last statement in the for loop body does the file
renaming with the standard Unix mv(1) command. Before that,
a print command simply informs the user of what’s happening.
There is one little problem with this solution: if there are any files in
the given directory that aren’t MS-DOS files (in particular,
if there are files whose names don’t contain uppercase letters or
don’t contain a dot), then the conversion will do nothing to those
filenames and mv will be called with two identical arguments.
mv will complain with the message:
mv:
filename
and
filename
are identical.
The solution is very simple: test to see if the filenames are identical:
for filename in ${1:+$1/}* ; do
    newfilename=$(print $filename | tr '[A-Z]' '[a-z]')
    newfilename=${newfilename%.}
    # subtlety: quote value of $newfilename to do string comparison,
    # not regular expression match
    if [[ $filename != "$newfilename" ]]; then
        print "$filename -> $newfilename"
        mv $filename $newfilename
    fi
done
If you are familiar with an operating system other than MS-DOS and Unix, you may want to test your script-writing prowess at this point by writing a script that translates filenames from that system’s format into Unix format. Use the above script as a guideline.
In particular, if you know the OpenVMS operating system from Compaq (nee DEC), here’s a programming challenge:
Write a script called vmsmv that is similar to dosmv but works on OpenVMS filenames instead of MS-DOS filenames. Remember that OpenVMS filenames end with semicolons and version numbers.
Modify your script so that if there are several versions of the same file, it renames only the latest version (with the highest version number).
Modify it further so that your script erases old versions of files.
The first of these is a relatively straightforward modification of dosmv. Number 2 is difficult; here’s a strategy hint:
Develop a regular expression that matches OpenVMS filenames (you need this for Number 1 anyway).
Get a list of base names (sans version numbers) of files in the given directory by piping ls through grep (with the above regular expression), cut, and sort -u. Use cut with a semicolon as “field separator”; make sure that you quote the semicolon so that the shell doesn’t treat it as a statement separator. sort -u removes duplicates after sorting. Use command substitution to save the resulting list in a variable.
Use a
forloop on the list of base names. For each name, get the highest version number of the file (just the number, not the whole name). Do this with another pipeline: pipe ls through cut, sort -n, and tail -1. sort -n sorts in numerical (not lexicographical) order; tail -N outputs the last N lines of its input. Again, use command substitution to capture the output of this pipeline in a variable.Append the highest version number to the base name; this is the file to rename in Unix format.
Once you have completed Number 2, you can do Number 3 by adding a single line of code to your script; see if you can figure out how.
Finally, ksh93 provides the arithmetic for
loop, which is much closer in syntax and style to the C for loop.
We present it in the next chapter, after discussing the shell’s general arithmetic
capabilities.
case
The next flow control construct to cover is case.
While the case statement in Pascal and the similar switch
statement in C can be used to test simple values like integers and
characters, the Korn shell’s case construct lets you test
strings against patterns that can contain wildcard characters.
Like its conventional language counterparts, case lets you
express a series of if-then-else type statements in a concise way.
The syntax of case is as follows:
caseexpressioninpattern1)statements ;;pattern2)statements ;;... esac
Any of the patterns can actually be several patterns separated
by “OR bar” characters (|, which is the same as the
pipe symbol, but in this context means “or”). If expression matches
one of the patterns, its corresponding statements are executed.
If there are several patterns separated by OR bars, the
expression can match any of them in order for the associated statements
to be run. The patterns are checked in order until a match is found;
if none is found, nothing happens.
This rather ungainly syntax should become clearer with an example.
An obvious choice is to revisit our solution to Task 4-2, the front-end
for the C compiler. Earlier in this chapter, we wrote some
code that processed input files according to their suffixes
(.c, .s,
or .o for C, assembly, or object code, respectively).
We can improve upon this solution in two ways.
First, we can
use for to allow multiple files to be processed at one time;
second, we can use case to streamline the code:
for filename in "$@"; do
    case $filename in
        *.c )
            objname=${filename%.c}.o
            ccom "$filename" "$objname" ;;
        *.s )
            objname=${filename%.s}.o
            as "$filename" "$objname" ;;
        *.o ) ;;
        *   )
            print "error: $filename is not a source or object file."
            exit 1 ;;
    esac
done
The case construct in this code handles four cases. The first
two are similar to the if and first elif cases in the
code earlier in this chapter; they call the compiler or the assembler if the
filename ends in .c or .s, respectively.
After that, the code is a bit different. Recall that if the
filename ends in .o nothing is to be done (on the assumption
that the relevant files will be linked later).
We handle this with
the case *.o ), which has no statements. There is nothing
wrong with a “case” for which the script does nothing.
If the filename
does not end in .o, there is an error.
This is dealt with in
the final case, which is *. This is a catchall
for whatever didn’t match the other cases.
(In fact, a * case
is analogous to a default case in C and an otherwise
case in some Pascal-derived languages.)
The surrounding for loop processes all command-line arguments
properly. This leads to a further enhancement: now that we know
how to process all arguments, we should be able to write the
code that passes all of the object files to the linker
(the program ld) at the end.
We can do this by building up a string of object file
names, separated by spaces, and hand that off to the linker when
we’ve processed all of the input files. We initialize the string
to null and append an object file name each time one is created,
i.e., during each iteration of the for loop.
The code for this is simple, requiring only minor additions:
objfiles=""
for filename in "$@"; do
    case $filename in
        *.c )
            objname=${filename%.c}.o
            ccom "$filename" "$objname" ;;
        *.s )
            objname=${filename%.s}.o
            as "$filename" "$objname" ;;
        *.o )
            objname=$filename ;;
        *   )
            print "error: $filename is not a source or object file."
            exit 1 ;;
    esac
    objfiles+=" $objname"
done
ld $objfiles
The first line in this version of the script initializes the
variable objfiles to null.[71]
We added a line of code in
the *.o case to set objname
equal to $filename,
because we already know it’s an object file. Thus, the value
of objname is set in every case — except for the error case,
in which the routine prints a message and bails out.
The last line of code in the for loop body appends a space and
the latest $objname to objfiles. Calling
this script with the same arguments as in Figure 5-1 would result
in $objfiles being equal to " a.o b.o c.o d.o”
when the for loop finishes (the leading space doesn’t matter).
This list of object filenames is given to ld as a single argument,
but the shell divides it up into multiple file names properly.
Task 5-4 is a new task whose initial solution uses case.
The code for the solution to this task should go into the file /etc/profile, which is the master startup file that is run for each user before his or her .profile.
For the time being, we assume that you have a traditional mainframe-style setup, in which terminals are hard-wired to the computer. This means that you can determine which (physical) terminal is being used by the line (or tty) it is on. This is typically a name like /dev/ttyNN, where NN is the line number. You can find your tty with the command tty(1), which prints it on the standard output.
Let’s assume that your system has ten lines plus a system console line (/dev/console), with the following terminals:
Lines tty01, tty03, and tty04 are Givalt GL35a’s (terminfo name “gl35a”).
Line tty07 is a Tsoris T-2000 (“t2000”).
Line tty08 and the console are Shande 531s (“s531”).
The rest are Vey VT99s (“vt99”).
Here is the code that does the job:
case $(tty) in
    /dev/tty0[134]            ) TERM=gl35a ;;
    /dev/tty07                ) TERM=t2000 ;;
    /dev/tty08 | /dev/console ) TERM=s531  ;;
    *                         ) TERM=vt99  ;;
esac
The value that case checks is the result of command substitution.
Otherwise, the only thing new about this code is the OR bar
after /dev/tty08. This means that
/dev/tty08 and /dev/console are alternate patterns for the case
that sets TERM to “s531”.
Note that it is not possible to put alternate patterns on separate lines unless you use backslash continuation characters at the end of all but the last line. In other words, the line:
/dev/tty08 | /dev/console ) TERM=s531 ;;
could be changed to the slightly more readable:
/dev/tty08 | \
    /dev/console   ) TERM=s531  ;;
The backslash must be at the end of the line. If you omit it, or if there are characters (even spaces) following it, the shell complains with a syntax error message.
This problem is actually better solved using a file that contains a table of lines and terminal types. We’ll see how to do it that way in Chapter 7.
When a case appeared inside
the $(...)
command-substitution
construct, ksh88 had a problem:
the ) that demarcates each pattern
from the code to execute terminated the $(...).
To get around this, it was necessary
to supply a leading ( in front of the pattern:
result=$(case $input in
         ( dave ) print Dave! ;;      Open paren required in ksh88
         ( bob  ) print Bob! ;;
         esac)
ksh93 still accepts this syntax, but it no longer requires it.
Merging Cases
Sometimes, when writing a case-style construct, there are
instances where one case is a subset of what should be done for another.
The C language handles this by letting one case in a
switch “fall through” into the code for another.
A little-known fact is that the Korn shell (but not the Bourne shell) has a similar facility.
For example, let’s suppose that our C compiler generates only
assembly code, and that it’s up to our front-end script to turn the
assembly code into object code. In this case, we want to fall through
from the *.c case into the *.s case.
This is done using ;& to terminate the body of the
case that does the falling through:
objfiles=""
for filename in "$@"; do
    case $filename in
        *.c )
            asmname=${filename%.c}.s
            ccom "$filename" "$asmname"
            filename=$asmname ;&    # fall through!
        *.s )
            objname=${filename%.s}.o
            as "$filename" "$objname" ;;
        *.o )
            objname=$filename ;;
        *   )
            print "error: $filename is not a source or object file."
            exit 1 ;;
    esac
    objfiles+=" $objname"
done
ld $objfiles
Before falling through, the *c case has to reset the
value of filename so that the *.s case
works correctly.
It is usually a very good idea to add a comment indicating that the
“fall through” is on purpose, although it is more obvious
in shell than in C.
We’ll return to this example once more in Chapter 6
when we discuss how to handle dash options on the command line.
select
Almost all of the flow-control constructs we have seen so far are also
available in the Bourne shell, and the C shell has equivalents with
different syntax. Our next construct, select, is unique to the Korn shell;
moreover, it has no analogue in conventional programming languages.
select allows you to generate simple menus easily.
It has concise syntax, but it does quite a lot of work.
The syntax is:
selectname[inlist] dostatements that can use$name ... done
This is the same syntax as the regular for loop except for
the keyword select.
And like for, you can omit
in
list, and
it will default to "$@", i.e.,
the list of quoted command-line arguments.
Here is what select does:
Generates a menu of each item in list, formatted with numbers for each choice
Prompts the user for a number (with the value of
PS3)Stores the selected choice in the variable name and the selected number in the built-in variable
REPLYExecutes the statements in the body
Repeats the process forever (but see below for how to exit)
Once again, an example should help make this process clearer. Assume you need to write the code for Task 5-4, but your life is not as simple. You don’t have terminals hardwired to your computer; instead, your users communicate through a terminal server, or they log in remotely, via telnet or ssh. This means, among other things, that the tty number does not determine the type of terminal.
Therefore, you have no choice but to prompt the user for his or her terminal type at login time. To do this, you can put the following code in /etc/profile (assume you have the same choice of terminal types):
PS3='terminal? '
select term in gl35a t2000 s531 vt99; do
    if [[ -n $term ]]; then
        TERM=$term
        print TERM is $TERM
        export TERM
        break
    else
        print 'invalid.'
    fi
done
When you run this code, you see this menu:
1) gl35a
2) t2000
3) s531
4) vt99
terminal?
The built-in shell variable PS3 contains the prompt string
that select uses; its default value is the not particularly
useful "#? “.
So the first line of the above code sets it to
a more relevant value.[73]
The select statement constructs
the menu from the list of choices. If the user enters a valid
number (from 1 to 4), the variable term is set to
the corresponding value; otherwise it is null. (If the user
just presses ENTER, the shell prints the menu again.)
The code in the loop body checks if term
is non-null. If so, it assigns $term to the environment
variable TERM,
exports TERM, and prints a confirmation message; then
the break statement exits the select loop.
If term
is null, the code prints an error message and repeats the prompt
(but not the menu).
The break statement is the usual way of exiting a select
loop. Actually (like its analogue in C),
it can be used to exit any surrounding control structure we’ve
seen so far (except case, where the double-semicolons
act like break) as well as the while and
until we will see soon. We haven’t introduced break until now
because some people consider it to be bad coding style to use it to
exit a loop. However, it is necessary for exiting
select when the user makes a valid choice.
(A user can also type CTRL-D — for end-of-input — to get
out of a select loop. This gives the user a uniform way
of exiting, but it doesn’t help the shell programmer much.)
Let’s refine our solution by making the menu more user-friendly,
so that the user doesn’t have to know the terminfo name of
his or her terminal. We do this by using quoted character
strings as menu items and then using case to determine the
terminfo name:
print 'Select your terminal type:'
PS3='terminal? '
select term in \
    'Givalt GL35a' \
    'Tsoris T-2000' \
    'Shande 531' \
    'Vey VT99'
do
    case $REPLY in
        1 ) TERM=gl35a ;;
        2 ) TERM=t2000 ;;
        3 ) TERM=s531 ;;
        4 ) TERM=vt99 ;;
        * ) print 'invalid.' ;;
    esac
    if [[ -n $term ]]; then
        print TERM is $TERM
        export TERM
        break
    fi
done
This code looks a bit more like a menu routine in a
conventional program, though select still provides the shortcut
of converting the menu choices into numbers.
We list each of the menu choices on its own
line for reasons of readability, but once again we need continuation
characters to keep the shell from complaining about syntax.
Here is what the user sees when this code is run:
Select your terminal type:
1) Givalt GL35a
2) Tsoris T-2000
3) Shande 531
4) Vey VT99
terminal?
This is a bit more informative than the previous code’s output.
When the body of the select loop is entered,
$term equals one of the four strings (or is null
if the user made an invalid choice), while the built-in variable
REPLY contains the number the user selected. We
need a case statement to assign the correct value to
TERM; we use the value of REPLY
as the case selector.
Once the case statement is finished, the
if checks to see if a valid choice was made, as in the
previous solution. If the choice was valid, TERM
has already been assigned, so the code just prints a confirmation message,
exports TERM, and exits the select
loop. If it wasn’t valid, the select loop repeats
the prompt and goes through the process again.
Within a select loop, if REPLY is set
to the null string, the shell reprints the menu.
This happens, as mentioned, when the user hits ENTER.
But you may also explicitly set REPLY to the
null string to force the shell to reprint the menu.
The variable TMOUT (time out) can affect the select statement.
Before the select loop,
set it to some number of seconds N, and if nothing is entered within
that amount of time, the select will exit.
As will be explained later, TMOUT also affects the
read command and the shell’s interactive prompting mechanism.
while and until
The remaining two flow control constructs the Korn shell provides
are while and until.
These are similar; both allow a section of code to be run
repetitively while (or until) a certain condition holds true. They also resemble analogous
constructs in Pascal (while/do
and repeat/until)
and C (while and
do/while).
while and until are actually most useful when combined
with features we will see in the next chapter, such as
arithmetic, input/output of variables, and command-line processing.
Yet we can show a useful example even with the machinery we have
covered so far.
whileconditiondostatements ...done
For until, just substitute until for while in the above example.
As with if, the condition is really a list of
statements that are run;
the exit status of the last one is used as the value of
the condition. You can use a conditional with [[ and ]]
here, just as you can with if.
Note
The only difference between
while and until is the way the condition is handled.
In while, the loop executes as long as the condition is true;
in until, it runs as long as the condition is false.
So far, so familiar.
However, the until condition is checked
at the top of the loop, not at the bottom as it is
in analogous constructs in C and Pascal.
The result is that you can convert any until into a while
simply by negating the condition. The only place where until
might be better is something like this:
untilcommand; dostatements ...done
The meaning of this is essentially, “Do statements until
command runs correctly.”
This is occasionally useful, such as when waiting for the occurrence of a particular event.
However, we use while throughout the rest of this book.
Task 5-5 is a good candidate for while.
By “simplified,” we mean that we will implement only the part
that checks all the directories in your PATH for the command
you give as argument (we won’t implement checking for aliases,
built-in commands, etc.).
We can do this by picking off the directories in PATH one by
one, using one of the shell’s pattern-matching operators, and
seeing if there is a file with the given name in the directory that you have permission to execute. Here is the code:
path=$PATH:
dir=${path%%:*}
while [[ -n $path ]]; do
    if [[ $dir == "" ]] ; then
        dir="."
    fi
    if [[ -x $dir/$1 && ! -d $dir/$1 ]]; then
        print "$dir/$1"
        exit 0
    fi
    path=${path#*:}
    dir=${path%%:*}
done
exit 1
The first line of this code saves $PATH in
path, our own temporary copy. We append a colon to the
end so that every directory in $path
ends in a colon (in $PATH, colons are
used only between directories); subsequent code
depends on this being the case.
The next line picks the first directory off $path
by using the operator that deletes the longest match of the pattern
given. In this case, we delete the longest match of the pattern
:*, i.e., a colon followed by anything. This gives us the first
directory in $path, which we store in the variable dir.
The condition in the while loop checks if
$path is non-null. If it is not null,
it first checks that $dir is not null.
This could happen for two adjacent colons, which represent the
current directory. In this case, dir is
explicitly set to dot.
Next, the script
constructs
the full pathname $dir/$1 and sees
if there is a file by that name for which you have execute permission
(and that is not a directory). If so, it prints the full pathname and
exits the routine with a 0 (“OK”) exit status.
If a file is not found, this code is run:
path=${path#*:}
dir=${path%%:*}
The first of these uses another shell string operator: this one
deletes the shortest match of the pattern given
from the front of the string. By now, this type of operator should
be familiar. This line deletes the front directory from $path
and assigns the result back to path.
The second line is the same as before the while: it finds
the (new) front directory in $path and assigns it to dir.
This sets up the loop for another iteration.
Thus, the code loops through all of the directories in PATH.
It exits when it finds a matching executable file or when it has
“eaten up” the entire PATH.
If no matching executable file is found, it prints nothing
and exits with an error status.
We can enhance this script a bit by taking advantage of the Unix utility file(1). file examines files given as arguments and determines what type they are, based on the file’s magic number and various heuristics (educated guesses). A magic number is a field in the header of an executable file that the linker sets to identify what type of executable it is.
If filename is an executable program (compiled from C or some other
language), typing file
filename
produces output similar to this:
filename: ELF 32-bit LSB executable 80386 Version 1
However, if filename is not an executable program, it will examine the first few lines and try to guess what kind of information the file contains. If the file contains text (as opposed to binary data), file will look for indications that it is English, shell commands, C, Fortran, troff(1) input, and various other things. file is wrong sometimes, but it is usually correct.
Assume that fred is an executable file in the directory
/usr/bin, and that bob is a shell script
in /usr/local/bin.
Typing file /usr/bin/fred produces this output:
/usr/bin/fred: ELF 32-bit LSB executable 80386 Version 1
Typing file /usr/local/bin/bob has this result:
/usr/local/bin/bob: commands text
We can just substitute file for print to print a more informative message in our script:
path=$PATH:
while [[ -n $path ]]; do
    dir=${path%%:*}
    if [[ $dir == "" ]] ; then
        dir="."
    fi
    if [[ -x $dir/$1 && ! -d $dir/$1 ]]; then
          file $dir/$1
          exit 0
    fi
    path=${path#*:}
done
exit 1
Notice that by moving the statement
dir=${path%%:*}
to the top of the loop body, it needs to be done only once.
Finally, just to show how little difference there is between
while, and until, we note that the line:
until [[ ! -n $path ]]; do
can be used in place of:
while [[ -n $path ]]; do
with identical results.
We’ll see additional examples of while in the next chapter.
break and continue
Earlier in this chapter, we saw the break statement used
with the select construct for breaking out of a loop.
break can be used with any looping construct:
for, select, while
and until.
The continue statement is related; its job is to skip any remaining statements in the body of the loop and start the next iteration.
Both the break and continue statements take an optional numeric argument (which can be a numeric expression). This indicates how many enclosing loops should be broken out of or continued. For example:
while condition1; do             Outer loop
    ...
    while condition2; do         Inner loop
        ...
        break 2                  Breaks out of outer loop
    done
done
...                              Execution continues here after break
Programmers will note that
the break and continue statements,
particularly with the ability to break or continue multiple loop levels,
compensate in a very clean fashion for the lack of a goto keyword
in the shell language.
[61] Because this is a “convention” and not a “law,” there are exceptions. For example, diff(1) (find differences between two files) returns 0 for “no differences,” 1 for “differences found,” or 2 for an error such as an invalid filename argument.
[62] LISP programmers will find this idea familiar.
[63] This option is available starting with ksh93g.
[64]
The Korn shell also accepts the [...] and
test commands.
(There are built-in commands in all versions of ksh;
they behave like the original external versions.)
The [[...]] construct has many more options and
is better integrated into the Korn shell language:
specifically, word splitting and wildcard expansion
aren’t done within [[ and ]], making quoting
less necessary.
In addition, you can always tell operators from operands, since the
operators cannot be the result of expansion.
[65] For the purposes of this example. We know this isn’t strictly true in real life.
[66] Remember that the same permission flag that determines execute permission on a regular file determines search permission on a directory. This is why the -x operator checks both things depending on file type.
[67] A function can have the same name as a script; however, this isn’t good programming practice.
[68] As we will see in Chapter 6, it is possible to do the case translation within the shell, without using an external program. We’ll ignore that fact for now, though.
[69]
Modern POSIX-compliant systems support locales, which are ways of
using non-ASCII character sets in a portable fashion.
On such a system, the correct invocation of tr is
tr '[:upper:]' '[:lower:]'.
Most long-time Unix users tend to forget this, though.
[70] Unix regular expression mavens should remember that this is shell wildcard syntax, in which dots are not operators and therefore do not need to be backslash-escaped.
[71] This isn’t strictly necessary, because all variables are assumed to be null if not explicitly initialized (unless the nounset option is turned on). It just makes the code easier to read.
[72] Our condolences.
[73]
As for PS1, ksh does parameter,
command, and arithmetic substitution on the value before printing it.