Chapter 6. Command-Line Options and Typed Variables
You should have a healthy grasp of shell programming techniques now that you have gone through the previous chapters. What you have learned up to this point enables you to write many nontrivial, useful shell scripts and functions.
Still, you may have noticed some remaining gaps in the knowledge
you need to write shell code that behaves like the Unix commands you
are used to. In particular, if you are an experienced Unix user,
it might have occurred to you
that none of the example scripts shown so far have the
ability to handle options (preceded by a dash (-))
on the command line.
And if you
program in a conventional language like C or Pascal, you will have
noticed that the only type of data that we have seen in shell variables
is character strings; we haven’t seen how to do arithmetic, for example.
These capabilities are certainly crucial to the shell’s ability to function as a useful Unix programming language. In this chapter, we show how the Korn shell supports these and related features.
Command-Line Options
We have already seen many examples of the positional parameters
(variables called 1, 2, 3, etc.)
that the shell uses to store the command-line
arguments to a shell script or function when it runs. We have also
seen related variables like * and @
(for the string(s) of all arguments)
and # (for the number of arguments).
Indeed, these variables hold all the information on the user’s
command line. But consider what happens when options are involved.
Typical Unix commands have the form command
[-options] args,
meaning that there can be zero or more options. If a shell script
processes the command fred bob pete, then
$1 is ``bob'' and $2 is ``pete''.
But if the command is fred -o bob pete, then
$1 is -o,
$2
is ``bob'', and $3 is
``pete''.
You might think you could write code like this to handle it:
if [[ $1 == -o ]]; then
    code that processes the -o option
    1=$2
    2=$3
fi
normal processing of $1 and $2...
But this code has several problems. First, assignments like
1=$2 are illegal because positional parameters are read-only.
Even if they were legal, another problem is that
this kind of code imposes limitations on how many arguments
the script can handle — which is very unwise. Furthermore,
if this command had several possible options, the
code to handle all of them would get very messy very quickly.
shift
Luckily, the shell provides a way around this problem. The command shift performs the function of:
1=$2
2=$3
...
for every argument, regardless of how many there are. If you supply
a numeric argument[74]
to shift, it shifts the arguments that
many times over; for example, shift 3 has this effect:
1=$4
2=$5
...
This leads immediately to some code that handles a single option (call it -o) and arbitrarily many arguments:
if [[ $1 == -o ]]; then
    process the -o option
    shift
fi
normal processing of arguments ...
After the if construct, $1, $2,
etc., are set to the correct arguments,
and $# is automatically adjusted, as well.
We can use shift together with the programming features we have seen so far to implement simple option schemes. However, we will need additional help when things get more complex. The getopts built-in command, which we introduce later, provides this help.
shift by itself gives us enough power to
implement the -
N
option to the highest script we saw in Task 4-1.
Recall that this script takes an input file that lists artists
and the number of albums you have by them. It sorts the list
and prints out the N highest numbers, in descending order.
The code that does the actual data processing is:
filename=$1
howmany=${2:-10}
sort -nr $filename | head -$howmany
Our original syntax for calling this script was
highest
filename
[N],
where N defaults to
10 if omitted. Let’s change this to a more conventional Unix syntax,
in which options are given before arguments:
highest [-
N]
filename. Here is how we would write
the script with this syntax:
if [[ $1 == -+([0-9]) ]]; then
    howmany=$1
    shift
elif [[ $1 == -* ]]; then
    print 'usage: highest [-N] filename'
    exit 1
else
    howmany="-10"
fi
filename=$1
sort -nr $filename | head $howmany
In this code, the option is considered to be supplied if $1
matches the pattern -+([0-9]). This uses one of the Korn shell’s
regular expression operators, which we saw in Chapter 4.
Notice that we didn’t surround the pattern with quotes
(even double quotes); if we did, the shell would interpret it literally,
not as a pattern. This pattern means
“A dash followed by one or more digits.” If $1 matches,
then we assign it to the variable howmany.
If $1 doesn’t match, we test to see if it’s an option at all,
i.e., if it matches the pattern -*. If it does, then it’s invalid;
we print an error message and exit with error status. If we reach the final
(else) case, we
provide the default value for howmany and
assume that $1 is a filename and
treat it as such in the ensuing code. The rest of the script
processes the data as before.
We can extend what we have learned so far to a general technique for handling multiple options. For the sake of concreteness, assume that our script is called bob and we want to handle the options -a, -b, and -c:
while [[ $1 == -* ]]; do
    case $1 in
        -a ) process option -a ;;
        -b ) process option -b ;;
        -c ) process option -c ;;
        *  ) print 'usage: bob [-a] [-b] [-c] args ...'
             exit 1 ;;
    esac
    shift
done
normal processing of arguments ...
This code checks $1 repeatedly as long as it starts with a dash
(-).
Then the case construct
runs the appropriate code depending on which option $1 is.
If the option is invalid (i.e., if it starts with a dash but
isn’t -a, -b, or
-c), the script prints a usage message
and returns with an error exit status. After each option is
processed, the arguments are shifted over. The result is that
the positional parameters are set to the actual arguments when
the while loop finishes.
Notice that by generalizing this code, you can
handle options of arbitrary
length, not just one letter (e.g., -fred instead of -a).
Options with Arguments
We need to add one more ingredient to make option processing really useful. Recall that many commands have options that take their own arguments. For example, the cut command, on which we relied heavily in Chapter 4, accepts the option -d with an argument that determines the field delimiter (if it is not the default TAB). To handle this type of option, we just use another shift when we are processing the option.
Assume that, in our bob script, the option -b requires its own argument. Here is the modified code that processes it:
while [[ $1 == -* ]]; do
    case $1 in
        -a ) process option -a ;;
        -b ) process option -b
                  $2 is the option's argument
             shift ;;
        -c ) process option -c ;;
        *  ) print 'usage: bob [-a] [-b barg] [-c] args ...'
             exit 1 ;;
    esac
    shift
done
normal processing of arguments ...
getopts
So far, we have a complete, though still constrained, way
of handling command-line options. The above code does not allow
a user to combine arguments with a single dash, e.g.,
-abc instead of -a -b -c. It
also doesn’t allow the user to
specify arguments to options
without a space in between, e.g.,
-barg in addition to -b arg.[75]
The shell provides a built-in way
to deal with multiple complex options without these constraints.
The built-in command getopts
[76]
can be used as the condition of the while in an option-processing
loop. Given a specification of which options are valid
and which require their own arguments, it sets up the
body of the loop to process each option in turn.
getopts takes at least two arguments. The first
is a string that can contain letters
and colons. Each letter is a valid option; if a letter is followed
by a colon, the option requires an argument.
If the letter is followed by a #, the option
requires a numeric argument.
The : or # may be followed
by [
description
],
i.e., a descriptive string enclosed in square brackets that is used
when generating usage error messages. If you append a space with more
descriptive text to the
list of option characters, that text is also printed in error messages.
getopts picks
options off the command line and assigns each one (without the
leading dash) to a variable whose
name is getopts’s second argument.
As long as there are options
left to process, getopts returns exit status 0; when the
options are exhausted, it returns exit status 1, causing the while
loop to exit.
By default, getopts loops through "$@",
the quoted list of command line arguments.
However, you may supply additional arguments to getopts,
in which case it uses those arguments, instead.
getopts does a few other things that make option processing easier; we’ll encounter them as we examine how to use getopts in the preceding example:
while getopts ":ab:c" opt; do
    case $opt in
        a  ) process option -a ;;
        b  ) process option -b
                  $OPTARG is the option's argument ;;
        c  ) process option -c ;;
        \? ) print 'usage: bob [-a] [-b barg] [-c] args ...'
             exit 1 ;;
    esac
done
shift $(($OPTIND - 1))
normal processing of arguments ...
The call to getopts in the while
condition sets up the loop to accept the options -a,
-b, and -c, and specifies
that -b takes an argument. (We will explain the
“:” that starts the option string in a moment.) Each
time the loop body is executed, it has the latest option
available, without a dash (-), in the variable
opt.
If the user types an
invalid option, getopts normally prints an
error message (of the form
cmd: -o: unknown option)
and sets opt to ?.
getopts finishes processing all its options,
and if an error was encountered, the shell exits.
However — now here’s an obscure kludge — if you begin the
option letter string with a colon, getopts won’t print the message,
and shell will not exit.
This allows you to handle error messages on your own.
You may either
supply the leading colon and provide your own error
message in a case that handles ? and exits manually, as above,
or you may provide descriptive text within the call to getopts,
and let the shell handle printing the error message.
In the latter case, the shell will also automatically exit upon
encountering an invalid option.
We have modified the code in the case construct to
reflect what getopts does.
But notice that there are no more shift statements inside the
while loop: getopts does not rely on
shifts to
keep track of where it is. It is unnecessary to shift arguments
over until getopts is finished,
i.e., until the while
loop exits.
If an option has an argument, getopts stores it in the variable
OPTARG, which can be used in the code that processes the
option.
The one shift statement left is after the while loop.
getopts stores in the variable OPTIND the number of
the next argument to be processed; in this case, that’s the number
of the first (non-option) command-line argument. For example,
if the command line were bob -ab pete, then $OPTIND
would be “2”. If it were bob -a -b pete,
then $OPTIND would be “3”.
OPTIND is reinitialized to 1 whenever you run a function,
which allows you to use getopts within a function body.
The expression $(($OPTIND - 1)) is an
arithmetic expression (as we’ll see later in this chapter) equal
to $OPTIND minus 1. This value is used as the argument to
shift. The result is that the correct number of arguments
is shifted out of the way, leaving the “real” arguments
as $1, $2, etc.
Before we continue, now is a good time to summarize everything that getopts does (including some points not mentioned yet):
If given the -a option and an argument, getopts uses that argument as the program name in any error messages, instead of the default, which is the name of the script. This is most useful if you are using getopts within a function, where
$0is the name of the function. In that case, it’s less confusing if the error message uses the script name instead of the function name.Its first (non-option) argument is a string containing all valid option letters. If an option requires an argument, a colon follows its letter in the string. An initial colon causes getopts not to print an error message when the user gives an invalid option.
Its second argument is the name of a variable that holds each option letter (without any leading dash) as it is processed. Upon encountering an error, this variable will contain a literal
?character.Following an option letter with a
#instead of a colon indicates that the option takes a numeric argument.When an option takes an argument (the option letter is followed by either a color or a
#symbol), appending a question mark indicates that the option’s argument is optional (i.e., not required).If additional arguments are given on the getopts command line after the option string and variable name, they are used instead of
"$@".If an option takes an argument, the argument is stored in the variable
OPTARG.The variable
OPTINDcontains a number equal to the next command-line argument to be processed. After getopts is done, it equals the number of the first “real” argument.If the first character in the option string is
+(or the second character after a leading colon), then options may start with+as well. In this case, the option variable will have a value that starts with+.
getopts can do much, much more than described here. See Appendix B, which provides the full story.
The advantages of getopts are that it minimizes extra code necessary to process options and fully supports the standard command option syntax as specified by POSIX.
As a more concrete example, let’s return to
our C compiler front-end (Task 4-2). So far,
we have given our script the ability to process C source files
(ending in .c), assembly code files (.s), and object code
files (.o). Here is the latest version of the script:
objfiles=""
for filename in "$@"; do
    case $filename in
        *.c )
            objname=${filename%.c}.o
            ccom "$filename" "$objname" ;;
        *.s )
            objname=${filename%.s}.o
            as "$filename" "$objname" ;;
        *.o )
            objname=$filename ;;
        *   )
            print "error: $filename is not a source or object file."
            exit 1 ;;
    esac
    objfiles+=" $objname"
done
ld $objfiles
Now we can give the script the ability to handle options. To know what options we’ll need, we have to discuss further what compilers do.
More about C compilers
C compilers on typical modern Unix systems tend to have a bewildering array of options. To make life simple, we’ll limit ourselves to the most widely-used ones.
Here’s what we’ll implement. All compilers provide the ability to eliminate the final linking step, i.e., the call to the linker ld. This is useful for compiling C code into object code files that will be linked later, and for taking advantage of the compiler’s error checking separately before trying to link. The -c option (compile only) suppresses the link step, producing only the compiled object code files.
C compilers are also capable of including lots of extra information in an object code file that can be used by a debugger (though it is ignored by the linker and the running program). If you don’t know what a debugger is, see Chapter 9. The debugger needs lots of information about the original C code to be able to do its job; the option -g directs the compiler to include this information in its object-code output.
If you aren’t already familiar with Unix C compilers, you may have thought it strange when you saw in the last chapter that the linker puts its output (the executable program) in a file called a.out. This convention is a historical relic that no one ever bothered to change. Although it’s certainly possible to change the executable’s name with the mv command, the C compiler provides the option -o filename, which uses filename instead of a.out.
Another option we will support here has to do with libraries. A library is a collection of object code, some of which is to be included in the executable at link time. (This is in contrast to a precompiled object code file, all of which is linked in.) Each library includes a large amount of object code that supports a certain type of interface or activity; typical Unix systems have libraries for things like networking, math functions, and graphics.
Libraries are extremely useful as building blocks that help programmers write complex programs without having to “reinvent the wheel” every time. The C compiler option -l name tells the linker to include whatever code is necessary from the library name [77] in the executable it builds. One particular library called c (the file libc.a) is always included. This is known as the C runtime library; it contains code for C’s standard input and output capability, among other things. (While Unix compilers normally take library specifications after the list of object files, our front-end treats them just like any other option, meaning that they must be listed before the object files.)
Finally, it is possible for a good C compiler to do certain things that make its output object code smaller and more efficient. Collectively, these things are called optimization. You can think of an optimizer as an extra step in the compilation process that looks back at the object-code output and changes it for the better. The option -O invokes the optimizer.
Table 6-1 summarizes the options we will build into our C compiler front-end.
| Option | Meaning |
-c
| Produce object code only; do not invoke the linker |
-g
| Include debugging information in object code files |
-l
lib
| Include the library lib when linking |
-o
exefile
|
Produce the executable file exefile instead of the default a.out |
-O
| Invoke the optimizer |
You should also bear in mind this information about the options:
The options -o and -l lib are merely passed on to the linker (ld), which processes them on its own.
The -l lib option can be used multiple times to link in multiple libraries.
On most systems, ld requires that library options come after object files on the command line. (This also violates the conventions we’ve been working so hard to adhere to.) In addition, the order of libraries on the command line matters. If a routine in libA.a references another routine from libB.a, then libA.a must appear first on the command line (
-lA -lB). This implies that the C library (libc.a) has to be loaded last, since routines in other libraries almost always depend upon the standard routines in the C library.The -g option is passed to the ccom command (the program that does the actual C compilation).
We will assume that the optimizer is a separate program called optimize that accepts an object file as argument and optimizes it “in place,” i.e., without producing a separate output file.
For our front-end, we’ve chosen to let the shell handle printing the usage message. Here is the code for the script occ that includes option processing:
# initialize option-related variables
do_link=true
debug=""
link_libs=""
clib="-lc"
exefile=""
opt=false

# process command-line options
while getopts "cgl:[lib]o:[outfile]O files ..." option; do
    case $option in
        c )    do_link=false ;;
        g )    debug="-g" ;;
        l )    link_libs+=" -l $OPTARG" ;;
        o )    exefile="-o $OPTARG" ;;
        O )    opt=true ;;
    esac
done
shift $(($OPTIND - 1))

# process the input files
objfiles=""
for filename in "$@"; do
    case $filename in
        *.c )
            objname=${filename%.c}.o
            ccom $debug "$filename" "$objname"
            if [[ $opt == true ]]; then
                optimize "$objname"
            fi ;;
        *.s )
            objname=${filename%.s}.o
            as "$filename" "$objname" ;;
            if [[ $opt == true ]]; then
                optimize "$objname"
            fi ;;
        *.o )
            objname=$filename ;;
        *   )
            print "error: $filename is not a source or object file."
            exit 1 ;;
    esac
    objfiles+=" $objname"
done

if [[ $do_link == true ]]; then
    ld $exefile $objfiles $link_libs $clib
fi
Let’s examine the option-processing part of this code. The first several lines initialize variables that we use later to store the status of each of the options. We use “true” and “false” for truth values for readability; they are just strings and otherwise have no special meaning. The initializations reflect these assumptions:
We will want to link.
We will not want the compiler to generate space-consuming debugger information.
The only object-code library we will need is c, the standard C runtime library that is automatically linked in.
The executable file that the linker creates will be the linker’s default file, a.out.
We will not want to invoke the optimizer.
The while, getopts, and case
constructs process the options in the
same way as the previous example. Here is what the code that
handles each option does:
If the -c option is given, the
do_linkflag is set to “false,” which causes theifcondition at the end of the script to be false, meaning that the linker will not run.If -g is given, the
debugvariable is set to “-g”. This is passed on the command line to the compiler.Each -l lib that is given is appended to the variable
link_libs, so that when thewhileloop exits,$link_libsis the entire string of -l options. This string is passed to the linker.If -o file is given, the
exefilevariable is set to “-o file“. This string is passed to the linker.If -O is specified, the
optflag is set to “true.” This specification causes the conditionalif [[ $opt == true ]]to be true, which means that the optimizer will run.
The remainder of the code is a modification of the for loop
we have already seen; the modifications are direct results of the
above option processing and should be self-explanatory.
Numeric Variables and Arithmetic
The expression $(($OPTIND - 1)) in the last example gives
a clue as to how the shell can do integer arithmetic.
As you might guess, the shell interprets words surrounded by
$(( and )) as arithmetic expressions. Variables
in arithmetic expressions do not need to be preceded
by dollar signs.
It is OK to supply the dollar sign, except when assigning a
value to a variable.
Arithmetic expressions are evaluated inside double quotes, like variables and command substitutions. We’re finally in a position to state the definitive rule about quoting strings: When in doubt, enclose a string in single quotes, unless it contains any expression involving a dollar sign, in which case you should use double quotes.
For example, the date(1) command on modern
versions of Unix accepts arguments that tell it how to format
its output. The argument +%j tells it to print the day of
the year, i.e., the number of days since December 31st of the
previous
year.
We can use +%j to print a little holiday anticipation
message:
print "Only $(( (365-$(date +%j)) / 7 )) weeks until the New Year!"
We’ll show where this fits in the overall scheme of command-line processing in Chapter 7.
The arithmetic expression feature
is built in to the Korn shell’s syntax, and it was
available in the Bourne shell (most versions) only through the external
command expr(1). Thus it is yet another example of a
desirable feature provided by an external command (i.e., a syntactic kludge)
being better integrated into the shell.
[[...]]
and getopts are also examples of this
design trend.
While expr and ksh88 were limited to integer arithmetic, ksh93 supports floating-point arithmetic. As we’ll see shortly, you can do just about any calculation in the Korn shell that you could do in C or most other programming languages.
Korn shell arithmetic operators are equivalent to
their counterparts in the C language.
Precedence and associativity are the same as in C.
(More details on the Korn shell’s compatibility with the C language may
be found in Appendix B; said details are of interest
mostly to people already familiar with C.)
Table 6-2
shows the arithmetic operators that are supported, in order from highest
precedence to lowest.
Although some of these
are (or contain) special characters, there is no need to backslash-escape them,
because they are within the $((...)) syntax.
| Operator | Meaning | Associativity |
++
--
| Increment and decrement, prefix and postfix | Left to right |
+
-
!
~
| Unary plus and minus; logical and bitwise negation | Right to left |
**
|
Exponentiation[a] | Right to left |
*
/
%
| Multiplication, division, and remainder | Left to right |
+
-
| Addition and subtraction | Left to right |
<<
>>
| Bit-shift left and right | Left to right |
< <= > >=
| Comparisons | Left to right |
==
!=
| Equal and not equal | Left to right |
&
| Bitwise and | Left to right |
^
| Bitwise exclusive-or | Left to right |
|
| Bitwise or | Left to right |
&&
| Logical and (short circuit) | Left to right |
||
| Logical or (short circuit) | Left to right |
?:
| Conditional expression | Right to left |
|
| Assignment operators | Right to left |
,
| Sequential evaluation | Left to right |
[a]
ksh93m and newer.
The | ||
Parentheses can be used to group subexpressions. The arithmetic expression syntax (like C) supports relational operators as “truth values” of 1 for true and 0 for false.
For example, $((3 > 2)) has the value 1;
$(( (3 > 2) || (4 <= 1) )) also
has the value 1, since at least one of the two subexpressions is true.
If you’re familiar with C, C++ or Java, the operators listed in Table 6-2 will be familiar. But if you’re not, some of them warrant a little explanation.
The assignment forms of the regular operators are a convenient shorthand for
the more conventional way of updating a variable. For example, in Pascal or
Fortran you might write x = x + 2 to add 2 to x.
The += lets you do that more compactly:
$((x += 2)) adds 2 to x and stores the
result back in x.
(Compare this to the recent addition of the += operator
to ksh93 for string concatenation.)
Since adding and subtracting 1 are such frequent operations,
the ++ and -- operators provide an even
more abbreviated way to do them.
As you might guess, ++ adds 1, while --
subtracts 1.
These are unary operators.
Let’s take a quick look at how they work.
$i=5$print $((i++)) $i5 6 $print $((++i)) $i7 7
What’s going on here? In both cases, the value of i is increased
by one. But the value returned by the operator depends upon its placement relative
to the variable being operated upon. A postfix operator (one
that occurs after the variable) returns the variable’s old value
as the result of the expression and then increments the variable.
By contrast, a prefix operator, which comes in front of the
variable, increments the variable first and then returns the new value.
The -- operator works the same as ++,
but it decrements the variable by one, instead of incrementing it.
The shell also supports base N numbers,
where N can be up to 64. The notation
B
#
N
means "N base B.” Of course,
if you omit the B
#, the
base defaults to 10.
The digits are 0-9,
a-z (10-35),
A-Z (36-61),
@ (62), and _ (63).
(When the base is less than or equal to 36, you may use mixed case letters.)
For example:
$ print the ksh number 43#G is $((43#G))
the ksh number 43#G is 42
Interestingly enough, you can use shell variables to contain subexpressions, and the shell substitutes the value of the variable when doing arithmetic. For example:
$almost_the_answer=10+20$print $almost_the_answer10+20 $print $(( almost_the_answer + 12 ))42
Built-in Arithmetic Functions
The shell provides a number of built-in arithmetic and trigonometric functions
for use with $((...)).
They are called using C function call syntax. The trigonometric functions
expect arguments to be in radians, not in degrees.
(There are 2π radians in a circle.)
For example, remembering way back to high-school days, recall that
45 degrees is π divided by 4. Let’s say we need the
cosine of 45 degrees:
$pi=3.1415927Approximate value for pi $print the cosine of pi / 4 is $(( cos(pi / 4) ))the cosine of pi / 4 is 0.707106772982
A better approximation of π may be obtained using the atan
function:
pi=$(( 4. * atan(1.) )) A better value for piTable 6-3 lists the built-in arithmetic functions.
| Function | Returns | Function | Returns |
abs
| Absolute value |
| Euclidean distance |
acos
| Arc cosine |
int
| Integer part |
asin
| Arc sine |
log
| Natural logarithm |
atan
| Arc tangent |
pow
[a]
| Exponentiation (x y ) |
atan2
[a]
| Arc tangent of two variables |
sin
| Sine |
cos
| Cosine |
sinh
| Hyperbolic sine |
cosh
| Hyperbolic cosine |
sqrt
| Square root |
exp
| Exponential (e x ) |
tan
| Tangent |
fmod
[a]
| Floating-point remainder |
tanh
| Hyperbolic tangent |
[a] Added in ksh93e. | |||
Arithmetic Conditionals
Another construct, closely related to $((
...)), is
((...)) (without the leading dollar sign). We use this
for evaluating arithmetic condition tests, just as [[...]]
is used for string, file attribute, and other types of tests.
((...))
is almost identical to
$((...)).
However, it was designed for use
in if and while
constructs. Instead of producing a textual result, it just sets its
exit status according to the truth of the expression: 0 if true,
1 otherwise. So, for example, ((3 > 2)) produces exit
status 0, as does (( (3 > 2) || (4 <= 1) )), but
(( (3 > 2) && (4 <= 1) )) has exit status 1 since the second
subexpression isn’t true.
You can also use numerical values for truth values within
this construct.
It’s like the analogous concept in C:
a value of 0 means false (i.e., returns exit status 1),
and a non-zero value means true (returns exit status 0),
e.g., (( 14 )) is true.
See the code for the kshdb
debugger in Chapter 9 for more examples of this.
Arithmetic Variables and Assignment
The ((...)) construct can also be used to define
numeric variables and assign values to them. The statement:
((var=expression))
creates the numeric variable var (if it doesn’t already exist) and assigns to it the result of expression.
The double-parentheses syntax is what’s recommended. However, if you prefer to use a command for doing arithmetic, the shell provides one: the built-in command let. The syntax is:
letvar=expression
It is not necessary (because it’s actually redundant)
to surround the expression with
$(( and )) in a let statement.
When not using quotes,
there must not be any space on either side
of the equal sign (=). However, it is good practice to surround expressions
with quotes, since many characters are treated as special by
the shell (e.g., *, #, and parentheses); furthermore, you must
quote expressions that include whitespace (spaces or TABs). See
Table 6-4
for examples.
Once you have quotes, you can use spaces:
let "x = 3.1415927" "y = 1.41421"
While ksh88 only allowed you to use integer variables,
ksh93 no longer has this restriction, and variables may
be floating point as well. (An integer is what was
called a “whole number” in school, a number that doesn’t have
a fractional part, such as 17 or 42. Floating-point numbers,
in contrast, can have fractional parts, such as 3.1415927.)
The shell looks for a decimal point in order to determine that a value
is floating point. Without one, values are treated as integers.
This is primarily an issue for division: integer division truncates
any fractional part. The % operator requires an
integer divisor.
The shell provides two built-in aliases for declaring numeric variables: integer for integer variables and float for floating point variables. (These are both aliases for the typeset command with different options. More details are provided in Section 6.5.3, later in this chapter.)
Finally, all assignments to both integer and floating-point variables are automatically evaluated as arithmetic expressions. This means that you don’t need to use the let command:
$integer the_answer$the_answer=12+30$print $the_answer42
| Assignment | Value |
let x=
|
$x
|
x=1+4
| 5 |
'x = 1 + 4'
| 5 |
'x = 1.234 + 3'
| 4.234 |
'x = (2+3) * 5'
| 25 |
'x = 2 + 3 * 5'
| 17 |
'x = 17 / 3'
| 5 |
'x = 17 / 3.0'
| 5.66666666667 |
'17 % 3'
| 2 |
'1 << 4'
| 16 |
'48 >> 3'
| 6 |
'17 & 3'
| 1 |
'17 | 3'
| 19 |
'17 ^ 3'
| 18 |
Task 6-1 is a small task that makes use of arithmetic.
We’ll make our option -
N, a la head. The syntax for
this single option is so simple that we need not bother with getopts.
Here is the code:
if [[ $1 == -+([0-9]) ]]; then
    (( page_lines = ${1#-} ))
    shift
else
    (( page_lines = 66 ))
fi
let file_lines="$(wc -l < $1)"

(( pages = file_lines / page_lines ))
if (( file_lines % page_lines > 0 )); then
    (( pages++ ))
fi

print "$1 has $pages pages of text."
Note that we use the arithmetical conditional
(( file_lines % page_lines > 0 )) rather than the
[[...]] form.
At the heart of this code is the Unix utility wc(1), which counts the number of lines, words, and characters (bytes) in its input. By default, its output looks something like this:
8 34 161 bob
wc’s output means that the file bob has 8 lines, 34 words, and 161 characters. wc recognizes the options -l, -w, and -c, which tell it to print only the number of lines, words, or characters, respectively.
wc normally prints the name of its input file (given as argument).
Since we want only the number of lines, we have to do two things. First, we give it input from file redirection instead,
as in wc -l < bob instead of wc -l bob.
This produces the number of lines preceded by one or more spaces.
Unfortunately, that space complicates matters:
the statement let file_lines=$(wc -l < $1) becomes
let file_lines=
N after command substitution; the space
after the equal sign is an error. That leads to the second modification,
the quotes around the command substitution expression. The
statement let file_lines="
N
"
is perfectly legal, and
let knows how to remove the leading space.
The first if clause in the pages script
checks to see if the first command line argument is an option.
If so, it
strips the dash (-) off and assigns
the result to the variable page_lines.
wc in the command substitution expression returns the
number of lines in the file whose name is given as argument.
The next group of lines calculates the number of pages and, if there is a remainder after the division, adds 1. Finally, the appropriate message is printed.
As a bigger example of arithmetic, we now complete our
version of the C shell’s pushd and popd functions
(Task 4-7).
Remember that these functions operate
on DIRSTACK, a stack of directories represented as a string
with the directory names separated by spaces.
The C shell’s pushd and popd take additional
types of arguments:
pushd +ntakes the nth directory in the stack (starting with 0), rotates it to the top, and cds to it.pushdwithout arguments doesn’t complain; instead, it swaps the two top directories on the stack and cds to the new top.popd +ntakes the nth directory in the stack and just deletes it.
The most useful of these features is the ability to get at the nth directory in the stack. Here are the latest versions of both functions:
function pushd {                # push current directory onto stack
    dirname=$1
    if [[ -d $dirname && -x $dirname ]]; then
        cd $dirname
        DIRSTACK="$dirname DIRSTACK"
        print "$DIRSTACK"
    else
        print "still in $PWD."
        return 1
    fi
}

function popd {                 # pop directory off the stack, cd there
    if [[ -n $DIRSTACK ]]; then
        top=${DIRSTACK%% *}
        DIRSTACK=${DIRSTACK#* }
        cd $top
        print "$PWD"
    else
        print "stack empty, still in $PWD."
        return 1
    fi
}
To get at the nth directory, we use a
while loop that transfers
the top directory to a temporary copy of the stack n times.
We’ll put the loop into a function called getNdirs that looks
like this:
function getNdirs {
    stackfront=''
    let count=0
    while (( count < $1 )); do
        stackfront="$stackfront ${DIRSTACK%% *}"
        DIRSTACK=${DIRSTACK#* }
        let count++
    done
}
The argument passed to getNdirs is the n in question.
The variable stackfront is the temporary copy that contains
the first n directories when the loop is done. stackfront
starts as null; count, which counts the number of loop iterations,
starts as 0.
The first line of the loop body
appends the top of the stack (${DIRSTACK%% *}) to stackfront;
the second line deletes the top from the stack. The last line
increments the counter for the next iteration.
The entire loop executes
n times, for values of count
from 0 to n-1.
When the loop finishes, the last directory in $stackfront is
the nth directory. The expression
${stackfront##* }
extracts this directory. Furthermore, DIRSTACK now contains
the “back” of the stack, i.e.,
the stack without the first n directories.
With this in mind, we can now write the code for the improved
versions of pushd and popd:
function pushd {
    if [[ $1 == ++([0-9]) ]]; then
        # case of pushd +n: rotate n-th directory to top
        num=${1#+}
        getNdirs $num

        newtop=${stackfront##* }
        stackfront=${stackfront%$newtop}

        DIRSTACK="$newtop $stackfront $DIRSTACK"
        cd $newtop

    elif [[ -z $1 ]]; then
        # case of pushd without args; swap top two directories
        firstdir=${DIRSTACK%% *}
        DIRSTACK=${DIRSTACK#* }
        seconddir=${DIRSTACK%% *}
        DIRSTACK=${DIRSTACK#* }
        DIRSTACK="$seconddir $firstdir $DIRSTACK"
        cd $seconddir

    else
        # normal case of pushd dirname
        dirname=$1
        if [[ -d $dirname && -x $dirname ]]; then
            cd $dirname
            DIRSTACK="$dirname $DIRSTACK"
            print "$DIRSTACK"
        else
            print still in "$PWD."
            return 1
        fi
    fi
}

function popd {      # pop directory off the stack, cd to new top
    if [[ $1 == ++([0-9]) ]]; then
        # case of popd +n: delete n-th directory from stack
        num=${1#+}
        getNdirs $num
        stackfront=${stackfront% *}
        DIRSTACK="$stackfront $DIRSTACK"

    else
        # normal case of popd without argument
        if [[ -n $DIRSTACK ]]; then
            top=${DIRSTACK%% *}
            DIRSTACK=${DIRSTACK#* }
            cd $top
            print "$PWD"
        else
            print "stack empty, still in $PWD."
            return 1
        fi
    fi
}
These functions have grown rather large; let’s look at them in turn.
The if at the beginning of pushd
checks if the first argument is an option of the form
+
N. If so, the first block
of code is run. The first statement simply strips the plus sign (+)
from the argument and assigns the result — as an integer — to
the variable num. This, in turn, is passed to the
getNdirs function.
The next two assignment statements set newtop to the nth
directory — i.e., the last directory in $stackfront — and
delete that directory from stackfront. The final two
lines in this part of pushd put the stack back together again
in the appropriate order and cd to the new top directory.
The elif clause tests for no argument, in which case pushd
should swap the top two directories on the stack. The first four lines
of this clause assign the top two directories to firstdir and
seconddir and delete these from the stack. Then, as above,
the code puts the stack back together
in the new order and cds to
the new top directory.
The else clause corresponds to the usual case, where the user
supplies a directory name as argument.
popd works similarly.
The if clause checks for the
+
N option,
which in this case means delete the Nth
directory.
num receives the integer count;
the getNdirs function puts the first N
directories into stackfront. Then the line
stackfront=${stackfront% *}
deletes the last directory (the Nth
directory) from
stackfront. Finally, the stack is put back together with
the Nth directory missing.
The else clause covers the usual case, where the user doesn’t
supply an argument.
Before we leave this subject, here are a few exercises that should test your understanding of this code:
Add code to pushd that exits with an error message if the user supplies no argument and the stack contains fewer than two directories.
Verify that when the user specifies
+Nand N exceeds the number of directories in the stack, both pushd and popd use the last directory as the Nth directory.Modify the getNdirs function so that it checks for the above condition and exits with an appropriate error message if true.
Change getNdirs so that it uses cut (with command substitution), instead of the
whileloop, to extract the first N directories. This uses less code but runs more slowly because of the extra processes generated.
Arithmetic for
The for loop as described in Chapter 5
has been in Unix shells
since the Version 7 Bourne Shell. As mentioned, you can’t do Pascal or C-style
looping for a fixed number of iterations with that for loop.
ksh93 introduced the arithmetic for
loop to remedy this situation and to bring the shell closer to a traditional
(some would say “real”) programming language.
The syntax resembles the shell’s arithmetic facilities
that we have just seen. It is almost identical to the syntax of the C
for loop, except for the extra set of parentheses:
for ((init;condition;increment)) dostatements ...done
Here, init represents something to be done once, at the start of the loop. The condition is tested, and as long as it’s true, the shell executes statements. Before going back to the top of the loop to test the condition again, the shell executes increment.
Any of init, condition, and
increment may be omitted. A missing condition
is treated as true; i.e., the loop body always executes.
(The so-called “infinite loop” requires you to use some other method
to leave the loop.)
We’ll use the arithmetic for loop for
Task 6-2, which is
our next, rather simple task.
Here’s the code; the explanation follows:
sum=0
count=$#
for ((i = 1; i <= count; i++))
do
    let "sum += $1"
    shift
done
print $sum
The first line initializes the variable sum to 0.
sum accumulates the sum of the arguments.
The second line is mostly for readability; count
indicates how many arguments there are. The third line starts
the loop itself. The variable i is the loop
control variable. The init clause sets it to
1, the condition clause tests it against the limit
count, and the increment clause
adds 1 to it each time around the loop. One thing you’ll notice right
away is that inside the for loop header, there’s no
need for the $ in front of a variable name to get
that variable’s value. This is true for any arithmetic expression in
the Korn shell.
The body of the loop does the addition.
It simply lets let do the math:
the addition is accomplished by adding $1
to the value in sum.
The shift command then
moves the next argument down into $1 for use the next
time around the loop. Finally, when the loop is done, the script
prints the result.
The arithmetic for loop is particularly
handy for working with all the elements in an indexed array,
which we’re about to see in the next section.
Arrays
So far we have seen three types of variables: character strings, integers,
and floating-point numbers.
The fourth type of variable that the Korn shell supports
is an array.
As you may know, an array is like a list of things; you can refer
to specific elements in an array with indices, so
that a[i] refers to the ith element of array a.
The Korn shell provides two kinds of arrays: indexed arrays, and associative arrays.
Indexed Arrays
The Korn shell provides an indexed array facility that, while useful, is much more limited than analogous features in conventional programming languages. In particular, indexed arrays can be only one-dimensional (i.e., no arrays of arrays), and they are limited to 4096 elements.[78] Indices start at 0. This implies that the maximum index value is 4095. Furthermore, they may be any arithmetic expression: ksh automatically evaluates the expression to yield the actual index.
There are three ways to assign values to elements of an array.
The first is the most intuitive: you can use the standard
shell variable assignment syntax with the array index in brackets
([]).
For example:
nicknames[2]=bob
nicknames[3]=ed
These assignments put the values bob and ed into the elements of the array
nicknames
with indices 2 and 3, respectively. As with regular shell variables,
values assigned to array elements are treated as character strings
unless the assignment is preceded by let,
or the array was declared to be numeric with one of the typeset
options -i, -ui,
-E, or -F.
(Strictly speaking, the value assigned with let is
still a string; it’s just that with let,
the shell evaluates the
arithmetic expression being assigned to produce that string.)
The second way to assign values to an array is with a variant of the set statement, which we saw in Chapter 3. The statement:
set -A aname val1 val2 val3 ...
creates the array aname (if it doesn’t already exist) and
assigns
val1 to aname[0],
val2 to aname[1], etc.
As you would guess, this is more convenient for loading up an array
with an initial set of values.
The third (recommended) way is to use the compound assignment form:
aname=(val1 val2 val3)
Starting with ksh93j, you may use the +=
operator to add values to an array:
aname+=(val4 val5 val6)
To extract a value from an array, use the syntax
${
aname
[
i
]}.
For example, ${nicknames[2]} has the value “bob”.
The index i can be an arithmetic expression — see above.
If you use * or @ in place
of the index, the value will be all elements, separated by spaces.
Omitting the index ($nicknames) is the same as specifying index 0
(${nicknames[0]}).
Now we come to the somewhat unusual aspect of Korn shell arrays.
Assume that the only values assigned to nicknames are the two we saw
above. If you type print "${nicknames[*]}", you will see the output:
bob ed
In other words, nicknames[0] and nicknames[1] don’t exist.
Furthermore, if you were to type:
nicknames[9]=pete
nicknames[31]=ralph
and then type print "${nicknames[*]}",
the output would look like this:
bob ed pete ralph
This is why we said “the elements of nicknames with indices 2 and 3” earlier,
instead of “the 2nd and 3rd elements of nicknames“. Any array elements with
unassigned values just don’t exist; if you try to access their values,
you get null strings.
You can preserve whatever whitespace
you put in your array elements by using
"${
aname
[@]}"
(with the double quotes) instead of
${
aname
[*]}, just as you can with
"$@" instead of
$* or "$*".
The shell provides an operator that tells you how many elements an
array has defined:
${#
aname
[*]}.
Thus ${#nicknames[*]}
has the value 4. Note that you need the
[*] because the name
of the array alone is interpreted as the 0th element. This means, for
example, that ${#nicknames} equals the length of nicknames[0] (see
Chapter 4).
Since nicknames[0] doesn’t exist, the value of
${#nicknames} is 0, the length of the null string.
If you think of an array as a mapping from integers to values (i.e., put in a number, get out a value), you can see why arrays are “number-dominated” data structures. Because shell programming tasks are much more often oriented towards character strings and text than towards numbers, the shell’s indexed array facility isn’t as broadly useful as it might first appear.
Nevertheless, we can find useful things to do with indexed arrays.
Here is a cleaner solution to Task 5-4, in which a user can select his or her terminal type (TERM
environment variable) at login time.
Recall that the “user-friendly”
version of this code used select and a case statement:
print 'Select your terminal type:'
PS3='terminal? '
select term in \
    'Givalt GL35a' \
    'Tsoris T-2000' \
    'Shande 531' \
    'Vey VT99'
do
    case $REPLY in
        1 ) TERM=gl35a ;;
        2 ) TERM=t2000 ;;
        3 ) TERM=s531 ;;
        4 ) TERM=vt99 ;;
        * ) print "invalid." ;;
    esac
    if [[ -n $term ]]; then
        print "TERM is $TERM"
        export TERM
        break
    fi
done
We can eliminate the entire case construct
by taking advantage of the fact that the select construct stores
the user’s numeric choice in the variable REPLY.
We just need a line of code that stores all
of the possibilities for TERM in an array, in an order that
corresponds to the items in the select menu. Then we can use
$REPLY
to index the array. The resulting code is:
set -A termnames gl35a t2000 s531 vt99
print 'Select your terminal type:'
PS3='terminal? '
select term in \
    'Givalt GL35a' \
    'Tsoris T-2000' \
    'Shande 531' \
    'Vey VT99'
do
    if [[ -n $term ]]; then
        TERM=${termnames[REPLY-1]}
        print "TERM is $TERM"
        export TERM
        break
    fi
done
This code sets up the array termnames
so that ${termnames[0]} is ``gl35a'', ${termnames[1]} is
“t2000”, etc. The line TERM=${termnames[REPLY-1]} essentially
replaces the entire case construct by using REPLY to
index the array.
Notice that the shell knows to interpret the text in
an array index as an arithmetic expression, as if it were enclosed in
(( and )), which in turn means
that the variable need not be
preceded by a dollar sign ($).
We have to subtract 1 from the value of REPLY because
array indices start at 0, while select menu item numbers start
at 1.
Think about how you might use arrays to maintain the directory stack for
pushd and popd. The arithmetic for
loop might come in handy too.
Associative Arrays
As mentioned in the previous section, shell programming tasks are usually string- or text-oriented, instead of number-oriented. ksh93 introduced associative arrays into the shell to improve the shell’s programmability. Associative arrays are a mainstay of programming in languages such as awk, perl, and python.
An associative array is an array indexed by string values. It provides an association between the string index and the value of the array at that index, making programming certain kinds of tasks work much more naturally. You tell the shell that an array is associative by using typeset -A:
typeset -A person
person[firstname]="frank"
person[lastname]="jones"
We can rewrite our terminal example from the previous section using associative arrays:
typeset -A termnames                  termnames is associative
termnames=([Givalt GL35a]=gl35a       Fill in the values
           [Tsoris T-2000]=t2000
           [Shande 531]=s531
           [Vey VT99]=vt99)
print 'Select your terminal type:'
PS3='terminal? '
select term in "${!termnames[@]}"     Present menu of array indices
do
    if [[ -n $term ]]; then
        TERM=${termnames[$term]}      Use string to index array
        print "TERM is $TERM"
        break
    fi
done
Note that the square brackets in the compound assignment act like double quotes;
while it’s OK to quote the string indices, it’s not necessary.
Also note the "${!termnames[@]}" construct.
It’s a bit of a mouthful, but it gives us all the array indices as
separate quoted strings that preserve any embedded whitespace, just like
"$@". (See the next section.)
Starting with ksh93j,
as for regular arrays,
you may use the +=
operator to add values to an associative array:
termnames+= ([Boosha B-27]=boo27 [Cherpah C-42]=chc42)
As a side note, if you apply typeset -A to a previously
existing nonarray variable,
that variable’s current value will be placed in index 0.
The reason is that the shell treats
$x as equivalent to ${x[0]},
so that if you do:
x=fred
typeset -A x
print $x
you will still get fred.
Array Name Operators
In Chapter 4 we saw that the shell provides a large number of ways to access and manipulate the values of shell variables. In particular, we saw operators that work with shell variable names. Several additional operators apply to arrays. They are described in Table 6-5.
| Operator | Meaning |
${!
array
[
subscript
]}
|
Return the actual subscript used to index the array. Subscripts can come from arithmetic expressions or from the values of shell variables. |
${!
array
[*]}
|
List of all subscripts in the array associative array. |
${!
array
[@]}
|
List of all subscripts in the array associative array, but expands to separate words when used inside double quotes. |
You can think of
the ${!...} construct to produce
the actual array as being conceptually similar to its use with nameref
variables. There, it indicates the actual variable that a nameref refers to.
With arrays, it yields the actual subscript used to access a particular
element. This is valuable because subscripts can be generated dynamically,
e.g., as arithmetic expressions, or via the various string operations
available in the shell. Here is a simple example:
$set -A letters a b c d e f g h i j k l m n o p q r s t u v w x y z$print ${letters[20+2+1]}x $print ${!letters[20+2+1]}23
To loop over all elements of an indexed array, you could easily
use an arithmetic for loop that went from
0 to, for example, ${#letters[*]} (the
number of elements in letters).
Associative arrays are different: there are no lower or upper
bounds on the indices of the array, since they’re all strings.
The latter two operators in
Table 6-5
make it easy to loop through an associative array:
typeset -A bob                             Create associative array
...                                        Fill it in
for index in "${!bob[@]}"; do              For all bob's subscripts
    print "bob[$index] is ${bob[$index]}"  Print each element
    ...
done
Analogous to the difference between $*
and "$@", it is best to use the @
version of the operator, inside double quotes, to preserve the original
string values.
(We used
"${!
var
[@]}"
with select in the last example in
the earlier section on associative arrays.)
typeset
The final Korn shell feature that relates to the kinds of values that variables can hold is the typeset command. If you are a programmer, you might guess that typeset is used to specify the type of a variable (integer, string, etc.); you’d be partially right.
typeset is a rather ad hoc collection of things that you can do to variables that restrict the kinds of values they can take. Operations are specified by options to typeset; the basic syntax is:
typesetoption varname[=value]
Here, option is an option letter preceded with a hyphen or plus sign. Options can be combined and multiple varnames can be used. If you leave out varname, the shell prints a list of variables for which the given option is turned on.
The available options break down into two basic categories:
String formatting operations, such as right- and left-justification, truncation, and letter case control
Type and attribute functions that are of primary interest to advanced programmers
Local Variables in Functions
typeset without options has an important meaning: if a typeset statement is used inside a function definition, the variables involved all become local to that function (in addition to any properties they may take on as a result of typeset options). The ability to define variables that are local to “subprogram” units (procedures, functions, subroutines, etc.) is necessary for writing large programs, because it helps keep subprograms independent of the main program and of each other.
Note
Local variable names are restricted to simple identifiers. When typeset is used with a compound variable name (i.e., one that contains periods), that variable is automatically global, even if the typeset statement occurs inside the body of a function.
If you just want to declare a variable local to a function, use typeset without any options. For example:
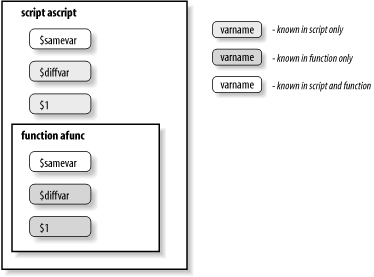
function afunc {
    typeset diffvar
    samevar=funcvalue
    diffvar=funcvalue
    print "samevar is $samevar"
    print "diffvar is $diffvar"
}

samevar=globvalue
diffvar=globvalue
print "samevar is $samevar"
print "diffvar is $diffvar"
afunc
print "samevar is $samevar"
print "diffvar is $diffvar"
This code prints the following:
samevar is globvalue
diffvar is globvalue
samevar is funcvalue
diffvar is funcvalue
samevar is funcvalue
diffvar is globvalue
Figure 6-1 shows this graphically.
You will see several additional examples of local variables within functions in Chapter 9.
String Formatting Options
Now let’s look at the various options to typeset. Table 6-6 lists the string formatting options; the first three take an optional numeric argument.
| Option | Operation |
-L
n
|
Left-justify. Remove leading spaces; if n is given, fill with spaces or truncate on right to length n. |
-R
n
|
Right-justify. Remove trailing spaces; if n is given, fill with spaces or truncate on left to length n. |
-Z
n
|
If used with |
-l
| Convert letters to lowercase. |
-u
| Convert letters to uppercase. |
Here are a few simple examples. Assume that the variable alpha
is assigned the letters of the alphabet, in alternating case, surrounded
by three spaces on each side:
alpha=" aBcDeFgHiJkLmNoPqRsTuVwXyZ "
Table 6-7 shows some typeset statements and their resulting values (assuming that each of the statements are run “independently”).
When you run typeset on an existing variable, its effect is cumulative with whatever typesets may have been used previously. This has the obvious exceptions:
A
typeset -uundoes atypeset -l, and vice versa.A
typeset -Rundoes atypeset -L, and vice versa.You may not combine
typeset -landtypeset -uwith some of the numeric attributes, such astypeset -E. Note, though, thattypeset -uicreates unsigned integers.typeset -Aandtypeset -n(associative array and nameref, respectively) are not cumulative.
You can turn off typeset options explicitly by typing
typeset +
o,
where o is the option you turned on before.
Of course, it is hard to imagine scenarios where you would want to
turn multiple typeset formatting options on and off over
and over again; you usually set a typeset
option on a given variable only once.
An obvious application for the -L and -R options is one in which you need fixed-width output. The most ubiquitous source of fixed-width output in the Unix system is reflected in Task 6-3.
For the sake of simplicity, we’ll assume further that our version of Unix is an ancient one, in which filenames are limited to 14 characters.[79]
Our solution to this task relies on many of the concepts we
have seen earlier in this chapter.
It also relies on the fact
that set -A (for constructing arrays) can be combined
with command substitution in an interesting way: each word
(separated by spaces, TABs, or newlines) becomes an element of the array.
For example, if the file bob contains 50 words, the array fred has 50 elements after the statement:
set -A fred $(< bob)
Our strategy is to get the names of all files in the
given directory into an array variable.
We use an arithmetic for loop
as we saw earlier in this chapter,
to get each filename into a variable whose length has been set
to 14. We print that variable in five-column format, with two spaces
between each column (for a total of 80 columns), using a counter
to keep track of columns. Here is the code:
set -A filenames $(ls $1)
typeset -L14 fname
let numcols=5

for ((count = 0; count < ${#filenames[*]} ; count++)); do
    fname=${filenames[count]}
    print -rn "$fname  "
    if (( (count+1) % numcols == 0 )); then
        print           # newline
    fi
done

if (( count % numcols != 0 )); then
    print
fi
The first line sets up the array filenames to contain
all the files in the directory given by the first argument (the current
directory by default).
The typeset statement sets up the variable fname to
have a fixed width of 14 characters.
The next
line initializes
numcols to the number of columns per line.
The arithmetic for loop iterates once for every element in filenames.
In the body of the loop, the first line assigns the next array element
to the fixed-width variable.
The print statement prints the
latter followed by two spaces; the -n option
suppresses print’s final newline.
Then there is the
if statement, which determines when to start the next line. It checks the remainder of count + 1 divided by
$numcols — remember that dollar signs aren’t necessary within
a $((...))
construct — and if the result is 0, it’s time to output a newline
via a print statement without arguments. Notice that even though
$count increases by 1 with every iteration of the loop, the
remainder goes through a cycle of 1, 2, 3, 4, 0, 1, 2, 3, 4, 0, ...
After the loop, an if construct outputs a final newline if
necessary, i.e., if the if within the loop didn’t just do it.
We can also use typeset options to clean up the code for our dosmv script (Task 5-3), which translates filenames in a given directory from MS-DOS to Unix format. The code for the script is:
for filename in ${1:+$1/}* ; do
    newfilename=$(print $filename | tr '[A-Z]' '[a-z]')
    newfilename=${newfilename%.}
    # subtlety: quote value of $newfilename to do string comparison,
    # not regular expression match
    if [[ $filename != "$newfilename" ]]; then
        print "$filename -> $newfilename"
        mv $filename $newfilename
    fi
done
We can replace the call to tr in the for loop with
one to typeset -l before the loop:
typeset -l newfilename
for filename in ${1:+$1/}* ; do
    newfilename=${filename%.}
    # subtlety: quote value of $newfilename to do string comparison,
    # not regular expression match
    if [[ $filename != "$newfilename" ]]; then
        print "$filename -> $newfilename"
        mv $filename $newfilename
    fi
done
This way, the translation to lowercase letters is done automatically
each time a value is assigned to newfilename. Not only is this
code cleaner, but it is
also more efficient, because the extra
processes created by tr and command substitution are eliminated.
Type and Attribute Options
The other options to typeset are of more use to advanced shell programmers who are “tweaking” large scripts. These options are listed in Table 6-8.
| Option | Operation |
-A
|
Create an associative array. |
-E
n
|
Represent the variable internally as a double-precision floating-point number; improves the efficiency of floating-point arithmetic. If n is given, it is the number of significant figures to use in output. Large numbers print in scientific notation: [-]d.ddd e±dd. Smaller numbers print in regular notation: [-]ddd.ddd. |
-F
n
|
Represent the variable internally as a double-precision floating-point number; improves the efficiency of floating-point arithmetic. If n is given, it is the number of decimal places to use in output. All values print in regular notation: [-]ddd.ddd. |
-H
|
On non-Unix systems, Unix-style filenames are converted into the format appropriate for the local system. |
-i
n
|
Represent the variable internally as an integer; improves the efficiency of integer arithmetic. If n is given, it is the base used for output. The default base is 10. |
-n
|
Create a nameref variable (see Chapter 4). |
-p
|
When used by itself, prints |
-r
|
Make the variable read-only: forbid assignment to it and disallow it from being unset. The built-in command readonly does the same thing, but readonly cannot be used for local variables. |
-t
|
“Tags” the variable. The list of tagged variables is available from typeset +t. This option is obsolete. |
-ui
n
|
Represent the variable internally as an unsigned integer. This is discussed further in Appendix B. If n is given, it is the base used for output. The default base is 10.[a] |
-x
|
This does the same thing as the export command, but export cannot be used for local variables. |
-f
|
Refer to function names only; see Section 6.5.4, later in this chapter. |
[a] This feature is only in ksh93m and newer. | |
The -i option is the most useful. You can put it in a script
when you are done writing and debugging it to make arithmetic
run a bit faster, though the speedup will be apparent only
if your script does a lot of arithmetic. The more readable
integer is a built-in alias for typeset -i, so that
integer x=5 is the same as typeset -i x=5.
Similarly, the word float is a predefined alias
for typeset -E.[80]
The -r option is useful for setting up “constants” in shell scripts; constants are like variables except that you can’t change their values once they have been initialized. Constants allow you to give names to values even if you don’t want them changed; it is considered good programming practice to use named constants in large programs.
The solution to Task 6-3 contains a good candidate for
typeset -r: the variable numcols, which specifies
the number of columns in the output. Since numcols is an
integer, we could also use the -i option, i.e., replace
let numcols=5 with typeset -ri numcols=5. If we were
to try assigning another value to numcols, the shell would
respond with the error message ksh: numcols: is read only.
These options are also useful without arguments, i.e., to see which variables exist that have those options turned on.
Function Options
The -f option has various suboptions, all of which relate to functions. These are listed in Table 6-9.
| Option | Operation |
-f
| With no arguments, prints all function definitions. |
-f
fname
| Prints the definition of function fname. |
+f
| Prints all function names. |
-ft
| Turns on trace mode for named function(s). (Chapter 9) |
+ft
| Turns off trace mode for named function(s). (Chapter 9) |
-fu
| Defines given name(s) as autoloaded function(s). (Chapter 4) |
Two of these have built-in aliases that are more mnemonic:
functions
(note the s)
is an alias for typeset -f and
autoload is an alias for typeset -fu.
Finally, if you type typeset with no arguments, you will see
a list of
all variables that have attributes set
(in no discernible
order), preceded by the
appropriate keywords for whatever typeset options are
turned on. For example, typing typeset in an uncustomized
shell gives you a listing of most of the shell’s built-in variables
and their attributes that looks like this:
export HISTFILE
integer TMOUT
export FCEDIT
export _AST_FEATURES
export TERM
HISTEDIT
PS2
PS3
integer PPID
export MAIL
export LOGNAME
export EXINIT
integer LINENO
export PATH
integer HISTCMD
export _
export OLDPWD
export PWD
float precision 3 SECONDS
export SHELL
integer RANDOM
export HOME
export VISUAL
export MANPATH
export EDITOR
export ENV
export HISTSIZE
export USER
export LANG
export MORE
integer OPTIND
integer MAILCHECK
export CDPATH
readonly namespace .sh
Here is the output of typeset -p:
typeset -x HISTFILE
typeset -i TMOUT
typeset -x FCEDIT
typeset -x _AST_FEATURES
typeset -x TERM
typeset -x ASIS_DIR
typeset HISTEDIT
typeset PS2
typeset PS3
typeset -i PPID
typeset -x MAIL
typeset -x LOGNAME
typeset -x EXINIT
typeset -i LINENO
typeset -x PATH
typeset -i HISTCMD
typeset -x _
typeset -x OLDPWD
typeset -x PWD
typeset -F 3 SECONDS
typeset -x SHELL
typeset -i RANDOM
typeset -x HOME
typeset -x VISUAL
typeset -x MANPATH
typeset -x EDITOR
typeset -x ENV
typeset -x HISTSIZE
typeset -x USER
typeset -x LANG
typeset -x MORE
typeset -i OPTIND
typeset -i MAILCHECK
typeset -x CDPATH
typeset -r .sh
The following command saves the values and attributes of all the shell’s variables for later reuse:
{ set ; typeset -p ;} > varlist[74] The argument can actually be a numeric expression; the shell automatically evaluates it.
[75] Although most Unix commands allow this, it is actually contrary to the Command Syntax Standard Rules originally set forth in intro(1) of the Unix System V User’s Manual. These rules have now been codified by POSIX.
[76] getopts replaces the external command getopt(1), used in Bourne shell programming; getopts is better integrated into the shell’s syntax and runs more efficiently. C programmers will recognize getopts as very similar to the standard library routine getopt(3).
[77] This is actually a file called libname.a in a standard library directory such as /lib or /usr/lib.
[78] 4096 is a minimum value in ksh93. Recent releases allow up to 64K elements.
[79] We don’t know of any modern Unix systems that still have this restriction. But applying it here considerably simplifies the programming problem.
[80] C, C++, and Java programmers may find the choice of the word “float” to be suprising, since internally the shell uses double-precision floating point. We theorize that the name “float” was chosen since its meaning is more obvious to the nonprogrammer than the word “double.”