Chapter 7. Input/Output and Command-Line Processing
The past few chapters have gone into detail about various shell programming techniques, mostly focused on the flow of data and control through shell programs. In this chapter, we’ll switch the focus to two related topics. The first is the shell’s mechanisms for doing file-oriented input and output. We present information that expands on what you already know about the shell’s basic I/O redirectors.
Second, we zoom in and talk about I/O at the line and word level. This is a fundamentally different topic, since it involves moving information between the domains of files/terminals and shell variables. print and command substitution are two ways of doing this that we’ve seen so far.
Our discussion of line and word I/O then leads into a more detailed explanation of how the shell processes command lines. This information is necessary so that you can understand exactly how the shell deals with quotation, and so that you can appreciate the power of an advanced command called eval, which we cover at the end of the chapter.
I/O Redirectors
In Chapter 1 you learned about the shell’s basic I/O redirectors,
<, >, and |.
Although these are enough to get you
through 95% of your Unix life, you should know that the Korn shell
supports a total of 20 I/O redirectors.
Table 7-1
lists them, including the three we’ve already seen.
Although some of the rest are useful, others are mainly for
systems programmers.
We will wait until the next chapter to discuss
the last three, which,
along with >| and <<<, are not present in most Bourne shell
versions.
| Redirector | Function |
>
file
| Direct standard output to file |
<
file
| Take standard input from file |
cmd1
|
cmd2
|
Pipe; take standard output of cmd1 as standard input to cmd2 |
>>
file
|
Direct standard output to file; append to file if it already exists |
>|
file
|
Force standard output to file even if noclobber is set |
<>
file
|
Open file for both reading and writing on standard input[a] |
<<
label
| Here-document; see text |
<<-
label
| Here-document variant; see text |
<<<
label
| Here-string; see text |
n
>
file
| Direct output file descriptor n to file |
n
<
file
| Set file as input file descriptor n |
<&
n
| Duplicate standard input from file descriptor n |
>&
n
| Duplicate standard output to file descriptor n |
<&
n
-
| Move file descriptor n to standard input |
>&
n
-
| Move file descriptor n to standard output |
<&-
| Close the standard input |
>&-
| Close the standard output |
|&
| Background process with I/O from parent shell |
n
<&p
|
Move input from coprocess to file descriptor n |
n
>&p
|
Move output to coprocess to file descriptor n |
[a]
Normally, files opened with | |
Notice that some of the redirectors in
Table 7-1
contain a digit n
and that their descriptions contain the term file descriptor;
we’ll cover that in a little while.
(In fact, any redirector that starts with < or
> may be used with a file descriptor; this is omitted
from the table for simplicity.)
The first two new redirectors, >> and >|, are simple
variations on the standard output redirector >. The >>
appends to the output file (instead of overwriting it)
if it already exists; otherwise it acts
exactly like >.
A common use of >> is for adding
a line to an initialization file (such as .profile or
.mailrc) when you don’t want to bother with a text editor. For example:
$cat >> .mailrc>alias fred frederick@longmachinename.longcompanyname.com>^D$
As we saw in Chapter 1,
cat without an argument uses standard input as its input. This
allows you to type the input and end it with CTRL-D on its own line.
The alias line will be appended to the file .mailrc
if it already exists; if it doesn’t, the file is created with
that one line.
Recall from Chapter 3 that you can prevent the shell from
overwriting a file with >
file
by typing set -o noclobber.
The >| operator overrides noclobber — it’s
the “Do it anyway, darn it!” redirector.
Unix systems allow you to open files read-only, write-only, and read-write.
The < redirector opens the input file read-only; if a program attempts
to write on standard input, it will receive an error.
Similarly, the > redirector opens the output file write-only; attempting
to read from standard output generates an error.
The <> redirector opens a file for both reading and writing, by
default on standard input. It is up to the invoked program to
notice this and take advantage of the fact, but it is useful in the case where a program
may want to update data in a file “in place.”
This operator is most used for writing networking clients; see
Section 7.1.4, later in this chapter
for an example.
Here-Documents
The <<
label redirector
essentially forces the input to a
command to be the shell program’s text, which is read until there is
a line that contains only label. The input in between is called
a here-document.
Here-documents aren’t very interesting when used from the command prompt.
In fact, it’s the same as the normal use of standard input except
for the label.
We could have used a here-document in the previous example
of >>, like this (EOF, for “end of file,”
is an often-used label):
$cat >> .mailrc << EOF>alias fred frederick@longmachinename.longcompanyname.com>EOF$
Here-documents are meant to be used from within shell scripts; they let you specify “batch” input to programs. A common use of here-documents is with simple text editors like ed(1). Task 7-1 uses a here-document in this way.
We can use ed to delete the body lines, leaving
just the header.
To do this, we need to know something about the syntax of mail messages,
specifically, that there is always a blank line between the header lines
and the message text.
The ed command /^$/,$d does the trick: it means,
“Delete from the first blank line[81]
through the last line of the file.”
We also need the ed commands
w (write the changed file)
and q (quit).
Here is the code that solves the task:
ed $1 << \EOF
/^$/,$d
w
q
EOF
Normally,
the shell does parameter (variable) substitution,
command substitution, and arithmetic substitution on text in a
here-document, meaning that you can use shell variables and commands to
customize the text.
This evaluation is disabled if any part of the delimiter is
quoted, as done in the previous example.
(This prevents the shell from treating $d
as a variable substitution.)
Often though, you do want the shell to perform its evaluations: perhaps the most common use of here-documents is for providing templates for form generators or program text for program generators. Task 7-2 is a simple task for system administrators that shows how this works.
You can get a list of all users on the system in various ways;
perhaps the easiest is to use cut to
extract the first field of /etc/passwd,
the file that contains all user account information. Fields in
this file are separated by colons (:).[82]
Given such a list of users, the following code does the trick:
pgmname=$1
for user in $(cut -f1 -d: /etc/passwd); do
    mail $user << EOF
Dear $user,

A new version of $pgmname has been installed in $(whence pgmname).

Regards,
Your friendly neighborhood sysadmin.
EOF
done
The shell substitutes the appropriate values for the name of the program and its directory.
The redirector << has two variations. First, you can
prevent the shell from doing parameter, command and arithmetic substitution by surrounding
the label in single or double quotes.
(Actually, it’s enough to quote just one
character in the label.) We saw this in the
solution to Task 7-1.
The second variation is <<-, which deletes leading TABs
(but not spaces) from the here-document and the label line.
This allows you to indent the here-document’s text, making the
shell script more readable:
pgmname=$1
for user in $(cut -f1 -d: /etc/passwd); do
    mail $user <<- EOF
        Dear $user,

        A new version of $pgmname has been installed in $(whence pgmname).

        Regards,

        Your friendly neighborhood sysadmin.
        EOF
done
Of course, you need to choose your label so that it doesn’t appear as an actual input line.
Here-Strings
A common idiom in shell programming is to use print to generate some text to be further processed by one or more commands:
# start with a mild interrogation
print -r "$name, $rank, $serial_num" | interrogate -i mild
This could be rewritten to use a here-document, which is slightly more efficient, although not necessarily any easier to read:
# start with a mild interrogation
interrogate -i mild << EOF
$name, $rank, $serial_num
EOF
Starting with ksh93n,[83] the Korn shell provides a new form of here-document, using three less-than signs:
program<<<WORD
In this form, the text of WORD (followed by a trailing newline) becomes the input to the program. For example:
# start with a mild interrogation
interrogate -i mild <<< "$name, $rank, $serial_num"
This notation first originated in the Unix version of the rc shell, where it is called a “here string.” It was later picked up by the Z shell, zsh (see Appendix A), from which the Korn shell borrowed it. This notation is simple, easy to use, efficient, and visually distinguishable from regular here-documents.
File Descriptors
The next few redirectors in Table 7-1 depend on the notion of a file descriptor. This is a low-level Unix I/O concept that is vital to understand when programming in C or C++. It appears at the shell level when you want to do anything that doesn’t involve standard input, standard output and standard error. You can get by with a few basic facts about them; for the whole story, look at the open(2), creat(2), read(2), write(2), dup(2), dup2(2), fcntl(2), and close(2) entries in the Unix manual. (As the manual entries are aimed at the C programmer, their relationship to the shell concepts won’t necessarily be obvious.)
File descriptors are integers starting at 0 that index an array of file information within a process. When a process starts, it has three file descriptors open. These correspond to the three standards: standard input (file descriptor 0), standard output (1), and standard error (2). If a process opens Unix files for input or output, they are assigned to the next available file descriptors, starting with 3.
By far the most common use of file descriptors with the Korn shell
is in saving standard error in a file. For example, if you want
to save the error messages from a long job in a file so that they
don’t scroll off the screen, append 2>
file
to your command.
If you also want to save standard output, append
>
file1
2>
file2.
This leads to Task 7-3.
We’ll call this function start. The code is very terse:
function start {
    "$@" > logfile 2>&1 &
}
This line executes whatever command and parameters follow start. (The command cannot contain pipes or output redirectors.) It first sends the command’s standard output to logfile.
Then, the redirector 2>&1 says, “Send standard error (file descriptor
2) to the same place as standard output (file descriptor 1).”
2>&1 is actually a combination of two redirectors in
Table 7-1:
n
>
file and
>&
n.
Since standard output is redirected to logfile, standard error
will go there too.
The final & puts the job in the background so that you get
your shell prompt back.
As a small variation on this theme, we can send
both standard output and standard error into a pipe instead
of a file: command
2>&1 | ... does this.
(Why this works is described shortly.)
Here is a function that sends both standard output and
standard error to the logfile (as above) and to the terminal:
function start {
    "$@" 2>&1 | tee logfile &
}
The command tee(1) takes its standard input and copies it to standard output and the file given as argument.
These functions have one shortcoming: you must remain logged in until
the job completes.
Although you can always type jobs (see
Chapter 1) to check on progress, you can’t leave your office for the day
unless you want to risk a breach
of security or waste electricity. We’ll see how to solve this problem in
Chapter 8.
The other file-descriptor-oriented redirectors
(e.g., <&
n)
are usually used for reading input from (or writing output to)
more than one file at the same time. We’ll see an example later in this chapter. Otherwise, they’re
mainly meant for systems programmers, as are
<&- (force standard input to close) and >&-
(force standard output to close),
<&
n
-
(move file descriptor n to standard input)
and
>&
n
-
(move file descriptor n to standard output).
Finally,
we should just note that
0< is the same as <,
and
1> is the same as >.
(In fact, 0 is the default for any operator that begins with <,
and 1 is the default for any operator that begins with >.)
Redirector ordering
The shell processes I/O redirections in a specific order. Once you understand how this works, you can take advantage of it, particularly for managing the disposition of standard output and standard error.
The first thing the shell does is set up the standard input and output for pipelines as
indicated by the | character.
After that, it processes the changing of individual file descriptors.
As we just saw,
the most common idiom that takes advantage of this is to send both standard output
and standard error down the same pipeline to a pager program, such
as more or less.[84]
$ mycommand -h fred -w wilma 2>&1 | more
In this example, the shell first sets the standard output of mycommand to be the pipe to more. It then redirects standard error (file descriptor 2) to be the same as standard output (file descriptor 1), i.e., the pipe.
When working with just redirectors, they are processed left-to-right, as they occur on the command line. An example similar to the following has been in the shell man page since the original Version 7 Bourne shell:
program > file1 2>&1          Standard output and standard error to file1
program 2>&1 > file1          Standard error to terminal and standard output to file1
In the first case, standard output is sent to file1, and standard error is then sent to where standard output is, i.e., file1. In the second case, standard error is sent to where standard output is, which is still the terminal. The standard output is then redirected to file1, but only the standard output. If you understand this, you probably know all you need to know about file descriptors.
Special Filenames
Normally, when you provide a pathname after an I/O redirector such as
< or >, the shell tries to
open an actual file that has the given filename. However, there are two
kinds of pathnames where the shell instead treats the pathnames specially.
The first kind of pathname is /dev/fd/
N,
where N is the file descriptor number
of an already open file.
For example:
# assume file descriptor 6 is already open on a file
print 'something meaningful' > /dev/fd/6   # same as 1>&6
This works even on systems that don’t have a /dev/fd directory.
This kind of pathname may also be used with the various file attribute test operators
of the [[...]] command.
The second kind of pathname allows access to Internet services via either the TCP or UDP protocol. The pathnames are:
-
/dev/tcp/host/port Using TCP, connect to remote host host on remote port port. The host may be given as an IP address in dotted-decimal notation (1.2.3.4) or as a hostname (www.oreilly.com). Similarly, the port for the desired service may be a symbolic name (typically as found in /etc/services) or a numeric port number.[85]
-
/dev/udp/host/port This is the same, but using UDP.
To use these files for two-way I/O, open a new file descriptor using the
exec command (which is described in
Chapter 9), using the “read and write”
operator, <>.
Then use read -u and
print -u to read from and write to the
new file descriptor.
(The read command and the -u
option to read and print are
described later in this chapter.)
The following example, courtesy of David Korn, shows how to do this. It implements the whois(1) program, which provides information about the registration of Internet domain names:
host=rs.internic.net
port=43
exec 3<> /dev/tcp/$host/$port
print -u3 -f "%s\r\n" "$@"
cat <&3
Using the exec built-in command
(see Chapter 9), this program uses the
“read-and-write” operator, <>, to open a two-way
connection to the host rs.internic.net
on TCP port 43, which provides the whois service.
(The script could have used port=whois as well.)
It then uses the print command to send the
argument strings to the whois server.
Finally, it reads the returned result using cat.
Here is a sample run:
$ whois.ksh kornshell.com

Whois Server Version 1.3

Domain names in the .com, .net, and .org domains can now be registered
with many different competing registrars. Go to http://www.internic.net
for detailed information.

   Domain Name: KORNSHELL.COM
   Registrar: NETWORK SOLUTIONS, INC.
   Whois Server: whois.networksolutions.com
   Referral URL: http://www.networksolutions.com
   Name Server: NS4.PAIR.COM
   Name Server: NS0.NS0.COM
   Updated Date: 02-dec-2001


>>> Last update of whois database: Sun, 10 Feb 2002 05:19:14 EST <<<

The Registry database contains ONLY .COM, .NET, .ORG, .EDU domains and
Registrars.
Network programming is beyond the scope of this book. But for most things, you will probably want to use TCP connections instead of UDP connections if you do write any networking programs in ksh.
String I/O
Now we’ll zoom back in to the string I/O level and examine the print, printf, and read statements, which give the shell I/O capabilities that are more analogous to those of conventional programming languages.
As we’ve seen countless times in this book, print simply prints its arguments to standard output. You should use it instead of the echo command, whose functionality differs from system to system.[86] (The Korn shell’s built-in version of echo emulates whatever the system’s standard version of echo does.) Now we’ll explore the print command in greater detail.
print escape sequences
print accepts a number of options, as well as several escape sequences that start with a backslash. (You must use a double backslash if you don’t surround the string that contains them with quotes; otherwise, the shell itself “steals” a backslash before passing the arguments to print.) These are similar to the escape sequences recognized by echo and the C language; they are listed in Table 7-2.
These sequences exhibit fairly predictable behavior, except for \f.
On some displays, it causes a screen clear, while on others
it causes a line feed. It ejects the page on most printers.
\v is somewhat obsolete; it usually causes a line feed.
| Sequence | Character printed |
\a
| ALERT or CTRL-G |
\b
| BACKSPACE or CTRL-H |
\c
|
Omit final newline and discontinue processing the string |
\E
| ESCAPE or CTRL-[ |
\f
| FORMFEED or CTRL-L |
\n
| newline (not at end of command) or CTRL-J |
\r
| ENTER (RETURN) or CTRL-M |
\t
| TAB or CTRL-I |
\v
| VERTICAL TAB or CTRL-K |
\0
n
|
ASCII character with octal (base-8) value n,
where n is 1 to 3 digits. Unlike C, C++, and
many other languages, the initial |
\\
| Single backslash |
The \0
n sequence is even more
device-dependent and can
be used for complex I/O, such as cursor control and special
graphics characters.
Options to print
print also accepts a few dash options; we’ve already seen -n for omitting the final newline. The options are listed in Table 7-3.
| Option | Function |
-e
|
Process escape sequences in the arguments (this is the default). |
-f
format
|
Print as if via printf with the given format (see the next section). |
-n
|
Omit the final newline (same as the |
-p
|
Print on pipe to coroutine; see Chapter 8. |
-r
|
Raw; ignore the escape sequences listed above. |
-R
|
Like -r, but furthermore ignore any other options except -n. |
-s
|
Print to command history file (see Chapter 2). |
-u
n
|
Print to file descriptor n. |
Notice that some of these are redundant:
print -n is the same as print with
\c at the end of a line;
print -u
n ... is
equivalent to print ... >&
n
(though the former is slightly more efficient).
However, print -s is not
the same as print ... >> $HISTFILE.
The latter command renders the vi and emacs editing
modes temporarily inoperable;
you must use print -s if you
want to print to your history file.
Printing to your history file is useful if you want to edit something
that the shell expands when it processes a command line, for example,
a complex environment variable such as PATH.
If you enter the command print -s PATH=$PATH,
hit ENTER, and then press
CTRL-P in emacs-mode (or ESC k in vi-mode), you will see something
like this:
$ P
                     ATH=/bin:/usr/bin:/etc:/usr/ucb:/usr/local/bin:/home/billr/bin
That is, the shell expands the variable (and anything
else, like command substitutions, wildcards, etc.) before it writes
the line to the history file.
Your cursor will be at the end of the line (or at the beginning of the
line in vi-mode), and you can edit your PATH without having
to type in the whole thing again.
printf
If you need to produce formatted reports, the shell’s print command can be combined with formatting attributes for variables to produce output data that lines up reasonably. But you can only do so much with these facilities.
The C language’s printf(3) library routine provides powerful formatting facilities for total control of output. It is so useful that many other Unix-derived programming languages, such as awk and perl, support similar or identical facilities. Primarily because the behavior of echo on different Unix systems could not be reconciled, and recognizing printf’s utility, the POSIX shell standard mandates a printf shell-level command that provides the same functionality as the printf(3) library routine. This section describes how the printf command works and examines additional capabilities unique to the Korn shell’s version of printf.
The printf command can output a simple string just like the print command.
printf "Hello, world\n"
The main difference that you will notice at the outset is
that, unlike print, printf does not
automatically supply a newline. You must specify it
explicitly as \n.
The full syntax of the printf command has two parts:
printfformat-string[arguments ...]
The first part is a string that describes the format specifications;
this is best supplied as a string constant in quotes. The second
part is an argument list, such as a list of strings or variable
values, that correspond to the format specifications. (If there are
more arguments than format specifications, ksh
cycles through the format specifications in the format string, reusing
them in order, until done.) A format specification is preceded by a
percent sign (%), and the specifier is one of the
characters described shortly. Two of the main format specifiers are
%s for strings and %d for decimal
integers.
The format string combines text to be output literally with specifications describing how to format subsequent arguments on the printf command line. For example:
$ printf "Hello, %s\n" World
Hello, World
Because the printf command is built-in, you are not limited to absolute numbers:
$ printf "The answer is %d.\n" 12+10+20
The answer is 42.
The allowed specifiers are shown in Table 7-4.
| Specifier | Description |
%c
|
ASCII character (prints first character of corresponding argument) |
%d
| Decimal integer |
%i
| Decimal integer |
%e
|
Floating-point format
([-]d.precision
|
%E
| Floating-point format ([-]d.precision
E[+-]dd)
|
%f
| Floating-point format ([-]ddd.precision) |
%g
|
|
%G
|
|
%o
| Unsigned octal value |
%s
| String |
%u
| Unsigned decimal value |
%x
| Unsigned hexadecimal number. Uses a-f for 10 to 15 |
%X
| Unsigned hexadecimal number. Uses A-F for 10 to 15 |
%%
| Literal % |
The printf command can be used to specify the width
and alignment of output fields. A format expression
can take three optional modifiers following % and preceding the format
specifier:
%flags width.precision format-specifier
The width of the output field is a numeric value.
When you specify a field width, the contents of the field
are right-justified by default. You must specify a flag of
“-” to get left-justification.
(The rest of the flags are discussed shortly.)
Thus, "%-20s" outputs
a left-justified string in a field 20 characters wide. If
the string is less than 20 characters, the field is
padded with whitespace to fill.
In the following examples,
a | is output to indicate the actual width of the field.
The first example right-justifies the text:
printf "|%10s|\n" hello
It produces:
| hello|
The next example left-justifies the text:
printf "|%-10s|\n" hello
It produces:
|hello |
The precision modifier, used for decimal or floating-point values, controls the number of digits that appear in the result. For string values, it controls the maximum number of characters from the string that will be printed.
You can specify both the width and precision dynamically, via values in the printf argument list. You do this by specifying asterisks, instead of literal values.
$myvar=42.123456$printf "|%*.*G|\n" 5 6 $myvar|42.1235|
In this example, the width is 5, the precision is 6, and the value
to print comes from the value of myvar.
The precision is optional. Its exact meaning varies by control letter, as shown in Table 7-5:
| Conversion |
Precision means |
%d, %i, %o, %u, %x, %X
|
The minimum number of digits to print. When the value has fewer digits, it is padded with leading zeros. The default precision is 1. |
%e, %E
|
The minimum number of digits to print. When the value has fewer digits, it is padded with zeros after the decimal point. The default precision is 10. A precision of 0 inhibits printing of the decimal point. |
%f
|
The number of digits to the right of the decimal point. |
%g, %G
|
The maximum number of significant digits. |
%s
|
The maximum number of characters to print. |
Finally, one or more flags may precede the field width and the precision. We’ve already seen the “-” flag for left-justification. The rest of the flags are shown in Table 7-6.
|
Character |
Description |
-
|
Left-justify the formatted value within the field. |
| space |
Prefix positive values with a space and negative values with a minus. |
+
|
Always prefix numeric values with a sign, even if the value is positive. |
#
|
Use an alternate form:
|
0
|
Pad output with zeros, not spaces. This only happens when the field width is wider than the converted result. In the C language, this flag applies to all output formats, even non-numeric ones. For ksh, it only applies to the numeric formats. |
If printf cannot perform a format conversion, it returns a non-zero exit status.
Similar to print, the built-in printf command
interprets escape sequences within the format string.
However, printf accepts a larger range of escape sequences; they
are the same as for the $'...' string.
These sequences are listed later in Table 7-9.
Additional Korn shell printf specifiers
Besides the standard specifiers just described, the Korn shell accepts a number of additional specifiers. These provide useful features at the expense of nonportability to other versions of the printf command.
-
%b When used instead of
%s, expands print-style escape sequences in the argument string. For example:$
printf "%s\n" 'hello\nworld'hello\nworld $printf "%b\n" 'hello\nworld'hello world-
%H When used instead of
%s, outputs HTML and XML special characters as their corresponding entity names. For example:$
printf "%s\n" "Here are real < and > characters"Here are real < and > characters $printf "%H\n" "Here are real < and > characters"Here are real < and > charactersInterestingly enough, spaces are turned into
, the unbreakable literal HTML and XML space character.-
%n This is borrowed from ISO C. It places the number of characters written so far into the given variable. This is possible since printf is built-in to the shell.
$
printf "hello, world\n%n" msglenhello, world $print $msglen13-
%P When used instead of
%s, translates the egrep-style extended regular expression into an equivalent Korn shell pattern. For example:$
printf "%P\n" '(.*\.o|.*\.obj|core)+'*+(*\.o|*\.obj|core)*-
%q When used instead of
%s, prints the string argument in quotes in such a way that it could later be reused inside a shell script. For example:$
printf "print %q\n" "a string with ' and \" in it"print $'a string with \' and " in it'(The
$'...'notation is explained in Section 7.3.3.1, later in this chapter.)-
%R Goes the other way from
%P, translating patterns into extended regular expressions. For example:$
printf "%R\n" '+(*.o|*.c)'^(.*\.o|.*\.c)+$-
%(date format)T The date format is a date command string similar to that of date(1). The argument is a string representing a date and time. ksh converts the given date string into the time it represents and then reformats it according to the date(1) format that you supply. ksh accepts a wide variety of date and time formats. For example:
$
dateWed Jan 30 15:46:01 IST 2002 $printf "%(It is now %m/%d/%Y %H:%M:%S)T\n" "$(date)"It is now 01/30/2002 15:46:07Unix systems keep time in “seconds since the Epoch.” The Epoch is midnight, January 1, 1970, UTC. If you have a time value in this format, you can use it with the
%Tconversion specifier by preceding it with a#character, like so:$
printf "%(It is now %m/%d/%Y %H:%M:%S)T\n" '#1012398411'It is now 01/30/2002 15:46:51-
%Z Print a byte whose value is zero.
Finally, for the %d format,
after the precision
you may supply an additional period and a number
indicating the output base:
$ printf '42 is %.3.5d in base 5\n' 42
42 is 132 in base 5
read
The other side of the shell’s string I/O facilities is the read command, which allows you to read values into shell variables. The basic syntax is:
read var1 var2 ...
There are a few options, which we cover in Section 7.2.3.5,
later in this chapter.
This statement takes a line from the standard input and
breaks it down into words delimited by any of the characters in the
value of the variable IFS (see Chapter 4;
these are usually a space, a TAB, and newline).
The words are assigned to variables
var1, var2, etc. For example:
$read fred bobdave pete$print "$fred"dave
$ print "$bob"
pete
If there are more words than variables,
excess words are assigned to the last variable.
If you
omit the variables altogether, the entire line of input is assigned
to the variable REPLY.
You may have identified this as the missing ingredient in the shell programming capabilities we’ve seen so far. It resembles input statements in conventional languages, like its namesake in Pascal. So why did we wait this long to introduce it?
Actually, read is sort of an escape hatch from traditional shell programming philosophy, which dictates that the most important unit of data to process is a text file, and that Unix utilities such as cut, grep, sort, etc., should be used as building blocks for writing programs.
read, on the other hand, implies line-by-line processing. You could use it to write a shell script that does what a pipeline of utilities would normally do, but such a script would inevitably look like:
while (read a line) do
    process the line
    print the processed line
end
This type of script is usually much slower than a pipeline; furthermore, it has the same form as a program someone might write in C (or some similar language) that does the same thing much, much faster. In other words, if you are going to write it in this line-by-line way, there is no point in writing a shell script. (The authors have gone for years without writing a script with read in it.)
Reading lines from files
Nevertheless, shell scripts with read are useful for certain kinds of tasks. One is when you are reading data from a file small enough so that efficiency isn’t a concern (say a few hundred lines or less), and it’s really necessary to get bits of input into shell variables.
One task that we have already seen fits this description: Task 5-4, the script that a system administrator could use to set
a user’s TERM environment variable according to which terminal line
he or she is using.
The code in Chapter 5 used a case statement
to select the correct value for TERM.
This code would presumably reside in /etc/profile, the system-wide initialization file that the Korn shell runs before running a user’s .profile. If the terminals on the system change over time — as surely they must — then the code would have to be changed. It would be better to store the information in a file and change just the file instead.
Assume we put the information in a file whose format is typical
of such Unix “system configuration” files: each line contains
a device name, a TAB, and a TERM value.
If the file, which we’ll call
/etc/terms,
contained the same data as the case statement
in Chapter 5, it would look like this:
console s531
tty01   gl35a
tty03   gl35a
tty04   gl35a
tty07   t2000
tty08   s531
We can use read to get the data from this file, but first we
need to know how to test for the end-of-file condition.
Simple: read’s exit status is 1 (i.e., nonzero) when there is
nothing to read.
This leads to a clean while loop:
TERM=vt99       # assume this as a default
line=$(tty)
while read dev termtype; do
    if [[ $dev == $line ]]; then
        TERM=$termtype
        export TERM
        print "TERM set to $TERM."
        break
    fi
done
The while loop reads each line of the input into the variables
dev and termtype.
In each pass through the loop,
the if looks for a match between $dev and the user’s
tty ($line, obtained by command substitution from the tty
command). If a match is found, TERM is set and exported, a message is printed,
and the loop
exits; otherwise TERM remains at the default setting of vt99.
We’re not quite done, though: this code reads from the standard input, not from /etc/terms! We need to know how to redirect input to multiple commands. There are a few ways of doing this.
I/O redirection and multiple commands
One way to solve the problem is with a subshell, as we’ll see in the next chapter. This involves creating a separate process to do the reading. However, it is usually more efficient to do it in the same process; the Korn shell gives us three ways of doing this.
The first, which we have seen already, is with a function:
function findterm {
    TERM=vt99       # assume this as a default
    line=$(tty)
    while read dev termtype; do
        if [[ $dev == $line ]]; then
            TERM=$termtype
            export TERM
            print "TERM set to $TERM."
            break
        fi
    done
}

findterm < /etc/terms
A function acts like a script in that it has its own set of
standard I/O descriptors, which can be redirected in the line of code that
calls the function.
In other words, you can think of this code as if findterm
were a script and you
typed
findterm < /etc/terms on the
command line. The read statement
takes input from /etc/terms
a line at a time, and the function runs correctly.
The second way is by putting the I/O redirector at the end of the loop, like this:
TERM=vt99       # assume this as a default
line=$(tty)
while read dev termtype; do
    if [[ $dev == $line ]]; then
        TERM=$termtype
        export TERM
        print "TERM set to $TERM."
        break
    fi
done < /etc/terms
You can use this technique with any flow-control construct,
including if...fi,
case...esac,
for...done,
select...done,
and until...done.
This makes sense because these are
all compound statements
that the shell treats as single commands
for these purposes.
This technique works fine — the read command reads a
line at a time — as long
as all of the input is done within the compound statement.
Putting the I/O redirector at the end is particularly important for making loops work correctly. Suppose you place the redirector after the read command, like so:
while read dev termtype < /etc/terms
do
    ...
done
In this case, the shell reopens /etc/terms each time around the loop, reading the first line over and over again. This effectively creates an infinite loop, something you probably don’t want.
Code blocks
Occasionally, you may want to redirect I/O to or from an arbitrary group
of commands without creating a separate process. To do that, you need to
use a construct that we haven’t seen yet.
If you surround some code with { and },[87]
the code
will behave like a function that has no name.
This is another type of compound statement.
In accordance with the equivalent concept in the C
language, we’ll call this a block of code.[88]
What good is a block?
In this case, it means that the code within the curly braces ({ }) will
take standard I/O descriptors just as we described for functions.
This construct is also appropriate for the current example
because the code needs
to be called only once, and the entire script is not really large
enough to merit breaking down into functions. Here is how
we use a block in the example:
{
    TERM=vt99       # assume this as a default
    line=$(tty)
    while read dev termtype; do
        if [[ $dev == $line ]]; then
            TERM=$termtype
            export TERM
            print "TERM set to $TERM."
            break
        fi
    done
} < /etc/terms
To help you understand how this works, think of the curly braces and the code inside them as if they were one command, i.e.:
{ TERM=vt99; line=$(tty); while ... ; } < /etc/terms
Configuration files for system administration tasks
like this one are actually fairly common; a prominent example is
/etc/hosts, which lists machines that are accessible
in a TCP/IP network. We can make /etc/terms more like these
standard files by allowing comment lines in
the file that start with #, just as in shell scripts. This way
/etc/terms can look like this:
#
# System Console is a Shande 531s
console s531
#
# Prof. Subramaniam's line has a Givalt GL35a
tty01   gl35a
...
We can handle comment lines in two ways. First, we could modify the while
loop so that it ignores lines beginning with #.
We would
take advantage of the fact that the equality
and inequality operators (== and !=)
under [[...]]
do pattern matching, not just equality testing:
if [[ $dev != \#* && $dev == $line ]]; then
    ...
The pattern is #*,
which matches any string beginning with #.
We must precede # with a backslash so
that the shell doesn’t
treat the rest of the line as a comment.
Also, remember
from Chapter 5 that the && combines the two
conditions so that both must be true for the entire condition
to be true.
This would certainly work, but the usual way to filter out
comment lines is to use a pipeline with grep. We give
grep the regular expression ^[^#], which matches anything except
lines beginning with #. Then we change the call to the block
so that it reads from the output of the pipeline instead of directly
from the file.[89]
grep "^[^#]" /etc/terms | {
    TERM=vt99
    ...
}
We can also use read to improve our solution to Task 6-3, in which we emulate the multicolumn output of ls. In the solution in the previous chapter, we assumed for simplicity that filenames are limited to 14 characters, and we used 14 as a fixed column width. We’ll improve the solution so that it allows any filename length (as in modern Unix versions) and uses the length of the longest filename (plus 2) as the column width.
In order to display the list of files in multicolumn format, we need to read through the output of ls twice. In the first pass, we find the longest filename and use that to set the number of columns as well as their width; the second pass does the actual output. Here is a block of code for the first pass:
ls "$@" | {
    let width=0
    while read fname; do
        if (( ${#fname} > $width )); then
            let width=${#fname}
        fi
    done
    let "width += 2"
    let numcols="int(${COLUMNS:-80} / $width)"
}
This code looks a bit like an exercise from a first-semester
programming class.
The while loop goes through the input looking for files
with names that are longer than the longest found so far;
if a longer one is found, its length is saved as the new longest length.
After the loop finishes, we add 2 to the width to allow for space
between columns. Then we divide the width of the terminal
by the column width to get the number of columns.
As the shell does division in floating-point, the result is passed
to the int function to produce an integer final result.
Recall from Chapter 3 that the built-in variable COLUMNS
often contains the display width; the construct
${COLUMNS:-80}
gives a default of 80 if this variable is not set.
The results of the block are the variables width and numcols.
These are global variables, so they are accessible by the rest of
the code inside our (eventual) script. In particular, we need them
in our second pass through the filenames. The code for this resembles
the code to our original solution; all we need to do is
replace the fixed column width and number of columns with the variables:
set -A filenames $(ls "$@")
typeset -L$width fname
let count=0

while (( $count < ${#filenames[*]} )); do
    fname=${filenames[$count]}
    print "$fname  \c"
    let count++
    if [[ $((count % numcols)) == 0 ]]; then
         print          # output a newline
    fi
done

if (( count % numcols != 0 )); then
    print
fi
The entire script consists of both pieces of code.
As yet another “exercise for the reader,” consider how you might
rearrange the code to only invoke the ls command once.
(Hint: use at least one arithmetic for loop.)
Reading user input
The other type of task to which read is suited is
prompting a user for input. Think about it: we have hardly
seen any such scripts so far in this book.
In fact, the only
ones were the modified solutions to Task 5-4, which involved
select.
As you’ve probably figured out, read can be used to get user input into shell variables. We can use print to prompt the user, like this:
print -n 'terminal? '
read TERM
print "TERM is $TERM"
Here is what this looks like when it runs:
terminal? vt99
TERM is vt99
However, in order that prompts don’t get lost down a pipeline,
shell convention dictates that prompts should go
to standard error, not standard output.
(Recall that select prompts to standard error.)
We could just use file descriptor 2 with the output
redirector we saw earlier in this chapter:
print -n 'terminal? ' >&2
read TERM
print TERM is $TERM
The shell provides a better way of doing the same thing:
if you follow the first variable name
in a read statement with a question mark (?) and a string,
the shell uses that string as a prompt to standard error. In other words:
read TERM?'terminal? '
print "TERM is $TERM"
does the same as the above. The shell’s way is better for the following reasons. First, this looks a bit nicer; second, the shell knows not to generate the prompt if the input is redirected to come from a file; and finally, this scheme allows you to use vi- or emacs-mode on your input line.
We’ll flesh out this simple example by showing how Task 5-4 would be done if select didn’t exist. Compare this with
the code in Chapter 6:
set -A termnames gl35a t2000 s531 vt99
print 'Select your terminal type:'
while true;  do
    {
        print '1) gl35a'
        print '2) t2000'
        print '3) s531'
        print '4) vt99'
    } >&2
    read REPLY?'terminal? '

    if (( REPLY >= 1 && REPLY <= 4 )); then
        TERM=${termnames[REPLY-1]}
        print "TERM is $TERM"
        export TERM
        break
    fi
done
The while loop is necessary so that the code repeats if
the user makes an invalid choice.
This is roughly twice as many lines of code as the first solution in
Chapter 5 — but exactly as many as the later, more user-friendly version!
This shows that select saves you
code only if you don’t mind using the same strings to display
your menu choices as you use inside your script.
However, select has other advantages, including the ability
to construct multicolumn menus if there are many choices,
and better handling of empty user input.
Options to read
read takes a set of options that are similar to those for print. Table 7-7 lists them.
| Option | Function |
-A
|
Read words into indexed array, starting at index 0. Unsets all elements of the array first. |
-d
delimiter
|
Read up to character delimiter, instead of the default character, which is a newline. |
-n
count
|
Read at most count bytes.[a] |
-p
| Read from pipe to coroutine; see Chapter 8. |
-r
|
Raw; do not use |
-s
|
Save input in command history file; see Chapter 1. |
-t
nseconds
|
Wait up to nseconds seconds for the input to come in. If nseconds elapses, return a failure exit status. |
-u
n
| Read from file descriptor n. |
[a] This option was added in ksh93e. | |
Having to type read word[0] word[1] word[2] ... to read
words into an array is painful. It is also error-prone; if the user types more words than
you’ve provided array variables, the remaining words are all assigned to the last array
variable. The -A option gets around this, reading each word
one at a time into the corresponding entries in the named array.
The -d option lets you read up to some other character than a newline. In practical terms, you will probably never need to do this, but the shell wants to make it possible for you to do it in case you ever need to.
Similarly, the -n option frees you from the default line-oriented way that read consumes input; it allows you to read a fixed number of bytes. This is very useful if you’re processing legacy fixed-width data, although this is not very common on Unix systems.
read lets you input lines that are longer than the width of your display device by providing backslash (\) as a continuation character, just as in shell scripts. The -r option to read overrides this, in case your script reads from a file that may contain lines that happen to end in backslashes.
read -r also preserves any other escape sequences
the input might contain. For example, if the file fred
contains this line:
A line with a\n escape sequence
read -r fredline will include the backslash in the
variable fredline,
whereas without the -r, read
will “eat” the backslash. As a result:
$read -r fredline < fred$print "$fredline"A line with a escape sequence $
(Here, print interpreted the \n
escape sequence and turned it into a newline.)
However:
$read fredline < fred$print "$fredline"A line with an escape sequence $
The -s option helps you if you are writing a highly interactive script and you want to provide the same command-history capability as the shell itself has. For example, say you are writing a new version of mail as a shell script. Your basic command loop might look like this:
while read -s cmd; do
    # process the command
done
Using read -s allows the user to retrieve
previous commands to your program with the emacs-mode
CTRL-P command or the vi-mode ESC k command.
The kshdb debugger in Chapter 9
uses this feature.
The -t option is quite useful. It allows you to recover in case your user has “gone out to lunch,” but your script has better things to do than just wait around for input. You tell it how many seconds you’re willing to wait before deciding that the user just doesn’t care anymore:
print -n "OK, Mr. $prisoner, enter your name, rank and serial number: "
# wait two hours, no more
if read -t $((60 * 60 * 2)) name rank serial
then
    # process information
    ...
else
    # prisoner is being silent
    print 'The silent treatment, eh? Just you wait.'
    call_evil_colonel -p $prisoner
    ...
fi
If the user enters data before the timeout expires, read returns
0 (success), and the then part of the if is
processed.
On the other hand, when the user enters nothing, the timeout expires and
read returns 1 (failure), executing the else
part of the statement.
Although not an option to the read command, the TMOUT
variable can affect it. Just as for select, if TMOUT
is set to a number representing some number of seconds, the read command
times out if nothing is entered within that time, and returns a failure exit status.
The -t option overrides the setting of TMOUT.
Finally, the -u
n option is useful in scripts that
read from more than one file at the same time.
Task 7-4
is an example of this that also uses
the n
<
I/O redirector that we saw earlier in this chapter.
We’ll format the output so the two output columns are fixed at 30 characters wide. Here is the code:
typeset -L30 f1 f2
while read -u3 f1 && read -u4 f2; do
    print "$f1$f2"
done 3<$1 4<$2
read -u3 reads from file descriptor 3, and 3<$1
directs the file given as first argument to be input on
that file descriptor; the same is true for the second argument
and file descriptor 4.
Remember that file descriptors 0, 1, and 2 are already used
for standard I/O. We use file descriptors 3 and 4 for
our two input files; it’s best to start from 3 and work
upwards to the shell’s limit, which is 9.
The typeset command and the quotes around the argument
to print ensure that the output columns are 30 characters
wide and that trailing whitespace in the lines from the file is
preserved.
The while loop reads one line from each
file until at least one of them runs out of input.
Assume the file dave contains the following:
DAVE
Height: 177.8 cm.
Weight: 79.5 kg.
Hair: brown
Eyes: brown
And the file shirley contains this:
SHIRLEY
Height: 167.6 cm.
Weight: 65.5 kg.
Hair: blonde
Eyes: blue
If the script is called twocols, then twocols dave shirley
produces this output:
DAVE                          SHIRLEY
Height: 177.8 cm.             Height: 167.6 cm.
Weight: 79.5 kg.              Weight: 65.5 kg.
Hair: brown                   Hair: blonde
Eyes: brown                   Eyes: blue
Command-Line Processing
We’ve seen how the shell processes input lines: it deals with single
quotes (' '), double quotes (" "),
and backslashes (\),
and it separates parameter, command and arithmetic expansions
into words, according to delimiters in the variable
IFS. This is a subset of the things the shell does
when processing command lines.
This section completes the discussion, in sometimes excruciating detail. We first examine two additional kinds of substitutions or expansions that the shell performs that may not be universally available. Then we present the full story of the order that the shell processes the command line. Covered next is the use of quoting, which prevents many or all of the substitution steps from occurring. Finally, we cover the eval command, which can be used for additional programmatic control of command line evaluations.
Brace Expansion and Process Substitution
Brace expansion is a feature borrowed from the Berkeley csh command interpreter and also available in the popular bash shell. Brace expansion is a way of saving typing when you have strings that are prefixes or suffixes of each other. For example, suppose you have the following files:
$ ls
cpp-args.c  cpp-lex.c  cpp-out.c  cpp-parse.c
You could type
vi cpp-{args,lex,parse}.c
if you wished to edit three out of the four C files,
and the shell would
expand this into vi cpp-args.c cpp-lex.c cpp-parse.c.
Furthermore, brace substitutions may be nested. For example:
$ print cpp-{args,l{e,o}x,parse}.c
cpp-args.c cpp-lex.c cpp-lox.c cpp-parse.c
This is a handy feature. We haven’t covered it up until now because it’s possible that your version of ksh may not have it. It is an optional feature that is enabled when ksh is compiled. However, it is enabled by default when ksh93 is compiled from source code.
Process substitution allows you to open multiple process streams and feed them into a single program for processing. For example:
awk '...' <(generate_data) <(generate_more_data)
(Note that the parentheses are part of the syntax; you type them literally.) Here, generate_data and generate_more_data represent arbitrary commands, including pipelines, that produce streams of data. The awk program processes each stream in turn, not realizing that the data is coming from multiple sources. This is shown graphically in Figure 7-1.a.
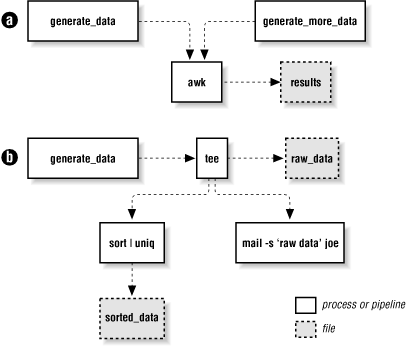
Process substitution may also be used for output, particularly when combined with the tee(1) program, which sends its input to multiple output files and to standard output. For example:
               generate_data | tee >(sort | uniq > sorted_data) \
                    >(mail -s 'raw data' joe) > raw_data
This command uses tee to (1) send the data to a pipeline that sorts and saves the data, (2) send the data to the mail program to user joe, and (3) redirect the original data into a file. This is represented graphically in Figure 7-1.b. Process substitution, combined with tee, allows you to create nonlinear data graphs, freeing you from the straight “one input, one output” paradigm of traditional Unix pipes.
Process substitution is only available on Unix systems that support the /dev/fd/N special files for named access to already open file descriptors. (This is different from the use of /dev/fd/N described earlier in this chapter, where the shell itself interprets the pathname. Here, because external commands must be able to open files in /dev/fd, the feature must be directly supported by the operating system.) Most modern Unix systems, including GNU/Linux, support this feature. Like brace substitution, it must be enabled at compile time, and may not be available in your version of ksh. As with brace expansion, it is enabled by default when ksh93 is compiled from source code.
Substitution Order
We’ve touched upon command-line processing
(see Figure 7-2) throughout this book; now is a good
time to make the whole thing explicit.[90]
Each line that the shell
reads from the standard input or a script is called a pipeline;
it contains one or more commands separated by zero or more pipe
characters (|). For each pipeline it reads, the shell
breaks it up into commands, sets up the I/O for the
pipeline, and then does the following for each command:
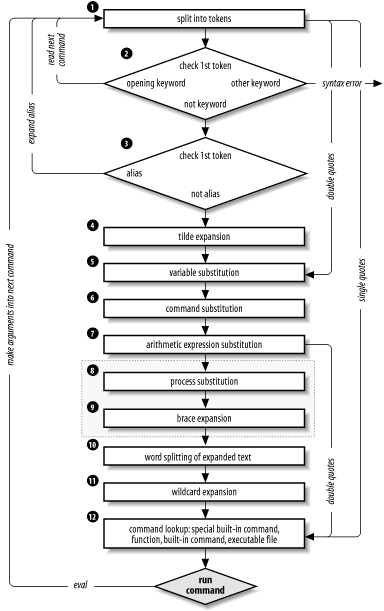
Splits the command into tokens that are separated by the fixed set of metacharacters: space, TAB, newline,
;,(,),<,>,|, and&. Types of tokens include words, keywords, I/O redirectors, and semicolons.Checks the first token of each command to see if it is a keyword with no quotes or backslashes. If it’s an opening keyword (
ifand other control-structure openers,function,{,(,((, or[[), the command is actually a compound command. The shell sets things up internally for the compound command, reads the next command, and starts the process again. If the keyword isn’t a compound command opener (e.g., is a control-structure “middle” likethen,else, ordo, an “end” likefiordone, or a logical operator), the shell signals a syntax error.Checks the first word of each command against the list of aliases. If a match is found, it substitutes the alias’s definition and goes back to Step 1; otherwise, it goes on to Step 4. This scheme allows recursive aliases; see Chapter 3. It also allows aliases for keywords to be defined, e.g.,
alias aslongas=whileoralias procedure=function.Substitutes the user’s home directory (
$HOME) for the tilde character (~) if it is at the beginning of a word. Substitutes user’s home directory for~user.[91]Tilde substitution occurs at the following places:
As the first unquoted character of a word on the command line
After the
=in a variable assignment and after any:in the value of a variable assignmentFor the word part of variable substitutions of the form
${variableopword}(see Chapter 4)
Performs parameter (variable) substitution for any expression that starts with a dollar sign (
$).Does command substitution for any expression of the form
$(string)or`string`.Performs process substitution, if that feature is compiled into the shell and your system supports /dev/fd.
Performs brace expansion, if that feature is compiled into the shell.
Takes the parts of the line that resulted from parameter, command, and arithmetic substitution and splits them into words again. This time it uses the characters in
$IFSas delimiters instead of the set of metacharacters in Step 1.Normally, successive multiple input occurrences of characters in
IFSact as a single delimiter, which is what you would expect. This is true only for whitespace characters, such as space and TAB. For non-whitespace characters, this is not true. For example, when reading the colon-separated fields of /etc/passwd, two successive colons delimit an empty field. For example:IFS=: while read name passwd uid gid fullname homedir shell do
     ...
done < /etc/passwd
To get this behavior with whitespace-delimited fields (for example, where TAB characters delimit each field), put two successive instances of the delimiter character into
IFS.ksh ignores any inherited (environment) value of
IFS. Upon startup, it sets the value ofIFSto the default of space, TAB, and newline.Performs filename generation, a.k.a. wildcard expansion, for any occurrences of
*,?, and[ ]pairs. It also processes the regular expression operators that we saw in Chapter 4.Uses the first word as a command by looking up its location according to the rest of the list in Chapter 4, i.e., as a special built-in command, then as a function, then as a regular built-in command, and finally as a file in any of the directories in
$PATH.Runs the command after setting up I/O redirection and other such things.
That’s a lot of steps — and it’s not even the whole story! But before we go on, an example should make this process clearer. Assume that the following command has been run:
alias ll="ls -l"
Further assume that a file exists called .hist537
in user fred’s home directory, which is /home/fred,
and that there is a double-dollar-sign variable $$
whose value is 2537 (we’ll see what this special variable is in the next chapter).
Now let’s see how the shell processes the following command:
ll $(whence cc) ~fred/.*$(($$%1000))
Here is what happens to this line:
ll $(whence cc) ~fred/.*$(($$%1000))Splitting the input into words.
llis not a keyword, so step 2 does nothing.ls -l $(whence cc) ~fred/.*$(($$%1000))Substituting
ls -lfor its alias “ll”. The shell then repeats steps 1 through 3; step 2 splits thels -linto two words.ls -l $(whence cc) /home/fred/.*$(($$%1000))Expanding
~fredinto /home/fred.ls -l $(whence cc) /home/fred/.*$((2537%1000))Substituting
2537for$$.ls -l /usr/bin/cc /home/fred/.*$((2537%1000))Doing command substitution on “whence cc.”
ls -l /usr/bin/cc /home/fred/.*537Evaluating the arithmetic expression
2537%1000.ls -l /usr/bin/cc /home/fred/.*537This step does nothing. (No process substitution.)
ls -l /usr/bin/cc /home/fred/.*537This step does nothing. (No braces to expand.)
ls -l /usr/bin/cc /home/fred/.*537This step does nothing. (No expanded text to split.)
ls -l /usr/bin/cc /home/fred/.hist537Substituting the filename for the wildcard expression
.*537.The command ls is found in /usr/bin.
/usr/bin/ls is run with the option -l and the two arguments.
Although this list of steps is fairly straightforward, it is not the whole story. There are still two ways to subvert the process: by quoting, and by using the advanced command eval.
Quoting
You can think of quoting as a way of getting the shell to skip some of the 13 steps above. In particular:
Single quotes (
'...') bypass everything through Step 11, including aliasing. All characters inside a pair of single quotes are untouched. You can’t have single quotes inside single quotes, even if you precede them with backslashes.[92]Double quotes (
"...") bypass steps 1 through 4, plus steps 8 through 11. That is, they ignore pipe characters, aliases, tilde substitution, wildcard expansion, process substitution, brace expansion, and splitting into words via delimiters (e.g., spaces) inside the double quotes. Single quotes inside double quotes have no effect. But double quotes do allow parameter substitution, command substitution, and arithmetic expression evaluation. You can include a double quote inside a double-quoted string by preceding it with a backslash (\). You must also backslash-escape$,`(the archaic command substitution delimiter), and\itself.
Table 7-8
contains some simple examples that show how these work;
they assume the statement dave=bob was run and user fred’s home directory is /home/fred.
If you are wondering whether to use single or double quotes in a particular shell programming situation, it is safest to use single quotes unless you specifically need parameter, command, or arithmetic substitution.
| Expression | Value |
$dave
|
bob
|
"$dave"
|
bob
|
\$dave
|
$dave
|
'$dave'
|
$dave
|
\'$dave\'
|
'bob'
|
"'$dave'"
|
'bob'
|
~fred
|
/home/fred
|
"~fred"
|
~fred
|
'~fred'
|
~fred
|
Using double quotes on variable values is increasingly important when dealing with the results of wildcard expansion. Today, it is not unusual to have files and directories available on Unix systems that actually physically exist on Microsoft Windows and Apple Macintosh systems. On those systems, spaces and other unusual characters, such as apostrophes and back-quotes, are common in filenames. Thus, to pass the full pathname into your application, be sure you quote things properly.
Task 7-5 is a more advanced example of command-line processing that should give you deeper insight into the overall process.
Recall from Chapter 4 that we found a simple way to set up
the prompt string PS1 so that it always contains the
current directory: PS1='($PWD)-> '.
One problem with this setup is that the resulting prompt strings can get very long. One way to shorten them is to substitute tilde notation for users’ home directories. This cannot be done with a simple string expression analogous to the above. The solution is somewhat complicated and takes advantage of the command-line processing rules.
The basic idea is to create a “wrapper” around the cd command, as we did in Chapter 5, that installs the current directory with tilde notation as the prompt string. We will see how to make this wrapper function shortly. The code we need to insert tilde notation is complicated in its own right; we develop it first.
We start with a function that, given a pathname
as argument, prints its equivalent in tilde notation if possible.
In order to write this function,
we assume that we already have an associative array named
tilde_ids, in which the subscripts are home directories and the values are user names.
Thus, print ${tilde_ids[/home/arnold]} would print
the value arnold. Here’s the function, named
tildize:
function tildize {
    # subdir of our home directory
    if [[ $1 == $HOME* ]]; then
        print "\~${1#$HOME}"
        return 0
    fi

    # loop over homedirs trying to match current dir
    typeset homedir
    for homedir in ${!tilde_ids[*]}; do
        if [[ $1 == ${homedir}?(/*) ]]; then
            print "\~${tilde_ids[$homedir]}${1#$homedir}"
            return 0
        fi
    done
    print "$1"
    return 1
}
The first if clause checks if the given pathname is under
the user’s home directory. If so, it substitutes tilde (~) for
the home directory in the pathname and returns.
If not, we loop over all the subscripts in
tilde_ids, comparing each one to our current directory.
The test matches home directories by themselves or
with some other directory appended (the ?(/*) part.)
If a user’s home directory is found, ~
user is substituted for the
full home directory in the
given pathname, the result is printed, and the function exits.
Finally, if the for loop exhausts all users without finding
a home directory that is a prefix of the given pathname, tildize simply echoes back its input.
Now, how do we create the tilde_ids array?
We use the function init_tilde_db.
It should be called once, from the .profile
file when we log in. The tilde_ids array
must be explicitly declared as an associative array using
typeset -A:
# tilde_ids[] is global associative array
# mapping directories to user names
typeset -A tilde_ids

function init_tilde_db {
    typeset user homedir    # local vars
    awk -F: '{ print $1, $6 }' /etc/passwd |
        while read user homedir; do
            if [[ $homedir != / ]]; then
                tilde_ids[$homedir]=$user
            fi
        done
}
We use the awk utility to extract the
first and sixth fields of the file /etc/passwd, which contain
user IDs and home directories, respectively.[93]
In this case,
awk acts like cut.
The -F: is analogous to
-d:, which we saw in Chapter 4, except that
awk prints the
values on each line separated by spaces, not colons (:).
awk’s output is fed into a while loop that checks
the pathname given as argument to see if it contains some user’s
home directory. (The conditional expression
eliminates “users” like daemon and root, whose
home directories are root and therefore are contained in every
full pathname.)
Now that we have the tildize function, you might think we could use it in a command substitution expression like this:
PS1='$(tildize $PWD)> '
In fact, you’d be right.[94]
But there’s a hidden cost here. The function is run every
time that the shell prints the prompt. Even if all you do is hit ENTER,
the shell runs the tildize function. If there are
lots of users on your system, the shell loops through all of the home directories,
each time.
To avoid this, we write a cd function
that only updates the prompt when we actually change directories.
The following code should go
into your .profile or environment file, along with the
definition of tilde_ids and tildize:
init_tilde_db  # set up array once, upon login

function cd {
    command cd "$@"  # run real cd
    typeset es=$?    # save exit status in a local var
    PS1="$(tildize $PWD)> "
    return $es
}

cd $PWD        # set prompt
As we saw in Chapter 5,
writing a function with the same name as a built-in command looks pretty
strange at first glance.
But, following the POSIX standard, the Korn shell distinguishes between
“special” built-in commands and regular built-in commands.
When the shell looks for commands to execute, it finds functions
before it finds regular built-in commands. cd
is a regular built-in command, so this works.
Within the function, we use the the cleverly named
command command
to actually get at the real cd command.[95]
The statement command cd "$@" passes the function’s
arguments on to the real cd in order to change the directory.
(As a side note, the shell defines an alias command='command ',
which allows you to use command with aliases.)
When you log in, this code sets PS1 to the initial
current directory (presumably your home directory).
Then, whenever you enter a cd command, the function
runs to change the directory and reset the prompt.
Of course, the function tildize can be any code that formats the directory string. See the exercises at the end of this chapter for a couple of suggestions.
Extended quoting
Single and double quoting have been in the Bourne shell and
its derivatives from the beginning (although the original Bourne shell
doesn’t do arithmetic or $(...)
substitution). The Korn shell offers variant versions of both single-
and double-quoted strings, as follows.
-
$"..." This version is the simplest. It is just like a regular double-quoted string. However, these strings are subject to locale translation at runtime. This is described further, below.
-
$'...' This string is similar to a regular single-quoted string in that none of the shell’s substitutions or expansions are performed on the contents. However, the contents are processed for escape sequences, similar to those used by the print command. ksh documentation refers to these as ANSI C strings.
The Korn shell’s internationalization features are beyond the
scope of this book, but
briefly, it works like this.
When ksh is invoked on a script with the -D
option, it prints a list of all
$"..."
strings to standard output.
This list can then be saved and used to produce translations that are used
at runtime when the script is actually executed.
Thus, in a French locale, if a translation is available for this program:
print $"hello, world" A well-known greeting among computer scientists
ksh would print bonjour, monde when the program runs.
The print command makes it possible to use C-style escape sequences
for output. And most of the time, this is all you need. But occasionally, it’s useful
to use the same notation in arguments to other programs. This is the purpose of the
$'...' string. The contents are not processed for variable,
command, or arithmetic substitution. But they are processed for escape sequences,
as shown in Table 7-9.
| Sequence | Meaning | Sequence | Meaning |
\a
| Alert, ASCII bell |
\t
| TAB |
\b
| Backspace |
\v
| Vertical tab |
\c
X
|
\x
HH
|
Character with value of hexadecimal digits HH | |
\C[.
ce
.]
|
The collating element ce.[a] [b] (A collating element is two or more characters that are treated as one unit for sorting purposes.) |
\x{
digs
}
|
Hexadecimal value of digs. Use the braces when following characters are hexadecimal digits that should not be interpreted.[a] [b] |
\e
|
\0
|
Rest of string ignored after this[b] | |
\E
|
ASCII Escape character[a] |
\
ddd
|
Character with value of octal digits ddd |
\f
| Form feed |
\'
| Single quote |
\n
| Newline |
\"
| Double quote |
\r
| Carriage return |
\\
| Literal backslash |
[a] Not in the C language. [b] New, starting with ksh93l. | |||
Of primary value is the fact that you can easily get single and double quotes
inside the $'...' kind of string:
$ print $'A string with \'single quotes\' and \"double quotes\" in it'
A string with 'single quotes' and "double quotes" in it
Of interest is the fact that the double quote doesn’t really need to be escaped, but that doing so doesn’t hurt anything, either.
eval
We have seen that quoting lets you skip steps in command-line processing. Then there’s the eval command, which lets you go through the process again. Performing command-line processing twice may seem strange, but it’s actually very powerful: it lets you write scripts that create command strings on the fly and then pass them to the shell for execution. This means that you can give scripts “intelligence” to modify their own behavior as they are running.
The eval statement tells the shell to take eval’s arguments and run them through the command-line processing steps all over again. To help you understand the implications of eval, we’ll start with a trivial example and work our way up to a situation in which we’re constructing and running commands on the fly.
eval ls passes the string ls to the shell to execute;
the shell prints a list of files in the current directory.
Very simple; there is nothing about the string ls that needs to be
sent through the command-processing steps twice. But consider this:
listpage="ls | more"
$listpage
Instead of producing a paginated file listing, the shell treats
| and more as arguments to
ls, and ls complains that no
files of those names exist. Why? Because the pipe character “appears” in
step 5 when the shell evaluates the variable, after
it has actually looked for pipe characters (in step 2). The variable’s
expansion isn’t even parsed until step 10. As a result, the shell
treats | and more as arguments
to ls, so that ls tries to
find files called | and more
in the current directory!
Now consider eval $listpage instead of just $listpage.
When the shell gets to the last step, it runs the command
eval with arguments ls, |, and more.
This causes the
shell to go back to Step 1 with a line that consists of these arguments.
It finds | in Step 2
and splits the line into two commands,
ls and more. Each command is processed in the normal
(and in both cases trivial) way. The result is a paginated list
of the files in your current directory.
Now you may start to see how powerful eval can be. It is an advanced feature that requires considerable programming cleverness to be used most effectively. It even has a bit of the flavor of artificial intelligence, in that it enables you to write programs that can “write” and execute other programs.[96] You probably won’t use eval for everyday shell programming, but it’s worth taking the time to understand what it can do.
As a more interesting example, we’ll revisit Task 4-1, the very first task in the book. In it, we constructed a simple pipeline that sorts a file and prints out the first N lines, where N defaults to 10. The resulting pipeline was:
sort -nr $1 | head -${2:-10}
The first argument specifies the file to sort; $2 is the number
of lines to print.
Now suppose we change the task just a bit so that the default is to print the entire file instead of 10 lines. This means that we don’t want to use head at all in the default case. We could do this in the following way:
if [[ -n $2 ]]; then
    sort -nr $1 | head -$2
else
    sort -nr $1
fi
In other words, we decide which pipeline to run according to whether
or not $2 is null. But here is a more compact solution:
eval sort -nr \$1 ${2:+"| head -\$2"}
The last expression in this line evaluates to the string | head -\$2 if
$2 exists (is not null); if $2 is null, then the expression
is null too.
We backslash-escape dollar signs (\$) before variable names to
prevent unpredictable results if the variables’ values contain
special characters like > or |. The backslash
effectively puts off the variables’ evaluation until the eval command
itself runs.
So the entire line is either:
eval sort -nr \$1 | head -\$2
if $2 is given or:
eval sort -nr \$1
if $2 is null.
Once again, we can’t just run this command without
eval because the pipe is “uncovered” after the shell tries to
break the line up into commands. eval causes the shell to
run the correct pipeline when $2 is given.
Next, we’ll revisit Task 7-3 from earlier in this chapter, the start function that lets you start a command in the background and save its standard output and standard error in a logfile. Recall that the one-line solution to this task had the restriction that the command could not contain output redirectors or pipes. Although the former doesn’t make sense when you think about it, you certainly would want the ability to start a pipeline in this way.
eval is the obvious way to solve this problem:
function start {
    eval "$@" > logfile 2>&1 &
}
The only restriction that this imposes on the user is that pipes and other such special characters must be quoted (surrounded by quotes or preceded by backslashes).
Task 7-6 is a way to apply eval in conjunction with various other interesting shell programming concepts.
make is known primarily as a programmer’s tool, but it seems as though someone finds a new use for it every day. Without going into too much extraneous detail, make keeps track of multiple files in a particular project, some of which depend on others (e.g., a document depends on its word processor input file(s)). It makes sure that when you change a file, all of the other files that depend on it are processed.
For example, assume you’re writing a book in DocBook XML.
You have files for the book’s chapters
called ch01.xml, ch02.xml, and so on.
The generated PostScript
output for these files are ch01.ps, ch02.ps, etc.
The tool to convert DocBook XML into PostScript is called (for some strange reason) gmat.
You run commands like
gmat ch
N
.xml
to do the processing.
(gmat knows to create ch01.ps from ch01.xml;
you don’t need to use shell redirection.)
While you’re working on the book,
you tend to make changes to several files at a time.
In this situation, you can use make to keep track of which files need
to be reprocessed, so that all you need to do is type make,
and it figures out what needs to be done. You don’t need
to remember to reprocess the files that have changed.
How does make do this? Simple: it compares the modification times of the input and output files (called sources and targets in make terminology), and if the input file is newer, make reprocesses it.
You tell make which files to check by building a file called makefile that has constructs like this:
target:source1 source2 ...commands to make target
This essentially says, “For target to be up to date, it must be newer than all of the sources. If it’s not, run the commands to bring it up to date.” The commands are on one or more lines that must start with TABs: e.g., to make ch07.ps:
ch07.ps : ch07.xml
        gmat ch07.xml
Now suppose that we write a shell function called makecmd that reads and executes a single construct of this form. Assume that the makefile is read from standard input. The function would look like the following code.
function makecmd {
    read target colon sources
    for src in $sources; do
        if [[ $src -nt $target ]]; then
            while read cmd && [[ $cmd == \t* ]]; do
                print "$cmd"
                eval $cmd
            done
            break
        fi
    done
}
This function reads the line with the target and sources;
the variable colon is just a placeholder for the :.
Then it checks each source to see if it’s newer than the target,
using the -nt file attribute test operator that we saw
in Chapter 5.
If the source is newer, it reads, prints, and executes the commands until
it finds a line that doesn’t start with a TAB or it reaches end-of-file.
(The real make does more than this; see the exercises
at the end of this chapter.)
After running the commands,
it breaks out of the for loop, so that it doesn’t run the
commands more than once.
(It isn’t necessary to
strip the initial
TAB from the command. The shell discards the leading whitespace automatically.)
The C compiler as pipeline
As a final example of eval, we’ll revisit our old friend occ, the C compiler front-end from the previous three chapters. Recall that the compiler front-end does its work by calling separate programs to do the actual compile from C to object code (the ccom program), optimization of object code (optimize), assembly of assembler code files (as), and final linking of object code files into an executable program (ld). These separate programs use temporary files to store their outputs.
Now we’ll assume that these components (except the linker) pass information in a pipeline to the final object code output. In other words, each component takes standard input and produces standard output instead of taking filename arguments. We’ll also change an earlier assumption: instead of compiling a C source file directly to object code, occ compiles C to assembler code, which the assembler then assembles to object code.[97] This lets us suppose that occ works like this:
ccom < filename.c | as | optimize > filename.o
Or, if you prefer:
cat filename.c | ccom | as | optimize > filename.o
To get this in the proper framework for eval,
let’s assume that the variables
srcname and objname contain the names of the source
and object files, respectively. Then our pipeline becomes:
cat $srcname | ccom | as | optimize > $objname
As we’ve already seen, this is equivalent to:
eval cat \$srcname \| ccom \| as \| optimize \> \$objname
Knowing what we do about eval, we can transform this into:
eval cat \$srcname " | ccom" " | as" " | optimize" \> \$objname
and from that into:
compile=" | ccom"
assemble=" | as"
optimize=" | optimize"

eval cat \$srcname $compile $assemble $optimize \> \$objname
Now, consider what happens if you don’t want to invoke the optimizer — which is the default case anyway. (Recall that the -O option invokes the optimizer.) We can do this:
optimize=""
if -O given then
    optimize=" | optimize"
fi
In the default case, $optimize evaluates to the empty string,
causing the final pipeline to “collapse” into:
eval cat $srcname \| ccom \| as \> $objname
Similarly, if you pass occ a file of assembler code (filename.s), you can collapse the compile step:[98]
assemble="| as"
if $srcname ends in .s then
    compile=""
fi
That results in this pipeline:
eval cat \$srcname \| as \> \$objname
Now we’re ready to show the full “pipeline” version of occ. It’s similar to the previous version, except that for each input file, it constructs and runs a pipeline as above. It processes the -g (debug) option and the link step in the same way as before. Here is the code:
# initialize option-related variables
do_link=true
debug=""
link_libs=""
clib="-lc"
exefile=""

# initialize pipeline components
compile=" | ccom"
assemble=" | as"
optimize=""

# process command-line options
while getopts "cgl:[lib]o:[outfile]O files ..." opt; do
    case $opt in
        c )    do_link=false ;;
        g )    debug="-g" ;;
        l )    link_libs+=" -l $OPTARG" ;;
        o )    exefile="-o $OPTARG" ;;
        O )    optimize=" | optimize" ;;
    esac
done
shift $(($OPTIND - 1))

# process the input files
for filename in "$@"; do
    case $filename in
        *.c )
            objname=${filename%.c}.o ;;
        *.s )
            objname=${filename%.s}.o
            compile="" ;;
        *.o )
            objname=$filename  # just link it directly with the rest
            compile=""
            assemble="" ;;
        *   )
        print "error: $filename is not a source or object file."
        exit 1 ;;
    esac

    # run a pipeline for each input file
    eval cat \$filename $compile $assemble $optimize \> \$objname
    objfiles+=" $objname"
    compile=" | ccom"
    assemble=" | as"
done

if [[ $do_link == true ]]; then
    ld $exefile $objfiles $link_libs $clib
fi
We could go on forever with increasingly complex examples of eval, but we’ll settle for concluding the chapter with a few exercises.
Here are a couple of ways to enhance occ, our C compiler:
Real-world C compilers accept the option -S, which tells the compiler to suppress the assembly step and leave the output in files of assembler code whose names end in
.s. Modify occ so that it recognizes this option.The language C++ is an evolutionary successor to C; it includes advanced features like operator overloading, mandatory function argument type checking, class definitions, templates, and many more. (Don’t worry if you don’t know what these are.) Some C++ compilers use C as an “assembly language”, i.e., they compile C++ source files to C code and then pass them to a C compiler for further processing. Assume that C++ source files have names ending in .cc, and that /lib/cfront is the C++ compiler “front-end” that produces C code on its standard output. Modify occ so that it accepts C++ as well as C, assembler, and object code files.
The possibilities for customizing your prompt string are practically endless. Here are two enhancements to the customization schemes that we’ve seen already:
Enhance the current-directory-in-the-prompt scheme by limiting the prompt string’s length to a number of characters that the user can define with an environment variable.
Read the man page for date(1) and read about the
SECONDSvariable in the ksh(1) man page. Arrange things so that the shell prints the current time of day in the prompt. (Hint: remember that the shell does variable, command, and arithmetic substitution on the value ofPS1before printing it out.)
The function makecmd in the solution to Task 7-6 represents an oversimplification of the real make’s functionality. make actually checks file dependencies recursively, meaning that a source on one line in a makefile can be a target on another line. For example, the book chapters in the example could themselves depend on figures in separate files that were made with a graphics package.
Write a function called readtargets that goes through the makefile and stores all of the targets in a variable or temp file.
Instead of reading the makefile from standard input, read it into an array variable called
lines. Use the variablecurlineas the “current line” index. Modify makecmd so that it reads lines from the array starting with the current line.makecmd merely checks to see if any of the sources are newer than the given target. It should really be a recursive routine that looks like this:
function makecmd {
    target=$1
    get sources for $target
    for each source src; do
        if $src is also a target in this makefile then
            makecmd $src
        fi
        if [[ $src -nt $target ]]; then
            run commands to make target
            return
        fi
    done
}
Implement this. Remember to use typeset to create local variables, and think about how associative arrays might be helpful in tracking targets, sources, and commands to execute.
Write the “driver” script that turns the makecmd function into a full make program. This should make the target given as argument, or if none is given, the first target listed in the makefile.
Finally, here are some problems that really test your knowledge of eval and the shell’s command-line processing rules. Solve these and you’re a true Korn shell wizard!
Advanced shell programmers sometimes use a little trick that includes eval: using the value of a variable as the name of another variable. In other words, you can give a shell script control over the names of variables to which it assigns values. How would you do this? (Hint: if
$fredequals ``dave'', and$daveis ``bob'', you might think that you could typeprint $$fredand get the responsebob. This doesn’t actually work, but it’s on the right track. This exercise is actually easy to solve using namerefs. But it’s worth doing it without them to test your understanding of eval and the shell’s quoting rules.)You could use the above technique together with other eval tricks to implement new control structures for the shell. For example, see if you can write a script (or function) that emulates the behavior of the C shell’s repeat command:
repeat
count commandThis works in the obvious way: the command is executed count times.
[81] The line has to be completely empty; no spaces or TABs. That’s OK: mail message headers are separated from their bodies by exactly this kind of blank line.
[82]
There are a few possible problems with this; for example, /etc/passwd
usually contains information on “accounts” that aren’t associated with
people, like uucp, lp, and daemon. We’ll
ignore such problems for the purpose of this example.
[83] Thanks to David Korn for providing me prerelease access to the version with this feature. ADR.
[84] less is a nonstandard but commonly available paging program that has more features than more.
[85] The ability to use hostnames was added in ksh93f; use of service names was added in ksh93m.
[86] Specifically, there is a difference between System V and BSD versions. The latter accepts options similar to those of print, while the former accepts C language-style escape sequences.
[87]
For obscure, historical syntactic reasons, the braces are shell keywords.
In practice, this means that the closing } must be
preceded by either a newline or a semicolon. Caveat emptor!
[88] LISP programmers may prefer to think of this as an anonymous function or lambda-function.
[89] Unfortunately, using read with input from a pipe is often very inefficient, because of issues in the design of the shell that aren’t relevant here.
[90]
Even this explanation is slightly simplified to elide the most petty details,
e.g., “middles” and “ends” of compound commands, special characters
within [[...]]
and ((...)) constructs, etc.
The last word on this subject is the reference book
The New KornShell Command and Programming Language
by Morris Bolsky and David Korn, published by Prentice-Hall.
[91]
Two obscure variations on this: the shell substitutes the current directory ($PWD)
for ~+ and the previous directory
($OLDPWD) for ~-.
[92]
However, as we saw in Chapter 1, '\''
(i.e., single quote, backslash, single quote, single quote)
acts pretty much like a single quote in the middle of a
single-quoted string; e.g.,
'abc'\''def' evaluates
to abc'def.
[93]
In large multi-machine environments, you may need to use something like
ypcat passwd | awk ... or
niscat passwd.org_dir | awk ... to get
the same information. Check with your system administrator.
[94] This doesn’t work in ksh88, though.
[95] As mentioned earlier, command is not a special built-in. Woe be to the shell programmer who writes a function named command!
[96]
You could actually do this without
eval, by printing commands to a temporary file and then
“sourcing” that file with .
filename.
But that is much less efficient.
[97] For what it’s worth, many Unix compilers generate assembly code, optimize the assembly code, and then generate object code.
[98]
Astute readers will notice that, according to this rationale,
we would handle object-code input files (filename.o)
with the pipeline eval cat $srcname > $objname, where the
two names are the same. This will cause the shell to destroy
filename.o by truncating it to zero length.
We won’t worry about this here.