UNDERSTANDING EXPOSURE IS A SKILL THAT WILL ELEVATE YOUR PHOTOS TO THE NEXT LEVEL. KNOWING THE REASON WHY YOUR PICTURES COME OUT TOO LIGHT OR TOO DARK WILL GIVE YOU THE ABILITY TO MAKE PHOTOGRAPHS THAT MATCH THE VIEW THAT YOUR EYE SEES, SO READ ON TO BANISH THOSE DISAPPOINTINGLY DULL PHOTOS FOR EVER MORE.
CHAPTER 2 LESSON 1
GETTING THE LIGHT RIGHT: THE ART OF EXPOSURE
EXPOSURE IS THE ART OF GETTING THE BALANCE RIGHT BETWEEN LIGHT AND DARK IN A PHOTO. IT IS THE VITAL SKILL YOU NEED TO TURN THE VIEW YOU SEE AT THE TIME INTO THE SCENE YOU CAPTURE FOR POSTERITY.
Happily, exposure is super easy to manage on your smartphone camera screen—it just takes a tap and a swipe.
One of the big issues people experience when shooting with a smartphone camera is that it doesn’t always manage the contrast between the highlights and the shadows as well as the eye does. Our brain is really good at this job and does it so much better than a camera. They are essentially doing the same job; they are both big sensors that interpret the light that comes through a lens, except that your camera’s sensor is smaller and less gifted than your brain.
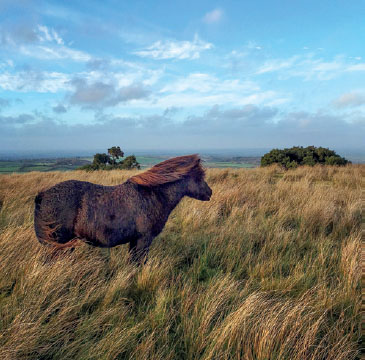
I think the sky is every bit as important as the landscape below; the way the clouds change the light on the landscape or are reflected in the glass of skyscrapers is an integral part of the scene in the moment of making that photo. I am an old-school photographer in that sense. I like to see cloud-highlight detail recorded faithfully, and I prefer pictures where the bright parts aren’t completely white with no detail (also referred to as “blown out” or overexposed). The land always references the sky above, so for me it’s important to have both sky and land equally represented.
CHAPTER 2 LESSON 2
TO TAKE YOUR SMARTPHONE PHOTOGRAPHY TO THE NEXT LEVEL, YOU CAN OVER-RIDE THE BASIC NATIVE CAMERA IN YOUR DEVICE TO TAKE MANUAL CONTROL OF THE SETTINGS, UNLOCKING ITS POTENTIAL TO PERFORM MORE INTELLIGENTLY. DON’T PANIC IF THIS SOUNDS TOO TECHNICAL, THE NEXT FEW PAGES WILL REVEAL ALL.
MANUAL iPHONE CONTROL WITH PROCAMERA
For the iPhone I use the ProCamera App among others. Worth investing in alone for its ability to save your photos as uncompressed RAW and TIFF files, it enables you to make bigger, better photos for printing and sharing. (To learn more about File Types, Files Sizes, and Compression, turn to page 139, and for more about Prints on Paper, see page 136.)
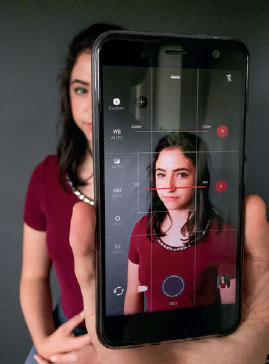
Another great tool in the ProCamera App’s armory is the ability to set the focal and exposure points in the same place or to pinch them apart, so that you can set a focal point in one place and expose for the brightest area separately. This can then be locked off, with just a tap and a press.
There is the option to choose between auto, full manual, and shutter priority or ISO priority mode in the ProCamera settings. I recommend that you shoot with ISO priority selected, because it gives you a simple workflow that begins with setting the ISO value, then looking at the available shutter speeds, and going on from there to set the exposure compensation. Note that there is more about ISO on pages 36–37.
The obvious exception to this workflow is if you want to shoot action scenes and freeze movement, when it works best to select a fast shutter speed. Tap the shutter speed figure at the top of the screen to activate the shutter priority setting. From here you can set yourself a fast shutter speed and let the app adjust the ISO to match the shutter speed you have selected. You can then make your own fine adjustments to the exposure by touching the E/V (exposure value) symbol (usually in the top center of your screen) to adjust the exposure manually to + or - 7. Try to keep that ISO as low as possible to avoid noise (see page 38 for more information about Noise).

Don’t forget to turn your grid view on in the settings. I prefer to work with the “rule of thirds” grid, which is usually labeled with the number 9, to represent the number of squares in the grid. See page 15 for more about using grids.
MANUAL ANDROID CONTROL WITH PRO MODE
You can easily control the latest Android devices with the Pro Mode, which is accessible in the camera settings.
Access the Pro Mode by swiping down on the = symbol on the main camera screen to reveal the settings menu.
The latest generation of Androids, such as the HTC U11, shoot RAW files in Pro Mode (for more about RAW files, see JPEG, TIFF, and RAW File Formats on page 141).
In Pro Mode you will find individual sliders that allow you to make adjustments to your ISO, shutter speed, focal range, and exposure compensation, among other things. To work in shutter priority mode, tap the Auto button at the top of each slider to turn the feature on and off.
CHAPTER 2 LESSON 3
THE 3 SIDES OF THE EXPOSURE TRIANGLE
WHEN YOU PRESS THE SHUTTER BUTTON, IT OPENS A LITTLE CURTAIN BEHIND THE LENS SO THAT LIGHT FALLS ON A SENSOR IN THE CAMERA. THIS IS WHAT CREATES THE PHOTO.
The process of allowing light into the camera involves three key functions that all work together:
SHUTTER SPEED
The amount of time the shutter stays open to let light hit the sensor is called Shutter Speed.
APERTURE
The size of the hole that opens to let the light in when the shutter is pressed is known as the Aperture.
ISO
You can alter the sensitivity of the sensor to let more or less light in when the shutter opens depending on how bright the shooting conditions are. This sliding scale is referred to as the ISO value.
Get to know your smartphone camera’s dynamic range by practicing on high-contrast scenes to test your camera’s capabilities.
You will need a scene with bright white areas and deep shadows, which you will find aplenty at noon on a sunny day.
▶ Tap to expose (and focus) on the bright white area, ideally a white wall or car, and take your first photo.
▶ Next, tap on the sky to expose for that and take a photo.
▶ Thirdly, tap on a mid-tone area (go for grass or brickwork that is in direct sunlight), and take another photo.
▶ Next, tap to expose for a mid-tone area again; this time, it needs to be out of direct sunlight but not in deep shadow. When you’re ready, take a fourth photo.
▶ Finally, take a fifth photo, exposing for the deep shadow area of the image.
Now look at these photos, zoom into them, and find the image that has retained the most detail across all the areas of the image. Once identified, this gives you a guide for exposing the scene. You will almost certainly still need to make some tweaks to the exposure in an editing app, but this exercise will have provided valuable information about your camera’s abilities with exposure.
CHAPTER 2 LESSON 4
DYNAMIC RANGE
THIS IS SIMPLY THE RANGE OF HIGHLIGHT AND SHADOW DETAIL THAT CAN BE CAPTURED BY A CAMERA.
Smartphone cameras have a fairly limited dynamic range. You will notice that in high-contrast scenes when you push your exposure up to illuminate your subject better, you end up with white, blown-out highlights that do not contain any detail at all.
Loss of detail occurs in your pictures when the range of exposure values in your image exceeds the capabilities of the camera. It is what happens when your camera cannot handle exposing the bright sky and the shadows evenly, resulting in either dark blocked-out shadows or overly bright “blown-out” skies. You can solve this problem by exposing for the highlights, making sure that they aren’t blown out and have lots of detail. The rest of the picture will come out darker, but this can be an easy thing to fix with an app afterward. Don’t let the dark areas get so dark that you either can’t see any detail at all in them or the detail you can see is really grainy—as this is not an easy fix without trading off some image quality elsewhere. It's better to have balance between the loss of detail in the highlights and in the shadows.
Ideally, try to manage a high-contrast image at the time of shooting. Make your adjustments there and then, knowing that working within the limitations of the smartphone means accepting that sometimes the camera alone cannot do the job. Instead of avoiding shooting photos that have more dynamic range than your camera can handle, just learn how to balance what you have in front of you and how to use the editing apps to fix the rest later. See pages 126–35 of the Editing with Apps section for details on how to fix exposure and dynamic range issues.
CHAPTER 2 LESSON 5
AS YOU ALREADY KNOW, THE SHUTTER IS THE LITTLE “CURTAIN” THAT OPENS BRIEFLY TO LET LIGHT IN WHEN YOU PRESS THE BUTTON TO TAKE A PHOTO (TECHNICALLY THE BUTTON IS CALLED A “SHUTTER RELEASE”). HOW LONG IT STAYS OPEN FOR IS WHAT WE REFER TO WHEN WE TALK ABOUT SHUTTER SPEEDS. THEREFORE SHUTTER SPEEDS ARE LINKED WITH TIME.
Shutter speeds can be long or short depending on the conditions. A fast shutter speed can stop time in its tracks and a slow one can seem to stretch time out.
So, as a rule of thumb, when it is bright and sunny you will need a faster shutter speed, to avoid letting too much of that bright light in. When it is dark, you will need a slower shutter speed to allow the shutter to stay open longer and let lots more light in. A good all-round shutter speed on a sunny day is 1/125s.
SHUTTER SPEED TIPS
Shutter speeds are measured in fractions of seconds, so 1/30s is one thirtieth of a second. A super-fast shutter speed is something around the 1/4000s mark—that’s one four thousandth of a second: lightning fast! Fast shutter speeds can capture a racecar speeding along, a horse galloping, or a sportsperson doing what they do best. These are movements that are usually impossible to discern precisely with the naked eye, but your shutter, with its ability to freeze motion, can give them a whole new perspective.
The slow shutter speeds that allow you to take long exposure photos which will last for two seconds, or even 30 seconds or more, are written like this: 1” or 30”. Slow shutter speeds let a lot more light in, so while the shutter is open, it will also record all the movement that happens in the viewfinder during that period of time. This will allow you to capture and blur movement, so that cascading waterfalls become smooth, silky, white sheets, and the lights of moving cars become trails of red and white.
A point to bear in mind here is that sometimes the camera will try to set a shutter speed which is too slow for the conditions. When shutter speeds are too slow, it is simply impossible to hold the camera still for the length of time that the shutter is open; the rhythms of your heart beat and breathing will make the camera shake and you will get blurry photos. Make sure that the shutter speed is not slower than 1/60s to prevent this. Ideally, a shutter speed of 1/125s will be fast enough to avoid any camera shake. If you want to use a shutter speed slower than 1/60s, to keep the image sharp put your camera on a tripod. If you don’t own a tripod, I strongly suggest that you invest in one: it’s an essential tool for every photographer. If you can’t stretch to buying one right away, then you can make do with resting your camera on a steady surface such as a table or a stack of sturdy books.
OVER SATURATION
Smartphones have a tendency to deliver over-saturated images, which can look distinctly fake. It is simple enough to deal with, though. Snapseed, Instagram, and VSCO all feature a saturation adjustment setting in the editing tools. Try turning the saturation down a tiny amount and see how it instantly makes images look more realistic.
SHUTTER SPEED EXPERIMENT
The way to understand how the shutter speed affects the camera is to play with it. Do this by taking the same picture but adjusting your shutter speed settings each time.
Whether you are shooting in Pro Mode on Android or using an app like ProCamera on your iPhone, set your ISO value to 100. Don’t let your camera adjust the ISO value during this exercise—keep it at 100 ISO to highlight just the effect from the variations in shutter speed. Start at the slow end of the shutter speed slider—it will have a whole number on it (for example 32 seconds). Take a photo and move the slider a small way along, then take another picture at this slightly faster shutter speed. You will soon be working with speeds that are shown as fractions of seconds (for example 1/30 of a second). Work along the slider and snap pictures at each shutter speed until you get to super-fast shutter speeds like 1/8000 of a second. One of the first things you notice when you review the images is that the faster the shutter speed, the darker your image is.
You will see that some of the photos are lovely and sharp, while some are blurry. Notice the point in the exercise where the pictures start to blur. This is the point when hand-holding is no longer stable enough for the shutter speed; this will usually be around the 1/60s, but if you have a camera that is good at handling low light, it may be closer to 1/20s. You will also be able to see the effect the shutter speed has on how light or dark your image is.
Now, try putting your camera on a tripod to photograph the slower shutter speeds and see what a difference it makes to the sharpness of your photos when you are shooting below 1/60s.
You should now understand the relationship between the shutter speed and the brightness of your image. You will be able to see that you only need the shutter to be open for a tiny fraction of a second to let light in, but the longer it is open, the more light gets in and the brighter the image is.
Don’t expect to be a master after one session, but if you practice shooting in this mode and make your own creative decisions about the amount of focus and light you want in your pictures, before long you will be turning out some great shots and you will know exactly how you achieved them. Then you’ll know it was worth the effort you took to learn this cool new skill!
CHAPTER 2 LESSON 6
IF YOU HAVE EVER SEEN A PRO PHOTOGRAPHER AT WORK YOU MAY HAVE NOTICED THAT THEY OFTEN TAKE CONTINUOUS SHOTS AT HIGH SPEED. THIS GIVES THEM THE OPPORTUNITY TO SELECT THE BEST FRAME LATER.
You have a continuous shooting feature on your smartphone called burst mode. Portraits aside, it is also a good way to work when you are trying to capture and freeze action.
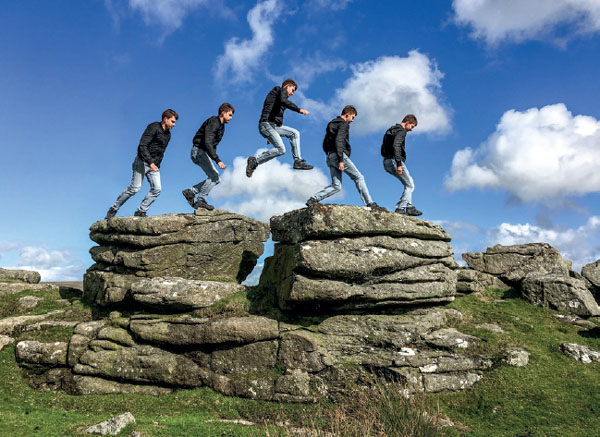
For the example opposite, I overlaid all the photos in the burst into one image so that I could illustrate just how much of the motion detail you can capture when shooting in burst mode. This makes for a pretty weird image though, so there is another one below which has just five of the frames selected and overlaid.
Never miss that definitive moment again! Just press and hold the shutter button down, instead of tapping it once the way you usually take a photo.
When you see the burst images in your camera roll they will appear as a single image, but there will be a number in the photo’s edge to tell you how many frames are in the burst. You can choose the “select” option in your photo album to go through the set of burst frames and just keep a few of them. I used Photoshop to overlay the frames in these examples, in case you’re wondering!
CHAPTER 2 LESSON 7
ISO STANDS FOR INTERNATIONAL STANDARDS ORGANIZATION, AND IT IS A SCALE FOR MEASURING SENSITIVITY TO LIGHT.
Adjusting your camera’s ISO value (rather than relying on automatic mode) lets you set its sensitivity to the light conditions, and this will allow you to get a lot more out of your camera. In the good old days, ISO originally referred to the speed of the film. The idea is to keep your ISO value as low as possible at all times, because although smartphones have clever algorithms for noise reduction these days, some are more effective than others, and the higher the ISO, the more the image will be affected by digital noise.
The higher the ISO number you select, the lower the amount of light you need to be able to shoot in. If you are shooting in bright light, you will need to set it to a slower speed like ISO 50 or ISO 125. If you set your camera to a low ISO, for example ISO 100, the resulting photograph will be better quality than one set at ISO 1600, because the trade-off for being able to shoot in low light is increased noise and grain on the image.
Another way to look at ISO is the way it can be used to manage shutter speed. If you want to be able to use a very fast shutter speed, you will need to gather the light into your image in a very short space of time. Therefore your camera will need to be highly receptive to light.
So, to freeze the movement of someone running past you, you will need a fast shutter speed. Start by setting the shutter speed needed to freeze the action, anything from 1/500th of a second or faster. Now, starting with your ISO at the lowest setting—ISO 100 or lower if possible—keep raising it incrementally until you get to the point when the screen isn’t too dark to see anything. If it is a well-lit scene, aim for an ISO well below ISO 800; anything over this ISO and the amount of digital noise in the image becomes an issue.
Here’s how to alter the ISO on your smartphone:
iPHONE
Open an advanced camera control app such as ProCamera (see page 29 for more about manual control with ProCamera) and set the mode to ISO priority.
▶ Note the current ISO is shown at the top right of the screen.
▶ Using the ISO sensitivity changer, which appears as a plus (+) or minus (-) setting on the bottom right of the screen, take the ISO down to ISO 25.
▶ When you change the exposure, you will see a marker move along the little guide toward the -7 or +7 values.
▶ On the top right of the screen, you will see the shutter speed, shown as a fraction, for example 1/80s. This shutter speed value will change as you adjust the exposure (as explained previously).
▶ There is a great ISO range available on the ProCamera app—from ISO 25 up to ISO 2000—to work with.
ANDROID
On an Android device, the range of ISO values available to you is around ISO 100 to ISO 800. To access your ISO settings, you will need to open up the Pro Mode (see page 29 for more about this) in your camera settings to alter your ISO.
▶ Swipe out the menu which is denoted by = on the main camera screen.
▶ In Pro Mode, slide the ISO slider left, as low as it will go. Most Androids go down to around ISO 100.
▶ Adjust the shutter speed slider until it is bright enough to see the scene on your screen, making sure your highlights aren’t blown out.

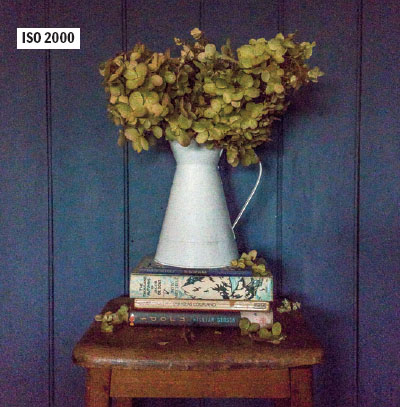
WHAT ISO TO USE WHEN
▶ ISO 50 to 200 is ideal for a bright sunny day.
▶ ISO 200 to 400 is a good range to shoot with on cloudy days or when the light is beginning to fade.
▶ ISO 400 to 800 is best for indoor shooting.
▶ ISO 800 and above is necessary for darker scenes and night-time shooting.
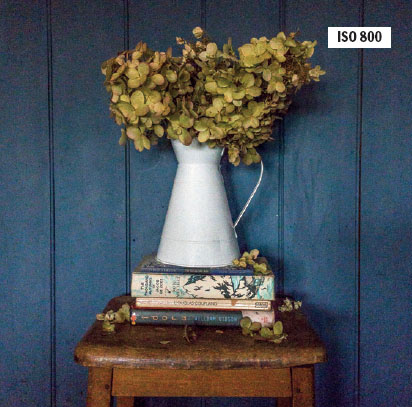
Shooting in low light is when you will test your smartphone’s capabilities to the limits. You can push your ISO setting to a high number to allow hand-holding (as opposed to using a tripod) in very low light, which is a remarkable feat in itself. But this comes with a price… noise. (The previous page shows the difference in the amount of noise present when shooting the same scene using four different ISO values.)
Noise appears when an area of the scene is so dark that only a minuscule number of photons of light hit the sensor. In this instance, the camera is not getting enough accurate image information to form a clear picture, so noise appears as a by-product of this sampling error. Noise is most notable in a dark area with smooth continuous tones such as a blank wall or a blue sky.
The higher your ISO setting, the more noise you will have. To manage it, try to keep the ISO setting as low as possible. Tripods are your best friend in this situation; they allow you to use a very low ISO for the conditions and you will be able to avoid noise almost entirely. To try some very low-light photography, maybe in the blue hour, iPhone users can use a low-light app such as Slow Shutter Cam that has amazing noise management algorithms. On Android I shoot RAW files (a file format that captures all image data recorded by the camera’s sensor when you take a photo) in the camera’s Pro Mode, and then adjust the noise in an app like Adobe Lightroom afterward. Android users can also try the Manual Camera app.
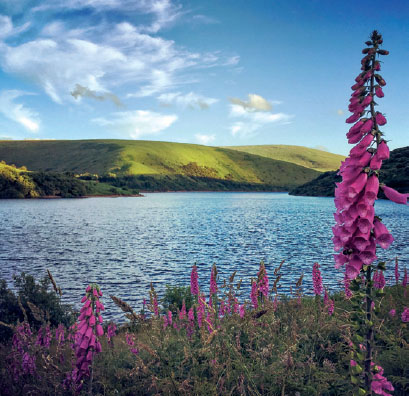
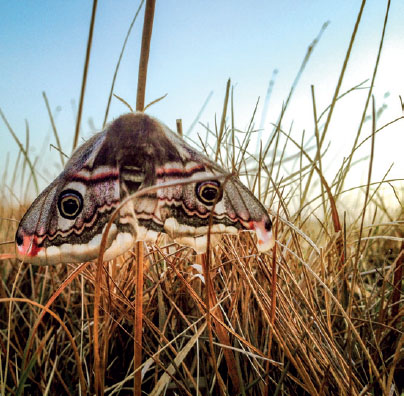
WHY YOU SHOULDN'T BE INTIMIDATED BY TECHNOLOGY
One of the big issues people experience with a smartphone camera is that it doesn’t always manage the contrast between the highlights and the shadows as well as our eye does. This results in a shot with dark shadows or bright skies, which differs from the view our eyes are seeing.
When you think about it, our heads are just like big cameras. Our brain is a big sensor that interprets the light that comes through the lens in our eyes, in much the same way as the camera lens and sensor relationship works. More so, the pupils in our eyes, or apertures—see where I am going with this?—let the light in by expanding and contracting to suit the brightness of the room, just like the aperture size can be changed in a camera lens to suit the brightness of the conditions.
At this stage in our technological advancement, our brains are much more powerful processors and much better at interpretation than any digital sensor; therein lies the disconnect between what we see and experience compared to what a camera sees and records with its relatively unsophisticated lens and sensor. That’s why you need to be able to use your big brain to tell the camera’s tiny brain what you want it to do—you’re the more intelligent one in the partnership—don’t underestimate yourself. And that, in a nutshell, is why there’s no reason to be intimidated by technology!
HIGH-DYNAMIC-RANGE IMAGING (HDR)
HDR is a matter of personal taste and I will leave it up to you, but I am not a fan so I always turn off the setting (tap the HDR symbol to toggle the feature on and off). Arguably, there are times when this function works very well, but conversely it can also ruin a picture. HDR processing works by finding hard edges in the image to transition from one exposure state to the next. This is fine when you have an image with everything in sharp focus, but it fails if some of the image is soft or out of focus—you end up with weird hard lines and halos which ruin your image.
If you use HDR at the point of image capture, you cannot get rid of it later, so it is better to learn how to use apps in the editing stage to get that contrasty, punchy effect. This way, you can make the same improvements, but everything is under your control.
DEPTH OF FIELD AND APERTURE
DEPTH OF FIELD IS THE ZONE IN WHICH OBJECTS FROM NEAR TO FAR ARE IN FOCUS IN YOUR PHOTOGRAPH.
A wide depth of field is where everything in the picture is in focus, so objects in the foreground, the middle ground, and the background are all equally sharp. A shallow depth of field is when only a foreground area is in focus and everything else around it is artfully out of focus. We need to know about depth of field because it is what helps claim a sense of space in our images. It is also about what is sharp and what is not. See the section on Focusing on page 17 for more about this.
We assign numbers to help us understand the focal range of the aperture (i.e. how much of the image is in focus). This number is preceded by an “f,” which stands for focal range. Most smartphones have a lens aperture of around f/1.7 to f2.2. A large f-number denotes that a large area of the image is in focus and a small f-number means a small area of the image is in focus. It is as simple as that. So an aperture of f/2 is going to have shallow focal range, whereas an aperture of f22 will mean that most of the image from foreground to background is sharp.
Working with a smartphone camera (which uses a fixed-aperture, fairly wide-angle lens), you will notice that the depth of field will extend the farthest when you are focusing on something far away, so this works well for landscape photography. If you choose something in the middle ground, you will see that almost everything beyond it will be fairly sharp too, allowing you to capture much of the scene in sharp relief. When you shoot something close to the lens, you will notice that only a small area of the picture in the foreground is sharp (a shallow depth of field). Go to the section on Still-life Shooting and Depth of Field on pages 112–13 for more about the practicalities of creating depth of field on a smartphone. When shooting landscapes, it never hurts to try a few shots where you make something in the foreground the focus of the image and let the background recede gently out of focus in a way that is both pleasing to the eye and makes the most of the limitations of a smartphone lens.
You can add additional lenses to change the depth of field. For more on the different types of lenses, see pages 44–45.
