Objective 7.3—Configure and Manage Service Composer
This chapter covers all or part of the following VCP6-NV exam blueprint topics:
Objective 7.3—Configure and Manage Service Composer
The previous chapter covered the distributed logical firewall and how it provides Layer 2, Layer 3, and Layer 4 security. NSX also provides the capability to enforce security at Layer 7 (application layer), and provide IDS and IPS, antivirus, and malware protection. All these are done outside the context of the network, just like the distributed logical firewall. NSX provides some of these security services natively, but others can be provided by integrating with VMware’s technological partners, such as Trend Micro, Palo Alto, and Symantec to name a few.
NSX is actually a platform where other security solutions can be integrated with it. Some allow security workflows that permit some level of automation when security threads are identified. This chapter covers how NSX manages to be a platform and allow some security automation by way of Service Composer.
The “Do I Know This Already?” quiz allows you to assess whether you should read this entire chapter or simply jump to the “Exam Preparation Tasks” section for review. If you are in doubt, read the entire chapter. Table 16-1 outlines the major headings in this chapter and the corresponding “Do I Know This Already?” quiz questions. You can find the answers in Appendix A, “Answers to the ‘Do I Know This Already?’ Quizzes.”
1. Which component is not a security service facilitated by Guest or Network Introspection?
a. Data loss prevention
b. Network Address Translation
c. Malware protection
d. Vulnerability management
2. Which security service is not facilitated by Network Introspection?
a. Intrusion prevention
b. Data security
c. Malware protection
d. Antivirus protection
3. Which statement is a valid example of a security service protecting a virtual machine?
a. The logical switch sends traffic that leaves the virtual machine and is directed to the security service appliance.
b. The distributed firewall sends traffic that arrives for the virtual machine from the security service appliance.
c. The ESXi host redirects virtual machine traffic to the security service module running in the host’s kernel.
d. The ESXi host redirects the virtual machine traffic to the security service appliance using the IOChain.
4. What is the first step in consuming a security service from a provider?
a. Register the security service with NSX Manager.
b. Register the security service with vCenter.
c. Register the ESXi hosts with the security service.
d. Create a profile with the security service provider.
5. Which is not a dynamic selection option for a security group?
a. Virtual machine name
b. Computer OS name
c. LDAP group
d. Entity
6. How do you prevent a virtual machine from being a member of a security group?
a. Do not include the virtual machine in the Define Dynamic Objects view.
b. Do not include the virtual machine in the Select Objects to Include view.
c. Add the virtual machine to the Select Objects to Exclude view.
d. Add the virtual machine to the NSX Manager’s Exclusion List.
7. If two security policies are associated with the same security group, which policy gets enforced first?
a. The security policy that is associated first
b. The security policy that is associated last
c. The security policy that has the highest weight
d. The security policy with the most secure service
8. Which is not a policy that can be configured as part of a security policy?
a. Guest Introspection Services
b. Network Introspection Services
c. Distributed firewall rule
d. SpoofGuard
9. A security policy named Santa Maria is configured with a distributed firewall rule and then applied to a security group named La Pinta.
Based on this configuration, which two conditions are true? (Choose two.)
a. The source or the destination of the distributed firewall rule is La Pinta.
b. The distributed firewall rule is added below any existing rules, but above the default rule.
c. Both the source and destination of the distributed firewall rule can be Any.
d. Santa Maria can be applied to another security group.
e. The distributed firewall rule is added at the top so it will be enforced before any existing rules.
10. Where are security tags created?
a. In NSX Manager
b. In vCenter
c. In Service Composer
d. In the security service provider
Services providers, in the context of NSX, are NSX registered entities that deliver network and security services beyond those offered natively by NSX. The fact that you can register non-NSX entities with NSX to enhance NSX functionality turns NSX into both a network platform and a security platform.
The nonhardware based services delivery sometimes requires the deployment of a virtual appliance in the ESXi host(s) where the virtual machine(s) that will receive the service is(are) running. In Chapter 10, “Layer 2 Extensions,” we touched on hardware-based services with Brocade’s Hardware VTEP. Table 16-2 lists the security services that may be delivered by service providers and whether VMware, a VMware Technology Partner, or both make available the service.
There are two types of security services:

Guest Introspection, such as malware protection and data security, requires that the virtual machine be running VMware Tools.
Network Introspection, such as application firewalls and intrusion prevention, are delivered by assigning a slot in the IOChain to redirect traffic to the virtual appliance delivering the security service. When traffic leaves the virtual machine toward the network or when the traffic leaves the network toward the virtual machine, the Network Introspection Service appliance receives the interesting traffic after the DFW processes it.
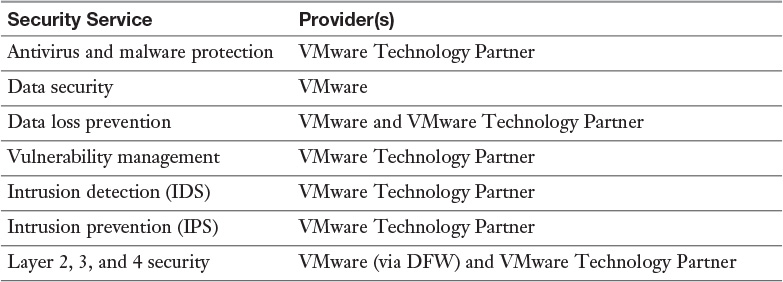
Figure 16-1 shows virtual machine DB_01 with a security service from Trend Micro. The Trend Micro virtual appliance is doing Network Introspection for all interesting traffic from and to DB_01.
1. DB_01 sends interesting traffic (it doesn’t matter what the destination is).
2. DB_01’s DFW enforces the Layer 2, Layer 3, and Layer 4 security policies applied. For simplicity I’m skipping over the fact that the DFW works at the vNIC level and just assuming that DB_01 has a single vNIC.
3. If the DFW allows the traffic, the traffic is then passed to the Trend Micro Deep Security Virtual Appliance, hanging off slot 4 in the IOChain.
VMware calls this traffic redirection traffic steering. The security service appliance has a vNIC, but it is only used for management plane traffic.
4. The Trend Micro virtual appliance performs Network Introspection. If the traffic is allowed, the traffic is sent back to the kernel.
5. The host forwards the traffic to the network. The network entry point can be a standard portgroup, a dvPortgroup, or a logical switch.
6. The host receives the interesting traffic from the network.
7. The host sends the traffic to the DB_01’s DFW.
8. DB_01’s DFW enforces the Layer 2, Layer 3, and Layer 4 security policies. If the traffic is allowed, the traffic is sent to the next slot in the IOChain.
9. The traffic is given to the Trend Micro Deep Security Virtual Appliance, in slot 4 in the IOChain.
10. The Trend Micro Deep Security Virtual Appliance performs Network Introspection.
11. If Trend Micro Deep Security Virtual Appliance allows the traffic, it is forwarded to DB_01.
Two tasks need to take place for a security service to be available to NSX. The first task is to register the service with NSX Manager (similar to how NSX Manager was registered with vCenter in Chapter 3, “NSX Architecture and NSX Manager”). The second task is to deploy the nonhardware based service provider’s appliance in each of the ESXi hosts in the clusters where the virtual machines are.
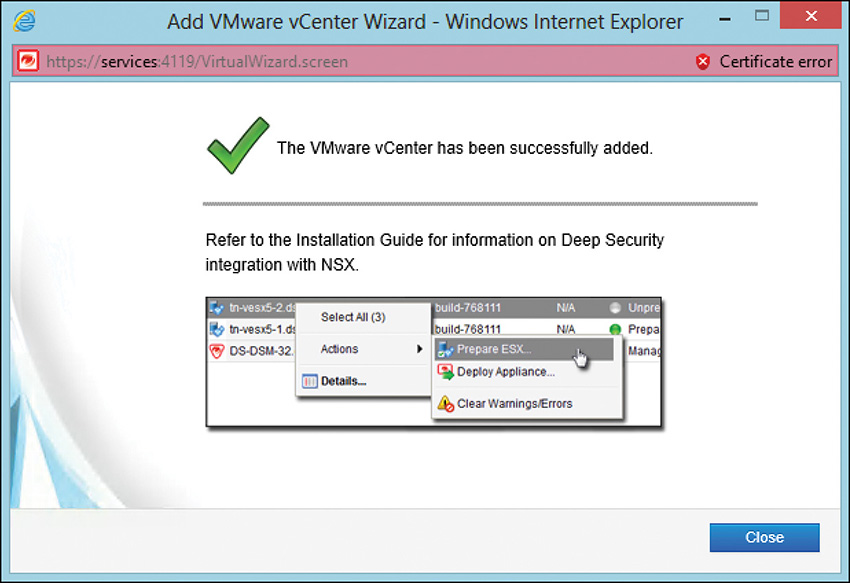
The registration of the service varies based on the provider of security service being registered. I happen to have Trend Micro’s Deep Security Manager and Virtual Appliance, so I’ll be using its security service solution to go over this task. (I won’t cover the step-by-step on how to configure the Trend Micro Deep Security Virtual Appliance itself as it’s beyond the scope of this book and not part of the exam blueprint.) First, have a look at Figure 16-2. It shows the Service Definition’s Service Managers view of NSX. The Service Managers view is where you can find all the service providers registered with NSX. Once Trend Micro is registered with NSX it shows up here.
A service provider may register more than one security service with NSX.
Now let’s get started in registering our Trend Micro Service:
Note
The Trend Micro screenshots that follow are for Deep Security Manager registering with NSX 6.1.
Step 1. Connect to the Trend Micro Deep Security Manager. This step varies by service provider.
Step 2. Enter the vCenter’s FQDN or IP and its credentials. You also are asked for NSX Manager’s FQDN or IP and its credentials. This also registers Deep Security Manager with NSX as a service, which is what is actually needed.
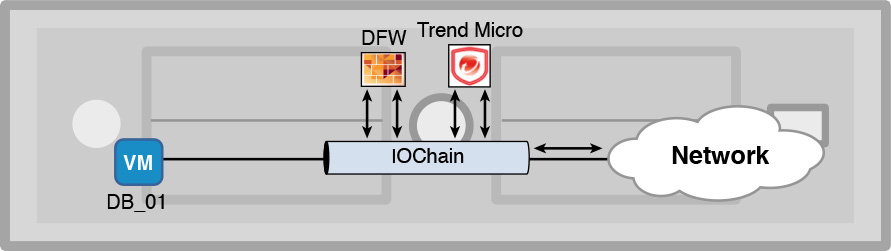
Step 3. Wait for the Deep Security Manager’s message stating the VMware vCenter has been successfully added, as shown in Figure 16-3. vCenter is listed in the Computer view on the left panel.
Step 4. Return to the Service Managers view of Networking and Security, select the NSX Manager that service registered with, and validate that you can see the Trend Micro Manager, as shown in Figure 16-4.
Our second task is to deploy the appliance to those ESXi hosts that will be running the VMs that use the service. Remember that NSX Manager likes to deploy at the cluster level.
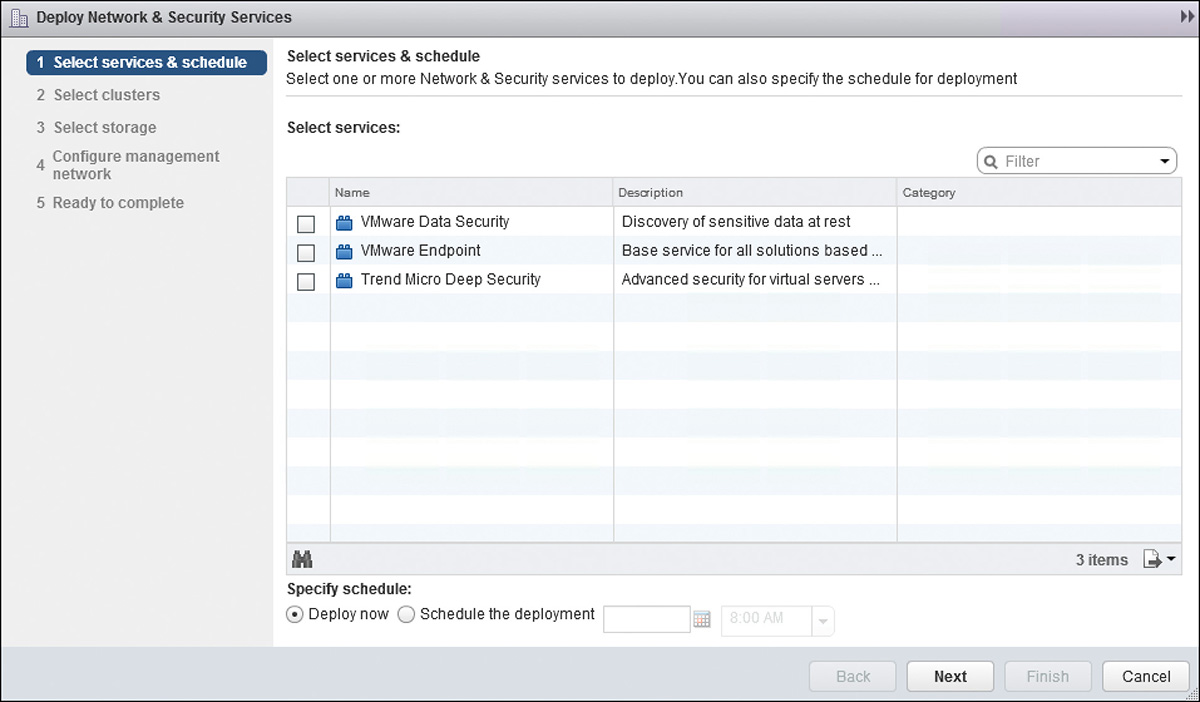
Step 1. Go to NSX Manager’s home page and select the Installation view.
Step 2. Select the NSX Manager that has the registered service and click the Service Deployments tab.
Step 3. Click the green + icon and wait for the Deploy Network & Security Services Wizard to open. You see all available service appliances that can be deployed, as shown in Figure 16-5.
Step 4. In the Select Services & Schedule view, select the service appliance(s) you want to deploy. You can select multiple services if you are going to be deploying them in the same clusters. Further down the window, you have the option to schedule the deployment for a certain date and time.
Step 5. Click Next.
Step 6. In the Select Clusters view, select the clusters to deploy the security service virtual appliance(s) and click Next. You can only do one data center at a time.
Step 7. In the Select Storage and Management Network view, select (per cluster), the datastore to deploy the service appliance(s), and the dvPortgroup to connect the management interface of the service appliance(s). You can also select to assign an IP by DHCP or from an IP pool.
Step 8. In the Ready to Complete view, review the configuration and click Finish.
At this point (or whenever you scheduled the service appliance[s] to be deployed), the following happens:
1. NSX Manager gets the service appliance ovf from the Service Management entity.
2. NSX Manager gives the ovf to vCenter and instructs it where to deploy it, per the instructions you provided.
3. vCenter creates a resource pool in each cluster, deploys the ovf, and adds the service appliance(s) to the resource pool, as shown in Figure 16-6.
The resource pool has expandable and unlimited CPU and memory reservations.
You are probably wondering: How do I add or configure a VM so that it leverages the security service? First, you need to create service profiles in the service provider manager (which varies by security service provider), which are made available to NSX. You then can apply them via NSX to VMs. The service profiles are the policies the security service appliance enforces. You have two options to apply the security service to a VM: Option 1, via Service Composer, and Option 2, via the logical firewall. In the next section we discuss how to apply the security service’s profiles to a VM to do Guest Introspection and Network Introspection.
Service Composer is one of the features that makes it possible for NSX to be a security platform. Service Composer allows for the consumption and enforcement of security services by applying policies to VMs. Service Composer allows for a VM with multiple vNICs to have the same policy applied to all its vNICs or to have different policies applied to each vNIC. Once a VM has been assigned to a policy, NSX enforces the policy on the VM no matter where the VM is running (as long as it runs in an ESXi host that has been prepared).
There are two parts to Service Composer: the security groups that contain a list of VMs and the security policies that get applied to the security groups (and thus the VMs).
A security group is the list of VMs or VMs’ vNICs for which you want to provide some security protection. A VM or its individual vNICs can be in a single security group or multiple security groups. A security group’s VM inclusion is done dynamically when a VM that is powered on matches the security group’s membership criteria. If a VM is powered off, the VM and its vNICs are removed from the security group membership. If the VM is powered on again, vCenter notifies NSX Manager, which then adds the VM and its vNICs into the security group again. A security group can be created before the VM is created.
To create a security group, follow these steps:
Step 1. Go to the Networking and Security page and select the Service Composer view.
Step 2. Click the Security Groups tab.
You may also go to the NSX Manager’s home page from the Networking and Security page, and then go to Manage > Grouping Objects > Security Groups.
Step 3. Click the New Security Group icon and wait for the New Security Group Wizard to open.
Step 4. Enter the name of the security group and click Next. You can also include a description.
If you create the security group from the Primary NSX Manager’s home page, you have the option to make this a universal security group by checking the Mark This Object for Universal Synchronization box.
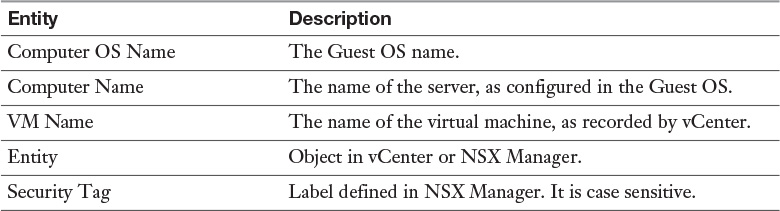
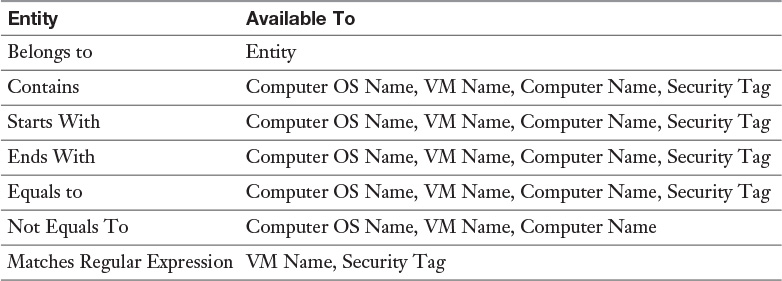
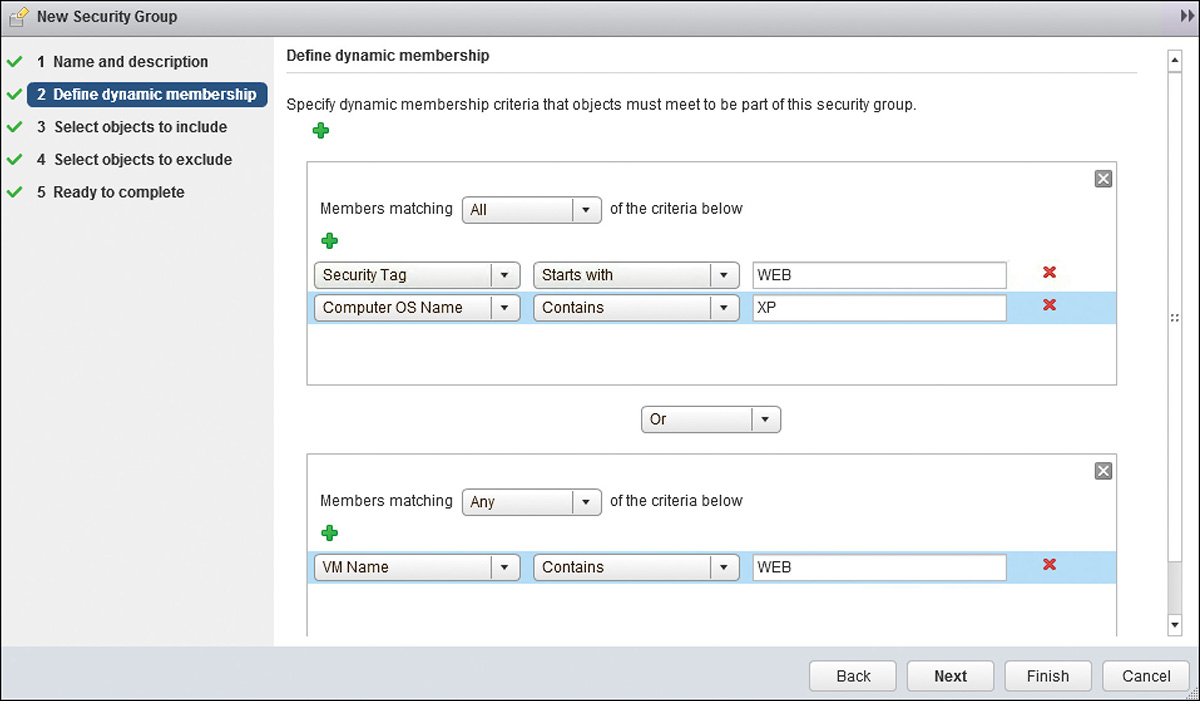
Step 5. In the Define Dynamic Membership view, enter the criteria that the virtual machine must match for inclusion in the security group and click Next. Table 16-3 shows the virtual machine dynamic selection options, whereas Table 16-4 shows the criteria that must be matched for the selection.
VMware does not support dynamic membership for universal security groups.
Multiple criteria groups can be created.
Matching options for criteria groups are And and Or.
Each criteria group can have multiple criteria.
Matching options within a criteria group are Any and All, as shown in Figure 16-7.
Step 6. In the Select Objects to Include view, manually select any virtual machine(s) that would not be dynamically selected in step 5 and click Next.
Multiple objects containing vNICs, IPs, or MAC addresses can be selected. Table 16-5 shows the objects available for inclusion.
Table 16-5 has a line for security groups. You can select an existing security group, which is then called a nested security group. Nested security groups may be used to reference some level for hierarchy among virtual machines for the purpose of policy enforcement. For example, a two-tier application may have a security group for each tier and a third security group that references the two-tier specific security groups.
Universal security groups only support security groups, IP sets, and MAC sets. All three must be universal.
Step 7. The next view, Select Objects to Exclude, is the exact opposite of Select Objects to Include. Manually select any virtual machine(s) that you do not want to be included in this security group. Even if the object has been included in steps 5 or 6, the object selected here always excludes from this security group. The options are the same as those in Table 16-5.
Universal security groups only support security groups, IP sets, and MAC sets. All three must be universal.
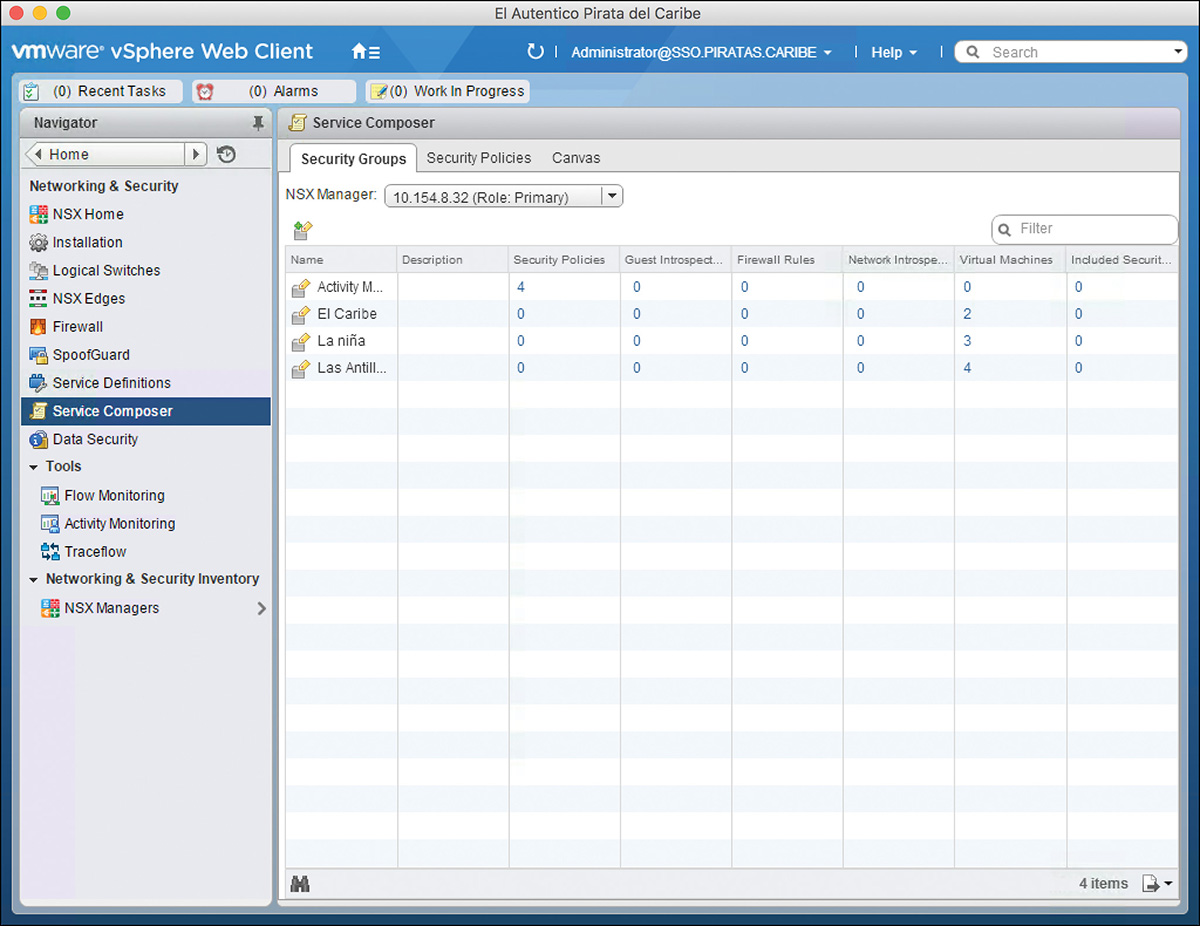
Step 8. Click Next, review your changes, and click Finish. Figure 16-8 shows the Security Groups tab with some security groups that have been created.
Now that we have some security groups, let me go on a slight tangent and revisit the logical firewall (this one is for you, security team). In Chapter 15, “Distributed Logical Firewall,” Table 15-5 listed security groups as one of the options for the firewall rules’ Source and Destination fields, and Table 15-7 listed security groups as one of the options for the firewall rules’ Applied To field. One potential advantage of using security groups in the logical firewall rules is that updates to the security group do not require that the logical firewall rules be republished. When a security group’s membership is updated, and the security group is being referenced in a logical firewall rule, NSX Manager immediately updates the necessary ESXi hosts about the membership change.
As cool and useful as using security groups in logical firewall rules sounds, it is not a panacea. As your environment evolves, security needs will change. Anyone who works in the data center knows that almost every new application that gets deployed comes with new security policies that don’t quite match the existing ones. This often requires creating a new firewall rule in the firewall. To allow for granular control of the enforcement of policies without impacting existing workloads, you want to use security policies from Service Composer for DFW rules.
Security policies are the security team’s NSX best friend. This is where you define exactly what you want happening in terms of security for VMs (and their vNICs). Security policies have one or more of the following:
Guest Introspection Services
Distributed firewall rules
Network Introspection Services
Guest Introspection provides security services at the VM level, such as malware protection. Network Introspection provides security services on the payload of the packet. The same service provider may provide both Guest Introspection Services and Network Introspection Services.
After a security policy is created, you associate it to one or more security groups. The moment you finish the association, the security policy to the security group(s), NSX Manager instructs the ESXi hosts to enforce the policies in the security policy to each and every VM in the security group. As the security group membership changes (VMs get created and/or powered on), the policies in the security policy associated to the security group get enforced on the new security group members. If a VM is removed from a security group, the policies associated with that security group will no longer be enforced on that VM.
To create a security policy, follow these steps:
Step 1. Go to the Networking and Security page and select the Service Composer view.
Step 2. Click the Security Policies tab.
Step 3. Click the Create Security Policy icon and wait for the New Security Policy Wizard to open.
Step 4. In the Name and Description view, enter a name and a description.
a. If you want to use the policies of an existing security policy, check the box for Inherit Security Policy and select the security policy.
b. In the Advanced section, you can change the weight of the policy. The weight is used to determine the ranking of the security policies relative to each other. For new security policies, NSX Manager adds a default weight of 1,000 plus the highest weight of any existing security policy.
c. Click Next.
Step 5. In the Guest Introspection Services view, click the green + icon to add a Guest Introspection Security Service and wait for the Add Guest Introspection Services Wizard to open.
This is how we call up the service configurations created in the Guest Introspection service provider. At the moment this security policy is applied to a security group, NSX Manager finds out the hosts that are running all the virtual machines in the security group and tells the service provider to push the security service configuration to the security service virtual appliances in the hosts.
a. Enter a name and description.
b. Choose whether to apply or block the service. If you block the service, this service won’t be enforced on the virtual machines of the Security Group(s) this security policy gets associated with.
c. If you choose to block the service, select the service type to block.
d. If you choose to allow the service, select the service name.
e. If you choose to allow the service, select the service’s profile to use. The list of available profiles is provided by the security service provider to NSX Manager. The same service name (step 5d. above) may provide multiple profiles to choose from.
f. In State, select to enable (or disable) the Guest Introspection Service. Disabling the Guest Introspection Service is typically used for staging. You configure the security policy now and turn it on (enable it) at a later time, perhaps during the maintenance window.
g. Select whether to enforce the service. If enforced, this service can’t be overwritten by other security policies.
This is mostly used when this security policy is inherited by other security policies (step 4a.). When this Guest Introspection Service gets inherited, it will be enforced first before any other Guest Introspection Services the inheriting security policy may have.
h. Click OK.
Step 6. Repeat step 5 to add more Guest Introspection Services. Click Next when done.
Step 7. In the Firewall Rules view, click the green + icon and wait for the New Firewall Rules Wizard to open.
This is the alternative I alluded to when I diverted the conversation toward the logical firewall at the end of the security group discussion. You can add DFW rules directly in the security policy. By writing the DFW rules in the security policy, you only impact the virtual machines that belong to the security group where this security policy gets applied.
a. Enter a name or description for the DFW rule.
b. For Source and Destination, the options are the Policy’s Security Groups, existing Security Groups, and Any. The Policy’s Security Groups means all the security groups this security policy gets associated to. If you select existing security groups you have the option to negate the source or destination.
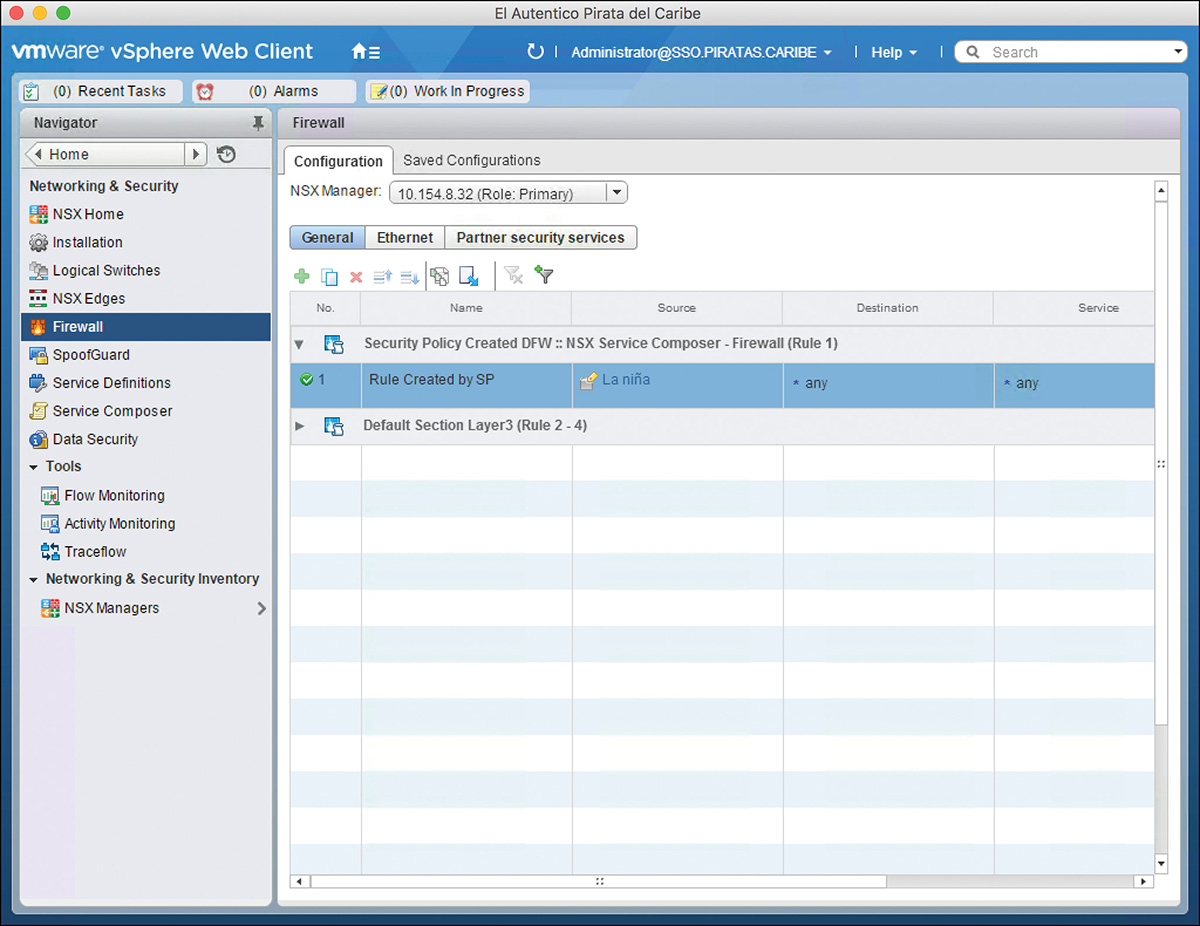
You can apply the same security policy to multiple security groups. So what happens here is that the DFW rule gets created under a new DFW section named after the security policy. The DFW rules Source and Destination fields are updated to include the security group the security policy gets associated to. For example, have a look at Figure 16-9. It shows a DFW rule that has two security groups in the source. This DFW rule was added because the same security policy, Enriquillo, was applied to both security groups. Security policy Enriquillo had a DFW rule that used the security group as the source. And while we are on the topic, either the source or the destination, or both, must be the policy’s security group.
c. Select the Service(s) for the DFW rule.
d. Select to Allow or Block.
e. Choose whether to log the rule.
f. Choose whether to enable or disable the rule. If disabled, the rule won’t be enforced. This is another good way to stage the security policy.
g. Click OK.
Step 8. Repeat step 7 to add more DFW rules and then click Next.
Step 9. In the Network Introspection Service view, click the green + icon and wait for the Add Network Introspection Service Wizard to open.
a. Write down a name and a description.
b. Choose whether to redirect the traffic being defined here to the service’s virtual appliance.
c. Select the service and the profile.
d. Select a source and destination to match the interesting traffic. Selection options are existing Security Groups, the Policy’s Security Group, and Any. You have the option to negate the Source and the Destination. Like the Firewall section, the Source, the Destination, or both must be the policy’s security group.
e. Select the service(s) to match the interesting traffic.
f. Choose whether to enable or disable the rule.
g. Choose whether to log the rule.
h. Click OK.
Step 10. Repeat step 9 to add more Network Introspection Services and then click Next.
Step 11. Review your changes and click Finish. Figure 16-10 shows the Security Policies tab with some security policies that have been created.
Let’s do a quick recap of what we’ve done thus far in this chapter:
1. We registered security services with NSX Manager.
2. We deployed the security service’s virtual appliances in the clusters.
3. We created security groups.
4. We created security policies.
Now on to the final step to associate a security policy with one or more security groups. While in the Security Policies tab, follow these steps to associate a security policy to one or more security groups:
Step 1. Select the security policy to associate.
Step 2. Click the Apply Security Policy icon and wait for the Apply Security Policy window to open.
Step 3. Select the Security Group(s) to associate.
Step 4. Click OK.
Step 5. Repeat steps 1 through 4 to associate other security policies to security groups.
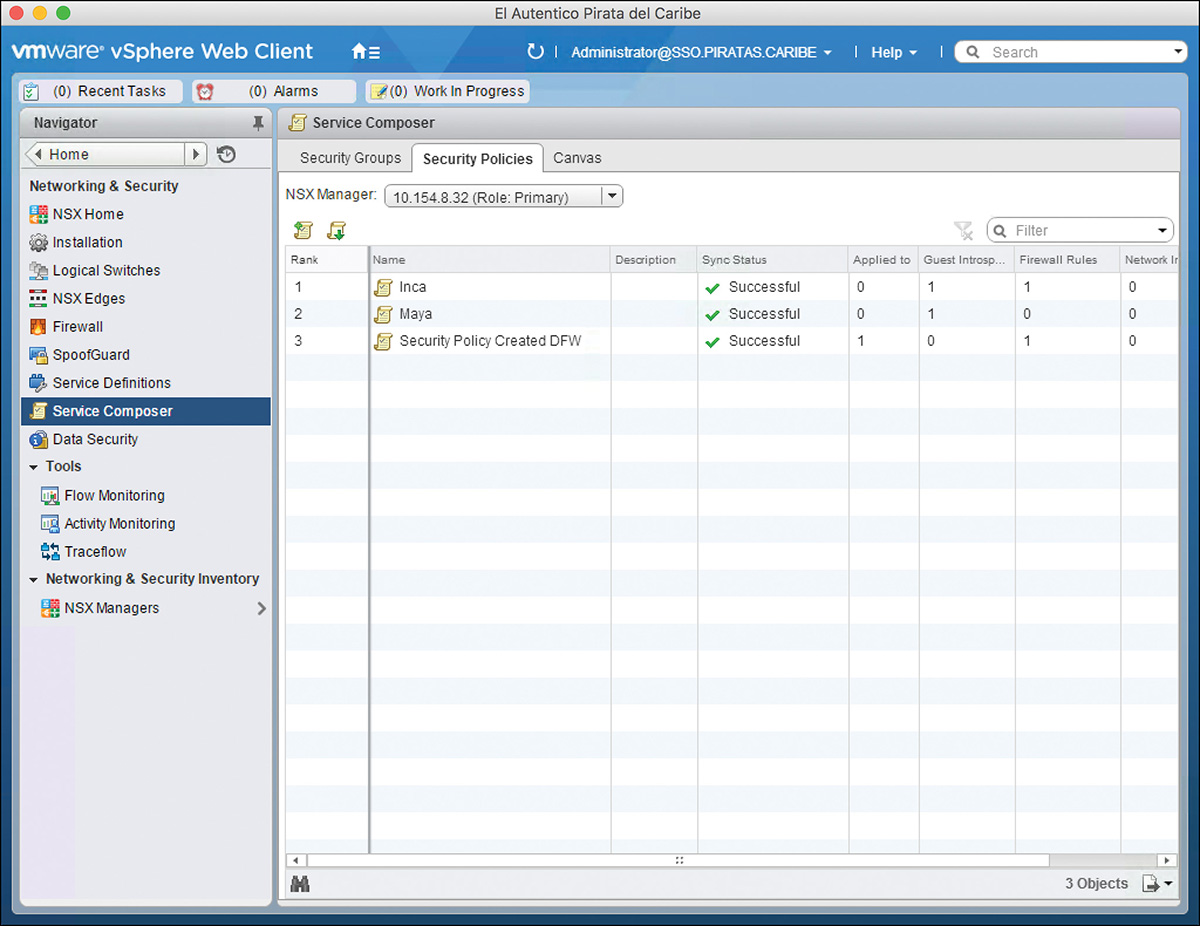
It is possible to associate two security policies to the same security group or have a VM belonging in two different security groups, each with its own security policy association. When this happens, one of the security policies must be enforced first before the other security policy. For example, if two security policies have a DFW rule and are associated with the same security group, which DFW rule is processed first? Have another look at Figure 16-10. Do you see the Rank column? The rank placement is directly related to the security policy’s weight. The security policy with the highest weight is ranked 1. The security policy with the lowest rank number will be enforced before security policies with higher rank numbers (when applied to the same VM).
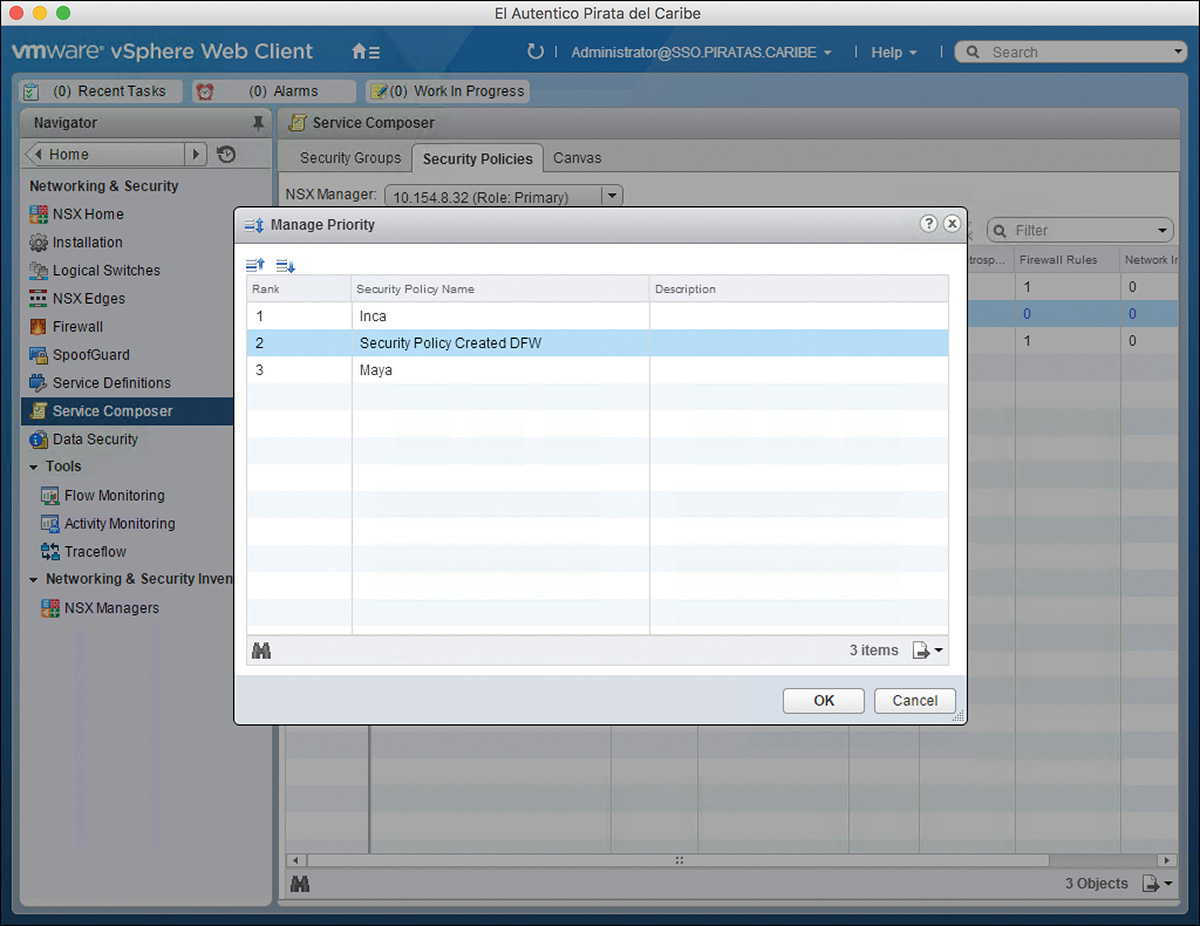
You can change the rank of any security policy by clicking the Manage Priority icon to display the screen shown in Figure 16-11. Optionally, you can edit the security policy’s weight.
The logical firewall can be configured to redirect interesting traffic to a security service virtual appliance. In the Firewall view of the Networking and Security page is a tab called Partner Security Services. In that tab, you can configure the equivalent of a firewall rule with Source, Destination, and Service fields. However, the Action field gives you slightly different options from a normal firewall rule. The options you have are the following:
Action:
Redirect: Send traffic that matches this rule to the security service virtual appliance.
Do not Redirect: Do not send the traffic that matches this rule to the security service virtual appliance.
Balance: Use the distributed load balancer for traffic that matches this rule.
Redirect To: Select the services’ profile and the logical switch or security group that will be bound by this rule. This Redirect To field also serves as the Apply To field in logical firewall rules.
Direction: In, out, or in/out relative to the virtual machine.
Log: To log or not to log (that is the question).
Comments: If desired, add a note or comment.
Virtual Server IP: This option is available only if you select an Action of Balance. This IP will be the distributed load balancer’s VIP.
Before you can use the logical firewall service redirection, you must first register the Security Service provider with NSX Manager and deploy the security service virtual appliance.
Rules created in the Partner Security Services tab are enforced after all Ethernet and General rules are processed. This means that a Layer 2 or Layer 3 and Layer 4 rule must allow the interesting traffic identified in the Partner Security Services rule.
A security tag is a label that you create in NSX Manager that can be attached to a VM. Security tags can be used as a membership parameter for security groups. So what’s so sexy about it since we already have so many other alternatives to add VMs in security groups? For one, a security tag is fully controlled by NSX Manager, so no matter what modifications are done to the virtual machine in vCenter (short of removing the virtual machine from vCenter’s inventory or deleting it) the virtual machine membership in the security group will remain. Another benefit of using security tags: You can create security workflows where a security service provider interacts with NSX Manager, triggered by some security event, and instructs NSX Manager to attach a security tag to a particular virtual machine.
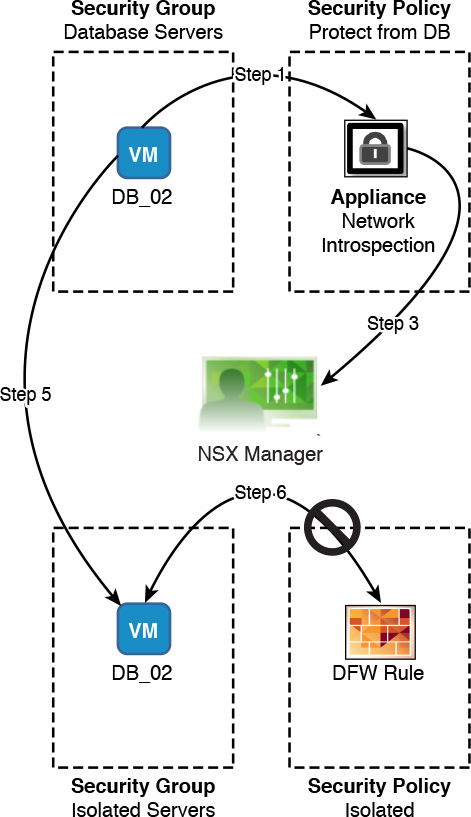
As an example, let’s go over Figure 16-12, where a virtual appliance is providing a security service to virtual machine WEB_03. The initial conditions are as follows:
DB_02 belongs to the security group named Database Servers.
A security policy named Protect From Database Servers is associated to Database Servers. Protect From Database Servers has a Network Introspection Service.
A security group named Isolated Servers has as a membership criteria of security tag named Isolate Me.
A security policy named Isolated is associated to Isolated Servers.
Security policy Isolated has a DFW rule blocking all traffic for the policy’s security group.
Security policy Isolated has a higher weight than security policy Protect From Database Servers.
1. DB_02 is sending traffic, which is steered to the Network Introspection virtual appliance.
2. The traffic triggers a security alert in the virtual appliance.
3. The security alert causes the Network Introspection provider to alert NSX Manager, requesting that security tag Isolate Me be placed on DB_02.
4. NSX Manager attaches the security tag Isolate Me to DB_02.
5. DB_02 becomes a member of Isolated Servers.
6. A DFW rule blocks all traffic to and from DB_02.
To create a security tag, follow these steps:
Step 1. From the Networking and Security page, click NSX Managers.
Step 2. Click the NSX Manager where you want to add the security tag.
Step 3. Go to Manage > Security Tags.
Step 4. Click the green + icon and wait for the New Security Tag Wizard to open.
Step 5. Enter the name and description of the security tag and click OK.
Once you have created the security tag, you can manually assign it to one or more virtual machines. To manually assign a security tag, follow these steps:
Step 1. Select the security tag.
Step 2. Click the Assign Security Tag icon and wait for the Assign Security Tag window to open.
Step 3. Select the virtual machines to assign.
Step 4. Click OK.
NSX Manager can have its own list of IPs and MAC addresses, which can be used as Source and Destination in DFW rules, as well as selection criteria for security group membership. NSX Manager IP sets are separate and independent of NSX Edge IP sets.
To create an NSX Manager IP set, follow these steps:
Step 1. From the Networking and Security page, click NSX Managers.
Step 2. Click the NSX Manager where you want to add the IP set.
Step 3. Go to Manage > Grouping Objects.
Step 4. Select IP Sets, click the green + icon, and wait for the New IP Set Wizard to open.
Step 5. Enter a name and description for the IP set.
Step 6. Type the IP address to include in the set:
a. You can enter a single IP address.
b. You can enter an IP range such as 10.73.21.154-10.73.21.73.
c. You can enter a subnet, such as 10.73.21.0/24.
Step 7. Check the Enable Inheritance to Allow Visibility at Underlying Scopes box if you want to allow this IP set to propagate to other scopes. This option is not available for universal IP sets.
Step 8. Check the Mark This Object for Universal Synchronization box to make this a universal IP set. This option is only available for the Primary NSX Manager.
Step 9. Click OK.
Step 10. Repeat steps 4 through 9 to add more IP sets.
To create a MAC set, follow these steps, starting from the Grouping Objects window:
Step 1. Select MAC Sets.
Step 2. Click the green + icon and wait for the New MAC Set Wizard to open.
Step 3. Enter a name and description for the MAC set.
Step 4. Type the MAC address to include in the set. You can enter multiple MAC addresses separated by commas.
Step 5. Check the Enable Inheritance to Allow Visibility at Underlying Scopes box if you want to allow this MAC set to propagate to other scopes. This option is not available for universal MAC sets.
Step 6. Check the Mark This Object for Universal Synchronization box to make this a universal MAC set. This option is only available for the Primary NSX Manager.
Step 7. Click OK.
Step 8. Repeat steps 2 through 7 to add more MAC sets.
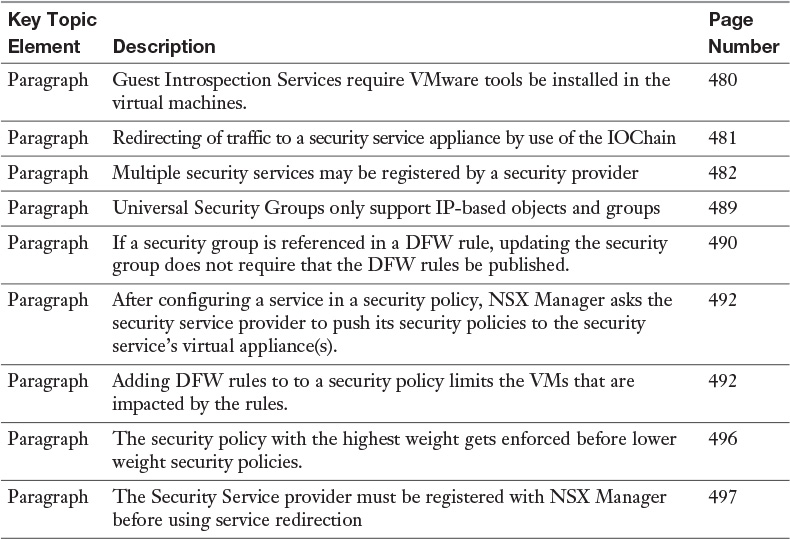
Review the most important topics from inside the chapter, noted with the Key Topic icon in the outer margin of the page. Table 16-6 lists these key topics and the page numbers where each is found.
Download and print a copy of Appendix C, “Memory Tables,” (found on the book’s website), or at least the section for this chapter, and complete the tables and lists from memory. Appendix D, “Memory Tables Answer Key,” also on the website, includes the completed tables and lists so you can check your work.
Define the following key terms from this chapter, and check your answers in the glossary: