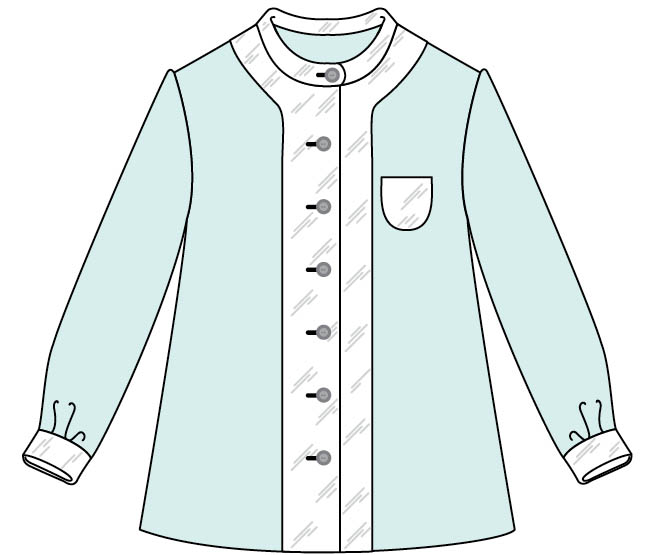
white areas show where interfacing can be applied beneath fabric
Most garments and some home-decor projects require an additional layer of fabric to add body and to support the intended shape of the finished project. Inner-support options include interfacing, underlining, lining, and interlining. Most garments have interfacing somewhere. Jackets and coats, as well as fitted skirts, dresses, and bodices in ball and wedding gowns, are also often lined. Underlining is an alternative to a slippery lining; it adds body and lines a garment in one operation. Knowing how and when to use these methods and materials to support fabrics is essential to creating projects that will hold their shape and wear well for their lifetime..
Interfacings add shape, stability, and structure to a sewing project. They are available in an array of fabric types — knit, woven, nonwoven, and weft insertion — and as sew-in or fusible interfacings. “Fusibles” are bonded permanently to fabric, using an iron. Choose from an array of weights to produce results that range from soft and fluid support to quite stiff shaping.
Q: Where is interfacing used?
A: Sew-in interfacings are basted to the garment edge on the inside before the construction begins. Fusible interfacings are usually applied directly to the facings instead. (Neither will show on the outside of the finished garment.) In addition to necklines, front- and back-opening edges, and the armholes in sleeveless garments, interfacing is also used to add body, shape, and a bit of firmness to design details, such as waistbands, collars, cuffs, front bands and tabs, welts, flaps, pockets, and buttonholes. In tailored coats and jackets, you’ll find interfacing adding weight and support to hemline edges too.

white areas show where interfacing can be applied beneath fabric
Q: What are the characteristics of each type of interfacing?
A: Consider the qualities of these major types as they relate to the fabric you are using and the desired results.
Woven. A lightweight fabric with lengthwise and crosswise threads and some give in the crosswise direction; cut edges will ravel; lightweight muslin and batiste are good examples; organdy and silk organza are good woven choices for lightweight and/or sheer fabrics; a few fusible versions are available, but most are sew-in.
Nonwoven. A paperlike fabric that is a web of man-made fibers bonded together; some are completely stable (they have no give), but many have multidirectional stretch; edges do not ravel; cutting with the grain is unnecessary unless the specific interfacing has give only in the crossgrain; lightweight versions are good for knits and for soft shaping in woven fabrics; available in sew-in and fusible versions and a wide range of weights.
Knit. Soft, fluid, tricot knit interfacing in light and medium weights; has crosswise give; stable in the lengthwise direction; great for knits but also offers soft shaping without crispness in wovens; available as a fusible only; does not ravel; use to completely interface/underline woven fabrics that need more body.
Weft insertion. Knit interfacing with threads interlaced in the crosswise direction through the knit loops for crosswise stability; has bias give like a woven; more drape than a woven interfacing, less than a knit fusible; available in light to tailoring weights; excellent in knits and wovens; does not ravel. Note: Warp-insertion interfacings are similar, but the threads interlace through the vertical loops, so the fabric has crosswise give.
Q: Are there any guidelines for selecting the best interfacing for my project?
A: Some patterns suggest appropriate interfacing types and weights for specific fabrics. Consider the following in your selection process:
Learn what to use for interfacing by examining ready-to-wear clothing. Determine what was used where and why, and whether or not you like the results. Let your preferences and observations guide your interfacing selection for similarly styled garments and fabrics.
Q: Which is better: a sew-in or a fusible interfacing?
A: A sew-in interfacing usually doesn’t affect the hand or change the character of the fabric like a fusible does. A fusible adheres to the fabric, making it somewhat stiffer after application. As you gain experience with different types, follow personal preferences. Whenever possible, I choose a fusible; it’s fast, easy to apply, and stays put inside the garment when fused correctly. On fabrics that can’t take the heat and/or moisture, plus the pressure that is required for fusing (see next question), use a woven or nonwoven sew-in interfacing.
Q: So, what types of fabric cannot take the heat and pressure required for fusing?
A: Use a sew-in interfacing for fabrics that are highly textured, silk and rayon velvets, napped, beaded or sequined, and highly heat-sensitive. In addition, fusibles are not appropriate for open-weave fabrics and laces that will reveal the interfacing. Fusing is not advised (and frequently doesn’t work) for metallics, faux fur, or real leather or suede. However, you can use a fusible with synthetic suede (but not synthetic leather).
If you are in doubt about using a fusible, do a test-fuse sample on a scrap. You may be surprised to find that fusibles work on some corduroys, as well as on cotton velvet and velve-teen, as long as you don’t press from the right side.
Q: How do I decide if a sew-in or a fusible is the best choice for a fabric that can take either type?
A: Place a layer of sew-in interfacing between two layers of the fashion fabric and drape it over your hand to see how it feels. Is the result crisp enough? Drapeable enough? Flexible enough? Stable enough? For a collar, shape the layers around your neck; for a cuff, wrap the layers around your wrist.
To choose the best fusible interfacing, test-fuse your choice(s) on the actual fabric. Preshrink the interfacing(s) (see below) and fuse as directed (see page 236). Cut 3" squares of each one you’re considering. Fuse to a piece of fabric that is large enough to fold over the interfacing so you can feel all three layers. For washable garments, launder your test sample to see how it holds up. Save your test-fused samples in your sewing notebook (see page 48), noting the brand name of each one.
It’s wise to keep a variety of interfacing types and weights on hand so you can test, compare, and choose the best one for the project. My stock includes 5-yard cuts (I buy on sale) of my favorites.
Q: What do I look for after fusing?
A: After fusing, examine the fabric’s right side for dots of fusible resin bleed-through or unsightly puckers or wrinkles. Feel it to make sure the results are firm enough, but not too firm, for the intended area. If the fusing is unsatisfactory with the general fusing method described on pages 236–238, experiment with more steam, less steam, a lower or higher iron temperature, a damp press cloth, or a dry iron until the bond is firm. If you can’t get a firm bond on your fabric no matter what you try, select a sew-in.
Q: How do I preshrink interfacings?
A: Be sure to read the bolt end or the plastic interleafing that comes with the interfacing yardage for suggestions about preshrinking. Follow these guidelines:
Q: How do I wet-shrink fusible interfacings?
A: Follow these easy steps:
Q: How do I apply fusible interfacing so that it stays put in the garment throughout its lifetime? I’ve had it come undone in some of my projects.
A: Always read the directions that come with the interfacing. Fusible interfacings usually require four things for a permanent fuse: heat and steam from your iron (some may not require steam), pressure from your hand on the iron, and adequate fusing time. The following steps outline a standard fusing method that works for most fusibles, but you may find the manufacturer’s directions for a specific interfacing varies from these in one or more ways. Be sure to ask for and save a copy of the fusing directions for each interfacing you like in your sewing notebook (see page 48).
If you’re having trouble bearing down on the iron for the amount of pressure needed, lower your ironing board a bit so you can use your body weight to exert additional pressure on the iron.
Q: How do I attach a nonfusible woven or nonwoven interfacing?
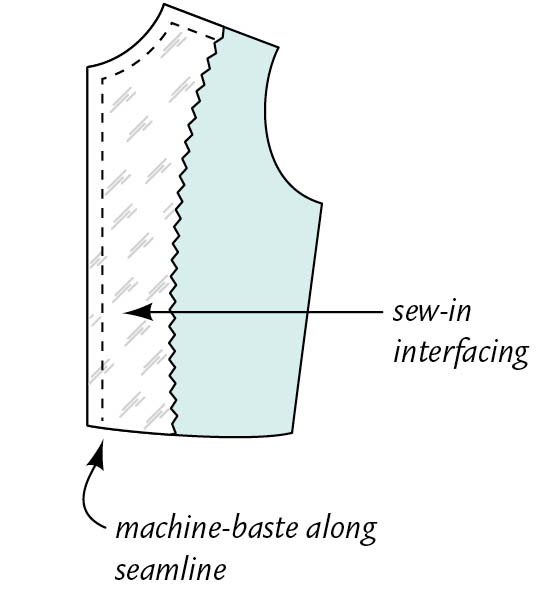
A: Cut out on the grain, just as for fashion fabric, and use pinking shears to trim away 1⁄2" along the inner edges (the ones that won’t be caught in a seam) so they won’t show past the inner finished edge of the facing. Baste to the wrong side of the garment pieces after staystitching (see pages 104–105) and before you begin the construction. To glue-baste, dab glue stick (or apply tiny dots of fabric glue) along the raw edges of the garment piece on the wrong side and smooth the interfacing in place. Keep the glue away from the stitching line. Use your fingers to make sure the two adhere, and allow to dry.
Q: Is it okay to use more than one type of interfacing in a garment?
A: Yes, I do this often. Choose the best one for the desired finished effect in each location where interfacing is needed for support.
Q: How do I attach interfacing along a fold line?
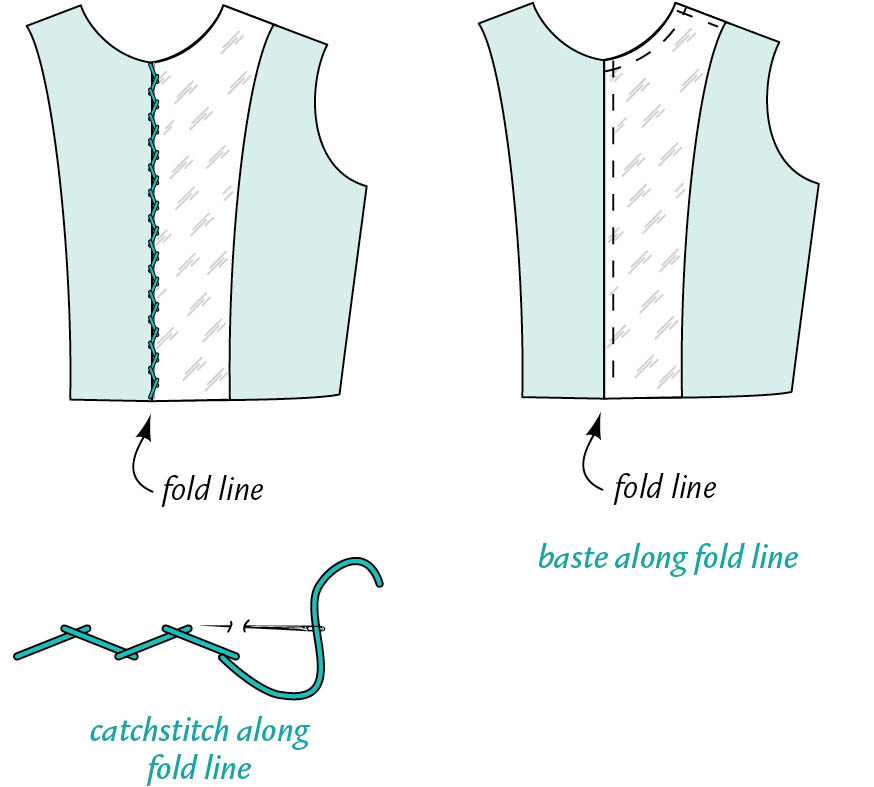
A: You have two choices. Either catchstitch the cut edge along the garment fold line, or hand- or machine-baste along the fold line, if the interfacing extends past it. The catch-stitching remains in the garment. The basting is removed after the garment is assembled, and the edges are topstitched to secure the interfacing.
Q: How do I prevent the inner edge of fusible interfacing from showing as a line on the outside of the garment?
A: Whenever possible, apply the interfacing to the facing, not to the garment. If you must apply directly to a garment section, pink the inner edge to make it less visible. Or, in some garments (jacket fronts and fitted bodices, for example), you may interface the entire garment piece for added support, which prevents interfacing shadow-through to the right side.
Q: I don’t have a large enough piece of fusible interfacing for my project, but I do have scraps. Can I piece it?
A: Yes, I do this often. It’s best to pink the edges where two sections meet, rather than overlapping them, for a smooth, flat join. This is a great way to use up scraps at midnight when the stores aren’t open and you want to sew! Store small pieces flat so you can use them for this purpose.
Q: What’s the best way to store fusible interfacing?
A: It’s impossible to press it to remove wrinkles or creases before cutting the required pieces. Roll it on a tube (from wrapping paper or paper towels, for instance). Preshrink the interfacing as directed on page 235, so it’s ready when you’re ready to sew — unless you will be steam shrinking it (see page 237). If the tube you are using isn’t long enough, carefully fold the interfacing lengthwise with fusible resin inside. Tuck a copy of the manufacturer’s instructions inside the tube. Cut a square of the interfacing to attach to a reference sheet for your sewing notebook (see page 48), along with the interfacing name and fusing directions.
Q: There is a brown buildup of fusible resin on my iron soleplate. How do I get it off?
A: It’s almost impossible to avoid this. You might have dropped a scrap of interfacing, resin side up on the ironing board; or sometimes the fusible “bleeds” onto your press cloth and transfers to something else when you use it the next time. Keep a tube of hot-iron cleaner handy for removing buildup; look for it in the fabric-store notions department. Follow the directions on the tube. One important precaution: Open the window for ventilation and locate the iron away from a smoke alarm.
To prevent the iron from picking up fusible resin, make sure the ironing board is swept free of any interfacing and fusibleweb crumbs. I use an adhesive lint roller to clean off the fusing space. Reserve a new press cloth for fusing and write “this side up” on one side, using an indelible ink pen. Keep that side facing you when you fuse, as some fusible resin can bleed through to the wrong side of the press cloth during fusing.
Q: After fusing my interfacing, I notice blisters in the fashion fabric. In some places it seems like the interfacing has actually separated. Can I fix this by re-fusing?
A: Probably not, particularly if this becomes noticeable after the garment is completed and has been cleaned or laundered. Blisters and separation are the result of improper fusing technique and can sometimes result from attempting to fuse interfacing to a fabric that resists fusing. The finish on the fabric may be the problem in this case. Sliding the iron while fusing can also cause this problem. Blisters point out the need to choose fusibles carefully, always testing first, and then ensuring optimum fusing conditions as outlined in the question about applying fusible interfacings on page 236.
Q: My fused sample has a lot of puckering and bubbling. What happened?
A: The fabric or the interfacing shrunk during the fusing, as a reaction to the heat of the iron. If the fashion fabric is bubbled, the interfacing is the culprit — and vice versa. To avoid this in your garment, see the question about how to pre-shrink interfacings on page 235.
Q: I’ve stopped using fusibles because the resin appears to seep through to the surface of my fashion fabric and shows up as small dots. What causes this?
A: For this very reason, I avoid using dot-resin fusible interfacings on smooth-surfaced fabrics, particularly lightweight and light-colored ones. I usually use an interfacing with flakes of resin, which results in an overall pattern that doesn’t strike through in an obvious way. This is just one more reason to test several fusible interfacing choices in order to choose the best one for your fabric. Reserve dot-resin fusibles for thicker and more firmly woven fabrics where strike-through is not going to be a problem.
Q: Is it possible to remove fusible interfacing if I’m not happy with the results?
A: You can try, but it can be tedious and may not work, especially with delicate or loosely woven fabrics or knits. Test first in a small section. Hold the steam iron close to the interfacing for several seconds to soften the fusible resin. Try to gently peel it away from the fabric while it’s warm. If you can’t lift and pull easily, warm it for an additional 10 seconds and try again. Continue in this fashion until it comes away easily — or give up. If you are successful but can see or feel fusible residue on the fabric, dampen a piece of muslin or similar fabric, position it on the fabric, press, and peel away immediately. Continue this process with clean fabric scraps until you have removed all residue.
In addition to the support of an interfacing, some garments require a lining, underlining, or interlining — or a combination of these.
Q: What’s the difference between lining, underlining, and interlining?
A: A lining is usually cut from a durable but smooth fabric with a somewhat slippery hand, so it’s easy to slip in and out of the finished garment. A lining adds a bit of support and covers the seam allowances and any other inner construction, such as the pocket bags inside a coat or jacket. Linings add a feeling of luxury, protect the fabric from body oil, and in skirts and dresses, eliminate the necessity of wearing a slip. They take some of the wearing strain, improving wrinkle-resistance and wear. Antistatic lining fabrics help eliminate garment cling.
Sew the lining as a separate “garment” to match the size and shape of whatever you’re making (a skirt or pants, for example), and “catch” it in the waistline seam and around a zipper. In coats and jackets, the lining is attached to the facings. In a jacket, it’s attached to the lower hem allowance, but usually hangs free at the bottom edge inside a skirt, pants, dress, or coat. For some fabrics, adding a lining means that seam finishing is unnecessary on the fashion fabric; however, the lining may require seam finishing to control raveling in garments where the lining is loose at the bottom edge.
An underlining is usually cut from a lightweight, nonslippery woven fabric and attached to each garment piece before any sewing is done. Then the two pieces of fabric are treated as one during the construction. Choose this method to enhance the performance (as in adding body or cutting down on wrinkles) and/or appearance (change the color) of the fashion fabric. The underlining can also double as a lining, or in some cases, you may want to line the garment as well. Sometimes, you can use a lightweight fusible interfacing as the underlining. When a garment is underlined, you may not need to interface it; that’s a decision only you can make by handling the underlined fabric to determine if it adds enough body at the edges.
An interlining is a thin layer of fabric (cotton flannel, for example) added to the lining fabric for a coat or outerwear jacket for warmth. The two pieces are treated as one during the lining construction. Sleeves are usually not interlined, as the extra layer can make them too tight and uncomfortable.
Q: What, why, and when should I underline?
A: Underlining is most often used in pants, skirts, fitted dresses, and some jackets and coats. Make sure the underlining fabric is lighter weight than the primary fabric in your project, so it doesn’t dominate the primary fabric. It should have comparable fluidity. Knits are usually not underlined, but if you must underline, see the next question for options. Consider underlining if you want to:
Q: What kind of fabric is best for underlining?
A: Underlining affects the hand and drape of the fabric, so choose accordingly. Cotton or cotton-polyester batiste or lightweight broadcloth are good choices for most woven fabrics. For fine fabrics, such as wool crepe, silk organza makes a lovely underlining. On knits, fusible weft-insertion or knit interfacings are the best choice because they have inherent stretch but add support. Yes, you can use an interfacing as an underlining! Tricot bathing-suit lining might be the perfect underlining choice for stretch lace, to add modesty and retain the lace’s stretch. You can be creative when choosing an underlining to create the desired finished effect and wear qualities.
Q: How much fabric will I need for an underlining?
A: I purchase the same amount as the garment requires and preshrink it using the appropriate method (see page 190). I often have a bit left over, but it’s good to have on hand when I need a woven interfacing. If it’s 100-percent cotton, I can use the extra for press cloths, too.
Q: How do I attach an underlining?
A: Preshrink the fashion and underlining fabrics. Cut the pieces from the fashion fabric and only the main garment pieces from the underlining fabric; transfer all construction marks. Underlining is not used in facings, waistbands, and detail areas that will be interfaced, unless you are using it to alter the color of a lightweight fabric. Attach each piece of underlining to its matching fashion fabric, with wrong sides facing, using basting stitches or glue basting. Treat the two fabrics as one during the construction.
Note: If you are using a fusible interfacing for the underlining, refer to the interfacing fusing directions on pages 236–238.
Q: Glue basting? What’s that?
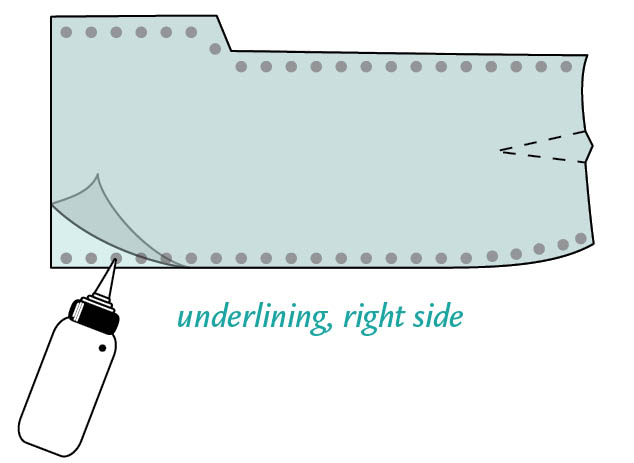
A: It’s the fastest way to add an underlining to the garment pieces, ensuring that the underlining is slightly smaller than the outer fabric, so it fits smoothly around the body curves. Think of a garment as a cylinder; each layer inside the next must be slightly smaller to fit smoothly without wrinkles. You’ll need permanent fabric glue that dries soft and flexible (not a glue stick).
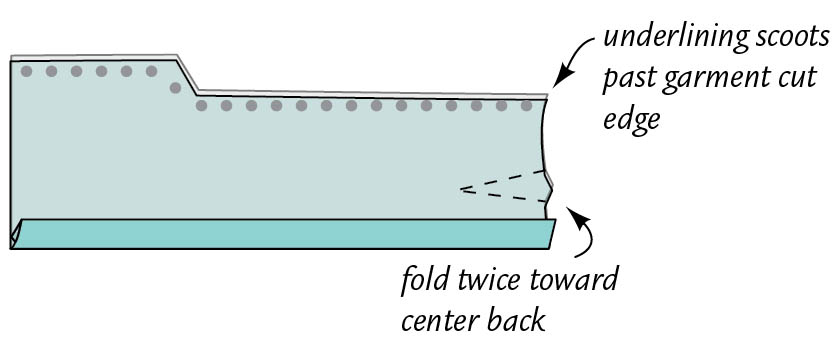
Q: How do I apply fusible interfacing as an underlining?
A: Don’t try to fuse interfacing to the entire yardage. Instead, use the “block” method. Cut out each garment piece with extra fabric all around — in a rectangular shape and on-grain. Cut matching interfacing rectangles and fuse in place. Then pin the pattern pieces in place and cut out.
Q: Do I apply an interlining to the lining in the same way?
Yes, you can glue-baste, or you may want to machine-stitch the underlining to the lining 1⁄2" from the raw edges and then trim it close to the stitching to eliminate bulk in the seams. At the lower edge, baste the interlining in place along the hemline fold, using tiny stitches on the garment side and longer ones along the fold line. Trim all but 1⁄2" of it out of the hem allowance and leave the basting in the fold line.
Q: Which fabrics are appropriate for linings?
A somewhat slippery, light- or medium-weight fabric is the usual choice for lining. China silk is a lightweight lining for soft jackets, dresses, skirts, and pants. Bemberg rayon lining is my favorite for most skirts, pants, and jackets because it is more breathable than a polyester lining. Silklike synthetic and synthetic/natural fiber blend fabrics, often called “silkies,” make wonderful linings, particularly in jackets, where the lining will be more noticeable. For a coat lining, look for a heavyweight, silky-surfaced fabric, such as polyester satin or an acetate satin or twill. Polyester linings wear better than rayon or acetate, so they may be the best choice for a coat or jacket that will receive a lot of wear. Reduce dry-cleaning bills by treating lining with a fabric protector, such as Scotchgard.
Note: Linings in knit garments can be cut from woven fabrics to control the stretch or from knit fabrics, which won’t affect the stretch. It all depends on your goals.
You may opt to use a half-lining in a skirt. For added durability, cut the pieces with the lengthwise grain running across the pieces (you can do this for full linings, too). This puts the stronger lengthwise grain across the area that gets the most stress. Cut the lining pieces so they end a few inches below the full hip and serge-finish the lower edge, or make a narrow hem.
Q: How do I add a lining to a skirt or a pair of pants?
A: Cut the major garment pieces from the lining fabric. You won’t need lining for the waistband or most design details (although patch pockets are often lined, so follow your pattern guide sheet). Construct the lining just as you would the garment, with the same fitting process. Press darts or tucks in the opposite direction than in the garment to stagger the layers and avoid lumps.
For the zipper opening, leave an extra 1⁄2" of the seam where it will be inserted unstitched, so it will be easy to clear the bottom of the zipper. Slip the lining into the garment with wrong sides facing and baste together along the waistline seam. Turn under the raw edges of the lining around the zipper so there is enough room for the zipper to slide by without catching the lining. Slipstitch in place. Finish the waistline and hem the garment. Hem the lining at least 1⁄2" shorter than the garment, so the lining won’t show at the lower edge.
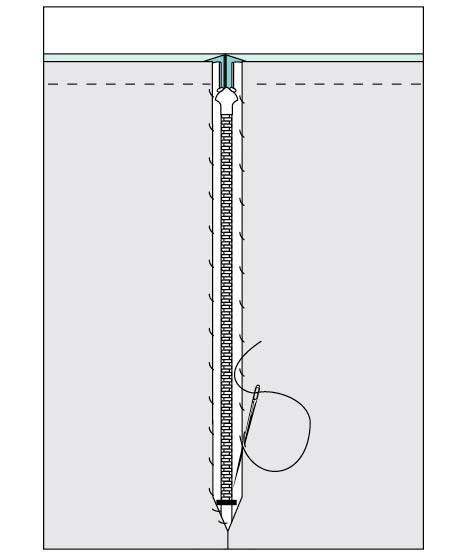
slipstitch lining to zipper tape
SEE ALSO: Line by Half, above.
Q: My zipper catches the lining edge sometimes. Is there a way to avoid this and make a neat, squared-off finish in the lining around the bottom of the zipper?
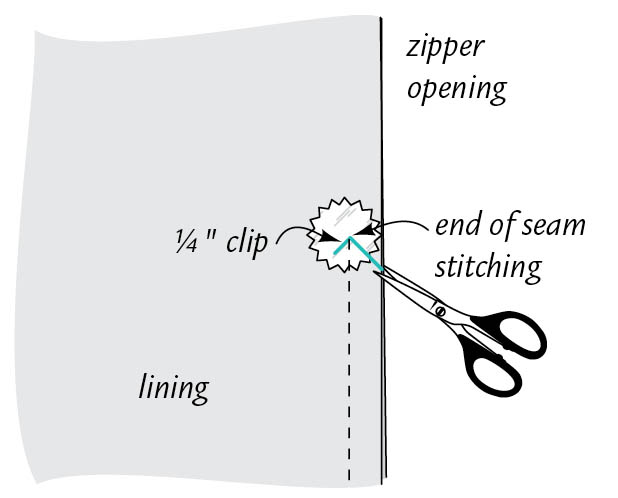
A: After ending the lining seam just below the zipper opening, center and fuse a 1"-diameter circle of lightweight fusible interfacing (cut this out with pinking sheers) over the end of the lining’s stitching on each side of the seam. Make a 45-degree-angle cut into the seam allowance to the end of the stitching. Then angle down into the lining and make a 1⁄4" cut. Press the seam open, turning down the triangular point as shown on the next page. Slipstitch the lining to the zipper tape, taking two or three stitches in the corners for added security.
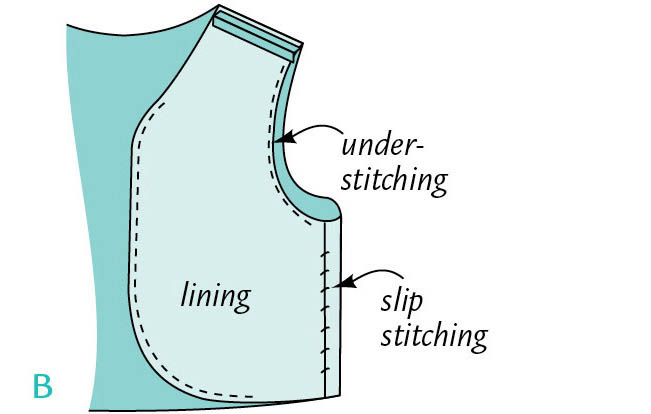
Q: Is there an easy way to line a vest to the edge, instead of facing the vest and hand sewing the lining in place?
A: Yes, the flip lining method is a cinch! (The method in your pattern guide sheet may not match this technique.)
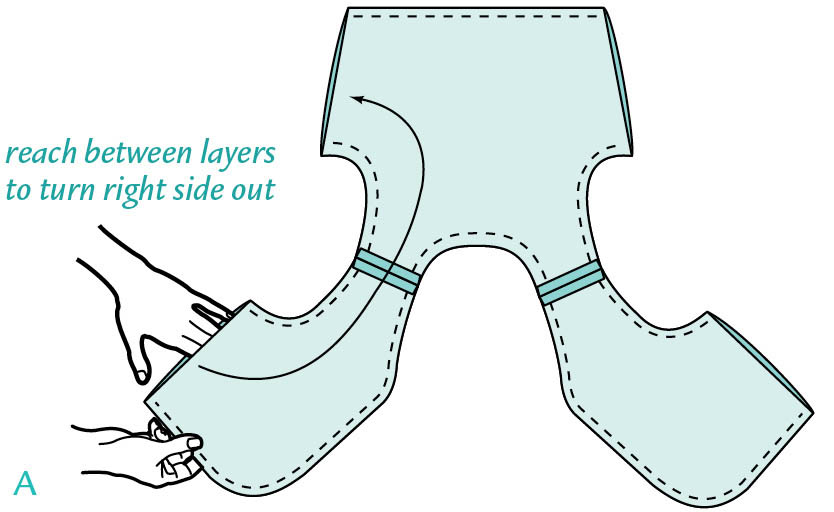
reach between layers
to turn right side out
Q: How can I prevent the lining in my pants from crawling up my legs (due to static electricity)?
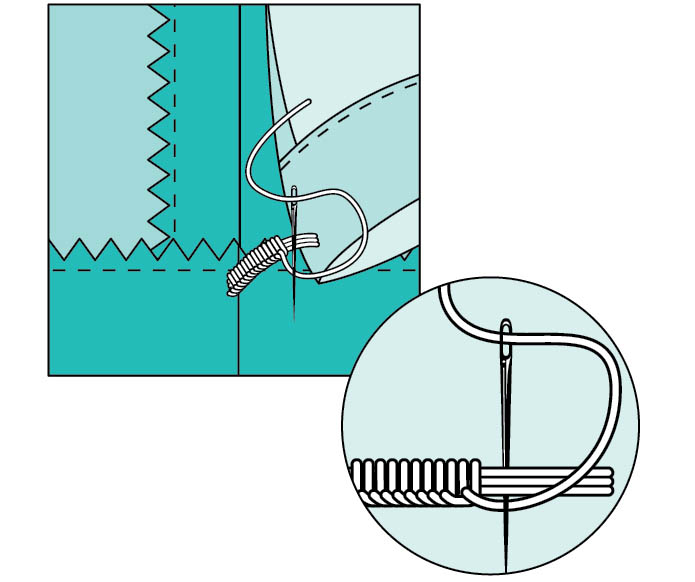
A: Add French tacks (also called swing tacks) to link the hems. Using a needle with a single waxed-and-pressed thread (see page 389) or topstitching thread, hide the knot between the hem allowance and the garment at the inseam, and take a small backstitch through the hem allowance. Take a small stitch in the lining hem allowance, opposite the first stitch, leaving 1" of slack in the thread. Make several more stitches of the same length and slack in the same location. To finish, work close (but not tight) blanket stitches (see page 124) over the threads that form the swing tack. End by taking several stitches in the lining hem allowance. Repeat at the outer seam to securely hold the lining hem in place. Note: French tacks are essential in lined coats. Make one at each side seam.
French tack