making a seam
Sewing two layers of fabric together to make a seam is the foundation of every other sewing technique. The type of seam and how you finish it depend on two things: the fabric and the desired result. Some seaming methods result in seams with completely finished edges. Others leave the edges exposed, requiring a finish to prevent raveling or to improve the appearance inside unlined clothing. Here you’ll find the most commonly used seams and seam finishes, as well as how to cut and apply binding, and stitch and press enclosed seams.
Plain, French, and flat-fell seams are the three most common machine-stitched seams. Serged seams are popular for knit fabrics, but machine-made seams are also appropriate for these fabrics. Plain seams require additional finishing when the fabric is woven and the cut edges tend to ravel. French and flat-fell seams are completely finished inside and out.
Q: What is the standard seam allowance?
A: In most garment patterns from commercial companies and independent designers, the standard seam allowance width — the distance from the cut edge to the stitching line — is 5⁄8". It allows a bit of “letting-out” room for fitting. Patterns designed for knits only may have 1⁄4"- or 3⁄8"-wide seam allowances. The seam allowance for most home-decor sewing projects is 1⁄2", but sometimes only 1⁄4" wide. Read your pattern guide sheet for the correct seam allowance.
Q: How do I make a plain seam?
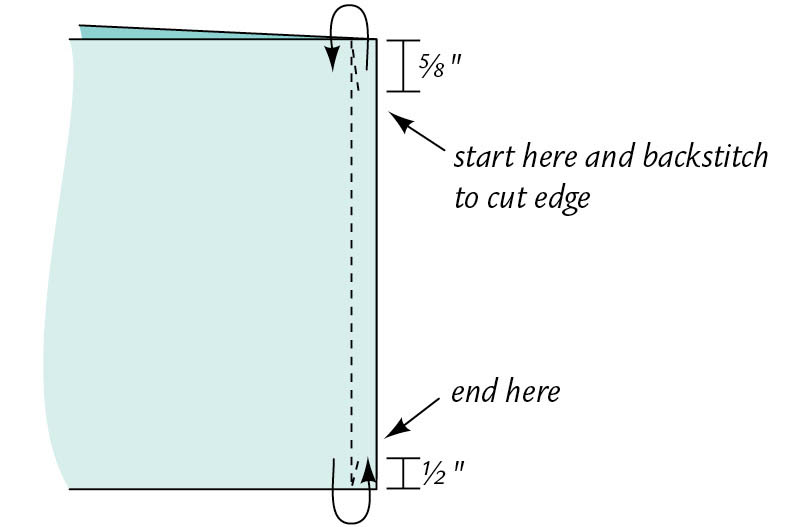
A: Adjust the machine for the correct stitch length and tension for your fabric (see pages 86–87) and thread it with the appropriate thread in the needle and bobbin.

making a seam
Hitting a pin with the needle will damage the sewing machine needle, the pin, and the fabric. If you hit one, stop and change the needle to avoid the possibility of snagging the fabric. Discard the damaged needle.
Q: Are there any other ways to begin and end a seam besides backstitching?
A: Adjust the stitch length to 1.25 to 1.5 mm (16 to 20 stitches per inch) and stitch the first 3⁄4" of the seam. Then, readjust to the normal stitch length needed for your project. Stop 3⁄4" from the lower end of the seam, change back to the shorter stitch length, and complete the seam. These tiny stitches are less likely to come undone (but they are difficult to remove if you make a stitching error).
Q: What is a “scant” seam allowance?
A: Stitch in the seam allowance 1⁄16" or a thread or two away from the actual stitching line. For a scant 5⁄8" seam, stitch halfway between 5⁄8" and 1⁄2". You can adjust the needle position one small step to the right and then guide the raw edges along the 5⁄8" mark engraved on the needle plate.
Q: How do I prevent the seam-allowance edges from raveling?
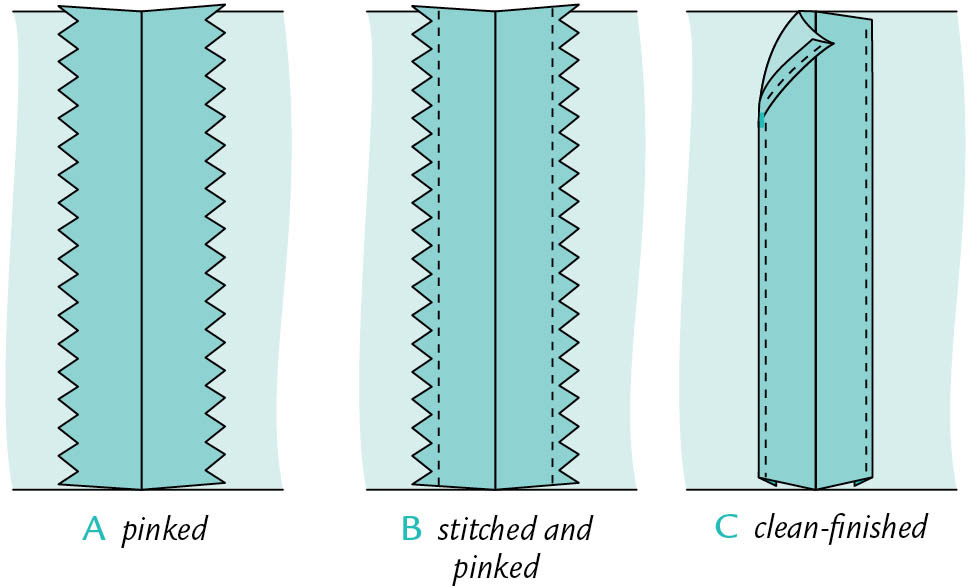
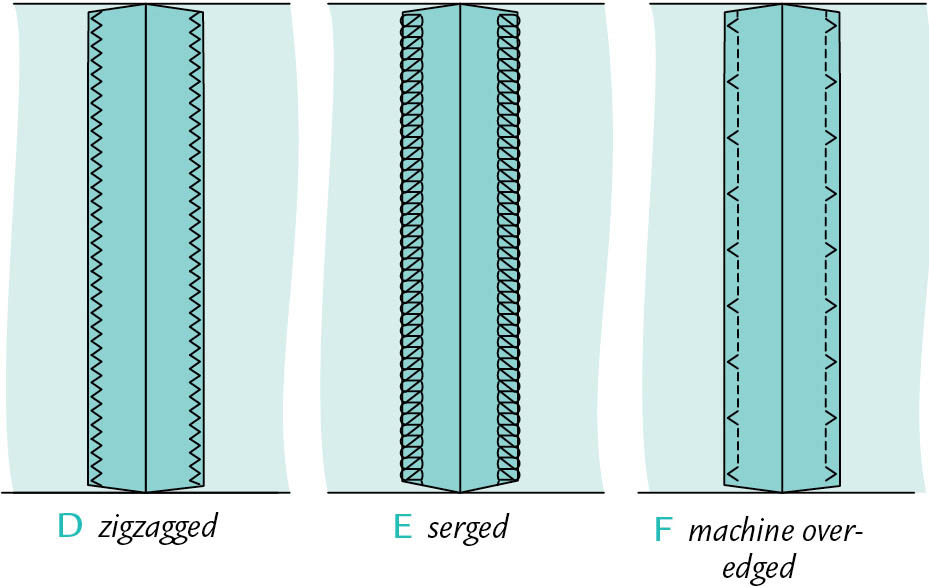
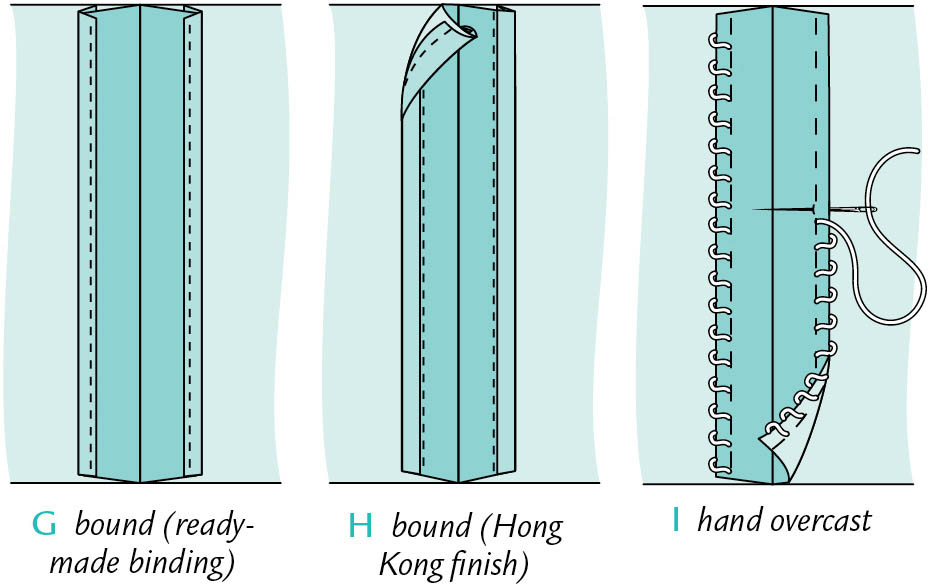
A: Choose from several standard machine and serger finishes:
Q: How do I sew a Hong Kong finish?
A: Use true-bias strips of a lightweight fabric, such as China silk or fine cotton batiste, in a matching or contrasting color.
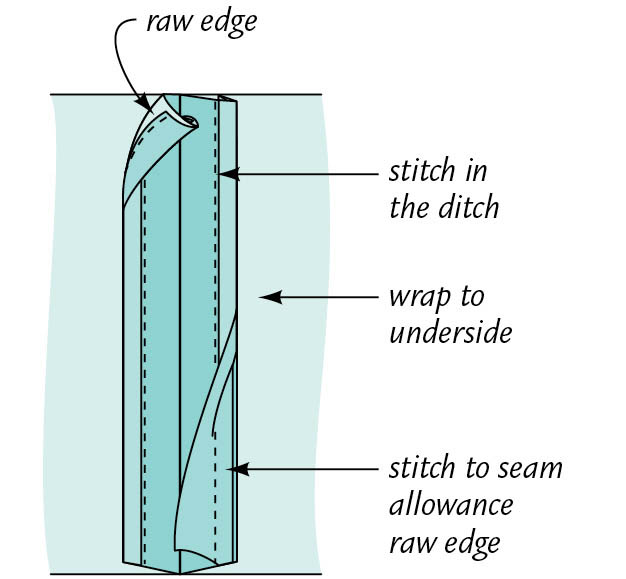
Hong Kong finish
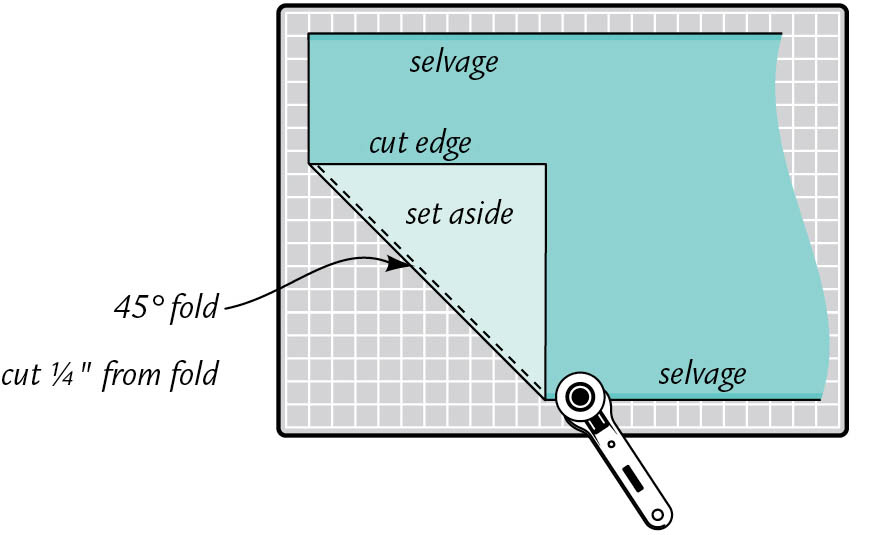
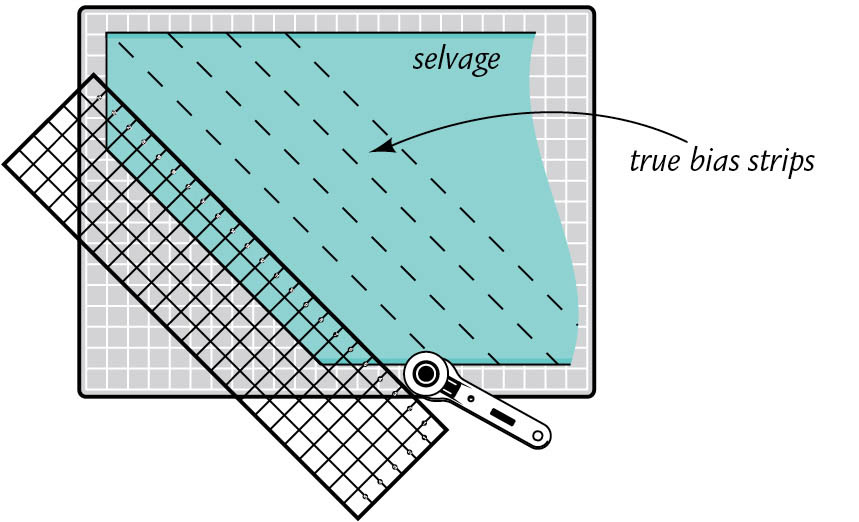
Q: How do I cut true-bias strips for binding?
A: Accurate cutting and careful handling are essential.
To cut a few strips, follow the steps below. If you need several yards, try the continuous bias-strip method (see question on page 267).
Q: How much fabric will I need for several yards of bias strips for Hong Kong finishing seams?
A: As a rule of thumb: 1 yard of 44"/45"-wide fabric will yield approximately 30 yards of 13⁄4"-wide bias binding, 16 yards of 23⁄4"-wide bias binding, or 14 yards of 33⁄4"-wide bias binding. If you need a lot of binding, you may prefer to use the continuous bias cutting method. In that case, calculate the required size for the fabric square you’ll need:
Q: How do I cut one continuous strip of bias from a piece of fabric?
A: Here’s my favorite method:
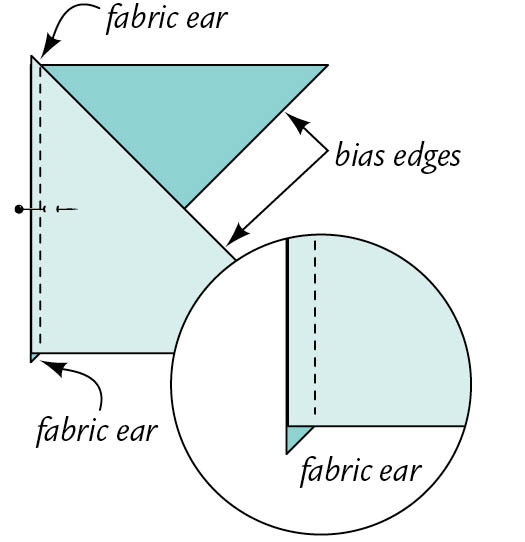
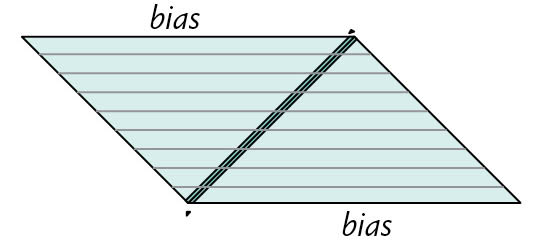
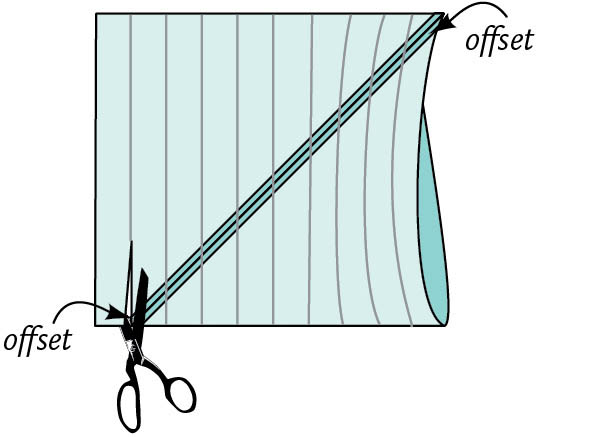
Q: How do I make a bias seam?
A: Even though the ends are angled when you cut true bias strips, it’s easier to join the ends for perfect seaming with this method. Place two strips with straight ends at precise right angles to each other on a rotary cutting mat. Draw a 45-degree-angle stitching line that intersects the edges of the lower strip. Stitch on the line and trim 1⁄4" from the stitching. Press the seam open.
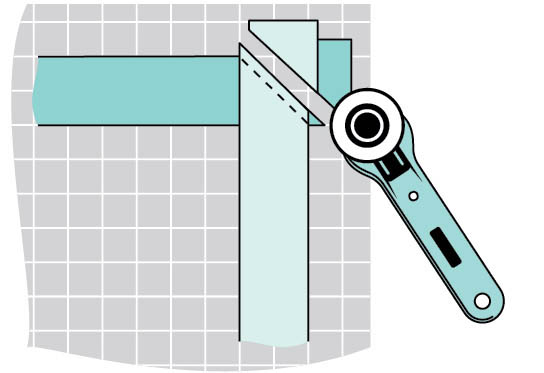
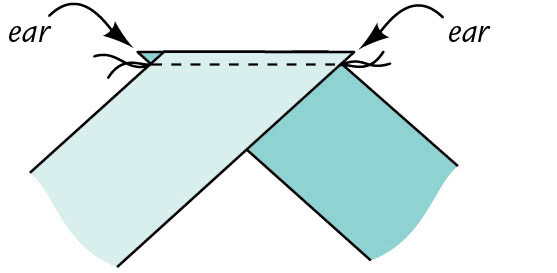
bias seam
Q: Is there anything else I can use for a bound-edge finish?
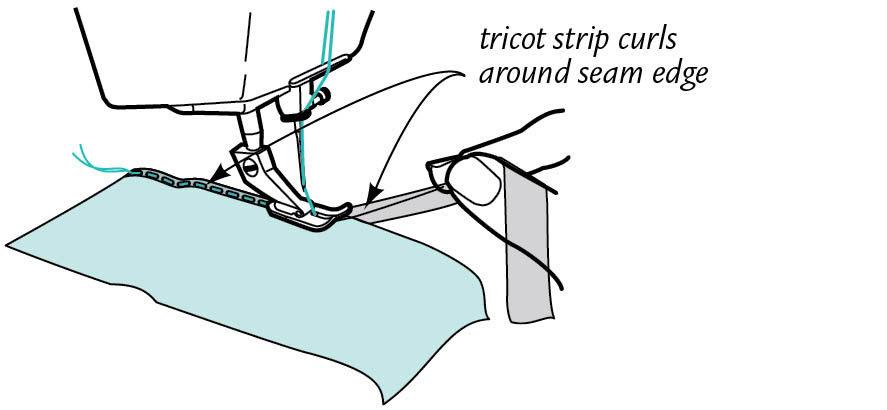
A: Bias tricot binding is a wonderful substitute. It’s sheer and lightweight and available in a few basic colors and two different widths. To bind an edge in one step, tug on the binding to determine which way it curls so you can wrap the raw edge with the strip curling around it. Straight-stitch or zigzag in place. Use this product for a lightweight casing (see pages 334–335).
Q: When should I use a French seam and how do I make one?
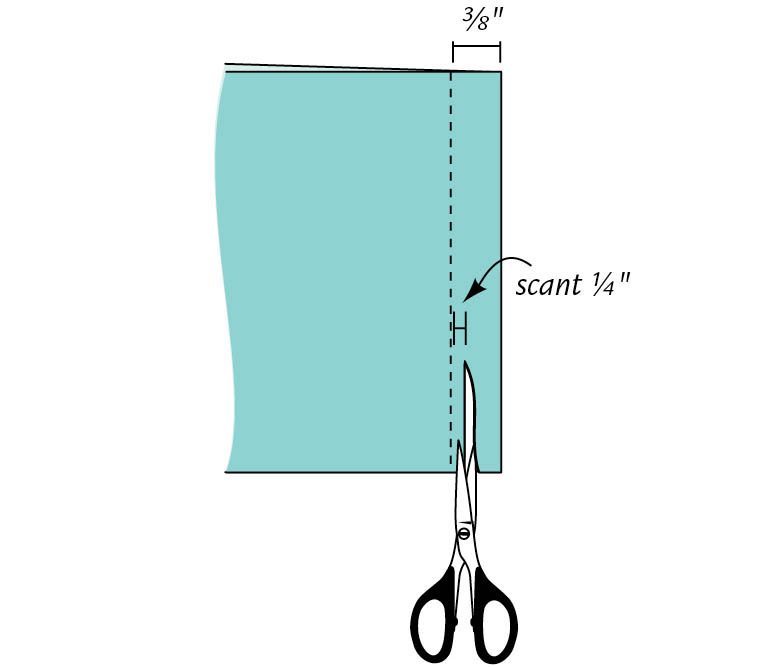
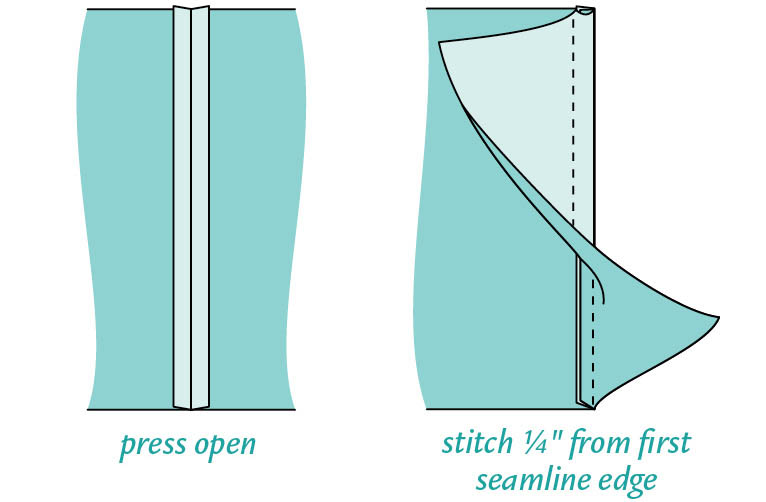
A: French seams are narrow seams that completely enclose the raw edges. Use them when sewing with sheers, laces, and lightweight or delicate fabrics, and for straight or nearly straight seams. You may be able to use them on a gently curved edge.
Q: What is a flat-fell seam and why would I use it?
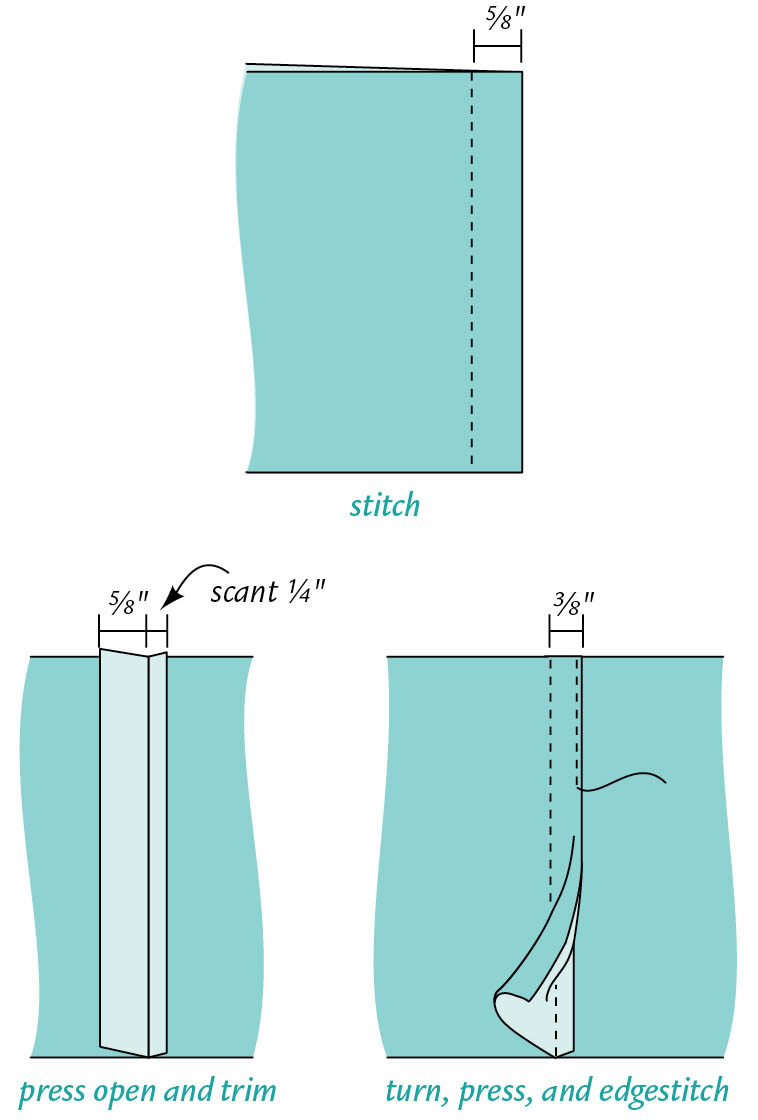
A: This seam is stitched twice, creating a strong seam with no exposed raw edges. It’s the classic seam for jeans but is also appropriate for completely reversible garments, unlined coats and jackets, and sportswear items. The hallmark of success is a flat seamline on the wrong side and an even-width, topstitched welt on the right side.
Q: How do you make a flat-fell seam?
A: Accurate stitching and careful pressing are essential when following these steps:
Q: My jeans have seams that look like flat-fell seams on the right side, but the raw edges are visible on the inside. What seam is that?
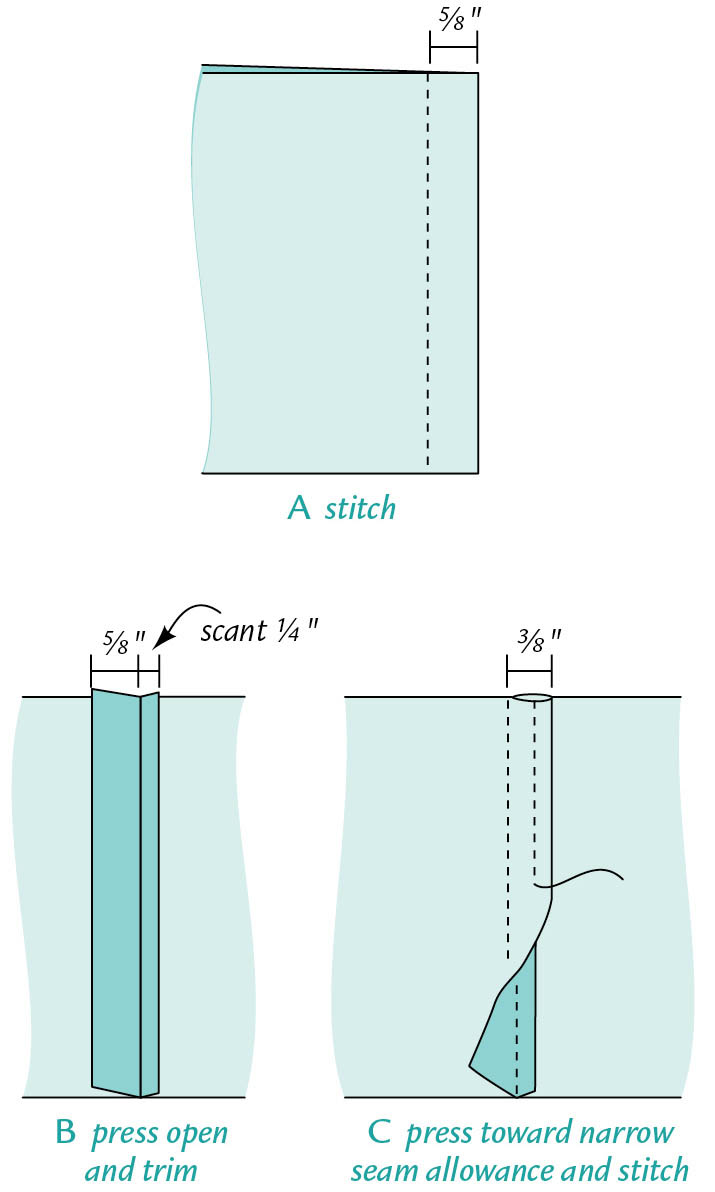
A: It’s a mock flat-fell seam, a fast and easy substitute for a true flat-fell seam.
Type of Seam |
Best Used for |
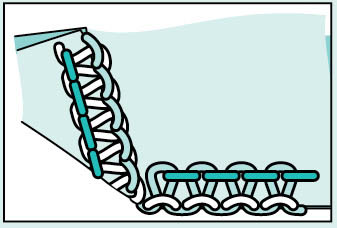
3-thread overlock
|
Construction seams in stretchy knits; seam finish on raw edges of pressed-open plain seams |
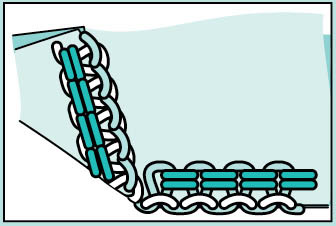
4-thread overlock
|
Construction seams in knits and wovens; best choice for durable seams in sports-, mens-, and childrenswear |
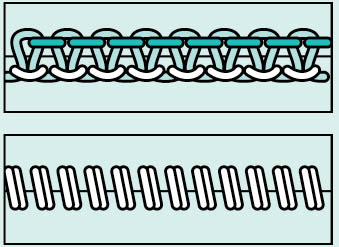
Flatlock (2- or 3-thread)
|
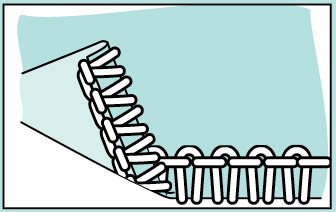
Construction seams in stretchy knits (activewear and lingerie); visible on outside of garment; has loops on one side, “ladders” on reverse |
Rolled edge (2-thread)
|
Very narrow seams on sheer fabrics for narrow fine-line finish (in place of French seam) |
Note: Some sergers are capable of other seams that incorporate a chainstitch with the overlock stitch, which creates a very stable, nonstretchy seam.
Type of Zigzag |
Best Used for |
Simple zigzag

|
Finish on single or double seam-allowance layers; satin stitching (see page 115); gathering over cord (see page 331) |
Multistitch zigzag

|
Same as for simple zigzag; narrow the stitch width to control fabric fraying |
Basic overlock (over-edge) or substitute blindstitch (see page 312)

|
Stretch stitch for lightweight knits and fine wovens; overcast raw edges with point of the zigzag at or near seam-allowance edge; attach elastic (see page 337) |
Double overlock

|
Overcasting knits and wovens; stitching and finishing 1⁄4"-wide seam allowances |
Super stretch

|
Seaming 1⁄4"-wide seams on super-stretch (e.g., swimwear) fabrics; applying raw-edge appliqués; decorative stitching |
Q: Are there any machine stitches that finish seam edges like a serger does?
A: Zigzagging is a very common edge-finishing stitch, along with the serpentine multistitch zigzag. Most zigzag machines offer one or more “stretch” stitches that create seams similar to overlocked serger seams. Some were designed specifically for knit sewing, but you can also use them to control raveling on single seam layers of wovens for a nonravel seam finish. Choose from those shown in the Zigzag Options on the above, and consult your machine manual for the ideal stitch settings. Test on scraps first. Twice-stitched seams like those shown for sewing on knits (see page 203) are also a good substitute for serged seams.
Sewing curved seams and adding piping between seam allowances offer special sewing challenges.
Q: My pattern has curved seamlines. Are there any special handling techniques?
A: Fitting the convex and concave pieces of a curved seam together smoothly, without puckers or pleats, takes patience and preparation.
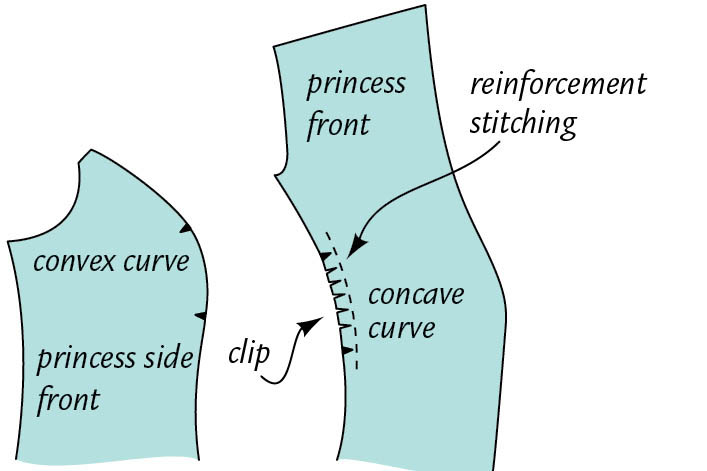
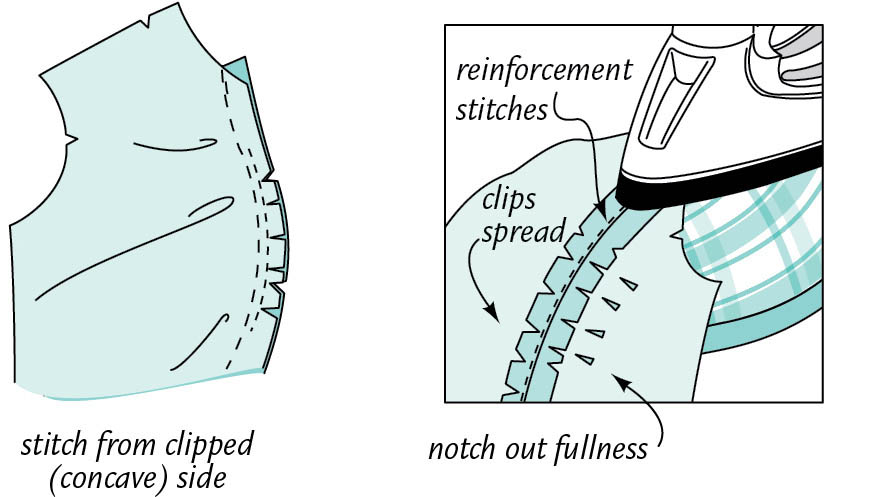
Which is which? If you cup your fingers, you create a “cave” inside your fingers and palm; that’s a concave curve. The outside curve of your other cupped hand is a convex curve that fits into the cave. Just remember the concave and the rest is easy!
Q: What about stitching two curved layers together that are the same shape?
A: Shorten the stitch length to 1.25 to 1.5 mm (16 to 20 spi). For accuracy, guide the cut edge along the seam guide on the needle plate and stitch slowly, watching the edge as you guide it. To avoid distortion, never stretch a curved seam edge while you stitch. On extreme curves, you may need to stitch a few stitches, stop, lift the foot, adjust the edge with the seam guide, and then continue in this start-stop-adjust fashion.
SEE ALSO: Enclosed Seams
Q: How do I add piping or cording to a seam?
A: Both piping and cording have a flange to include in a seam allowance. They are common in home-decor items but are also a nice touch at the edge of a collar or around a simple neckline, tucked into a faced edge. Either purchase ready-made or make your own. To add it to a seam, follow these steps:
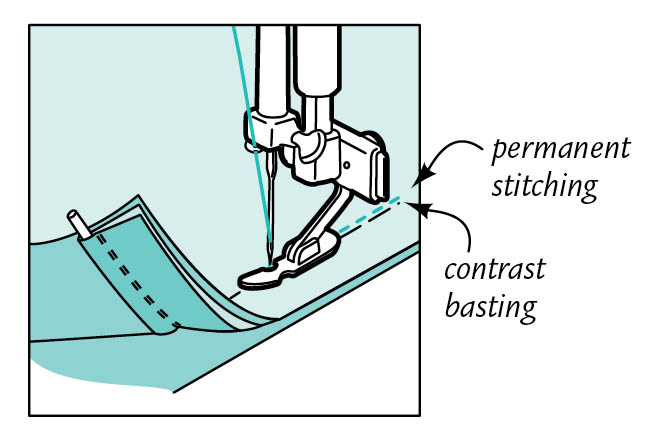
adding piping or cording
Q: Are there any special tricks for applying piping around curves and corners?
A: Clipping the piping seam allowance will help you to gently ease the piping around the curve as you baste it in place in the seam allowance. Shorten the stitch length for smoother stitching. Use the normal stitch length when stitching in straight lines. On corners, pin-baste the piping to the first edge and stitch to within an inch of the corner. Adjust the piping down to the corner, and clip the seam allowance almost to the piping stitching; pin-baste the remainder of the piping in place. Use a shorter stitch for the 1" before and past the clipped corner, and then return to normal to complete the stitching.
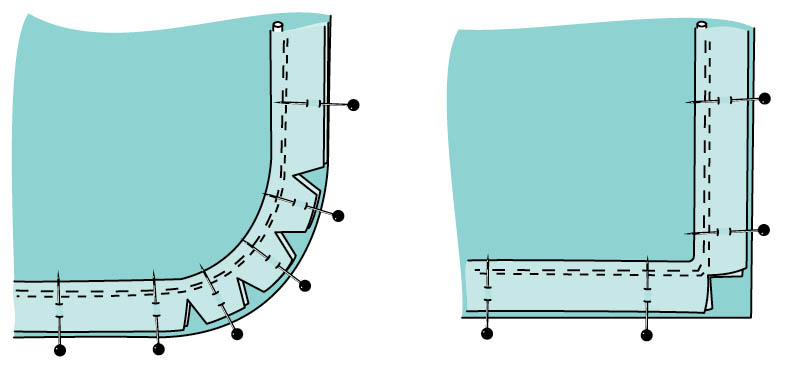
clip piping seam allowance to ease around curves and corners
Q: How do you neatly join piping ends when the piping encircles the edge of a sleeve or a pillow?
A: Leave at least 11⁄2" of the piping free at the beginning. Stitch around the perimeter, then near the place where you started, stop and undo the piping stitches. Cut the cord inside to butt up to the first end. Leave at least 1" of fabric beyond the cut end to turn under and over the butted ends. Trim the turn-under to 1⁄4". Complete the stitching.
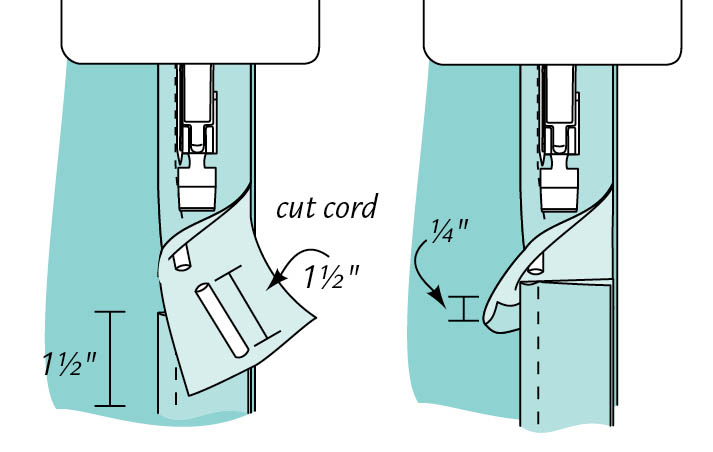
butt cord ends and turn under excess fabric
Q: How do I match intersecting seams and eliminate bulk where seams cross, such as at the waistline, shoulder, or underarm?
A: Press and finish seam edges before you sew the two garment sections together. Use a fine needle to hold them securely with seamlines perfectly aligned. If the seam allowances were pressed to one side, adjust so the two allowances lie in opposite directions to nest together for a perfect match and eliminate a distracting and thick bump. If seams were pressed open, place a fine pin or needle pin through all layers at the outer edges of the seam allowances, to keep them from getting pushed out of place while stitching. After stitching, reduce bulk by clipping the seam allowances at an angle from the seam edge to the stitching line. Do this whether the crossing seam will be pressed open, pressed toward the garment in one direction, or enclosed inside a facing.
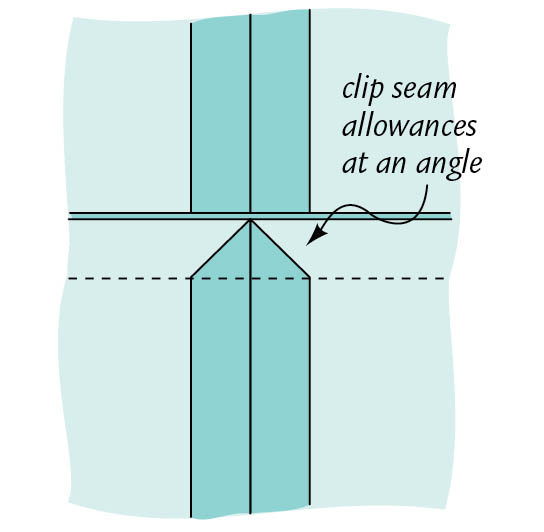
intersecting seams
Q: The machine jams when I start stitching, and I end up with a messy bunch of stitches on the underside of my seam. What’s wrong?
A: Those birds’ nests are a real plague and often happen because the feed dogs don’t have much to grab onto at the beginning of a seam. Check the threading and make sure the bobbin thread is engaged in the tension mechanism. When you start a seam, pull enough top and bobbin thread behind the presser foot to grasp firmly. As you begin to stitch, hold onto them to give the feed dogs a bit of traction.
For lightweight fabrics, change to a straight-stitch throat plate (see pages 16–17). If you don’t have a straight-stitch plate, consider investing in one. For a quick fix, place two layers of Scotch Magic Tape or masking tape over the zigzag hole and run an unthreaded needle up and down to pierce a hole in it. Clean any adhesive residue on the needle with rubbing alcohol. Remove the tape when you’re ready to zigzag.
SEE ALSO: Lead On!
Q: Is there an easy way to rip out machine stitches without damaging the fabric?
A: On the bobbin-thread side of the seam, use a sharp seam ripper or small, sharp scissors to lift and snip every fifth or sixth stitch along the seam. Flip the piece over and pull the thread. It should lift away easily in one piece, leaving only small thread tufts on the reverse to remove. Run a piece of masking tape over the seamline to pick up these tufts, or use a lint roller, a small foam paintbrush, or a pink pencil eraser to whisk them away. There are other ways to unstitch a seam, but I find this method the fastest, easiest, and safest.
Enclosed seams require careful sewing and turning so that the seamline rolls slightly to the inside, rather than to the outside, of the garment. Trimming and grading, clipping, notching, and careful pressing are essential for smooth finished edges that lie flat. You’ll use these techniques to apply facings at the neckline and armhole edges of sleeveless garments, as well as when attaching facings to waistlines or creating cuffs, collars, and pocket flaps.
Q: What is trimming and grading?
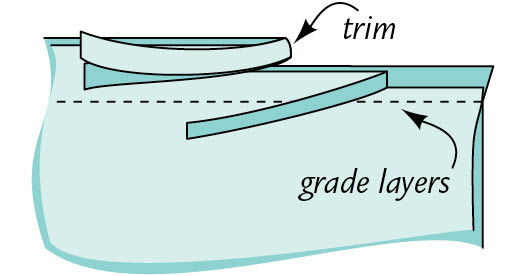
A: Trimming and grading removes some of the seam allowance in enclosed edges at necklines and armholes, and on collars, cuffs, and pockets. To trim an enclosed seam, cut away at least half of a 5⁄8" seam allowance. To grade an enclosed seam, trim the seam and then trim the layers to staggered widths, with the seam allowance that lies closest to the garment left slightly wider than the remaining layers; this provides a bevel so the edges don’t imprint or make a visible ledge on the right side. For a double-layer seam, trim to 1⁄4" and 1⁄8.
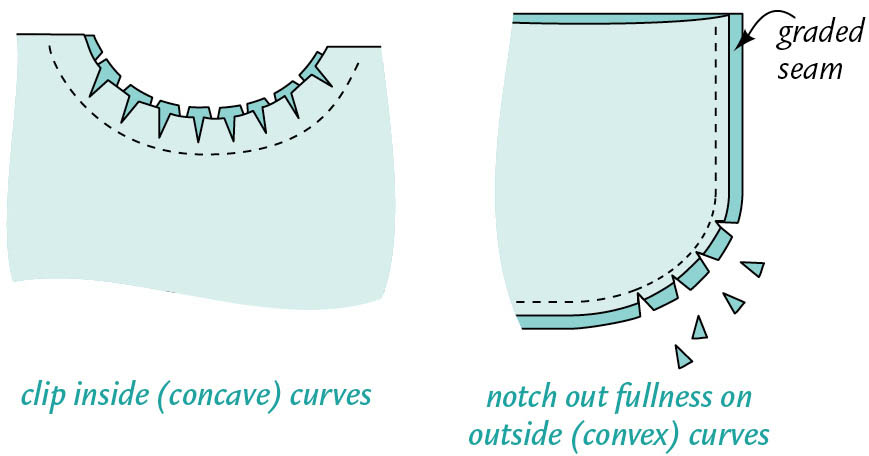
Don’t worry about raveling on the trimmed seams. The edges will be enclosed, understitched (see question on pages 284–285), and perhaps topstitched. Before turning and pressing, clip inward (concave) curves, spacing them 1⁄4" apart in highly curved sections, farther apart in flatter areas of the curve. Also trim away excess fabric at points and corners.
Q: How do I turn a curved enclosed edge so it is smooth and free of lumps?
A: On concave neckline and armhole curves, clip to the stitching line every 1⁄4" or so to help the seam lie flat when you turn the facing inside. On outward curves of a collar, notch out V-shaped sections along trimmed and graded seam allowances, so the excess fabric can’t double up on itself when turned (which would create a lumpy finish with “pokey” edges). Use pinking shears to make quick work of notching trimmed seams. Remember: Clip inward curves and notch outward curves.
Q: I’m afraid to clip and notch enclosed seams on loosely woven fabrics. Any advice?
A: Stagger clips and notches to avoid weakening the seam. Notch or clip only one layer, then move 1⁄4" away and repeat on the other layer of the seam.
Q: How do I prevent finished facings and the faced edges of collars and cuffs from rolling to the outside along the pressed edge?
A: Understitch enclosed seams to attach the seam layers to the facing (or the lining), making it easy to press a flat edge. The stacked-and-stitched layers weight the facing so it turns naturally to the inside, creating a soft roll of the fashion fabric so the facing doesn’t show along the edge. Here’s how to understitch:
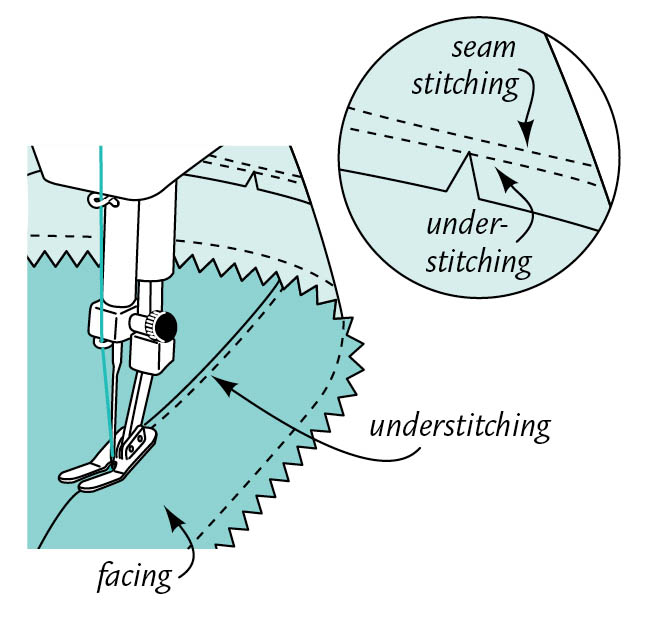
Q: How do I understitch a blouse or jacket with turn-back lapels?
A: Understitch on the garment side above the point where the lapel turns onto the garment (lapel roll) and on the facing side below the point of the roll. Secure the threads at the point of the roll by drawing them between the layers inside the facing, and tie off.
Q: How do I stitch an enclosed seam in a pillow cover so the pillow corners will be square and filled out?
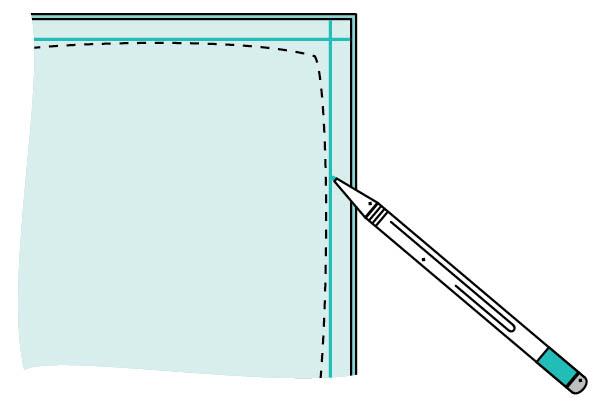
A: On the wrong side of one pillow cover, chalk-mark the intersecting seamlines at each corner. Pin the two pieces together and stitch; when you are within a few inches of the seam intersection, begin tapering inside the line. Pivot and reverse the tapering. For a really plump pillow, use a pillow form slightly larger than the finished pillow cover or stitch wider seams when sewing the pieces together. You can also tuck bits of polyester fiberfill into pillow corners to help plump them out.
Collars require the support of interfacing, plus trimming, grading, clipping, and notching as described in the previous section. Here you’ll find a few additional tips for preparing collars. Attach them to the garment neckline and finish as directed in your pattern guide sheet.
Q: What type of interfacing should I use in a collar?
A: Interface the upper collar and the undercollar layer with fusible interfacing, if possible (although not on sheer or show-through fabrics). When both layers are interfaced, they can be handled the same way and are less likely to stretch out of shape during sewing. On light- and medium-weight fabrics, I use a lightweight fusible interfacing on both so they have the same hand and handling. On medium- and heavyweight fabrics, I use a medium-weight interfacing on the upper collar and a softer interfacing on the undercollar (also called the collar facing in some patterns).
Q: How do I make sure my collars are smooth, with flat outer edges and points (or curves) that lie flat?
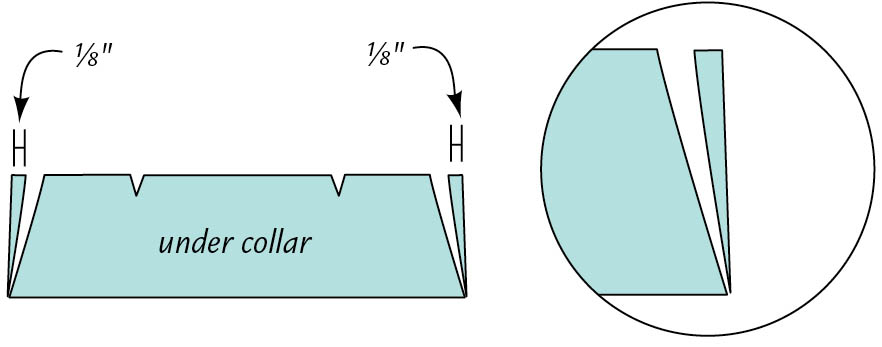
A: After applying the interfacing, trim a scant 1⁄8 from the outer edges of the undercollar, tapering to nothing at the collar’s outer edge as shown. This helps it roll to the underside on all three enclosed edges. When you pin the smaller under-collar to the upper collar, gently force the raw edges to match. Stitch with the undercollar facing you so the feed dogs help ease the upper collar to the slightly smaller undercollar. Trim, grade, clip, and turn as described on page 282. Understitch (see question on page 284) before you turn the collar right side out and press. Otherwise, press the seams open on a point presser (see page 40) to make it easier to turn and press, and so the undercollar doesn’t roll out at the edge.
If your pattern provides separate pattern pieces for the upper- and undercollars, compare them. You may find that the undercollar is already a bit smaller. However, for heavier fabrics, it’s a good idea to trim the undercollar as described on the above.
Q: I always end up with lumpy points and corners that don’t look square on the finished collar. What to do?
A: Don’t pivot sharply when stitching around the point. To make room for the trimmed seam allowances:
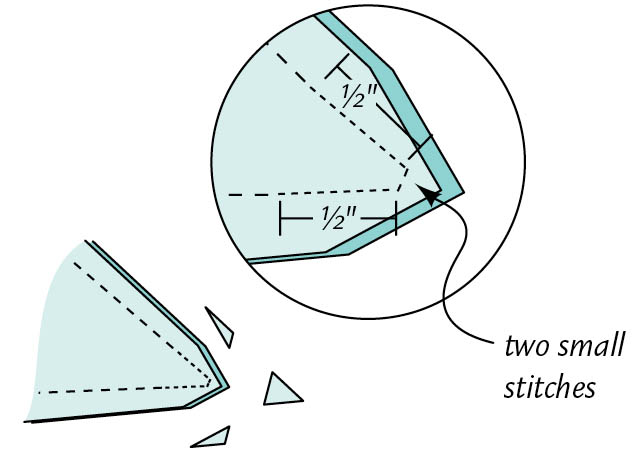
Carefully trim to remove as much of the seam allowance as possible. On very sharp points, trim as close as possible to the stitches and taper the trimming on either side of the point. Trim far enough into the seam on each side of the point, so the two seam allowances don’t overlap inside and create a lumpy, knobby point when turned. Turn right side out and press.
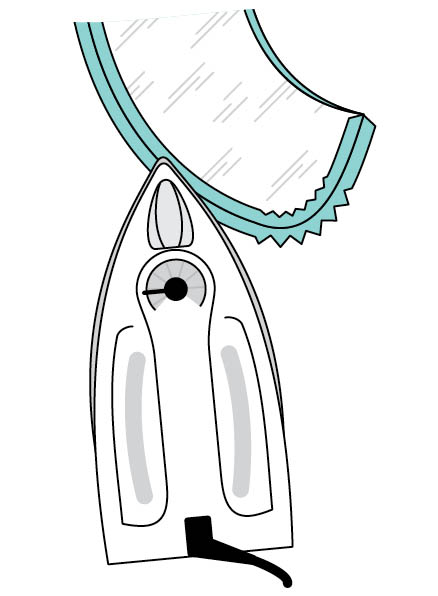
Q: How do I press an enclosed seam in a collar (or cuff)?
A: For a smooth and easy turn, press the seam open after trimming and clipping it (see the questions about trimming and clipping on pages 282–283). This may seem strange, but it makes turning the enclosed edge (right along the stitching) so much easier. Use a point presser to reach into the point or corner (see page 40). For rounded edges, place the piece on the ironing board and use the point of the iron and your fingers to coax open one seam allowance and press.
Q: How do I turn sharp points in collars without making a hole in them?
A: Don’t use scissors or anything else with a sharp point. Invest in an inexpensive bamboo point turner. You can use the curved end of it to help shape enclosed curves, too. Other alternatives include a wooden bamboo skewer, filed to a dull point with an emery board, or a chopstick.
Q: How can I keep collar points from curling away from my shirt?
A: First, make sure you’ve followed the directions on pages 287–288 for trimming the undercollar a bit smaller. In addition, you can weight the points by adding a small triangular patch of lightweight fusible interfacing to each point on the upper collar before you sew the upper collar to the undercollar.
Facings finish the shaped raw edges of armholes and necklines, as well as opening edges on jackets, coats, shirts, and blouses. They are cut as separate pieces and are shaped like the garment edge. On straight-grain edges, such as the front opening edges of a jacket with a jewel neckline, a facing is often cut as an extension to the pattern piece. Neckline facings are typically used to hide raw edges on a collar. In some cases, you can substitute a bias binding for a facing, adding a neat designer finish and detail around the neck and/or armholes.
Q: If the facing is a separate piece, how do I prepare and attach it to the garment?
A: Interfacing is essential to control stretch in the garment and the facing edges. Apply a fusible interfacing of the appropriate type and weight to the wrong side of the facing piece(s). (See pages 236–238.) If you prefer a sew-in interfacing, attach it to the garment (see page 239) before applying the facings. To attach a facing to a closed neckline (as in a tank top) or armhole, follow the steps below. Note: Apply interfacing and finish the edges of cut-in-one facings as described here for separate facings. Follow your pattern directions for folding and stitching them in place.
Q: How should I tack facings in place?
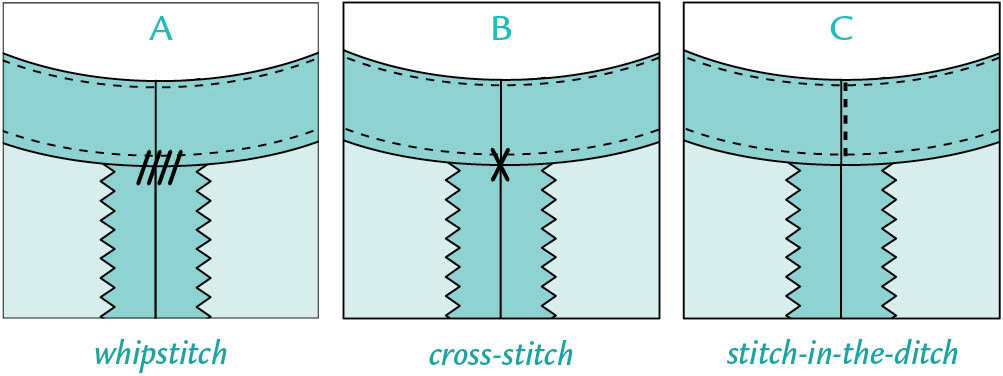
A: You can use a few whipstitches (A) or a cross-stitch (B) to tack the edges to the seam allowances. I prefer to stitch-in-the-ditch (C) whenever possible. To do so:
Topstitching also keeps facings in place — if it is appropriate for the project.
Q: How do I substitute a bound edge for facings on the neckline and armholes of a simple shell blouse or tank top?
A: Cut out the front and back pieces, following the pattern tissue. Also cut the facings to support the neckline shape and keep it from stretching. Apply a lightweight fusible interfacing to the wrong side of the facings and then stitch them together at the shoulder seams, trim the seam allowances to 1⁄4", and press open.
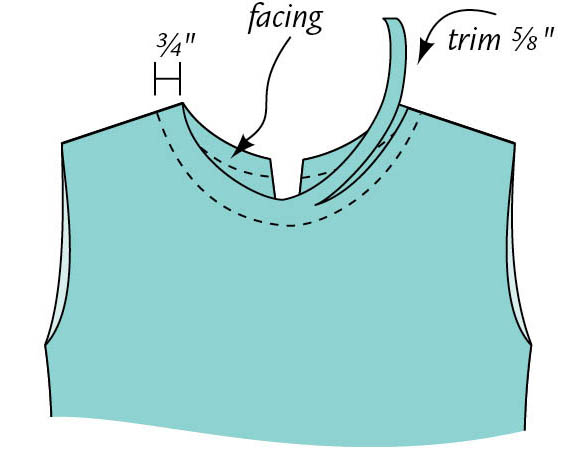
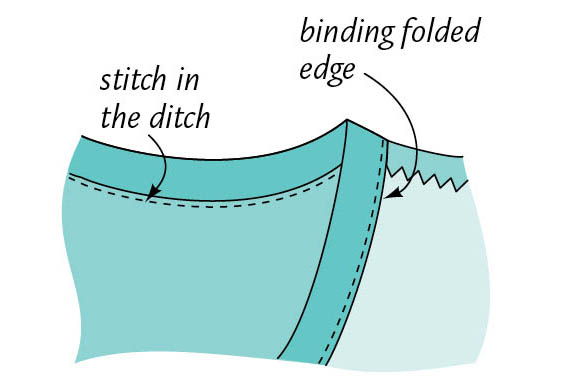
To finish facing inner edges, choose from these options:
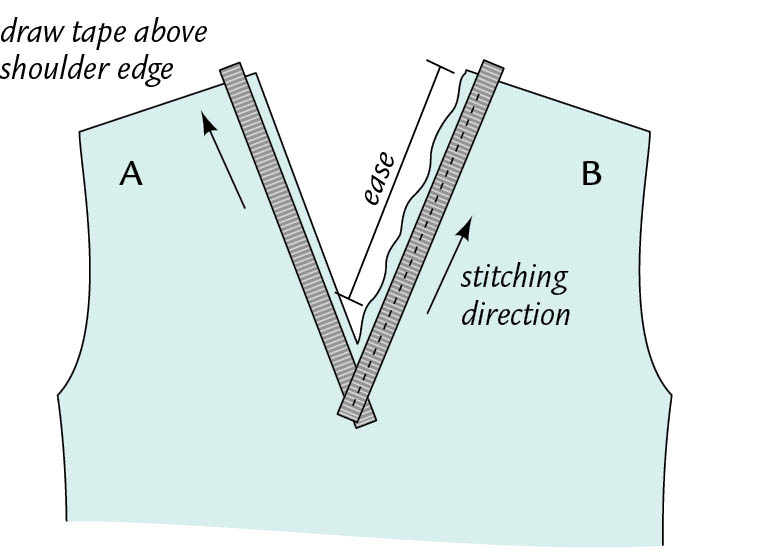
Q: How do I prevent faced V- and wrap-front necklines from stretching and gaping?
A: This happens due to the bias in the cut edge; it can get stretched during stitching. You can stabilize the edge and make it hug your body to eliminate gaping with a simple taping procedure before you attach the facing:
Q: My pattern calls for a facing, but my fabric is sheer and I don’t want the facing to show through. What can I do?
A: For sheer and semisheer fabrics and openwork fabrics, such as lace, try cutting the facing from a solid-color sheer fabric. Test the color beneath the sheer. Often a skin-tone sheer is a good choice. For interfacing, try skin-tone tulle or silk organza instead.