Making clothing requires cutting flat pieces from fabric, then using seams, darts, gathers, pleats, and tucks to shape them to fit the body. Learning how to stitch and press darts is key to molding fabric to hug body curves in fitted and semi-fitted styles. Gathers, pleats, tucks, and elastic applications offer additional ways to adjust fullness in specific pattern designs to fit it to the body contours at the waist, wrist, neckline, and ankles. These shaping methods are commonly used in home-decor projects, too.
Stitching darts (tapered and stitched folds) is the classic technique for making a flat piece of fabric fit smoothly over body contours at the hip, bust, waist, upper back, and elbow. They are essential in clothing when the fashion is for body-fitting garments, such as straight skirts, fitted pants, figure-skimming sheath dresses, and fitted jackets, skirts, vests, and blouses.
Q: Where are darts most commonly used?
A: In general, darts extend from the waistline up or down to point to the fullest part of the body — the bustline or tummy, for example — and end about 1⁄2" to 1" before the fullest part of it. They may also be used in the side seam for the bust, at the elbow in a fitted sleeve, and at the back shoulder. The larger the curve, the farther away from the fullest part the dart should end, to place the fullness in the garment over the fullness of the body curve. Misplaced darts place fullness in the wrong place and look puckered at the point. Avoid puckered points and misplaced fullness with careful placement, stitching, and pressing. Transfer darts to the fabric pieces following the marking guidelines on pages 170–172.
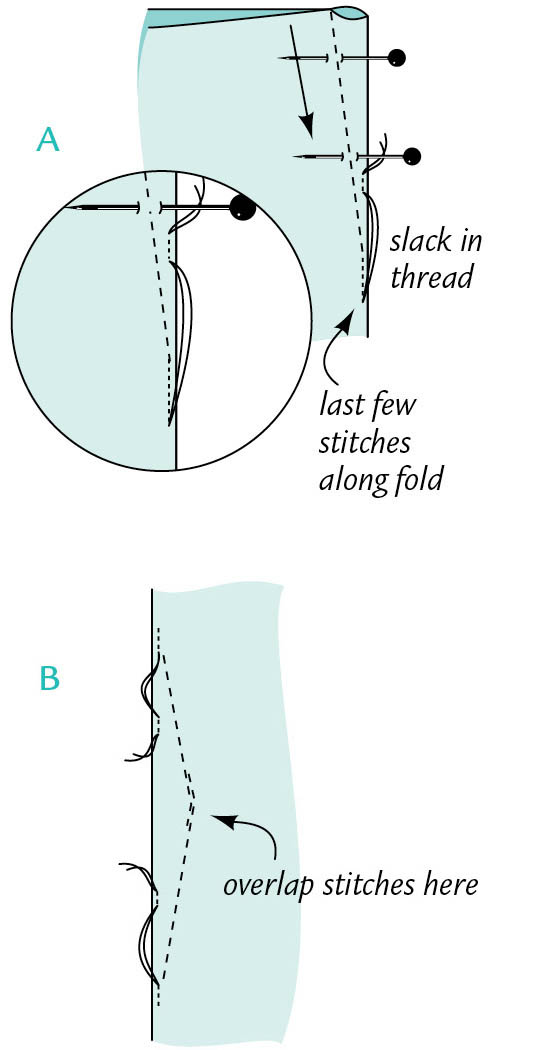
Q: How do I stitch a dart that doesn’t have an unsightly pucker at the point?
A: If you didn’t use dressmaker’s carbon to transfer the dart marking, mark a solid stitching line as follows:

Q: If I don’t chainstitch and backstitch at dart points, how do I secure the stitches?
A: Tie the two threads together in an overhand knot, and work it carefully down the thread so that it lies at the dart point. Clip the thread ends and add a drop of seam sealant for added security.
Q: How do I press a dart?
A: Check the fit before you press, then follow these steps to maintain the contour and shaping that darts create:
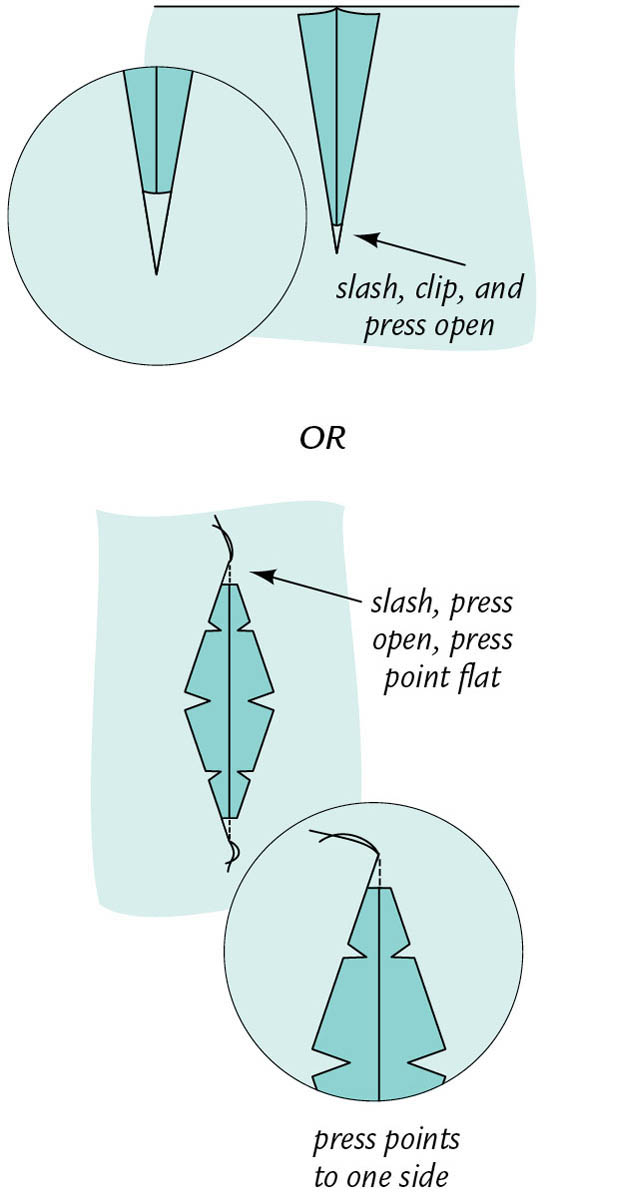
Q: Is there a way to eliminate the dart thickness in thick fabrics?
A: Slash the dart through the center fold, ending within 1⁄2" of the point and clip the curved areas as needed so you can press the seam open. Press the points flat on wider darts or to one side on skinny darts.
Q: Does it matter in which direction a dart is pressed?
A: Pattern guide sheets usually specify the pressing direction. In general, press horizontal darts down and vertical darts toward the center. For a more youthful-looking bustline, press horizontal bust darts up toward the neckline, rather than down as usually directed. If the fabric is bulky, it’s okay to slash and press wide darts open in any location.
Q: Is it okay to change a dart to gathers for more ease?
A: This is a great idea when fitting the front of a straight skirt or fitted pants over a full, rounded tummy. For best results, loosen the needle tension, set the machine for a basting-length stitch, and stitch from the right side between the two dart lines. Pull on the bobbin thread to draw up the ease to fit, distributing it evenly. Do the same on a back shoulder seam to eliminate the dart (see easing illustration on page 328).
Q: How do I make sure the bust darts are in the correct location?
A: You’ll need two accurate body measurements:
Measure your pattern in these same places and mark your bust point on the tissue with an X.
Look at the darts on the pattern. They should point to and stop 1⁄2" to 1" short of your bust point. (You may find a bust-point X on some pattern tissues, but it may not match where yours is.) Adjust darts as needed for a better fit, before you cut fabric, then check the location in the fabric as you sew. You may need to fine-tune the bust-point positions as you go along, as they may be a bit too low in knits and other fabrics with lots of give.
To adjust a pattern the easy way, draw a box around the dart, cut it out, and move it up or down, in or out, so the point is correctly positioned. It should be neither too high, too low, nor too far toward the center or away from it. Adjust so the fullness at the end of the dart will be where it is needed. Tuck a piece of pattern paper behind the hole that is left, and tape in place.
Tucks and pleats draw in and control fullness. They provide a decorative or more tailored look, when gathers are too soft for the desired effect. They require folding and straight stitching; if your work is not precise, errors multiply quickly with multiple pleats or tucks and adversely affect final fit and appearance. Careful marking (see pages 165–174) sets the scene for accuracy. Because they involve multiple layers of fabric, pleats and tucks are most effective in light- to medium-weight fabrics.
Q: What’s the difference between tucks and pleats?
A: Pleats are fabric folds designed to control fullness in a variety of ways, determined by the way they are folded, stitched, and pressed. Most types, other than those that release into soft fullness, require a sharp press along the length of the pleat fold. Pleats are deeper than tucks, providing design ease to flow over body curves.
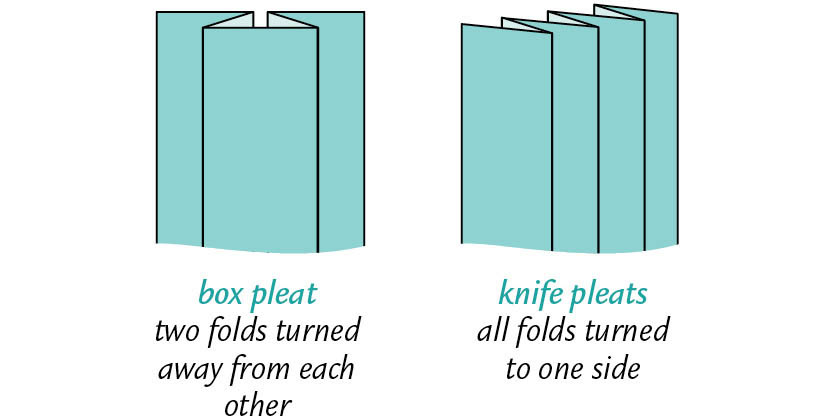
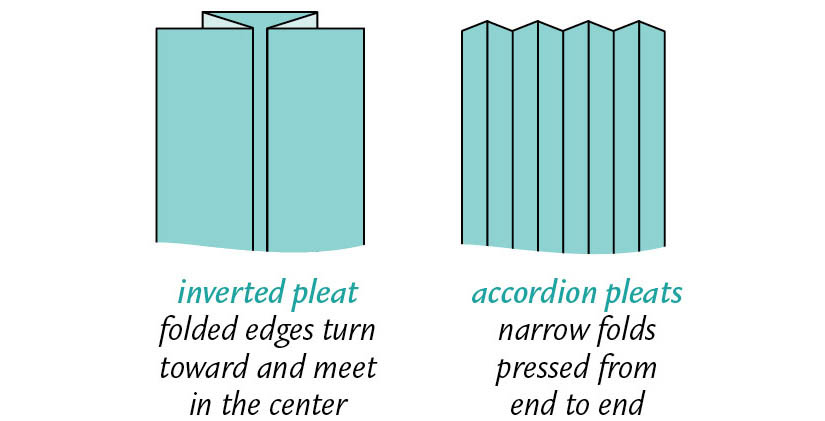
Tucks are narrow folds of fabric. They may be stitched partially or along their entire length. The stitching may be visible on the outside or may be done from the inside to control the fullness, as in the waistline tucks in trouser-style skirts and pants. When partially stitched, inside or out, they are called released tucks. Make tucks and pleats following the directions specified in your pattern guide sheet.


Q: Any tips for sewing perfect tucks?
A: Here are a few tips for perfectly spaced and stitched tucks:
Q: How do I handle seams inside the fold of the pleats in my skirt when making the hem?
A: Determine where the uppermost edge of the hem allowance will fall and clip the seam allowances to the stitching at that location. Clip at the hemline fold and remove excess fabric in the hem allowance by trimming the seams to 1⁄4". Notch out wedges in the seam allowance at the hemline fold for a flat hem fold there (A). Turn and complete the hem with the desired method. On the inside of the garment, edgestitch the hem allowance through the layers at the pleat edge (B).
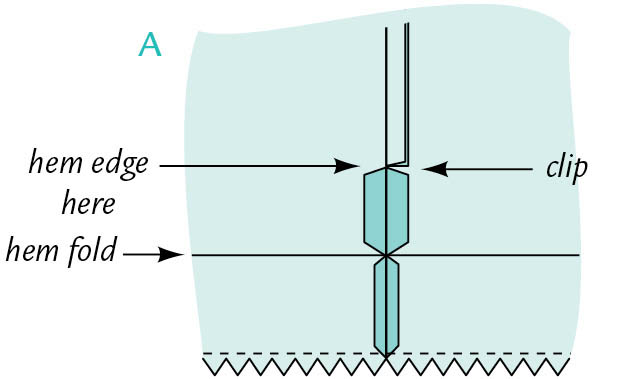
trim seam allowance; notch out fabric at fold line
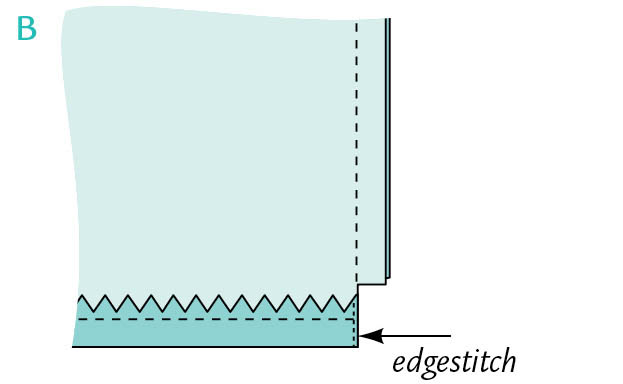
Q: Is there a way to keep pleats pressed and hanging straight, for easier pressing during the garment’s life?
A: After hemming, stitch close to the inside folded edge of each pleat on the inside as shown in the hem allowance in the previous question. Continue along the length of the inside crease, so it’s edgestitched from end to end. Press again from the outside, tucking fabric strips between the pleat edge and the fabric to avoid edge imprints.
Q: How do I press crisp pleat edges in fabrics made of synthetics or synthetic blends?
A: After pressing with the steam iron, with the paper strips still in place, immediately replace the iron with a tailor’s clapper (see page 37) and bear down for several seconds. The cool wood will absorb the steam and train the edge to remember its crease. Allow the fabric to cool completely before moving it. You can set creases in pants legs in the same manner.
When you sew together two layers of fabric of unequal lengths, you will need to ease or gather the longer layer to fit the shorter one. Pin and stitch carefully. This will ensure eased areas with no obvious tucks, and gathered areas with the fullness evenly distributed.
Q: What’s the difference between easing and gathering?
A: Gathers are obvious in the finished piece; for instance, gathers are the defining detail in a dirndl skirt. Ease can also be worked into a seam without obvious gathers. There is often a slight ease in back shoulder seams to provide a bit of extra room to accommodate the natural back shoulder curve. Shirt sleeves with a flat cap may have a bit of ease between the notches. Set-in sleeves (see pages 359–367) require moderate ease to create a smooth rounded cap or extensive ease for styles with obvious gathers (often found in little girls’ dresses).
Q: How do I handle minimal ease, like what’s needed in the back shoulder?
A: The ease is usually in a defined area: between a set of notches, dots, or other construction marks. Match the notches first, then the ends of the seam, and pin. Match the center of the larger edge to the center of the smaller edge and pin. Then use a few pins in each section to evenly distribute the fullness (this is called “easing to fit”). Stitch, removing pins as you reach them.
Experienced sewers often use minimal pins and sew with the eased side down, so the feed dogs can help with the easing. The goal is a smooth seam without puckers in either layer of the fabric.
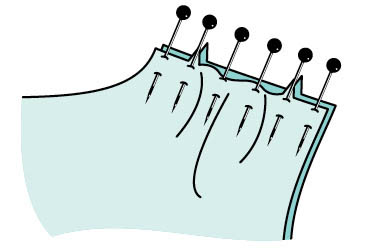
easing at the shoulder seam
Q: How do I prevent little pleats from being caught in the easing or gathering?
A: Standard directions for gathering suggest machine-basting on the seamline and then again 1⁄4" away. This gives you no control over the gathered fabric below the seam-line. Adjust the standard method slightly by using three rows of machine basting.
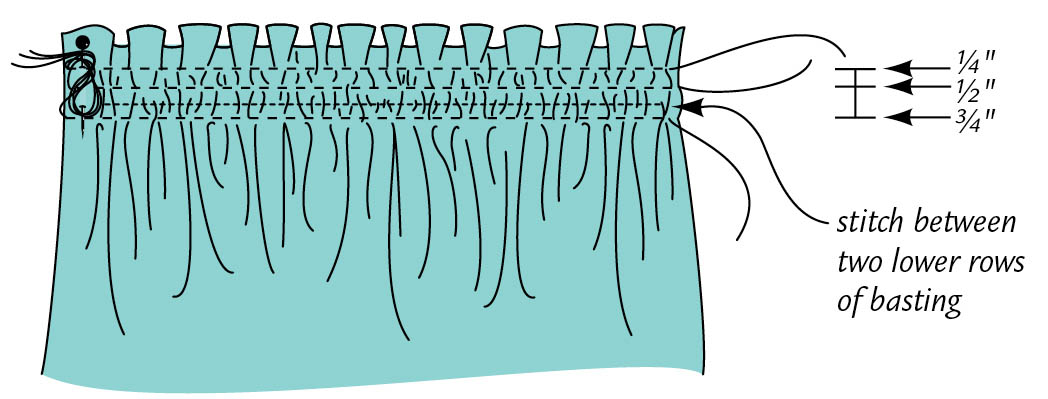
You may be able to purchase a gathering presser foot for your machine. It can gather a piece of fabric separately and/or gather it while you stitch it to its companion piece. If you do a lot of home-decor sewing or make garments with yards of ruffling, you may want to invest in the ruffler attachment that creates tiny pleats, rather than gathers, to draw in excess fullness. Follow the directions that come with the foot or ruffler.
Q: How do I prevent the gathering thread from breaking while I’m drawing up the gathers?
A: Be sure to decrease the upper-thread tension. Divide the expanse to be gathered into smaller sections, like quarters or eighths, so the threads are not overly stressed while you pull them. Do the same on the piece to which it will be sewn. For the machine basting, use topstitching thread in the needle and bobbin.
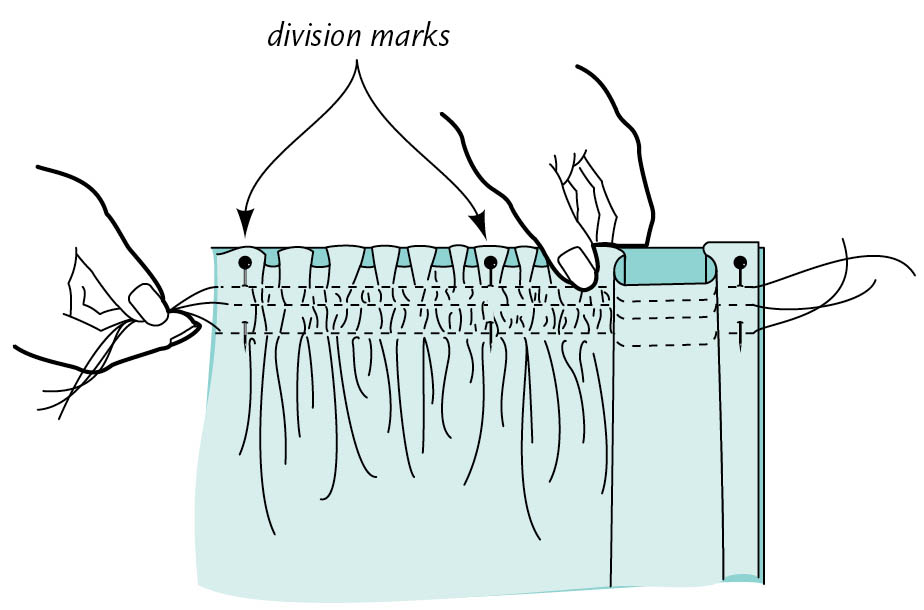
On long expanses in home-decor items, you can zigzag over a heavy thread or cord without catching it with the needle so it can slide freely under the stitches. Pull on the cord and slide the fabric along the cord to create the gathers. Adjust the fullness evenly, pin to the corresponding piece, and stitch.
Q: Is there a formula for determining how long a fabric strip should be to make a gathered ruffle?
A: The fuller the ruffle, the richer the look. Measure the distance along or around the edge where you attach the ruffle. Use the directions below to determine the cut length and width, and cut the ruffle strips. You may need to join several strips for the total required length. (Use bias seams as shown on page 268.)
Elastic is either stitched directly to fabric to draw up fullness or inserted through a casing: a fabric tunnel stitched in place at the elastic location. Casings are most commonly used at the waistline, neckline, wrists, and ankles. They may be included in the pattern piece as a turn-under allowance, or they may be created with an additional layer of fabric. Elastic can also be attached directly to the fabric without a casing.
Q: How do I choose the right elastic for my project?
A: Most packaged elastic includes recommendations for use, along with the correct application methods, but you’ll also find assorted elastic types available on large reels to purchase by the yard. Below are the basic types:
Q: Should I preshrink elastic?
A: It’s a good idea to preshrink all types, except for transparent elastic, before you measure and cut the required lengths. If the application method you choose requires stitching through the elastic, preshrinking is not necessary.
Q: How do I make a casing?
A: When a turn-under casing allowance is included on the pattern pieces for pull-on pants and skirts, follow the directions in the pattern guide sheet (see pages 130–131).
Sometimes elastic is required in the garment interior (at the waist or within a sleeve, for example) where there is no edge to turn for the casing. Solution: Add a piece of fabric wide enough to accommodate the elastic you’ve chosen, plus 5⁄8" which allows 1⁄4" turn-under allowance, plus a little ease room for the elastic. Ready-made bias tape with edges already turned is a common choice, but you can also use a strip of lightweight fabric, ribbon, or tricot-knit binding of the appropriate width for the elastic. Note: If you are using tricot-knit binding or ribbon, you won’t need turn-under allowances on the long edges.
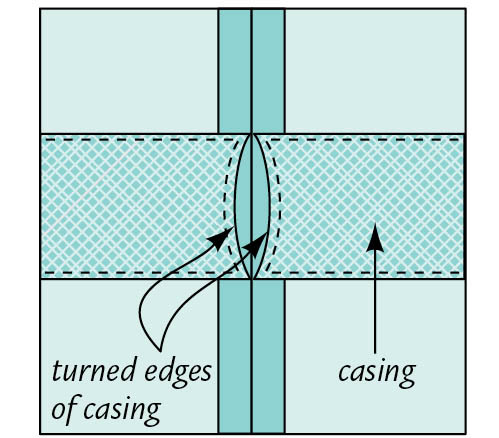
To create a casing at a shaped edge, apply bias tape or self-fabric bias binding (see page 265) as for a facing, leaving an opening for the elastic insertion. Turn to the inside, press, edgestitch, and insert the elastic as described above. It’s not necessary to close the opening.
Q: What’s the best way to join the ends of elastic in casings?
A: Choose from the following options:
Q: How do I apply elastic directly to the garment when there is no casing?
A: Use narrow knitted or woven elastic and cut it 8 percent shorter than the length of the garment where it will be applied. Your pattern may specify the length to cut. Adjust the machine for a long, narrow multistitch zigzag (or substitute two rows of straight stitching) and use a ballpoint needle.
For a waistline application with a zipper opening at center front or back. Divide the elastic and the garment location where it will be stitched into eighths; mark with pins or marking pen. Pin the elastic to the garment with marks matching and 1⁄2" extending at the opening edges. Stitch in place, stretching the elastic to fit between the marks. (Turn under the elastic ends and whipstitch to the zipper or seam allowance at the opening edges.) On shorter expanses, such as at a sleeve edge, quarter-mark the elastic and the garment, and apply in the same manner.
For elastic in the interior of a sleeve. Apply to the sleeve before you stitch the underarm seam. It’s easier than applying it in the round.
For a garment without an opening. Overlap the ends and stitch together in the X-box pattern (see page 346) to make an elastic circle before pinning and stitching in place.
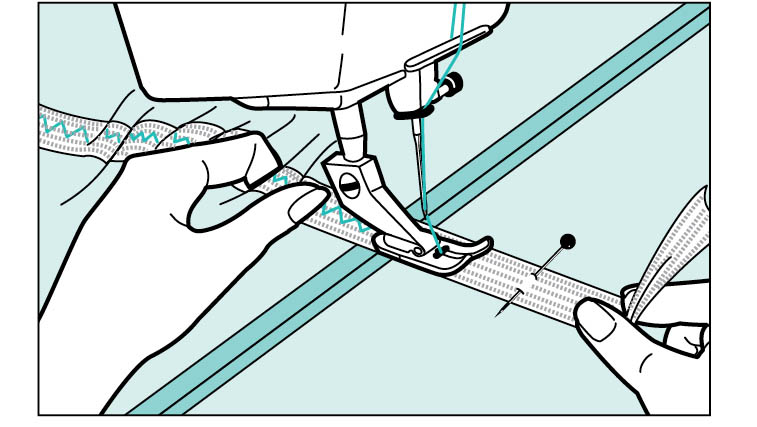
stretch elastic to fit between quarter marks
Q: Is there an advantage to using a casing instead of stitching elastic directly to the garment?
A: It’s much easier to adjust the elastic for a perfect fit in a casing, and it also makes it possible to adjust or replace worn elastic later. Stitched-on elastic is difficult to remove and stitching through elastic does weaken it somewhat.
Q: How do I prevent popped stitches in the casing stitching on knits?
A: Hand-wrap (don’t machine-wind) woolly nylon thread onto the bobbin. Don’t stretch it as you wind. Use regular thread in the needle. Adjust the machine for a narrow zigzag stitch. With the casing allowance pinned in place and facing you, stretch the casing as you stitch it in place. The stretchy thread in the bobbin will be on the right side of the garment and will prevent popped stitches.
SEE ALSO: Casings