GROW
It is true that the aesthetic appeal of some vegetables is limited, but the all-too-brief beauty of the poppy flower cannot be denied. The flowers can be enjoyed for their full life too, as it is the seeds that are the aim here. Leave a seed head or two standing – the birds will appreciate it, and you will probably get some self-sown flowers next year too.
Seeds of the red field or Flanders poppy (Papaver rhoeas) and the pale purple opium poppy (P. somniferum) are suitable to cook with. In some countries it is illegal to grow opium poppies without a licence, while in other countries it is acceptable to grow them (just not to process the seeds into opium!) so please check your garden is operating within the law.
In spring or autumn sow seeds direct into welldrained soil or a pot in a sunny position. It is possible to buy plug plants, but results may not be as good, because poppy seedlings do not appreciate disturbance. Space plants 10cm/4in (P. rhoeas) or 25cm/10in (P. somniferum) apart.
Just enjoy the flowers.
Only the seeds can be eaten – all other parts of poppies are toxic. Once the petals fall away to reveal the seed head in late summer/autumn, wait for it to dry out a bit. The seeds will be ripe when the seed head can be shaken like a rattle. Cut the seed head off the stalk, and extract the seeds into a paper bag. Leave the sealed bag in a dry place for a couple of weeks until the seeds are completely dry, then pour into a jar to store until needed. If you are uncertain when the seed head may be ripe and do not want to miss your seed collection opportunity, tie a paper bag over the top of the stalk. The seed head will ripen within the bag, and any loose seeds are collected within it.

The common field (or Flanders) poppy, Papaver rhoeas, flowers only briefly.
BAKE
Poppy seed flower-pot bread (see here)
BAKE

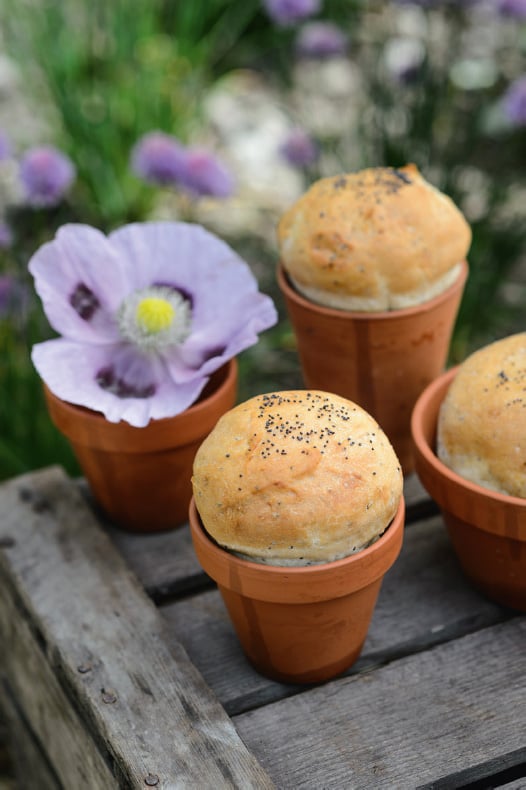
These little seeded rolls are baked in real clay flower pots, and can be returned to the pots for serving. It is probably best to purchase new pots; keep them to a diameter and height less than 15cm/6in and ideally to around 9cm/3½in. White bread flour shows off the poppy seeds to best advantage, but could be substituted in whole or part with wholemeal or granary flour.
MAKES 6 ROLLS
YOU WILL NEED
6 small prepared clay flower pots, the base and sides lined with baking paper.
1 × baking sheet
INGREDIENTS
Pot preparation:
2 tbsp olive oil
Bread:
1kg/1lb 3oz bread or strong flour
2 tsp fast-action dried yeast
600ml/1 pint warm water (200ml/7 fl oz boiling water, the remainder cold water)
1 tbsp olive oil
3 tsp salt
3 tsp poppy seeds
Decoration:
olive oil, for glazing
½ tsp poppy seeds, for sprinkling
METHOD
• |
To prepare the pots, wash them thoroughly and allow to dry. Preheat the oven to 180°C/350°F/gas mark 4. Brush the insides of the pots liberally with the olive oil and put the pots on the baking sheet. Bake for an hour, allow to cool, then wash and dry again. (Such preparation needs to be done only once.) |
• |
For the bread, sift the flour into a large mixing bowl and stir in the yeast. Pour in the warm water, then the olive oil. Mix for 5 minutes before adding the salt and poppy seeds. Knead until the dough is smooth and elastic. Divide the dough into 6 equal pieces (unless your pots are of different sizes, in which case split it up appropriately) and put into the lined pots, pressing into a rough pot shape to fit. Cover with clingfilm and leave in a warm place for an hour until the dough has doubled in size. Meanwhile preheat the oven to 200°C/400°F/gas mark 6. Remove the clingfilm, and put the pots on to the baking sheet. Brush the tops with olive oil and sprinkle with poppy seeds. Bake for around 30 minutes; the rolls should sound hollow when tapped on the base. Remove from the oven, turn the rolls out of the pots and put them on to a wire rack to cool. |
TO SERVE
Serve warm or cold, in the pots, perhaps as part of a ploughman’s (or gardener’s) lunch.
GROW
Poppies (see here)
GROW
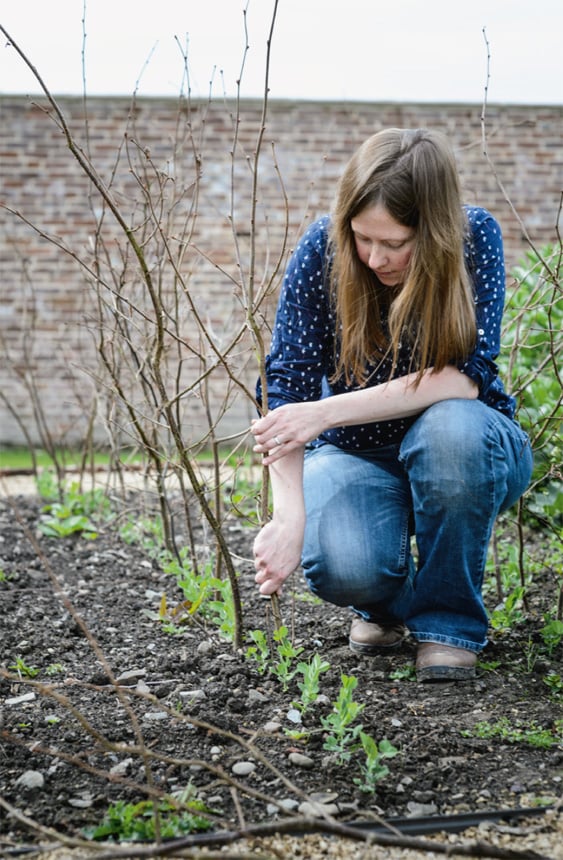
Eating peas straight from the pod, direct from the plant, is one of the home-grower’s greatest pleasures, and a considerable temptation when working in the garden. If you can get them to the kitchen, cook them as soon as possible after picking, to retain that super-sweet flavour. If not, well, the shoots and flowers are just as tasty!
To ensure a good supply over spring and summer, plant early, second early and maincrop varieties in succession. The sweetest varieties are the petit-pois types. Good choices are ‘Kelvedon Wonder’ (early), ‘Early Onward’ (second early) and ‘Balmoral’ (maincrop). Any culinary pea flower or shoot is edible, but to grow plants just for the shoots choose ‘Twinkle’ (early).
Peas like an open, sunny spot, in a soil enriched with plenty of organic matter. Sow in autumn/winter or spring; even with a single variety it is a good idea to sow at regular intervals. Seeds can be sown in lengths of guttering, and then the whole thing – plants, compost and all – can be slid into a prepared drill when the seedlings are established. Plants can be set as close as 5cm/2in apart, with the rows as far apart as the plants will be high (check the seed packet). Peas also do well in pots, but choose dwarf varieties for this, as these will not need staking.
Protect peas from marauding mice and birds, especially pigeons. Most peas (not the dwarf varieties) will need supports to climb up. Either put in a row of twiggy sticks alongside the seedlings, or stretch some netting between posts at either end of the row. The peas will cling on to the support themselves; they will not need tying in.
BAKE
Pea cheesecake (see here)
Pick the flowers, shoots and pods whenever they are ready. Regular picking of the pods will encourage the development of more flowers and pods.
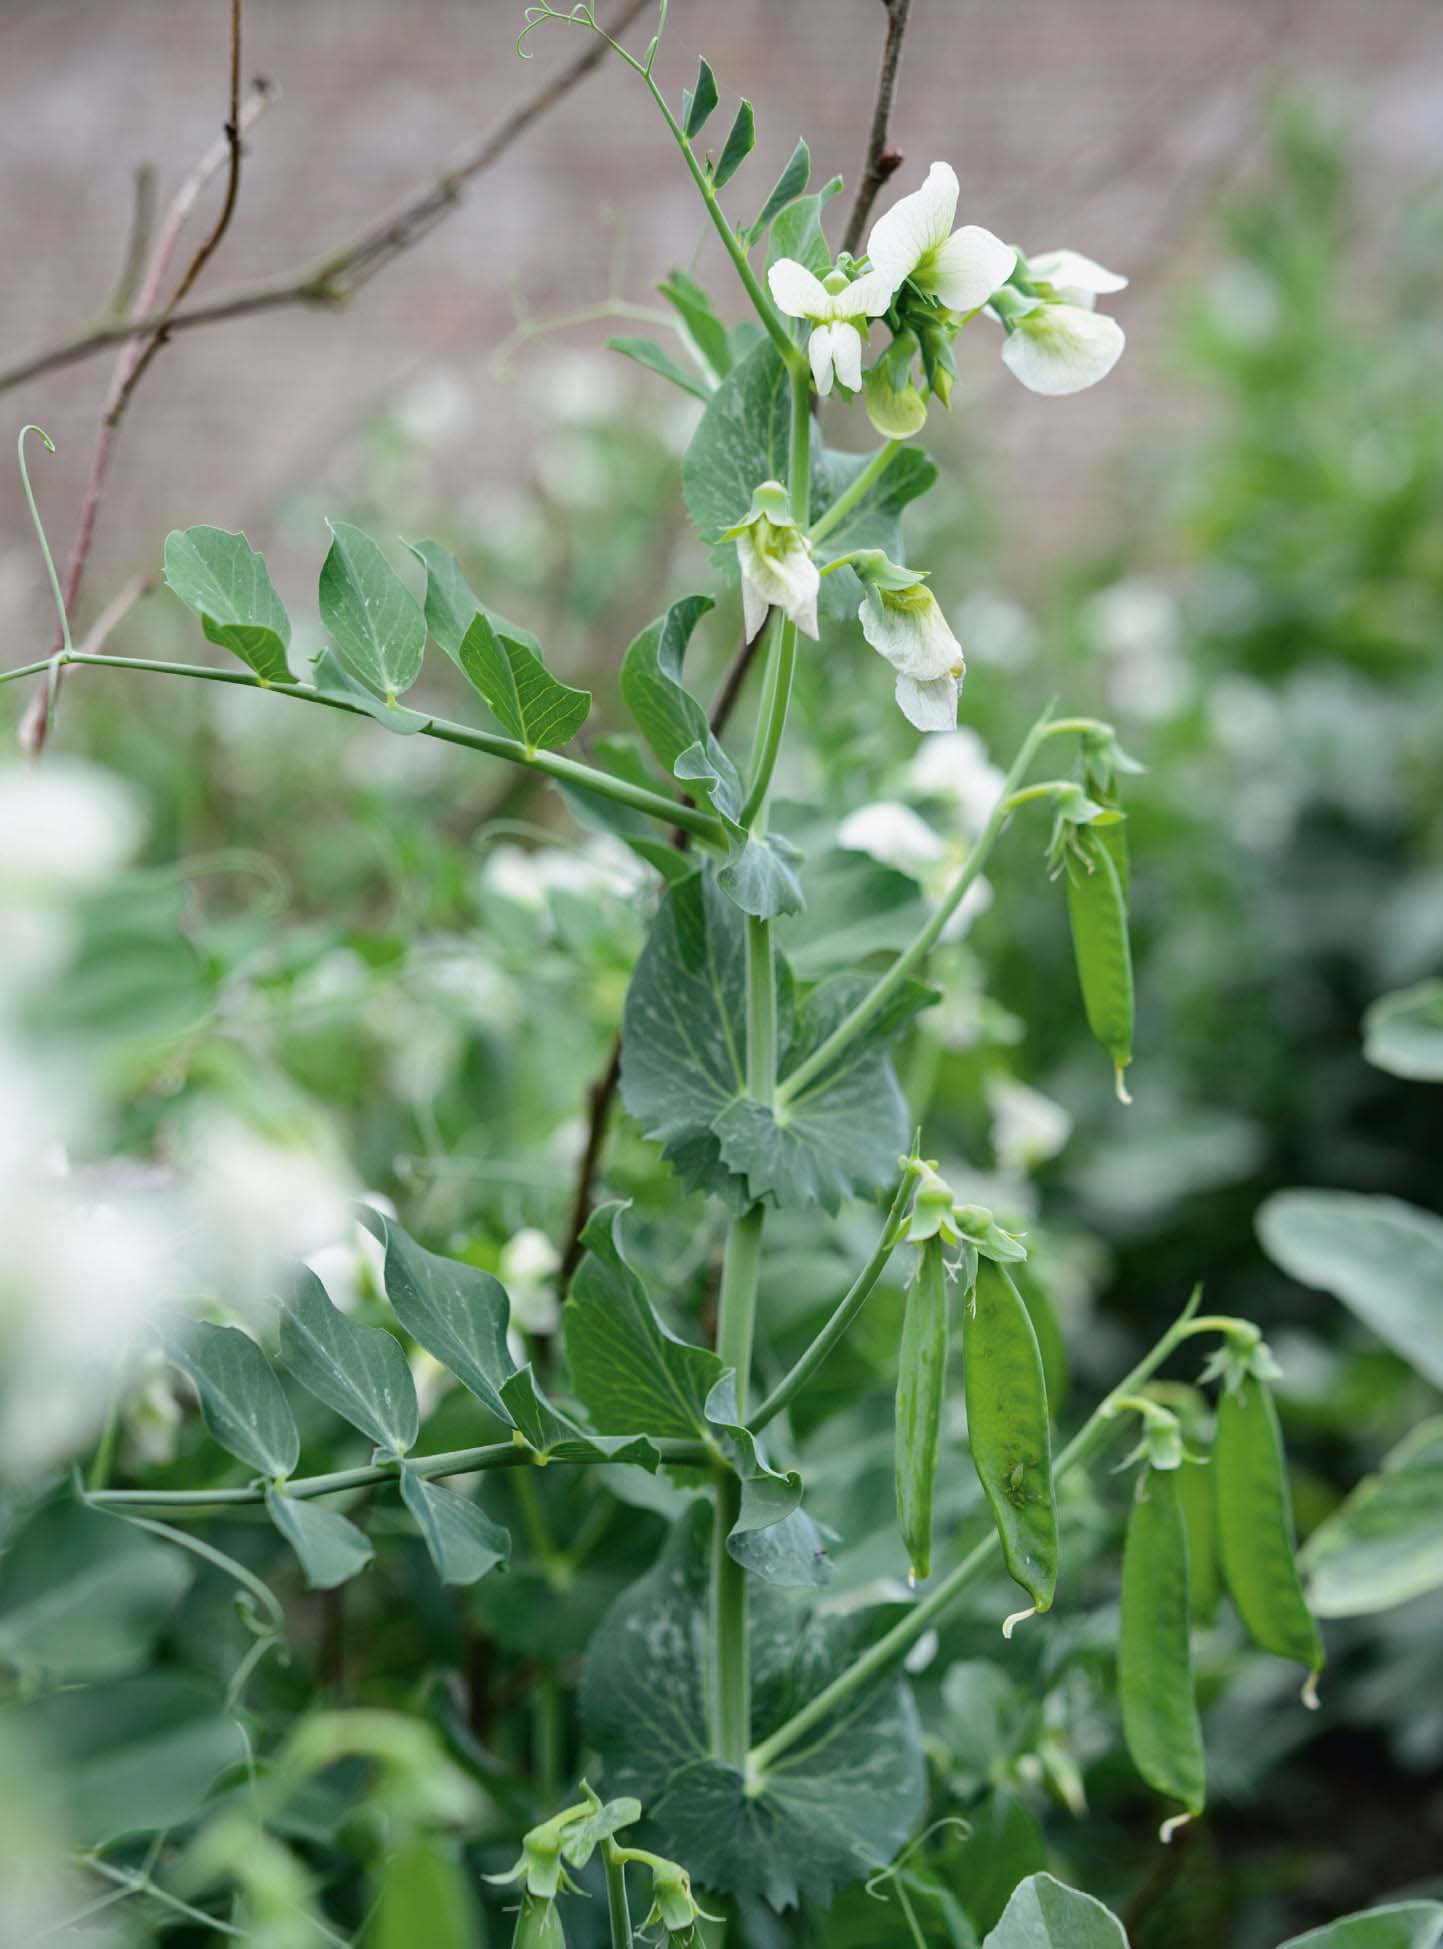
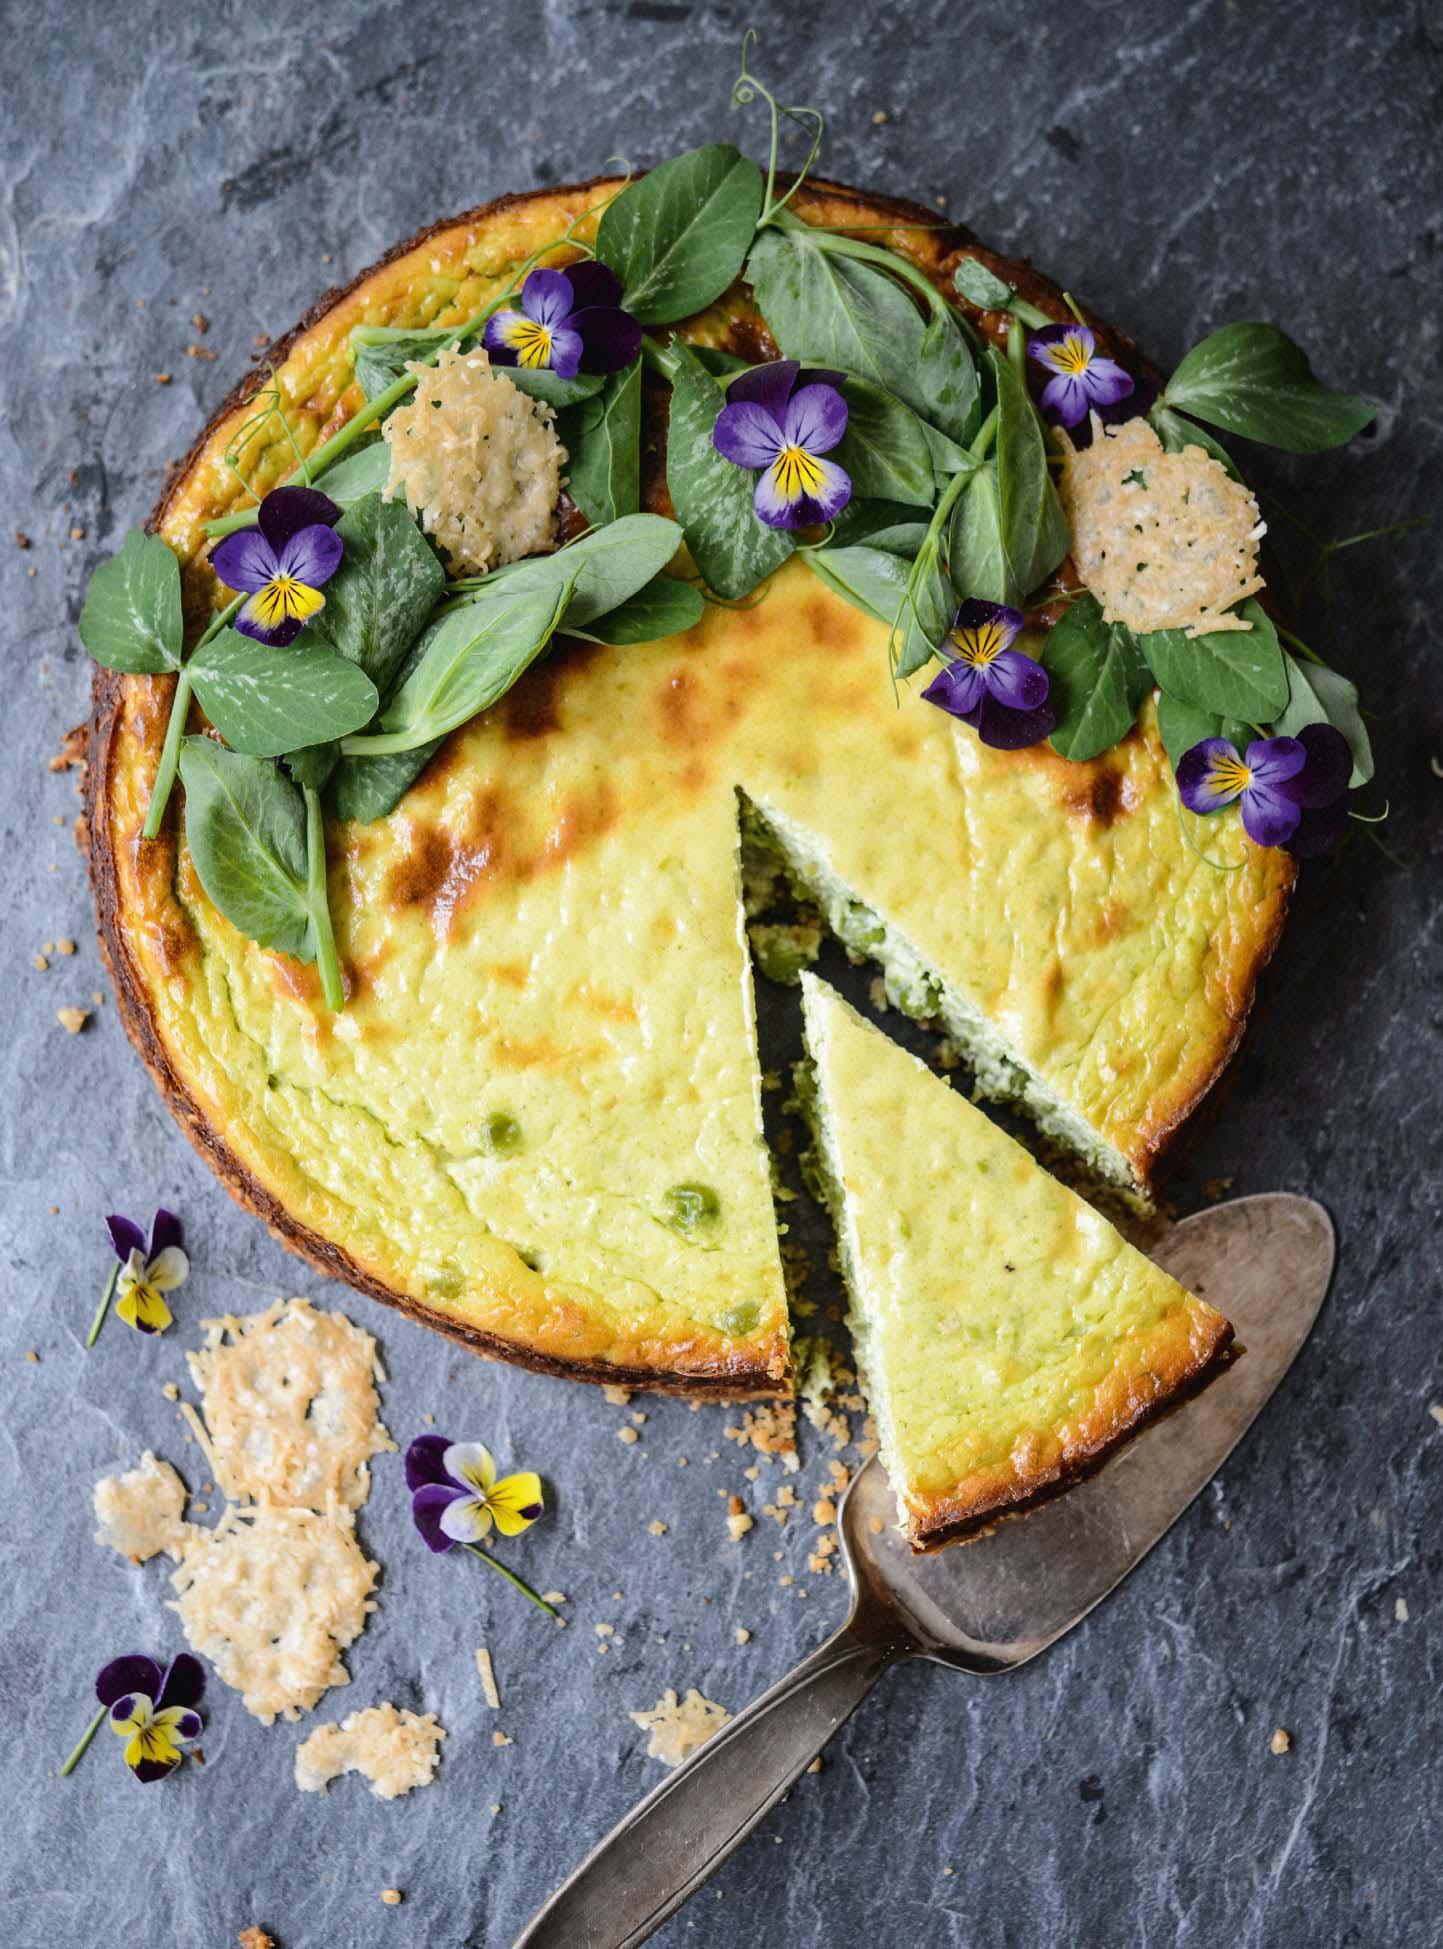
Pea flowers are delicious, but leave some to develop into pods of peas.
BAKE
This unusual dish is a delicious light lunch or summer starter, and uses everything but the pod itself from the pea plant. (If you want to save your pea flowers to turn into more peas, omit them or use other edible flowers.) Savoury cheesecakes are a great alternative to quiches and tarts; and as this recipe uses oatcakes for the base it is wheat-free too.
SERVES 4–6 AS A LIGHT LUNCH WITH SALAD 8–10 AS A STARTER
YOU WILL NEED
1 × spring-form, round cake tin, 23cm/9in diameter, greased and base-lined
INGREDIENTS
Base tier:
200g/7oz oatcakes
100g/3½oz unsalted butter
Parmesan crisps:
20g/¾oz Parmesan cheese,
finely grated
100g/3½oz butter
2 garlic cloves, crushed
300g/10oz peas
Filling:
360g/12oz cream cheese
120ml/4 fl oz double cream
4 eggs
1 lemon, zest
salt and pepper, to taste
100g/3½oz peas
Decoration:
handful of pea shoots
edible flowers (for example, pea flowers, violas)
METHOD
TO SERVE
Turn the cheesecake out on to a serving plate, scatter over the pea shoots and flowers. Nestle the Parmesan crisps among them. Serve warm, with a crispy and peppery side salad.
GROW
Potatoes have long been included in baking, to add both moisture and bulk to savoury and sweet cakes and breads. When used out of choice rather than necessity, it makes sense to grow the varieties that will impart the best flavour.
The early and salad potatoes work well for baking, as they have a lower water content than larger maincrop varieties. ‘International Kidney’ is the closest a home-grower can get to a ‘Jersey Royal’ new potato, while ‘Epicure’ is another good early and salad ‘Pink Fir Apple’ has a great flavour. ‘Cara’ and ‘Arran Victory’ are more good choices.
Potatoes develop from specially grown seed potatoes, which are available to buy from late winter. These should be put in a cool, dry, light place to chit (the formation of little leafy sprouts out of the seed potato) – old egg boxes are ideal receptacles for this. Plant out the chitted potatoes in early spring, putting them sprout-end up in a hole three times their depth and covering carefully so as not to damage the young shoots. Space the plants 30cm/12in apart, with 40cm/16in between rows. To encourage the formation of more potatoes, once the shoots reach about 10cm/4in above the surface, cover them over with soil drawn up from either side of the row.
To plant in deep pots or sacks, put a 15cm/6in tier of compost in the bottom of the pot, place the chitted potatoes on top and cover with another 30cm/12in of compost. Cover the shoots when they break through as above until you reach the top of the pot/sack.
Protect the leaves from frost with horticultural fleece, newspaper or cardboard. Water only in dry weather, as otherwise watering encourages the development of more leaves than potatoes.
Potatoes will be ready to harvest 3–5 months after planting, depending on whether they are early or maincrop varieties. Make sure you dig up all the potatoes, even the very little ones; any remaining may develop into more plants there next year.
BAKE
Although the potatoes add a depth of flavour, as well as moisture to replace the need for butter and milk, these scones are really about the pesto. Making your own pesto is a viable option only if you grow your own basil, as it is needed in quantity. It is well worth having a basil plant – or several – to hand. In winter try substituting parsley for the basil and walnuts for the pine nuts.
MAKES 10–12 SCONES
YOU WILL NEED
1 × baking sheet, dusted with flour
1 × cookie cutter, 6cm/2½in diameter
INGREDIENTS
For the pesto:
65g/2oz basil leaves
1 garlic clove, crushed
13g/½oz pine nuts
small pinch of salt
60ml/2fl oz olive oil
50g/2oz Parmesan cheese, finely grated
For the scones:
2 eggs, beaten
300g/10oz potatoes, boiled, drained and mashed
300g/10oz plain flour
1 tbsp baking powder
½ tsp salt
METHOD
• |
For the pesto, blend all the ingredients except the cheese into a consistent paste, then stir in the cheese and set aside. |
• |
For the scones, preheat the oven to 180°C/350°F/gas mark 4. Mash the eggs into the cooled potato with a fork, then sift in the flour, baking powder and salt. Mash roughly, then add 150g/5oz of the pesto and bring it all together to a dough. Tip the dough out on to a floured surface and flatten to around 3cm/1¼in thick. Punch out the scones using the cookie cutter and place on the floured tray. Reshape the dough and continue cutting out the scones. Bake for 20–25 minutes until risen and slightly browned. Remove from the oven and cool on a wire rack for 5–10 minutes. |
TO SERVE
Serve warm, slathered with cold butter.
BAKE
Soda bread, which is created using baking powder rather than yeast, requires no kneading and no proving. It is best served warm, making it an ideal choice for a quick weekend lunch. Tradition has it that the cross sliced into the top of the bread is to ward off the devil, but whatever the origin it makes each loaf easy to tear apart into chunks to share.
MAKES 2 LOAVES
YOU WILL NEED
1 × baking sheet, dusted with flour
INGREDIENTS
500g/1lb 2oz plain flour, plus extra for dusting
1 tsp salt
pinch of freshly ground pepper
4 tsp baking powder
150g/5oz grated pumpkin
100g/3½oz grated gruyere cheese
300ml/½ pint buttermilk
METHOD
• |
Preheat the oven to 200°C/400°F/gas mark 6. Mix the flour, salt, pepper, baking powder, pumpkin and three-quarters of the cheese quickly and thoroughly in a large bowl. Then make a well in the centre. |
• |
Pour in the buttermilk and stir until it comes together as one ball of dough. Work as quickly as possible until the ingredients are all incorporated, but do not mix for longer than necessary to do this. |
• |
Divide the dough into two equal pieces, and shape each into a ball. Put on to the baking sheet and flatten slightly. Cut a deep (almost to the base) cross in each ball, sprinkle with the remaining cheese and dust with a little flour. |
• |
Bake for 25–30 minutes, until the bread sounds hollow when tapped on the base. Remove from the oven and cool on a wire rack. |
TO SERVE
Serve warm or cold. The loaves will last 2 days at most, and are best eaten as soon as possible after baking.

GROW
Pumpkins & winter squashes (see here)
GROW
Leafy crops are some of the best to grow rather than buy, as they really benefit from being eaten as soon as possible after picking. Spinach, which can be harvested over a long period, is worth making space for in the veg patch.
‘Amazon’ and ‘Palco’ are both good for baby leaves and have some resistance to bolting. ‘Atlanta’ will withstand colder temperatures and last longer into the autumn and winter.
Spinach plants will happily grow in a little shade, and this will help prevent them bolting in hot weather. The plants are hardy, and can be sown in early spring. A sowing in late spring will give leaves later into autumn. Sow in drills 20cm/8in apart, thinning plants to 5–10cm/2–4in apart, for baby leaves. For bigger leaves, sow seeds 15cm/6in apart in drills 30cm/12in apart. Sow three seeds to a 30cm/12in pot.
Regular harvesting will ensure the plants flourish. Water well; especially in hot weather keep the soil consistently moist to stave off bolting. It may be necessary to protect plants from birds, slugs and snails.
Start picking the leaves as soon as they are a usable size. Regular picking of young leaves will keep the plant producing fresh crops of tender leaves, but pick a few leaves from each plant rather than denuding a single one entirely. Older leaves will be tougher and more bitter.
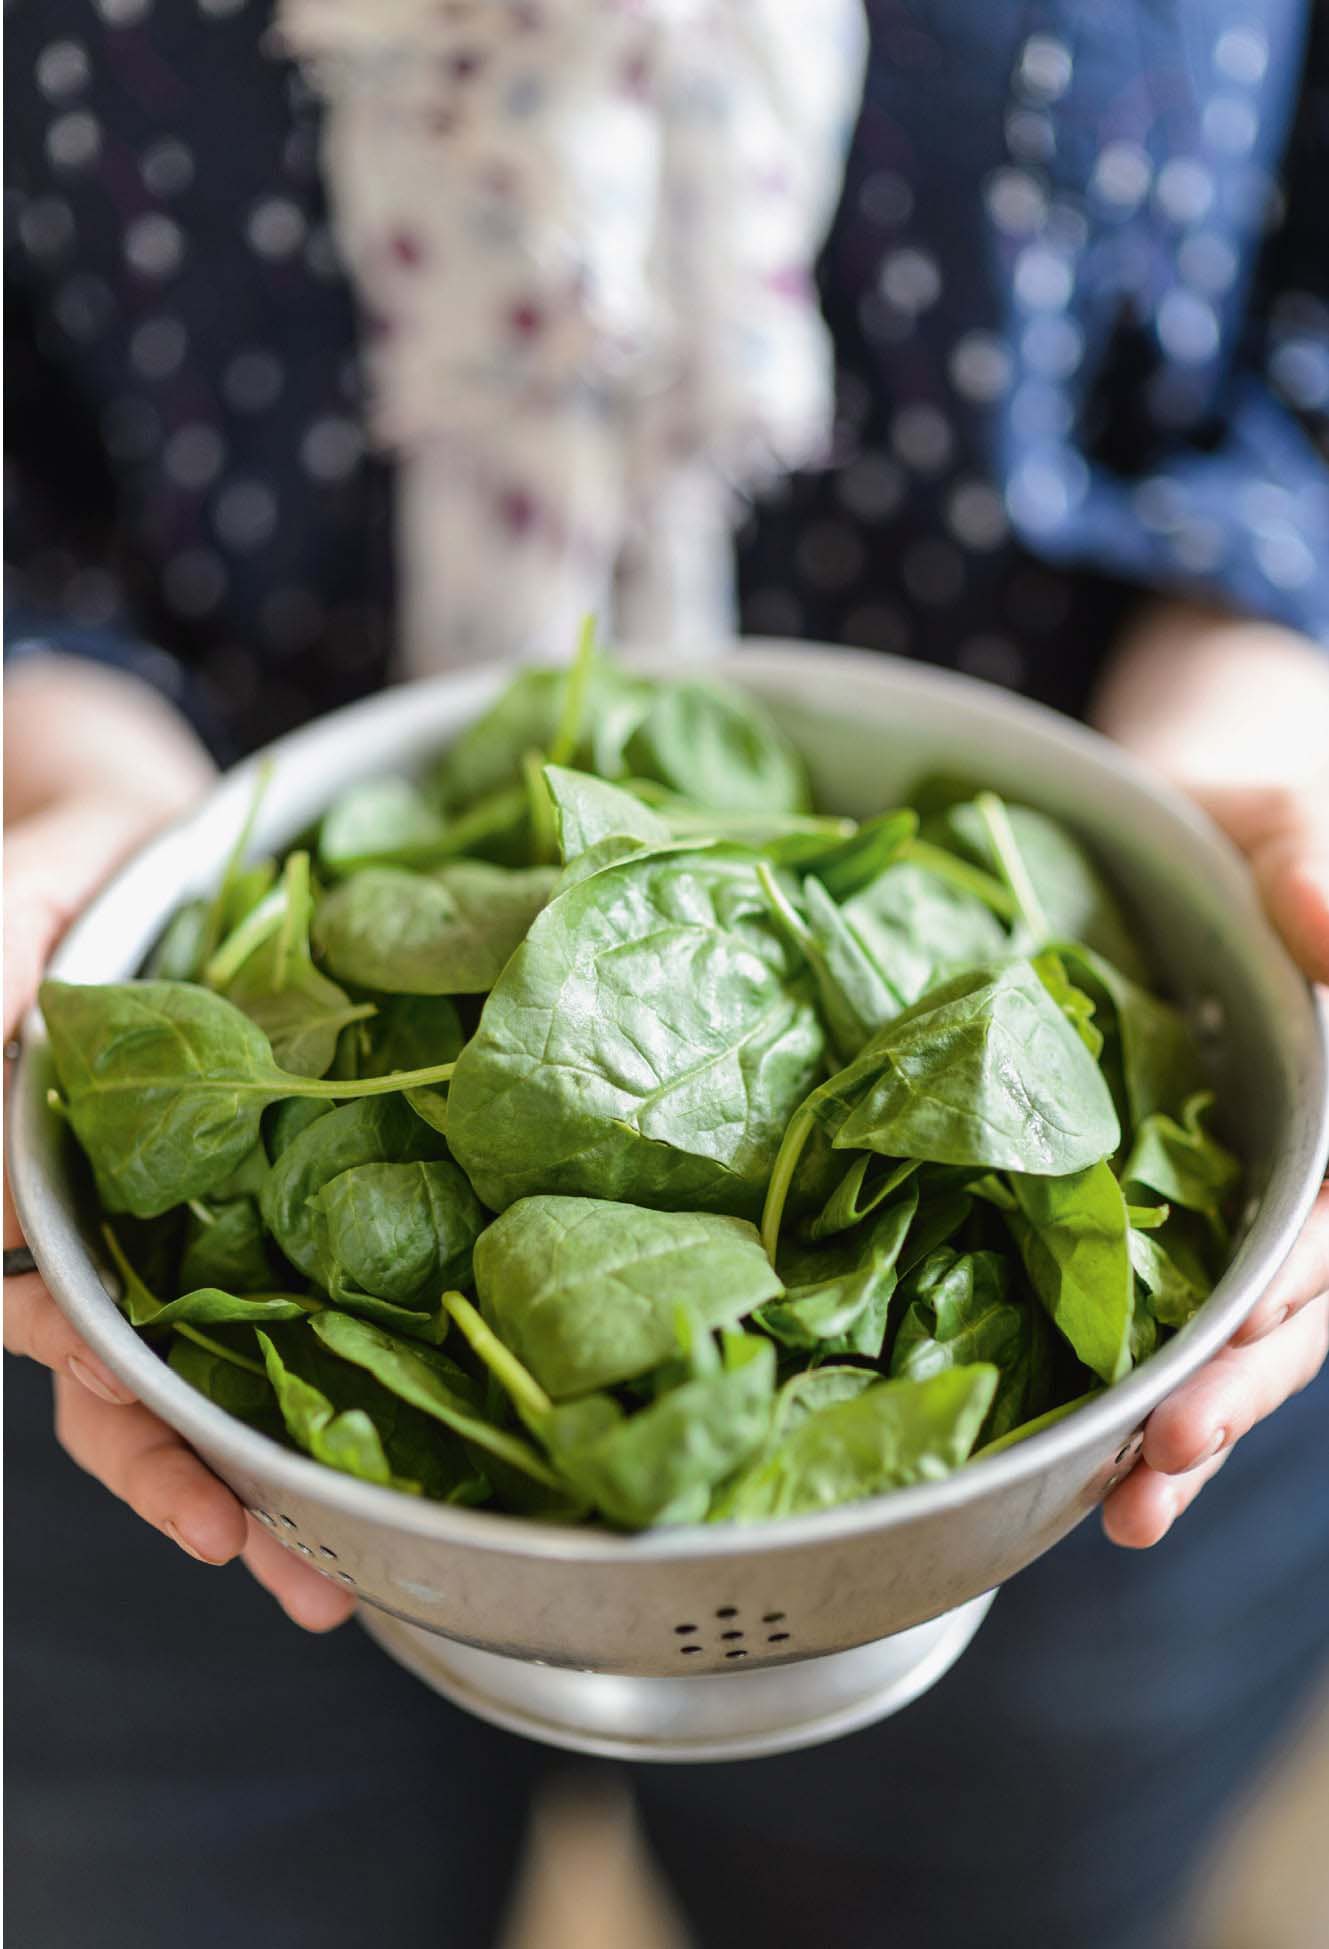
Always rinse spinach before using, to wash off any soil and grit particles.
BAKE
Spinach & cheese muffins (see here)
BAKE
These flavourful muffins are just the thing to sustain you through the afternoon on the allotment or in the garden.
MAKES 12 MUFFINS
YOU WILL NEED
1 × 12-hole muffin or cupcake tin, lined with paper cases
INGREDIENTS
Spinach mix:
15g/½oz unsalted butter
½ shallot, finely chopped
1 garlic clove, finely chopped
250g/8oz spinach, roughly chopped
small pinch of freshly grated nutmeg
Muffin batter:
375g/13oz plain flour
3 tsp baking powder
large pinch of salt
large pinch of freshly ground pepper
150g/5oz cheddar cheese, grated
2 eggs
375ml/13fl oz milk (semi-skimmed or full fat)
10g/½oz oats, for decoration
METHOD
• |
For the spinach mix, melt the butter in a large frying pan over a low heat, add the shallot and garlic and fry gently until softened but not coloured. Tip in the spinach, and add the nutmeg. Cook, stirring, until the spinach has completely wilted and reduced. There should be hardly any liquid left. Leave to cool, then roughly chop again. |
• |
For the muffin batter, preheat the oven to 180°C/350°F/gas mark 4. Sift together the flour, baking powder, salt and pepper into a large bowl, then stir in the cheese. In a separate bowl, lightly whisk the eggs into the milk. Stir the milk/egg mix into the dry ingredients until fully incorporated, then quickly fold in the spinach mix so that it is evenly distributed. Spoon into the paper cases, and sprinkle the tops with the oats. Bake for 25 minutes, then remove from the oven and turn out to cool on a wire rack. |
TO SERVE
Serve warm or cold.
GROW
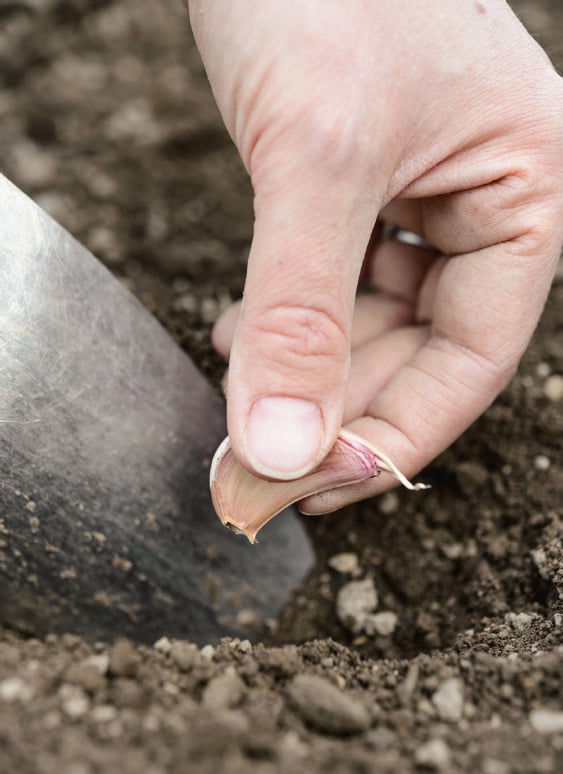
Garlic, a base flavour in so many dishes, is one of the lowest-maintenance vegetables. Growing your own also means you can try plaiting the dried bulbs together into a long string to hang in the kitchen.
Choose hardneck varieties (rather than softneck – the other main type of garlic), as not only do they produce better-sized cloves, but they may also put out a flower spike (known as a scape), which is edible too. Try ‘Lautrec Wight’ or ‘Red Sicilian’. ‘Elephant’ garlic is not a true garlic yet produces enormous bulbs of a milder flavour: try them in the root veg tarte Tatin (see here).
Garlic needs an open, sunny site and well-drained soil, as otherwise it can be prone to rotting. It is best grown from cloves rather than seed. Bulbs (specifically for planting, although it is possible to use those sold for eating) are available from late summer, for planting in autumn and winter. Garlic requires a cold spell in order to produce plenty of cloves, so any cloves planted in spring will not divide up so well if at all. Plant the cloves direct into the ground or in a modular tray in a cold frame for transplanting in spring. Push the cloves into the soil so that they are completely covered, with the baseplate downwards (pointy end up!), leaving about 15cm/6in between cloves and 30cm/12in between rows. To grow in pots, make sure the cloves have enough space to develop into decent-sized bulbs; 6–8 plants per pot of 30cm/12in diameter is sufficient.
Aside from keeping the weeds down, and watering in very dry weather, there’s little else to do but wait. If the plants start to grow flower spikes, cut these off.
Garlic is ready when the leaves start to yellow and dry out in late spring or early summer; check the bulbs are big enough by lifting one. Leave the bulbs to dry out in the sun while raised off the ground, to enable good air circulation. Once the skins rustle to the touch, the bulbs can be stored in a cool, dry place.
BAKE
Pea cheesecake (see here)
Pesto potato scones (see here)
Root veg tarte Tatin (see here)
Spinach & cheese muffins (see here)
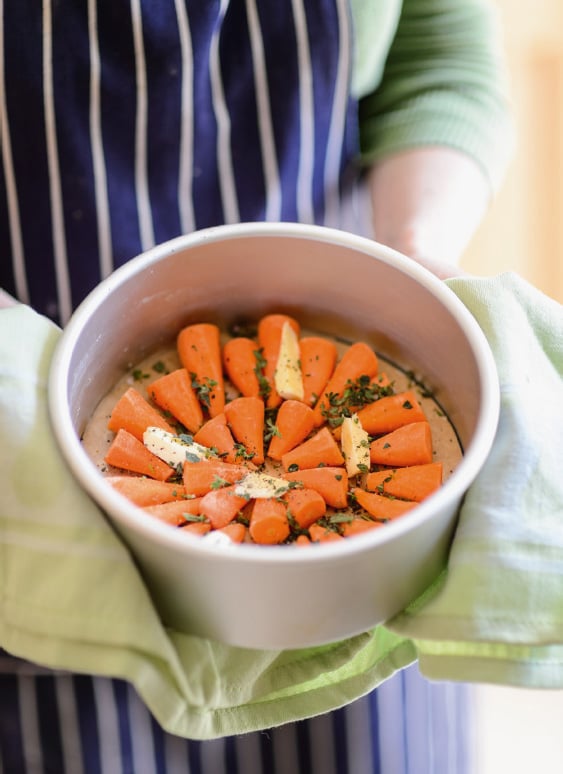
This is a versatile and easy dish that can include any type of root vegetable. Tarte Tatin is baked upside-down, and the vegetables are arranged on the bottom of the tin so that when turned out they are in an attractive pattern on the pastry – get creative with the shapes and colours of your veg! (NB By all means make your own puff pastry, but to make this bake easier and faster I would recommend using shop-bought – just make sure it is all-butter pastry.)
This tart is especially good with thinnings or baby vegetables of carrots, beetroot and parsnips: use just one type of vegetable per tarte Tatin, or mix several together. Use baby veg and thinnings whole, cut full-sized roots into small chunks or slices. Roasting garlic (especially ‘Elephant’ garlic) makes it creamy and mild flavoured.
SERVES 2 AS A MAIN COURSE
YOU WILL NEED
1 × flan tin, 20cm/8in diameter, greased and base-lined
INGREDIENTS
250g/8oz puff pastry
300–400g/10–14oz root vegetables
15g/½oz unsalted butter
1 tbsp fresh herbs, finely chopped (thyme and rosemary work well with all the veg)
salt and pepper, to taste
vinaigrette (optional), for drizzling
METHOD
• |
Roll out the pastry and cut out a disc of 22cm/8½in diameter(that is, just bigger than the base of the tin). Wrap in baking paper and put in the refrigerator. |
• |
Preheat the oven to 180°C/350°F/gas mark 4. Arrange the prepared vegetables in the base of the tin, remembering that the underside will be what is on display once served. Dot over the butter, sprinkle with three-quarters of the herbs and season well with salt and pepper. Cover the top of the tin with foil and bake for 20–40 minutes until the vegetables are tender. |
• |
Remove from the oven and take off the foil. Turn the oven up to 190°C/375°F/gas mark 5. Take the pastry disc out of the refrigerator and place it over the top of the vegetables. Tuck the edges down the sides. Return the tin to the oven and bake for a further 20 minutes until the pastry is puffed up and golden. Remove from the oven and leave to cool in the tin for 10 minutes. |
TO SERVE
Turn out, inverted, on to a serving board. Peel off the base paper, scatter with the remaining chopped herbs and drizzle with a vinaigrette, if liked.