GROW
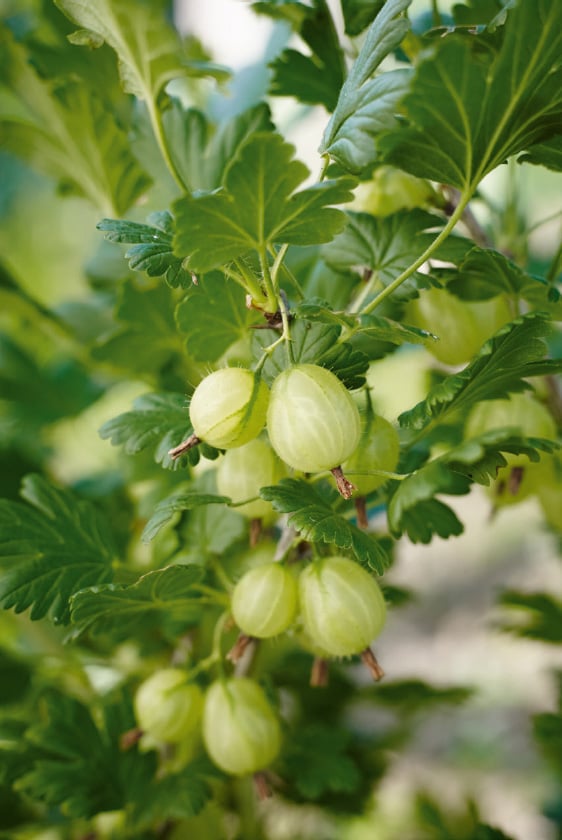
It is worth the odd thorn in the finger to pick the fuzzy green gooseberries that herald the start of the summer soft fruit season. Along with currants, gooseberries are less easy to find in the shops than other berries.
‘Careless’ crops early in the season and is good for cooking, while ‘Invicta’ provides a reliably good harvest and has some resistance to mildew (a common problem in gooseberries). The red berries of ‘Whinham’s Industry’ are sweet enough to eat raw.
Plants can be bought bare-root in winter or container-grown year-round. They are happy in a little shade and will also appreciate shelter from winds and a well-drained soil, but the early flowers of gooseberry plants will be killed by the cold, so do not plant in a frost pocket. Gooseberries can be trained against a wall or fence in a fan shape or as a cordon. Alternatively a bush can be raised off the ground on a tall leg to create a standard, under which other plants can be grown. Allow 1.25m/4ft between plants growing as bushes; on a wall or fence allow 30cm/12in between cordons and 1.5m/5ft between fans. Gooseberries will happily grow in large pots too, and in fact this can be preferable because the plants can then be moved under cover (into a greenhouse for example) in late winter to get an earlier harvest than plants growing outside.
Prune bushes to maintain a goblet shape of 8–10 branches. Remove old, dead or diseased branches back to the main stem in early spring and shorten new growth by one-half in midsummer. On cordons shorten all new growth to five buds in summer, then back to one bud in winter. To prune a fan, treat each branch as if it were a cordon. Mulch gooseberries in spring.
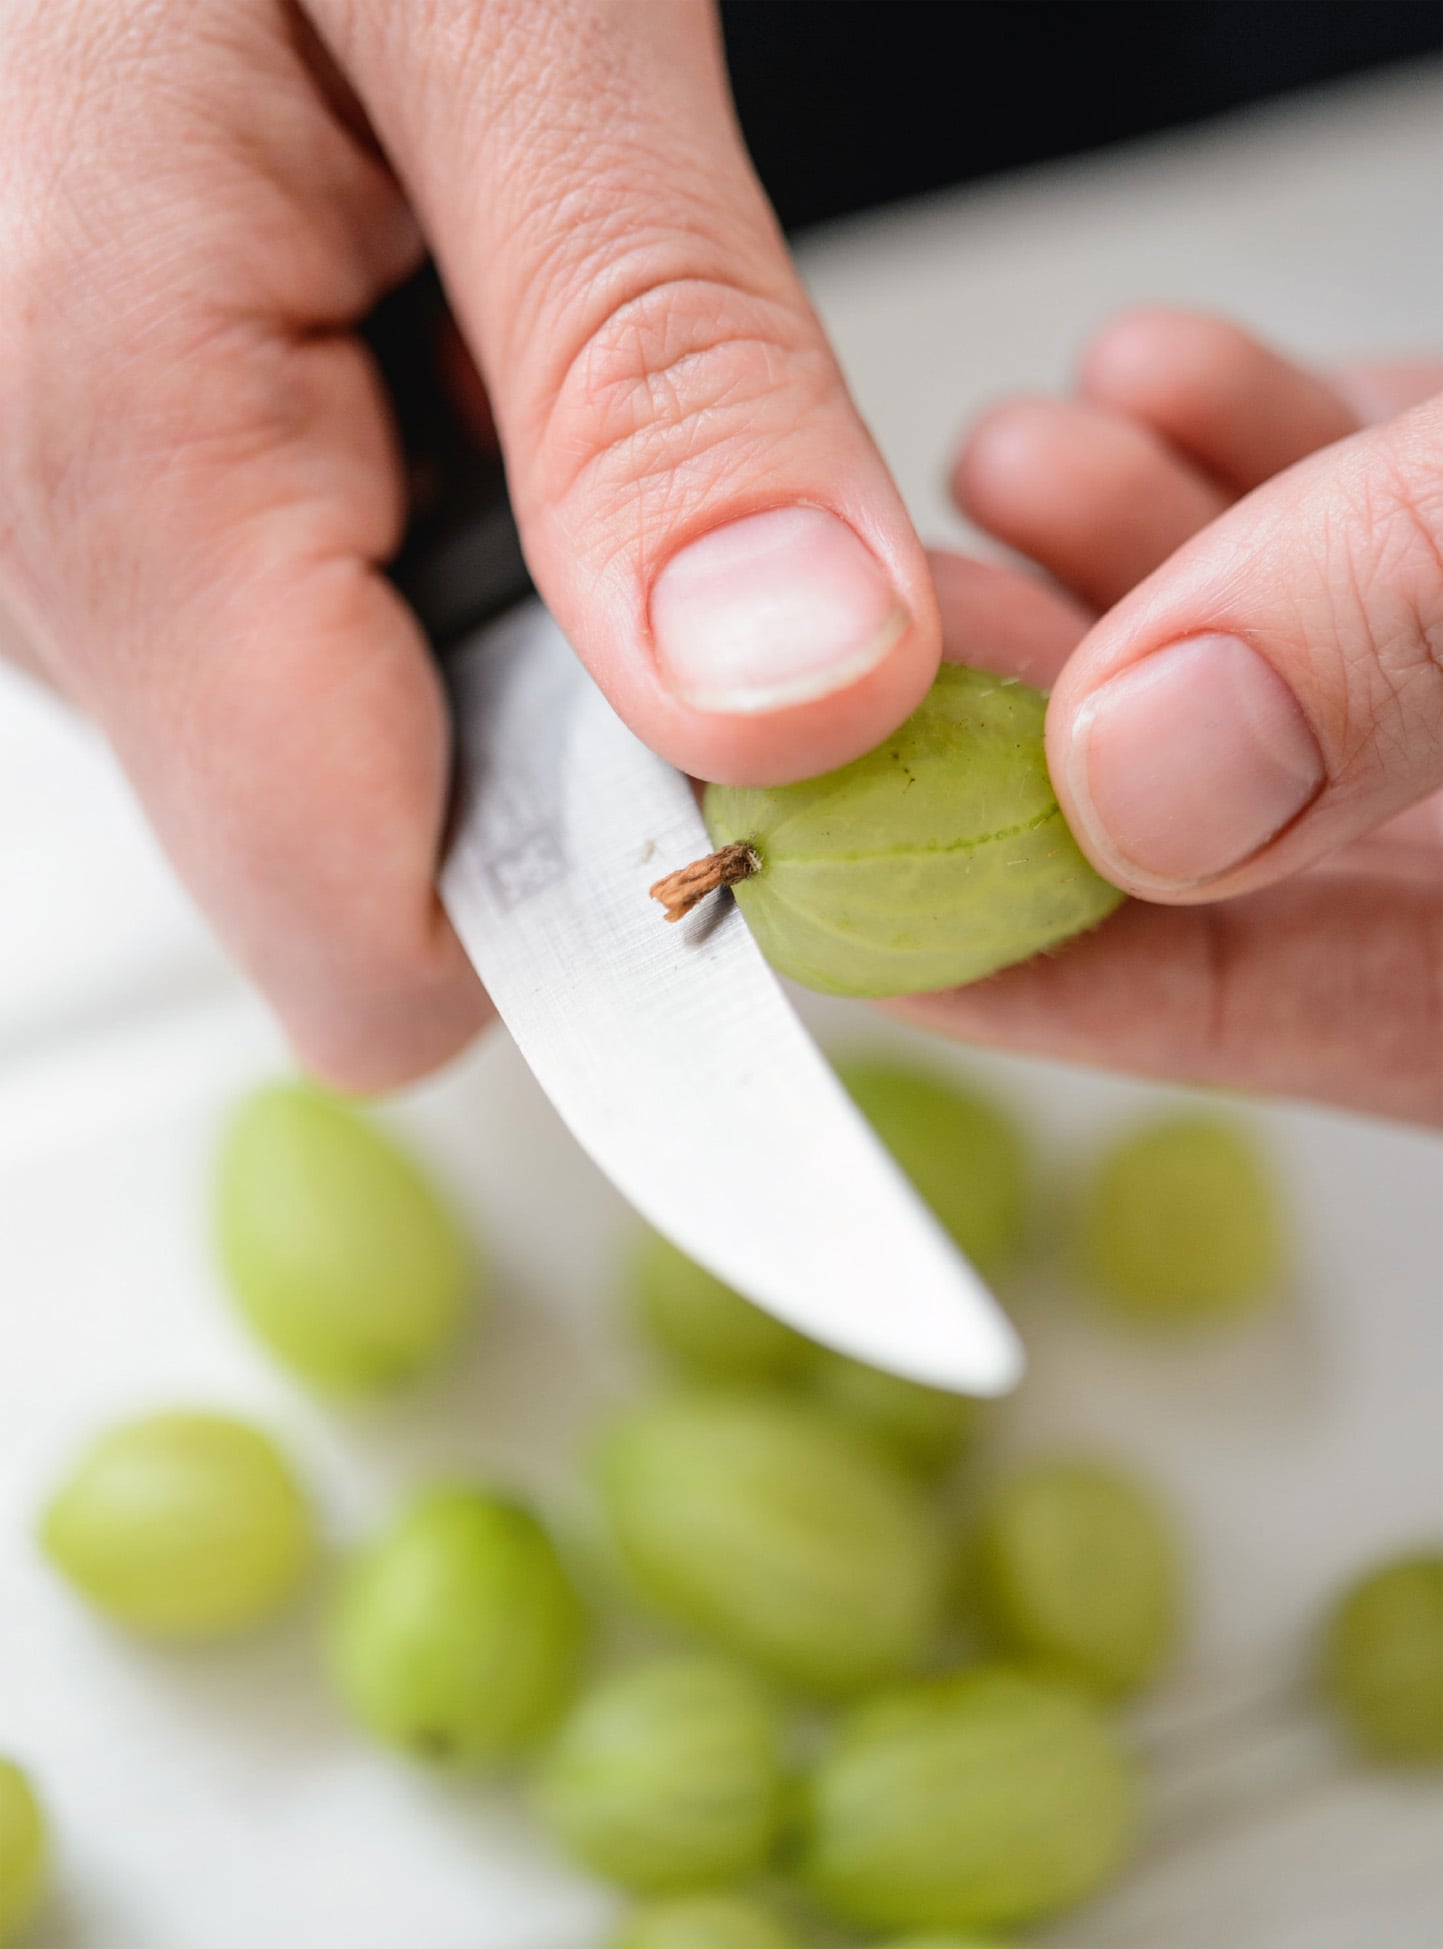
Pick half the berries from mid- to late spring, and leave the rest to swell and sweeten until early or midsummer. Keep a small stalk on the berry to avoid tearing the skin. Top and tail in the kitchen later.
BAKE
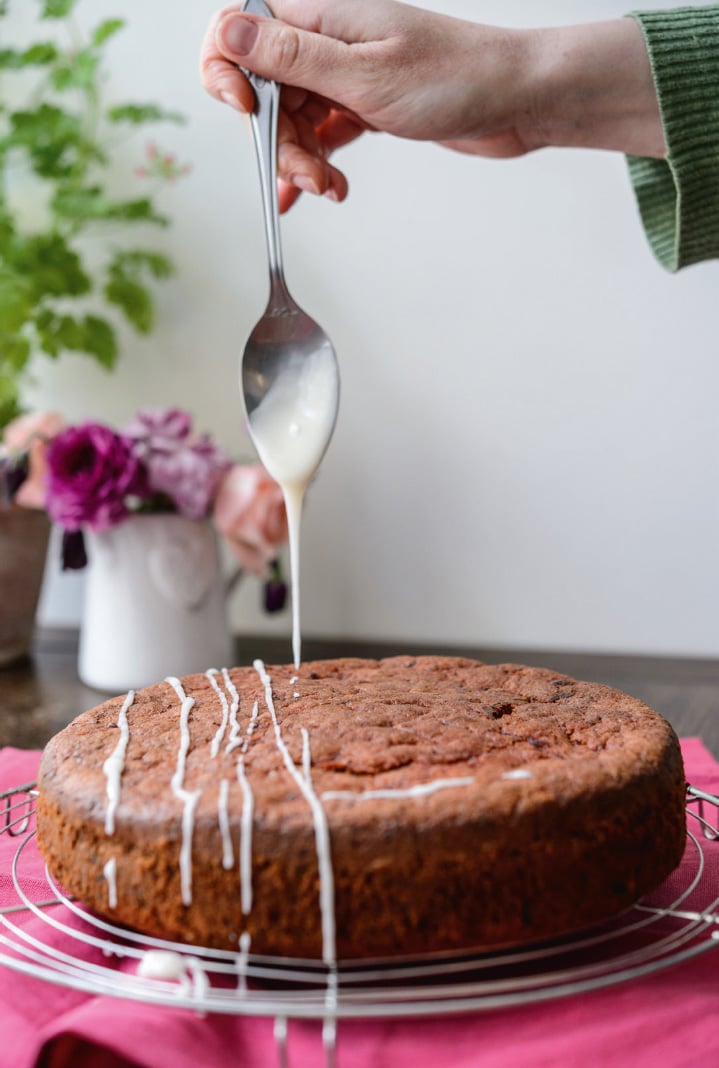
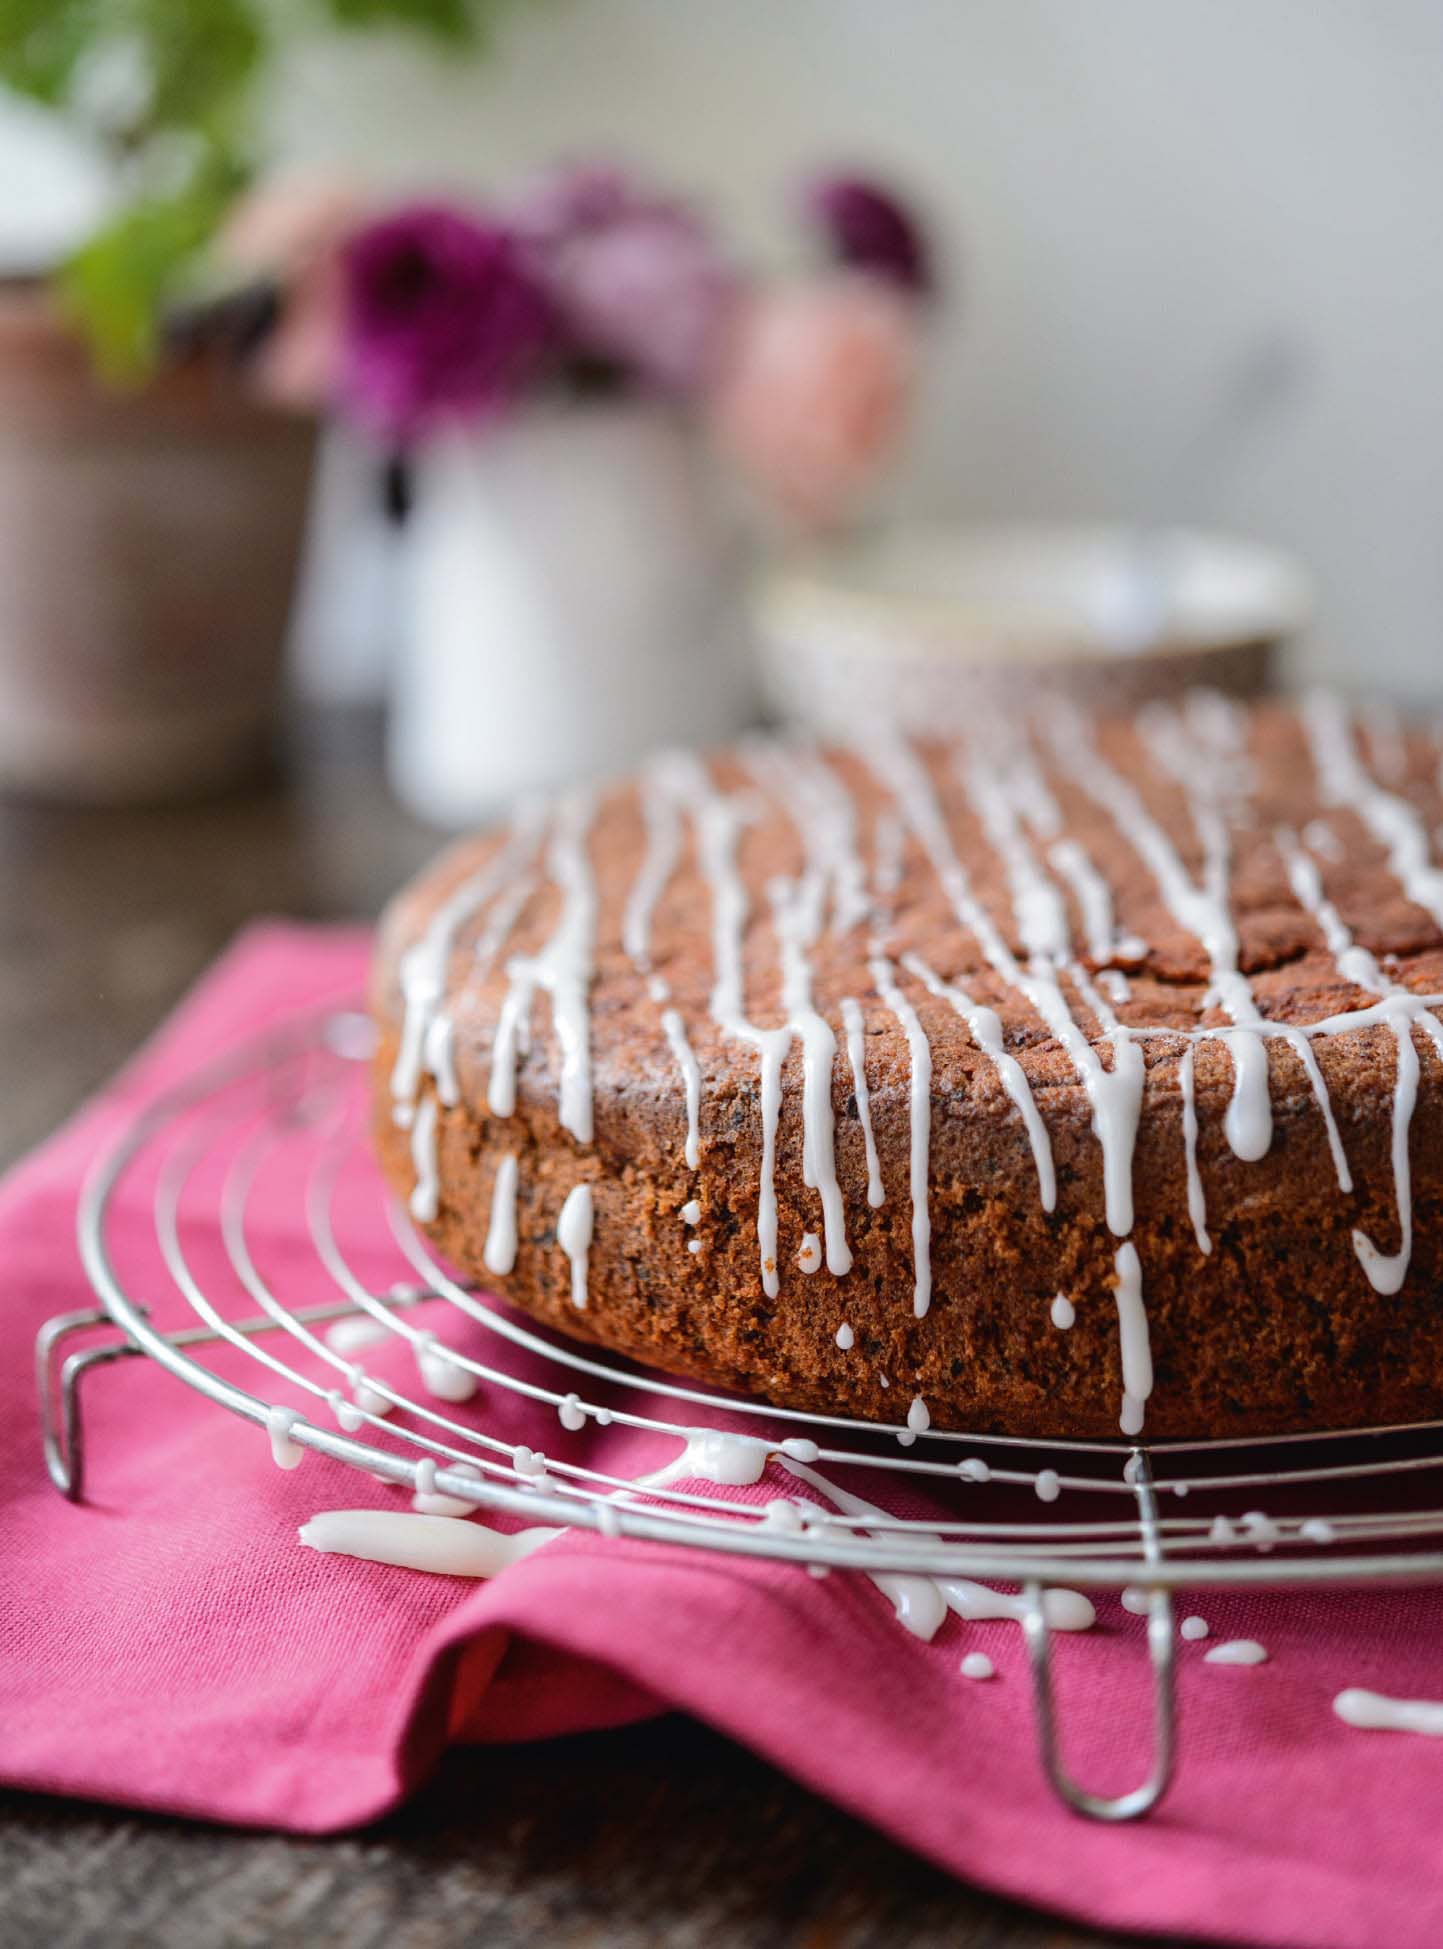
Things that grow together, go together, as the saying goes. This cake of early summer harvests is perfect for those first tentative picnics of the season.
MAKES A TWO-LAYER CAKE
YOU WILL NEED
2 × deep, round cake tins, 20cm/8in diameter, greased and base-lined
INGREDIENTS
Gooseberry compote:
500g/1lb 2oz gooseberries
100–150g/3½–5oz caster sugar
Elderflower syrup:
75g/2½oz caster sugar
75ml/2½fl oz water
6–7 elderflowers
6 eggs
180g/6oz caster sugar
180g/6oz plain flour
90g/3oz unsalted butter, melted
8 tbsp elderflower syrup
Icing sugar, to dust (for decoration)
Cream:
100ml/3½fl oz double cream
4 tbsp elderflower syrup
METHOD
• |
For the compote, put the gooseberries and 100g/3½oz of the sugar in a saucepan with a splash of water and bring to a simmer, stirring to dissolve the sugar. Cook over a medium–low heat until the fruit is soft, then push through a sieve into a bowl. Add more sugar to taste and leave to cool. |
• |
For the syrup, follow the flower syrup instructions in Flower meringues (see here). |
• |
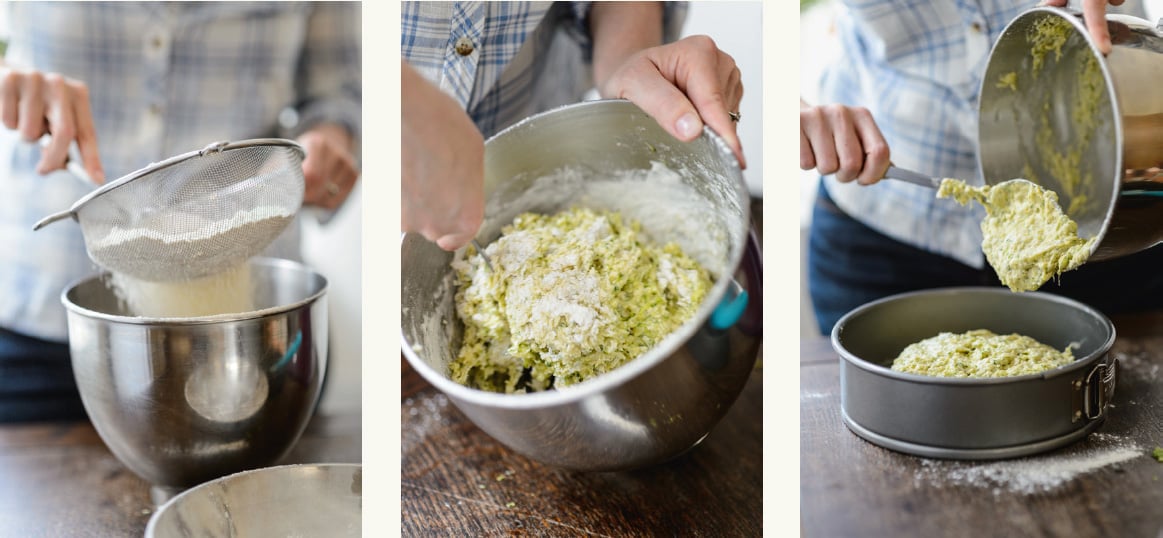
For the cake, preheat the oven to 180°C/350°F/gas mark 4. Whisk the eggs and sugar together (this should be done using a stand mixer or electric beaters for best effect) until a little mix trickled over the surface leaves a trail, and the mixture has at least doubled in volume. Sift in half the flour and fold in. Sift in the rest of the flour and fold in. Finally trickle the melted butter into the batter, folding as you go to minimize the loss of volume, and continue folding until everything is incorporated. Divide between the two tins and bake for 25–30 minutes until golden, and firm to the touch. Do not open the oven door before 25 minutes have elapsed or the cake will sink. Remove from the oven and turn over on to a wire rack, but leave the tins over the top of the sponges for 10 minutes, then remove them. Once cool, drizzle each sponge with 4 tbsp elderflower syrup. |
• |
For the cream, whisk the cream and syrup together until stiff enough to spread. |
TO ASSEMBLE
Spread the compote and then the cream over one layer of sponge. Place the other sponge carefully on top and dust with icing sugar just before serving.
GROW
When I first started growing my own vegetables, I had a friend who thought carrots is carrots is carrots. I presented him with my home-grown roots for dinner, pulled from the soil that afternoon. ‘Oh’, he said, ‘so that’s what carrots are supposed to taste like.’
For recipes that call for blended or grated carrot, sweet, juicy, long, blunt-ended varieties are best, such as ‘Sugarsnax 54’, ‘St Valery’, any of the ‘Nantes’ type or the shorter ‘Amsterdam Forcing’ for growing in pots. When using whole carrots, as in Root veg tarte Tatin (see here), baby carrot varieties such as ‘Paris Market’ are a good choice, and also suitable for growing in pots.
Sow carrots in a sunny spot in spring, and again at intervals until late summer. Scatter the seed thinly in a drill in well-prepared soil free from large stones. Small carrots can be grown in pots, and this is actually preferable to growing them in heavy clay soils.
Carrot flies are attracted by the scent of the foliage so avoid brushing it while tending the plants. To protect the crop from such pests, cover with horticultural fleece or fine mesh. Clear plastic tunnels can also be used if aired daily. Check the edges and folds regularly for slugs and snails. Thin the seedlings once the roots have grown to a usable size, leaving one plant every 10cm/4cm or so.
Satisfying as it is to just pull up carrots using the foliage, this should be avoided so the root does not break; instead use a fork to lever them out of the ground. Carrot thinnings provide the first harvest, while the main crop will be ready around four months after sowing.
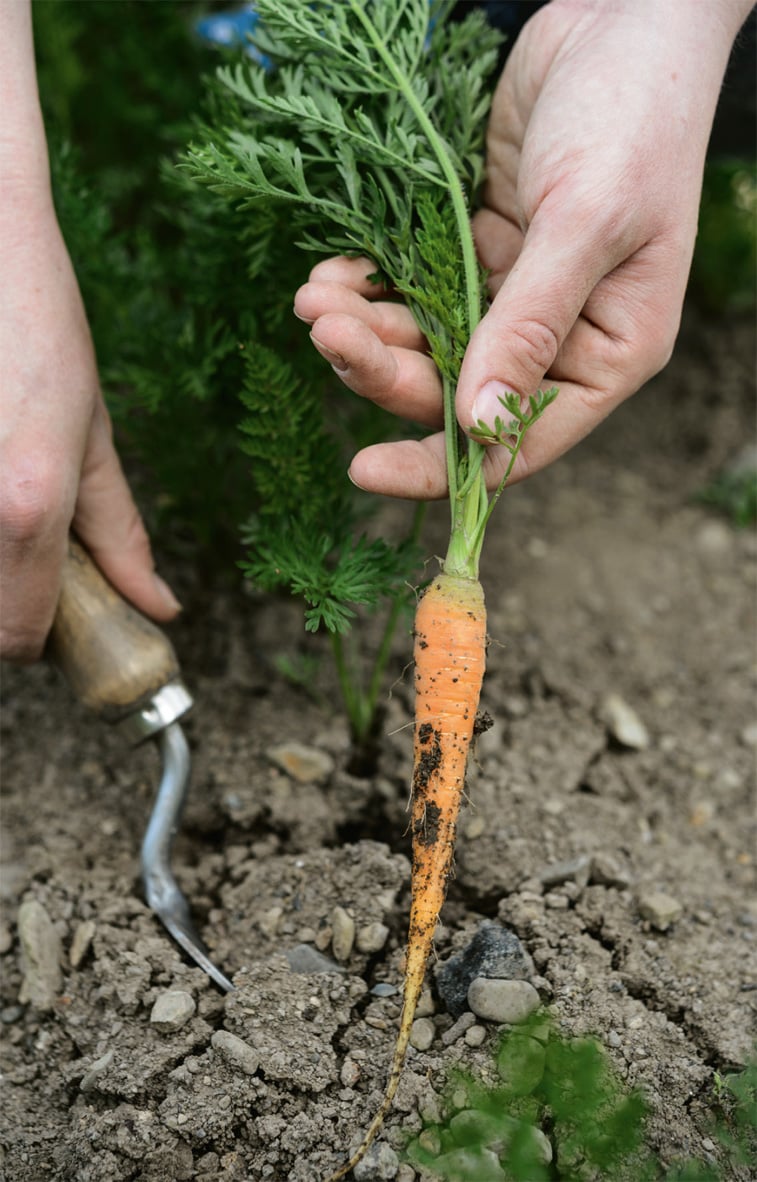
Use a hand fork to harvest carrots, to avoid breaking the roots.
BAKE
Carrot & almond cake (see here)
Carrot cake (see here)
Carrot cookies (see here)
Root veg tarte Tatin (see here)
BAKE

This gluten-free carrot cake is best eaten the day after making, so bake the sponges in advance and assemble the cake at the last minute. For a dairy-free cake, top with the water icing instead of the frosting, and fill with apricot jam.
MAKES A TWO-LAYER CAKE
YOU WILL NEED
2 × deep, round cake tins, 20cm/8in diameter, greased and base-lined
INGREDIENTS
Cake:
6 eggs
250g/8oz light brown muscovado sugar
450g/1lb peeled and finely grated carrots
1 orange, zest
300g/10oz ground almonds
150g/5oz rice flour
1 tsp baking powder
2 tsp ground cinnamon
1 tsp ground ginger
Frosting:
350g/12oz icing sugar
150g/5oz cream cheese
25g/1oz unsalted butter
½ tsp vanilla extract
Dairy-free water icing:
100g/3½oz icing sugar water
Dairy-free filling:
100g/3½oz apricot jam
Decoration:
75g/2½oz walnuts and/or pecans, toasted
1 orange, zest
METHOD
• |
For the cake, preheat the oven to 180°C/350°F/gas mark 4. Whisk the eggs and sugar together until pale, frothy and increased in volume. Fold in the carrots and orange zest. Mix the almonds, rice flour, baking powder and spices together, then sift and fold into the mix. Divide between the two tins and bake for 30–35 minutes, until a skewer comes out clean. Remove from the oven and leave in the tins for 10 minutes. Then turn out on to a wire rack to cool completely. |
• |
For the frosting, sift the icing sugar into a bowl, then add the cream cheese, butter and vanilla extract. Beat together for 5–8 minutes until creamy. (If your kitchen is warm, it can help to chill the frosting for half an hour or so in the refrigerator before spreading on the cakes.) |
• |
For the dairy-free water icing, sift the icing sugar into a bowl and add water a few drops at a time, stirring until it turns to a smooth paste. |
TO ASSEMBLE
Use half the frosting to sandwich the two sponges together, then spread the rest over the top. Decorate with the toasted nuts and orange zest.
For a dairy-free cake, sandwich the two sponges together with the jam. Spread the water icing over the top and decorate with the toasted nuts and orange zest.
GROW
Carrots (see here)
BAKE
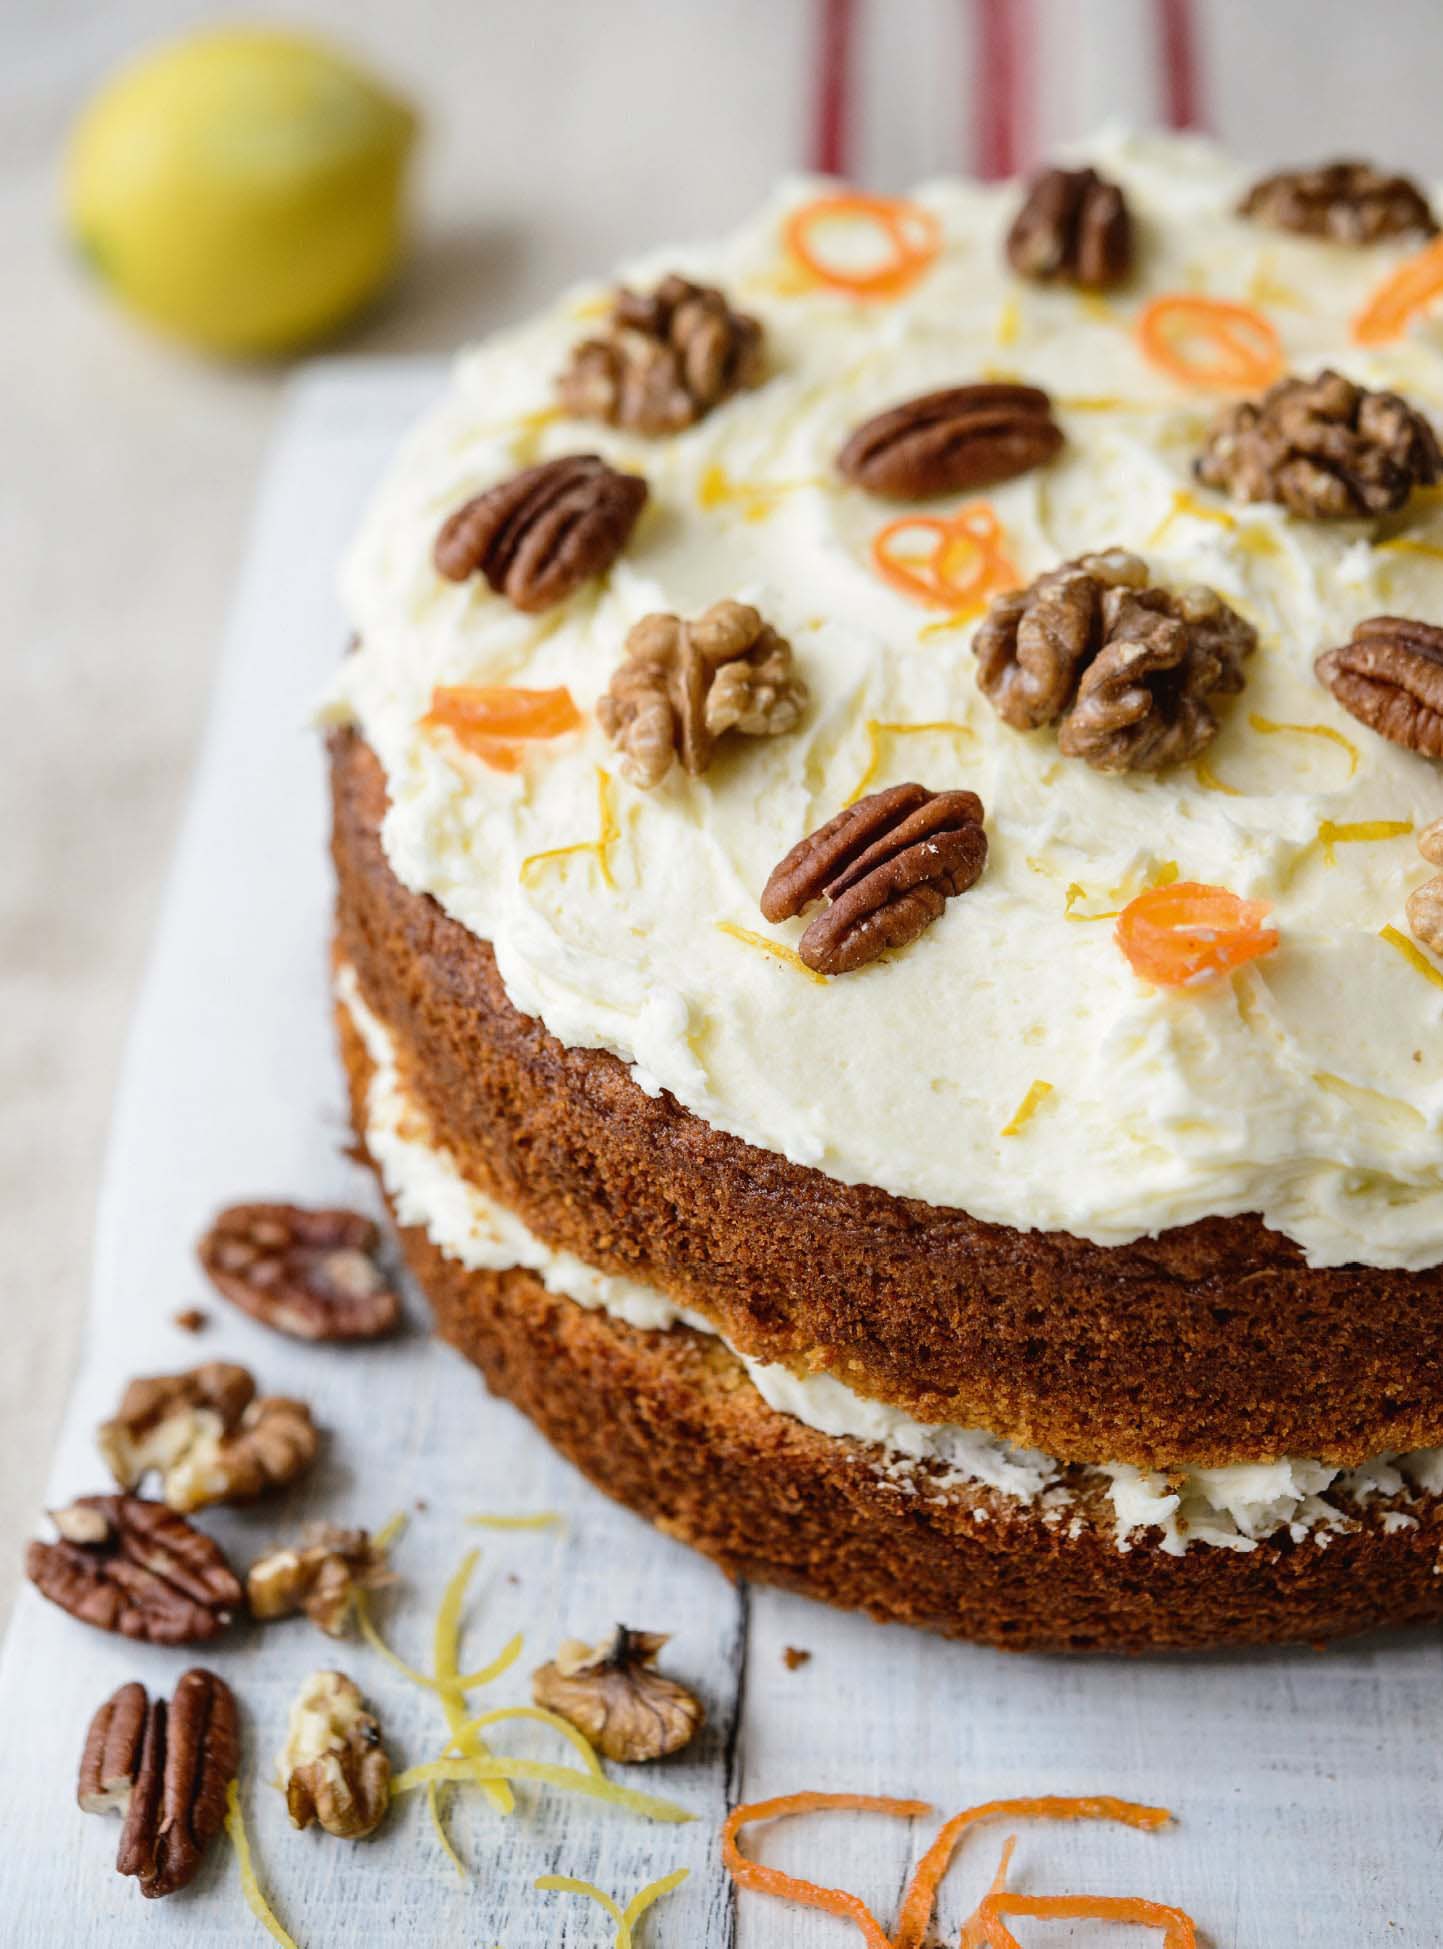
Perhaps the most well-known of all the vegetable cakes, and with good reason, carrot cake comes in many guises. This sponge version is lightly spiced, moist and includes a zesty buttercream. It is light enough for baking with fresh, sweet carrots in summer. For more of a winter-warmer, try the Parsnip winter cake (see here).
MAKES A TWO-LAYER CAKE
YOU WILL NEED
2 × deep, round cake tins, 20cm/8in diameter, greased and base-lined
INGREDIENTS
Cake:
200g/7oz peeled carrots
2 tbsp natural yogurt
1 tbsp orange juice
330g/11oz plain flour
300g/10oz light brown muscovado sugar
2 tsp ground cinnamon
1 tsp ground ginger
1½ tbsp baking powder
180g/6oz unsalted butter
3 eggs
1 peeled carrot
70g/2½oz caster sugar
70ml/2½fl oz water
Buttercream:
300g/10oz icing sugar
150g/5oz unsalted butter
3 tsp lemon juice, to taste
Decoration:
1 lemon, zest
75g/2½oz walnuts and/or pecans, toasted
METHOD
• |
For the cake, preheat the oven to 170°C/325°F/gas mark 3. Grate the carrots, then blitz in a food processor or blender with the yogurt and orange juice to form a rough purée. Set aside. Sift the flour, sugar, spices and baking powder into a large bowl, then beat in the butter until it has coated the dry ingredients and the mix looks like breadcrumbs. Beat in the eggs until just incorporated, and then the carrot purée for 2–3 minutes. Divide between the two tins. Bake for 30 minutes, or until a skewer comes out clean. Then remove from the oven and turn out the cakes to cool on a wire rack. |
• |
For the candied carrot, using a zester or small knife, pare long, thin strips of carrot into a small saucepan. Then add the sugar and water. Bring to a simmer over a medium heat and cook for about 5 minutes, until a thin syrup has formed. Hook out the carrot strips and leave to cool on a wire rack. |
• |
For the buttercream, sift the icing sugar and beat with the butter to combine, then add lemon juice to taste. Beat for 5–10 minutes until light and fluffy. |
TO ASSEMBLE
Use half the buttercream to sandwich the two layers of cake together, and the other half to cover the top. Grate over the lemon zest and finish by sprinkling over the toasted nuts and candied carrot.
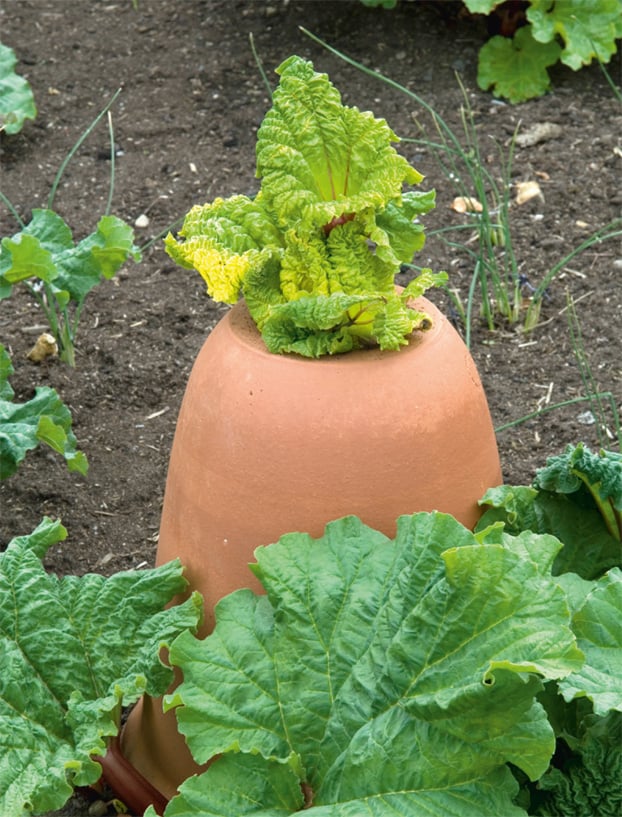
GROW
Rhubarb comes back year on year, and needs minimal maintenance. Its pink stems are a welcome sight in early spring – the first bounty of the new season.
‘Timperley Early’ and ‘Hawke’s Champagne’ both give early, sweet harvests (the clue is in the name). ‘Victoria’ is a reliable, later-season cropper.
Rhubarb will happily grow in a bit of shade or full sun, and is perfect to stick in that spot you do not know what else to do with. A rich soil is better than a sandy one, but an annual mulch will help out plants in any soil – take care not to cover the plant’s crown though, or it may rot. Plant dormant crowns in autumn or winter, and allow a square metre/yard for each plant. Rhubarb is not an ideal candidate for a pot, but it could be grown in a very large one.
Pull off any stems/leaves that die back in summer, and clear all the old leaves away in autumn, to expose the plant to the cold (it needs this to grow well the following year). Should a flower spike appear, cut it off at the base.
To get rhubarb’s neon-pink, tender stems early in the season, you need to force the plant by putting a pot, bucket or bin over the top of the plant in mid-winter. The container needs to be tall enough for the stems to grow up underneath, and it must exclude all light. A dustbin, weighted down on top, is not attractive but effective; traditional clay forcing pots are prettier but expensive. If you want to force your rhubarb, have three or more plants and force one a year in rotation to give them time to recuperate because forcing takes a lot of energy out of the plant. Similarly wait at least a year before forcing a new plant.
Forced stems are ready to pick in early spring, unforced 3–4 weeks later. Gather only the forced stems from a forced plant, and then leave it to recover for the rest of the year. Harvest by pulling the stem away from the plant – if it detaches it is ready. Rhubarb leaves are toxic and should be discarded. Do not pick the stems from a plant in its first year – it needs time to establish.
BAKE
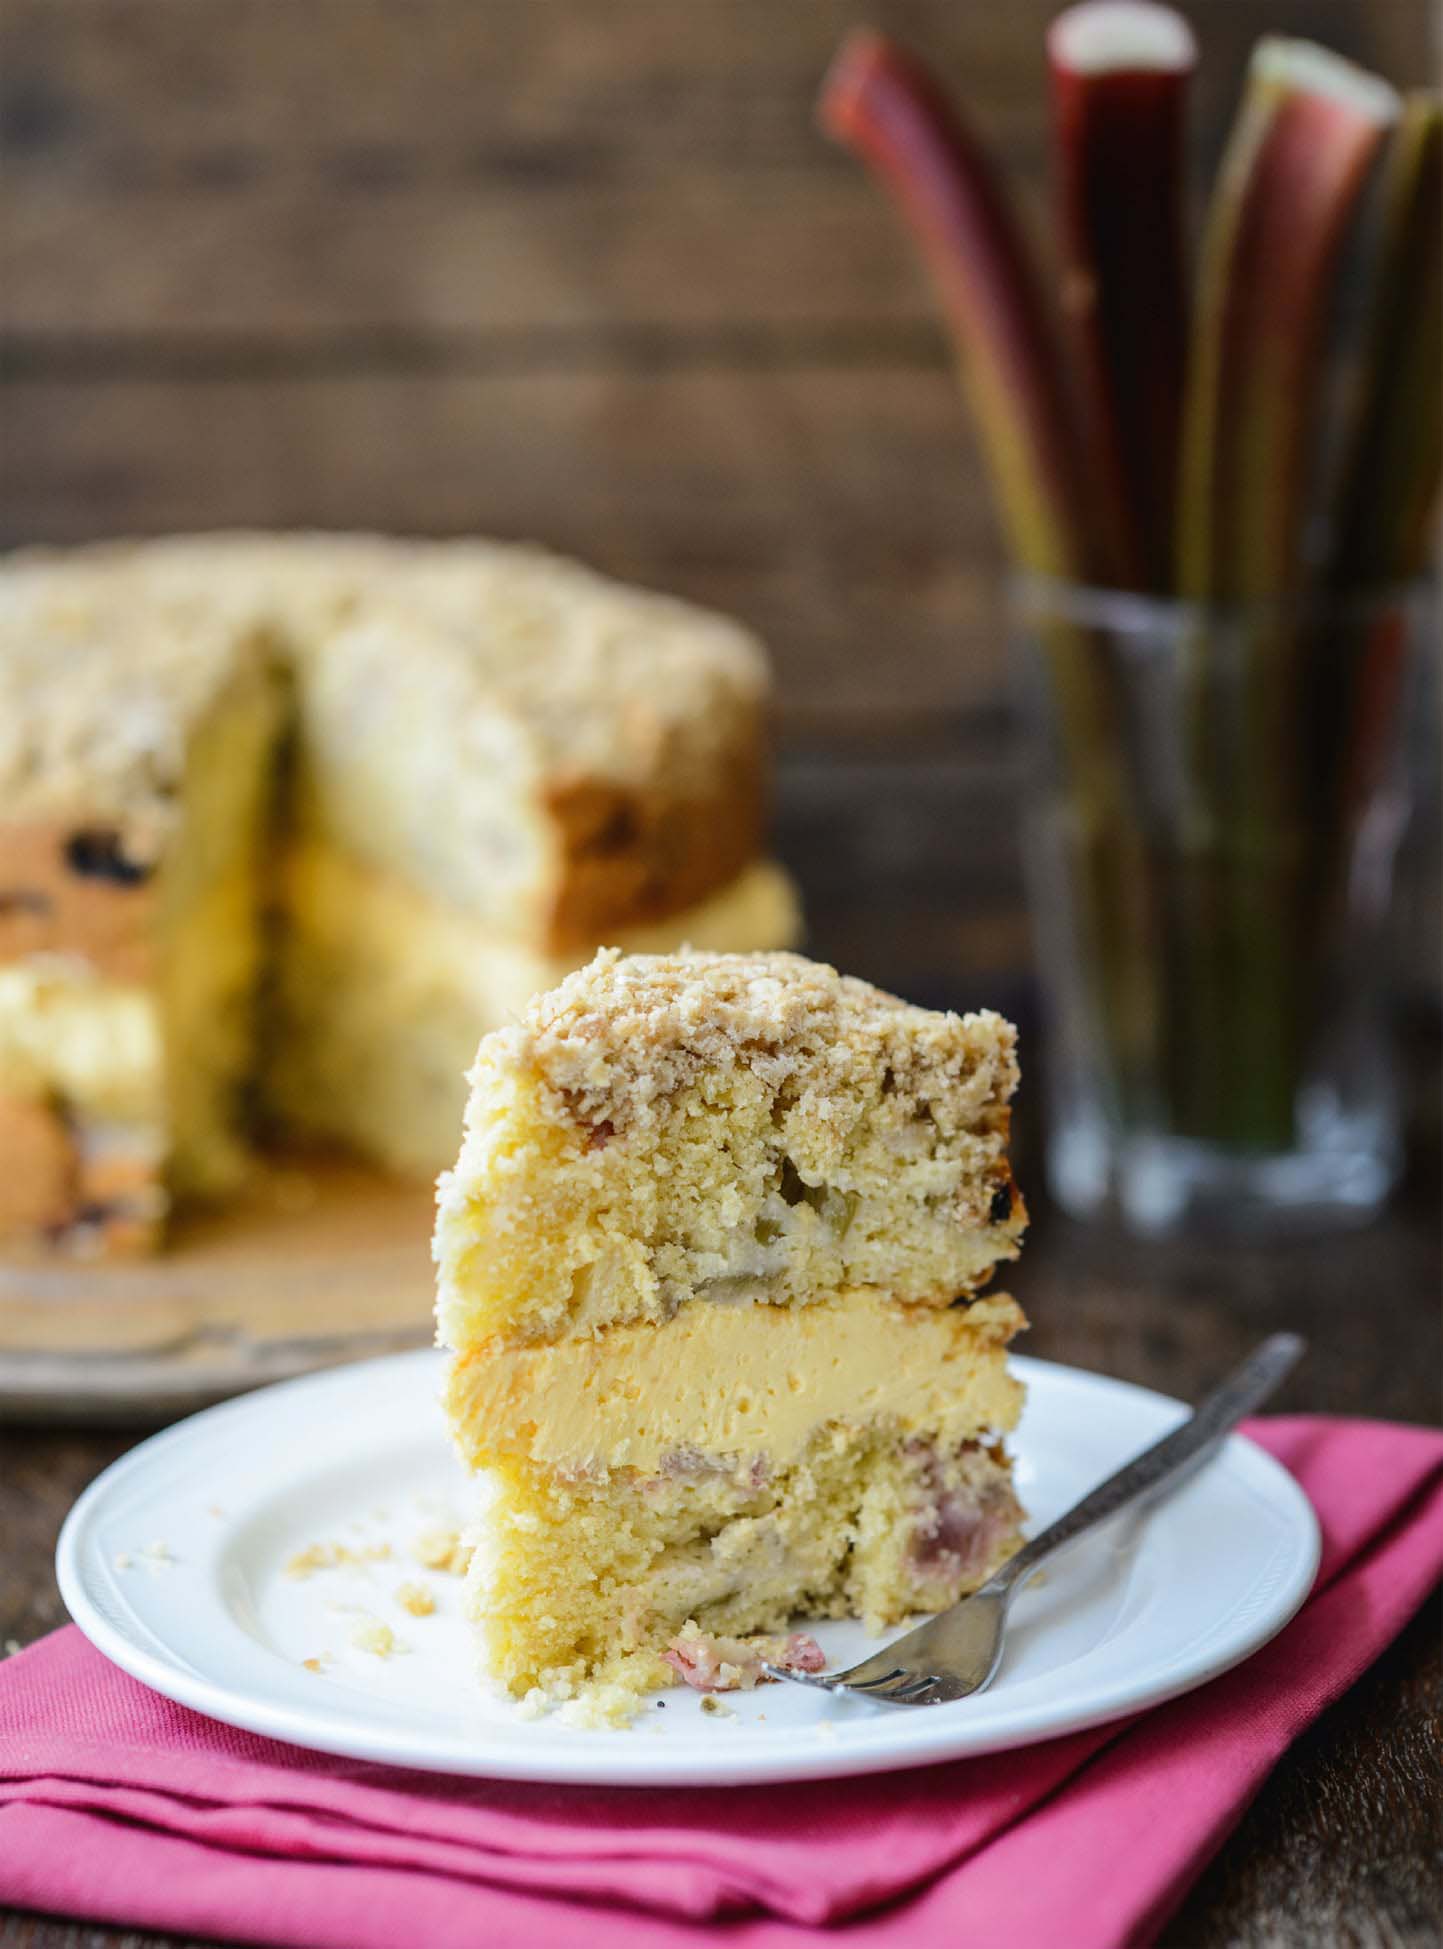
Rhubarb crumble is one of those puddings I always think will be a good idea, then find it is a bit overwhelming. This cake brings together rhubarb, a crumble topping and some custard (in the buttercream) without being overpowering.
SERVES 8–10
YOU WILL NEED
2 × deep, round cake tins, 20cm/8in diameter, greased and base-lined
INGREDIENTS
Crumble topping:
40g/1½oz plain flour
40g/1½oz porridge oats
40g/1½oz unsalted butter
40g/1½oz light brown muscovado sugar
Cake:
600g/1lb 5oz rhubarb, trimmed and cut into 0.5cm/¼in pieces
350g/12oz plain flour
1 tbsp baking powder
100g/3½oz ground almonds
1 tsp ground ginger
250g/8oz unsalted butter
150g/5oz caster sugar
4 eggs
¼ tsp vanilla extract
Buttercream:
350g/12oz icing sugar
50g/2oz custard powder
150g/5oz unsalted butter
50ml/2fl oz double cream
METHOD
• |
For the crumble topping, mix the flour and oats together, then rub in the butter. It is fine to leave some small chunks of butter. Stir in the sugar and set aside. |
• |
For the cake, preheat the oven to 170°C/325°F/gas mark 3. Toss the rhubarb pieces in 3 tbsp of the flour. Mix the remaining flour with the baking powder, ground almonds and ginger and set aside. Cream the butter and sugar together, then beat in the eggs, one by one, and the vanilla extract. Stir in the flour mix until everything is incorporated. Stir in the rhubarb. Divide the mixture between the two tins and spread as level as you can (it is quite a sticky, lumpy batter). Scatter the crumble topping in an even layer over the top of the mixture in one tin. Bake for 50–60 minutes until a skewer comes out clean. Leave in the tins for 10 minutes, then turn out on to a wire rack, to finish cooling. |
• |
For the buttercream, sift the icing sugar and custard powder into a large bowl. Add the butter and cream and beat (on a slow setting at first for a stand mixer, then a high one) for 5–10 minutes until fluffy. |
TO ASSEMBLE
Spread the buttercream over the non-crumble topped sponge, and place the crumbled sponge on it.
GROW
Rhubarb (see here)
GROW
I cannot abide the vacuum-packed or pickled beetroot available in the shops, but home-grown roots are a different story, especially when they are baked in a cake! Beetroot is one of the most reliable vegetables to grow from seed, and the young leaves (eat raw, in salads) are a bonus crop.
‘Boltardy’ is probably the most widely available and reliable variety, and produces the classic red colour; sweeter, less earthy choices include ‘Detroit Dark Red’ and ‘Sanguina’.
Sow seeds in early spring, and at intervals until early summer, direct into a drill or pot in an open, sunny site. Thin once the baby beets have reached an edible size and leave the rest to grow a little bigger. Aim for 5–10cm/2–4in between each plant. Rows should be 20cm/8in apart.
Weed and water as necessary. Keep an eye out for slugs and snails.
Use the thinnings first, but do not let the remaining roots get too big, as they lose both sweetness and tenderness the larger they grow. Harvest when the beets are bigger than a golf ball but smaller than a tennis ball.
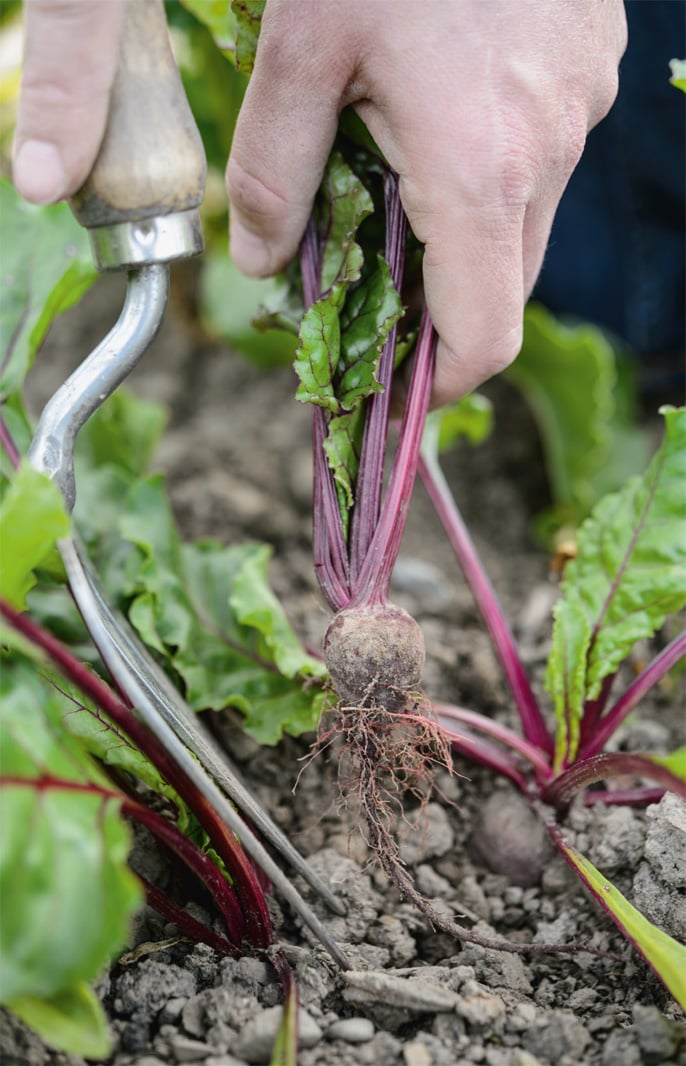
Thin beetroot once they get to a usable size.
BAKE

Pairing beetroot with the robust flavourings of orange and cinnamon creates a moist and deliciously warming cake, perfect for a rainy afternoon.
MAKES A SINGLE-LAYER CAKE
YOU WILL NEED
1 × spring-form, round cake tin, 23cm/9in diameter, greased and base-lined
INGREDIENTS
Cake:
4 eggs, separated
250g/8oz dark brown muscovado sugar
400g/14oz peeled and coarsely grated beetroot
200ml/7fl oz vegetable oil or sunflower oil
1 tsp vanilla extract
1 orange, zest
300g/10oz plain flour
3 tsp baking powder
¼ tsp bicarbonate of soda
1 tsp ground cinnamon
Icing:
50g/2oz icing sugar
1 orange, juice
METHOD
• |
For the cake, preheat the oven to 170°C/325°F/gas mark 3. Whisk the egg yolks and sugar until pale and smooth. Stir in the beetroot, oil, vanilla extract and orange zest. Whisk the egg whites to soft peaks and set aside briefly while you sift the flour, baking powder, bicarbonate of soda and cinnamon into the batter and fold them in. Finally fold in the whisked egg whites. Pour into the prepared tin and smooth level. Bake for 45–50 minutes until a skewer comes out clean. Remove from the oven and leave in the tin for 10 minutes. Then turn out on to a wire rack to cool completely. |
• |
For the icing, sift the sugar into a bowl, and add the orange juice a little at a time (you will only need about a quarter of it), mixing until you have a smooth paste. |
TO SERVE
Drizzle with the icing.
GROW
Once they get going, courgette plants, which are a type of summer squash, will provide you plenty of fruit for cakes, large edible flowers and some more besides.
The cylindrical courgettes are easiest to grate, and can be harvested small enough not to be watery. Plants with a bushy, rather than a trailing, habit are easier to manage. Flavoursome varieties include: ‘Romanesco’, which has the added attraction of large flowers; and yellow-skinned ‘Parador’. ‘Defender’ is reliable, disease-resistant and prolific.
Courgettes need a sunny spot, plenty of space (set bush varieties 90cm/36in apart) and copious amounts of water. Sow in modular trays or small pots under cover in spring, and plant out in early summer after the last frost. Hollow out a slight dip in the soil (about 50cm/20in circumference) and plant in the middle of that, to keep water from running off. You could buy young plants, but you will have a greater choice of variety if you grow from seed.
Water regularly, and check for slugs and snails, which can leave grazing trails across the skins of the courgettes. Plants in large pots should be kept particularly well-watered to minimize the risk of mildew.
For the best flavour harvest courgettes before they get more than 10cm/4in long, using a knife to cut them off at the base. If left on the plant they will quickly turn to marrows, so check as often as possible for new pickings. Pick the male flowers for eating – those without a baby courgette at their base – to ensure you still get the courgettes as well.
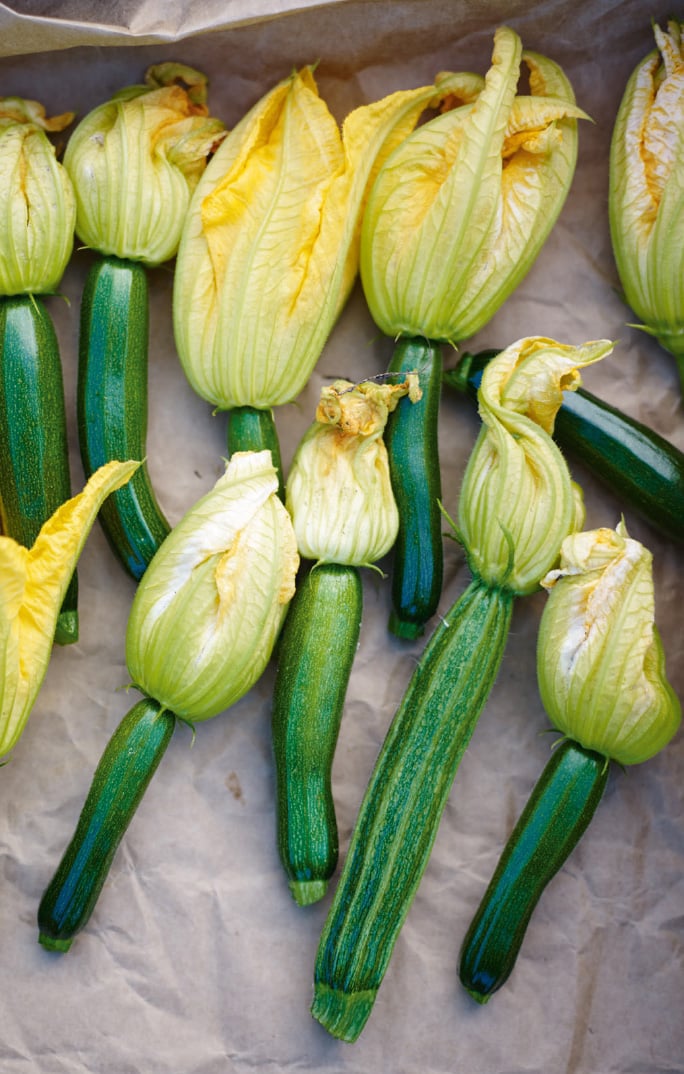
For optimum flavour, harvest courgettes when they are still small.
BAKE
Courgette cake (see here)
BAKE
Small, flavourful courgettes make a great cake ingredient, contributing flavour, moisture and an attractive summery green speckling to a sponge.
MAKES A SINGLE-LAYER CAKE
YOU WILL NEED
1 × spring-form, round cake tin, 23cm/9in diameter, greased and base-lined
INGREDIENTS
Cake:
180g/6oz unsalted butter
250g/8oz caster sugar
2 eggs
400g/14oz baby courgettes, finely grated
2 lemons, zest
350g/12oz plain flour
1½ tbsp baking powder
Icing:
100g/3½oz icing sugar
Decoration:
1 lemon, zest
1 lime, zest
METHOD
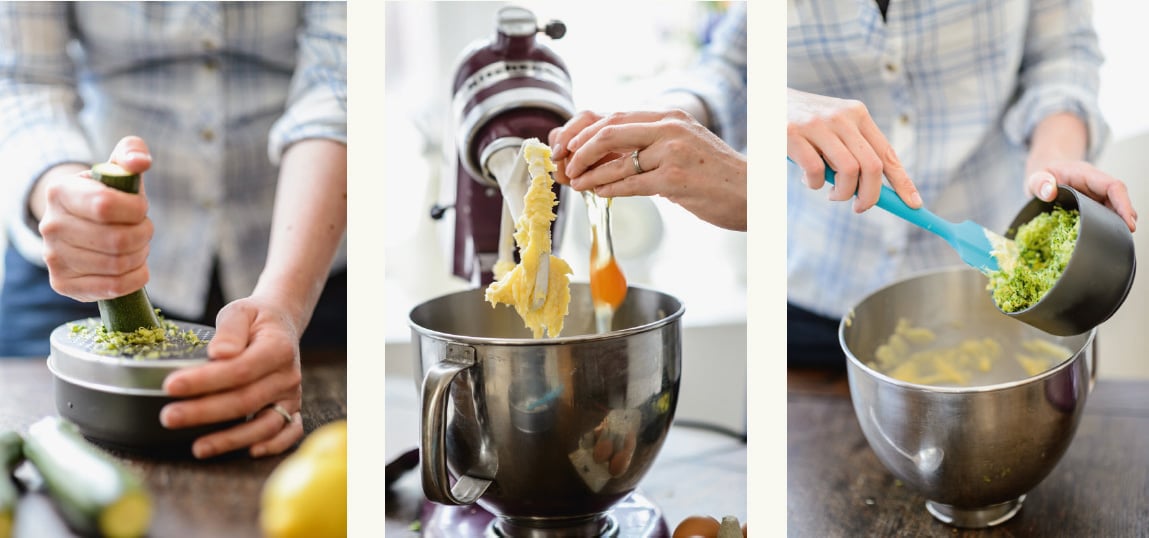
• |
For the cake, preheat the oven to 160°C/325°F/gas mark 3. Beat the butter and sugar together until light and fluffy, then add the eggs one at a time, beating well to incorporate after each one. Stir in the courgettes and lemon zest, then sift in the flour and baking powder. Fold everything together quickly but carefully. Pour into the tin and spread level. Bake for 45 minutes, until a skewer comes out clean. Remove from the oven and leave for 10 minutes in the tin. Then turn out on to a wire rack to cool completely. |
• |
For the icing, sift the icing sugar into a large bowl and add the mascarpone. Beat together with a fork until smooth. |
TO ASSEMBLE
Spread the icing over the sponge and scatter with the lemon and lime zest.

GROW
If you have access to a range of varieties you can be picking enough fruit for using all summer (and autumn) long.
There are two distinct groups of raspberries: summer and autumn fruiting. The summer group is then divided into early, mid-season and late fruiting varieties. Of the summer varieties, ‘Joan J’ is a good choice for mid- to late crops and ‘Glen Cova’ for an early summer harvest. ‘Autumn Bliss’ is a reliable and widely available autumn fruiter.
Raspberries are sold as bare-root or potted canes. Plant in spring, in a well-drained soil. They will happily grow in some shade as well as full sun, and so will do well against a wall or fence. Tie their long canes into horizontal wires either fixed between two posts or to a wall/fence. Two wires – one at 60cm/24in above the ground, another 60cm/24in above that – will be sufficient; bend over any growth higher than the top wire and tie in again. Alternatively plant raspberries around a wigwam, and tie into that, or against an archway. It is possible to grow raspberries in a large pot, tied to a central post or wigwam. New varieties more suitable for pot cultivation are now being introduced.
Mulch the canes well in spring, and make sure they are well-watered in dry spells, especially once they are flowering and fruiting. Pruning is straightforward: remove the canes that have fruited, as they will not produce more fruit. Autumn-fruiting varieties bear fruit on canes that developed earlier in the season, so the whole lot can be cut to the ground in winter/early spring. Summer-fruiting raspberries bear fruit on canes produced the previous summer, so always have both fruiting and new canes. In autumn cut down the old summer-fruiting canes, and tie in the greener new canes.
Pick every couple of days – raspberries are ripe when they pull away easily from their central plugs.
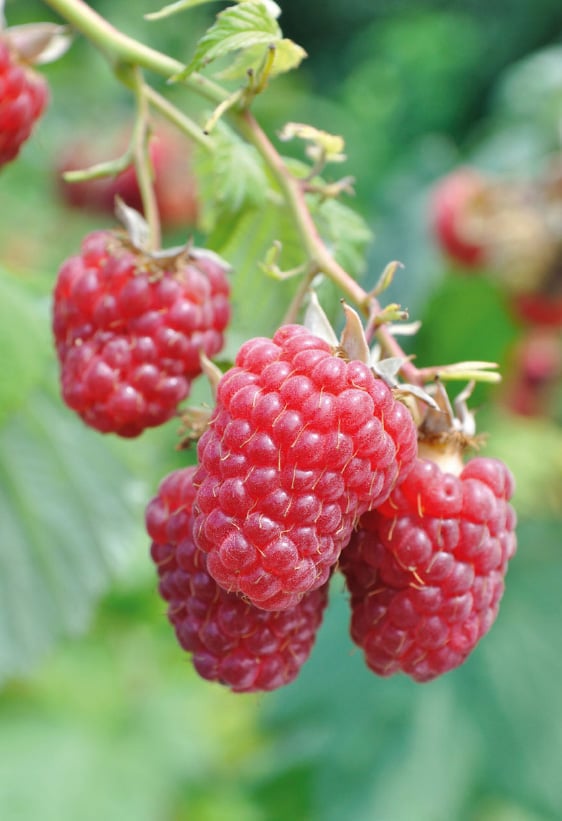
Some raspberries will be easy to spot but check carefully under the leaves for ripe raspberries lurking beneath.
BAKE
A muffin for all seasons (see here)
Chocolate & raspberry bean cake (see here)
Fresh fruit cake (see here)
Fruity pizza (see here)
Raspberry & white chocolate roll (see here)
Shades of berry cake (see here)
GROW
Beans such as adzuki and kidney are widely used in baking but cannot be grown successfully in cool-temperate climates. Borlotti beans make a great alternative and, with their red-and-cream-speckled pods, are a very attractive addition to the veg patch.
‘Lingua di Fuoco 2’ is the best climbing variety of borlotti bean, but if you do not have the option of growing up a wigwam or trellis try the dwarf type ‘Splendido’.
A sunny site is needed for good bean development and soil rich in organic matter so dig in plenty of compost the previous autumn and add some more to the planting holes. Borlotti beans are frost tender, so either sow under cover in spring and plant out in early summer after the last frost, or sow direct into the ground in early summer. These beans can be grown in large pots, but climbing varieties will still need a wigwam of hazel stakes or canes to grow up.
Encourage climbing beans to twine around the wigwam supports, and stake dwarf beans, using the three-loop system (see here), to avoid the weight of the pods pulling the plants over. Keep plants well-watered, especially in dry periods, to ensure the beans develop well and the plants do not succumb to diseases such as mildew.
The beans will be ready to harvest in late summer or early autumn, when the pods are fat with the beans inside. Pick and use the podded beans straight away, or dry them to store and use later. If you are storing the beans, leave the pods on the plant to dry first, but pick them before any prolonged wet weather is forecast or they begin to split and drop the beans. Then remove their pods and leave the Borlotti beans in a warm, dry place until completely desiccated. Store in an airtight container.
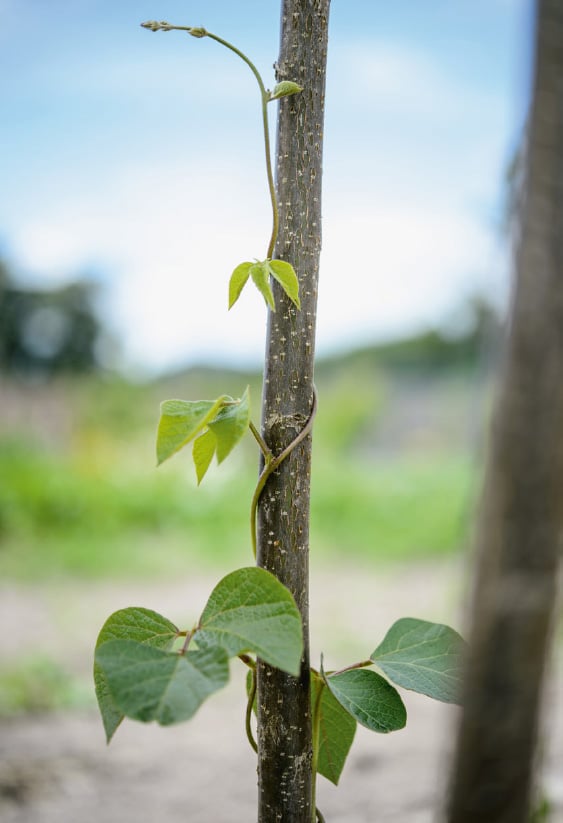
Beans will twine themselves around a wigwam of canes and do not need tying in.
BAKE
Chocolate & raspberry bean cake (see here)
BAKE
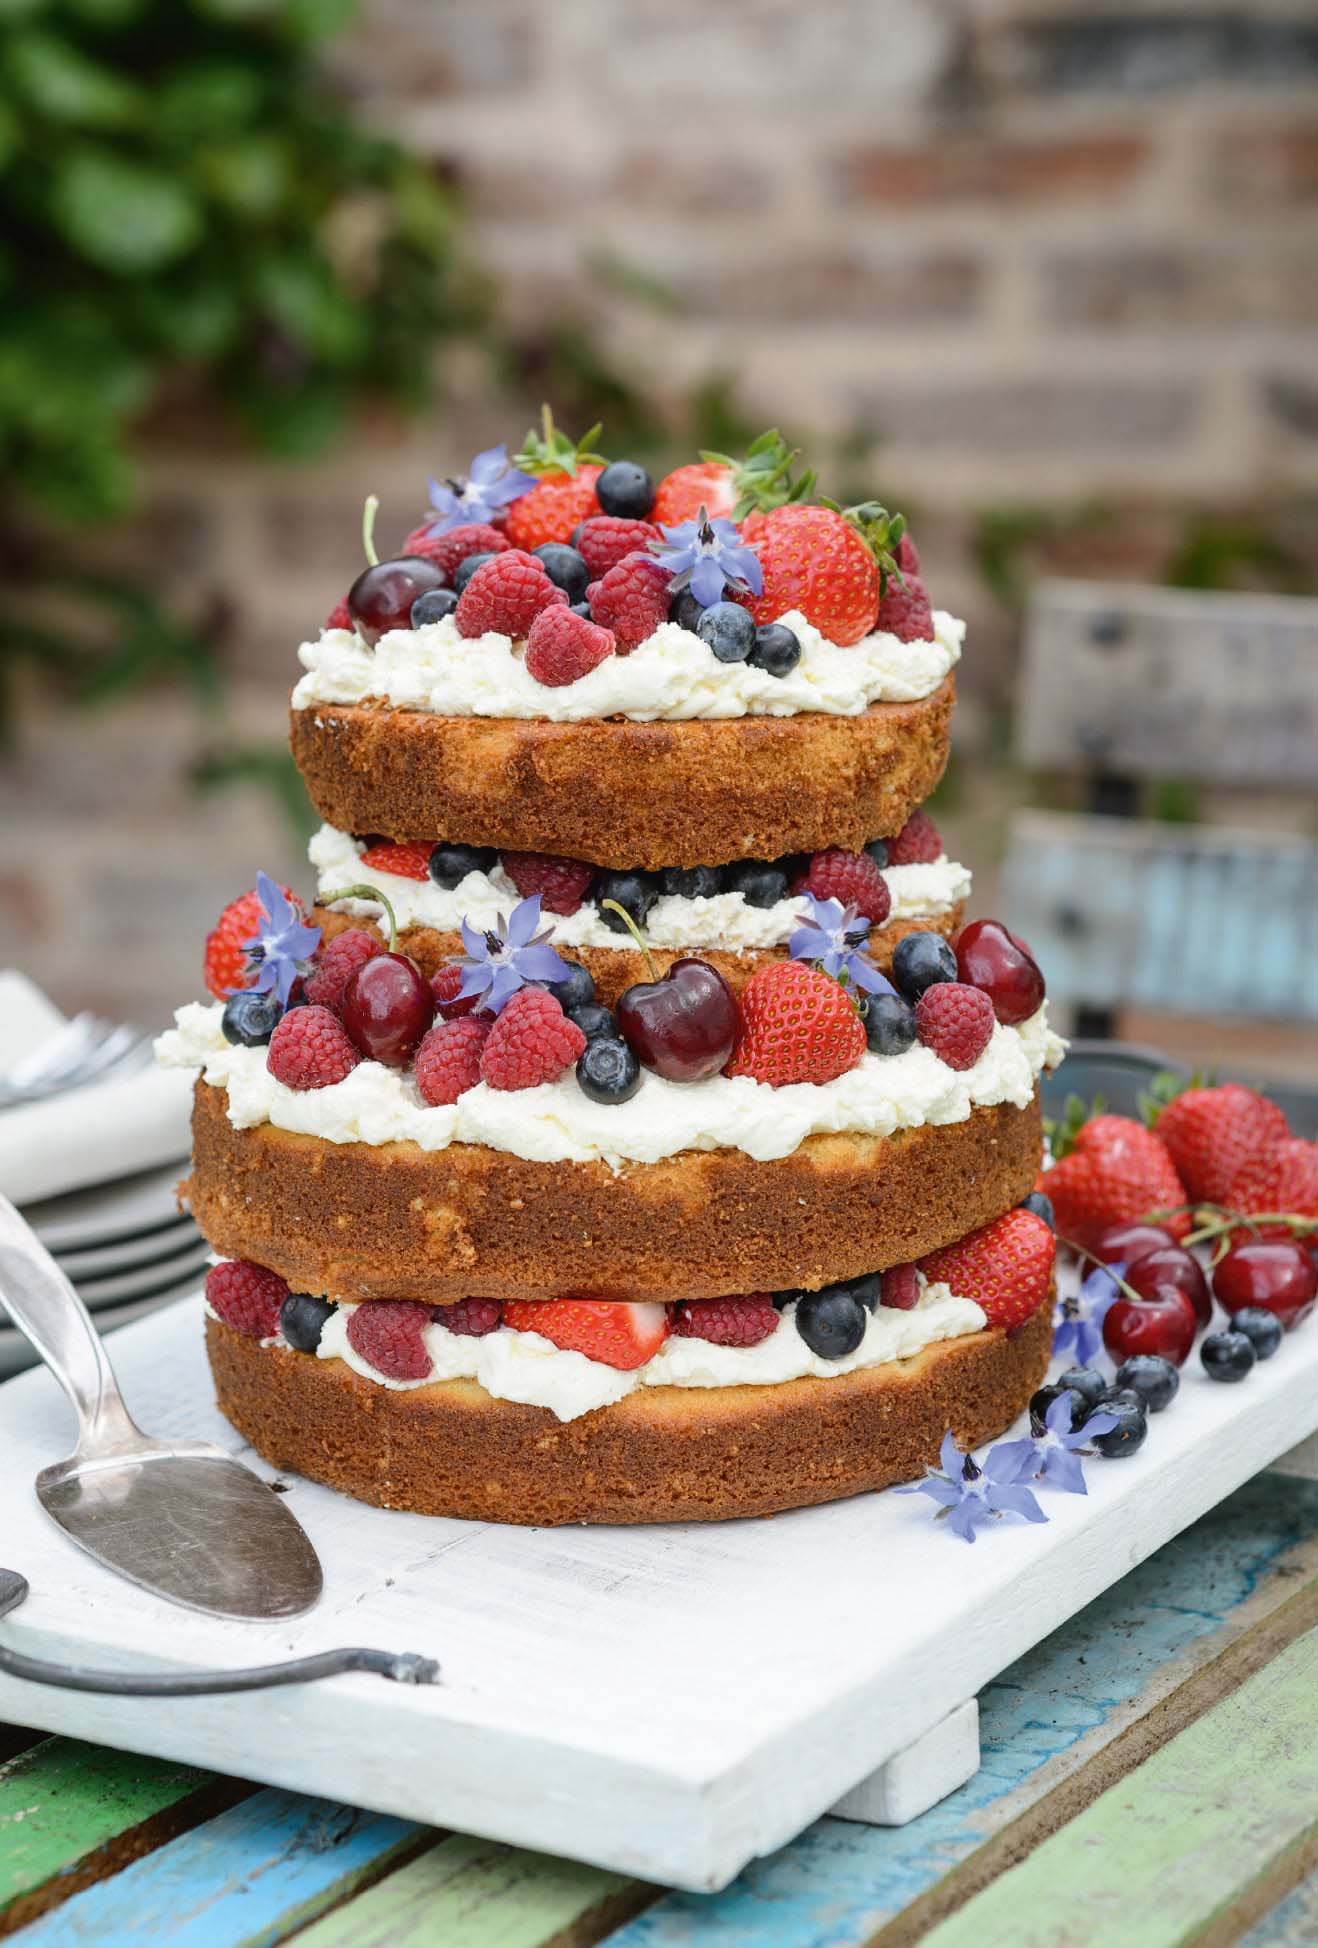
This is a bucolic summer feast of a cake, a spectacular but simple bake. Light vanilla sponges full of fresh fruit are sandwiched with cream and loaded with as much fruit as they will take. Use whatever fruit you have in abundance.
MAKES A TWO-LAYER CAKE (OR FOUR LAYERS/TWO TIERS)
YOU WILL NEED
Two-layer sponge:
2 × deep, round cake tins, 20cm/8in diameter, greased and base-lined
Four-layer/two-tier sponge:
2 × deep, round cake tins, 20cm/8in diameter, greased and base-lined
2 × deep, round cake tins, 15cm/6in diameter, greased and base-lined
3–4 × wooden skewers or dowels
INGREDIENTS
For two layers |
(For four layers) |
Cake: |
|
300g/10oz plain flour |
(450g/15oz) |
4 tsp baking powder |
(2 tbsp) |
155g/5½oz unsalted butter |
(230g/8oz) |
250g/8oz caster sugar |
(375g/12oz) |
3 medium eggs |
(4 large eggs) |
100ml/3½fl oz milk |
(150ml/5fl oz) |
1 tsp vanilla extract |
(1½ tsp) |
150g/5oz fresh berries/currants such as raspberries, blueberries and/or currants |
(225g/7½oz) |
Filling and topping: |
|
400ml/¾ pint double cream, whipped |
(600ml/1 pint) |
500g fresh fruit such as raspberries, blueberries, strawberries, currants and/or cherries |
(750g) |
edible flowers (optional), for decoration |
|
METHOD
• |
Preheat the oven to 180°C/350°F/gas mark 4. Set aside 3 tbsp (4 tbsp) of the flour, then sift the remaining flour and the baking powder into a large bowl and mix well. Add the butter and beat using the paddle attachment on a stand mixer (or rub in by hand) until the mix resembles breadcrumbs and all the flour is coated. Stir in the sugar. |
• |
Briefly beat the eggs and vanilla extract into the milk with a fork, then pour into the mix. Beat to incorporate, if possible using a high setting, for 2 minutes. |
• |
Divide between the tins. Toss the fruit in the reserved flour and scatter evenly over the top of the batter. |
• |
Bake for 25 minutes (25–30 minutes, the small tins may need to come out before the larger). Remove from the oven and leave in the tins for 10 minutes. Then turn out on to a wire rack to cool completely. |
TO ASSEMBLE
BAKE

This is one of those dark, rich, fudgy chocolate cakes for the days when ordinary cake just will not do. Using beans for the substance of the cake means it is glutenand dairy-free (provided your chocolate contains no milk products). It can also be baked out of season, by using dried beans and omitting the fresh fruit decoration. Substitute blackcurrants or strawberries (and their respective jams) if you prefer.
MAKES A TWO-LAYER CAKE
YOU WILL NEED
2 × deep, round cake tins, 20cm/8in diameter, greased and base-lined
INGREDIENTS
Beans:
200g/7oz dried or 400g/14oz
fresh borlotti beans
Cake:
6 eggs, separated
200ml/7fl oz sunflower oil
1 tbsp vanilla extract
¼ tsp salt
200g/7oz plain dark chocolate, melted (70 per cent cocoa solids)
250g/8oz light brown muscovado sugar
50g/2oz cocoa powder
Filling and topping:
100g/3½oz raspberry jam
100g/3½oz plain dark chocolate, melted (70 per cent cocoa solids)
100g/3½oz fresh raspberries
METHOD
• |
For the beans, soak dried beans overnight in plenty of cold water. Drain, rinse and put in a saucepan with more cold water. Bring to the boil and boil for half an hour until soft. Bring fresh beans to the boil in cold water and cook until soft. Drain and cool, then weigh out 400g/14oz. |
• |
For the cake, preheat the oven to 180°C/350°F/gas mark 4. Put the beans, egg yolks, oil, vanilla extract, salt and melted chocolate into a food processor (or you could use a stick blender) and blend to a thick paste. Pour the chocolate bean mix into a large bowl and set aside while you whisk the egg whites to soft peaks. Add the sugar, cocoa powder and a spoonful of the egg whites to the chocolate bean mix and stir until everything is incorporated, then fold in the rest of the egg whites. Divide between the two tins and bake for 20–25 minutes until there is no wobble in the cake when the tin is shaken and the surface of the cake is slightly cracked. Remove from the oven and leave in the tins for 10 minutes, then turn out each sponge on to a wire rack to cool completely. |
TO ASSEMBLE
Sandwich the two layers of cake together with the jam. Pour the melted chocolate over the cake, spreading it so the top is entirely covered and it drips down the sides in places. Finish with the fresh fruit.
GROW
Not, perhaps, the most obvious vegetable to bake with, but Florence fennel’s aniseed flavour lends itself well to cakes. This bulbous vegetable has a reputation for being difficult to grow, which is largely due to its tendency to bolt in unfavourable weather, but it is worth the little extra time watering so that you can enjoy its crisp bulbs and pretty feathery foliage.
‘Romanesco’ and ‘Finale’ are both bolt-resistant, and ‘Victorio’ is good for sowing later in summer.
A little shade and rich, moisture-retentive soil will help prevent Florence fennel bolting in hot weather. Sow direct, in early spring or mid-to late summer. Florence fennel is prone to bolting, so the later sowings will do better, and successional sowing will ensure a harvest even if one batch does bolt. It is also possible to sow in modular trays for planting out once the seedlings have four leaves, but take care not to disturb the roots. Leave 30cm/12in between rows and plants. Florence fennel can also be grown in pots.
Keep the soil around the plants moist, as again this will help minimize bolting, and keep the area free of weeds.
Bulbs will be ready to harvest about three months after sowing. Either pull out the whole bulb, or cut it off, leaving a small stump, which should re-sprout a few smaller leaves.

Harvest Florence fennel by pulling up the plant, or cutting it off at the base.
BAKE
Fennel cake (see here)
BAKE
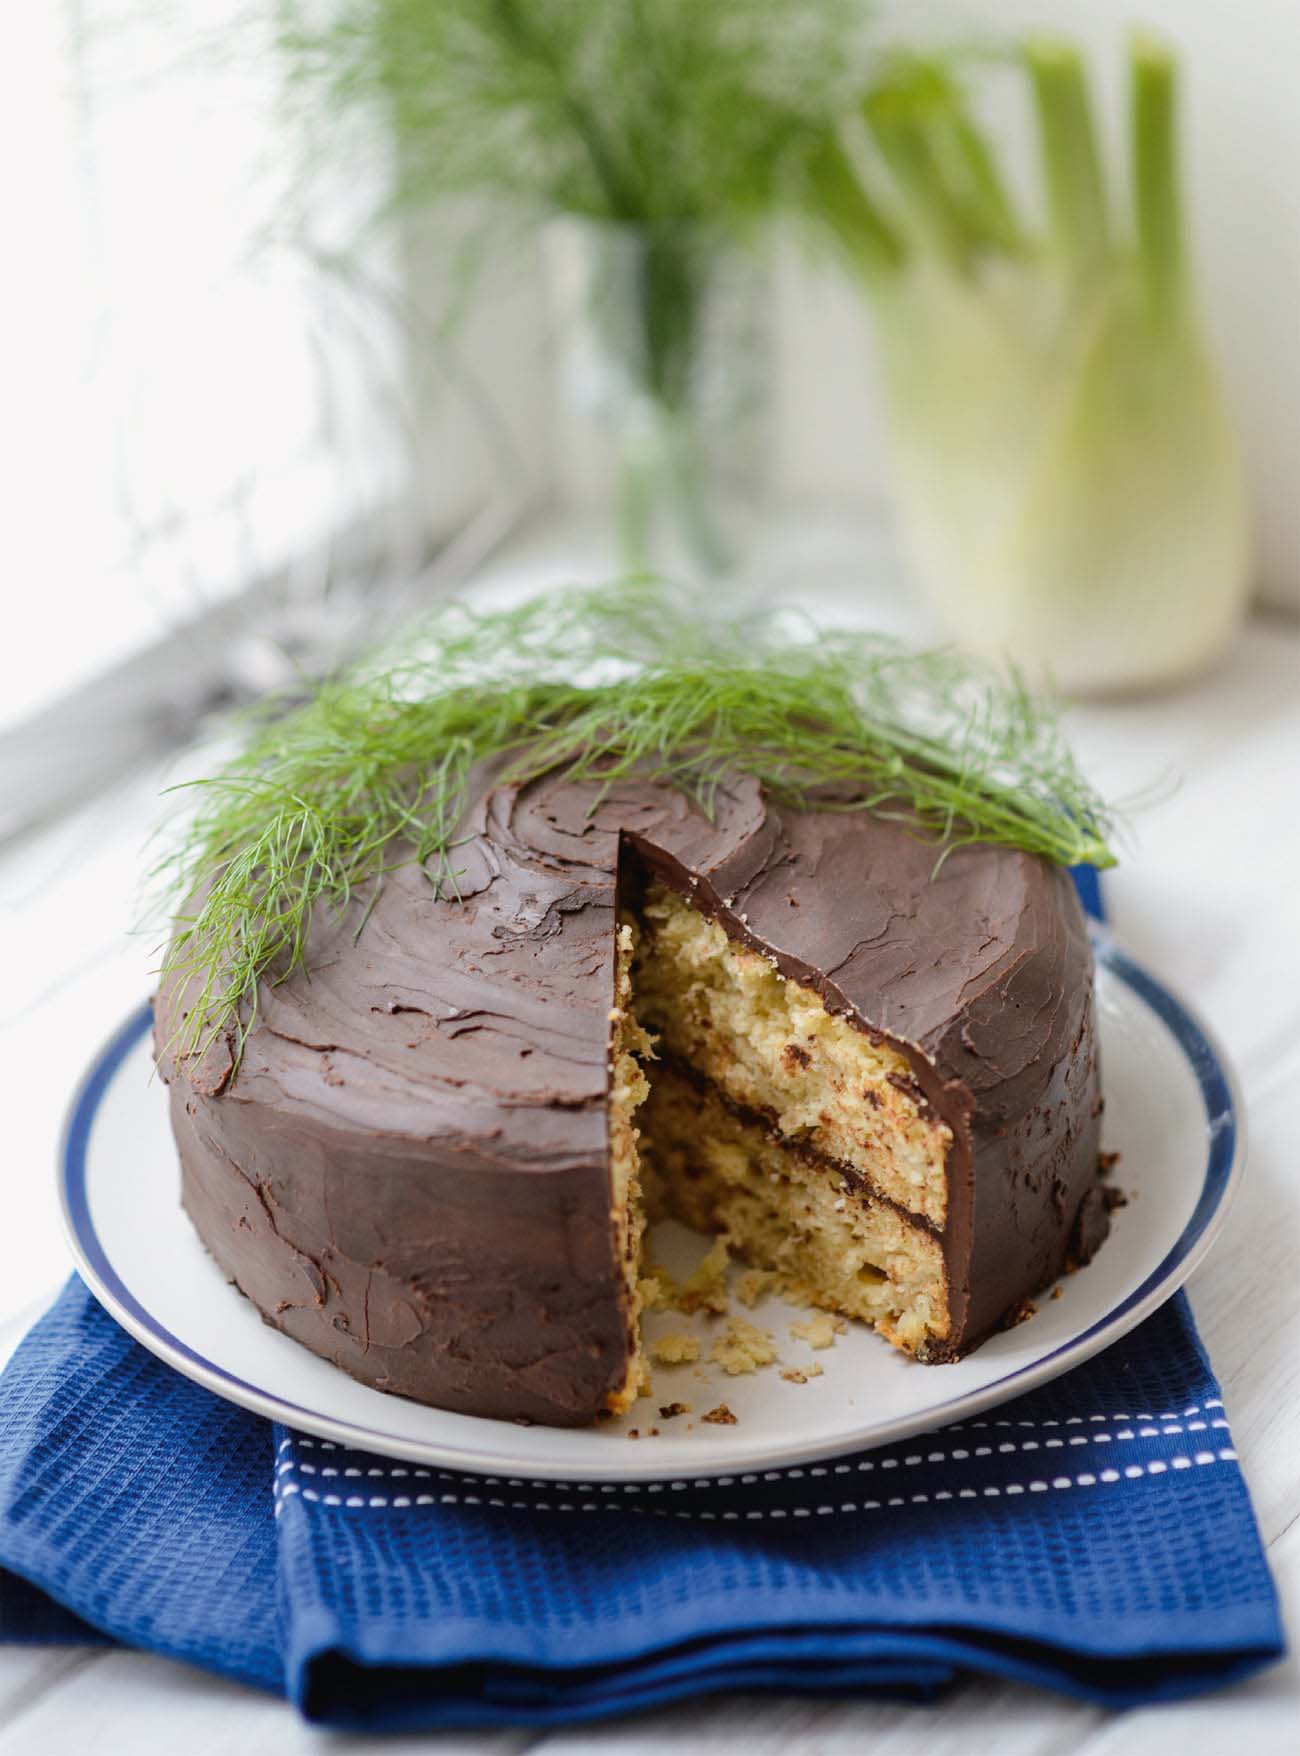
Reserve the fronds from your bulb fennel to decorate the top of the cake (put them in a vase of water to keep them fresh). The bright green is set off beautifully by the plain dark chocolate.
MAKES A TWO-LAYER CAKE
YOU WILL NEED
2 × deep, round cake tins, 20cm/8in diameter, greased and base-lined
INGREDIENTS
Cake:
600g/1lb 5oz finely chopped Florence fennel, fronds, base and core removed
350g/12oz plain flour
100g/3½oz ground almonds
1 tbsp baking powder
250g/8oz unsalted butter
150g/5oz caster sugar
4 eggs
300ml/½ pint double cream
2 star anise
250g/8oz plain dark chocolate, finely chopped (70 per cent cocoa solids)
50g/1½oz unsalted butter
Decoration:
fennel fronds
METHOD
• |
For the cake, preheat the oven to 160°C/325°F/gas mark 3. Scatter 2 tbsp of the flour over the fennel flesh and toss to coat. Mix the remaining flour, the almonds and baking powder together and set aside. Beat the butter and sugar together until light and fluffy, then incorporate the eggs, one by one, beating well after each addition. Stir in the coated fennel then fold in the flour mix until everything is included. Divide between the two tins and bake for 40–45 minutes until a skewer comes out clean and the fennel is soft. Remove from the oven and leave to cool in the tins for 10 minutes, then turn out on to a wire rack to cool completely. |
• |
For the ganache glaze, bring the cream and anise to the boil in a saucepan over a medium heat, then set aside to cool completely. Meanwhile put the chocolate into a large bowl. Bring the cream mix back to just under the boil, then pour half of it through a sieve into the chocolate. Stir until the chocolate is melting, then add the remaining cream mix (again, through a sieve) and the butter, and stir until smooth and glossy. |
TO ASSEMBLE
Spread one sponge with a layer of ganache. Set the other sponge on top and use the remaining ganache to coat the top and sides (a crumb layer is useful for a smooth finish). Decorate with the reserved fennel fronds.
GROW
Florence fennel (see here)
BAKE
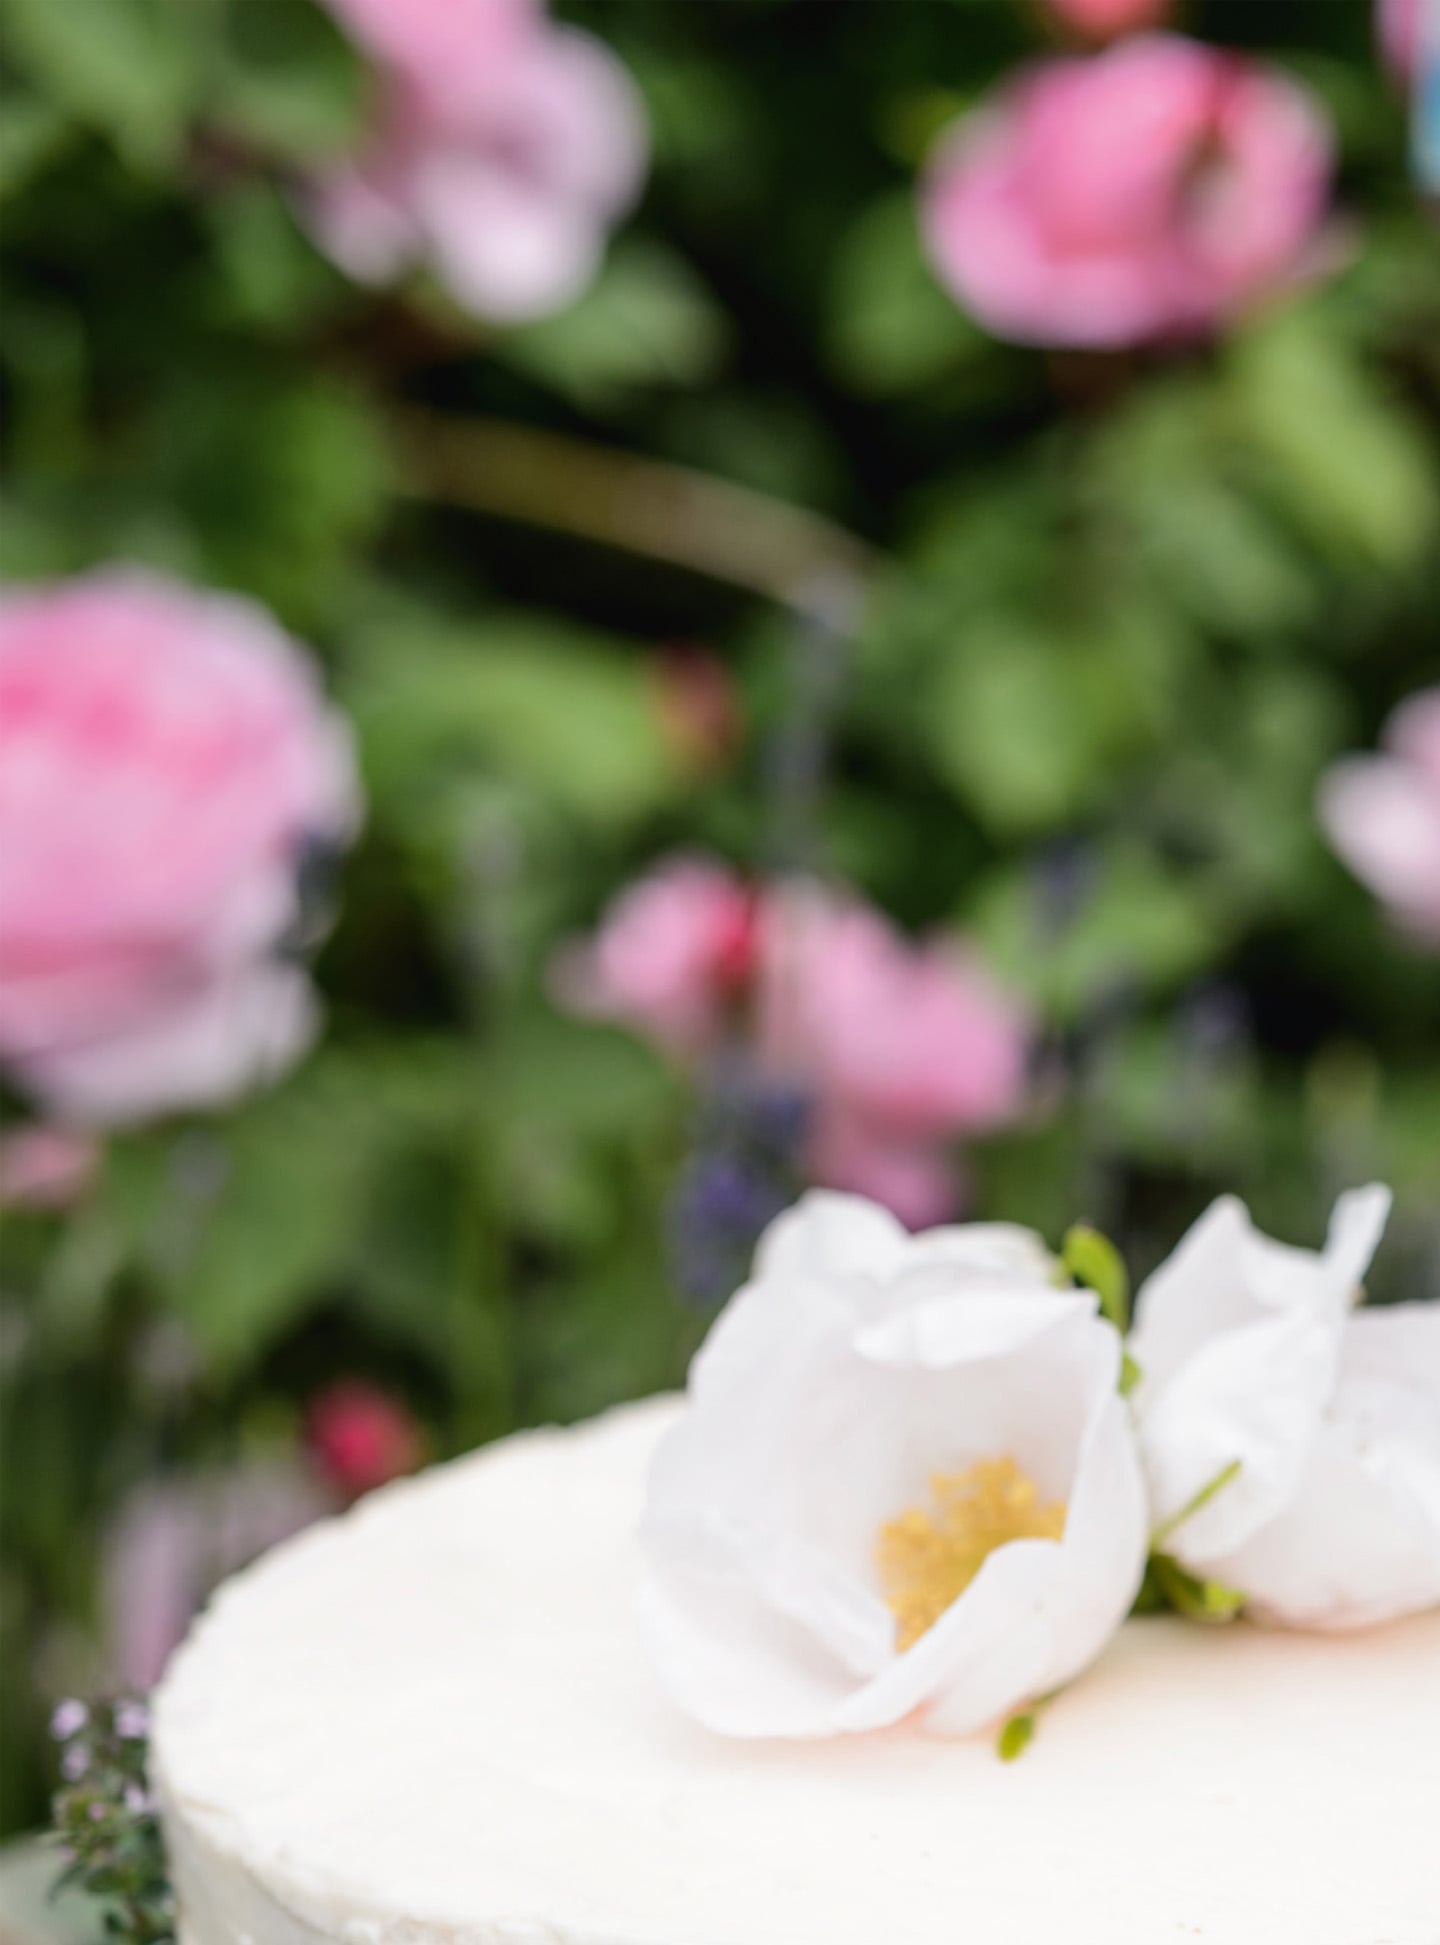
When eating this pretty cake you may have the sensation of walking through a rose garden: a tantalizing scent and flavour of rose that is distinct but not overpowering.
MAKES A TWO-LAYER CAKE
YOU WILL NEED
2 × deep, round cake tins, 20cm/8in diameter, greased and base-lined
INGREDIENTS
150g/5oz caster sugar
150ml/5fl oz water
10 rose flowers
Cake:
6 eggs
180g/6oz caster sugar
180g/6oz plain flour
90g/3oz unsalted butter, melted
4 tbsp rose syrup
Buttercream:
360g/13oz icing sugar
100g/3½oz unsalted butter
7 tbsp rose syrup
Red/pink food colouring (optional)
Decoration:
Rose flowers or petals
Sprigs of foliage (e.g. lemon thyme)
METHOD
• |
For the syrup, follow the flower syrup instructions in Flower meringues (see here). |
• |
For the cake, preheat the oven to 180°C/350°F/gas mark 4. Whisk the eggs and sugar together (for best effect use a stand mixer or electric beaters) until a little mix trickled over the surface leaves a trail, and the mixture has doubled or tripled in volume. Sift in half the flour and fold in. Sift in the remaining flour and fold in. Finally trickle the butter into the batter, folding as you go to minimize the loss of volume, and continue folding until everything is incorporated. Divide between the two tins and bake for 25–30 minutes until golden, firm and springy to the touch. Do not open the oven door before 25 minutes have elapsed or the cake will sink. Remove from the oven and turn over on to a wire rack but leave the tins over the top of the sponges for 10 minutes, then remove the tins. Once cool, drizzle each sponge with 2 tbsp of rose syrup. |
• |
For the buttercream, sift the icing sugar into a bowl and add the butter. Beat until combined, then, still beating on slow speed, trickle in the rose syrup and a few drops of food colouring. Beat at high speed for 5–10 minutes until light and fluffy. |
TO ASSEMBLE
Use one-third of the buttercream to sandwich the two sponges together. Spread the remaining buttercream over the top and sides. Arrange rose flowers or petals on the top and stick the foliage sprigs around the edge.
GROW
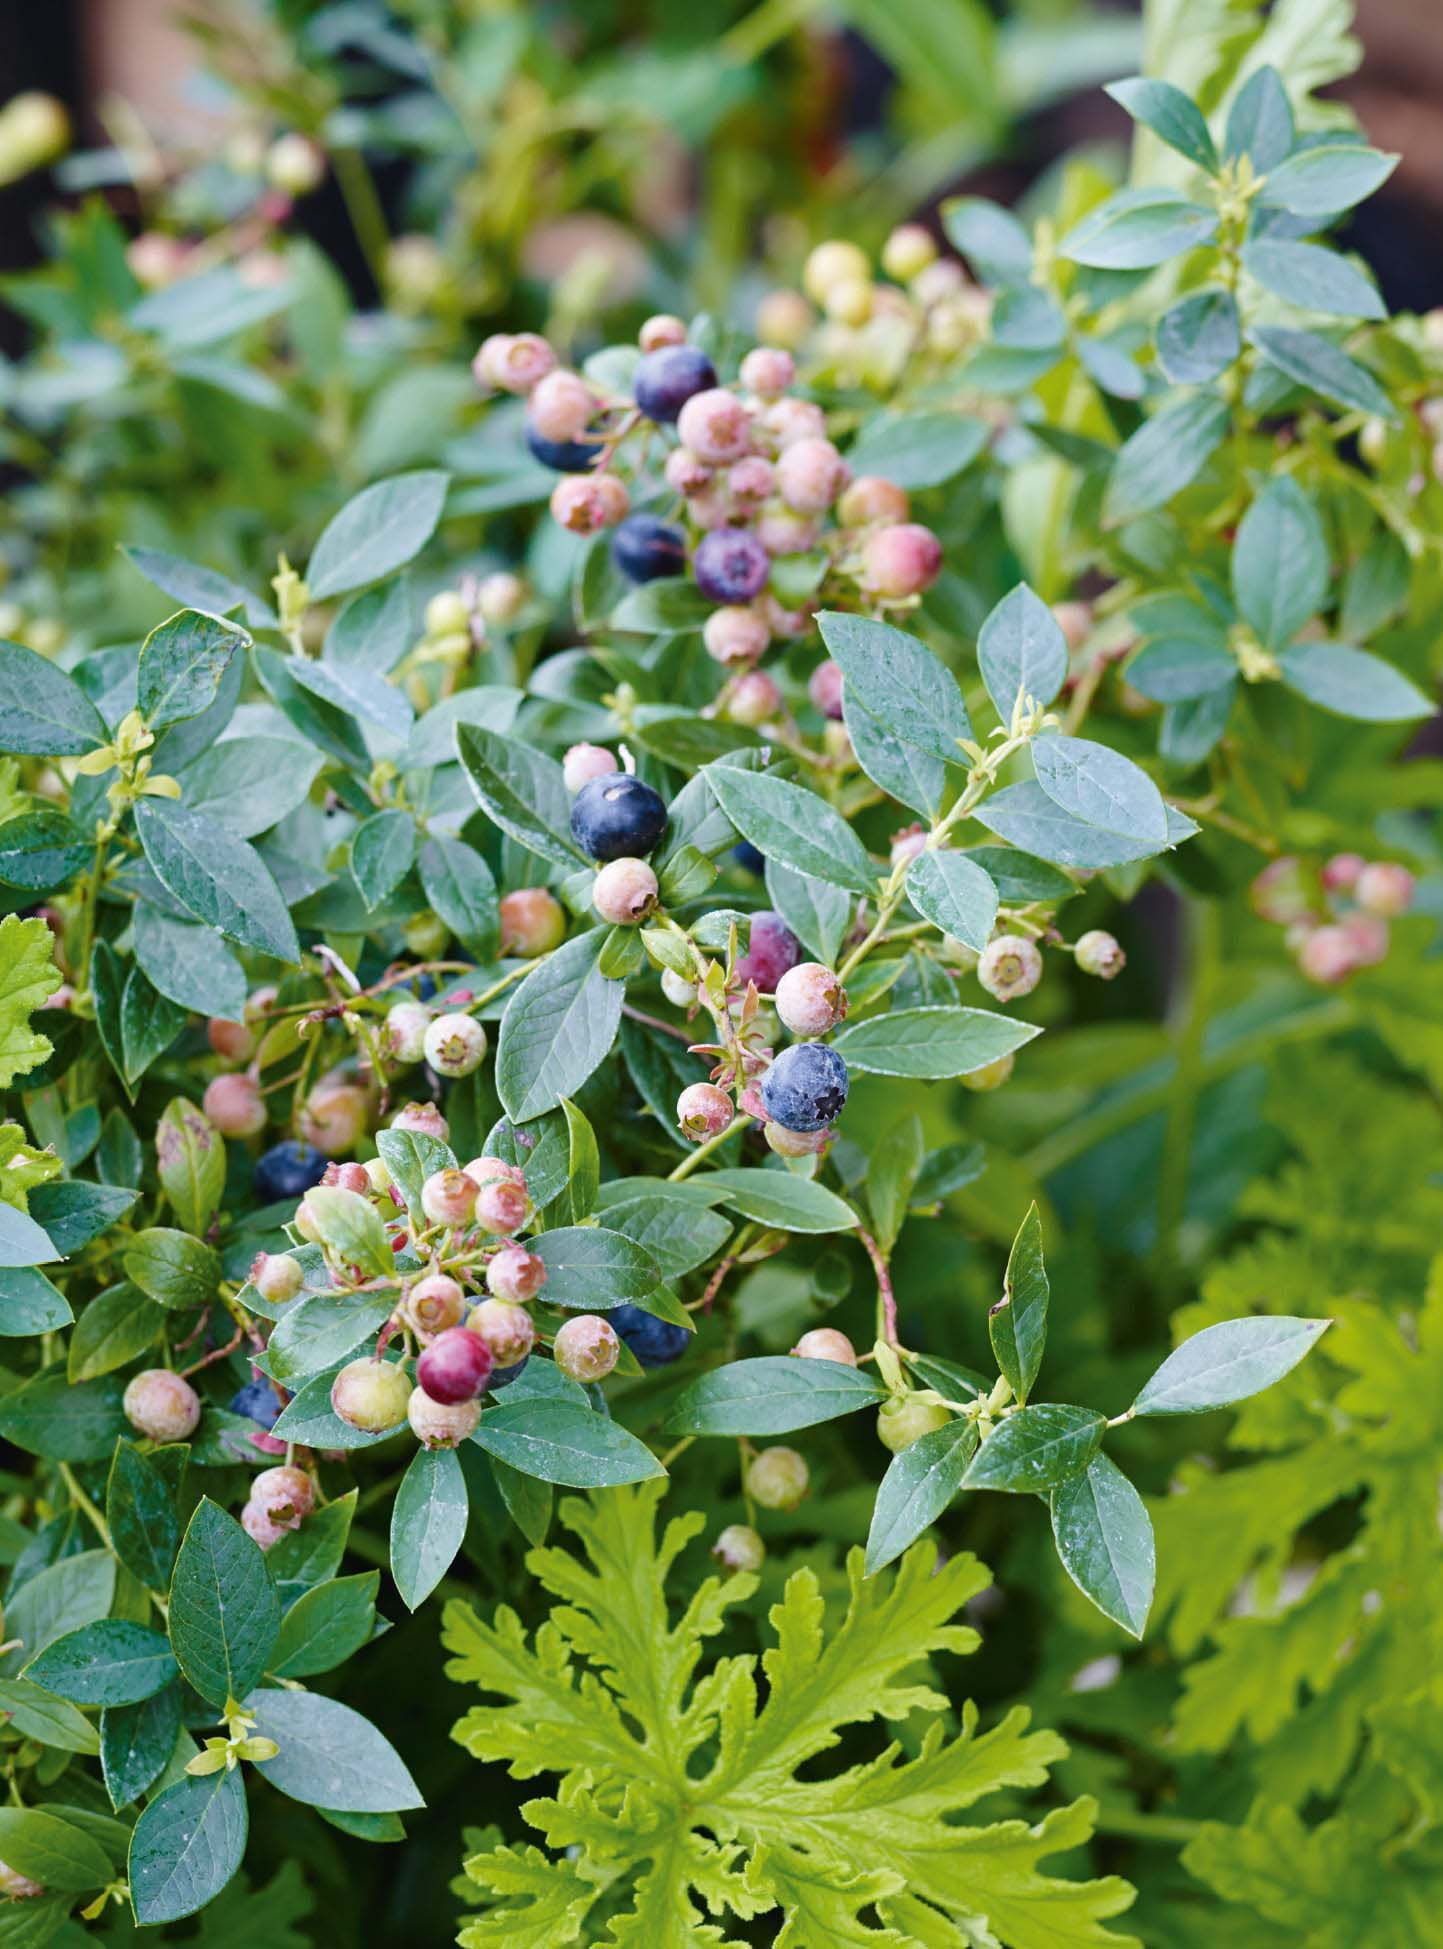
It is strange that it took until relatively recently for this North American plant to spread to fruit cages and farms elsewhere in the world. Blueberries are not difficult to grow, are suitable for most climates and have pretty blossom and stunning autumn leaf colour as well as delicious fruit.
Large-sized berries are not necessarily the best for baking, as their higher water content means less intense flavour and soggy cakes. Therefore choose varieties such as ‘Rubel’ and ‘Herbert’. You will get more berries on each plant if you have more than one bush, because pollination will improve, but you will still get some harvest from one plant.
Blueberries like a sunny spot in well-drained, acidic soil, but if your patch does not have such soil conditions you can grow them in a large pot using ericaceous compost mixed with some composted bark. They will grow, but not fruit as well, in some shade. In autumn or spring buy container-grown plants to put in the ground or a pot. Space plants 1.5m/5ft apart.
BAKE
A muffin for all seasons (see here)
Fresh fruit cake (see here)
Shades of berry cake (see here)
Keep plants in moist soil, especially in pots in hot weather. Use rainwater if possible, not just for the environmental reasons, but because tap water tends to be alkaline and will affect the soil’s acidity levels. Mulch in spring with composted bark or pine needles, or ericaceous compost. As with all soft fruit, the berries will be a target for birds, so you may need to net the plants as the fruit ripens. Very little pruning is needed. Once the plant has reached full size (once it is 4–5 years old), remove any dead or diseased branches, and a few of the oldest branches, to thin out the growth.
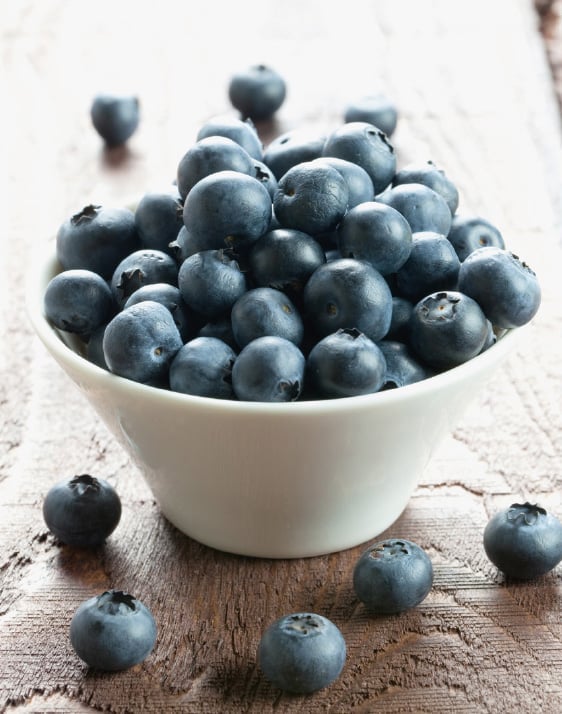
Blueberries are ready to pick when they are soft, completely blue and have developed that characteristic silver bloom on their skin.
BAKE
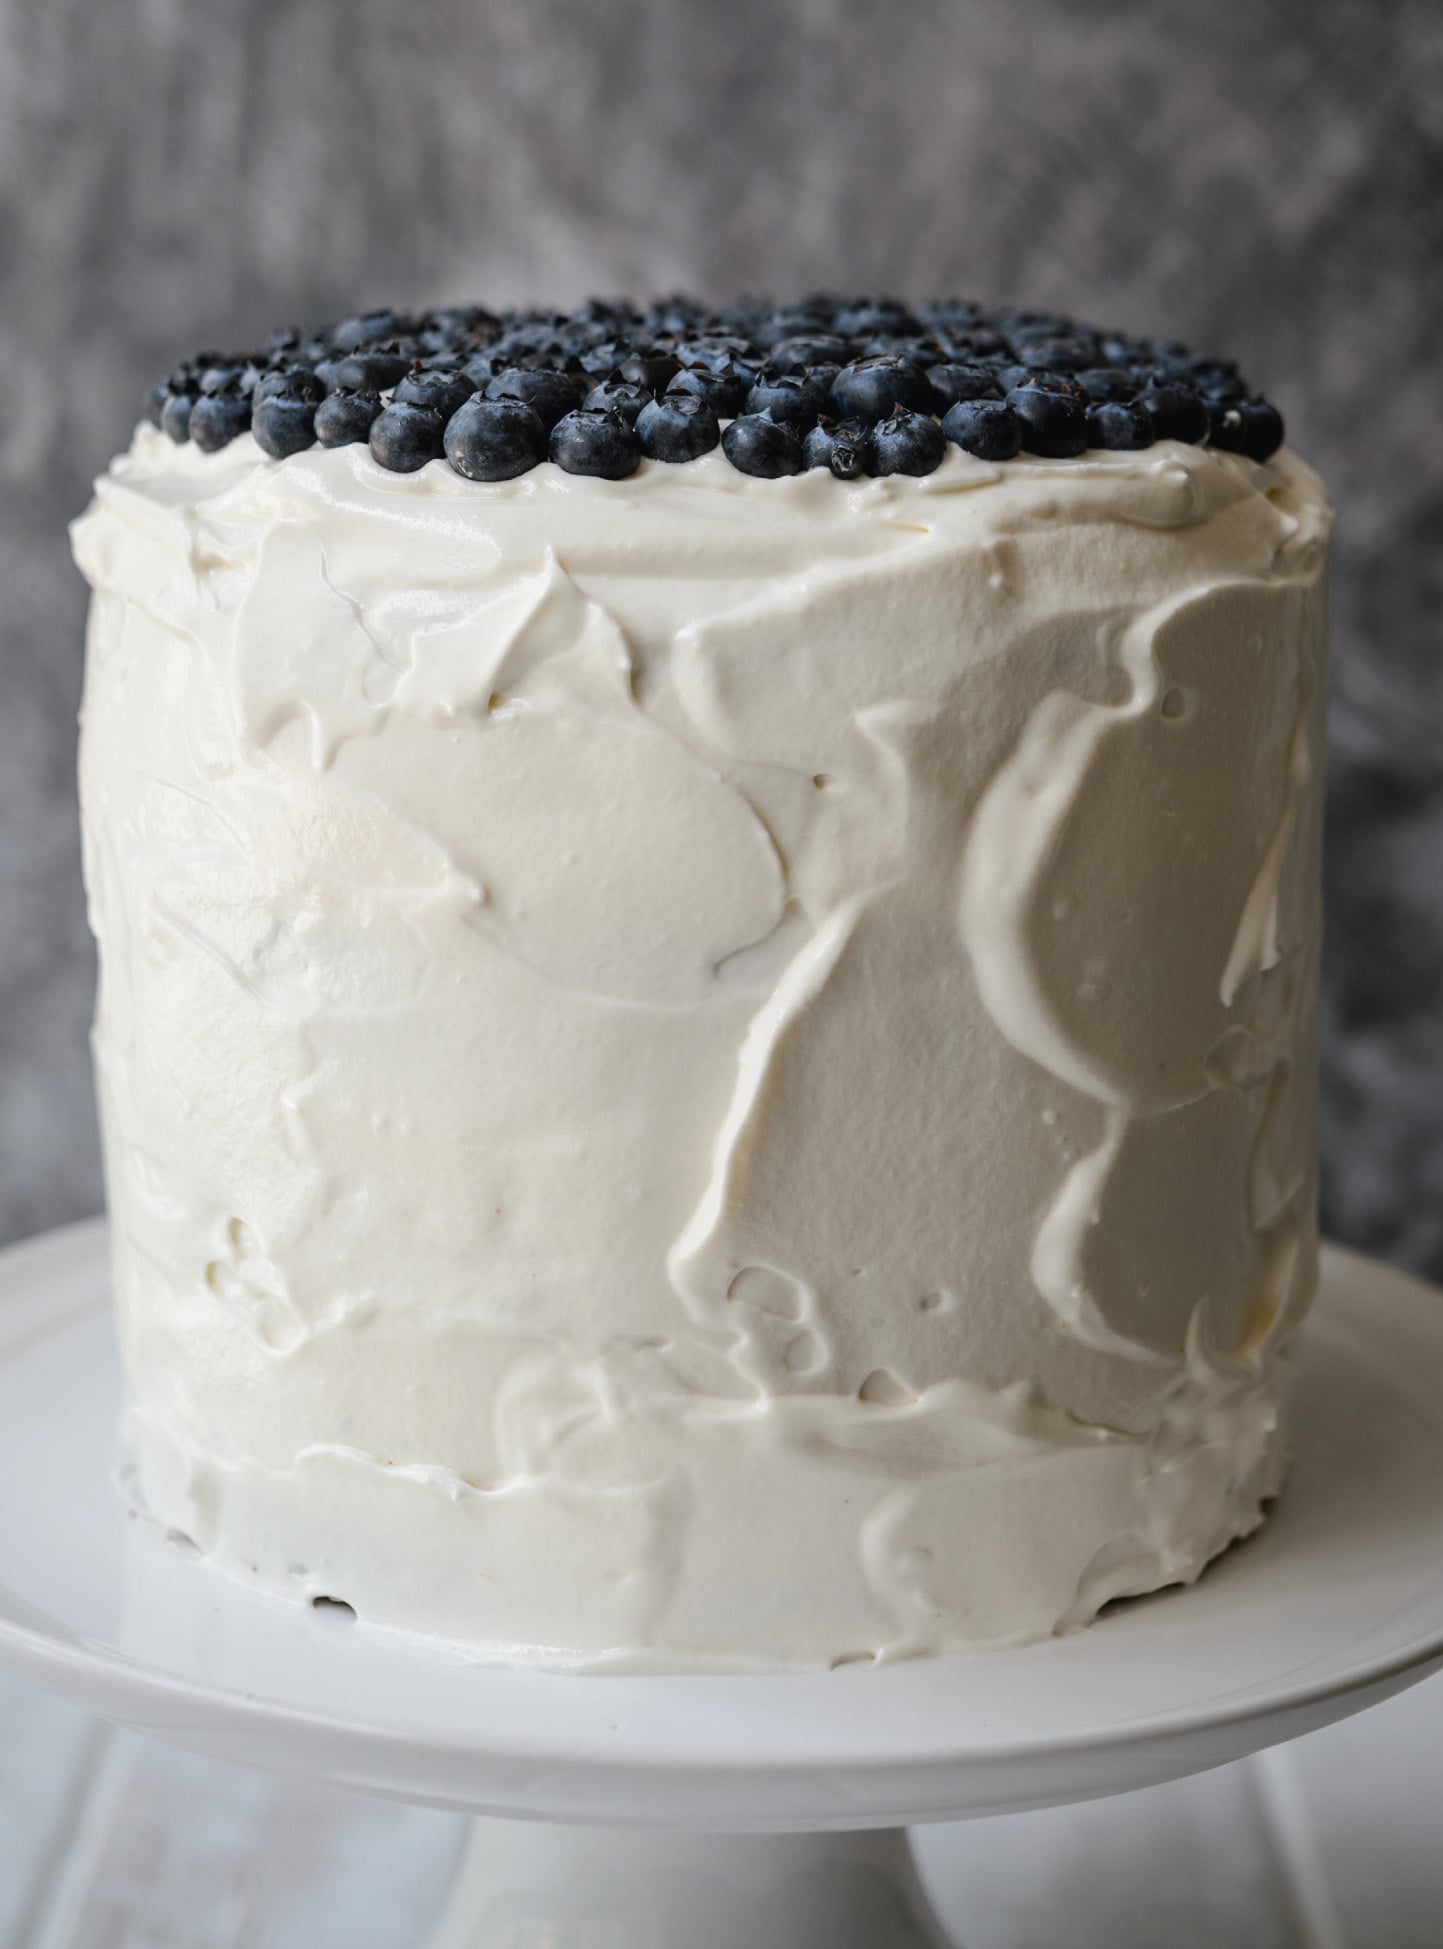
Having four layers, each one flavoured with a different berry (OK, so blackcurrants are not berries, but I could not resist the title), this cake is undeniably large.
However quantities are given per layer, so you can scale it down if you want; halve the frosting quantities for a two-layer cake. The fruit is blitzed then mixed into the cake batter, so it is a good choice for berries that do not look good enough to be on display.
MAKES A FOUR-LAYER CAKE
YOU WILL NEED
1 × deep, round cake tin, 20cm/8in diameter, greased and base-lined (used four times)
3–4 × wooden skewers or dowels
INGREDIENTS
Cake, per layer:
200g/7oz plain flour
2½ tsp baking powder
½ tsp bicarbonate of soda
small pinch of salt
100g/3½oz unsalted butter
150g/5oz caster sugar
2 eggs
140g/4½oz puréed blackcurrants or raspberries or blueberries or strawberries
Frosting for four layers (two layers in brackets):
200g/7oz caster sugar (100g/4oz)
80ml/2½fl oz golden syrup (40ml/1½fl oz)
5 tbsp water (2½ tbsp)
4 egg whites (2 egg whites)
Decoration:
250g/8oz blueberries
METHOD
TO ASSEMBLE
Lay the blackcurrant sponge on a plate and spread with a fairly thin tier of frosting. Set the raspberry sponge on top, and spread with frosting, then the blueberry sponge, more frosting, finally finishing with the strawberry sponge. Push the skewers or dowels vertically through all the tiers to prevent any slipping. Spread a thin layer of frosting over the top and sides as a crumb layer, then put the cake in the refrigerator for half an hour, before taking out and spreading the remaining frosting over the top and sides. Cover the entire of the top of the cake with the blueberries.