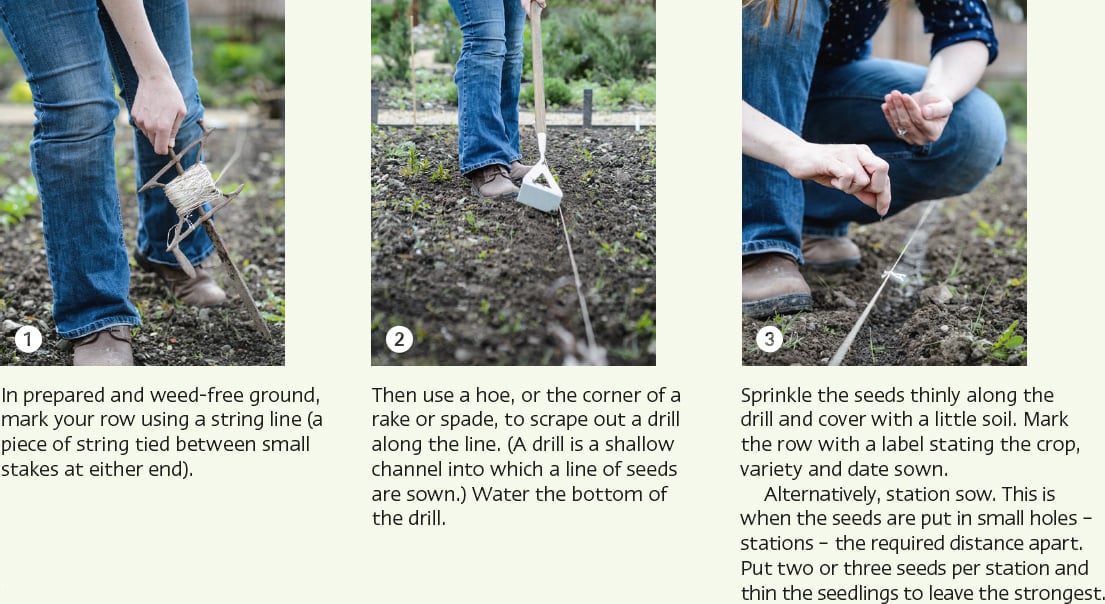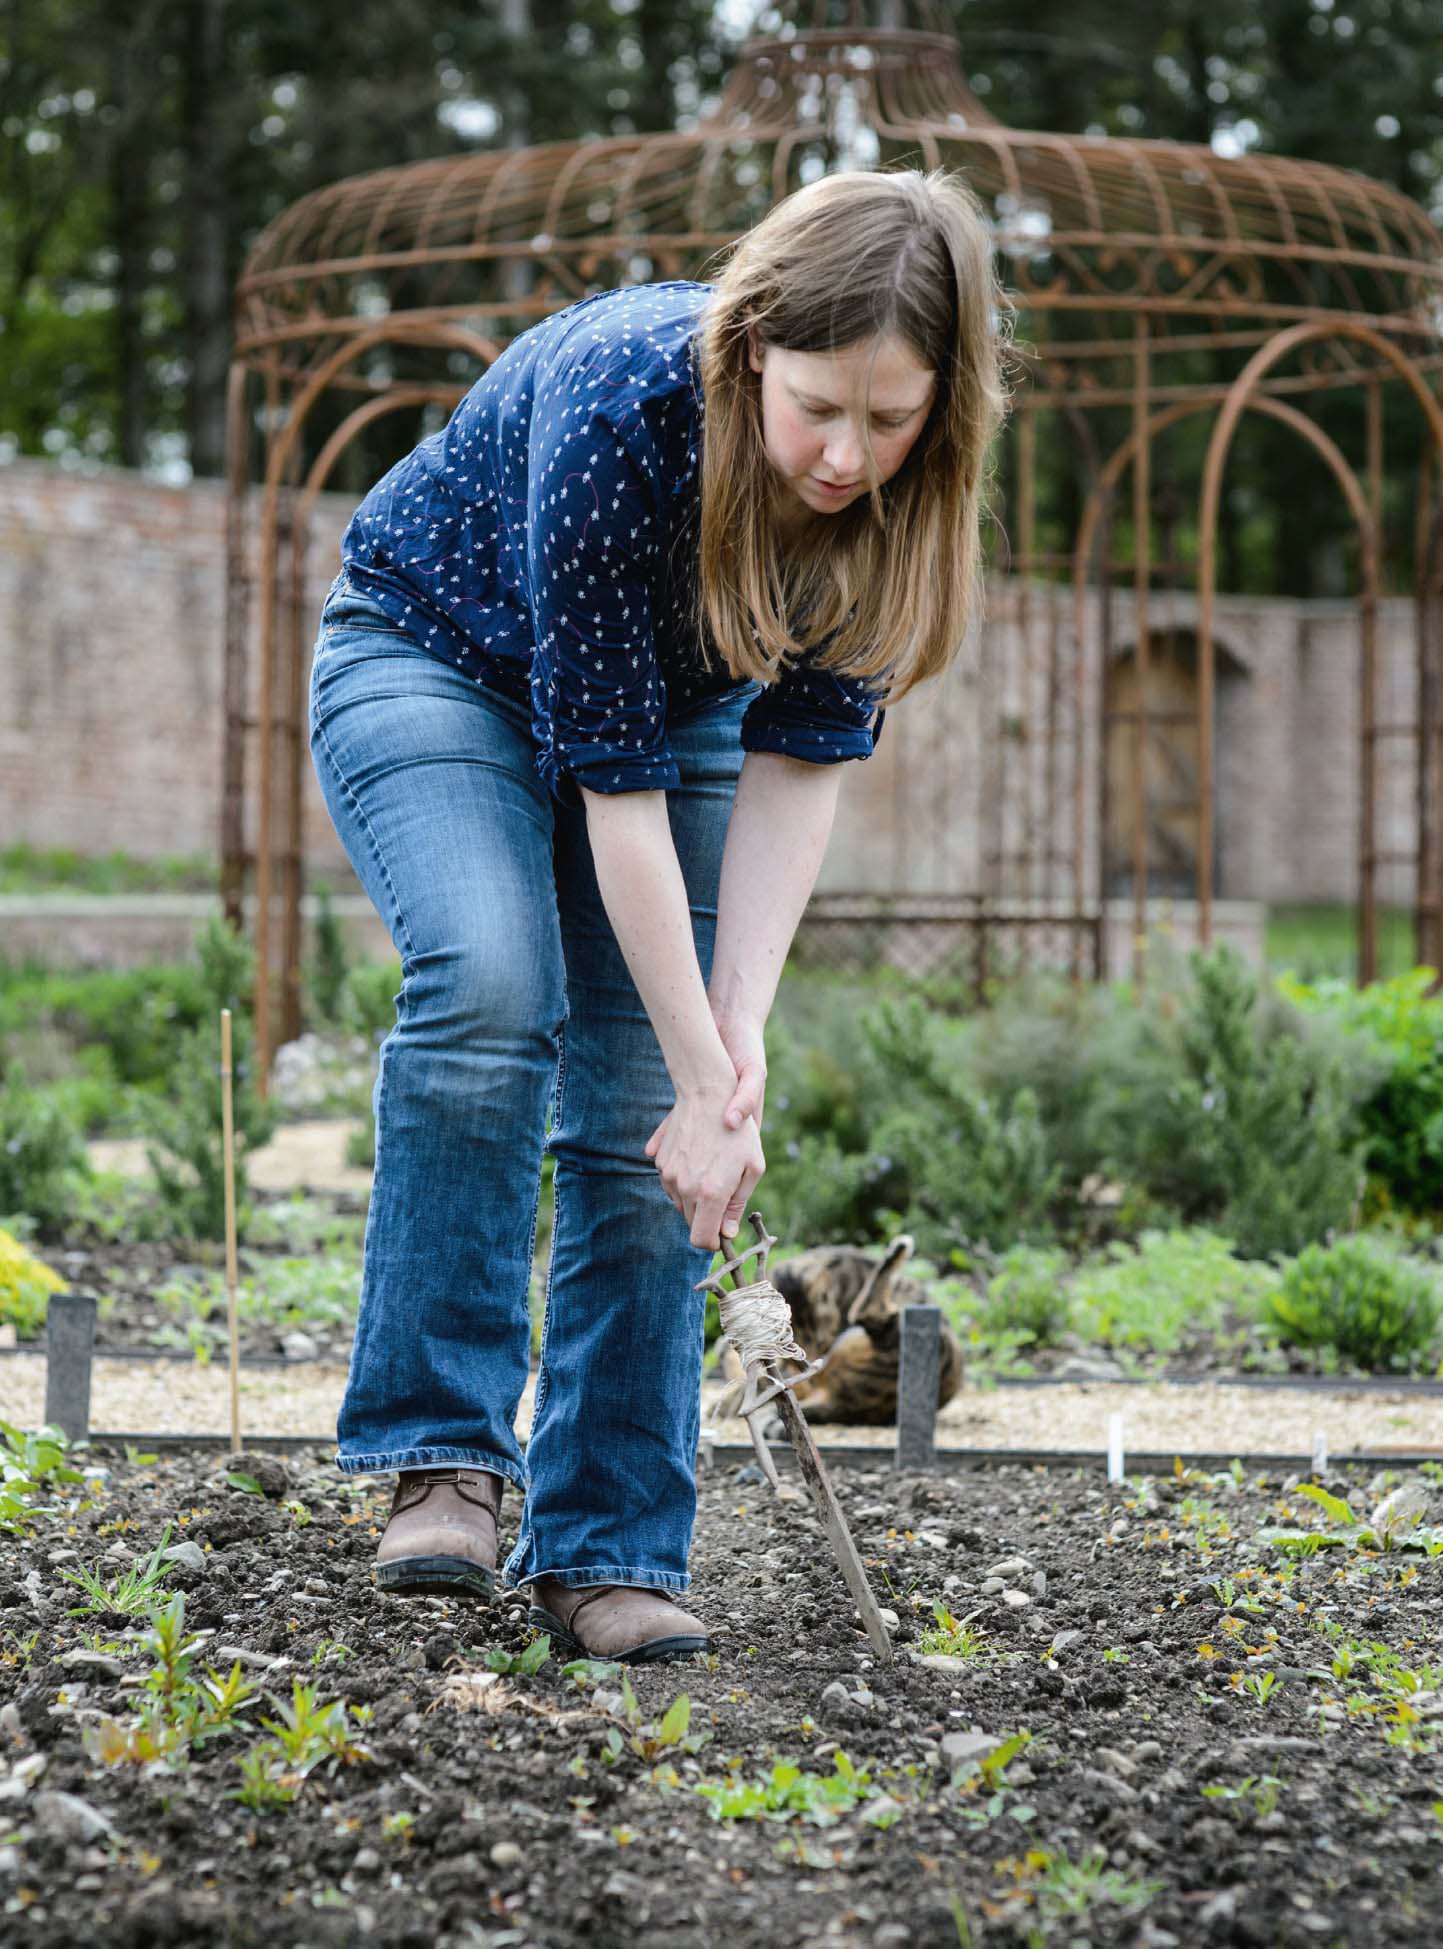
A string line is useful to mark out where to sow your row of seeds.
Many people are convinced they do not have ‘green fingers’, and that any plant they attempt to grow will wilt before their eyes. This is simply not true. Plants do not have feelings; they cannot fail to flourish out of spite. They are biologically programmed to grow and flower and all you need do is provide each one with a few basics: something to grow in, some light and some water. The plant will do the rest.
Below I have given some general tips for successful growing and have explained some basic procedures that are common to many crops, such as how to sow seeds.
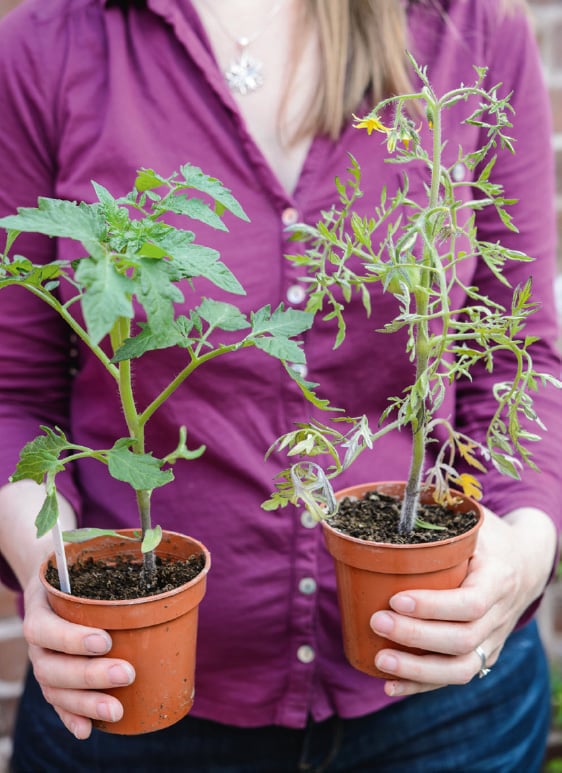
Although the right-hand tomato plant is taller and has some fruit on it, the left-hand plant is healthier, sturdier and a better choice.
Purchasing seeds from a reputable seed merchant is relatively risk-free, as they are bound by regulations to ensure a high proportion of the seed will germinate if sown correctly. Do make sure that they are within their sow-by date, because many seeds lose viability after a year or so.
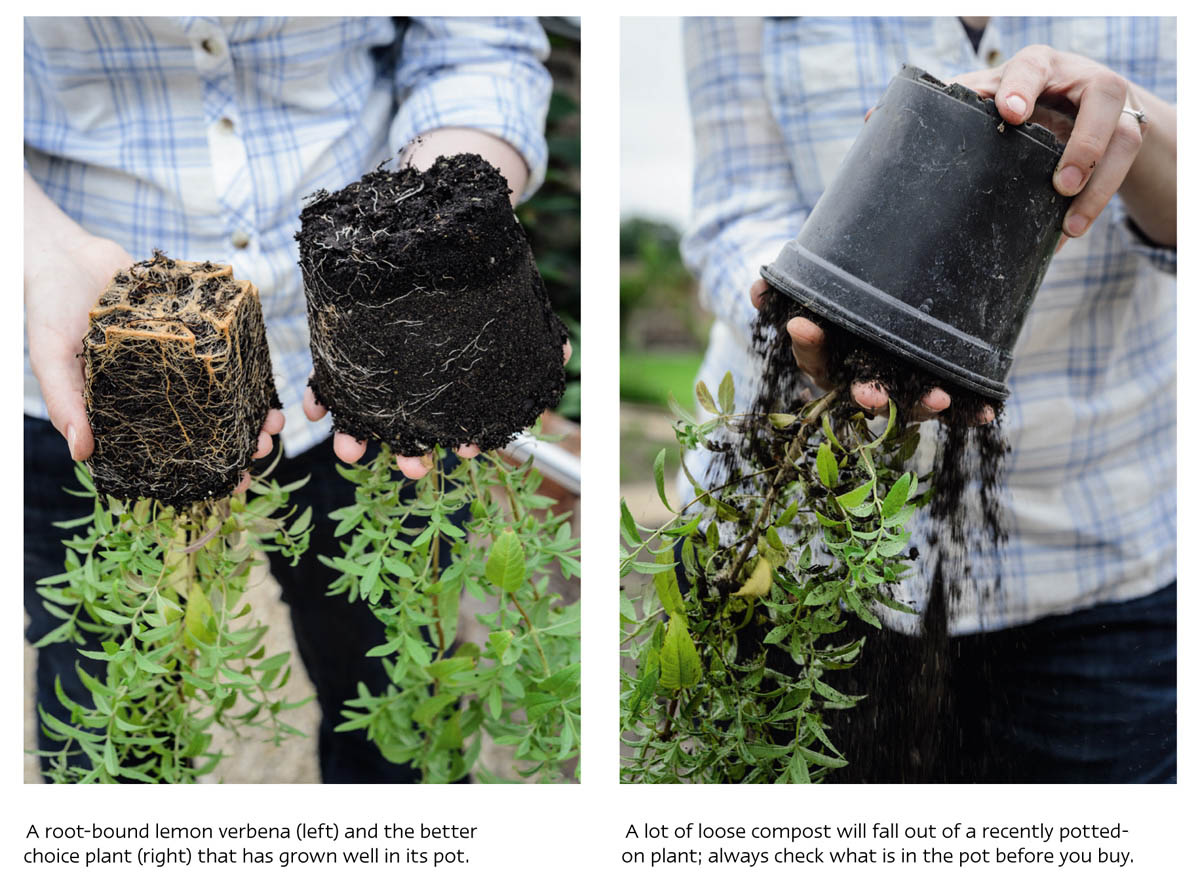
Plant buying is much more a case of caveat emptor (buyer beware). If you are doing this online, use only trustworthy suppliers (SEE here for some recommendations) or sites that offer a no-quibbles return policy. When choosing plants in a shop, do not be afraid to give each one a good check over before you part with your cash. Some retailers may sell some poor-quality plants. Run down this checklist in your head:
SEE ALSO Plant names.
Technically, compost is the organic matter you would make yourself, by rotting down plant material over a year or so until it has turned into a nutrient-rich, soil-like substance that can be dug into or spread over the top of the beds to improve the soil quality. However the word compost is also widely used to describe the various types of soil-substitutes available to buy in bags to fill pots and sow seeds in.
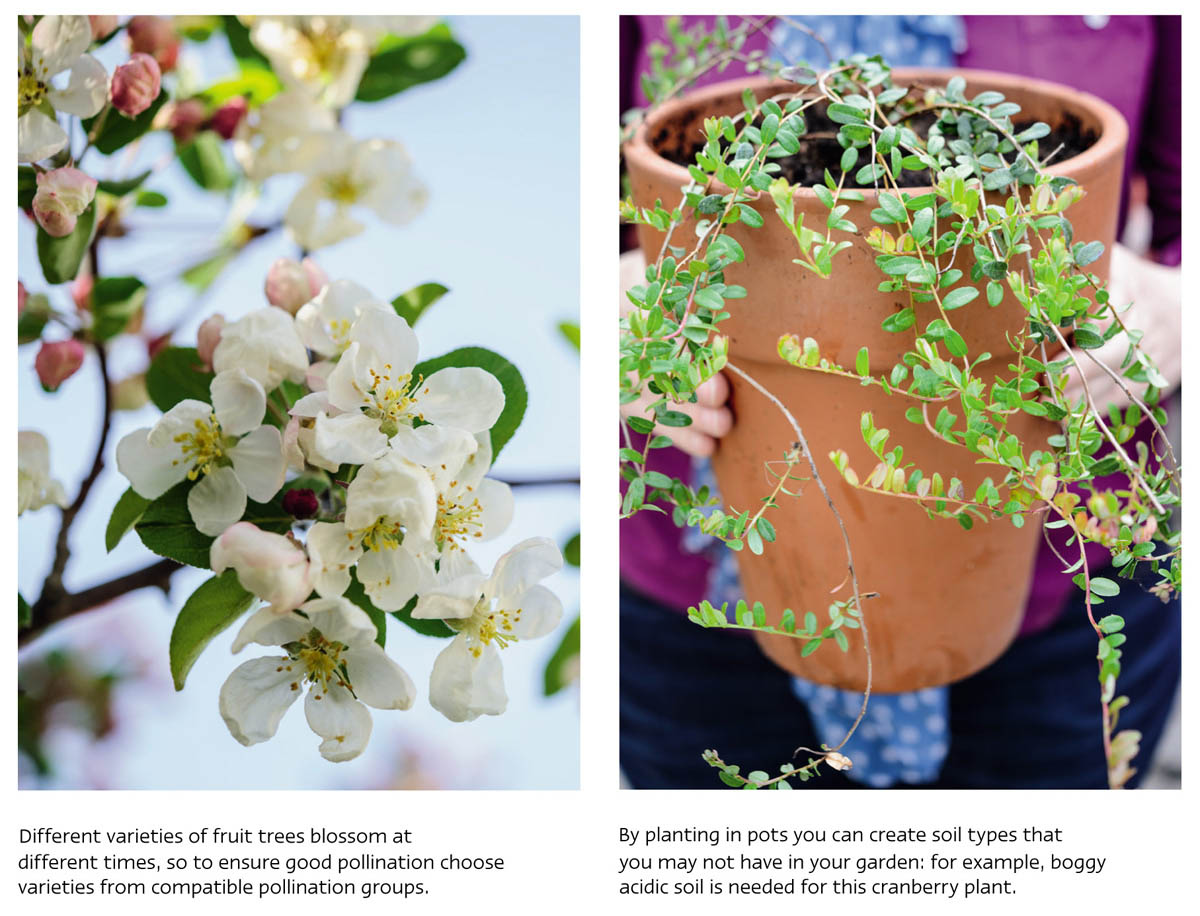
When buying compost, consider what you need it for. To plant up pots, multipurpose compost is fine, unless you are growing blueberries or cranberries, in which case you will need ericaceous compost. This has an acidic pH, and is often marketed as rhododendron and camellia compost. For sowing seeds, you will require a finer-grade medium, so buy the specific seed compost.
There are also environmental considerations. Organic compost, which is free from pesticides and herbicides, is available if you prefer to use that. Many composts are now also peat-free, although sometimes the environmental impact of the substitutes used is almost as bad as the peat. In general you get what you pay for, so buy the best quality you can afford.
SEE ALSO Organic matter.
Plants whose top growth dies back over winter to shoot anew in spring need the dead growth cutting back. This can be done in autumn or winter – in fact any time before the new shoots start appearing – and if the stems are left to stand over winter they will provide shelter for beneficial insects such as ladybirds. Whenever you tackle this job, cut off the dead stems back to ground level.
To dig or not to dig? That is the question I am sure Hamlet would have asked if he spent more time in the garden and less time moping about the castle. The arguments for and against are, essentially, this:
• |
Digging over vegetable beds every year allows for the incorporation of organic matter (SEE Organic matter) and the removal of perennial weed roots; it also relieves compaction. However it brings more weed seeds to the surface where they can then germinate. |
• |
Not digging, that is, just spreading on a layer of mulch every autumn and raking over the area before planting and sowing in spring, preserves the balance of the soil’s structure and ecosystems, allowing all the soil flora and fauna to do the work of incorporating the organic matter and keeping the soil aerated for you. However this takes time and will not help a compacted soil in the short term. |
Personally I favour a mix of the two approaches: spread a good, thick layer of mulch over the beds in autumn, then in spring use a garden fork to turn the soil over gently, not going too deep, but levering it up slightly. On first creating a new bed I would always dig it over properly (not forgetting to add plenty of organic matter), as the soil is likely to be quite compacted and weedy. Once dug, or not, use a rake to break down smaller clumps of soil or organic matter on the surface, remove larger stones and create a level surface.
Most plant diseases are fungal rots that start on a single leaf or wounded part of the plant and spread from there. This means that they are easy to prevent. Keep plants healthy to enable them to fight off disease more effectively. Use clean pots and tools; buy healthy plants; do not set plants too close together (humidity and poor air circulation foster fungi); and remove any diseased parts with a clean cut back to healthy growth.
SEE here for sources of information to deal with specific problems.
You do not need a lot of fancy equipment to start growing plants. These basics will meet your needs, initially at least:
• |
trowel for planting small plants and/or shovelling compost into a pot; |
• |
hand fork for weeding; |
• |
spade and/or garden fork for digging over the soil (if you have any) and for planting trees and other large plants; |
• |
large rake for preparing the soil (if you have any); |
• |
seed trays and/or small pots in which to sow seeds; |
• |
pots into which to plant (if you are using containers); |
• |
compost for planting up pots and sowing seeds (SEE Compost); |
• |
watering can; |
• |
secateurs for cutting woody stems – for softer, smaller plants kitchen scissors are adequate. |
Plants can get most of their nutrients from the soil, water and air, but sometimes need a little extra. For example, those grown in pots will exhaust the nutrients in the potting compost within a few months, and vegetables are hungry crops, having to do a lot in the short time they have to get to harvestable size, so a little extra nutrition will not go amiss there either. The application of fertilizer to plants is often called ‘feeding’.
Liquid fertilizers are short-term, fast-action and the most expensive way to feed your plants. There are many types available, including multipurpose vegetable and fruit feed, seaweed extract and specific flowering and fruiting fertilizers such as tomato feed. All contain the three main nutrients of nitrogen (N), phosphorus (P) and potassium/kalium (K) in varying ratios. A balanced fertilizer, which is good for regular feeding of container-grown plants, will have these three in roughly equal proportions (look for the N:P:K ratio on the packet) as well as a range of other nutrients. Tomato fertilizers will have a much higher proportion of potassium/kalium, and are good to use once a crop has started to produce flowers and fruit.
Alternatively granular, slower-acting fertilizers are available and these are applied around the base of the plant. Their nutrients are released as the granules dissolve and therefore last longer.
Whether you choose liquid or granular fertilizers, always follow the instructions on the packet, and do not exceed the recommended dosage. You need to apply fertilizer only through the growing season (spring to late summer).
Plants raised (from seed) indoors must be hardened off before they can be put outside; if this is not done, the sudden drop in temperature will be a shock and delay their growth. Acclimatize plants over the course of a week by moving them outside just in the daytime at first, then overnight with a covering of horticultural fleece or newspaper, then finally leave them uncovered at night. They are then ready to plant out (if applicable). Of course if you have a cold frame in which to harden off your plants, this is ideal, and its closable roof replaces the need for fleece or newspaper at night.
Mulch is any kind of organic matter (SEE Organic matter) that is applied over the surface of the soil or around the base of a plant (and ‘mulching’ is its application). Mulches are generally applied annually in spring, to add nutrients, conserve soil moisture and improve soil structure (they will gradually be incorporated into the soil by worms).
Ensure the soil is moist (water it if necessary), then spread a 2–3cm/¾–1¼in-thick layer over the soil, taking care not to let it actually touch the stems or trunks of plants. SEE ALSO Soil.
Organic matter is any kind of plant or animal waste that is used as a mulch or dug into the soil to enrich it. It is not necessarily free from pesticides and herbicides. Before being added to the soil, any organic matter should be well-rotted: for example, horse manure needs to be left for at least a couple of years. When the organic matter is crumbly, dark brown and sweet-smelling it is ready to use.
Unfortunately the animal kingdom does not appreciate that you want to be repaid with a harvest for the investment and effort you put into your crops, and pests will readily come and eat them before you get the chance. However there are a number of things you can do to reduce the risk and limit the damage done by pests.
As with plant diseases, practising good plant hygiene helps keep plants healthy. If they are also watered, fed and otherwise well looked after, they will be strong and better able to withstand attacks by insects such as aphids (blackfly and greenfly). Keeping weeds down also reduces pests’ hiding places.
Watch your plants attentively as you tend them: turn over the leaves and check the undersides; assess their general appearance; and move pots and check under their rims to seek out snoozing slugs (slugs will be on the move at dusk and dawn, and this is the best time to catch them). A pest infestation caught and removed early will save a lot of remedial effort later. Protecting your crops with netting or other structures is not attractive, but sometimes the only way to deter pests. Red fruit is a magnet to birds, and netting your soft fruit plants may be necessary while they are ripening.
Finally get help from nature. A diverse, vibrant patch, with plenty of flowers and different plants, will attract not only the pollinators you need but also insects such as hoverflies and ladybirds, whose larvae feed on aphids. A small pond, if you can make one, could attract frogs and toads, who love to lunch on slugs. Birds will eat snails as well as your fruit, so provide winter food and water for them too.
SEE here for sources of information to deal with specific problems.
Every plant has a Latin name that is unique to it. Many also have a common name, but these vary so much across regions and countries that it would be difficult to know whether you were buying the plant you actually wanted. The only way to be sure is to check its Latin name. To use Latin names you do not require an in-depth understanding of the naming system. Just be aware that all plant names have two parts (genus and species), and then potentially a variety (or cultivar, short for cultivated variety) name as well. For example, Lavandula angustifolia is the two-part name for the type of lavender that is delicious in shortbread (SEE here). If you asked for just ‘lavender’, you could end up with Lavandula stoechas, which is poisonous. Then, if you wanted a particularly compact plant, you might want to get the cultivar ‘Hidcote’, so you would therefore need Lavandula angustifolia ‘Hidcote’.
Fruit and vegetables are the exception to this rule – all have Latin names of course, but the common names are much more widely used. Here too there are many different varieties, but they are generally sold as, for example, apple ‘Bramley’s Seedling’ rather than Malus domestica ‘Bramley’s Seedling’.
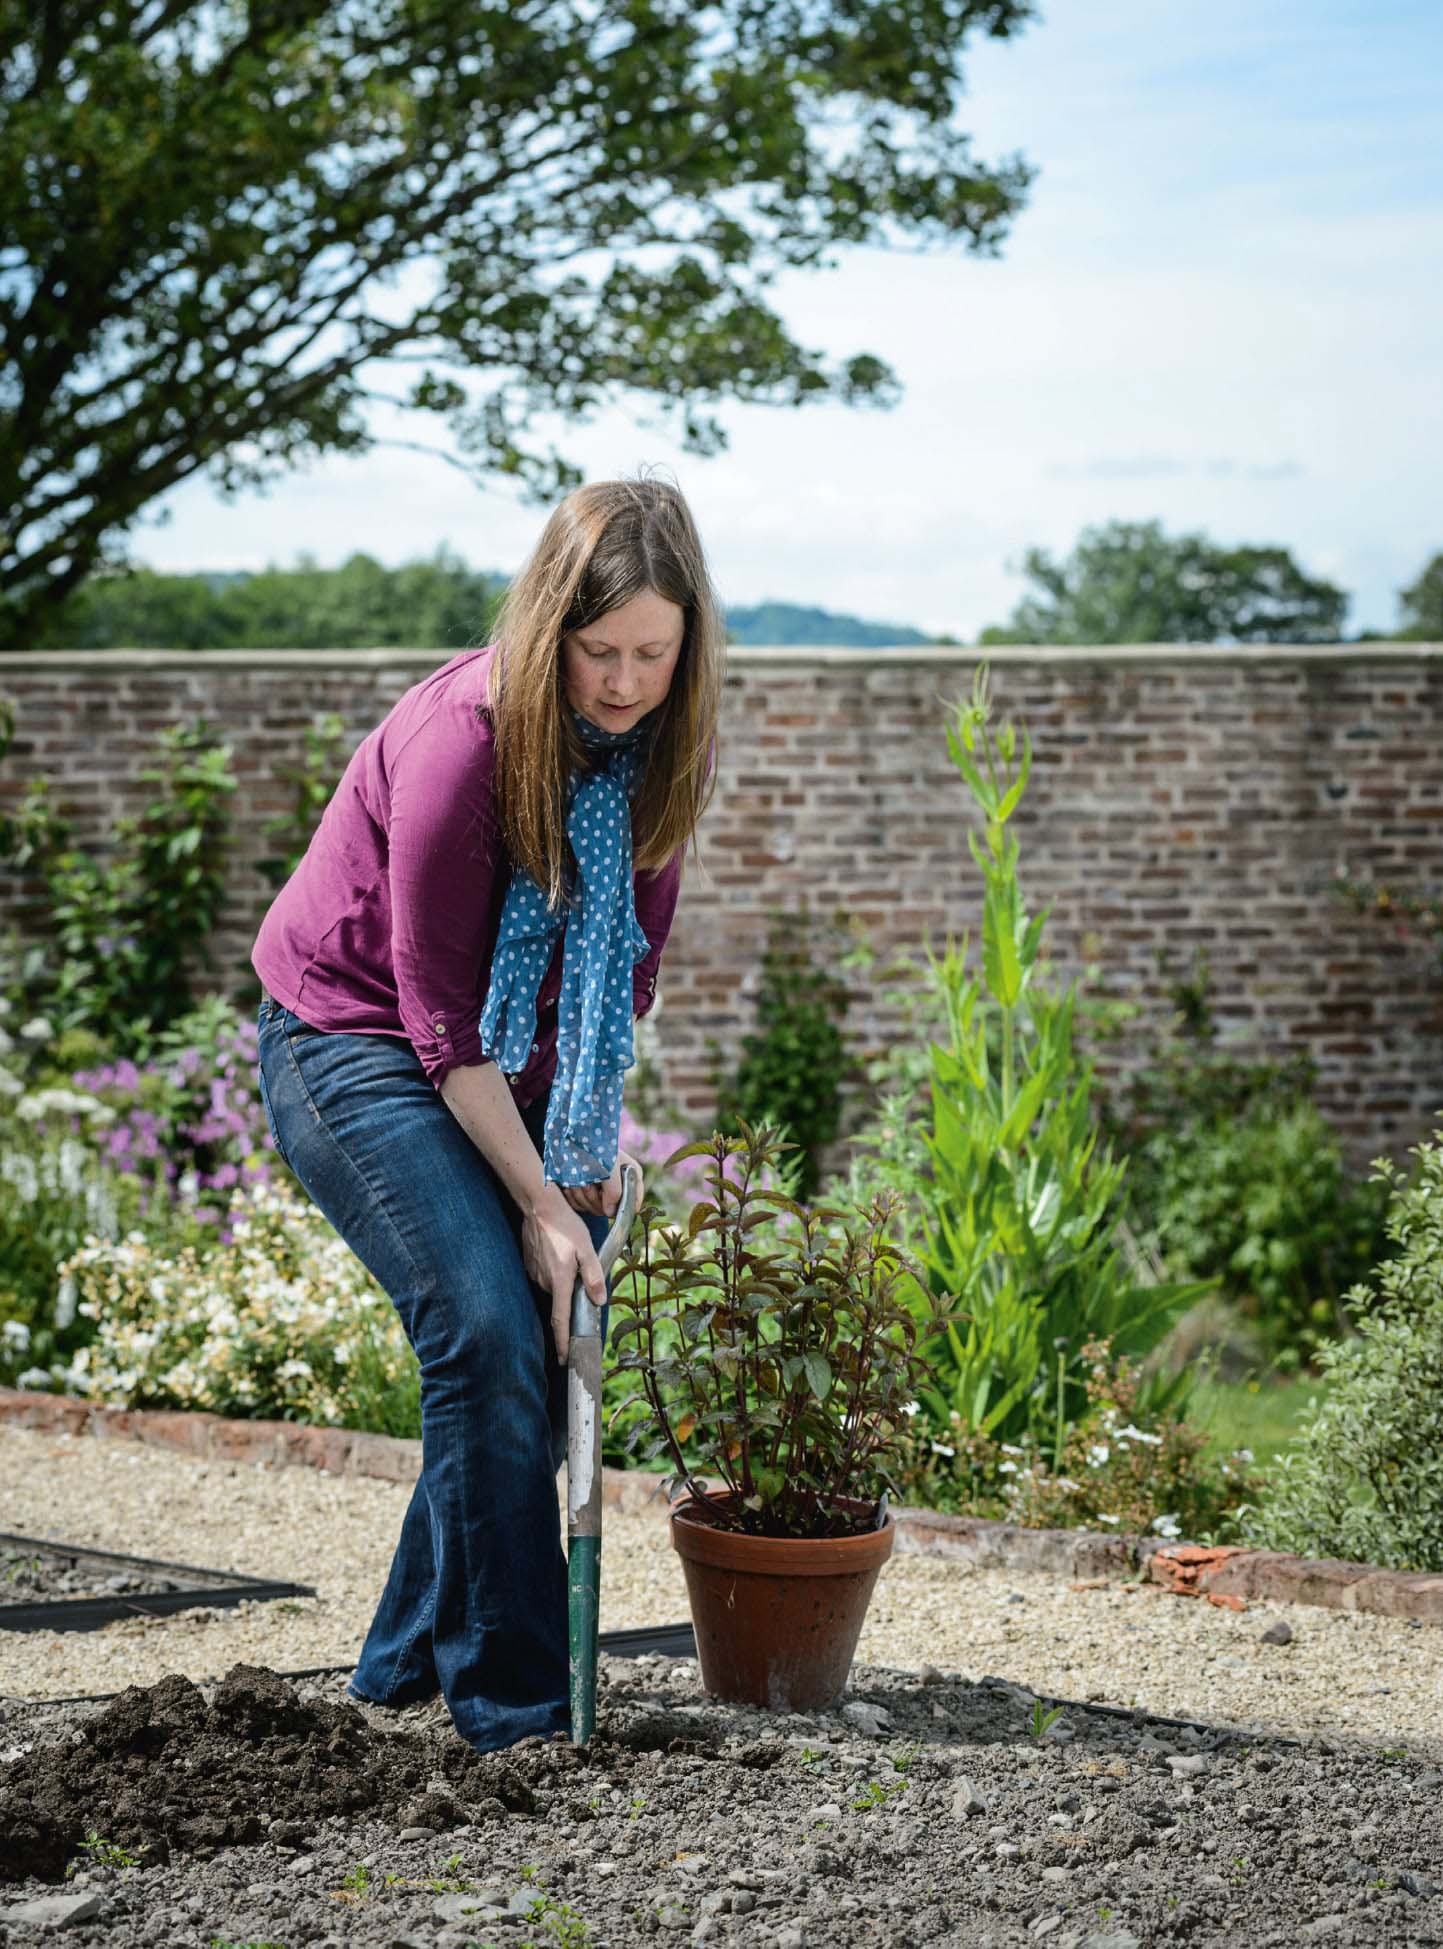
When planting a tree, shrub or other type of plant into the ground, follow the same steps regardless of its size and whether it is bare-root or potted.
Planting is best done in spring and autumn, when the soil is warm and there is usually plenty of rain. Be prepared to water (perhaps even twice daily) anything planted in hot weather. It is also possible to plant in winter, but the plants are generally dormant, and will not put on much root or shoot growth until spring.
Prepare the soil thoroughly before planting by digging over the area (a radius of 50cm/20in from where the plant will go if you can) to relieve any compaction and enable the roots to spread easily through the soil. You get only one chance to do this, so do it well. Do not turn the soil over more than you have to; just break up the clods and remove any weeds (a garden fork is often better than a spade for this). Then dig the hole for the plant. It should be the same depth as the root ball on the plant, so that the crown is flush with soil level, and the planting hole should be twice as wide as the root ball. Use a fork to break up the soil in the bottom of the hole. Water the bottom of the hole (with a full large watering can). Put the plant in the hole and backfill around it, firming it in quite vigorously. You should not be able to pull it out of the soil if you give the stem a quick tug. Water the plant again (this will also help to bed it in), and spread some mulch (SEE Mulch) around the base.
Until the plant is able to grow new roots into the soil in search of water and food, it is reliant on what it can take up from the root ball – it is therefore still essentially in a pot. Water it frequently for at least two weeks, until it shows signs of significant new growth, indicating it has also put out new roots. Continue to keep an eye on the plant in hot weather though.
SEE ALSO Planting out.
Planting out is the term used to describe the steps by which young (plug) plants, raised from seed (usually indoors) and hardened off, are planted out into the ground or larger pots outside. Water the plugs before planting. Prepare and rake the soil (SEE Digging), then use a trowel to dig a small hole for the plant. Put it into the hole so the top of the plug-shaped root ball is at soil level, and firm the soil around it. Take care not to press down directly around the stem. Water in well.
SEE ALSO Planting.
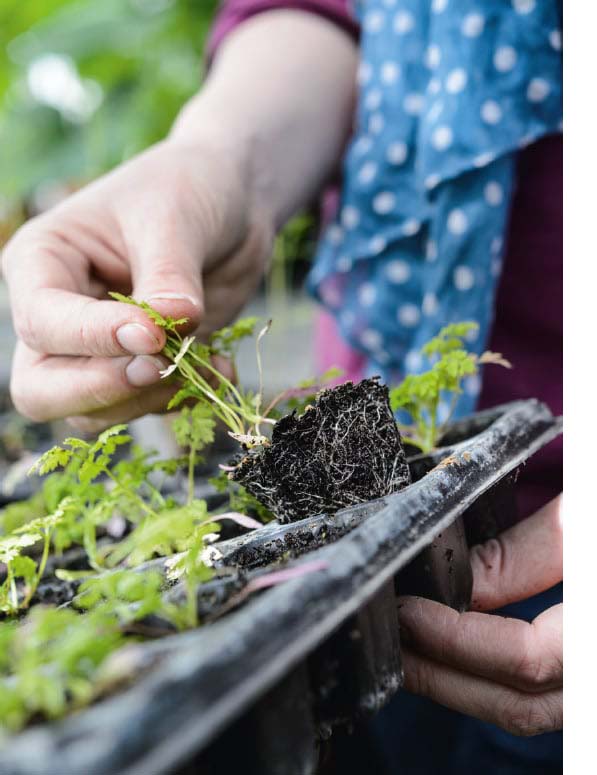
Plug plants (also known as module-grown or module plants) are young seedlings raised in a modular tray (SEE Sowing seeds), resulting in a plug-shaped root ball. Individual plug seedlings are much easier to plant than seedlings sown all in one tray. To remove a plug plant from its tray, hold a leaf – never the delicate stem – between thumb and forefinger. Use the other hand to squeeze the plastic cell around the root ball (or push up through the cell hole in the base of a polystyrene tray), thereby loosening the plug plant. Then plant it into a larger pot or plant it outside (SEE Planting out).
When buying fruit trees, it is important to choose the right pollination group. Different varieties flower at varying times, and unless self-fertile each fruit tree needs to be pollinated by a nearby tree that is also in flower. Each type of fruit has its varieties divided into pollination groups depending on when it blossoms – the group number should be supplied on the label. Make sure you choose trees from the same or adjacent groups.
Plants grown in pots will need more attention than those in the ground, but do enable those without a garden to grow something of their own. A few simple steps will safeguard your plant’s success:
• |
Always choose the largest pot you can to give each plant as much space as possible to spread its roots and shoots, and to minimize the time you have to spend watering it. |
• |
Check that there is good drainage at the base of the pot, to prevent the roots drowning in soggy compost. Provided it is well-drained, you do not need to add crocks (broken up old pots) or stones or gravel to the bottom of the container. If you can raise the pot off the ground with little pot ‘feet’ this will also help. |
• |
Use good-quality, multipurpose potting compost (SEE Compost), and mix in horticultural grit at a ratio of 1:3 for plants that need very good drainage (e.g. rosemary and lavender). |
• |
Water regularly, and check if the pot requires watering daily (or even twice daily for small pots in a hot, sunny spot). SEE Watering. |
• |
Fertilize the plant regularly through the growing season (from spring to late summer). SEE Fertilizers. |
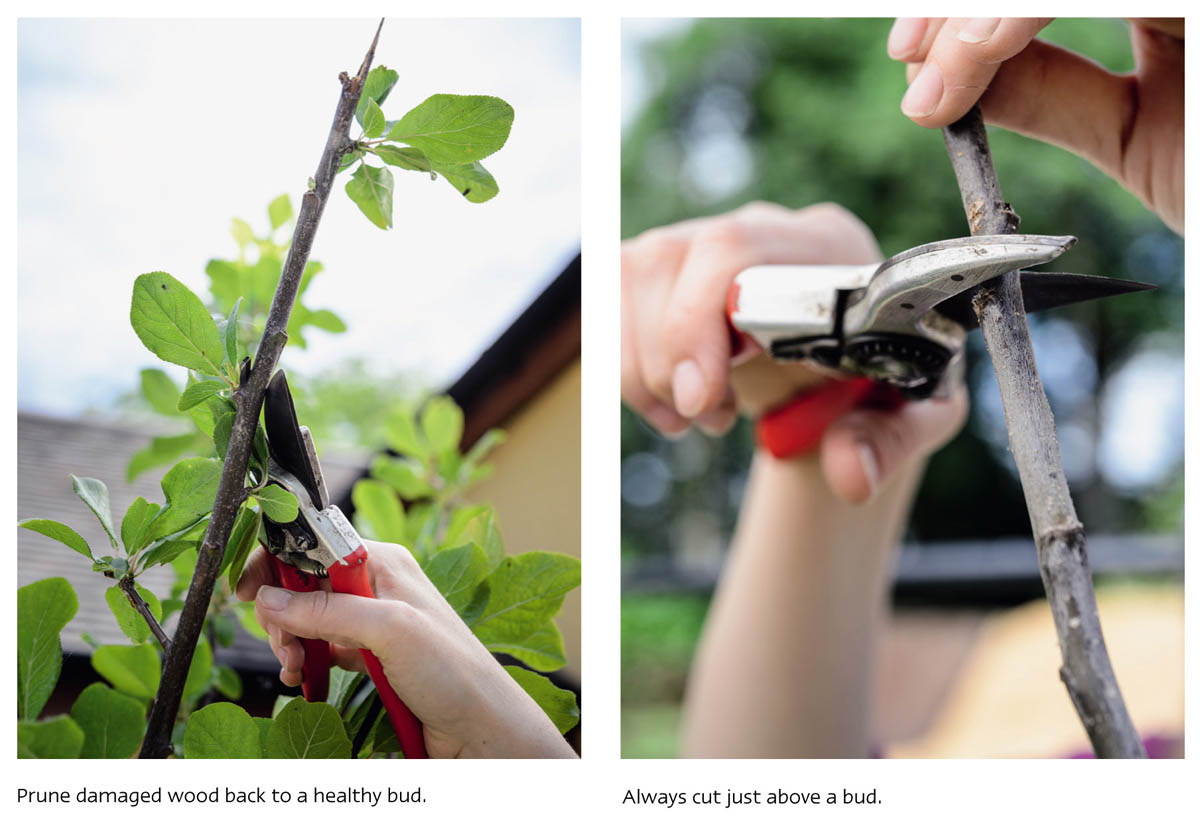
Pruning is the removal of unwanted branches from a shrub or tree. It is carried out once or twice a year to restrict the size of the plant, to remove dead or damaged wood, and to promote particular growth habits, flowering and fruiting. All pruning follows the same principles:
• |
Use sharp, clean secateurs, loppers or a saw, and the appropriate tool for the size of the branch. |
• |
Cut just above a bud; never leave a bud-less stub, as this will die back, look ugly and be more susceptible to disease, which might then spread to the rest of the tree/shrub. |
• |
Remove the 3Ds before taking out any other branches: the Dead, Diseased and Dying branches. Cut these back to healthy growth. |
• |
Look for the fourth D: Duplicates. Are there two branches growing in the same direction very close to one another? One of them should come out. What about crossing branches? Remove anything that is not within the framework you are after (bearing in mind the points below). |
• |
Look twice, cut once. You cannot stick a branch back on again, so be sure it is the right one to remove. |
• |
Never cut off more than a quarter to a third of the branches at any one time. |
• |
Prune in the dormant season (when the branches are bare) except for cherries and plums (which are pruned in summer). |
• |
Trained fruit trees and shrubs are also pruned in summer to restrict their growth even further. |
• |
SEE here for sources of more information on pruning. |
This comprises the roots and the compost/soil that sticks to the roots when the plant is taken out of a pot or the ground.
In order to make trees more manageable for gardeners and farmers, fruit trees are actually now two separate plants, grafted together when very young. The grower can therefore choose not only the variety (the top part) but also the rootstock (which determines the tree’s vigour). Some (known as the ‘MM’ rootstocks) also confer some disease resistance to the whole tree as well.
For most garden situations and trained trees a dwarfing or semi-dwarfing rootstock is preferable, such as ‘MM106’ for apples, ‘Quince C’ for pears, ‘Pixy’ for plums and ‘Gisela 5’ for cherries. Check the label on the trees you might buy, or talk to the retailer about what varieties are available on which rootstocks before you make your choice (remembering also to think about the Pollination groups).
In this book a cool-temperate climate is assumed and so:
• |
spring is March, April and May; |
• |
summer is June, July and August; |
• |
autumn is September, October and November; |
• |
winter is December, January and February. |
Early spring is therefore March, mid-spring April and late spring May and so forth.
If you live in a location with different climatic conditions, some seasonal tasks may fall slightly earlier or later than specified here. Use your neighbours’ gardens and vegetable patches as a guide.
Most soil types fall somewhere towards the middle of a spectrum, with pure clay at one end and pure sand at the other. It is useful to know roughly what kind of soil you have as it will better inform how you manage your plants.
To assess your soil, take up a handful (add a little water if it is very dry). If you cannot roll it into a ball and it feels gritty, you have predominantly sandy soil. Sandy soils warm up quickly in spring, and are excellent for root crops such as carrots, which can push easily through the soil. They are well-drained, so will not get waterlogged in wet weather, but will also need more watering (and fertilizer, as the nutrients leach out with the water) in dry spells.
Soil that rolls easily into a ball has a proportion of clay in it. If you can form the ball into a sausage, and then loop the sausage into a ring, you have a high clay soil. The sooner in this process it falls apart the less clay there is. Clay soils retain more nutrients, but also more water and so can get soggy. They are harder to cultivate and tend to stick together in big clods. If you do dig over the soil (SEE Digging), do so in autumn but leave it in its large clods. The frost will break these down over the winter.
No matter what your soil type, it will be improved by the regular addition of copious quantities of organic matter (SEE Organic matter), both dug into the beds and applied as a mulch (SEE Mulch). Over time it is possible to get the loveliest, crumbliest, dark brown, nutrient-rich, well-drained soil there is simply by adding organic matter every year or twice a year.
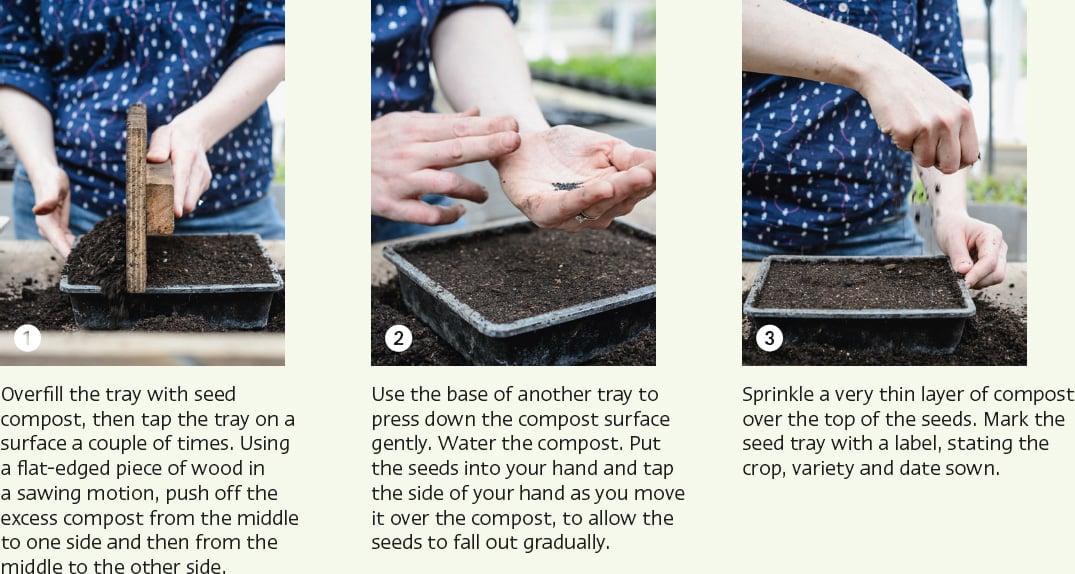
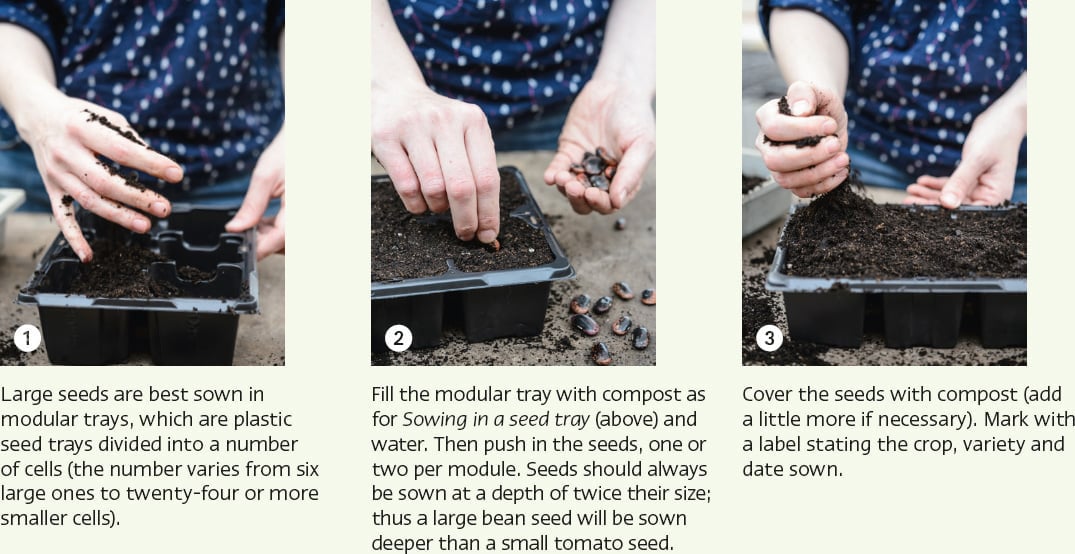
There are two ways to start a plant from seed: sow and raise it in a seed tray, little pot or modular tray under cover before planting out the little seedling; and sow the seed directly into a large pot or the ground where it will grow all season. Raising young plants in pots/trays requires more equipment, time and space (such as a sunny windowsill, or greenhouse if you have got one) than sowing direct. However it means that you can get earlier harvests (as you can start frost-tender plants indoors long before they would be able to be sown outside), and you put out only successful young plants. Direct sowing can result in patchy rows if some of the seed does not come up, and the seedlings are more at the mercy of the variable weather and pests, but is the only option for some seeds such as root crops like carrots. However and wherever the seeds were sown, once they are in the soil/compost, keep it consistently moist (but not damp), and preferably warm. Germination rates vary between crops – check the seed packet for this and more sowing information.
SEE ALSO Compost, Digging, Plug plants, Successional sowing, Watering.
With many crops, the harvest can be spread over the season by sowing in small batches over a number of weeks. Rather than sowing at calendar-based intervals, wait until the first seedlings have four leaves before sowing again. Refer to the seed packet for the months you can sow in, and take full advantage of that range.
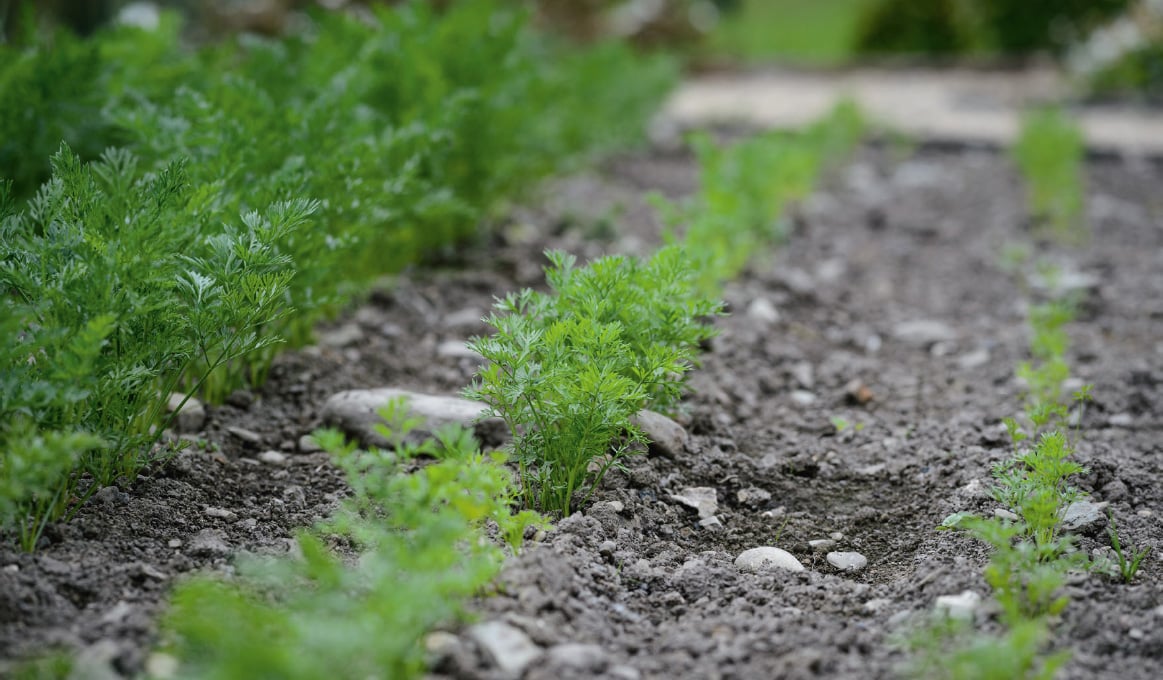
Carrots can be sown successionally.
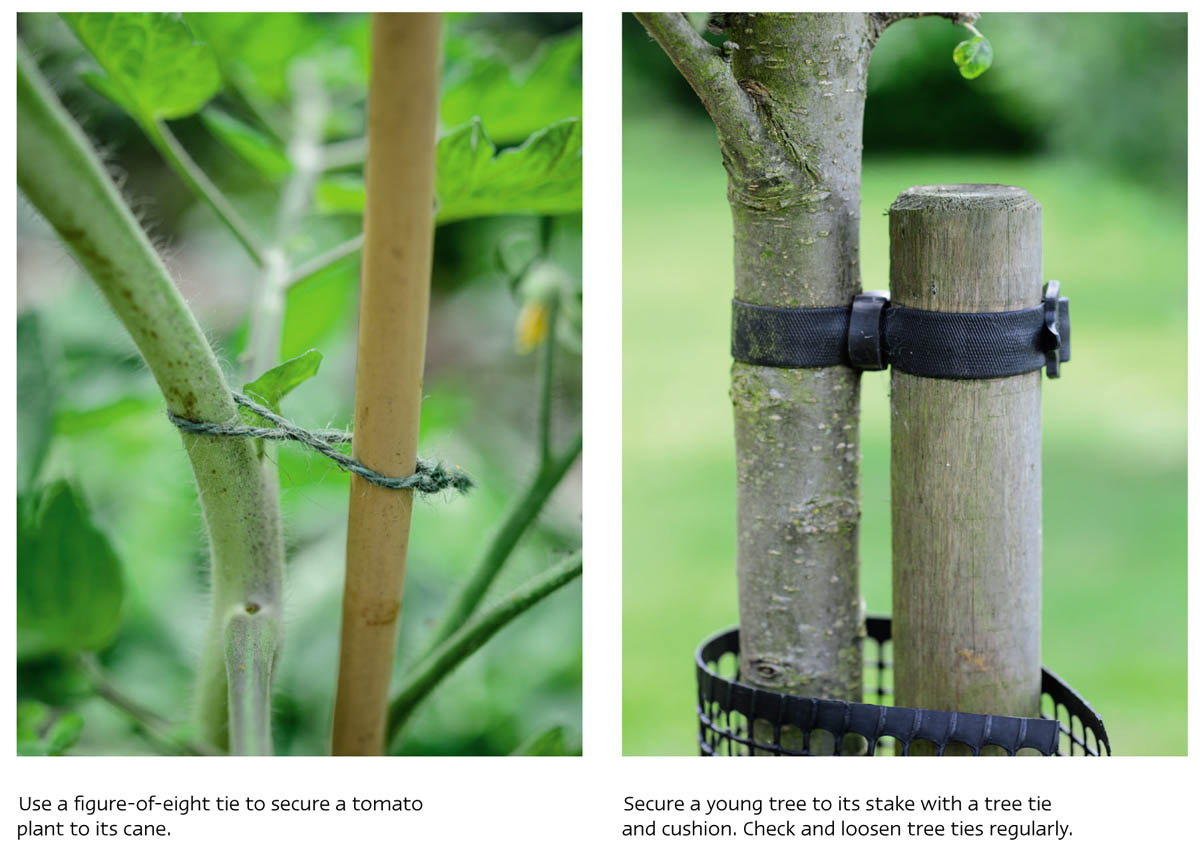
Climbing beans are best allowed to twine up a wigwam made from bamboo canes or hazel stakes. Tie each young fruit tree and other tall, thin plants to a long and sturdy bamboo cane/hazel stake using a figure-of-eight tie: one loop should go around the stem and the other one around the cane, always tying off against the cane not the plant. Larger trees, while they are establishing (around two years), may need a thicker stake for support. Before you plant the tree hammer this in securely, 5–10cm/2–4in from the trunk, so that the prevailing wind will blow the tree away from the stake. Use a tree tie with a cushion to secure the stake and tree together, and check it every couple of months to see if the tie needs loosening.
Secure bushy plants that need some support, such as chillies, using the three-loop method. Insert a central cane and tie one end of the twine to it. Then mentally divide the plant branches into three sections, and loop twine around each section in turn, returning to loop round the cane between each section. Tie off the twine at the cane. Do this about 15cm/6in above soil level when the plant is 30cm/12in tall, and again if necessary at 30cm/12in above soil level once the plant is 40–50cm/16–20in tall.
Sometimes nature is particularly bountiful and provides more than is needed. While it is tempting to leave all the seedlings that germinate, or all the fruit on an apple tree, this will result in a lower-quality harvest, so you need to reduce the number.
Thin the clusters of tiny apples and pears once the plant has already dropped some in late spring; take out the smallest and leave – depending on the size of the tree – two or three fruit per cluster.
Seedlings sown in modular trays should be thinned so that only one seedling per module remains. Pull out any extra seedlings carefully, leaving the strongest-looking one (not necessarily the tallest).
Crops such as carrots and beetroot that are drill sown will also require excess roots removed to allow the others to develop at the correct spacing. However do not be too hasty in pulling them out. If you wait until all the roots are big enough to be harvested as baby veg, then you can actually use the thinnings (in a root veg tarte Tatin, here) rather than having to throw them away, and you will still get a later harvest of bigger vegetables.
SEE ALSO Sowing seeds.
If you think you do not have space for a fruit tree, think again! There are dwarf forms (sometimes called ballerina trees) that can be grown in relatively small pots, as well as trees that can be trained against a wall or fence. The main training forms and the fruits they are suitable for are:
Training trees and shrubs does take time, and they will also require summer pruning to restrict their growth, but they look very attractive and are surprisingly productive for the space they occupy.
SEE here for sources of information on how to train fruit trees.
Watering is one of the basic tasks of gardening, and one that is so often done badly. The main tenets are these:
There are two types of weed – annual and perennial. Annual weeds germinate fast, grow fast and set seed fast, but are easy to pull out and once they have gone they will not come back, provided they have not had time to set seed. They include plants such as hairy bittercress (Cardamine hirsuta), fat-hen (Chenopodium album) and groundsel (Senecio vulgaris). Perennial weeds live year on year, and all their roots should be removed or they will regrow. Docks (Rumex) and some nettles (Urtica) belong to this group.
Whether annual or perennial, all weeds are best removed with a hand fork to get all the roots out (or even a spade). If you are short of time you could hoe the beds instead, but any perennial weeds will come back again. Always try and get weeds out before they flower, as weed seeds can persist in the soil for many years: as the adage goes, ‘one year’s seed . . . seven years’ weeds’. But also be aware that, even if you bought in sterile, weed-free topsoil for your garden, you will still get weeds, as the seeds are blown in on the wind or dropped by birds.
Weeding is a task best approached piecemeal. When you go to harvest a crop, pull out a few weeds for five minutes. When you pop out for some fresh air, pull out another five minutes’ worth of weeds. This way it never becomes a daunting task that is easy to put off and tough to get through, and the garden stays in good order.

Prepare everything you need in advance for a stress-free baking experience.