CHAPTER 6: Lists Plus
© Repina Valeriya/Shutterstock
This chapter is a combination of both alternative implementations of lists and new theoretical material accompanied by the C++ implementations of the constructs. The chapter begins by describing the C++ template mechanism, which allows the type of the objects within a data structure to be defined at run time. Next, three new implementations of lists are discussed: circular linked lists, doubly linked lists, and lists with headers and trailers.
We then introduce the concepts of shallow copying and deep copying and demonstrate how to force C++ to use deep copying through use of the class copy constructor and overloading the assignment operator. Finally, we show how most of the remaining C++ operators can be overloaded.
Our final linked list implementation uses an array of records rather than pointers. A similar implementation is widely used in operating systems software.
Finally, we explore the C++11 range-based for loop to iterate over built-in data structures and leverage operator overloading to support range-based iteration in our own list-based data structures.
6.1 More About Generics: C++ Templates
In Chapter 3, we defined a generic data type as a type for which the operations are defined, but the types of the items being manipulated are not. We have demonstrated how container types can be generic by defining the type of the items to be on the structure in a separate file called ItemType.h and having the specification files for the containers include that file. This technique works for any language that allows you to include or access other files.
However, some languages have special language constructs that allow you to define generic data types. C++ is one of these. The construct is called a template. A template allows you to write a description of a class type with “blanks” left in the description, to be filled in by the client code. Just as variables are the parameters to functions, types are parameters to templates.
Let’s look at how this construct works using the Stack ADT:
template<class ItemType>
class StackType
{
public:
  StackType();
  bool IsEmpty() const;
  bool IsFull() const;
  void Push(ItemType item);
  void Pop();
  ItemType Top() const;
private:
  int top;
  ItemType items<MAX_ITEMS>;
};
This code is known as a class template. The definition of StackType begins with template<class ItemType>, and ItemType is called the formal parameter to the template. (You could use any identifier for the formal parameter; we use ItemType in this example.) The client program uses code like the following to create several stacks whose components are of different data types:
// Client code
StackType<int> myStack;
StackType<float> yourStack;
StackType<char> anotherStack;

myStack.Push(35);
yourStack.Push(584.39);
anotherStack.Push('A');
In the definitions of myStack, yourStack, and anotherStack, the data type name enclosed in angle brackets is the actual parameter (or argument) of the template. At compile time, the compiler generates (instantiates) three distinct class types and gives its own internal name to each type. You might imagine that the definitions are transformed internally into something like this:
StackType_int myStack;
StackType_flo yourStack;
StackType_char anotherStack;
In C++ terminology, the three new class types are called template classes (as opposed to the class template from which they were created).
When the compiler instantiates a template, it literally substitutes the actual parameter for the formal parameter throughout the class template, just as you would perform a search-and-replace operation in a word processor or text editor. For example, when the compiler encounters StackType<float> in the client code, it generates a new class by substituting float for every occurrence of ItemType in the class template. The result is the same as if we had written the following:
class StackType_float
{
  void Push(float item);
  void Pop();
  float Top() const;
private:
  int top;
  float items<MAX_ITEMS>;
};
A useful perspective on templates is this: An ordinary class definition is a pattern for stamping out individual variables or objects, whereas a class template is a pattern for stamping out individual data types.
There are two things to note about parameters to templates. First, the class template uses the word class in its formal parameter list: template<class ItemType>. However, the use of class is simply required syntax; it does not mean that the client’s actual parameter must be the name of a class. The actual parameter can consist of the name of any data type, whether it is built in or user defined. In the client code just shown, we used int, float, and char as actual parameters. Second, observe that when the client passes a parameter to the StackType template (as in StackType<int>), the parameter is a data type name, not a variable name. This usage seems strange at first because when we pass parameters to functions, we always pass variable names or expressions, not data type names. Furthermore, note that passing a parameter to a template has an effect at compile time, whereas passing a parameter to a function has an effect at run time.
Now that we’ve seen how to write the definition of a class template, how do we handle the definitions of the member functions? We need to write them as function templates so that the compiler can associate each one with the proper template class. For example, we code the Push function as the following function template:
template<class ItemType>
void StackType<ItemType>::Push(ItemType newItem)
{
  if (IsFull())
    throw FullStack();
  top++;
  items<top> = newItem;
}
Just as with the class template, we begin the function definition with template<class ItemType>. Next, every occurrence of the word StackType must have <ItemType> appended to it. If the client has declared a type StackType<float>, the compiler generates a function definition similar to the following:
void StackType<float>::Push(float newItem)
{
  if (IsFull())
    throw FullStack();
  top++;
  items<top> = newItem;
}
Finally, when working with templates, we change the ground rules regarding the files into which we put the source code. Previously, we placed the class definition into a header file StackType.h and the member function definitions into StackType.cpp. As a result, we could compile StackType.cpp into object code independent of any client code. This strategy won’t work with templates. The compiler cannot instantiate a function template unless it knows the actual parameter to the template and this actual parameter appears in the client code. Different compilers use different mechanisms to solve this problem. One general solution is to compile the client code and the member functions at the same time. A popular technique is to place both the class definition and the member function definitions into the same file: StackType.h. Another technique involves giving the include directive for the implementation file at the end of the header file. Either way, when the client code specifies #include "StackType.h", the compiler has all the source code—both the member functions and the client code—available to it at once. The following code lists the contents of both the class definition and the function implementations; pay close attention to the required syntax of the member function definitions:
// The class definition for StackType using templates.

class FullStack
// Exception class used by Push when stack is full.
{};

class EmptyStack
// Exception class used by Pop and Top when stack is empty.
{};

#include "MaxItems.h"
// MaxItems.h must be provided by the user of this class.
// This file must contain the definition of MAX_ITEMS,
// the maximum number of items on the stack.

template<class ItemType>
class StackType
{
  public: StackType();
  bool IsEmpty() const;
  bool IsFull() const;
  void Push(ItemType item);
  void Pop();
  ItemType Top() const;
private:
  int top;
  ItemType items<MAX_ITEMS>;
};

// The function definitions for class StackType.
template<class ItemType> StackType<ItemType>::StackType()
{
  top = -1;
}

template<class ItemType>
bool StackType<ItemType>::IsEmpty() const
{
  return (top == -1);
}

template<class ItemType>
bool StackType<ItemType>::IsFull() const
{
  return (top == MAX_ITEMS-1);
}

template<class ItemType>
void StackType<ItemType>::Push(ItemType newItem)
{
  if (IsFull())
    throw FullStack();
  top++;
  items<top> = newItem;
}

template<class ItemType>
void StackType<ItemType>::Pop()
{
  if (IsEmpty())
    throw EmptyStack();
  top--;
}

template<class ItemType>
ItemType StackType<ItemType>::Top()
{
  if (IsEmpty())
     throw EmptyStack();
  return items<top>;
}
6.2 Circular Linked Lists
The linked list data structures that we implemented in Chapters 3–5 are characterized by a linear (line-like) relationship between the elements: Each element (except the first) has a unique predecessor, and each element (except the last) has a unique successor. Using linear linked lists does present a problem: Given a pointer to a node anywhere in the list, we can access all the nodes that follow it, but none of the nodes that precede it. With a singly linked linear list structure (i.e., a list whose pointers all point in the same direction), we must always have a pointer to the beginning of the list in order to access all the nodes in the list.
In addition, the data we want to add to a sorted list may already be in order. Sometimes people manually sort raw data before turning it over to a data entry clerk. Likewise, data produced by other programs are often in some order. Given a Sorted List ADT and sorted input data, we always insert new items at the end of the list. It is ironic that the extra work done manually to order the data ahead of time actually increases the time to insert the data in order.
We can, however, change the linear list slightly, making the pointer in the next member of the last node point back to the first node instead of containing NULL (Figure 6.1). Now our list becomes a circular linked list rather than a linear linked list. We can start at any node in the list and traverse the entire list. If we let our external pointer point to the last item in the list rather than the first, we have direct access to both the first and the last elements in the list (Figure 6.2). listData->info references the item in the last node, and listData-> next->info references the item in the first node. We mentioned this type of list structure in Chapter 5, when we discussed circular linked queues.
We do not need to change any of the declarations in the class SortedType to make the list circular rather than linear. After all, the members in the nodes are the same; only the value of the next member of the last node has changed. How does the circular nature of the list alter the implementations of the list operations? Because an empty circular list has a NULL pointer, the IsEmpty operation does not change at all. However, using a circular list requires an obvious change in the algorithms that traverse the list. We no longer stop when the traversing pointer becomes NULL. Indeed, unless the list is empty, the pointer never becomes NULL. Instead, we must look for the external pointer itself as a stop sign. Let’s examine these changes in the Sorted List ADT.

Figure 6.1 A circular linked list

Figure 6.2 Circular linked lists with the external pointer pointing to the rear element
Finding a List Item
The GetItem, PutItem, and DeleteItem operations all require a search of the list. Rather than rewriting each of these with minor variations, let’s write a general FindItem routine that takes item as a parameter and returns location, predLoc, and found. PutItem and DeleteItem need the location of the predecessor node (predLoc); GetItem can just ignore it.
In the linear list implementation, we searched the list using a pair of pointers, location and predLoc. (Remember the inchworm from Chapter 4?) We modify this approach slightly for the circular list. In the linear list version, we initialized location to point to the first node in the list and set predLoc to NULL (Figure 6.3a). For the circular list search, we initialize location to point to the first node and predLoc to point to its “predecessor”—the last node in the list (Figure 6.3b).
The search loop executes until (1) a key greater than or equal to the item’s key is encountered, or (2) we reach the end of the list. In a linear list, the end of the list is detected when location equals NULL. Because the external pointer to the list points to the last element, we know that we have processed all of the items without finding a match when location points to the first element again: location = listData->next. Because it makes no sense to search an empty list, let’s make it a precondition that the list is not empty.

Figure 6.3 Initializing for FindItem
Following the execution of the loop, if a matching key is found, location points to the list node with that key and predLoc points to its predecessor in the list (Figure 6.4a). Note that if item’s key is the smallest key in the list, then predLoc points to its predecessor—the last node in the circular list (Figure 6.4b). If item’s key is not in the list, then predLoc points to its logical predecessor in the list and location points to its logical successor (Figure 6.4c). Notice that predLoc is correct even if item’s key is greater than any element in the list (Figure 6.4d). Thus, predLoc is set correctly for inserting an element whose key is larger than any currently in the list.

Figure 6.4 The FindItem operation for a circular list
The following C++ code implements our FindItem algorithm as a function template. Notice two things in the function heading. First, NodeType was defined in Chapter 5 as a struct; here, it must be a struct template. So each declaration using NodeType must include an actual parameter (the name of a data type) in angle brackets. For example, listData is declared in the code to be of type NodeType<ItemType>* and not simply NodeType*. Second, observe the syntax for the declarations of location and predLoc. You see an asterisk (*) and an ampersand (&) next to each other. Although this syntax may look strange at first, it is consistent with the usual way that we indicate passing-by-reference: Place an & after the data type of the parameter. Here, we place an & after the data type NodeType<ItemType>*, which is a pointer to a node:
template<class ItemType>
void FindItem(NodeType<ItemType>* listData, ItemType item,
                       NodeType<ItemType>*& location,
                       NodeType<ItemType>*& predLoc, bool& found)
// Assumption:  ItemType is a type that has a ComparedTo function.
// Pre:   List is not empty.
// Post:  If there is an element someItem whose key matches item's
//        key, then found = true; otherwise, found = false.
//        If found, location contains the address of someItem and
//        predLoc contains the address of someItem's predecessor;
//        otherwise, location contains the address of item's logical
//        successor and predLoc contains the address of item's
//        logical predecessor.
{
  bool moreToSearch = true;

  location = listData->next;
  predLoc = listData;
  found = false;
  while (moreToSearch && !found)
  {
    if (item.ComparedTo(location->info) == LESS)
      moreToSearch = false;
    else if (item.ComparedTo(location->info) == EQUAL)

      found = true;
    else
    {
      predLoc = location;
      location = location->next;
      moreToSearch = (location != listData->next);
    }
  }
}
Note that FindItem is not a member function of the class SortedType. Rather, it is an auxiliary or “helper” operation, hidden within the implementation, that is used by SortedType member functions.
Inserting Items into a Circular List
The algorithm to insert an element into a circular linked list is similar to that for the linear list insertion:
The task of allocating space is the same as that carried out for the linear list. We allocate space for the node using the new operator and then store item into newNode->info. The next task is equally simple; we just call FindItem:
FindItem(listData, item, location, predLoc, found);
Of course, we do not find the element because it isn’t there; it is the predLoc pointer that interests us. The new node is linked into the list immediately after Node(predLoc). To put the new element into the list, we store predLoc->next into newNode->next and newNode into predLoc->next.
Figure 6.5(a) illustrates the general case. What are the special cases? First, we have the case of inserting the first element into an empty list. In this case, we want to make listData point to the new node and to make the new node point to itself (Figure 6.5b). In the insertion algorithm for the linear linked list, we also had a special case when the new element key was smaller than any other key in the list. Because the new node became the first node in the list, we had to change the external pointer to point to the new node. The external pointer to a circular list, however, doesn’t point to the first node in the list—it points to the last node. Therefore, inserting the smallest list element is not a special case for a circular linked list (Figure 6.5c). However, inserting the largest list element at the end of the list is a special case. In addition to linking the node to its predecessor (previously the last list node) and its successor (the first list node), we must modify the external pointer to point to Node(newNode)—the new last node in the circular list (Figure 6.5d).

Figure 6.5 Inserting into a circular linked list
The statements to link the new node to the end of the list are the same as those for the general case, plus the assignment of the external pointer, listData. Rather than checking for this special case before the search, we can treat it along with the general case: Search for the insertion place and link in the new node. Then, if we detect that we have added the new node to the end of the list, we reassign listData to point to the new node. To detect this condition, we compare item to listData->info.
The resulting implementation of PutItem is shown here:
template<class ItemType>
void SortedType<ItemType>::PutItem(ItemType item)
{
  NodeType<ItemType>* newNode; NodeType<ItemType>* predLoc;
  NodeType<ItemType>* location; bool found;

  newNode = new NodeType<ItemType>;
  newNode->info = item;
  if ((listData->info.ComparedTo(item)==LESS
  {
    FindItem(listData, item, location, predLoc, found);
    newNode->next = predLoc->next;
    predLoc->next = newNode;

    // If this is the last node in the list, reassign listData.
    if (listData->info.ComparedTo(item)==LESS
      listData = newNode;
  }
  else  // Inserting into an empty list.
  {
    listData = newNode;
    newNode->next = newNode;
  }
  length++;
}
Deleting Items from a Circular List
To delete an element from the circular linked list, we use the same general algorithm that we developed for the linear list:
For the first task, we use FindItem. After the return from FindItem, location points to the node that we wish to delete, and predLoc points to its predecessor in the list. To remove Node(location) from the list, we simply reset predLoc->next to jump over the node that we are deleting. That works for the general case, at least (see Figure 6.6a).
What kind of special cases do we have to consider? In the linear list version, we had to check for deleting the first (or first and only) element. From our experience with the insertion operation, we might surmise that deleting the smallest element (the first node) of the circular list is not a special case; Figure 6.6b shows that guess to be correct. However, deleting the only node in a circular list is a special case, as we see in Figure 6.6c. The external pointer to the list must be set to NULL to indicate that the list is now empty. We can detect this situation by checking whether predLoc equals location after the execution of FindItem; if so, the node that we are deleting is the only one in the list.
We might also guess that deleting the largest list element (the last node) from a circular list is a special case. As Figure 6.6d illustrates, when we delete the last node, we first do the general-case processing to unlink Node(location) from the list, then we reset listData to point to its predecessor, Node(predLoc). We can detect this situation by checking whether location equals listData after the search:
template<class ItemType>
void SortedType<ItemType>::DeleteItem(ItemType item)
{
  NodeType<ItemType>* location;
  NodeType<ItemType>* predLoc;
  bool found;

  FindItem(listData, item, location, predLoc, found);
  if (predLoc == location)  // Only node in list?
    listData = NULL;
  else

Figure 6.6 Deleting from a circular linked list
  {
    predLoc->next = location->next;
    if (location == listData)  // Deleting last node in list?
      listData = predLoc;
  }
  delete location;
  length--;
}
Having worked through a number of the list operations in detail, we leave the circular implementation of the other Sorted List ADT operations as a programming assignment. None of the operations that we have looked at so far has become shorter or much simpler when the implementation changed to a circular list. Why, then, might we want to use a circular, rather than a linear, linked list? Circular lists are useful for applications that require access to both ends of the list. (The circular linked version of the queue in Chapter 5 is a good example of this scenario.)
6.3 Doubly Linked Lists
As noted previously, we can use circular linked lists to reach any node in the list from any starting point. Although this structure offers advantages over a simple linear linked list, it remains too limited for certain types of applications. Suppose that we want to delete a particular node in a list, given only a pointer to that node (location). This task involves changing the next member of the node preceding Node(location). As we saw in Chapter 5, however, given only the pointer location, we cannot access its predecessor in the list.
Another task that is difficult to perform on a linear linked list is traversing the list in reverse. For instance, suppose that we have a list of student records sorted by grade point average (GPA), from lowest to highest. The dean of students might want a printout of the students’ records, sorted from highest to lowest, to use in preparing the Dean’s List.
In such a case, where we need to access the node that precedes a given node, a doubly linked list is useful. In a doubly linked list, the nodes are linked in both directions. Each node of a doubly linked list contains three parts:
Info: The data stored in the node
Next: The pointer to the following node
Back: The pointer to the preceding node
Figure 6.7 depicts a linear doubly linked list. Note that the back member of the first node, as well as the next member of the last node, contains a NULL. The following definition might be used to declare the nodes in such a list:

Figure 6.7 A linear doubly linked list
template<class ItemType>
struct NodeType
{
  ItemType info;
  NodeType<ItemType>* next;
  NodeType<ItemType>* back;
};
Using this definition, let’s write the member functions PutItem and DeleteItem using the auxiliary function FindItem.
Finding an Item in a Doubly Linked List
In the FindItem function, we no longer need to use the inchworm search; instead, we can get the predecessor to any node through its back member. We change the FindItem interface slightly. That is, because we no longer need predLoc, we return one pointer, location. If found is true, location points to the node with the same key as item; otherwise, location points to the node that is the logical successor of item. (Recall that FindItem is a function template.)
template<class ItemType>
void FindItem(NodeType<ItemType>* listData, ItemType item,
     NodeType<ItemType>*& location, bool& found)
// Assumption:  ItemType is a type that has a ComparedTo function.
// Pre:  List is not empty.
// Post: If there is an element someItem whose key matches item's
//       key, then found = true; otherwise, found = false.
//       If found, location contains the address of someItem;
//       otherwise, location contains the address of the logical
//       successor of item.
{
  bool moreToSearch = true;

  location = listData;
  found = false;
  while (moreToSearch && !found)
  {
    if (item.ComparedTo(location->info) == LESS)

      moreToSearch = false;
    else if (item.ComparedTo(location->info) == EQUAL)
      found = true;
    else
    {
      location = location->next;
      moreToSearch = (location != NULL);
    }
  }
}
Operations on a Doubly Linked List
The algorithms for the insertion and deletion operations on a doubly linked list are somewhat more complicated than the corresponding operations on a singly linked list. The reason is clear: There are more pointers to keep track of in a doubly linked list.
As an example, consider the PutItem operation. To link the new node, Node(newNode), after a given node, Node(location), in a singly linked list, we need to change two pointers: newNode->next and location->next (see Figure 6.8a). The same operation on a doubly linked list requires four pointer changes (see Figure 6.8b).
We allocate space for the new node and call FindItem to find the insertion point:
FindItem(listData, item, location, found);
After the return from FindItem, location points to the node that should follow the new node. Now we are ready to link Node(newNode) into the list. Because of the complexity of the operation, you must be careful about the order in which you change the pointers. For instance, when inserting Node(newNode) before Node(location), if we change the pointer in location->back first, we lose our pointer to Node(location)’s predecessor. Figure 6.9 shows the correct order for the pointer changes.
We do have to be careful about inserting an item into an empty list, as it is a special case.
One useful feature of a doubly linked list is its elimination of the need for a pointer to a node’s predecessor to delete the node. Through the back member, we can alter the next member of the preceding node to make it jump over the unwanted node. Then we make the back pointer of the succeeding node point to the preceding node:

Figure 6.8 Insertions into singly and doubly linked lists

Figure 6.9 Linking the new node into the list

Figure 6.10 Deleting from a doubly linked list
We do, however, have to be careful about the end cases. If location->back is NULL, we are deleting the first node; if location->next is NULL, we are deleting the last node. If both location->back and location->next are NULL, we are deleting the only node. Figure 6.10 illustrates this operation.
We leave the coding of SortedType as a programming assignment.
6.4 Linked Lists with Headers and Trailers
In writing the insertion and deletion algorithms for all implementations of linked lists, we see that special cases arise when we are dealing with the first node or the last node. One way to simplify these algorithms is to ensure that we never insert or delete items at the ends of the list.
How can this goal be accomplished? Recall that the elements in a sorted linked list are arranged according to the value in some key—for example, numerically by identification number or alphabetically by name. If we can determine the range of possible values for the key, it is often a simple matter to set up dummy nodes with values outside of this range. We can place a header node, containing a value smaller than any possible list element key, at the beginning of the list. We can place a trailer node, containing a value larger than any legitimate element key, at the end of the list.

Figure 6.11 An “empty” list with a header and a trailer
The header and the trailer are regular nodes of the same type as the real data nodes in the list. They have a different purpose, however; instead of storing list data, they act as placeholders.
If a list of students is sorted by last name, for example, we might assume that there are no students named “AAAAAAAAAA” or “ZZZZZZZZZZ.” We could, therefore, initialize our linked list to contain header and trailer nodes with these values as the keys. See Figure 6.11. How can we write a general list algorithm if we must know the minimum and maximum key values? We can use a parameterized class constructor and let the user pass as parameters elements containing the dummy keys. Alternatively, we can just leave the keys undefined and start the search with the second node in the list.
6.5 Copy Structures
In this section, we reverse the usual order of presentation. We show an example of a problem, and then we give the solution to the general problem. Let’s look at an example where a client of the Stack ADT needs a CopyStack operation:
The client has access to all public member functions of StackType but cannot access any of the private data members. To make a copy of a stack, we must take all the items off oldStack and store them in a temporary stack. We can then copy the temporary stack back into copy:
template<class ItemType>
void CopyStack(StackType<ItemType> oldStack,
               StackType<ItemType>& copy)
{
  StackType<ItemType> tempStack;
  ItemType item;

  while (!oldStack.IsEmpty())
  {
    item = oldStack.Top(); oldStack.Pop(); tempStack.Push(item);
  }

  // oldStack is now empty; tempStack is the reverse of oldStack.
  while (!tempStack.IsEmpty())
  {
    item = tempStack.Top();
    tempStack.Pop();
    copy.Push(item);
  }
}
This situation seems quite straightforward. We realize that oldStack is empty because all of the items have been popped, but because oldStack is a value parameter, the original stack is not affected—right? Wrong! If the static, array-based implementation of StackType is used, this function works correctly. The array is physically located within a class object. The class object is copied into the value parameter oldStack, and the original object is protected from change. But what happens if we use the dynamically linked implementation? The external pointer to the stack is copied into oldStack and is not changed, but the items to which it points change; they are not protected. See Figure 6.12.

Figure 6.12 Stack is a value parameter
Can’t we solve this problem by copying tempStack back into oldStack? Let’s consider the code for the Push operation and see what happens in the linked implementation. The first item is pushed onto the stack, and its address is stored into the data member topPtr of the parameter oldStack. As each successive item is placed on the stack, its address is stored into data member topPtr. Therefore, the topPtr data member of oldStack should contain the address of the last item put onto the stack, which is what we want. Because the stack is passed by value, however, only the copy of the external pointer to the stack (data member topPtr of oldStack) is passed to the function; the original pointer does not change. We have re-created the stack, but its external pointer is not transmitted back to the calling code.
Two solutions to this problem are possible: We can make the first parameter a reference parameter and re-create the stack, or we can provide a copy constructor, as described in the next section.
Shallow Versus Deep Copies
The problem described in the previous section occurred because when a class object is passed by value, a shallow copy of the parameter is made. With a shallow copy, only the data members in the parameter are copied. In the case of CopyStack, only a copy of the external pointer to the stack was passed as the parameter. When pointers are involved, we need a deep copy—one where the data members of the parameter and everything to which the data members point are copied. Figure 6.13 shows the difference.
If the calling code passes an actual parameter callerStack to the CopyStack function, a shallow copy causes the data member callerStack.topPtr to be copied into oldStack.topPtr. Both pointers now point to the same linked structure (Figure 6.13a). When the CopyStack function removes the items from the stack, it destroys the caller’s stack! What we want is a deep copy of the stack so that CopyStack works with an identical but separate copy of the caller’s stack (Figure 6.13b). In this case, the caller’s stack remains unchanged by any manipulations within the function.
Class Copy Constructors
C++ uses shallow copying in the following cases: passing parameters by value, initializing a variable in a declaration (StackType myStack = yourStack;), returning an object as the value of a function (return thisStack;), and implementing the assignment operation (stack1 = stack2;). Again, because of the active stance of a class object, C++ supports another special class operation called the copy constructor, which we will describe shortly. If present, the copy constructor is used implicitly when a class object is passed by value, when a class object is initialized in a declaration, and when an object is a function return value.

Figure 6.13 Shallow copy versus deep copy of a stack
What about the assignment operation? If you want to assign one object to another using a deep copy, you have to write a member function to perform the deep copy and explicitly invoke it rather than use the assignment operator, or overload the assignment operator. We discuss the first alternative in this section and the second alternative in the next section.
The copy constructor has a special syntax. Like the class constructor and destructor, it has no return type, just the class name:
template <class ItemType>
class StackType
{
public:
  .
  .
  // Copy constructor.
  StackType(const StackType<ItemType>& anotherStack);
  .
  .
};
The pattern that signals a copy constructor is the single reference parameter of the class type. The reserved word const protects the parameter from being altered even though it is passed by reference. Because the copy constructor is a class member function, the implementation has direct access to the class data. To copy a linked structure, we must cycle through the structure one node at a time, making a copy of the node’s content as we go. Therefore, we need two running pointers: one pointing to successive nodes in the structure being copied and one pointing to the last node of the new structure. Remember that in the deep copy of a linked structure, the info members are the same but the next members are not. In writing the algorithm, we must be sure to take care of the case where the stack being copied is empty:
Notice that our algorithm avoids using an extra pointer to the new node being inserted by storing its address directly in the structure where the new node will go. ptr1 points to the node to be copied, and ptr2 points to the last node copied. See Figure 6.14.
template <class ItemType>
StackType<ItemType>::StackType(const StackType<ItemType>& anotherStack)
{
  NodeType<ItemType>* ptr1;
  NodeType<ItemType>* ptr2;

  if (anotherStack.topPtr == NULL)
    topPtr = NULL;

Figure 6.14 Relative position of pointers at the beginning of each iteration
  else
  {
    topPtr = new NodeType<ItemType>;
    topPtr->info = anotherStack.topPtr->info;
    ptr1 = anotherStack.topPtr->next;
    ptr2 = topPtr;
    while (ptr1 != NULL)
    {
      ptr2->next = new NodeType<ItemType>;
      ptr2 = ptr2->next;
      ptr2->info = ptr1->info;
      ptr1 = ptr1->next;
    }
    ptr2->next = NULL;
  }
}
StackType oneStack = anotherStack creates a copy of anotherStack and stores it in oneStack.
Copy Function
We saw how the client program could write a CopyStack function to copy one stack into another, provided that a class copy constructor is defined to maintain the integrity of the original stack passed as a value parameter. Alternatively, could we include a member function to copy one stack into another and let the client invoke it explicitly? Sure, but first we must decide whether we are copying self (the object on which we are invoking the member function) to another object or another object into self. That is, member functions are always applied to an object of the class type. One stack would be the object to which the function is applied, and the other stack would be a parameter of the function. Given the statement
myStack.Copy(yourStack);
is myStack being copied into yourStack or the other way around? Of course, we can’t answer this question until we see the function declaration. If yourStack is being copied into myStack, then the code for Copy would be nearly identical to the class copy constructor. The difference is that myStack already points to a dynamic structure, and we must deallocate all the nodes of this structure by applying MakeEmpty before the copying begins. On the other hand, if myStack is being copied into yourStack, then we have to rethink the algorithm. We leave this change as an exercise.
There is a third way to implement a copy function. Suppose that we’d like to write a function in which both stacks are parameters to the function:
Copy(myStack, yourStack);
Compared to dot notation, this syntax is more familiar to (and therefore more comfortable for) some programmers. But we just said that member functions are applied to an object of the class type. How can we do this? C++ provides a syntactic device called a friend function, which allows this type of construction. A friend function is not a member of the class, and yet it has permission to access private class members directly. Here is how this friend function would be declared and implemented:
template<class ItemType>
class StackType
{
public:
  friend void Copy(StackType<ItemType>, StackType<ItemType>&);
};

template<class ItemType>
void Copy(StackType<ItemType> original, StackType<ItemType>& copy)
{
  if (original.topPtr == NULL)
    copy.topPtr = NULL;
  else
  {
    NodeType<ItemType>* ptr1;
    NodeType<ItemType>* ptr2;

    copy.topPtr = new NodeType<ItemType>;
    copy.topPtr->info = original.topPtr->info;
    ptr1 = original.topPtr->next;
    ptr2 = copy.topPtr;
    while (ptr1 != NULL)
    {

      ptr2->next = new NodeType<ItemType>;
      ptr2 = ptr2->next;

      ptr2->info = ptr1->info;
      ptr1 = ptr1->next;
    }
    ptr2->next = NULL;
  }
}
Notice that we do not preface the name of the function with the class name. Copy is a friend function, not a member function. Copy does have access to the private data members of its parameters, but access to them must be qualified by the parameter name and a dot. There is no implicit self in a friend function. The friend function is declared within a class definition, but it is not a member function of the class.
Overloading Operators
In the previous section, we pointed out that the assignment operator (=) normally causes shallow copying. It would be nice if we could write
myStack = yourStack;
Of course, if the stack is implemented as a dynamic linked structure, this code would result in two pointers pointing to the same stack rather than two distinct stacks. We can solve the problem of shallow copying with the assignment operator by overloading its meaning:
template<class ItemType>
class StackType
{
public:
   ⋮
  void operator=(StackType<ItemType>);
   ⋮
};
The function definition looks like this:
template<class ItemType>
void StackType<ItemType>::operator= (StackType<ItemType> anotherStack)
{
   ⋮
}
The function body is identical to that of the Copy member function that we discussed (but left as an exercise) earlier. Therefore, if we have already written a Copy member function, then to overload the assignment operator, we make only one small change: Change the function name from Copy to operator=.
With an operator= function provided by the StackType class, the client code can use a statement like
myStack = yourStack;
The compiler implicitly translates this statement into the function call:
myStack.operator= (yourStack);
Thus, the class object to the left of the equals sign in the client code is the object to which the operator= function is applied, and the object to the right of the equals sign becomes the parameter to the function.
We can overload the assignment operator for any number of classes. When the compiler sees an assignment operator, it looks at the types of the operands and uses the appropriate code. If the operands are objects of a class that has not overloaded the assignment operator, the default meaning of assignment is used—that is, copying data members only, yielding a shallow copy.
If we can overload the assignment operator, can we also overload other operators? Yes—all C++ operators may be overloaded except : :, ., sizeof, and ?:. In Chapter 1, we introduced a class DateType. Let’s expand this class by overloading the relational operators <, >, and ==. We will also update it with a constructor rather than an Initialize method. The functions that overload the operators are shaded.

The syntax for overloading a symbol is the word operator, followed by the symbol to be overloaded. The first operand is the object to which the operator is applied, and the second operand is the parameter. These functions are member functions and are known in C++ as operator functions. Here are their implementations:
bool DateType::operator<(DateType other) const
{
  if (year < other.year)
    return true;
  else if (year > other.year)
    return false;
  else if (month < other.month)
    return true;
  else if (month > other.month)
    return false;
  else if (day < other.day)
    return true;
  else return false;
}
bool DateType::operator>(DateType other) const
{
  if (year > other.year)
    return true;
  else if (year < other.year)
    return false;
  else if (month > other.month)
    return true;
  else if (month < other.month)
    return false;
  else if (day > other.day)
    return true;
  else return false;
}
bool DateType::operator==(DateType other) const
{
  if (year == other.year && month == other.month && day == other.day)
    return true;
  else
    return false;
}
If myBirthday and yourBirthday have been initialized, and the client code includes
if (myBirthday < yourBirthday)
or
if (myBirthday > yourBirthday)
or
if (myBirthday == yourBirthday)
the respective member functions from the DateType class are invoked.
For our Unsorted ADT, we required ItemType to be a class with a member function ComparedTo. Now that we know how to overload the relational operators, we could overload “<” and “==” in the ItemType class and then rewrite the code for PutItem, GetItem, and DeleteItem using the relational operators. We could do this, but should we? We cannot use the relational operators as labels on a switch statement, so the code would have to be a series of if-else clauses. Some programmers find switch statements more self-documenting, and others like to use the relational operators. The choice is a matter of personal style.
One final comment before we leave the problems related to classes in which at least one of the data members is a pointer type: If one of the three—class destructor, copy constructor, or overloaded assignment operator—is necessary, then most likely all three are necessary. This is sometimes called the “Rule of the Big 3.”
6.6 A Linked List as an Array of Records
We have used both statically allocated arrays and dynamically allocated arrays for our array-based implementations. We have used dynamic memory allocation to obtain the necessary memory for the nodes making up the linked structures developed in this and previous chapters.
The choice between array-based and linked list representations is not the same as the choice between static and dynamic storage allocation. They are separate issues. We typically store arrays in variables that have been declared statically, as illustrated in Figure 6.15a, but an array-based implementation does not necessarily use static storage. The entire array could exist in a dynamically allocated area of memory; that is, we could get space for the whole structure at once using the new operator, as illustrated in Figure 6.15b.

Figure 6.15 Array-based lists in static and dynamic storage
We tend to think of linked structures as residing in dynamically allocated storage, as depicted in Figure 6.16b, but this is not a requirement. A linked list could be implemented in an array; the elements might be stored in the array in any order and “linked” by their indexes (see Figure 6.16a). In the following sections, we develop the array-based linked-list implementation.
Why Use an Array?
Dynamic allocation of list nodes offers many advantages, so why would we even discuss using an array-of-records implementation instead? We have noted that dynamic allocation is merely one advantage gained by choosing a linked implementation; another advantage relates to the efficiency of the insertion and deletion algorithms. Most of the algorithms that we have discussed for operations on a linked structure can be used for either an array-based or a dynamic implementation. The main difference involves the requirement that we manage our own free space in an array-based implementation. Managing the free space ourselves gives us greater flexibility.
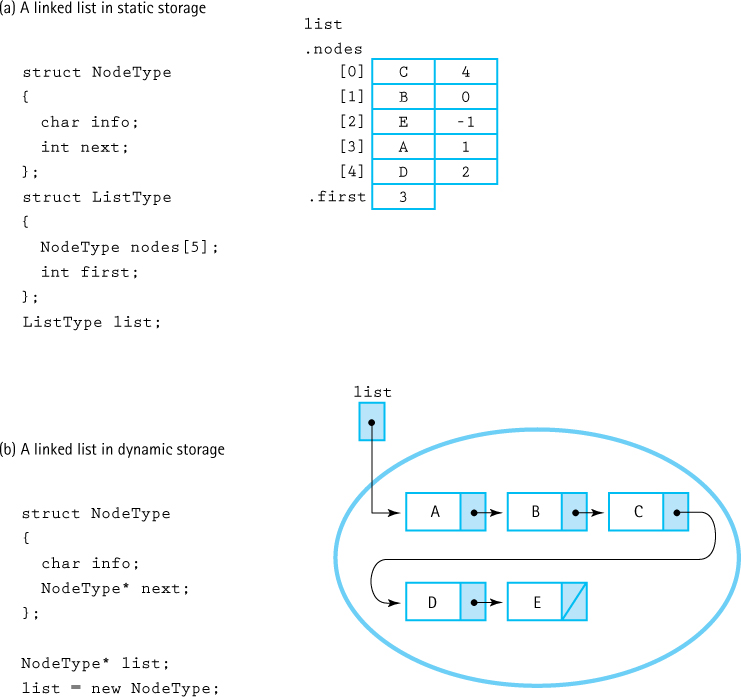
Figure 6.16 Linked lists in static and dynamic storage
Another reason to use an array of records is the fact that a number of programming languages do not support dynamic allocation or pointer types. You can still use linked structures when programming in one of these languages, but you would have to represent pointer values as array indexes.
Using pointer variables presents a problem when we need to save the information in a data structure between runs of a program. Suppose that we want to write all the nodes in a list to a file and then use this file as input the next time we run the program. If the links are pointer values—containing memory addresses—they are meaningless on the next run of the program because the program may be placed somewhere else in memory the next time. We must save the user data part of each node in the file and then rebuild the linked structure the next time we run the program. An array index, however, remains valid on the next run of the program. We can store the entire array, including the next data member (indexes), and then read it back in the next time we run the program.
Most important, sometimes dynamic allocation isn’t possible or feasible, or dynamic allocation of each node, one at a time, is too costly in terms of time—especially in system software such as operating system code.
How Is an Array Used?
Let’s return to our discussion of how we can implement a linked list in an array. As noted earlier, the next member of each node tells us the array index of the succeeding node. The beginning of the list is accessed through a “pointer” that contains the array index of the first element in the list. Figure 6.17 shows how a sorted list containing the elements David, Miriam, Joshua, Robert, and Leah might be stored in an array of records called nodes. Do you see how the order of the elements in the list is explicitly indicated by the chain of next indexes?
What goes in the next member of the last list element? Its “null” value must be an invalid address for a real list element. Because the nodes array indexes begin at 0, the value –1 is not a valid index in the array—that is, no nodes<-1> exists. Therefore, –1 makes an ideal value to use as a “null” address. Let’s use the constant identifier NUL rather than NULL to keep the distinction clear. We could use the literal value –1 in our programs, as follows:
while (location != -1)
but it is better programming style to declare a named constant. In fact, we can define NUL to be –1:
const int NUL = -1;
When using an array-of-records implementation to represent a linked list, the programmer must write routines to manage the free space available for new list elements. Where is this free space? Look again at Figure 6.17. All of the array elements that do not contain values in the list constitute free space. Instead of the built-in allocator new, which allocates memory dynamically, we must write our own function to allocate nodes from the free space. We call this function GetNode.

Figure 6.17 A sorted list stored in an array of records
When elements are deleted from the list, we need to free up the node space. We can’t use delete, though, because it works only for dynamically allocated space. So we write our own function, FreeNode, to return a node to the pool of free space.
This collection of unused array elements can be linked together into a second list, a linked list of free nodes. Figure 6.18 shows the array nodes with both the list of values and the list of free space linked through their next members. Here, list is the external pointer to a list that begins at index 0 (containing the value David). Following the links in the next member, we see that the list continues with the array slots at index 4 (Joshua), 7 (Leah), 2 (Miriam), and 6 (Robert), in that order. The free list begins at free, at index 1. Following the links in the next member, we see that the free list also includes the array slots at indexes 5, 3, 8, and 9. Two NUL values appear in the next column because the nodes array contains two linked lists.
Two approaches to using an array-of-records implementation for linked structures are possible. The first is to simulate dynamic memory. One array stores many different linked lists, just as the nodes on the free store can be dynamically allocated for different lists. In this approach, the external pointers to the lists are not part of the storage structure, but the external pointer to the list of free nodes is part of the structure. Figure 6.19 shows an array that contains two different lists. The list indicated by list1 contains the values John, Nell, Susan, and Susanne, and the list indicated by list2 contains the values Mark, Naomi, and Robert. The remaining three array slots in Figure 6.19 are linked together in the free list.

Figure 6.18 An array with a linked list of values and free space
The second approach is to have one array of records for each list. In this approach, the external pointer is part of the storage structure itself (see Figure 6.20). The list constructor takes a parameter that specifies the maximum number of items on the list. This parameter is used to dynamically allocate an array of the appropriate size. Note that the array itself resides in dynamic storage, but the linked structure uses array indexes as “pointers.” If the list will be saved between runs of the program, the contents of the array are saved and the indexes (links) remain valid.
Let’s implement this second approach. In implementing our class functions, we need to keep in mind that two distinct processes go on within the array of records: bookkeeping related to the space (such as initializing the array of records, getting a new node, and freeing a node) and the operations on the list that contains the user’s data. The bookkeeping operations are transparent to the user. The prototypes of the member functions stay the same, including both a parameterized and a default constructor. The private data members, however, change. We need to include the array of records. Let’s call this array nodes and place it in dynamic storage. MemoryType, then, is a struct containing two items: an integer “pointer” to the first free node and a true pointer to the dynamically allocated array of nodes.

Figure 6.19 An array with three lists (including the free list)
To simplify the following discussion and code, we assume that the items on the list are integers rather than using a template class:
struct MemoryType;

class ListType
{
public:
// Member function prototypes go here.
private:
  int listData;
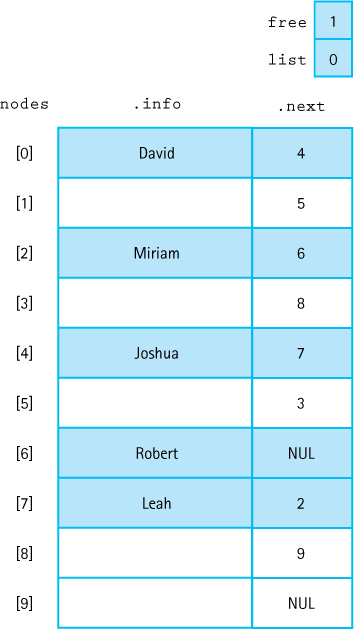
Figure 6.20 The list and linked structure are together
  int currentPos;
  int length;
  int maxItems;
  MemoryType storage;
};
The functions that do the bookkeeping are auxiliary (“helper”) functions, not class member functions. Member functions are those functions that the user invokes; auxiliary functions are those functions that help to implement the member functions. Let’s look first at these bookkeeping functions. The nodes are all free initially, so they must be chained together and the index of the first node stored into free. GetNode must return the index of the next free node and update free. FreeNode must take the node index received as a parameter and insert it into the list of free nodes. Because the first item in the list is directly accessible, we have GetNode return the first free item and FreeNode insert the node being returned at the beginning of the free list. (Yes, we keep the free list as a stack—not because we need the LIFO property, but because the code is the simplest for what we need.)
The following code defines MemoryType and implements these auxiliary functions:
// Prototypes of auxiliary functions.
void GetNode(int& nodeIndex, MemoryType& storage);
// Returns the index of a free node in nodeIndex.
void FreeNode(int nodeIndex, MemoryType& storage);
// Returns nodeIndex to storage.
void InitializeMemory(int maxItems, MemoryType&);
// Initializes all memory to the free list.

// Define end-of-list symbol.
const int NUL = -1;

struct NodeType
{
  int info;
  int next;
};

struct MemoryType
{
  int free; NodeType* nodes;
};

void InitializeMemory(int maxItems, MemoryType& storage)
{
  for (int index = 1; index < maxItems; index++)
    storage.nodes<index-1>.next = index;
  storage.nodes<maxItems-1> = NUL;
  storage.free = 0;
}

void GetNode(int& nodeIndex, MemoryType& storage)
{
  nodeIndex = storage.free;
  storage.free = storage.nodes<free>.next;
}

void FreeNode(int nodeIndex, MemoryType& storage)
{
  storage.nodes<nodeIndex>.next = storage.free;
  storage.free = nodeIndex;
}
The class constructors for the class ListType must allocate the storage for the array of records and call InitializeMemory. For the default constructor, we arbitrarily choose an array size of 500:
ListType::ListType(int max)
{
  length = 0;
  maxItems = max;
  storage.nodes = new NodeType<max>;
  InitializeMemory(maxItems, storage);
  listData = NUL;
}
ListType::ListType()
{
  length = 0;
  maxItems = 500;
  storage.nodes = new NodeType<500>;
  InitializeMemory(500, storage);
  listData = NUL;
}

ListType::~ListType()
{
  delete <> storage.nodes;
}
Let’s look at our design notation, the dynamic pointer-based equivalent, and the array-of-records equivalent. We also need to examine the bookkeeping equivalent of the dynamic pointer-based operations and the array-of-records version. Once we understand all these relationships, coding the member functions of ListType is quite straightforward. In fact, it is so straightforward that we leave the code as a programming assignment.
| Design Notation/Algorithm | Dynamic Pointers | Array-of-Records “Pointers” |
|---|---|---|
| Node(location) | *location |
storage.nodes<location> |
| Info(location) | location->info |
storage.nodes<location>.info |
| Next(location) | location->next |
storage.nodes<location>.next |
| Set location to Next(location) | location = location->next |
location = storage.nodes<location>.next |
| Set Info(location) to value | location->info = value |
storage.nodes<location>.info = value |
| Allocate a node | nodePtr = new NodeType |
GetNode(nodePtr) |
| Deallocate a node | delete nodePtr |
FreeNode(nodePtr) |
6.7 Polymorphism with Virtual Functions
In addition to encapsulation and inheritance, the third capability that must be available in an object-oriented programming language is polymorphism. In Chapter 2, we defined the term polymorphism as the ability to determine which function to apply to a particular object. This determination can be made at compile time (static binding) or at run time (dynamic binding). For a language to be truly object-oriented, it must support both static and dynamic binding; that is, it must support polymorphism. C++ uses virtual functions to implement run-time binding.
The basic C++ rule for passing parameters is that the actual parameter and its corresponding formal parameter must be of an identical type. With inheritance, C++ relaxes this rule somewhat. The type of the actual parameter may be an object of a derived class of the formal parameter.1 To force the compiler to generate code that guarantees dynamic binding of a member function to a class object, the reserved word virtual appears before the function declaration in the declaration of the base class. Virtual functions work in the following way: If a class object is passed by reference to some function, and if the body of that function contains a statement:
formalParameter.MemberFunction(...);
then
If
MemberFunctionis not a virtual function, the type of the formal parameter determines which function to call. (Static binding is used.)If
MemberFunctionis a virtual function, the type of the actual parameter determines which function to call. (Dynamic binding is used.)Let’s look at an example. Suppose that
ItemTypeis declared as follows:
class ItemType
{
public:
  virtual RelationType ComparedTo(ItemType) const;
private:
  char lastName<50>;
};

RelationType ItemType::ComparedTo(ItemType item) const
{
  int result;
  result = std::strcmp(lastName, item.lastName);
  if (result < 0)
    return LESS;
  else if (result > 0)
    return GREATER;
  else
    return EQUAL;
}
Now let’s derive a NewItemType class that contains two strings as data members. We want ComparedTo to use both of them in the comparison:
class NewItemType : public ItemType
{
public:
  RelationType ComparedTo(ItemType) const;
private:
  // In addition to the inherited lastName member
  char firstName<50>;
};

RelationType NewItemType::ComparedTo(NewItemType item) const
{
  int result;

  result = std::strcmp(lastName, item.lastName);
  if (result < 0)
    return LESS;
  else if (result > 0)
     return GREATER;
  else
  {
    result = strcmp(firstName, item.firstName);
    if (result < 0)
      return LESS;
    else if (result > 0)
      return GREATER;
    else
      return EQUAL;
  }
}
The function ComparedTo is marked as virtual in the base class (ItemType); therefore, according to the C++ language, ComparedTo is a virtual function in all derived classes as well. Whenever an object of type ItemType or NewItemType is passed by reference to a formal parameter of type ItemType, the determination of which ComparedTo to use within that function is postponed until run time. Let’s assume that the client program includes the following function:
void PrintResult(ItemType& first, ItemType& second)
{
  using namespace std;
  if (first.ComparedTo(second)==LESS)
    cout << "First comes before second";
  else
    cout << "First does not come before second";
}
It then executes the following code:
ItemType item1, item2;
NewItemType item3, item4:
      ⋮
PrintResult(item1, item2);
PrintResult(item3, item4);
Because item3 and item4 are objects of a class derived from ItemType, both of the calls to PrintResult are valid. PrintResult invokes ComparedTo. But which one? Is it ItemType::ComparedTo or NewItemType::ComparedTo? Because ComparedTo is a virtual function and the class objects are passed by reference to PrintResult, the type of the actual parameter—not the formal parameter—determines which version of ComparedTo is called. In the first call to PrintResult, ItemType::ComparedTo is invoked; in the second call, NewItemType::ComparedTo is invoked. This situation is illustrated in the following diagram:
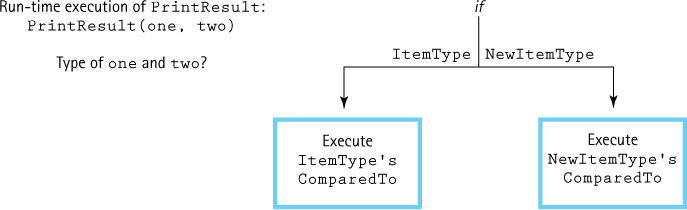
This example demonstrates an important benefit of dynamic binding. The client does not need to have different versions of the PrintResult function for each possible implementation of ItemType. If new classes are derived from ItemType (or even from NewItemType), objects of those classes can be passed to PrintResult without any modification of PrintResult.
If you have a pointer defined as a pointer to a base class and dynamically allocate storage using the base type, the pointer points to a base-class object. If you dynamically allocate storage using the derived type, the pointer points to a derived-class object. Take, for example, the following short program with a base class One and a derived class Two:
#include <iostream>
class One
{
public:
  virtual void Print() const;
};

class Two : public One
{
public:
  void Print() const;
};

void PrintTest(One*);

int main()
{
  using namespace std;
  One* onePtr;
  onePtr = new One;

  cout << "Result of passing an object of class One: ";
  PrintTest(onePtr);

  onePtr = new Two;

  cout << "Result of passing an object of class Two: ";

  PrintTest(onePtr);
  return 0;
}

void PrintTest(One* ptr)
{
  ptr->Print();
}

void One::Print() const
{
  std::cout << "Print member function of class One" << endl;
}

void Two::Print() const
{
  std::cout << "Print member function of class Two " << endl;
}
onePtr points first to an object of class One and then to an object of class Two. When the parameter to PrintTest points to an object of class One, the class One member function is applied. When the parameter points to an object of class Two, the class Two member function is applied. The fact that the type of the run-time object determines which member function is executed is verified by the following output:

We must issue a word of caution about passing a parameter of a derived type to any function whose formal parameter is of the base type. If you pass the parameter by reference, no problem arises. If you pass the parameter by value, however, only the subobject that is of the base type is actually passed. For example, if the base type has two data members and the derived type has two additional data members, only the two data members of the base type are passed to a function if the formal parameter is of the base type and the actual parameter is of the derived type. This slicing problem (any additional data members declared by the derived class are “sliced off”) also can occur if we assign an object of the derived type to an object of the base type.
Look back at Figure 5.15 in Chapter 5, which shows the relationship of objects of QueType and CountedQueType. If a CountedQueType object is passed as a value parameter to a function whose formal parameter is of type QueType, only those data members of QueType are copied; length, a member of CountedQueType, is not. Although this slicing does not present a problem in this case, be aware of this situation when designing your hierarchy of classes.
6.8 A Specialized List ADT
We have defined Unsorted and Sorted List ADTs and given several implementations of each. Our lists can be used for many applications. However, some applications always need special-purpose lists. Perhaps they require specific list operations that are not defined by our List ADTs, or perhaps the specific qualities of our lists (unique elements) do not mesh well with the requirements of the application. In such cases, we may be able to extend one of our list classes to create a new list that meets the needs of the application. Alternatively, we might create a new list class that is customized for the application in question.
In the Case Study later in this chapter, we need lists with a unique set of properties and operations. The lists must hold elements of the type int; duplicate elements are allowed. The lists need not support IsFull, GetItem, or DeleteItem. In fact, the only list operations that we have been using that this new list construct requires are the GetLength operation and the operations that enable us to move through the items in the list.
Operations that step through the items in a data structure in a regular order are often called iterators. As we will see in Section 6.9 later in this chapter, C++ provides a construct to enable us to define iterator operations so that we can use them in for loops. For the Case Study, we will need to process elements from left to right and from right to left, so we need to support two iterators. In addition, we plan to insert items at the front and at the back of our lists. The reasons for these requirements are made clear in the Case Study; for now, we just accept the requirements as stated and consider how to implement the new list.
Let’s summarize these specifications in a CRC card:

Given this unique set of requirements, we decide to start from scratch for our new List ADT. Of course, we can reuse our knowledge of lists and perhaps even reuse (cut and paste) some of the code from the previous list implementations. Because the new list construct creates a specialized list for a specific application, we call the list class SpecializedList. To satisfy the requirement that we be able to iterate through the list in both directions, instead of our standard “current position” property, lists of the class SpecializedList have both “current forward position” and “current backward position” properties and provide iterator operations for traversing the list in either direction. Note that this statement does not mean that an iteration can change direction—rather, two separate list traversals can be going on at the same time, one forward and one backward, using two different iterator operations.
One advantage of a doubly linked structure is that it supports the ability to traverse a structure in both directions. When a structure is linked in only one direction, it is not simple to traverse it in the other direction. Because a doubly linked list is linked in both directions, traversing the list forward or backward is equally easy. On the other hand, a circular structure with the external pointer pointing to the last item in the structure gives direct access to both the front element and the last element. A doubly linked circular structure would be ideal (see Figure 6.21):
struct NodeType;

class SpecializedList
{
public:
  SpecializedList();                 // Class constructor.
  ~SpecializedList();                // Class destructor.
  SpecializedList(const SpecializedList& someList);
  // Copy constructor.

  void ResetForward();
  // Initializes the current position for an iteration
  //  through the list from first item to last item.

  void GetNextItem(int& item, bool& finished);
  // Gets the next item in the structure.
  //  finished is true if all items have been accessed.

Figure 6.21 A circular doubly linked list
  // GetNextItem and GetPriorItem are independent; a forward
  //  iteration and a backward iteration may be in progress
  //  at the same time.

  void ResetBackward();
  // Initializes current position for an iteration
  //  through the list from last item to first item.

  void GetPriorItem(int& item, bool& finished);
  // Gets the previous item in the structure.
  //  finished is true if all items have been accessed.

  void PutFront(int item);
  // Inserts item as the first item in the structure.

  void PutEnd(int item);
  // Inserts item as the last item in the structure.

  int GetLength();
  // Returns the number of items in the structure.
private:
  NodeType* list;
  NodeType* currentNextPos;
  NodeType* currentBackPos;
  int length;
};
      ⋮
struct NodeType
{
  NodeType* next; NodeType* back;
  int info;
};
The constructor must set the list pointer to NULL and the length to 0:
SpecializedList::SpecializedList()
{
  length = 0;
  list = NULL;
}
Although we provide a length operation, we give the user another way of determining when the last item has been accessed. GetNextItem and GetPriorItem both have two parameters: a returned item and a Boolean flag. This flag is set to true when the last item has been returned. ResetForward sets currentNextPos to NULL, and GetNextItem returns the next item in the structure, setting finished to true when currentNextPos equals list. ResetBackward sets currentBackPos to NULL, and GetPriorItem returns the previous item in the structure, setting finished to true when current-BackPos equals list->next:
void SpecializedList::ResetForward()
// Post: currentNextPos has been initialized for a forward
//       traversal.
{
  currentNextPos = NULL;
}

void SpecializedList::GetNextItem(int& item,
     bool& finished)
// Pre:  ResetForward has been called before the first call to
//       this function.
// Post: item is a copy of the next item in the list.
//       finished is true if item is the last item in the list;
//       false otherwise.
{
  if (currentNextPos == NULL)
    currentNextPos = list->next;
  else
    currentNextPos = currentNextPos->next;
  item = currentNextPos->info;
    finished = (currentNextPos == list);
}

void SpecializedList::ResetBackward()
// Post: currentBackPos has been initialized for a backward
//       traversal.
{
  currentBackPos = NULL;
}

void SpecializedList::GetPriorItem(int& item, bool& finished)
// Post: item is a copy of the previous item in the list.
//       finished is true if item is the first item in the list;
//       false otherwise.
{
  if (currentBackPos == NULL)

    currentBackPos = list;
  else
    currentBackPos = currentBackPos->back;
  item = currentBackPos->info;
  finished = (currentBackPos == list->next);
}
int SpecializedList::GetLength()
{ return length; }
PutFront inserts the new item as the first item in the list (see Figure 6.22a). PutEnd inserts the new item as the last item in the list (see Figure 6.22b). The results look quite different in the diagram, but a careful examination reveals that they are identical except for the external pointer list. Inserting an item at the beginning does not change list; inserting one at the end does. We can use the same insertion routine for both, but have PutEnd move list:
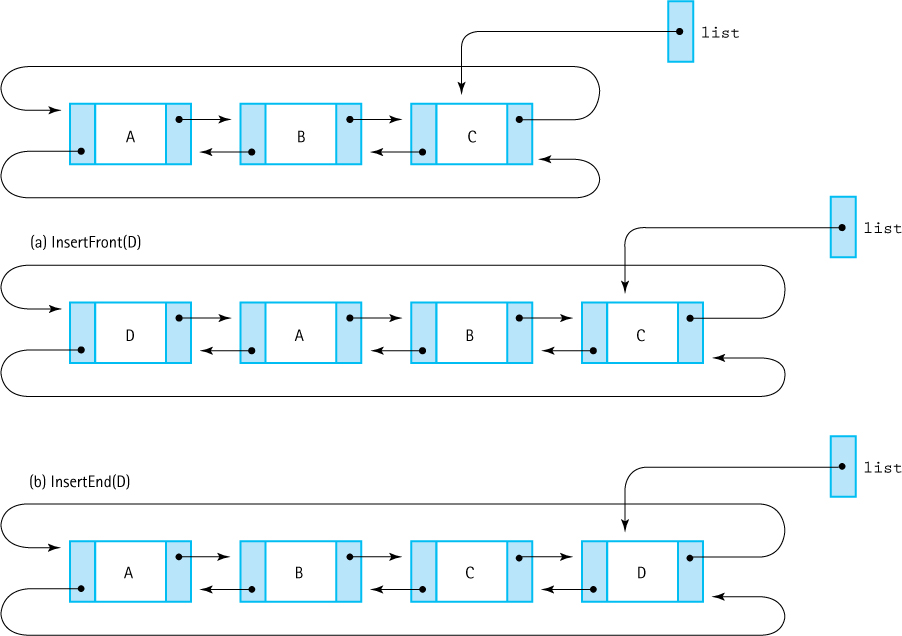
Figure 6.22 Putting at the front and at the rear
void SpecializedList::PutFront(int item)
// Post: item has been inserted at the front of the list.
{
  NodeType* newNode;

  newNode = new NodeType;
  newNode->info = item;
  if (list == NULL)
  { // list is empty.
    newNode->back = newNode;
    newNode->next = newNode;
    list = newNode;
  }
  else
  {
    newNode->back = list;
    newNode->next = list->next;
    list->next->back = newNode;
    list->next = newNode;
  }
  length++;
}

void SpecializedList::PutEnd(int item)
// Post: item has been inserted at the end of the list.
{
  PutFront(item);
  list = list->next;
}
We leave the implementations of the class destructor, copy constructor, and overloaded assignment operator, plus functions LengthIs and MakeEmpty, as a programming assignment.
Test Plan
Items must be inserted at both ends of the list, and traversals must go both forward and backward. Note that some of the operations have not been implemented. For example, we can’t test the constructor by printing the length. But how can we test it? Well, if the other operations work correctly, then the constructor can be assumed to be correct. Rather than testing all the front insertions and then all the end insertions, let’s change the pattern somewhat and mix them up:
| Operation to Be Tested and Description of Action | Input Values | Expected Output | |
|---|---|---|---|
PutFront |
|||
| Insert five items | 1, 2, 3, 4, 5 | ||
PutEnd |
|||
| Insert two items | 0, –1 | ||
PutFront |
|||
| Insert one item | 6 | ||
PutEnd |
|||
| Insert one item | –2 | ||
ResetForward |
|||
GetNextItem |
|||
| Call nine times, print each time | 6, 5, 4, 3, 2, 1, 0, –1, –2 | ||
ResetBackward |
|||
GetPriorItem |
|||
| Call nine times, print each time | –2, –1, 0, 1, 2, 3, 4, 5, 6 | ||
We should also test each time that GetNextItem and GetPriorItem are called to see whether we have reached the end of the traversal. On the Web, the file SpecialDr. cpp is the driver for this class, Special1.in is the input file representing this test plan, and Special1.out is the output. The file SpecializedList.h contains the code from this chapter.
6.9 Range-Based Iteration
We have defined and implemented several list-based ADTs that support iteration across contained elements. Iteration lets us apply the same operation to each element in a list ADT, in the order that they are stored. For example, we may want to display the value for each element contained in a list or compute a class average from a list of student grades. Our current list implementations provide the ResetList and GetNextItem methods that are used in combination with GetLength and an indexed-based for loop to step through each element. Although this is a perfectly reasonable approach for implementing iteration in a list, it is easy to introduce errors in your code by forgetting to call ResetList or by having an “off by one” error in the for loop condition.
Consider the PrintList function that we implemented in Section 3.2 of Chapter 3 to print the elements of an unsorted list to a file. We could have mistakenly written the termination condition as counter < length or accidentally initialized the loop counter to 0. In the former case, the last element of the list would never be written to the data file; in the latter case, it might lead to accessing an array past the last element in an array-based implementation or a NULL pointer in a linked implementation. Mistakes such as these are common and can lead to erroneous results (or, in the worst-case scenario, crash your program). To eliminate these problems and to simplify iteration over arrays, collections2 in the standard library, and your own ADTs, C++3 provides a range-based for loop.
The range-based for loop eliminates the index variable and termination condition typically used in the indexed-based for loop. In particular, it implements a “foreach” iteration style. That is, for each element e in an ADT, perform some operation on the element e. Consider the following code for iterating over an array of integers using the index-based for loop:
int numbers = {1, 2, 3, 4, 5};
for (int i = 0; i < 5; i++)
{
  cout << numbers<i> << endl;
}
This for loop iterates using an index variable i, indexes each element in the numbers array with i, and terminates when i >= 5. Now contrast this with a range-based for loop implementation:
for (int e : numbers)
{
  cout << e << endl;
}
As you can see, the indexed-based for loop is similar to the range-based form, however, with the later we can eliminate the index variable. In fact, we no longer care how the elements are, accessed only that we can iterate over them. The general form of a range-based for loop is
for (range declaration : collection)
{
  body
}
The range declaration must be the same type as the elements contained in the ADT as it is assigned the next element in the collection for each iteration of the loop. A colon (:) separates the declaration and the collection. There is no need for an ending condition, as the range-based for loop begins with the first element and ends with the last element.
C++ includes a number of ADTs as part of its standard library, including list, vector, stack, map, and several others. All of the included data structures support range-based iteration, allowing the programmer to write more robust code. For example, the list
ADT is available for use and supports similar operations (and many more) as our list ADT does. Here is an example of iterating over the C++ list ADT:
#include <list>
using namespace std;
int main()
{
  list<int> numbers(10, 50);
  for (int n : numbers) {
    cout << n << endl;
  }
}
The C++ standard library list ADT is made available by including the list header file. There are several ways to create a new list. In this program, we create a list of ten integers, each initialized to the value 50. As you can see, the range-based for loop looks the same for both arrays and lists. In fact, for all C++ collections, we can use the same iteration pattern. There is no need to know the length, which observer methods to use (e.g., GetNextItem), special requirements (e.g., ResetList), or any underlying implementation details of the ADT to use range-based iteration. Doing so keeps the logical and implementation levels completely separate and reduces the potential for programmer error. How can we use range-based for loops to iterate over our handcrafted ADTs?
It turns out that the range-based for loop is syntactic sugar for a traditional for loop that expects certain methods to be implemented by the collection. The compiler expands the code written with the range-based for loop into C++ that uses the traditional for loop. In doing so, the compiler can make the proper checks to ensure that the generated code is properly formed.
To provide range-based iteration support for our ADTs, we must include the following methods as part of our ADT implementation:
Iteratorbegin(): returns anIteratorobject that represents the start of the ADT.Iteratorend(): returns anIteratorobject that represents the end of the ADT.
An Iterator object is an instance of a class that “knows” how to iterate over a particular ADT and is required to overload three operators: the dereference operator (*), increment operator (++), and the not equals operator (!=). The compiler uses the begin and end methods of the ADT and these three operators to translate the range-based for loop into the traditional for loop style.
We can refactor (rewrite) our linked implementation of SortedList from Chapter 4 to support range-based iteration.
In addition to supporting range-based iteration, we will parameterize our sorted list with an element type T to allow us to instantiate a list of elements of any type T. Here is the new logical definition of the sorted list class:
template<class T>
class SortedType
{
public:
  SortedType();
  ~SortedType();
  bool IsFull() const;
  int GetLength() const;
  void MakeEmpty();
  T GetItem(T item, bool& found);
  void PutItem(T item);
  void DeleteItem(T item);
  SortedTypeIterator<T> begin();
  SortedTypeIterator<T> end();
private:
  NodeType<T>* listData;
  Int length;
};
As you can see, we extend the definition of our sorted list to include begin and end methods that each return an instance of an iterator object (SortedTypeIterator<T>4) that must support the dereference, increment, and not equals operators. Note that we have removed the ResetList and GetNextItem methods from our original implementation of iteration in favor of range-based iteration. Before we look at the implementation of begin and end, we must first consider how to implement the sorted list type iterator.
The sorted type iterator is responsible for iterating from the beginning to the end of a list. Because we are implementing a linked structure, we must traverse a linked list of NodeType<T> objects. Thus, the implementation of the sorted type iterator must have access to the internal implementation of the sorted list ADT. In particular, the sorted list ADT and iterator share the definition of the NodeType<T> struct through a common header file (NodeType.h). Here is the definition of the SortedTypeIterator:
template<class T>
class SortedTypeIterator
{
public:
  SortedTypeIterator(NodeType<T>* start);
  T& operator*();
  SortedTypeIterator<T>& operator++();
  bool operator!=(const SortedTypeIterator<T>& it) const;
private:
  NodeType<T>* item;
};
The SortedTypeIterator includes a constructor with a single parameter indicating where the iteration should begin. It then defines each of the operators that it is required to implement to support range-based iteration. The dereference operator returns a reference to the current element in the iteration. The increment operator returns a reference to a sorted type iterator that captures the current element in the iteration. The not equals operator is used to compare two sorted type iterators to determine if they are equivalent. Looking at the implementation of these operators will help clarify the method signatures and how the iterator and its operators are used:
template<class T>
SortedTypeIterator<T>::SortedTypeIterator(NodeType<T> *start)
{
  this->item = start;
}
The SortedTypeIterator maintains a pointer to the current element in the iteration. The constructor records this fact by assigning the parameter (start) to its instance variable item:
template<class T>
T& SortedTypeIterator<T>::operator*()
{
    return item->info;
}
The dereference operator for the SortedTypeIterator simply returns the info field of the NodeType object. Note that during iteration, we are not interested in returning the whole NodeType object (nor do we want it to be returned). We are interested only in iterating over the data contained in the list. Thus, if our linked list nodes contain integer values, we are iterating over integers:
template<class T>
SortedTypeIterator<T>& SortedTypeIterator<T>::operator++()
{
  if (item == NULL || item->next == NULL)
    item = NULL;
  else
    item = item->next;
  return *this;
}
The job of the increment operator is simply to advance iteration to the next element in the linked list once we are done inspecting the current item and wish to move on to the next. To handle iteration properly, we must consider the edge cases: the list is empty OR we are at the end of the list. As you can see, these cases are both handled by the if statement checking if the current item is null (list is empty) or if the pointer to the next item is null (end of list). If either of these conditions is true, we set the current item to NULL to indicate that we have reached the end of the list. If both of these conditions are false, we assign the current item to the next item in the linked list. We then return a reference to the same SortedTypeIterator:
template<class T>
bool SortedTypeIterator<T>::operator!=(const SortedTypeIterator<T> &it) const
{
  return item != it.item;
}
Finally, the not equals operator simply compares the item of the SortedTypeIterator with the item of another SortedTypeIterator. As mentioned previously, the range-based for loop is translated into a standard for loop. The standard for loop must check for a terminating condition. In particular, it must check that we have reached the end of the ADT (a list in this case) to ensure that iteration stops. In our implementation, the fact that the ending element is NULL can be used in implementing the begin and end methods.
The range-based for loop uses the begin and end methods implemented for the ADT to determine the starting and ending iteration points, respectively. The starting point in the iteration should be the first node in the linked list:
template<class T>
SortedTypeIterator<T> SortedType<T>::begin()
{
  SortedTypeIterator<T> it(listData);
  return it;
}
The implementation of the begin method is straightforward. We return a newly constructed SortedTypeIterator with its starting point being the first node in the linked list stored by the sorted list (listData). Note that the template type T is the same type for both the sorted list ADT and its companion sorted type iterator. That is, creating a sorted list of int, float, double, etc. will ensure that the returned sorted type iterator will also be of the same parameterized type.
The implementation of end is equally simple:
template<class T>
SortedTypeIterator<T> SortedType<T>::end()
{
  SortedTypeIterator<T> it(NULL);
  return it;
}
We represent the end of the sorted list ADT as a sorted type iterator initialized with NULL. When the ranged-based for loop increments the iterator to the next element and that element is NULL, the termination condition is detected using the overloaded not equals operator to compare the value of the sorted type iterator with the value returned by end.
Although we just demonstrated a particular implementation of an ADT that supports range-based iteration, the same pattern can be applied to any data structure where a beginning and ending iteration point can be defined. For example, an array-based implementation of a list might use index 0 as its starting iteration point and index length-1 as its ending iteration point. The general method signatures for begin and end are:
Iterator begin();
Iterator end();
where the Iterator type includes the following methods:
T& operator*();
Iterator& operator++();
bool operator!=(const Iterator& it) const;
and the type T is the data type of the values contained in the ADT and iterated over by the Iterator. The usage of const ensures that the iterator will not be modified.
The range-based for loop provides an abstraction for iterating over an ADT. It helps to reduce programmer errors by isolating the internal implementation of iteration (e.g., indexing, linked list traversal) inside an iterator object. In addition, it simplifies code and makes it easier to understand the intent of the programmer. Although there are clear benefits for using range-based iteration, it currently supports only forward iteration. That is, there is no direct way to reverse the beginning and ending iteration point to allow backward iteration over an ADT.
Summary
This chapter is a collection of theoretical material and implementation techniques. Rather than requiring the user to provide a file containing information about the items in the structure, C++ provides a way to provide this information when a structure is declared in a program. Templates are a C++ construct that allows the client to specify the type of the items to be in the structure in angle brackets beside the type name in the declaration statement.
The idea of linking the elements in a list has been extended to include lists with header and trailer nodes, circular lists, and doubly linked lists. The idea of linking the elements is a possibility to consider in the design of many types of data structures.
A shallow copy is a copy where items are copied, but not the items to which they might point. A deep copy is a copy where items and the items to which they may point are copied. C++ provides a construct called a copy constructor, which can be used to force a deep copy. The relational operators can be overloaded, so that values of different types can be compared using the standard symbols. The assignment operator also can be overloaded.
In addition to using dynamically allocated nodes to implement a linked structure, we looked at a technique for implementing linked structures in an array of records. In this technique, the links are not pointers into the free store, but rather indexes into the array of records. This type of linking is used extensively in systems software.
Polymorphism is revisited in this chapter with an example of how to use the C++ virtual function construct to implement dynamic binding. We also examined the concept of deep versus shallow copying and assignment operator overloading.
Range-based iteration is introduced and compared to traditional indexed-based for loops. We showed an example of using range-based iteration over arrays and the C++ list ADT. The sorted list ADT from Chapter 4 was generalized using a template parameter and refactored to support range-based iteration using an iterator object.
The Case Study at the end of the chapter designed a Large Integer ADT. The number of digits is bounded only by the size of memory. Several relational and arithmetic operators were overloaded to work with objects of this type.
Exercises
-
Dummy nodes are used to simplify list processing by eliminating some “special case.”
What special case is eliminated by a header node in a linear linked list?
What special case is eliminated by a trailer node in a linear linked list?
Would dummy nodes be useful in implementing a linked stack? That is, would their use eliminate a special case?
Would dummy nodes be useful in implementing a linked queue with a pointer to both head and rear elements?
Would dummy nodes be useful in implementing a circular linked queue?
-
Implement the class constructor, destructor, and copy constructor for the circular linked list class.
-
If you were going to implement the FIFO Queue ADT as a circular linked list, with the external pointer accessing the “rear” node of the queue, which member functions would you need to change?
-
Write a member function
PrintReversethat prints the elements on a list in reverse order. For instance, for the listXYZ,list.PrintReverse()would outputZYX. The list is implemented as a circular list, withlistDatapointing to the first element in the list. You may assume that the list is not empty. -
Can you derive a
DLListtype from theSpecializedListclass that has a member function calledPutItemthat inserts the item into its proper place in the list? If so, derive the class and implement the function. If not, explain why not. -
If you were to rewrite the implementation of the Sorted List ADT using a doubly linked list, would you have to change the class definition? If so, how?
-
Outline the changes to the member functions that would be necessary to implement the Sorted List ADT as a doubly linked list.
-
Write a member function
Copyof the Stack ADT, assuming that the stack named in the parameter list is copied into self. -
Write a
Copymember function of the Stack ADT, assuming that self is copied into the stack named in the parameter list. -
Using the circular doubly linked list shown here, give the expression corresponding to each of the following descriptions:

(For example, the expression for the
infomember of Node 1, referenced from pointer A, would beA->info.)The
infomember of Node 1, referenced from pointer CThe
infomember of Node 2, referenced from pointer BThe
nextmember of Node 2, referenced from pointer AThe
nextmember of Node 4, referenced from pointer CNode 1, referenced from pointer B
The
backmember of Node 4, referenced from pointer CThe
backmember of Node 1, referenced from pointer A
-
The text edited by a line editor is represented by a doubly linked list of nodes, each of which contains an 80-column line of text (type
LineType). There is one external pointer (typeLineType*) to this list, which points to the “current” line in the text being edited. The list has a header node, which contains the string “- – – Top of File – – -” and a trailer node, which contains the string “- – – Bottom of File – – -”.Draw a sketch of this data structure.
Write the type declarations to support this data structure.
Write the class constructor, which sets up the header and trailer nodes.
Code the following operations:
Describe the operations in part (d) in terms of Big-O notation. How could you change the list to make these operations O(1)?
Code the
InsertLineoperation, using the following specification:What other member functions should be included?
-
Of the three variations of linked lists (circular, with header and trailer nodes, and doubly linked), which would be most appropriate for each of the following applications?
You want to search a list for a key and return the keys of the two elements that come before it and the keys of the two elements that come after it.
A text file contains integer elements, one per line, sorted from smallest to largest. You must read the values from the file and create a sorted linked list containing the values.
A list is short and frequently becomes empty. You want a list that is optimal for inserting an element into the empty list and deleting the last element from the list.
-
What is the Big-O measure for initializing the free list in the array-based linked implementation? For the
GetNodeandFreeNodefunctions? -
Use the linked lists contained in the array pictured in Figure 6.19 to answer the following questions:
What elements are in the list pointed to by
list1?What elements are in the list pointed to by
list2?What array positions (indexes) are part of the free space list?
What would the array look like after the deletion of Nell from the first list?
What would the array look like after the insertion of Anne into the second list? Assume that before the insertion, the array is as pictured in Figure 6.19.
-
An array of records (nodes) is used to contain a doubly linked list, with the
nextandbackmembers indicating the indexes of the linked nodes in each direction.Show how the array would look after it was initialized to an empty state, with all the nodes linked into the free-space list. (The free-space nodes have to be linked in only one direction.)

Draw a box-and-arrow picture of a doubly linked list into which the following numbers are inserted into their proper places: 17, 4, 25.
Fill in the contents of the array on the next page after the following numbers are inserted into their proper places in the doubly linked list: 17, 4, 25.

Show how the array in part (c) would look after 17 is deleted.
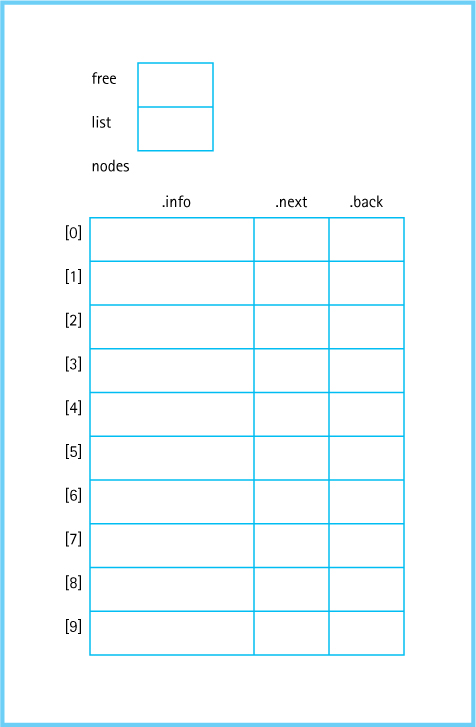
-
Discuss the changes that would be necessary if more than one digit is stored per node in the
LargeIntclass. -
Distinguish between static and dynamic binding of functions.
-
Rewrite
SortedType(array-based) using templates. -
Rewrite
SortedType(linked) using templates. -
Rewrite
StackType(linked) using templates. -
Rewrite
QueType(linked) using templates. -
Replace the
ComparedTofunction in an array-basedUnsortedListby assuming that member functions of theItemTypeclass overload the relational operators. -
Create the Unified Modeling Language (UML) diagrams for class
LargeInt. -
True or False? A doubly linked list has two pointers in each node.
-
True or False? A header node is a placeholder node at the beginning of a list, which is used to simplify list processing.
-
True or False? A trailer node is not syntactically different from the other nodes in the list.
-
True or False? A trailer node is not logically different from the other nodes in the list.
-
True or False? A trailer node is a placeholder node at the end of a list, which is used to simplify list processing.
-
True or False? A programmer, using inheritance to specialize a class X, needs access to the source code for X’s implementation.
-
True or False? In C++, a derived class’s constructor is executed after its base class constructor is executed.
-
True or False? For a C++ derived class to override an inherited member function, the base class is required to declare the function to be virtual.