Gosh, there’s a lot of fabric in this world. Our drawers and closets are stuffed, our thrift stores are brimming with castoffs. We love gorgeous new fabrics as much as anybody, but we feel a responsibility and desire to make good use of what’s already out there. Throughout this book, we’ve created projects that repurpose t-shirts, blankets, sweaters, and other goodies, and in this chapter we’ve fashioned a few more favorites. We hope they’ll inspire you to cast a fresh eye on preworn and preloved items. Here’s our quick summary of what to look for to ensure the best upcycling results.

We highly recommend buying 100% cotton tees, though if you have a project in mind that calls for something slinky, then go for a silk, rayon, or polyester one. Always check for stains. You may be able to appliqué or cut around a stain, but if it’s in a tricky spot, keep looking for a different t-shirt; there are so many to choose from. Pockets can be clever additions to the design of a skirt or dress, but if you don’t want to keep the pocket, skip the garment, since removing it will leave holes. We generally work with solids, but sometimes we come across a graphic that is beautiful and interesting, and it’s fun to incorporate that into a project (see the Reversible Graphic Belt, page 248, for a good example).
Once you’ve caught the upcycling fever, you’ll find yourself prowling the racks and yard sales where the used home-decor items hang. These large pieces can be repurposed in so many ways. Dye them. Cut them up. If there are stains on a tablecloth, appliqué over them. Vintage pillowcases can be turned into all kinds of small projects. Even a vinyl cloth can be used to make bags and pouches. Treat these items like yardage; they’ll pay you back big time.
Don’t miss our favorite idea for dressing up an old blanket (see page 206): appliquéing it with fabric or felted wool. Blankets are also great as batting for quilts, pot holders, rugs, or anything that needs insulating qualities or heft. We buy them, stick them right in the washing machine, and then air-dry them. Dry cleaning works well too. However, if a garment or store smells like mothballs, run the other way!
Felting old sweaters in the washing machine is a simple form of upcycling, but you need to start with the right wool. Read the label carefully, and skip sweaters that don’t have a label.
What to know: Sweaters made of 100% wool or cashmere felt the best. Merino wool shrinks up nicely, while lambswool might be a little stubborn or it might felt right away. Sweaters with a small percentage of synthetic fibers may felt, or they may not; the stakes are low if you want to try it. Pick colors you love and don’t shy away from really ugly-shaped sweaters since you will be disassembling them anyway. Very thick sweaters, like Irish fisherman’s sweaters and other items knit from superbulky yarns, will result in a very thick piece of felted wool, often too thick to get under your presser foot. Steer away from those.
How to do it: To felt a sweater, wash it in the washing machine on the hot wash/cold rinse setting with regular laundry detergent. Dry it in the dryer on high heat. Repeat the process as often as necessary until the ribbing or knit stitches become very tight and you can snip and cut away the edges without any raveling.
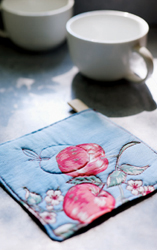
Salvage the pretty parts of a timeworn vintage tablecloth by turning them into a set of pot holders, embellished with outline stitching for a modern dimension. It’s easy to move the multiple layers through the sewing machine, making this project a good one for honing your thread-drawing skills.
With the right side of the fabric facing up, measure, mark, and cut two 8″ squares.
With the right sides together, straight stitch around three sides of the cotton squares with a ½″ seam.
Turn the pot holder right side out and insert the felted wool square or batting squares into the pocket. Press the open raw edges to the wrong side, with one of the raw edges encasing the exposed edge of the wool or batting.
Fold the twill tape in half and tuck the ends in one side of the opening to make a hanging loop.
Straight stitch  ″ from the edge around the entire perimeter of the pot holder, starting at the corner with the loop.
Straight stitch over some of the outlines of the fabric print using the free-motion drawing technique (see page 134). Stitch on one side or both, as desired.
what you’ll need
• Vintage or other printed cotton fabric (at least 8″ × 16″)
• 7″ square of felted wool or three 7″ squares of cotton batting
• 1 spool of contrasting thread
• 4″ of ½″-wide cotton twill tape
Stitching tip: Your stitched lines will appear on the flip side of the pot holder, creating lovely layered patterns.

Arm warmers have a practical Dickensian chic. We love to wear them when we’re sewing or typing on a cold winter’s day. You can make these in a flash out of any felted sweater, but we highly recommend using cashmere if you can swing it.
what you’ll need
• Sleeves from a felted sweater (see page 244)
• 1 spool of coordinating thread
• Embroidery thread and needle
Cut off the sleeves from a felted sweater, near the armhole seam. Turn the sleeves inside out and slide them onto the wearer’s arms. Pin the sleeves along the seam for a snug fit at the wrist and up the arm. Pin mark the desired length (ours reach about 2″ above the elbow). Take the sleeves off.
Lay the sleeves flat with the wrong side out and trim them at the marked length. Using a straight stretch stitch, stitch a new seam along the pin markings up each arm. Cut off the extra fabric along the new seam. Turn the sleeves right side out.
On each arm warmer, measure 2″ up from the finger opening (wrist) along the seam and snip a thumb hole opening about 1½″ long.
With the embroidery thread and needle, hand-sew a blanket stitch along the thumb holes and finger openings. Leave a 2″ tail of thread at the beginning and end of the stitching. When the stitching is complete, knot the thread tails together securely and then trim them.

Stitching tip: For easier hand sewing, slip each armie on your nondominant arm (we find it easier anyway).

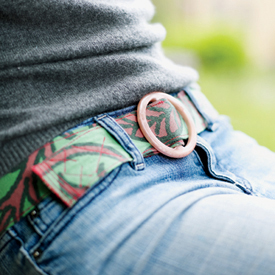
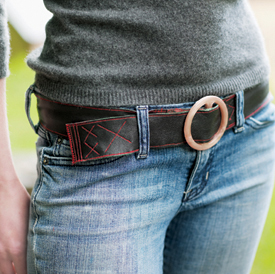
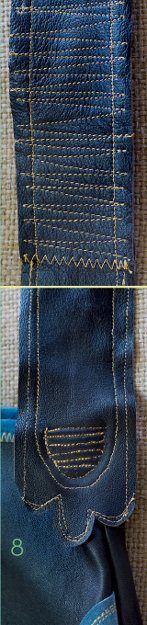
Rescue that loved-to-pieces tee from the rag bag by turning it into cool accessory. The leather backing is more than just good-looking; it also gives the belt structure and keeps the jersey from stretching. If you don’t have upcycled leather on hand, you could also use canvas or any other sturdy fabric.
Measure the wearer’s waist (or hips, depending on how the wearer wears belts) and add 5″ to 6″.
Determine which part of the t-shirt graphics you want to use and be sure to mark and cut there. It’s hard to get a long enough strip of fabric for a belt from a t-shirt, so you’ll cut two pieces and sew them together.
With the right side facing up, measure, mark, and cut two pieces each from the jersey and the backing fabrics as follows:
—1¾″ × half the desired finished belt length
Align the jersey strips with the right sides together along one short edge. Straight stitch a ¼″ seam to join the strips. Press the seam allowances open.
Lay the leather strips end to end, overlapping the ends by ½″. Straight stitch along the overlap to join the strips.
Align the jersey and leather strips with the wrong sides together.
Straight stitch (our stitch length was 2) around the perimeter of the strips, as close as possible to the edges.
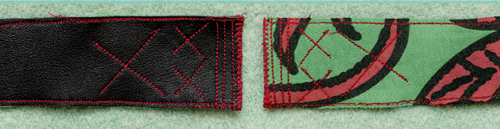
Use a straight stretch stitch to secure the strips together (especially if your leather strips include seaming from the original garment or bag) and embellish it with Xs and straight lines of stitches, as shown.
Overcast the short edge with stretch zigzag stitches for reinforcement.
Thread one end of the belt through the buckle, loop it back, and straight stitch it in place to secure the buckle.
what you’ll need
• 1 cotton jersey t-shirt with graphics
• Upcycled leather (from a bag or garment) or a sturdy fabric for backing
• 1 spool of contrasting thread
• 2″-wide slide-on belt buckle
what you’ll need
• Adult (size large) wool sweater, felted (see page 244)
• Two-panel dress pattern, sized to fit wearer (see page 34)
• Button
• 1 spool of coordinating thread
• Embroidery thread and needle for attaching the button
• Hand needle
A sweater with a color or pattern that’s a bit too raucous for the grown-ups in the house can be perfectly adorable on a child. This two-panel dress is supersweet over a tee and tights, and can be embellished with a simple circle blossom, as shown here, or thread-sketched with any design that might tickle its wearer’s fancy.
Cut apart the sweater along the seams so you can use the front of the sweater to cut the front of the dress and the sweater back for the dress back.
Follow the instructions for the Two-Panel Garment, (see chapter 3, page 34) through step 2, making the following adjustments:
—Fold each sweater panel in half lengthwise, and pin the pattern with its marked ″center″ aligned on the fold.
—To add flare at the hem, mark the bottom edge 3½″ wider than the pattern piece, for a total of 7″. Trace around the pattern, drawing the side seams to add the flare.
Pin the front and back panels with the wrong sides together.
Straight stretch stitch ¼″ seams at the shoulders and sides, taking care to keep the stitches straight since they will be exposed.
Zigzag through the center of the seam allowances to hold them flat and give them a nice finish.
From the sweater scraps, cut a 2½″-diameter circle and a 2″-diameter circle. Stack them with the smaller circle on top.
Attach the flower to the dress shoulder with a button, stitching it in place with embroidery thread.
Design tip: Zigzag edgestitching creates a lettuce-edge effect for your bloomers.

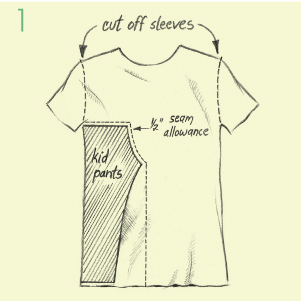
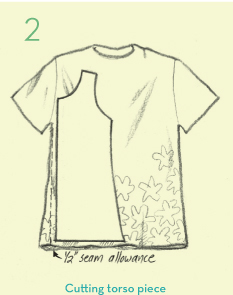
Whether you call them pantaloons, baggies, or bloomers, these sweet bottoms are designed to wear under a skirt, dress, or tunic for maximum style and playground practicality (hang from the monkey bars without fear of undie exposure!). You can make them from jersey yardage, but we think it’s more fun to upcycle fabric from a roomy men’s t-shirt, plucked out of Dad’s cast-off pile or thrifted from a secondhand store.
Cut the sleeves off the shirt and lay out the torso piece with the front side facing up.
Fold the pants in half at the crotch seam with the legs aligned, and place them on the fabric as shown, aligning the side seam of the pants close to one of the shirt side seams. Trace around the pants, leaving an extra ½″ for seam allowance as shown, widening the marked (inseam) line so it is more or less vertical. This makes the pattern piece for one pant leg.
Flip the pants over and align the side seam with the other side of the shirt to make the pattern for the other leg. Repeat the tracing as above.
Cut along the lines through both thicknesses of fabric.
what you’ll need
• 1 extra-large adult t-shirt
• Well-fitting stretch-knit pants (yoga or elastic-waist athletic pants) for pattern
• ¾ yard of coordinating fold over elastic
• 1 spool of coordinating thread
Unfold both pieces and align them with the right sides together.
Straight stretch stitch a ½″ seam from the waist down to the crotch point (as shown in illustration on page 253). Repeat on the opposite side.
Pin the pants with the right sides together so the crotch seams are aligned. Starting at the bottom edge of one leg, straight stretch stitch up the inside leg seam, across the crotch seam, and then back down the other leg inseam.
Then, working again from bottom edge to waist, sew up the outer side seams on each leg.
Turn the bloomers right side out. Finish the waistline with fold over elastic. (See chapter 1, page 19).
Zigzag around the raw edges of each leg opening.
Working on one leg at a time, mark a line all the way around the leg about 1½″ above the opening.
Measure the circumference of the wearer’s leg at the point where the bloomers will end. Cut a piece of fold over elastic two times the leg measurement. Cut the elastic in half so you have a piece for each leg.
Align the bottom edge of the elastic along the marked line. Edgestitch the elastic in place along the top and bottom edges with a small zigzag stitch, pulling the elastic taut as you stitch. Overlap the ends by ½″ and backtack.
Trim the excess elastic close to your stitching (but don’t cut the stitches).

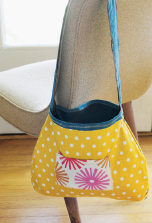
Out-of-fashion leather coats, jackets, bags, and even belts can be miraculously transformed into this hip and handy tote with a little snipping and stitching. We cut our own shoulder strap, but if you’re lucky enough to thrift a belted coat, you’re a step ahead of the game.
• Leather jacket (for the main body)
• Contrasting leather (for appliqué pieces)
• ½ yard of lining fabric
• yard of fabric for pocket
• Leather sewing machine needle
• 1 spool of contrasting thread
• Side panel and flower appliqué templates (pages 309 and 311)
Use sharp scissors to cut off the jacket sleeves and open the side seams, doing your best to preserve large swaths of the leather. Remove any lining or interfacing from the jacket interior. Repeat, if necessary, with another jacket, to obtain leather for the appliqué pieces.
With the wrong side of the fabrics and leather facing up, measure, mark, and cut the following pieces:
Cut from the main-body leather:
—exterior bottom panel: 2½″ × 15½″
—exterior side panel (cut 2): Trace the side panel template*
—shoulder strap: 2″ × 35″ (if necessary, piece several shorter lengths end to end)
Cut from the lining fabric:
—interior bottom panel: 2½″ × 15½″
—interior side panel (cut 2): Trace the side panel template
Cut from the pocket fabric:
—pocket (cut 2): 4½″ × 6½″
Cut from the contrasting leather
—appliqué: see step 5
—binding: 1″ × 25″ (or cut 2 pieces 1″ × 13″ to allow for a seam)
—strap lining: 1¾″ × 33″
*If you don’t have a large enough piece of leather to cut the side panels on the fold, cut two pieces and stitch them together, allowing enough for seam allowance at what would have been the fold.
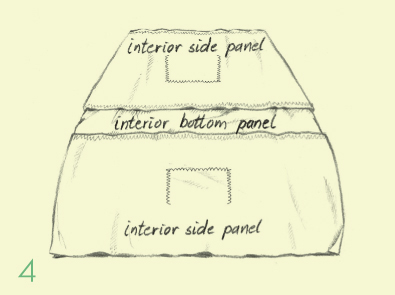
Hem the top of each pocket by pressing the top raw edges ½″ to the wrong side; zigzag them in place.
Center each pocket on an interior side panel piece, 1″ below the top edge; pin them in place.
Zigzag (our stitch width was 2) along the sides and bottom of the pockets to attach them to the lining.
Pin an interior side panel to each long edge of the interior bottom panel with the right sides together; straight stitch with ¼″ seams.
Fold the two interior side panels so they are aligned with the right sides together, tucking the bottom panel within the fold (between the side panels). Straight stitch the panels together along the sides with ¼″ seams. Turn the lining right side out and set it aside.
Design tip: Invent your own stitched design for the strap ends—anything will look great as long as there’s plenty of stitching to attach the strap securely—and the stitching adds a little whimsy in the process.
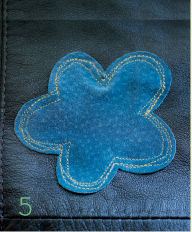
Trace the flower template as many times as desired on the wrong side of the contrasting leather and cut the flowers out with sharp scissors.
Pin the appliqués on the exterior side panels. Trim any that extend beyond the panel edges.
Install the leather needle (you’ll use it for the rest of the project) and straight stitch the appliqués in place several times around and just inside the edges.
As for the lining in step 4, pin an exterior side panel to each long edge of the exterior bottom panel with the right sides together; straight stitch with ¼″ seams.
Fold the two side panels so they are aligned with right sides together, tucking the bottom panel within the fold (between the side panels). Using a straight stretch stitch, sew both sides with ¼″ seams.
Slip the lining inside the exterior so the wrong sides are together and the top edges are aligned. Baste or pin the top edges together.
Piece the binding strips if necessary to make one strip 25″ long. Fold it in half lengthwise and position it over the top of the bag, encasing the top edges of the lining and exterior in the fold.
Starting at one side seam, zigzag the binding in place, around the entire top edge of the bag. Overlap the narrow ends slightly.
If necessary, piece the strap pieces to obtain the desired length.
Trim the leather strap ends as desired; ours has a scalloped edge.
Add decorative stitched lines across the strap to embellish and strengthen the leather.
If you like, trim the ends of the strap lining to complement the leather strap ends. Pin the lining to the strap with the wrong sides together; the lining straps are shorter. Straight stitch the lining and leather pieces together close to the edge.
Position one side seam of the bag under the sewing machine needle. It might help to convert to the machine’s sleeve arm for easier maneuvering. Center one strap end over a side seam so it extends about 2″ below the top edge. Using a straight stretch stitch, edgestitch all around the strap end. Then stitch a U shape inside the stitches and fill in the U shape with straight lines of stitching. Repeat for the opposite strap end and side seam.
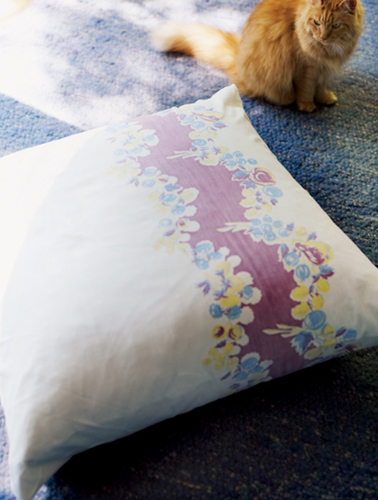
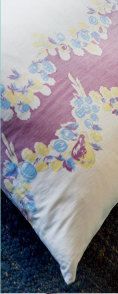
The envelope closure on this cushy item makes construction a breeze. Of course, Nicole’s husband looked more than skeptical as he saw her making this lovely white cushion. But it is crazy beautiful, and soft as can be. In her fantasies, Nicole’s home is filled with white cushions made from fabulous fabric like this!
Spread the tablecloth out and determine which section you’d like to highlight. With this section as centered as possible, measure, mark, and cut the following:
—cushion cover: 34″ × 66″
what you’ll need
• 32″ square cushion form (we used one stuffed with feather and down)
• A vintage tablecloth, at least 66″ long
• 1 spool of coordinating thread
• 30″ length of sew-on Velcro
Straight stitch a ½″ double-fold hem (see page 19) along both short sides.
Fold both short ends toward the middle with the right sides together, so the length from folded edge to folded edge is 32″. The hemmed edges will overlap slightly to form the cushion cover opening. Pin the overlap closed.
Using a knit stitch, stitch a ½″ seam along each side, sealing the raw edges as you stitch.
Unpin the overlap and position the Velcro strips on the hemmed edges, at least ″ in. Straight stitch just inside the edges of the Velcro strips to secure them. Turn the cushion cover right side out and stuff the cushion inside.
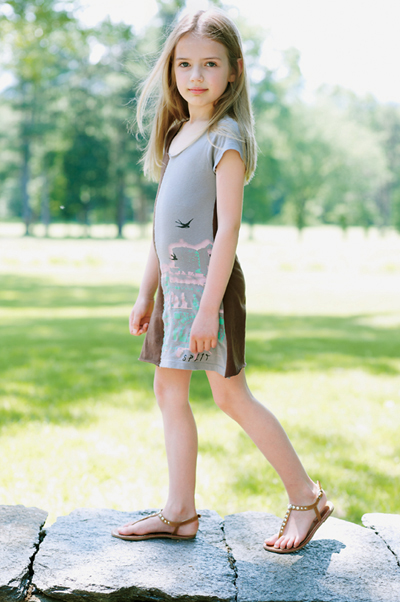
Your favorite little girl will love this comfy dress styled from Mom or Dad’s tees or from sweet thrifted finds. We finished our version with short sleeves, but it’s also delightfully cool as a tank dress. P.S. You could make one of these as a woman’s tunic, too.
Determine the desired dress length and make the torso and sleeve patterns (see chapter 2, pages 29–30). Decide which shirt will supply which panels (we used a brown t-shirt for one front and two back panels, and a printed shirt for the remaining front panel). Place the pressed shirts right side facing up.
what you’ll need
• 2 adult t-shirts, plain or printed, both the same size*
• Torso and sleeve pattern pieces, sized to fit for wearer (see chapter 2, pages 29–30)
• Spools of coordinating and contrasting thread
*The length of the shirts will determine how long the dress can be. Adult small t-shirts will most likely work for a toddler’s garment; however, an older (and taller) child might need large or extra-large shirts as starting points.
Follow the instructions for the Four-Panel Garment (see chapter 3, page 38) through step 3, positioning the torso pattern piece on each t-shirt to trace it, as shown on page 263. When cutting the panels, cut through both the front and back of the shirts.
For a dress with sleeves, follow the instructions for Sleeves Made Simple (see chapter 3, page 42), using the leftover t-shirt fabric, or (as we did here), cutting off and repurposing the sleeves from one of the shirts. If the sleeves are too large, cut them apart at the underarm seams, fold them in half with seam edges aligned, and trace the sleeve pattern onto each one.
Join the panels and sleeve pieces and finish the bottom edge as directed in the Four-Panel Garment instructions (see chapter 3, page 38). Trim the sleeves to the desired length. With a tricot stitch and contrasting thread, topstitch over the front and back center seams.

Cutting tip: You will probably end up cutting extra panels, but they can be used as sleeve fabric. You could also make ruffles from them (see page 60) to sew at the neckline or bottom edge.
Stitching tip: Make sure to stitch plenty of lines so that the layers of fabric won’t shift when the mat is used.
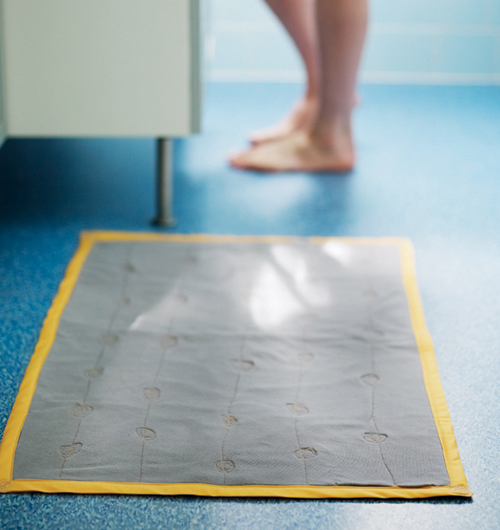
Towels with frayed edges are the perfect candidates for this makeover. Find a complementary fabric that makes you happy, stitch it to the towels with some free-flowing thread doodles, add bias tape, and you’ve just upgraded your bathroom decor.
Measure, mark, and cut both towels and the cotton fabric (grain can run either direction) so there are three pieces, all 20″× 32″.
Layer the cut pieces as follows: the top piece with the wrong side facing up, then the toweling pieces over it, with the right side of the better looking towel on top. The middle toweling piece simply serves as an interfacing, giving the mat more heft, so choose the more tired-looking towel for the center. Pin the layers together and straight stitch around all the edges with a ¼″ seam.
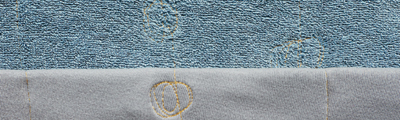
Straight stitch, using the Doodling with Thread technique (see page 134), squiggly lines approximately 2″ to 3″ apart on the toweling side, adding a loop to the lines every so often.
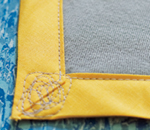
Pin bias tape along the short sides, enclosing the raw edges. Edgestitch it in place with a straight stitch. Repeat on the long edges, mitering the tape at the corners (see page 21). To finish, stitch a few free-motion doodled circles in each corner of the mat.
what you’ll need
• 2 bath towels (one will be hidden as an interfacing layer, so the towels needn’t match)*
• ¾ yard of cotton fabric for the top
• 1 spool of contrasting thread
• 1 or 2 packages of wide double-fold bias tape
*For a finished size of 21″ × 33″.
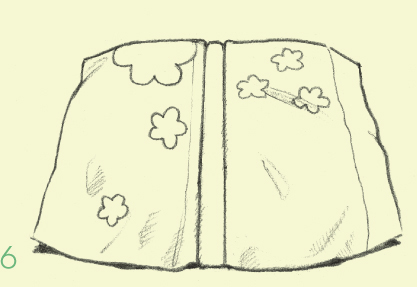
To make this cool cotton wrap skirt, head to the thrift store and pick out three generously sized men’s dress shirts. The shirts can be as alike or different as you desire; the skirt will be extremely cute either way.
Wash and press the shirts. Cut off the sleeves and shoulder yokes at the seams; then cut the side and shoulder seams to remove the front. You will use only the back panels.
Follow the instructions through step 2 for the Three-Panel Wrap Skirt (see chapter 3, page 49), cutting one panel from each piece of shirt fabric and making the following changes when measuring and marking:
—length: add ¾″ for the hem
—hem flare: mark the panel’s bottom edge 3″ wider than the waist on each side
Instead of pinking the raw edges of the side seams, zigzag with contrasting thread as in step 2 (see chapter 3, page 50).
Stitch ¼″ double-fold hems along the outside edges of the skirt (see chapter 1, page 19) with coordinating thread.
Press a ¾″ hem to the wrong side along the bottom edge of the skirt and zigzag it in place with contrasting thread.
To finish the waist, follow steps 4 and 5 for the Three-Panel Wrap Skirt (see chapter 3, page 49), attaching the bias tape with coordinating thread.
what you’ll need
• 3 extra-large men’s cotton dress shirts
• 3 yards of double-fold ½″-wide cotton bias tape
• Spools of coordinating and contrasting thread


Design tip: If you’re feeling really inspired, add pockets from the original shirts or snip off some of the buttons and stitch them to the skirt as fun trimming.
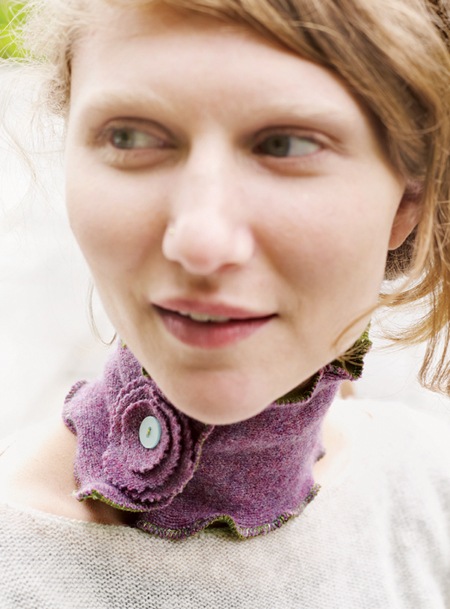
We love a lot about this little item. First, it’s a fantastic use for upcycled fabric, giving a whole new life to swatches from an old sweater and an old tee. Second, the clever layering of fabric means no itching, with soft jersey wrapping your neck, and warm wool on the outside. Third, the lettuce-edge frames the wearer’s face in an adorable way, and the little felted flower is like a cherry on top.
Pin the wool and the jersey with the wrong sides together. Using a knit or zigzag stitch, edgestitch around all four sides.
With pinking shears, cut three circles from the remaining wool, each a little smaller than the last (ours measured 2½″, 2″, and 1½″ in diameter.)
Stack the circles with the smallest circle on top and a button centered over the circles. Hand-sew the circles and button together and onto the end of the neck warmer, centered about 1″ from the edge.
Hand-sew a snap, with one side beneath the flower and the other at a corresponding spot on the opposite end of the neck warmer.
what you’ll need
• 5″ × 16″ length of felted wool (see page 244)
• 5″ × 16″ piece of cotton jersey
• 1 button
• 1 spool of contrasting thread
• Needle and embroidery thread
• 1 sew-on snap
• Pinking shears
Cutting tip: We used pinking shears for a decorative edge, but they could be cut with straight scissors.
Stitching tip: Edgestitching on these fabrics accomplishes two tasks at once; it creates a flouncy lettuce edge while joining the inner and outer layers.
Finishing tip: We like sew-in snaps for their utter lack of fussiness. With a needle, thread, and a few quick stitches, you have a secure closure for your garment, which sometimes is a much better option than sewing buttonholes.
This cold-weather essential is twice as cozy when it’s sewn from a favorite old sweater, and it gets extracool with the addition of a striking graphic appliqué, cut from a t-shirt or fabric. If your fabric has good stretch, this hat should fit just about anybody.
Fold the fabric in half and position the template on top of it. Trace the template twice, then cut through both thicknesses of fabric for a total of four panels.
With the right sides together, straight stretch stitch two panels together from the top point down to the bottom edge with a ½″ seam. Press the seam open. Repeat with the remaining two panels. Then, stitch the two joined panels with the right sides together in the same way, so all four panels are joined together.
Roll the bottom edge ½″ to the wrong side and then another 1½″ and pin. Turn the hat right side out. Straight stretch stitch the hem in place 1″ from the fold.
Cut out a small graphic from print yardage or an old t-shirt. Stitch the graphic appliqué to the hat where desired, straight stitching just inside the edges. Leave the edges rough.
what you’ll need
•  yard of felted wool or stretch fabric (stretch terry or wool or cotton jersey)
• Graphic cut from a t-shirt or print fabric
• Hat template (page 310)
• 1 spool of coordinating thread

one size fits all!

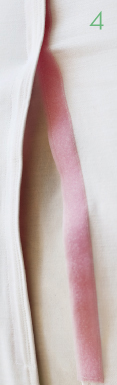
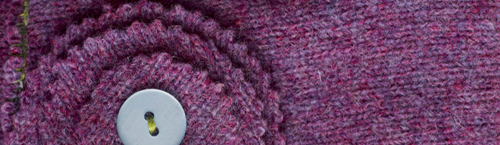
Most of us have an unloved old sweater lurking in the bottom of a drawer or the back of a closet. Make a trip to the notions store, pick up whatever trimmings strike your fancy, and get that woeful woolly garment back into circulation fast.
Cut off any unwanted sweater parts such as cuffs and turtlenecks. Fold the front panel in half from the neck to the bottom edge, aligning the side and shoulder seams. Cut along the fold to open the sweater front (see illustration on page 109).
Trim one end of the ribbon into a point. Fold the pointed end over ½″.
With a tiny zigzag (our stitch width was 1.5; stitch length 2), edgestitch the ribbon in place along the edges of the sweater’s front opening, allowing the stitch to overcast the ribbon a bit. At the bottom edge of the sweater, trim away the excess ribbon. Repeat to sew more ribbon around the sleeve openings.
what you’ll need
• Large wool sweater, washed and felted (see page 244)
• Velvet ribbon and other trimmings as desired
• 1 spool of coordinating thread (matched to ribbon)
• Embroidery thread and needle
• Hook and eye closure
Add more trim as desired, by machine or by hand, as appropriate. We stitched lengths of velvet rickrack over the ribbon along the front openings, hand-embroidered cross-stitches at the neckline and running stitches around the sleeves, and added two velvet flowers (cut from a ribbon) at the neck closure.
Hand-sew the hook and eye closure on the wrong side at the top of the center opening.

Stitching tip: It’s a good idea to sew along the side of the ribbon closest to the opening first so you are certain that the ribbon is aligned with the edge.
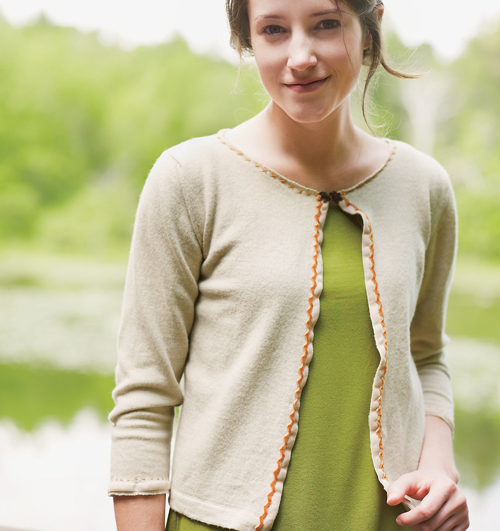
Finishing tip: Add more closures down the front to make the sweater a closed rather than open cardigan.