Your friend, the guy or gal who you can tell you anything, wanders into your cubicle, clearly with something on his mind. “Dude, get in shape,” is all he says, then unceremoniously walks away. You figure he’s right; the encounter had a “right on the money” vibe to it. What’s the first thing you do?
You join a local gym, the one that everyone’s joining lately, or that one on the way to work that you got a couple of guest passes to but never bothered to visit. “Gym” is also considered an antiquated term for it; the numerous fitness franchises are running out of brand names for their fitness facilities, and they all have a different angle, and machines, and gizmos.
So you’ve joined up and shown up. Now what? You see crowds of people milling around and on machines. It’s like that scene in the film Gattaca with Ethan Hawke trying to pretend he’s Jude Law on the treadmill, except there are ellipticals, cycle spinners, StairMasters, and more. You haven’t even ventured into the football-field-sized mecca of stationary weight machines and barbells. It’s kind of scary, jarring, but you want to do more than sit down at the juice bar, order a 12-ounce “Seattle’s Best,” and ogle the people sauntering by in their Lycra.
You can get one of the in-house trainers to show you around, but while that’s a good idea for the first time, you don’t necessarily want to get sucked into their way of doing things, and it costs a lot more. Besides, these fitness facilities aren’t really that different from each other, and a fully equipped one commonly has everything you need to get strong and fit.
This chapter describes the kinds of exercises and routines you can focus on in a typical modern gym. There are dozens of them, in reality, so we’re only going to get you started with about 15 of them, including photos, then point you in the direction of good websites that contain many exercise descriptions and demonstration videos.
We’re also going to introduce a few smartphone apps that make a good accompaniment to working out in a gym, or home, or hotel room—but only if you have the patience and time to make screen choices and enter data, during or after a workout.
These include Men’s Health Workouts, Fitocracy’s mobile app, and a workout tracker at www.bodybuilder.com (there are dozens of fitness apps, however, so we recommend if you’re an app aficionado that you do some exploring on your own). We’ll also briefly discuss the CrossFit philosophy and facilities that are cropping up all over the place.
Before you hit the gym, it’s of paramount importance to get some instruction on the proper technique for lifting weights. The excellent site Bodybuilder.com, for example, has a comprehensive collection of demonstration videos on just about any exercise with weights you can think of.
Before we get into all that, though, let’s get some lightweight philosophy and terminology out of the way.
By now you might be wondering why the chapter focuses on the “lifting weights” angle. A gym offers all kinds of routines, including all those cardio machines, not to mention Yoga, Pilates, Zumba, and countless variations on those movement scenarios. Since we realistically cannot cover everything you can possibly do in a gym or fitness place, we’re not going to try. We’re also going to venture out on a limb and recommend resistance exercise or strength routines as the main activity to focus on in the gym.
You can, of course, use any piece of equipment, machine, or class you want upon entrance to a facility (such as for a warm-up), but in terms of health and fitness, a solid resistance-exercise routine will get you the most bang for your buck, for the following reasons, among others:
Adding lean mass or muscle counteracts one of the principal effects of aging, which is the loss of lean mass or muscle. If we age in a Western society without doing anything to resist the typical influences of the lifestyle, our body composition changes: we lose muscle as we gain fat. It can begin happening fairly early in life, such as the late 30s or 40s. This development is, by definition, unhealthy. We need fat to survive. A normal distribution of adipose tissue is an amazingly efficient form of energy storage and regulation. However, lots of extra fat is evidence that the calories you consume exceed your total energy expenditure (TEE, or the amount of calories you burn off each day) and that your metabolism has begun to go south on you. Extra fat is bad for your internal organs; a robust distribution of extra muscle is healthy for your internal organs. The medical community has even invented a fancy, disease-sounding name for this condition of losing muscle: sarcopenia. It’s considered such a threat to the health of an aging population that—you guessed it—the pharmaceutical industry is going all out to invent a pill to combat sarcopenia. You don’t need a pill. Just lift weights.
Resistance training is another fertile area for geeks gathering and analyzing data, on routines, weight lifted, reps, total volume, and progress—and that might be the most stimulating aspect of lifting weights, at least in the beginning.
For the younger among us, resistance training helps you to realize your athletic goals, whether it’s sprinting on a track or bicycle, a team sport, or using your upper body to hit or throw a tennis ball, baseball, or lacrosse ball. Resistance training, when done correctly, will increase your strength, by an impressive magnitude—possibly 100 percent, depending on the baseline you start from. Yes, you can double your strength.
Resistance training helps avoid injuries by strengthening muscle fiber, connective tissue (such as ligaments and tendons), and bone mass (yes, a person who lifts weights has greater bone density than someone who doesn’t). Ever gotten a serious injury, one that happened while you were doing something relatively innocuous such as bending over to lift something or stepping on stairs the wrong way; one that took you out of school, work, life for weeks or months? Ever considered an easy-to-adopt routine that makes sure this never happens in the first place, or ever has to happen again? (Losing excess weight is also an injury-preventive measure.)
The practical effects of being stronger cannot be overemphasized or quantified—think of all the “heavy work” you have to do in ordinary life, from lifting items around the house (including people and children) to performing physical tasks around the yard or at work. Ever since I got back into weights with greater seriousness a few years ago, I’ve noticed a huge difference in this area.
Resistance training counts as anaerobic and aerobic cardiovascular training. In other words, resistance training will give you significantly better oxygen capacity for walking up hills and stairs, carrying loads, and just getting around in life. Anaerobic training means utilizing energy in the absence of a continuous replenishment of oxygen, as in sprinting. Aerobic exercise involves utilizing a more or less continuous supply of oxygen as you breathe and run, bike, or swim, for instance. Weightlifting helps both areas. Ever noticed how much you’re huffing and puffing after high-intensity resistance training? (We’ll explain that term in more detail shortly.) It follows that if a muscle has more capacity for pulling a given weight, you will use less oxygen doing so. In addition, your cardiovascular mechanics—the heart, lungs, capillaries, and veins, along with the brain, liver, even the endocrine system (all of the glands that secrete the all-important hormones that rule what goes on in your body, such as growth hormone, testosterone, and the adrenal hormones like epinephrine and cortisol)—all of these systems must upregulate to support this new muscle fiber you are adding.
New muscle fiber increases your basal metabolic rate (BMR—see Chapter 9), or the amount of calories you burn at rest or during normal activities, but not by the degree that people typically assume it does. If you add 10 pounds of muscle to your body, for example, your calorie burn increases by about 60 to 100 calories per day (about 6 to 10 calories per pound of muscle per day). The benefits of new muscle and weight training are greater strength, injury prevention, balance, and metabolic health, not necessarily more calories burned per day.
Cardiovascular work is usually initiated at the expense of resistance training. Unless you’re running or biking at a high intensity (such as doing Tabata sprints), the value of these exercises for most people is minimal. Excess cardio, for example, actually burns up or catabolizes your lean mass (so it can contribute to weakening during the aging process). “Despite increased testosterone, hypertrophy does not typically take place with aerobic endurance training. In fact, oxidative stress may actually promote a decrease in muscle fiber size in order to optimize oxygen transport into the cell. Without the proper exercise stimulus, the cellular mechanisms that mediate muscle fiber growth are not activated to the extent that hypertrophy [muscle growth] occurs.”1 This means that too much running or biking could make some of your muscles smaller.
If you’re reluctant to try weightlifting because it seems like foreign territory for you—a clique or cult you do not want to join—I urge you to rethink your decision and try to expel the negative stereotypes. Try to ban these biases and images from your head—that weightlifting is just for adolescents (including adolescent-acting adults) who are trying to look like the Incredible Hulk or young Arnold, or people who are incarcerated and trying to make their tattoos look bigger by increasing the surface area of the underlying muscle.
Weightlifting is for everybody, including octogenarians and nonagenarians—people between the ages of 90 and 99. Most gyms could probably give you some great stories about elderly people who have gotten stronger and healthier (physical strength does equate to health) since starting a resistance-training program.
Note
I didn’t know I was a quinquagenarian (between the ages of 50 and 59; if you want to see all those fun names for ages, go to http://en.wikipedia.org/wiki/Ageing#Dividing_the_lifespan).

Weightlifting, including high-intensity training, is also absolutely very good for women. They often turn out to be better at it than a lot of men are.
When Weightlifting Is Work: Two NFL Football Players’ Perspectives on Training

Jim Turner was a wide receiver, returned kicks, and played special teams with the Carolina Panthers about 10 years ago, and Chris Crocker, a safety with the Cincinnati Bengals, is a 10-year veteran. He’s played for three other teams: Cleveland, Atlanta, and Miami. Both of them, obviously, know their way around a gym and strength building. Turner (“J.T.”) is 6’ 4” and played at about 210 pounds; Crocker is listed on his Bengals web bio page at 5’ 11”, 197 pounds. I interviewed them at separate times during the winter of 2012, near the close of the National Football League (NFL) season.
What was your greatest thrill as an NFL player?
J.T.: I got to meet Jerry Rice on the field before we played the 49ers my rookie year. Even when you’re in the NFL you still looked up to these guys when you were young.
What kinds of off-season strength routines did you do?
J.T.: We spent the off-season working out—back in the old days they actually had an off-season; [but for us] even the workouts that were not mandatory had a high attendance. The type of strength routines you did depended on your strength coach; I had three different coaches with three different strategies.
For upper-body day (typically Monday) the routines involved triceps work, pushups, pull-ups, deadlifts, machine pull-downs with the Smith machines; and “curls for girls”—guys like to look good in their uniform. For leg days, we [did] not do squats with the bar because of the back issue—we did more push squats, the leg press, one-legged squats, calf raises, a lot of hamstring and quad exercises because that’s where a lot of injuries come from. You have to make sure those muscles are strengthened and balanced.
With pro sports and resistance training, we fundamentally [design workouts] that will help us do what we have to do during the game: sprints (e.g., short sprints like 40s; “two-mile runs would be distance training for an NFL player”), squats, deadlifts, a lot of people do deadlifts—because that’s the stuff that makes you strong. That’s the core stuff that works. I see people do esthetic stuff that really doesn’t help them, when I go to the gym now.
Crocker: In most teams that I’ve been on it’s mandatory that you lift twice a week, one upper body, one lower body. Some of the guys do their own thing and lift three to four times a week.
Its different everywhere—this is the fourth team I’ve played on and my 10th season. You go through different phases—the older you get, the fewer heavy weights you use—you try to focus on elasticity and flexibility; you’re still trying to be explosive, but you’re going about it in a different way. Things like TRX bands come into play [www.trxtraining.com/]. We’re using a lot of the same things [amateur athletes] use. You do a lot of things that require muscle-memory—football-specific stuff.
Looking back, would you have done anything different training-wise (e.g., rest for athletes seems to have greater appreciation nowadays)?
J.T.: Yes, yes, yes, more rest, more sleep. I got into yoga later, but I would have implemented more flexibility into the program earlier. I would have warmed up better. I ran track in college and high school and one thing I learned from that sport was that you almost have to warm up to exhaustion. I would have integrated more warm-up into my NFL routine, practice-and game-wise.
Another thing is that the guys don’t really like to work out. Everyone is self-motivated, but there’s a reason why the NFL fines you for missing workouts. Just because they’re professional athletes, don’t think that they wake up in the morning and say “Wow, I can’t wait to get to the gym.” That’s far from the case.
Tell your readers, everyone’s in the same boat. Human beings don’t like to [do those kinds of workouts]—it doesn’t feel good for anybody; it’s not supposed to feel good, but at the end of the day the results are there.
Crocker: I’m satisfied [with the approach his strength coaches used]. [When I asked him whether it was true that the resistance training isn’t very fun, he answered:] I would say that it’s not fun trying to maintain the strength—when you’re younger you lift and gain strength fast. When you’re older you have to work twice as hard [to maintain the same level of power]. You’re already consumed with trying to play the sport, the last thing you want to worry about is maintaining [muscle-specific strength]. That’s why later on I have focused on trying to be flexible and explosive. [With weightlifting] you can get into areas where you’re too big for your position; you don’t see quarterbacks bench pressing 500 pounds, like an offensive lineman.
Do you use any of those Super Slow techniques that are popular in some weightlifting circles?
Crocker: We don’t do anything slow in football.
A term you’re usually going to come across while analyzing your gym workouts is total energy expenditure (TEE). We have previously defined basal metabolic rate (BMR) as the energy expended keeping your brain and basic systems going—in practical terms, the amount of calories you would burn if you were motionless all day. It’s basically a calculated figure to help determine your daily caloric needs—you don’t really want to be motionless all day!
Your TEE is your BMR plus the calories you burn moving and exercising all day. If you want to be really specific, the TEE equals your BMR plus exercise-oriented thermogenesis (generating heat by moving about) plus the calories expended by non-exercise activity thermogenesis (NEAT).
The latter term means “the energy expended for everything that is not sleeping, eating, or sports-like exercise.”2 For example, all that activity that I’ve mentioned that doesn’t have anything to do with a formal workout: walking places, going up and down stairs, chasing the dog, answering the door, doing chores and taking the trash out. What the Fitbit tends to measure is NEAT.
TEE is the most practical measure of the amount of energy you’re expending in a day, and it’s a useful number to compare to your total caloric intake. Generally, you will gain weight if your caloric intake, as measured by a tool such as FitDay (www.fitday.com), exceeds your TEE. This isn’t always a bad thing. If you want to put on a substantive amount of muscle, you will have to provide the raw materials in the form of food and calories. You will not only have to consume quality protein and plenty of fats to burn off, you will generally have to be in a calories-surplus state to add muscle weight to your body.
A journal article from October 20063 (Preventing Chronic Disease; www.ncbi.nlm.nih.gov/pmc/articles/PMC1784117/) provides us with a couple of equations or formulas that give a close approximation of how many calories you are burning by just humming along throughout the day and perhaps hitting the gym afterward.
The largest portion of these calories is referred to as the basal energy expenditure (BEE), also known as the BMR. Remember, this is the amount of calories your body expends just keeping its own cells and systems going for about 24 hours. The formula is long, but not that complicated:
BEE = 293 – 3.8 × age (years) + 456.4 × height (meters) + 10.12 × weight (kg)
Note
I plugged in my age, weight, and height and came up with about 1,500 calories. Of course, the various formulas and tools you use for estimating the BMR will not always spit out the same number. My Tanita body-composition scale specifies around 1,680 for my BMR, and a previous formula we discussed estimated 1,440. It’s often a fairly rough estimation.
For women, the formula from the article looks like this:
BEE = 247 – 2.67 × age (years) + 401.5 × height (meters) + 8.6 × weight (kg)
What about a more realistic figure for the amount of calories you are going to burn off via all of your gym activities? You figure out the TEE by using this formula:
TEE = 864 – 9.72 × age (years) + PA × [(14.2 × weight (kg) + 503 × height (meters)]
What’s PA? It represents a physical activity rating for the day (I’ve condensed that aspect of the formula for the sake of brevity; the scientific article describes a more lengthy way of scoring separate activities by their metabolic equivalent of task—MET—and thus reaching a PA level for them). Here are the numerical options for the PA part of this equation:
Men:
Sedentary: PA = 1.0
Low active: PA = 1.12
Active: PA = 1.27
Very active: PA = 1.54
Women:
Sedentary: PA = 1.0
Low active: PA = 1.14
Active: PA = 1.27
Very active: PA = 1.45
Assume that I downhill-skied all day in the cold, or did a lot of walking plus my hardest bout of high-intensity weight training. With my age (55), height (1.7 meters), and weight (65 kilograms) plugged in, here is what the formula looks like (some sets of parentheses added by me).
The formula itself: TEE = 864 – 9.72 × age (years) + PA × [(14.2 × weight (kg) + 503 × height (meters)]
With values: TEE = ((864 - (9.72 × 55)) + ((1.54 (PA)) × [(14.2 × 65 + 503 × 1.7)])) = 3,068 calories
That’s a close enough approximation of how many calories I would burn during a high-activity day, but the number seems to inhabit the low end of the range. It would not be surprising if the various tools that people use to estimate their TEEs use this and similar formulas.
High-intensity training, or HIT, is generally the kind of weight training that uses high weights and low reps. As resistance training has many different formats and camps, and triggers much web forum debate, the HIT routines tend to have their strong advocates and committed detractors (the opposite of HIT would be using light weights, multiple sets, and high reps).
Setting aside the hyperanalysis among the lifting cognoscenti (just Google the term “high intensity training,” and you’ll see plenty of lengthy discussions and articles), I tend to apply HIT to weights, as well as sprinting for runners or cyclists—anything that is conducive to intensity.
Any short-term exercise that is anaerobic in nature and tends to hit the big muscle groups with an all-out effort is HIT, as far as I’m concerned. I suppose it’s an issue of semantics; you can drill down to more specific applications of this term if you’d like. When performed correctly and falling far short of causing injury, the HIT routines are some of the most effective fitness regimens for any program.
Mountaineering Guide: When Your Job Is Your Fitness Routine
Only in recent history have humans created separate time segments in their lives for workouts and fitness. Right up until the modern era (when the running and outdoor-rec booms began in earnest, during the seventies), many people had ordinary lives that kept them in pretty good shape by default. Now you have to look for such lifestyles. I emailed Matt Hegeman of Alpine Ascents (Seattle, Washington), who was my lead guide on a 2011 Mt. Rainier climb, about whether he had a fitness regimen for keeping him ready in the big mountains. In a word, “No.”

“My fitness regimen may not be very easy to put a finger on since I don’t really have one,” he said. “My fitness comes by doing. For example, in the summer for work I climb Rainier and on my days off I’ll go rock climbing. No time for training. If I want to get in better shape for rock climbing, I go rock climbing 3–5 [times] per week. If I want to get in better shape for skiing, I go skiing 3–5 [times] per week. My lifestyle allows me to do this. I guess you could say that my lifestyle is my training regimen.”
Hegeman recently participated in a guided climb of Aconcagua in Argentina, the highest mountain outside the Himalaya at 22,841 feet above sea level. He called it “Aconslogua” due to the merciless uphill but not often technical terrain of the climb. I can attest to the fact that the lifestyle will keep you in shape, simply based on our final Rainier day: about 3,400 feet up at midnight, followed by a 9,000-foot descent. On guiding days, a guide will burn thousands of calories, perhaps up to 7,000. And what did Hegeman and some of the other guides have planned for the following week (after maybe half a day’s rest)? Another five-day guided tour of Mt. Rainer’s Emmons Glacier. Alpine Ascent’s home is at www.alpineascents.com/guides.asp.
Before we describe certain routines, we’re going to get some basic resistance-training terms out of the way.
The repetitions, or reps, are the number of times you lift a weight before you take a rest. For example, 10 reps of a bench press at a certain weight involves executing the bench press 10 times in a row without racking the bar/weight and 15 reps of Hindu pushups simply means doing this type of pushup 15 times. A set is a group of reps that you do before resting or moving on to a set of another activity, as in “one set of 10 reps.” Imagine an egg carton as a set and the eggs as reps. A typical egg carton is one set of 12 reps (unless it’s a baker’s dozen, then it would be 13 reps).
Of course, there are many more notations for sets and reps, including forms of shorthand. Although many people (including me) just keep track in their heads, others like to write down what they’ve accomplished in the gym, or check notes describing their workouts. In order to reduce writing or typing, you can write “3 x 10 x 150# or kg,” meaning “three sets of 10 reps each at 150 pounds or kilograms”—kg—a kilogram is 2.2 pounds. Or you can use something slightly more verbose, such as “150 lb x 3 reps x 3 sets.”
A session is one workout, as in a weightlifting session. A session usually contains more than one exercise and more than one set, but it doesn’t have to. Your training routine will include a certain number of sessions per week, from one to up to four or more if you’re an experienced weight trainer.
You can also keep track of the total volume lifted in the session, day, or week, or even within a time period (say, in a set of bench presses with short rests between each rep). Volume is the total amount of pounds or kilograms you lifted during an exercise or a session. For example, if you did 10 reps of bench presses at 150 pounds, the volume was 1,500 pounds.
Note
Volume is impressive and motivating—as in, “Hey, I lifted three tons of weight during that session!” But it may not be as relevant as the incremental gains you are making in strength for the different exercises. Volume is a statistical or aggregate figure that has anecdotal value at best (as in, “During my lifetime, I’ve run the equivalent of once around the equator”).
Repetition maximum, or RM, is a term that’s bandied about a great deal in weightlifting circles. RM is a way to express the relative intensity of an exercise, so one repetition maximum, or “1RM,” for the squat would be the most weight you could squat one rep. As another example, if you can bench press 200 pounds once, your 1RM for the bench press is, you guessed it, 200 pounds.
Higher RMs reflect the weight that you can lift for multiple reps, not just one. For example, 5RM for the military press is the weight that you can presently do five repetitions of for that exercise (it will, of course, change as you get stronger).
Similarly, 10RM for the leg press is the weight that you can push on the leg press for 10 reps. The higher the RM, the lower the weight; your 1RM for the bench press might be 200 pounds, but your 10RM might be 150 pounds.
As you might have guessed, the “protocol” or the plan for your weight routine might not change as rapidly as your increase in strength. For example, midway through your routine, Tuesday’s schedule might call for 5RM of the deadlift. When you first started lifting weights, this might have been 100 pounds. Now you can do 155 pounds five times, or more, but the exercise is still referred to as “5RM deadlift.”
A weight for a particular exercise is often referred to as a percentage of RM. Let’s say you wanted to start off an exercise with a set of weights that was not quite as difficult as 10RM (the weight you can only do 10 reps of before you’re maxed out). The level of intensity could be referred to as “80 percent of 10RM.” If your 10RM is 150 pounds, 80 percent of your 10RM is 120 pounds. Or you could be doing a high-intensity session that falls just short of an all-out effort, such as “85 to 90 percent 1RM.”
How do you know what your 1RM is? You could perform a 1RM test with spotters, say, on the bench press (a certain safety technique by which one or two spotters can steady or lift up the bar if you fail to complete the rep—very important with exercises like the bench press). That can be kind of risky, though, particularly for beginners. At least one equation exists for estimating the 1RM based on lifting multiple reps with a lighter weight.
The formula goes like this: 1RM = ((# of reps) / 30 + 1) x weight lifted
For example, say you lifted 150 pounds 11 times, or for 11 reps. The equation will look like: (11/30 + 1) x 150 = 205. This equation estimates that your 1RM for that exercise is 205 pounds.4
The “predictions [based on estimations] are more accurate when the equations are based on loads equal to or less than a 10RM,” and they get more accurate the closer you get to 1RM, according to the excellent reference book Essentials of Strength Training and Conditioning.5 In other words, the amount you can do for 5RM or 3RM is a more accurate predictor of your 1RM than your 10RM.
Alright, enough of the RMs. Exactly how many sets and reps do you perform for each exercise?
So you’ve decided that you are going to initiate a resistance-training routine involving the bench press, the deadlift, and the bicep curl in one session. How many sets are you going to do for one session? In instances when you are using a trainer, this plan will be handed to you, for better or worse (you can tell I like to design my own training sessions).
This issue is another area of great debate among resistance trainers. The protocol or scheme, a kind of recipe for what combination of sets and reps will make you stronger for each exercise, will often be different for each trainer or expert you consult. There are numerous different protocols for weightlifting, which just means that you have a lot of room for variety and experimentation.
Note
The rule of thumb is that “lower reps, higher weights,” closer to your 1RM for each exercise, will help build power and muscle. Higher reps, lower weights will help increase muscular endurance.
The protocal should take into account whether you are a beginner, when you’re probably starting off with higher reps and lower weights, or an experienced personal weight trainer.
Everyone is different, in terms of factors such as baseline fitness, strength, and age, when they begin weight-training programs. Another major consideration is the goal of your resistance-training program. Someone who’s a competitive power lifter has a different goal than a geek who is just trying to get fitter. One strategy is to try different protocols and see what makes you stronger and what works for you.
There are actually three components to a protocal: the actual weight you’ll be lifting, the number of sets in one session, and the number of reps per set (not to mention the different exercises that will comprise one session and the number of days during the week you will work out).
I know a good athlete who prefers doing one set of 10 reps to “failure,” or 10RM, for each exercise. This is easy to remember, but it can be a little difficult at first for inexperienced lifters to determine how much weight to use. 10RM is about 75 percent of your 1RM, so if you have already determined that in the leg press machine, say, your 1RM is 160 pounds, then your 10RM should be about 120 pounds.
What if you don’t know what your 1RM is? How do you know what failure is? In this case, you can just make a subjective determination that “I can’t do another rep” (but never do this unspotted with exercises that could be risky, such as the bench press!). The more experience you gain as a resistance trainer the easier it will be to tell when you’re reaching your “failure” point. Similar to that feeling of “I don’t have one more sprint interval left,” the muscles are quivering and you’re building up a lot of tightness or lactic acid, which is a byproduct of the muscle’s energy output.
Another scheme for determining sets and reps is to use a lighter weight and multiple reps to “pre-exhaust” the muscle group first, before you hit it with a heavier set, such as 85% of 1RM. This method also offers the advantage of warming up the muscle group and lets you smooth out your technique first without the pressure of having to tackle the heaviest weight. The first set might be considered aerobic, while the second set is anaerobic, roughly similar to sprinting at 75 percent of max speed for 100 yards prior to going all-out for 100 yards.
Still another variation is the inverse of pre-exhaustion, where you follow up a hard set with a high-rep, lighter-weight set. The idea is that the first set fatigues the powerful, fast-fatiguing Type II muscle fibers, while the second set takes care of the less powerful, slower-fatiguing Type I fibers.
Vary your routine; do both methods. Mix things up. Combine a body-weight exercise with a hard barbell exercise. For example, I will follow up a hard set of bench presses with a set of inverted pushups (feet on the bench), to failure.
The two tools we discuss in Chapter 9, GAIN Fitness (www.gainfitness.com) and a “workout of the day” generator, also offer some insight into sets and reps. GAIN Fitness recommends two sets of 12–13 reps for each exercise, with a 40-second rest between sets. They include body-weight-type exercises, barbells, and kettlebells (these are basically cannonballs with handles, a popular new tool in CrossFit circles).
Here’s what The WOD Shop (www.wodshop-service.org/getWod.do) generated for me when I requested a workout involving lifting weights:
Rest 1 minute between rounds, add 10# per round, continue until failure: 2x Back squat (185#/95#)
Unless I’m misinterpreting these instructions, what they are specifying here is, “Do one rep of back squats with 185 pounds, then one rep with 95 pounds; rest one minute; add 10 pounds to each exercise and do the same thing.” The exercise calls for unlimited rounds “to failure,” meaning you keep doing these sets, two reps each, until you can’t any more. There’s always a minute between the “rounds” (which in this case encompasses one set and two reps).
You’ve probably concluded by now that there are countless variations or schemes for sets and reps. I’ve seen schemes where lifters have done 10 or more sets of 3 reps for the same exercise, over and over again with a heavy weight, or 5 sets of 5 reps at 5RM.
My wife’s training facility uses four sets for each exercise, but they don’t count reps, they have the athletes perform reps for 45 seconds, with short rests between sets.
The bottom line with resistance training when choosing these schemes is that heavier weights with exercises that recruit more muscle groups, and lower RMs, produce the best results. Hormones send signals to the cells to synthesize new protein, and thus new muscle. Hormones rule! You can eat as much protein and take as many supplements as you want, but the signal to make new muscle is delivered by a hormone—and involves the mTOR pathway.
To make more lean mass for your body, you have to use the routines that best cultivate muscle-building or anabolic hormones such as testosterone and growth hormone.
Here’s another quote on this matter from Essentials of Strength Training and Conditioning:
When the intensity used was 10RM (heavy resistance) with three sets of each exercise (high total work, approximately 60,000 J) and short (1-minute) rest periods, large increases were observed in serum [growth hormone] GH concentrations. The most dramatic increases occurred in response to a 1-minute rest period when the duration of exercise was longer (10RM vs. 5RM).6
A split routine involves using resistance training for the upper body one day and the lower body another, allowing each muscle group to rest. This is very common, and allows you to train on multiple days without overtraining, if you do it right.
A compound set, on the other hand, includes two exercises in the same set. The exercises target the same muscle group, as in performing hammer curls for the biceps followed by some biceps curls.
With all that said, it’s about time that we started describing particular routines and weightlifting exercises.
Now you’ve made your grand entry to the gym, and you’ve avoided using the juice bar as a cop-out refuge. You probably want to do some kind of warm-up, and if it’s a cardio-related warm-up you are comfortable with, such as sitting on a bike and pedaling for 10 minutes, then have at it.
Personally, I feel that this is a waste of time, and a bit tedious. Why do they provide modern treadmills and stationary cycles with TV monitors, so that you can watch Real New Jersey Housewives during your warm-up (or is it Real Desperate Dallas Housewives—I don’t know, some combination of “real” and “desperate”)? Because everyone assumes that spinning or treadmilling is boring, and people require auxiliary entertainment just to get through it.
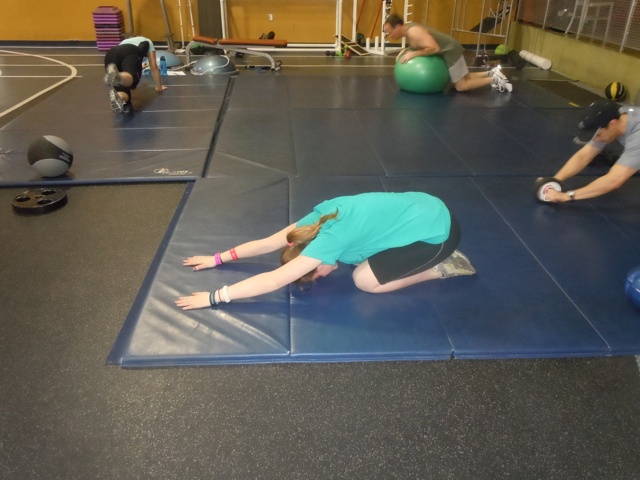
What I do for warm-ups is a set of dips, and sometimes some push-ups or pull-ups. It only takes a minute, and it gets my blood pumping and my heart rate going. I usually feel the need to stretch out my lower back, so I assume a yoga position called the “child’s pose” (see Figure 8-1). Then I take a long wooden staff (most gyms keep these around) and I limber up my back and legs with the staff on my shoulders, sort of like a yoke. This is all over in minutes, and I’m on to my first routine.
You can also add or use a first set of lightweight resistance training, as described in “Pre-Exhaustion,” as a warm-up, or do a more conventional warm-up, like swimming, which is an excellent loosening activity for the muscles.
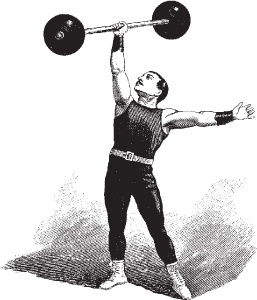
Now I’m going to introduce several resistance-training exercises. I’ll accompany them with pictures, and, whenever available, link them to a video clip or some other explanatory site. I’m going to start with five go-to routines that use some of the body’s larger muscle groups and are proven strength-builders: the bench press, the military press, the deadlift, the leg press, and the back squat. These are tried-and-true resistance-training exercises, and while some have fallen into disfavor on the Internet among hardcore weightlifters (e.g., the bench press), putting these five exercises together will doubtlessly help you increase all-body strength and fitness.
Along the way, you can check out the sidebars, which are examples of routines and interviews with workout mavens. Even if you had a resistance-training program that involved only these five routines, you could still expect to get good results (provided you lifted enough weight, that is).
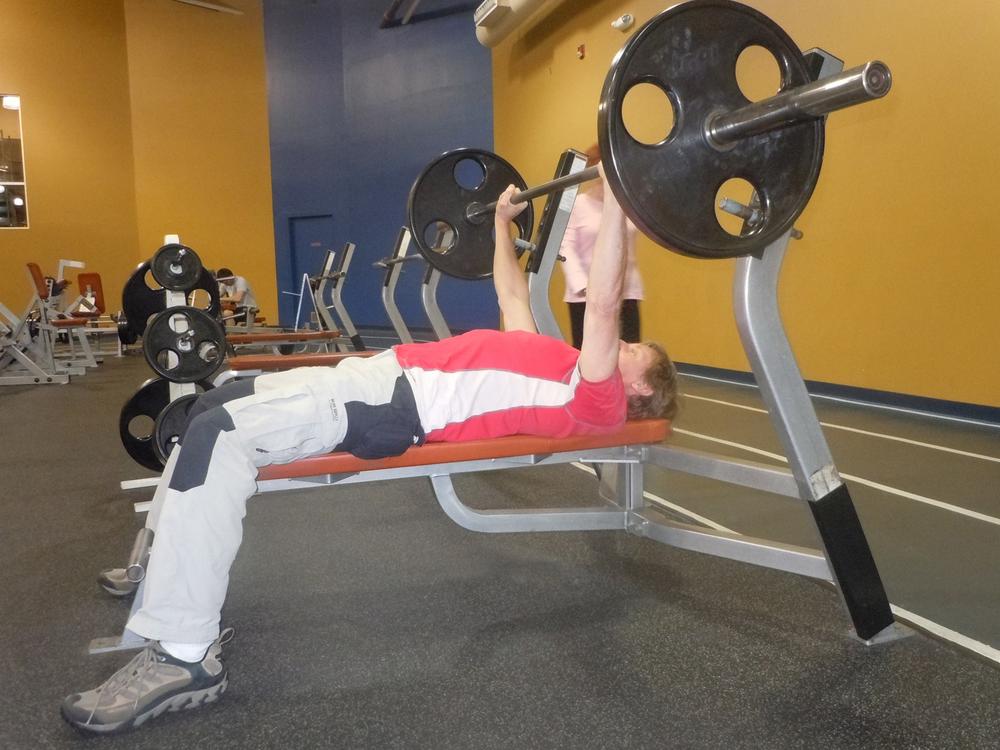
You probably recall this exercise from high school—I do. The “200-pound bench press club,” the stocky dudes who used to hang out in the corner of the gym after school. With the bench press, you lie on your back on a bench under the bar, with both feet flat on the floor. You place both hands on the bar, slightly wider than shoulder width (see Figure 8-2), with your palms facing outward, or away from you. Move the bar off the rack, let the bar down toward your chest (but not all the way, obviously!), and push the bar back up, as many reps as you can do. In most cases with the bench press, you will have a spotter.
A warm-up that a beginner can do, with a spotter, is to bench press the bar as many times as he can. In most gyms, the bar weighs 45 pounds, but check with the people who work there first. Another variation on a bench press workout, a kind of compound exercise or superset, is to follow the bench press with inverted pushups off the bench. You can also do the bench press with dumbbells of varying weights, which increases the range of motion used for this exercise.
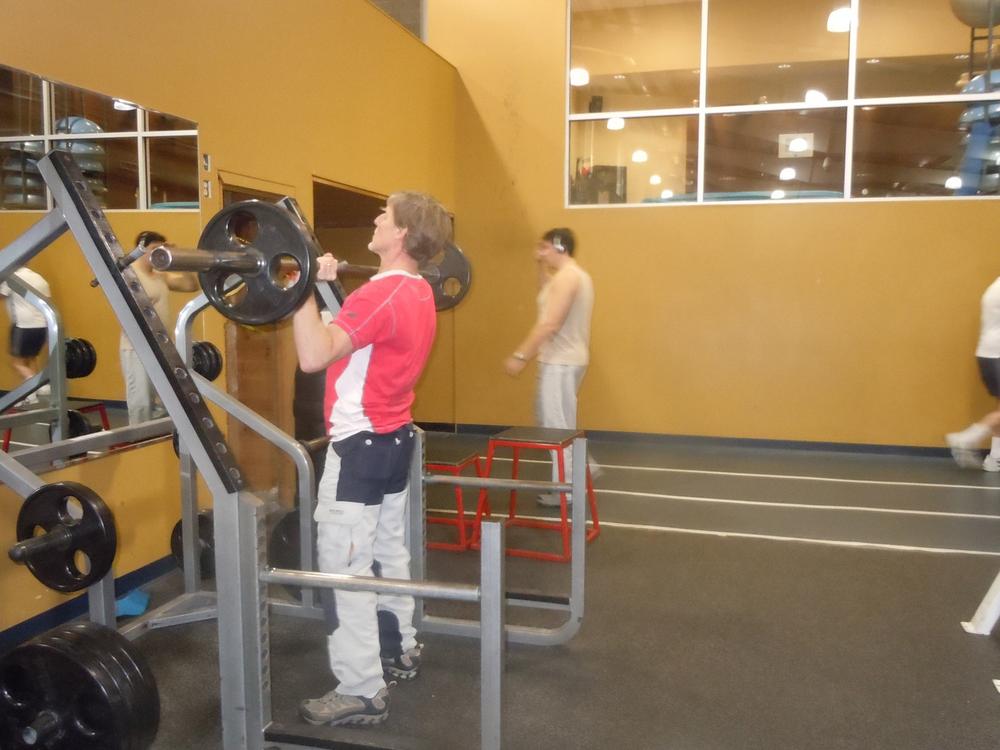
There are a number of different ways to do the military press (such as beginning with the bar on the floor, or a seated military press), but we’re going to show a standing variation of the military press, with the bar placed on a rack at about chest height (the equipment is sometimes called a squat rack; it has two hooks placed at different heights for racking the bar). Here’s a video link showing the general technique for this exercise from Bodybuilder.com: www.bodybuilding.com/exercises/detail/view/name/standing-military-press.
With the military press, you grasp the bar with palms facing outward, carefully move it off the rack, then bring the bar down to your chest, and push it all the way over your head. Unlike many other exercises, where you do not lock the joints such as the elbows or knees, the military press pushes the bar in a straight-up-arms position. Figure 8-3 shows the beginning of the rep before the big push.
The military press can also use dumbbells, such as in a seated position, as shown in Figure 8-4. This exercise is also called the shoulder press.

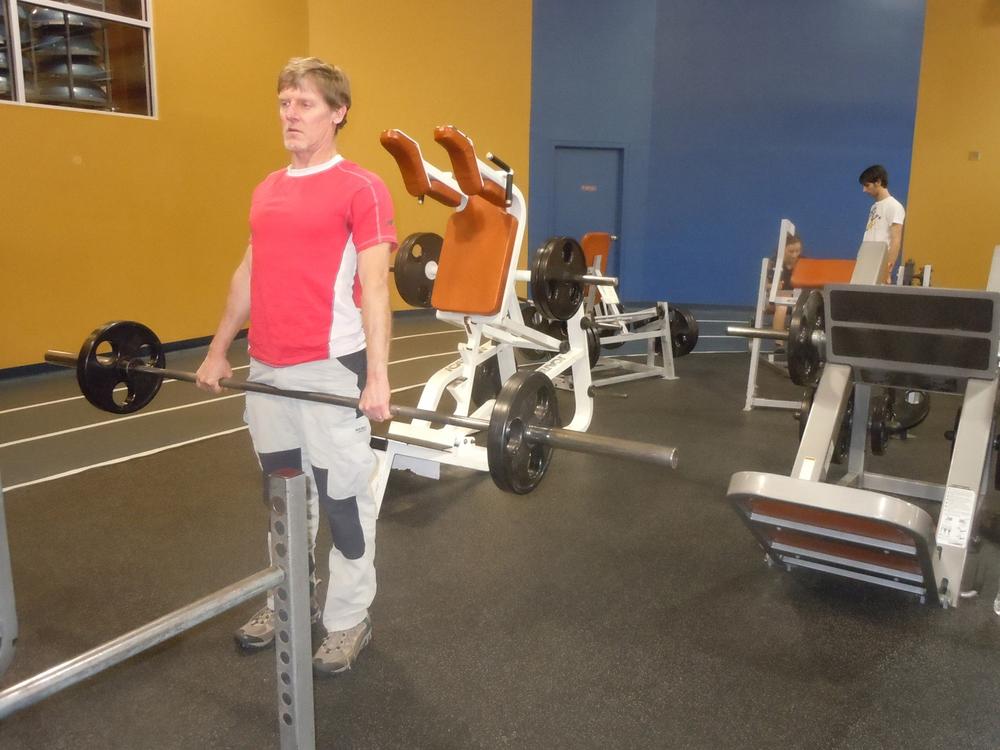
For the deadlift, the barbell starts on the floor, or you can take the bar off the rack while standing. You crouch down with your legs bent, and grasp the bar at about shoulder width with your palms down (but there are variations on the grip), shins almost touching the bar. A common instruction for the deadlift is to “drive through your heels” as you pick up the bar, pushing your hips toward the bar at the end of the movement. An excellent demo video from Bodybuilding.com is here: www.bodybuilding.com/exercises/detail/view/name/barbell-deadlift.
You should watch this video before you perform the exercise, because you can hurt your back doing the deadlift if it is not executed correctly. Begin with lower weights first as you grow accustomed to the movement. Figure 8-5 shows the finish of the deadlift.
The leg press is designed to strengthen the big upper-leg muscles. It is a very effective strengthener for the glutes (your fanny muscles), the hamstrings (the skeletal muscles along the back of your legs), the quadriceps (your thighs), and even your calves. Unlike the other exercises we’ve described so far, the leg press, in this variation, involves a machine, not a barbell. It’s a pushing exercise, rather than a pulling one like the deadlift. You sit in a seat and place both of your feet on a plate or platform about shoulder width apart, as shown in Figure 8-6.
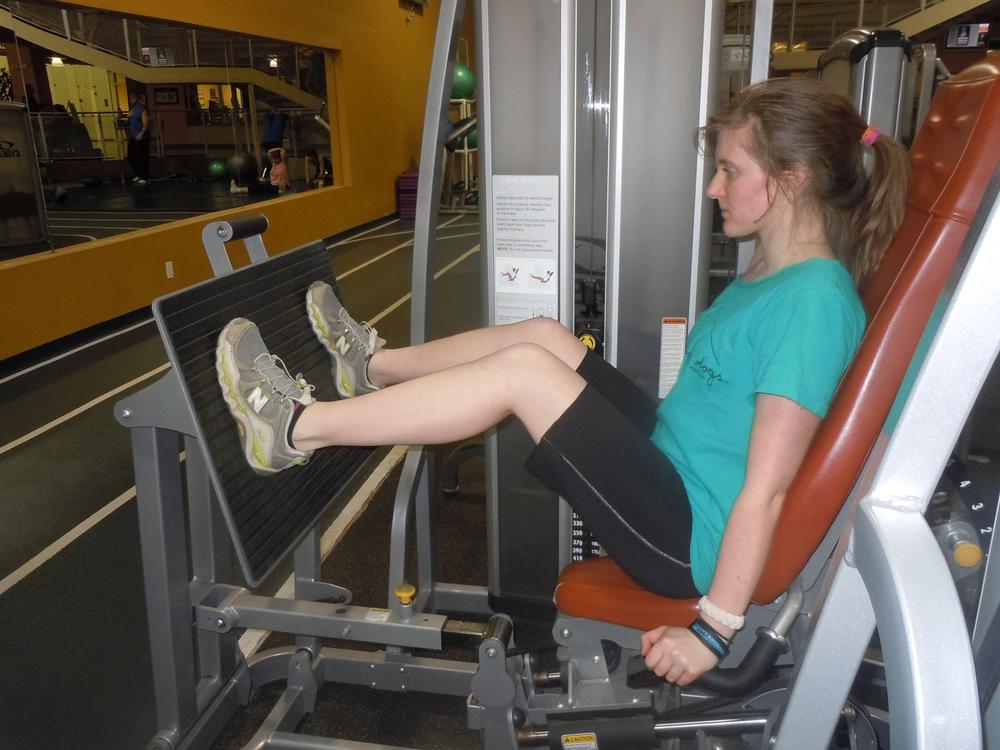
As with many machines, it’s a good idea to use the leg press with low weight the first time around, focusing on a smooth, slow motion and proper technique (inhale when the weight comes back toward you; exhale when you push). Do not lock your knee joints during this exercise; keep your legs slightly bent at the end of your push motion. Keep your feet flat on the plate. (A variation of this technique uses only one leg, with comparatively light weights, in order to help strengthen the weaker leg when you have a strength imbalance between your two limbs.)
This is a good conditioning exercise for jumping, sprinting, skiing, and other sports. Here’s an excellent demonstration video from Bodybuilding.com: www.bodybuilding.com/exercises/detail/view/name/leg-press.
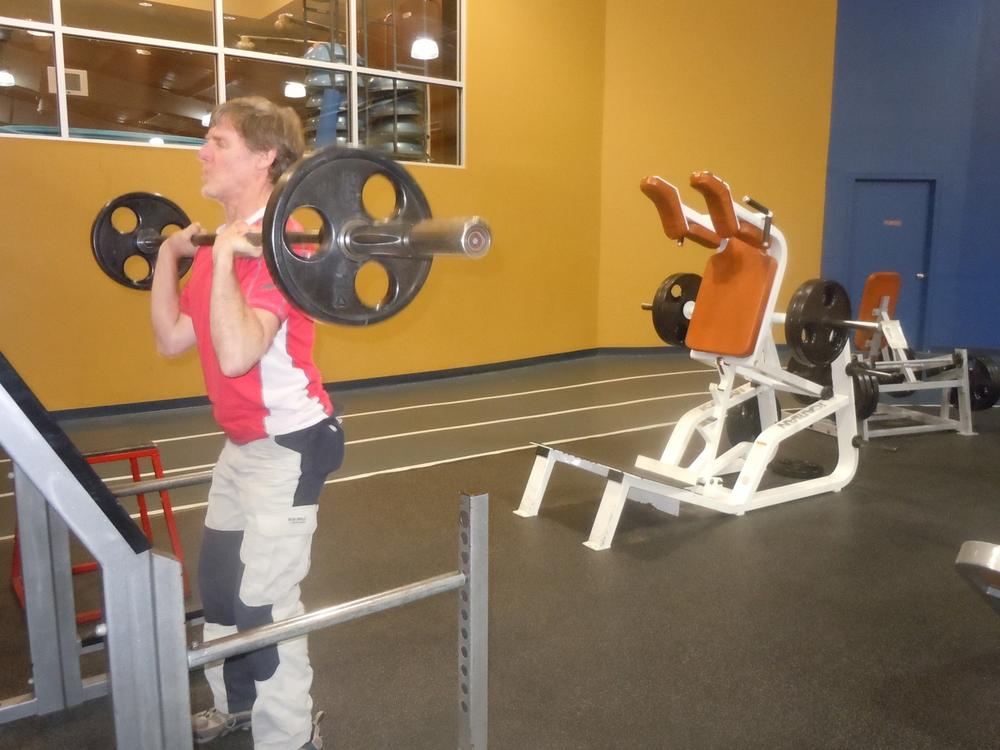
The back squat is another strengthening exercise for your upper leg muscles: the quads and the hamstrings. The bar touches your shoulders behind your head, as shown in Figure 8-7. You place the bar on your back by “stepping into it,” when the bar is already positioned with its weights on a squat rack, which is a tool that most gyms will have in their resistance-training areas. The rack allows you to position the bar at different heights. This prevents you from straining yourself trying to get the bar off the floor and onto your back.
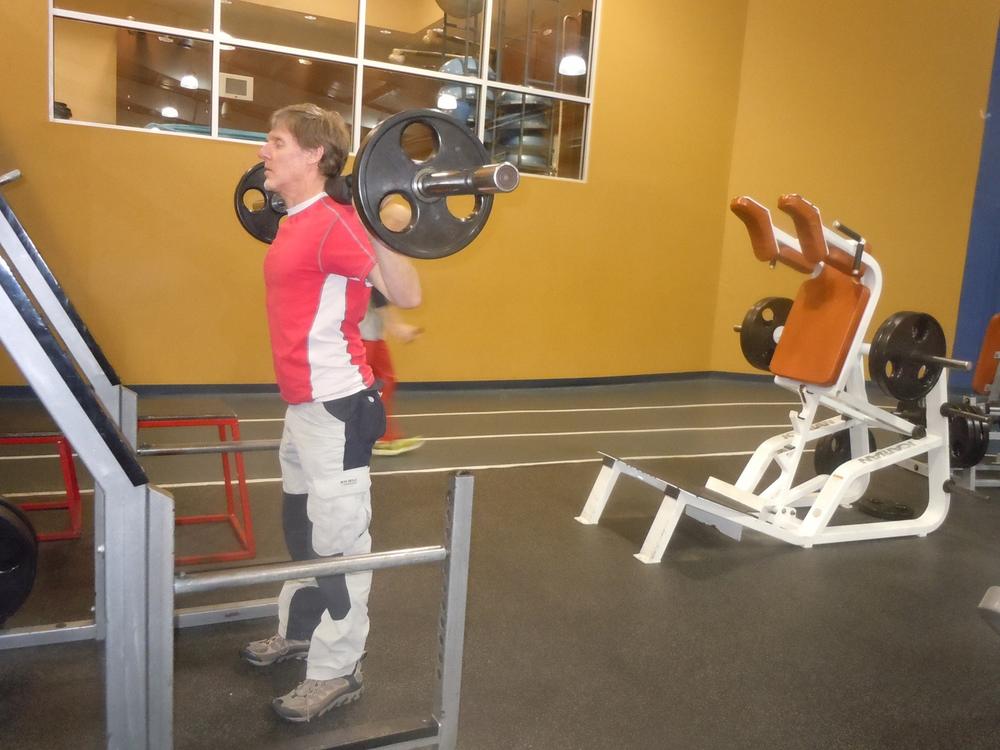
When you’re finished with a set, you can just step toward the rack again (not that you’re very far away from it in the first place!) and place the bar on the two hooks that are about at your shoulder height. You should probably use a barbell pad as well, as the bar can create some discomfort on the shoulders.
Practice with a wooden staff or a bar alone with no weight before you begin a back squat (or any type of squat) with weighted plates on the bar. You have to be careful with this technique, because the improper usage of it can potentially hurt your knees or lower back (that’s why I prefer the leg press for a challenging thigh exercise—there’s less of a risk of back injury). The following video provides a demonstration: www.youtube.com/watch?v=Hyjpz4jkjSQ.
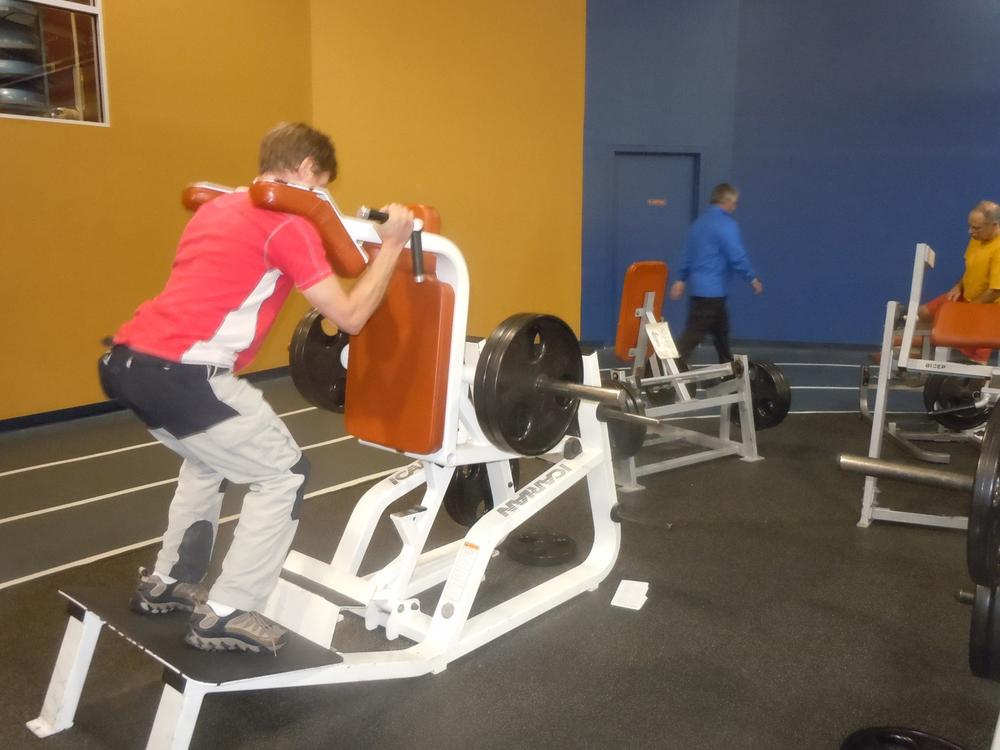
Figure 8-8 shows a front squat, which is another variation. Figure 8-9 shows a power squat, which is a machine that, in my personal experience, allows you to safely use much more weight than a back squat, without putting potentially excessive pressure on your lower back, for example.
Since it doesn’t involve free weights, the power squat can safely substitute for free-weight squats, if you’re not quite ready for those.
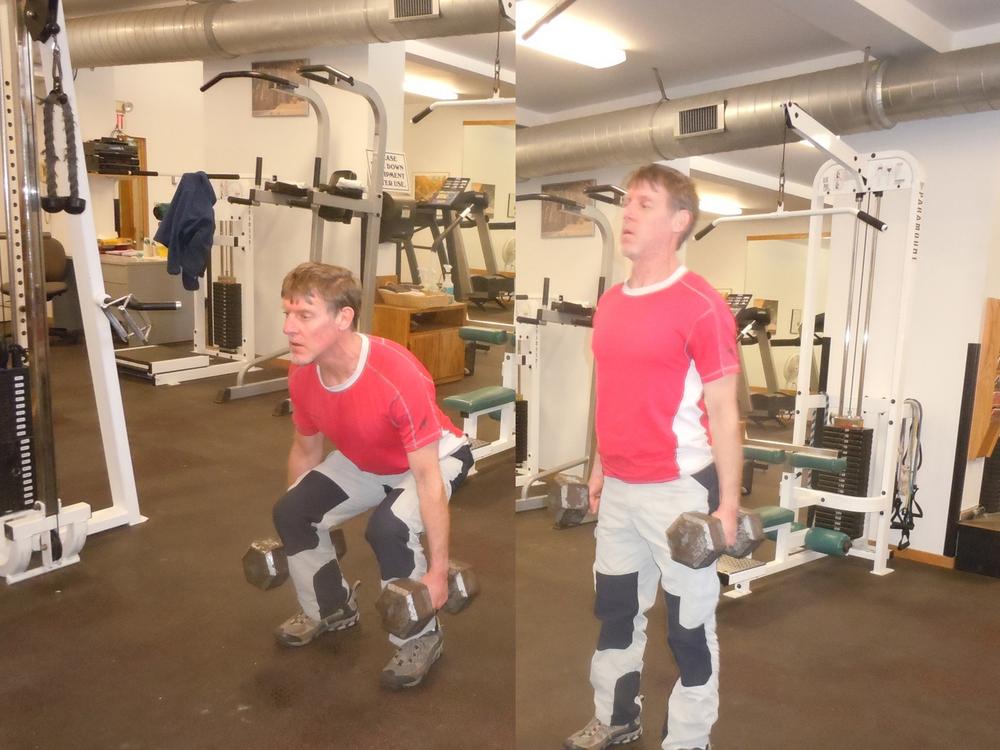
You can use dumbbells to initiate both squats and deadlifts. This is fine; one technique isn’t necessarily better than the other, and you’re still working hard. For squats, hold a dumbbell in each hand at shoulder height, then perform the squat as you would with a bar. For deadlifts, carefully move a couple of dumbbells to the floor next to your feet: one to your left, one to your right. Bend down and pick them up, drive through your heels and stand straight, as shown in Figure 8-10.
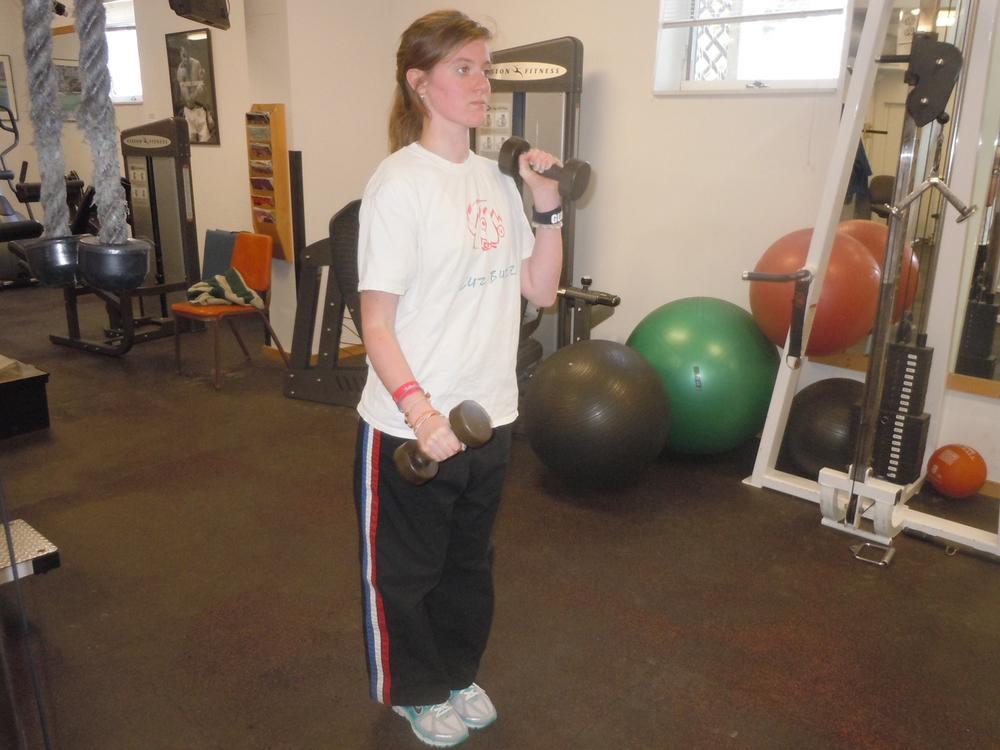
Bicep curls and hammer curls are two exercises you can do with dumbbells that strengthen your upper arms. The latter are for triceps and the former for biceps muscles. You can do curls standing up or sitting down, but I’ve found that when standing up, the routine requires more effort (we’re not trying to make these workouts easier!).
For hammer curls, for the triceps or the back of the upper arm, the dumbbells are parallel to your body and the grip used is similar to a handshake, as shown in Figure 8-11. This exercise can be combined in a compound set with bicep curls for a complete arm-strengthening exercise.
Figure 8-12 shows the well-known bicep curl with dumbbells. This uses a palms-up grip, similar to a chin-up. One option for your routine is to perform a set of hammer curls, take a short rest or do an upper-body set of another exercise, then complete the troika with a set of bicep curls. Rinse and repeat.
Bicep curls and hammer curls focus on fairly small muscle groups of the arm, so make sure you’re not spending too much time on them at the expense of hitting the big muscle groups with your weight training—the hamstrings, quads (thigh muscles), glutes (butt muscles), and lower, middle, and upper back, as well as the trapezoid or shoulder muscles.

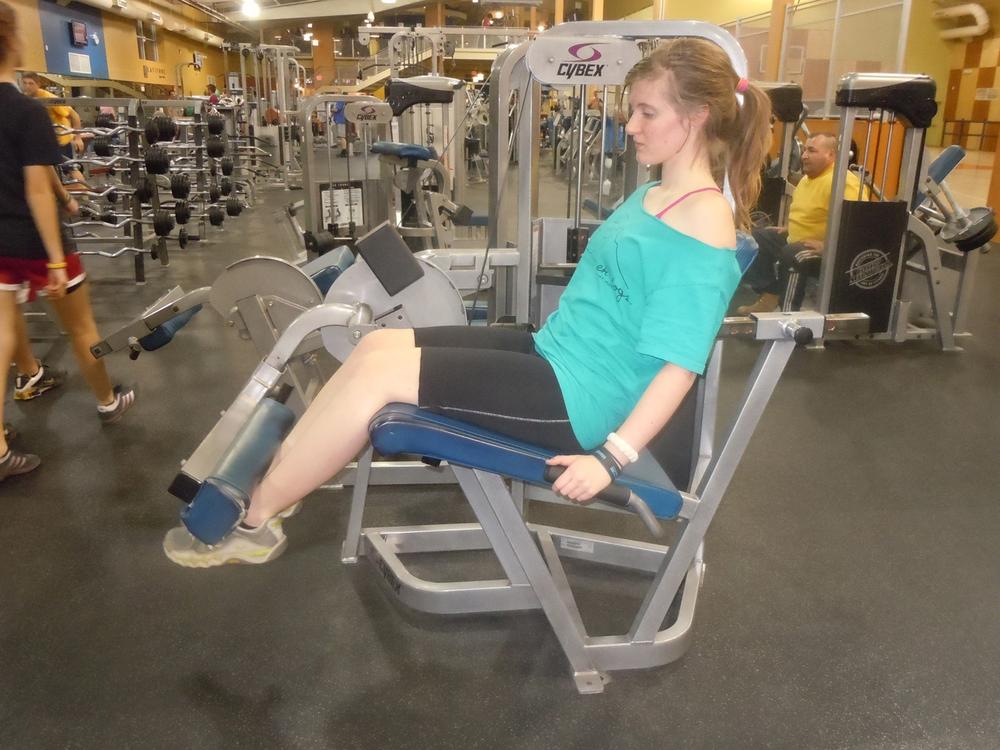
The leg extension machine is a machine that you sit down in for exercising the quadriceps muscles. Leg extensions can be performed with either one or both legs (the one-legged exercise to help correct a strength imbalance between the two legs, for example). Use only light to moderate weight at the beginning for this exercise, because you could otherwise hurt your knee joints. I use leg extensions, mostly of the one-legged variety, as a complementary routine following more effective lower-body techniques, such as the leg press or back or power squat. Figure 8-13 shows a leg extension machine.
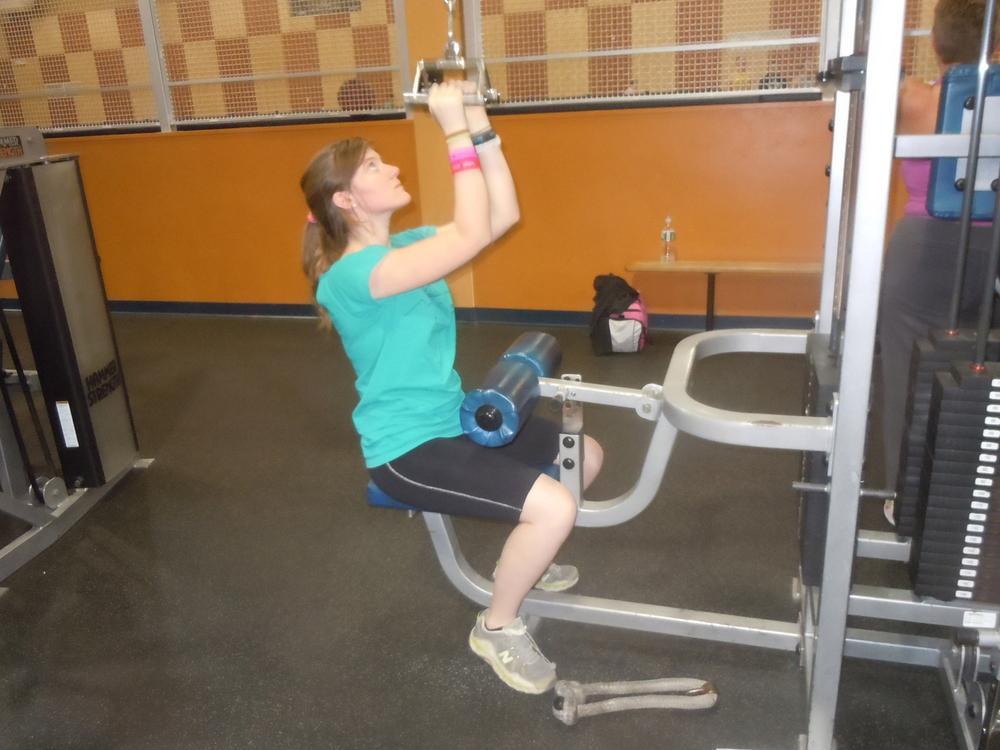
The cable pulldown is an excellent exercise for the upper back (traps) and arms (seemingly more of an exercise for the triceps, in terms of the arm). There are numerous variations of this exercise, both standing and sitting, as well as with wide or narrow grips. The one I have chosen to show in Figure 8-14 involves sitting down at a cable machine, using a narrow grip, and pulling down on a weighted stack.
This brief introduction is sufficient, to say the least, to get you started on an all-body resistance-training regimen at the gym. There are nevertheless hundreds of exercises that can be performed with free weights and barbells, machines, dumbbells, kettlebells, weighted balls—you name it. To come right down to it, you don’t need the endless flood of “new and improved” fitness tools, wherein it is difficult to separate slick marketing from an actual tool or device that has a practical, beneficial effect. You can add strength and lean mass with a small, well-defined set of free weights and machines, for instance.
It helps to watch technique-oriented videos before you start a new resistance-training routine. The Mayo Clinic website has an extensive collection of “how-to” videos: www.mayoclinic.com/health/strength-training/MY00033. They are mostly designed for beginners and include coverage of machines, free weights, and body-weight exercises.
Bodybuilding.com also has a huge library of instructional videos and other resources: www.bodybuilding.com/exercises/. If that’s not enough, a Google search on “resistance training videos,” for example, produces more than 10 million hits.
The next section describes a couple of apps that you can use to track your sets and reps. Then we conclude the chapter with a segment that introduces CrossFit, a variation on the local gym that you might be interested in trying out at some point. CrossFit offers a few useful routines that you cannot find at a typical fitness facility, like climbing ropes!
Remember that “what gets measured gets managed” paradigm we mentioned in the preface—the measure first mantra? It’s often a good idea to keep track of your sets and reps over time, as well as the subjective aspects of weightlifting (e.g., “I was maxed out by that last set, even though last week I got through it no problem.”). The data is not only motivational, but it shows you what you’re doing right, what you’re doing wrong, when you need to rest, and what type of rest works best.
Note
Consider recording sets, reps, and the weight used for various exercises, as well as the effect of sleep and nutrition on your energy levels.
The purpose of resistance training is to increase muscular strength by gradually increasing the resistance or weight you are lifting. This action stimulates the muscles and other physical systems to adapt to an ever-increasing load or level of weight. If you want to be scientific about your weightlifting, it can be difficult to remember the weight that you used for various exercises, and thus to manage the sequential incrementing of that weight as you develop strength, if you don’t keep records.
Traditionally, people bring lists they’ve written down or printed out of their exercises, sets, reps, and weight used, as well as their goals for the day or session. It’s a tried-and-true method, and it might be useful if you have a particularly complicated session planned for that day—say, half a dozen or more exercises. Or, you may be able to keep your set-and-rep scheme in your head. Either “low-tech” option works fine; I don’t use any recording apps for my typically short and efficient workouts.
If something more high-tech appeals, though, you can use a smartphone app to set up and record your weightlifting, and there are some good ones out there.
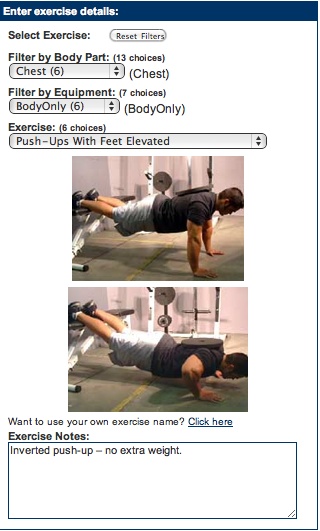
Men’s Health Workouts is a comprehensive app (for both Android and the iPhone) that includes numerous recipes and descriptions of resistance-training techniques, as well as methods for recording them. Before you get into the description of this app, be advised that it is not designed to record exercise routines you have invented. You have to perform the Men’s Health routines (there are dozens to choose from), and it provides you with a feature to save the sets and reps. This app also does not have a web-connected dashboard and graphics, at least at the time I checked it out, for viewing your workouts.
Figure 8-15 shows the main screen, which gives you the choice between exercise descriptions, workout recipes, and logging (inputting reps and sets).
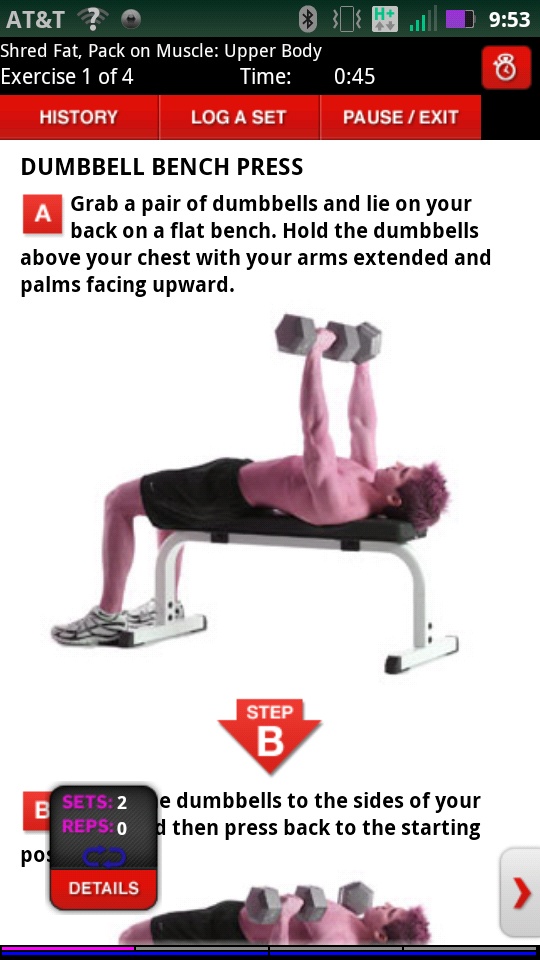
Choose Workouts and Build New Muscle from the resulting screen, and you get a little description of the recommended program. Specifically, this routine involves four weeks of training using eight exercises, of the “3 sets, 8 to 10 reps” variety. The routines are of the “do this, do that” prescriptive variety, but you can obviously adapt them to your own program. Perhaps run through the whole routine once to determine if you want to adopt parts of it or the whole thing. The app does a pretty good job of briefly describing and illustrating the exercises, as shown in Figure 8-16.
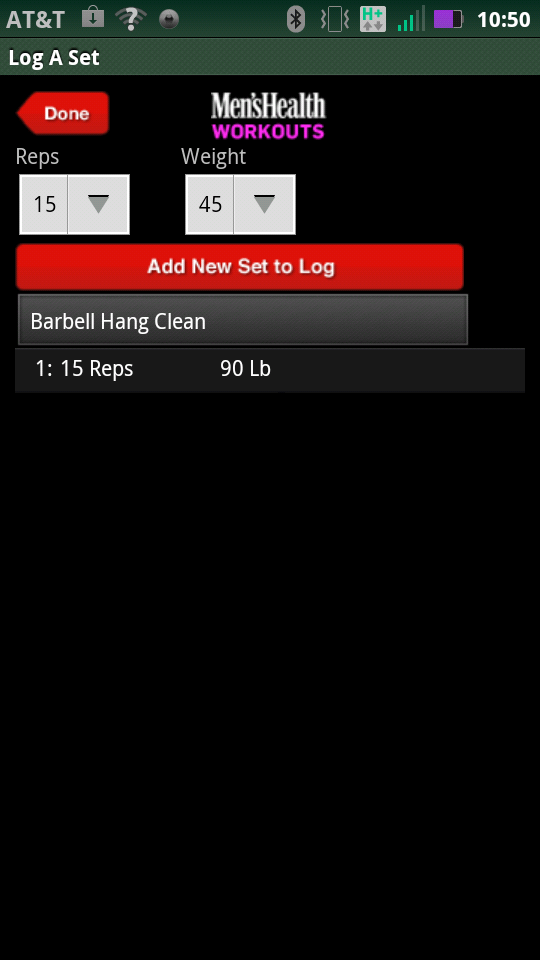
The app times your sets, with an option to pause or exit a workout. It can be inconvenient and awkward to carry around a smartphone (thus all the armbands and similar accessories they’re willing to sell you!) and push buttons during your workout. Some athletes respond better to using devices in the weight room than others. When it’s time to log the workout, select “Add New Set to Log” and the app saves it on your device’s storage medium, as shown in Figure 8-17.
The big missing element—the elephant in the room, so to speak—is the absence of an accompanying website with all your workout data uploaded and displayed with charts and graphics.
We described Fitocracy in Chapter 2. If you’re a Fitocracy member, you can use its mobile site (not a smartphone app, as of this writing) to record weight-training sessions. Go to the site at www.fitocracy.com/m/play/. The sets will be saved and added to your data at the website, on the cloud, so to speak.
This site has an intuitive design for entering weightlifting data. Given that your own data is stored on Fitocracy’s servers (for viewing/manipulating once you log onto the site), the data is accessible on your phone via the mobile app. Figure 8-18 shows a screen for logging a set.
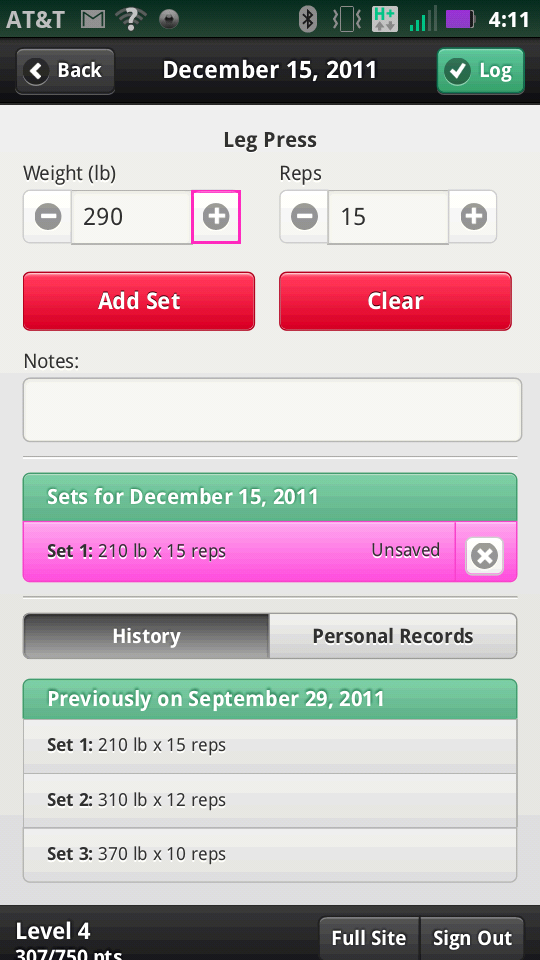
Bodybuilder.com has a pretty good website for tracking sets and reps—it’s called the BodySpace Workout Tracker. It has the nice feature of creating a template from a previous workout, and you can use that template to enter data for a current session. Figure 8-19 shows the screen for creating a workout involving inverted pushups.
Using the template, you enter a new workout into the tool using a calendar and an intuitive screen, and the tool saves the data for you, as shown in Figure 8-20.
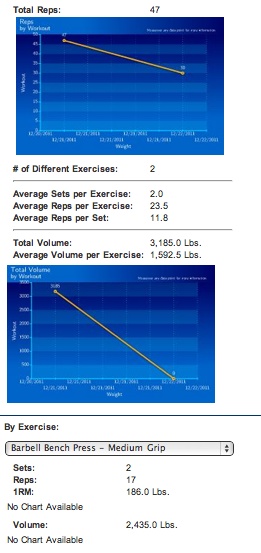
In the site’s View/Edit History section, the tool proffers a nice set of charts and aggregate statistics for previous workouts, as shown in Figure 8-21. The app compiles statistics such as volume (total weight lifted) and calculates your 1RM (highest total you can lift one rep) for the workout’s exercise.
We include an introduction to CrossFit here, but not because it is one of the loudest recent buzzwords of the exercise world (although that noise may well lead you to wonder, “What is CrossFit?”). As a cross-training regimen, it seems to be a very good fit with the other regimens we covered in Chapter 7 and earlier in this chapter, such as sprinting, body-weight exercises, and weightlifting. CrossFit involves all of these activities, and more. We’ll let the developers speak for themselves, from the introductory page at: www.crossfit.com/cf-info/what-crossfit.html:
CrossFit is the principal strength and conditioning program for many police academies and tactical operations teams, military special operations units, champion martial artists, and hundreds of other elite and professional athletes worldwide. Our program delivers a fitness that is, by design, broad, general, and inclusive. Our specialty is not specializing. Combat, survival, many sports, and life reward this kind of fitness and, on average, punish the specialist.
Note
We’ll talk about CrossFit again in Chapter 9, when we discuss using a WOD (or workout of the day) generator. The CrossFit gang also pay more than lip service to additional health-related aspects such as nutrition and fasting, which are widely discussed in this book.
CrossFit might be thought of as cross-training on steroids. Cross-training is the traditional term for using exercises that promote variety and focus on both cardiovascular strength and power, for example, combining running, sprinting, and weightlifting. Cross-training was an outgrowth of people finally burning out on “just running” or “just cycling,” as well as the proliferation of extensive year-round training programs for one team sport (promoting more burnout), leading many to realize that they needed some variety throughout the year.
CrossFit is basically offered at gyms that are specially designed for those purposes, and you can find them in the Yellow Pages and advertised on the Web. They have introductory courses on the huge variety of techniques they use, and the Web also offers a ton of descriptions and videos. Just go to the CrossFit Frequently Asked Questions (FAQ page), for instance, at www.crossfit.com/cf-info/faq.html#General0.
Note
The list of CrossFit videos is here: www.crossfit.com/cf-info/excercise.html.
CrossFit involves a smorgasbord of weightlifting, gymnastics, body-weight exercises (all kinds of pushups), newish techniques (such as hoisting kettlebells around), and the kind of climbing maneuvers you might see at a military boot camp or “muddy gladiator”–type weekend race, like climbing ropes. The CrossFitters pride themselves on being all-rounders and “functional,” meaning their techniques are meant to make you strong in a practical way, instead of just making a particular muscle group bulge out or giving you six-pack abs.
Note
The six-pack ab mentality is so pervasive that my 7-year-old blurted out one day that he “only had a two-pack.”
With CrossFit, you can work out alone or in a class full of sweaty people doing mountain climbers and hoisting barbells, which a lot of people apparently like to do. Class-style fitness has never appealed to me, but I suppose that depends on your personality and experience. I’ve found that some CrossFit facilities are particularly rigorous about making you take classes and/or move about the facility with an instructor, so you may have to shop around if that’s not your style.
With all the information available on the Web you are certainly capable of buying the equipment or just using your local gym to initiate your own CrossFit routine. CrossFit proponents often recommend that you learn the different techniques, then use the various WOD generators.
CrossFit also has competitive tournaments, and the various techniques involved in the competitions are a reflection of just how versatile and strenuous CrossFit can be. The tournament might require its entrants to do as many pull-ups as they can, run a 5k, run a 400-meter dash, squat as much weight as they can, do a timed weightlifting contest for total volume, and so on. Just looking at the results will knock you out. It is the Everyman’s Olympic decathlon.