We geeks just don’t get outside enough. After a while, “outside” begins to be defined as the carpeted hallway outside the main office where the rest-rooms are, or the food court emporium downstairs.
I once worked in a software house in a beautiful, historic seacoast community. People worked hard there and seemed to like the company and their jobs. The trouble was, no one went outside. People were so fond of their cushy positions, it was as if they were afraid to leave the environs after 9 AM rolled around. Even at lunch break, most of them would stay in their cubicles or repair to the cafeteria for the meatloaf and mashed potatoes.
What do you expect from a company that still held “casual Friday,” during which management wore jeans (they probably called them “dungarees”)?
Of course, it wasn’t exactly the company’s fault that no one was going outside (even though they were a little chintzy about vacation time). Everyone had simply forgotten their roots, or had been dissuaded by antisun dogma.
Outside the company were beautiful hilly walks that you could take in the sun. I took them every lunch break, and they made me forget about the somewhat dun-looking brick offices. A whole new world existed out there, including a coffee shop I’d hit up for a to-goer on the way back. The shop was partly managed by a former Sherpa for Mt. Everest expeditions, believe it or not (he was now working at about 50 feet above sea level). He would chat with me about climbing Everest, I would look at his maps, and from there I would dream. I never would have discovered his shop if I never went outside.

To keep a theme going from Chapter 1, we have built-in software code that expects us to be companionable with the sun. We were not designed to sit in a dark room all day and night, typing code. This has become the norm in some software outfits, but once you discover the negative fitness implications of being a shut-in, you might look askance at this sunless office existence.
Simply being in the sun, or at least outside, first thing in the morning, then at least sporadically throughout the day for an indoor worker and for a long time during the weekend, is healthy.
The problem is, we’ve been inculcated with advice and dogma that the sun is our enemy. It causes skin cancer; therefore, we should always cover ourselves with clothes and sunblock. A very good doctor in every other way once told me to apply sunblock whenever I was out in the sun for more than 10 minutes, even in New England during the winter.
The sun is healthy for a number of reasons:
It helps you make vitamin D (a lot of it, if you’re a young lifeguard in a bathing suit or a youngster running around in the sun—sun burns are bad though, so watch the dosage).
Vitamin D and/or increased sun exposure may actually prevent many cancers, possibly beyond the vitamin-D effect. According to Dr. john Briffa, “Higher levels of this nutrient and/or increased sunlight exposure are associated with a reduced risk of several cancers.”1
Sun exposure first thing in the morning stimulates a part of the hypothalamus in the brain called the supra-chiasmatic nucleus (SCN) to send signals to the rest of the body, helping control body temperature and the release of hormones such as cortisol and melatonin (which has a delayed release, until evening). These actions control your internal clock (when you feel wakeful and sleepy—see Chapter 9).2
Sunlight has a mood-elevating effect for most people.
Heck, we might find out, down the line, that a little sun exposure positively effects gene expression.
And it goes on and on.
Our ancestors spent a lot of time outdoors in and out of the sun, and it’s even surmised that as we migrated to northern latitudes from Africa, the evolution to lighter skin was designed to admit more sunlight and vitamin D.
Go Outside for Friluftsliv: Ask the Scandinavians
Why should I go outside, when I have work to do? Well, ask the Norwegians and Swedish people, with their centuries-old friluftsliv (roughly pronounced, “free-loofs-leave”) tradition. As a writer who has just come upon this concept, I realize that I have strongly embraced this tradition (without conceiving of it concretely as “tradition”), even though I never knew that a cultural philosophy had been framed around it. The term translates loosely as “free air life” or “free open air.”
It is a philosophy of basically making a spiritual connection with nature by walking and skiing in the wilderness a lot (please hold the sarcasm about communing with nature; there really is something to this philosophy fitness-wise). “Nature” could just be the local park or coastline—whatever you have available. You don’t have to jump on a plane bound for an expensive holiday in the Alps or Himalaya to enjoy it. The idea is to take long walks (or ski trips) whenever you have the free time, with people you enjoy or just on your own, and that this activity is intrinsically beneficial for your body and soul, and makes you spiritually stronger by helping you appreciate your environment and understand your ecological niche.
Since way before the iPad, friluftsliv has been thought of as an escape valve for modern industrial lifestyles that jam us inside all the time and somewhat warp our views of our place on the earth. There is a philosophical connection between friluftsliv and the concept of “Deep Ecology,” an invention of the Norwegian mountaineer and philosopher Arne Naess (see www.deepecology.org/movement.htm).
Both the Swedish and Norwegians have cultivated their outdoor traditions by implementing laws allowing the free use of uncultivated land and wilderness for hiking and skiing, no matter who owns it. Too often, as one essay about friluftsliv points out, we have commercialized the wilderness as an “arena” for testing ourselves and our gear.3
Not to mention the fact that long walks outside are healthy and a good remedy for stress. Friluftsliv, hmm, it’s hard to say, but count me in.
Note
A recent study in the British Journal of Nutrition examined the vitamin-D levels of two traditional cultures that live near the equator and spend a lot of time outside—the Maasai and Hadzabe hunter-gatherers of Tanzania in East Africa. The mean vitamin-D level (25(OH)D) in the blood of about 60 study participants, men and women, was 115 nmol, or about 46 ng/ml, all obtained naturally by exposure to sunlight. The people typically avoided the sun at its strongest, during midday. “Populations with traditional lifestyles having lifelong, year-round exposure to tropical sunlight might provide us with information on optimal vitamin D status from an evolutionary perspective,” according to the study.4
So, now we’ve established that being outside is healthy (see the sidebar on the Scandinavian philosophy of friluftsliv).
Obviously, exercising outside is healthy, too—particularly the right kind of exercise. Simply being outside during parts of the day, such as first thing in the morning as the sun rises, enhances your overall outlook and fitness in its own right. Now we’re going to add some descriptions of outdoor fitness techniques and tools, beginning with good old walking.
Back when I was putting in mega miles as a runner and biker, I used to have a somewhat snotty attitude toward walking. I used to see lots of people taking their habitual morning walks, and snicker. My attitude could be summed up as “Hey, we’re bipedal by nature, so how can that be a ‘workout’? You gotta kick it up a notch to get really strong!”
Little did I realize that I was the one who was wrong, or know that this was the whole point, and elegance, of walking in the first place. We’re perfectly designed for walking, we can go many miles without tiring or breaking down, and the motion itself has a variety of beneficial effects. It’s healthy, simply because walking isn’t sitting.
You don’t have to put in mega miles to reap the benefits of walking. As mentioned in Chapter 2 on tools, we seem to be designed for a steady oscillation of movement throughout the day (not sitting all day). Thus, little walks spread throughout the day, particularly as mental breaks, have a perfect place in our fitness strategy while working. Not to mention the fact that they get us outside, under the sun (or maybe if you’re in Seattle, at least the view is good), and off the mechanistic treadmill.
Note
It’s possible that walking helps burn fats, the chief source of fuel for striding, from peripheral fat depots of the body, where you want to reduce it. Jogging, on the other hand, may burn fat predominantly within the muscles’ fat storage sites, where you don’t mind having fat.
Walking raises the heart rate, but not to the extent where you kick your metabolism up to a level where you stop burning fats predominantly (we’ll discuss walking and weight loss when we cover our Endomondo fitness walk). The cardiovascular benefits particularly accrue when you’re carrying a little weight like a backpack and the walk itself is hilly (see Hiking and Climbing just ahead in this chapter).
You can combine walking with many other fitness techniques, such as pull-ups, push-ups, jumping, and sprints. We’ll discuss all of these combo fitness techniques throughout this chapter.
Walking is the perfect recovery plan for resting from a sprint or especially a resistance-training or weight workout. You’re getting the rest that’s required following those types of training sessions (if you’re doing them correctly), yet ideally, you’re outside, getting some movement, as well as enjoying Mother Nature.
Walking is also good preparation for any big efforts that you have planned (e.g., climbing your first 14,000-foot mountain, or doing your first triathlon), yet it doesn’t leave you overtrained, unrested, or with muscles that lack their stored glycogen. It is essentially a form of rest that still qualifies as exercise, if you catch my drift.
Sports nutrition–wise, the big muscles are likely to retain their glycogen stores, since during a slow walk you are mostly going to burn fats from fat storage sites (so don’t bring stuff to eat on a walk, or your body will leave the fats alone and burn the carbs you’re eating for energy!).
Walking is the “training” you can do with other companions, whether it be an 80-year-old grandparent, a child, or a dog. What is that saying? “Want to lose weight—get a dog.” There are hundreds of benefits to walking. Like swimming, you can even do it injured (unless the injury is to your legs).
Note
Walking is great for people whose jobs require long or frequent cell phone calls. Just do it while walking; you’ve killed two birds with one stone, and converted a health-negative behavior (yakking on cell phones) to a net positive. As long as you keep the cell phone a safe distance from your head, that is! Do most phone calls while walking—the calories will add up.
Other than your walking stick, of course, a phone with the Endomondo app loaded onto it and a camera are perfect tools for tracking and capturing your walk. Go to www.endomondo.com if you haven’t acquired the free app yet.
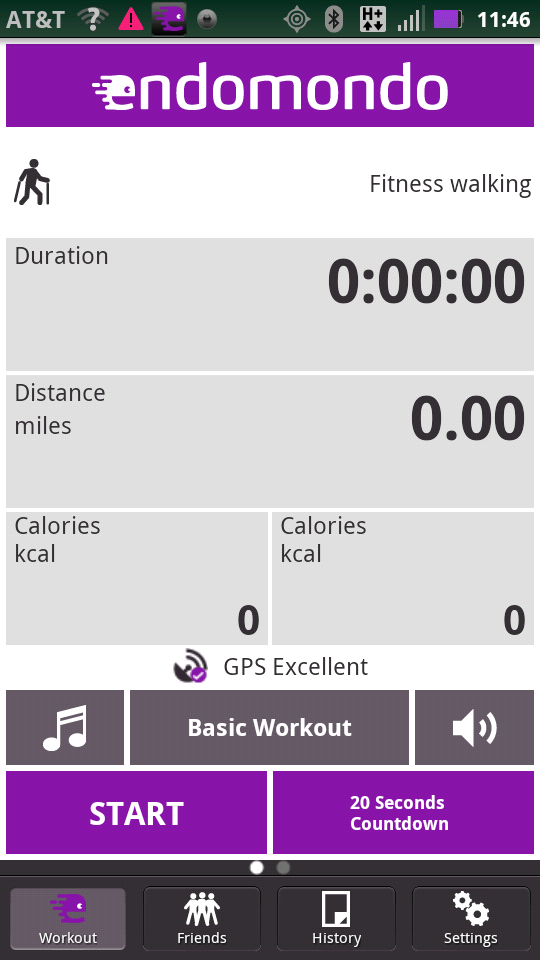
When you launch the app on your phone, you’ll see the screen shown in Figure 7-1. This is the screen that tracks your walk. Notice that the type of activity with the little hiker icon has been set to Fitness walking (just tap that area of the screen to show different types of exercise routines). Start the timer and off you go.
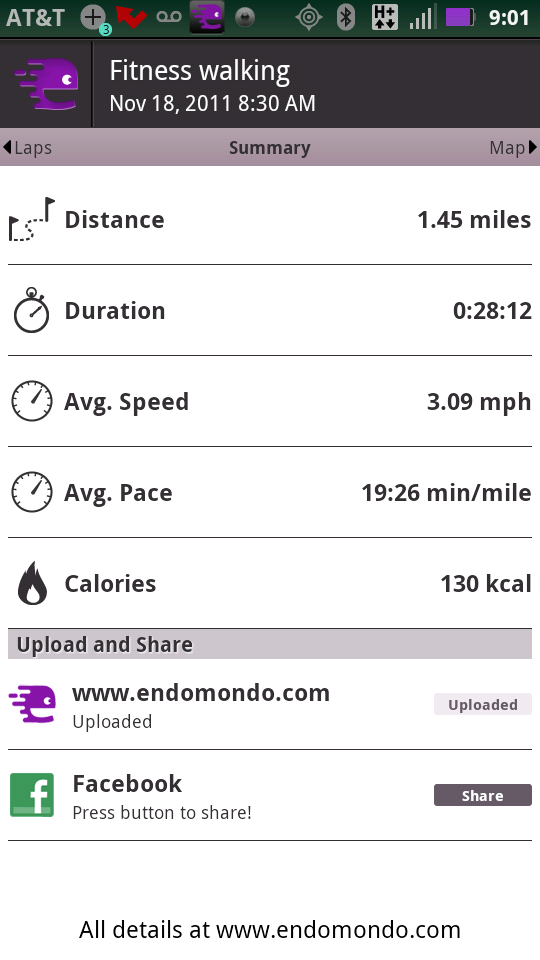
The app will grab all the statistics and mapping data for your walk (and we’ll show you how to load that data into Google Earth later, in the Hiking and Climbing section). Figure 7-2 shows the statistics for the short walk I took to start off the morning. It wasn’t very long—1.45 miles and about 28 minutes—but notice that the calories or kcals burned were estimated at 130. I’ll include a bit more information on that in a moment. The buttons at the bottom allow you to upload the session to Endomondo’s website, where you have a personal page, or to Facebook.
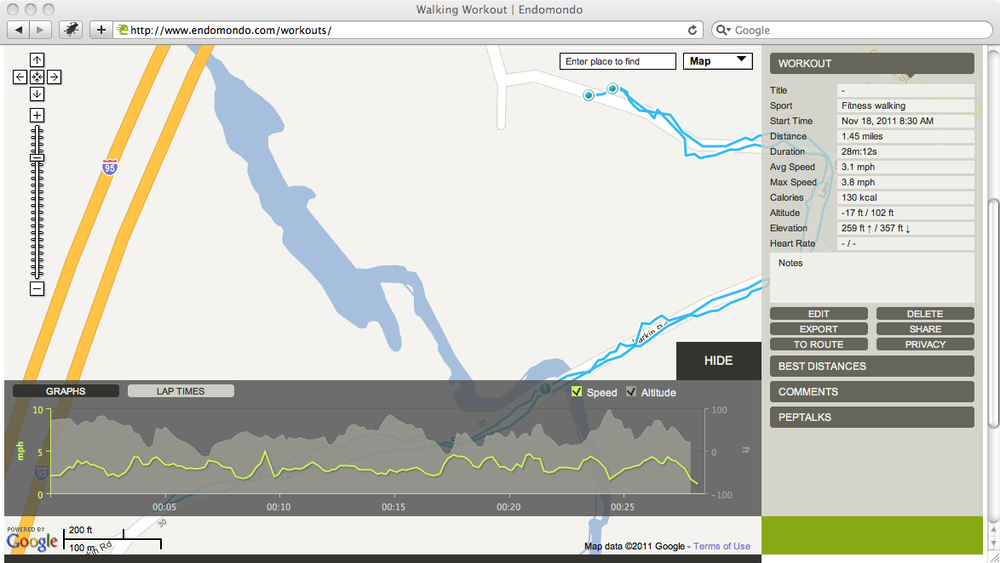
You can scroll to another screen for a map of your walk, but you can view an even better one on the website itself. Figure 7-3 shows the map for my flat walk and the profile graph, which displays the miles-per-hour and elevation data for every step (no pun intended) of the way. Endomondo will store all your walks, runs, cycles, hikes, etc.
The calorie count is, of course, an estimate, which probably includes your basal metabolic rate (BMR). See the sidebar on BMR for more information. For example, my BMR is roughly 70 calories per hour, meaning I’d burn off about 1,680 calories while prone in bed all day. So, during a 28-minute walk, I burned about 130 kcal according to Endomondo, or about 100 kcal extra on top of my BMR.
If you’re trying to drop a few extra pounds (and who isn’t these days, among us geeks?), and you take two of these pleasant, easy walks per day (no big deal), you will expend an extra 7 x 200, or 1,400 kcal for one week (if you don’t quaff a pint of India Pale Ale during the walk, or chow down a corn muffin). This would add up to 8,400 calories in six weeks, or about 2.4 pounds (8,400 / 3,500).
As mentioned previously, the section on hiking shows how to load captured Global Positioning System (GPS) data into Google Earth to view an even cooler and more memorable panorama of your route (except we’ll show something more exciting, as in a wilderness mountain hike).
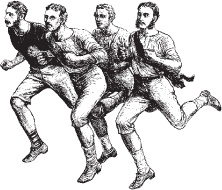
We are all natural-born sprinters. How many times did you sprint as a child—after a friend, a dog, a baseball, a Frisbee, a dream, a phantom? Forgot, didn’t you? It had to have been thousands of times. Study after study has shown how effective and efficient sprinting is for fitness. We won’t bore you with all the technical details behind sprinting, except to mention a few eye-opening studies, then we’ll move straight to some cool sprinting techniques and protocols.
One of the most impressive aspects of sprinting, or interval training, is that studies show it tends to slow the aging process in terms of the cardiovascular system and the specific leg muscles involved with sprinting, such as the Type II “fast twitch” fibers in your quadriceps or thigh muscles. Your skeletal muscles include Type I slow-twitch muscle fibers, which are less powerful but take longer to fatigue, and the faster-fatiguing “fast-twitch” fibers—Type IIa (slightly longer to fatigue) and Type IIx.
Note
Interval training means short, often all-out sprints followed by short rests, and then additional sprint repetitions. Intervals are a common training technique in a number of sports, including cycling, Nordic skiing, swimming, and even weightlifting.
One 2006 study did a detailed analysis via muscle biopsies of the legs of sprinters of varying ages. They studied men aged 18 years all the way up to 84. The results were surprising; the 84-year-olds (yeah, people that age and older are still sprinting!) had fiber-power values that greatly exceeded those of untrained 70-year-old men. Even more impressive was that the octogenarians had the equivalent sprint power of untrained 40-year-old men, less than half their age.5 So get granddad out there!
The study also emphasized the fitness gains and antiaging aspects of explosive-type exercise techniques: “Although our findings are not directly applicable to untrained people, they tend to favor the view that, to minimize the effect of aging on the neuromuscular system, optimal overall physical training might require actions that impose explosive-type overload on muscle.”6
Sprinting produces high fitness levels in a more time-efficient manner compared with long endurance workouts. Study after study indicates this benefit, including the original research behind the now-famous Tabata Protocol (see the Tabata sprints section).
A 2006 study in the Journal of Physiology studied the fitness difference between athletes who had undergone short-term interval training and others who did long-distance cycling. They split up 16 men to perform six training sessions over 14 days. The “sprinters” did four to six all-out 30-second sprints on a bike with 4 minutes rest between them. The long-distance cyclists did 90-minute to 2-hour cycles each workout, at a moderate pace.
The study scientifically analyzed the athletes after the study period to measure their progress in improving cardiovascular strength. Even though the total difference in cycling time was 2.5 hours for the sprinters (over six workouts) versus 10.5 hours for the longer-distance cyclists, the training benefits were about the same.
“Given the large difference in training volume, these data demonstrate that SIT [sprint-interval training] is a time-efficient strategy to induce rapid adaptations in skeletal muscle and exercise performance that are comparable to endurance training in young active men.”7
“So what?” you might reply. “I like riding my bike for long distances—I don’t want to go home after getting my butt kicked for 28 minutes.” So be it—I often have the same attitude. Long-distance endurance training, what some have dubbed “chronic cardio,” does have it downsides, however, in terms of eating up lean body mass (a.k.a. your muscles) and generating more wear-and-tear injuries to the feet, knees, and hips, as well as a greater production of oxidative stress—the “reactive oxygen species” that you’re eating all those antioxidants in your meals to deal with.
On the other hand, one of the upsides of “long slow distance” is its relaxing, contemplative quality—its positive influence on reducing stress. Sprinting, by contrast, sometimes feels like another form of stress.
Note
It is “good stress”, though—see Chapter 11 and its segment on hormesis.
As a practical matter, not everyone can jump right into sprinting, particularly someone who has weight issues or is bouncing back from injury or illness and has just begun an exercise program.
This past weekend, I took advantage of a mild winter in New England to put in about 30 miles on my mountain bike, under the sun. It felt wonderful (I did throw in some cycling sprints in high gear on the first day), and provided a welcome relief to higher-intensity skiing in some of the subArctic temperatures we had experienced of late.
The consensus advice is, at least once a week, substitute a sprint workout for one or more of those long hauls, and you’ll be fitter and better off.
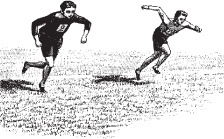
Sprinting offers all kinds of combinations or ways of structuring the workout. Thankfully, everyone knows how to do it (just run, and imagine you’re being chased by a grizzly bear!). It all depends how fit you are when you start sprinting. I’m an advocate of going to a track or a soccer field where the distances are known and/or marked off. A beach is also a great place to sprint, because it offers the extra resistance of sand and the opportunity to do the runs barefoot, along with the sublime seascape itself.
A regulation soccer field is about 100 yards from goal line to goal line (some are 110). Here’s a routine I use sometimes.
I have a soccer field about two miles from my house (given the popularity of the sport, just about everyone does these days). As a warm-up, I pull on a pair of sneakers, hop on a mountain bike, and ride around effortlessly for 10 or 20 minutes, ending at the field. A warm-up is necessary—it doesn’t have to be too extensive—because you’re going to be using your “highest gear” for sprinting, and you don’t want to tear anything.
I get to the soccer field, park the bike, and do a little more stretching and warm-up as I jog over to the goal line. Since it’s grass, I often do these sprints barefoot. In the beginning of the season, when I’m not up to sprint shape, I dash no more than 50 yards, to the center of the field. Even a few 25-yarders to get in the proper state of mind and to prime the big leg muscles for an all-out effort will do the trick.
Another common technique for sprint warm-ups on a field or basketball court is “shuttle runs.” Sprint 5 yards, turn around and jog back; sprint 10 yards, turn around and jog back, sprint 15 yards, and so on.
I sprint to the 50-yard line four or five times, with each sprint a little stronger than the one before. Depending on how you feel, you can just walk back to the goal line after each dash. The idea is not to keep the heart rate high all the time, but to produce a maximum effort that lasts just a few seconds.
All forms of exercise are “mental” in nature, and involve a lot of emotional engagement and visualization. Sprinting is no different. I imagine I’m fleeing from a predator, or trying to save a loved one (yikes, that train is coming and they need to be dragged off the tracks in time!). When you hit the final 10 yards, you really open up; imagine an Olympic sprinter who starts in a crouch, but by the final yards she’s in a straight-up stance, taking short powerful strides and pumping her arms.
Sprinting involves a lot of upper body engagement to propel the body forward.
If a few 50-yard sprints feel good, it’s time for an all-out 100. Do one complete soccer-field sprint all out, leaving nothing left. Time yourself, and use that metric for future runs. As you get stronger, all your sprints will be 75 to 100 yards, barring a few warm-ups.
How do you know you’ve gone all out for 100 yards? This is kind of a personal, almost primordial feeling, a mixture of fatigue and fear. Most of the time, you simply can’t go any faster. Once you get used to sprinting 100 yards, the final 25 yards will feel liberating, but you can’t wait to hit the finish line. Your body should feel like it is undergoing an intensive, good stress. Once there, you commonly can’t talk at all as you catch your breath. Your heart rate probably hit its maximum level, roughly 220 minus your age, then went back down, rapidly if you’re in good condition. Sometimes after the final rep of an interval you feel ever so slightly nauseous. This passes very quickly. I don’t advocate sprinting until you barf!
Note
To get yourself psyched, watch Usain Bolt of Jamaica run a sub-20-second 200 meters: www.squidoo.com/Usain-Bolt-The-Track-And-Field-Athlete-Biography.
You can walk back slowly to the goal line, with runner’s high and all, calmly savoring the maximum effort. You’re the healthier for it.
There are all kinds of protocols you can use for structuring your sprints, including ones of your own invention (see the Make it up section).
We just mentioned a study that used four to six repetitions of 30-second all-out sprints, with four minutes of rest between them. This is a good protocol for the beginning of your sprint program. The rest period seems like a long time, but that’s the point. Being rested for each repetition allows you to reach the proper level of intensity for each interval.
As we’ll get into in our discussion of resistance training in the next chapter, the purpose of the sprint is to stimulate or stress the big, fast-fatiguing Type IIa or IIx muscle fibers. These muscles are not trained by slow to moderate jogging; that kind of locomotion will be taken care of by the less powerful, slower-to-fatigue Type I fibers of the leg.
If you don’t blast through your fast-twitch muscles, you won’t stimulate the adaptations and metabolic changes that you want.
Another protocol involves 10 one-minute intervals at 60 percent of your maximum capacity, with a minute rest between each one. This routine came from Clarence Bass’s website (www.cbass.com); he’s a totally ripped septuagenarian who has written many books on bodybuilding and health, and knows of what he speaks.
The latter routine could be used as a moderate introduction to hard sprints like the Tabata Protocol.
The now-famous (among interval and CrossFit geeks) Tabata protocol is a remarkably simple (but hard!) method for increasing your cardiovascular strength and health. It is becoming very popular in several sports, as it’s become quite common for runners, cyclists, Nordic skiers, and CrossFit aficionados to adopt this technique.
The Tabata Protocol is named after one of its inventors, a professor and researcher in Japan named Izumi Tabata. His studies determined that this interval protocol allows you to have your cake and eat it too: the routine strengthens both aerobic fitness and sprint strength. It derived from work he originally did with speed skaters.
The intervals involve eight repetitions of 20-second all-out efforts, with 10-second rests. In other words, a total of four minutes, not including warm-up and cool down. The key is the shortness of rest, which is minimal while you’re doing these sprints, if you do them correctly (meaning, you don’t exceed the rest interval). Izumi himself, in an interview, pointed out that this four-minute maxed-out routine is “more than enough to make even a fit person exhausted . . painful.” In fact, for this reason, he doubted that Tabata would ever be popular beyond hard-core competitive athletes.8
The protocol has nevertheless become wildly popular, even among resistance trainers, probably because of its proven effectiveness, its short-term duration, and the challenge it presents. I think people simply love running as fast as they can, as if this behavior triggers a kind of Paleo pathway with which we are instinctively familiar.
For example, I introduced Tabata sprints to a cross-country team about a year ago. We jogged over to a dirt path in the woods. Knowing that a typical soccer field length would be good for Tabata sprints, I jogged along, roughly measuring that distance (counting a yard for every one of my strides), then marked the end with a stick I pulled out of the woods. This was a decidedly low-tech introduction to Tabata sprints, taking place in a woodsy, less sanitized environment than a track.
Then we broke up into two separate groups, one the slightly speedier and more fit and the other slightly less so. I did the sprints with them, then looked at my watch to count off the 10-second rest. They turned out to love the workout, and it became their favorite training session throughout the week. The cross-country coach, a friend of mine, noted that the team made rapid strides in overall strength and fitness once they started using Tabata. It was noticeable after just two sessions.
One of the runners told me later that she kept doing them throughout the summer once a week on her driveway.
You don’t have to jump right into Tabata sprints. You can just make up your own routine, and it will make a difference. It’s the all-out effort that matters. Here’s what I did the other weekend. I didn’t have the flexibility to go to a track or the beach alone, as I was looking after my son at home.
I used Endomondo to measure a 100-to 120-yard length along the flat driveway that runs in front of my house. This is easy to do: just set Endomondo for a Fitness walk, and begin walking until you reach .07 mile (roughly 123 yards; the app will increment the miles by hundredths of a mile). 100 yards is about .056 of a mile, so you can pace out .06 of a mile and place a marker a bit shy of that milestone. Now you have a 100- and a 120-yard course to sprint on.
I did six 120-yard sprints with a leisurely walk back to the starting line in between, accounting for a rest between reps of about 1:15. I was doing each rep in about 19 to 21 seconds, not quite all out, but maybe 80 to 90 percent. Then I did the final 100 all out, a little faster than I did the previous sprints. That was just what I felt like doing that morning, no more no less. In the old running days we used to say, “Do one less interval than you think you can do” (don’t run to failure). In other words, when you finish an interval and your body is telling you that you have just one left, that’s the time to go home.
I cannot point to a scientific study that underlies the latter strategy, but it’s folk wisdom that works well.
Sprints can easily be incorporated into steady-state training sessions. This is typical of cycling when you head off at your usual “spin” or cross-country pace, then initiate sporadic all-out sprints along the way. Fartleks and body speeds are two ways of incorporating sprints into long runs.
Fartlek means “speed play” or “speed game” in Swedish. It is nothing more than fast runs or sprints between landmarks during a long run. The technique has been around since the running boom started in earnest decades ago, and was designed to add a speed workout to mileage.
The way I always did fartleks was to sprint between telephone poles. City or suburban runners can sprint a block sporadically; or you can use whatever milestone you want, such as running hard up every hill. You can also mix up the number of repetitions and the intensity of each. If you run a fartlek really hard, you may have to walk the next tenth of a mile or so.
Fartleks matter even on a short run, like two to three miles. Instead of just plodding along on a rather inefficient jog workout, you’ve done your routine run plus sprints.
Body speeds are a kind of technique drill for runners. They are good preparation for doing sprints if you’re just getting back to running all out (because we do let that inborn skill go stale!).
You head out on a flat run or a track, and then for 50 or 100 yards or so run at about 75 percent of your maximum rate or sprint speed. While you’re running, you visualize being graceful, balanced, and smooth in your stride. You try to improve awkward aspects of your running, like rocking back and forth and not using your arms enough.
In other words, you’re not going fast enough to be thinking exclusively about how hard the effort is and only getting to the finish line. Your pace is slower, so you have the luxury of focusing on body and spirit as you glide along—it’s “mindful sprinting.”
The idea is that by practicing your fast-running technique, you will become a smoother runner, and the more graceful sprinting will become second nature during your all-out intervals. Body speeds are also fun to do because you are going fast (and fast is fun), but they don’t hurt as much as all-out sprints. They seem to work.
These are exercises that are designed to make you strong by pulling or pushing your own weight around. They can be performed inside or outdoors, but for most people it’s more fun to do them outside. That way you can get some sun and fresh air while you’re huffing and puffing, and you can combine these exercises with runs, hikes, and bikes.
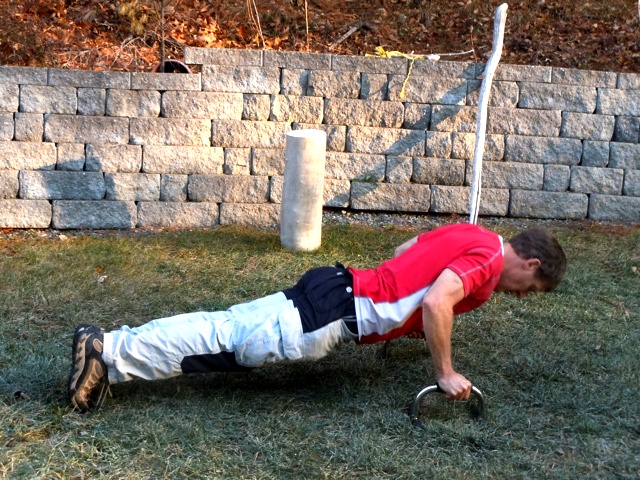
Most people know what a push-up is (as well as a pull-up), ever since Coach McConnell barked at them in gym class, “Down and do 10!” Figure 7-4 shows what a pushup looks like.
Note
Figure 7-4 shows a person using push-up bars, which provide some variation when doing the exercise. For some people, the pushups are a little easier and the position more comfortable with the bars. For others, they are harder. The conventional push-up involves palms flat on the ground.
Push-up training, particularly in the beginning, shares some features with sprinting. If you can’t yet do a lot of push-ups at once (e.g., 30–50 without resting), work up to them in sets, with a decent rest between sets.
Push-ups are a great warm-up exercise, as well as a strengthener for your arms, shoulders, chest, and back.
You can improve your push-up and overall strength by actually making them harder by adding more weight. I do push-ups with my young son lying on my back, which is kind of a nice way to get a workout in while you are horsing around with kids. You can also do push-ups with a weighted vest (a vest you put on that suddenly makes you 40 pounds heavier!). For the sake of “empathy training,” all men should be required to walk around in these vests before their wives ever enter into a pregnancy.
The idea is that when you’ve done push-ups with a greater amount of weight resisting you, your muscles (and everything else that is involved with pushing your weight, such as the neural mechanics) will adapt to the harder weight and the “normal” push-ups will be easier.
Other ways to “resist” a typical push-up is by doing inverted ones, with your feet on a bench, step, chair, or couch. Or, even harder, place your feet on the small inflatable exercise balls they have in gyms and do inverted push-ups that way.
Combine push-ups with sprints/weights. After each sprint interval, drop down and do 10 push-ups. This is a CrossFit-type routine. Or include push-ups with weightlifting. I often finish my final set of bench presses by turning around and doing inverted push-ups on the same bench. Bench presses are covered in Chapter 8.
Most people can do at least one push-up with no practice, but pull-ups? This is a tough one. It’s a challenge worth meeting, though, because once you reach the point where you can perform several pull-ups, you know you have reached an impressive level of conditioning, strength, and health.
Pull-ups are a challenging but fruitful exercise. This exercise strengthens the arms, chest, back, and even abdominal muscles. Chin-ups are very similar, but involve the grip with your palms facing you, or facing each other (as in the grips on certain pull-up bars in gyms).
Outdoors offers the ideal setting for doing pull-ups. I start off most mornings at home with some sun (if it’s out) and a set of pull-ups on a small jungle gym in my yard. You can obviously do them on any conceivable bar or beam from which you can hang, including a tree branch.
Figure 7-5 shows a setup for outdoor chin-ups. The grip involves the palms facing toward me.
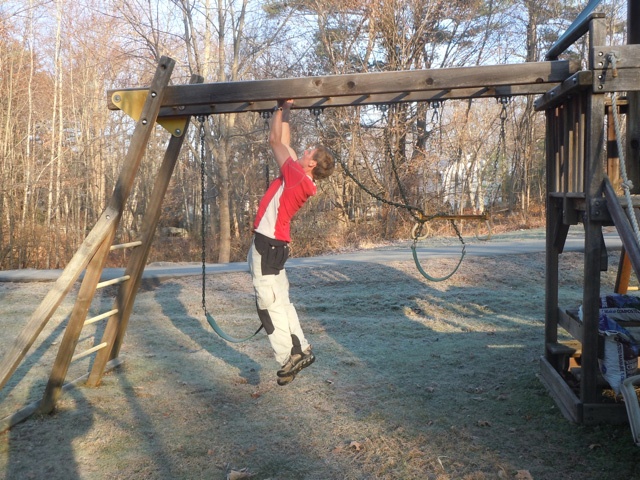
Warm up first by doing something with your arms and shoulders that is easier than a pull-up (which includes just about anything) such as a dip or pushup. Grip the bar above you and hang by the bar, palms facing away from you about shoulder-width apart. Cross one foot behind the other and try to keep your back straight, your body aligned and balanced. Pull yourself up so that your chin meets or exceeds the bar height. Then go all the way back down and do it again. Yeah, right!
Try to do as many as you can. Imagine not only your chest and arms providing the propulsion, but also bring in your upper back and abdomen with a recruitment of many muscle groups. The same concepts hold true for chin-ups, but this time the grip involves the palms facing in.
You can get stronger for pull-ups by implementing any exercise that strengthens the upper body, such as push-ups, bench presses, or military presses (see Chapter 8). Another way to increase the number of pull-ups you can do is to offer resistance in some manner, as in increasing the weight you are lifting, beyond your body weight. Use a weighted vest or belt and try to do as many pull-ups or chin-ups as you can.
Another recommendation comes from Stew Smith, a former Navy Seal, whose website includes a lot of valuable fitness information.9 He suggests using the pyramid method: do one pull-up, rest, two pull-ups, rest, etc. until you can’t do anymore. Then work your way back down (say you were able to do five): 1,2,3,4,5,4,3,2,1.
Let’s say you have a bad habit you want to break, or you simply want to draw attention to it. You can’t keep your hand out of a bag of cookies or potato chips, or a refrigerator full of beer. You have a weakness for watching vapid TV broadcasts when you could be reading or getting more outdoor exercise. Every time you eat a cookie, you have to do 5 pull-ups, a kind of penance. Or 10 pull-ups; make it progressively more difficult. Every minute of imbecilic TV or web surfing is translated into another pull-up. Or better yet, simply turn off the TV and other screen devices unless you have something purposeful to do with them (like finish a book!).
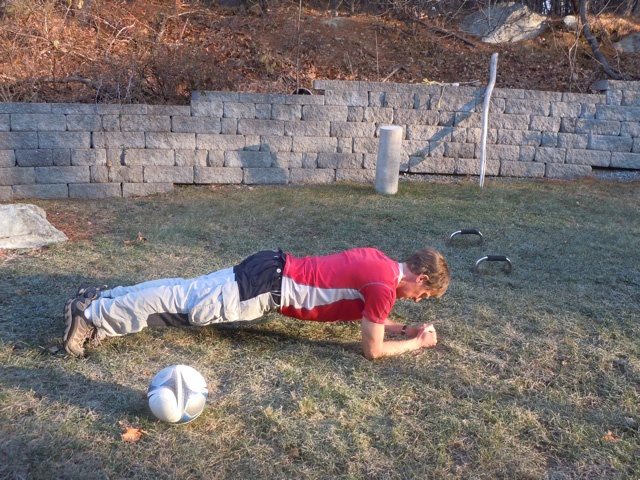
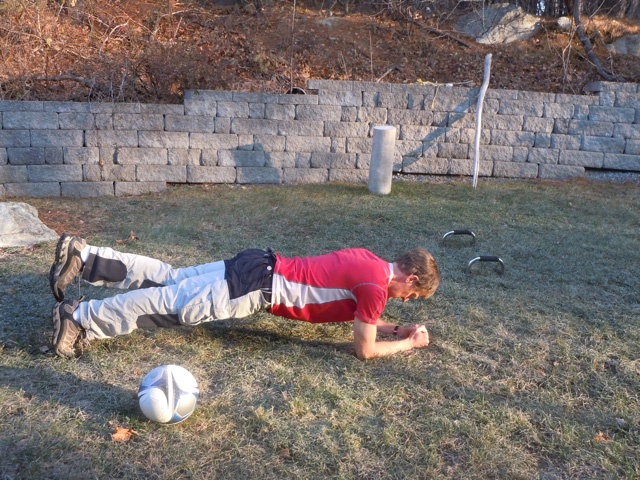
Pull-ups strengthen your entire upper body, and so do planks. You’ve heard people mention the importance of strengthening your core (i.e., lower and upper back, abdomen, hip extensors, etc.). The plank is a good exercise for this.
The plank position is similar to a push-up position, but you are balanced on your forearms and toes. Keep your body aligned in a level position; don’t let your back sag down. Use your abdominal muscles to keep your back and hips in a straightforward position. Try to hold the position for a minute, and do several repetitions.
Figure 7-6 shows what a plank looks like.
Obviously, you can do planks both inside and outside the gym. Another variation is to do inverted planks, similar to an inverted push-up, in which your feet are up off the ground on a bench or chair. I don’t fancy this position, however, because it seems to turn into an upper-body workout. Another plank variation is the kickback; when you’re in the plank position, pick up one of your feet about five inches and hold that position for a few seconds, as Figure 7-7 depicts.
Jumping falls into the sprint category as an exercise we are designed for, but that quickly goes stale as we age. It’s an explosive movement that will keep the powerful Type II, fast-fatiguing, fast-twitch muscles of the leg in tune. I like to do various jumping drills outside. Walking along a trail in the woods, I’ll find a fallen tree and do sets of five standing jumps as high as I can onto the fallen trunk.
You can combine a short sprint with leaping. Go out to the beach and do a running jump as far as you can into the sand, similar to an Olympic long jump. We’re often too static and programmed with our exercise routines. We go to the gym or “facility” and train robotically or let an instructor put us through our paces; we lose the creativity and playful nature of exercise.
Just make something up that requires different kinds of leaps under the sun. I have a stone wall that I jump on top of after a 30-yard or so run. It’s almost 40 inches high, and I’ve found that the upper-leg weightlifting has helped augment my jumping ability.
Hiking is a perfect combination of cardiovascular and weight-bearing exercise, if you’re carrying something on your back. Most hikes don’t peg your heart rate at an incessantly high level (which isn’t recommended for frequent exercise bouts, because it wears you out and depresses your immune system, among other things).
The exceptions are the occasional hard climbs such as Mt. Washington’s Tuckerman Ravine in New Hampshire, Mt. Whitney in California, Mt. Rainier in Washington, or countless other climbs in the Rockies, Alps, Andes, Scottish Highlands, or other places. It’s not like you’re going to do these climbs every weekend, unless you’re a mountain guide. Particularly concerning the Whitney Mountaineer’s Route or Rainier, you will be baked afterward, and sore. Better to rest for a couple of weeks after these kinds of efforts.
Hiking is generally a low-level effort ideal for strengthening the upper legs, recovering from harder efforts such as sprints or weights, as well as enjoying Mother Nature. It provides a break from “screen life” and the thousand little stresses of our modern lives.
I’ve moved to using trekking poles for hiking in recent years, and I find that they help me establish a rhythm, as well as taking the pressure off my knees and lower back during any steep descents.
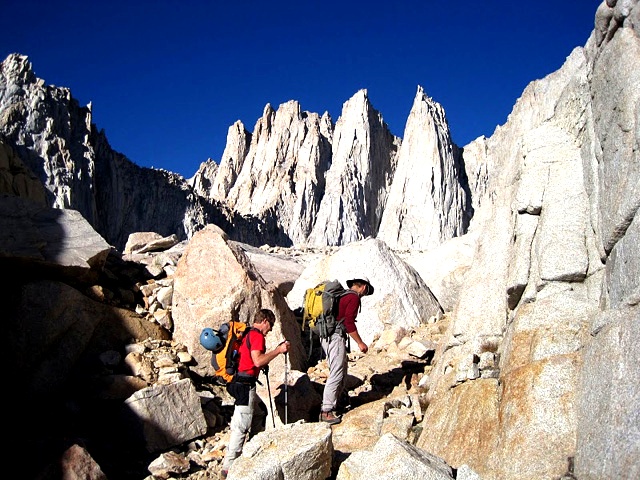
Figure 7-8 shows me following my guide Braden Downey on Mt. Whitney’s Mountaineer’s Route in 2010. Quite a spiritual journey!
Hiking as training is great for you, whether you are planning an upcoming climb or not. Pack a heavy backpack, anywhere from 20 to 40 pounds, and hit your favorite trail, or even some stadium steps. If the pack isn’t heavy enough, put rocks or other heavy items inside it. When I’m training for a hard hike or climb and I can’t get to Vermont’s Green Mountains at the moment, I’ll hike wearing a 40-pound vest.
There are numerous GPS-related tools and apps that augment a great hike (along with a good camera!). You can use Endomondo to track your hike and measure all kinds of aspects, such as your pace at different segments of the climb and the various elevation grades.
You can use Backpacker GPS Trails, another app for cell phones, to map out a hike with waypoints, as well as load preexisting treks into the software to guide your own trip.
We discussed Endomondo’s mashup with Google Earth briefly in Chapter 2, but here I’m going to go into a little more depth on each application’s features. These are great combinations of software tools, tailor-made for trekking geeks.
Figure 7-9 shows a late-autumn wilderness hike I took in Vermont’s Green Mountains. This was actually the descent part of a hike into the woods from the top of a small mountain. The figure shows the screen Endomondo will display in your browser after you click the Workouts menu choice, then choose one of your climbs in the calendar view.
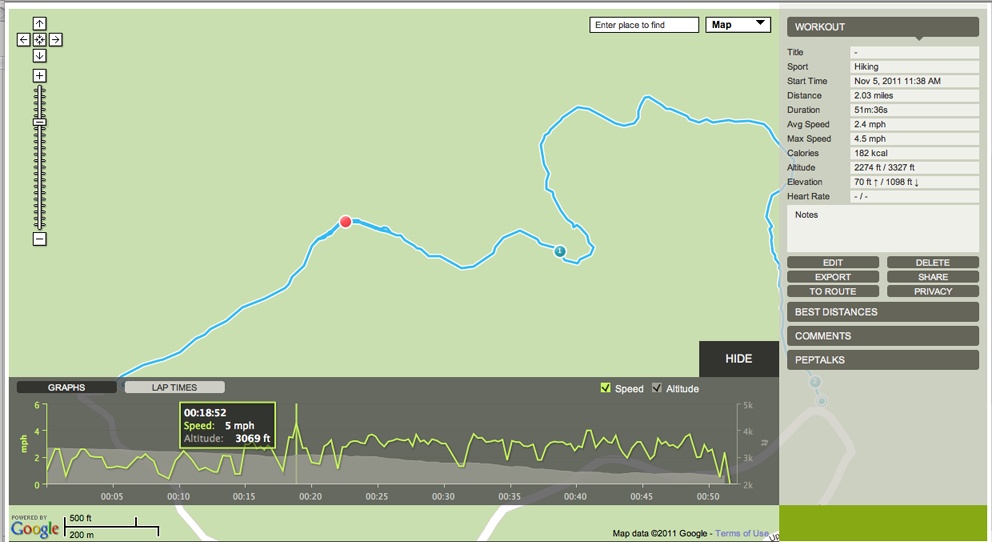
As Figure 7-9 shows, you can trace the line on the graph at the bottom of the page with your cursor, and it will show the accumulated time at that point, the speed at which you were moving, and the elevation. The little blue circles are mile markers along your route.
The right-hand column shows all the juicy statistics for the hike. Click the Export button to store a GPX XML file, specifically a .gpx file, on your computer’s hard drive.
Note
GPX stands for GPS Exchange Format. It is a “light-weight XML data format for the interchange of GPS data (waypoints, routes, and tracks) between applications and Web services on the Internet” (www.topografix.com/gpx.asp). See the Inside the GPS Exchange Format File sidebar for more GPX files).
The free Google Earth application can then import this .gpx file.
It’s a text (actually, XML) file with a name such as no name.gpx.xml. Open up this file in your favorite, XML-capable text editor and save it as myhike.gpx, or something like that, to make it friendlier for Google Earth (I use the BBEdit text editor on the Mac for this task).
The GPX file contains a bunch of track segments and track points in XML markup, which looks like the following code:
<trk>
    <src>http://www.endomondo.com/</src>
    <link href="http://www.endomondo.com/workouts/kEWNFeprngg">
      <text>endomondo</text>
    </link>
    <type>HIKING</type>
    <trkseg>
      <trkpt lat="44.147904" lon="-72.915766">
        <time>2011-11-05T15:38:39Z</time>
      </trkpt>
      <trkpt lat="44.147904" lon="-72.915766">
        <ele>1013.6</ele>
        <time>2011-11-05T15:38:44Z</time>
      </trkpt>
    </trkseg>
</trk>
This is the way the GPS device records a route: as a sequence of latitude and longitude points associated with a point in time, as well as an elevation figure.
Launch Google Earth (there’s a free version), then open up your myhike.gpx file from within Google Earth, using the File→Open command.
Note
If you’ve resaved the file Endomondo exported in your text editor (with a .gpx extension), Google Earth shouldn’t have any problem recognizing it.
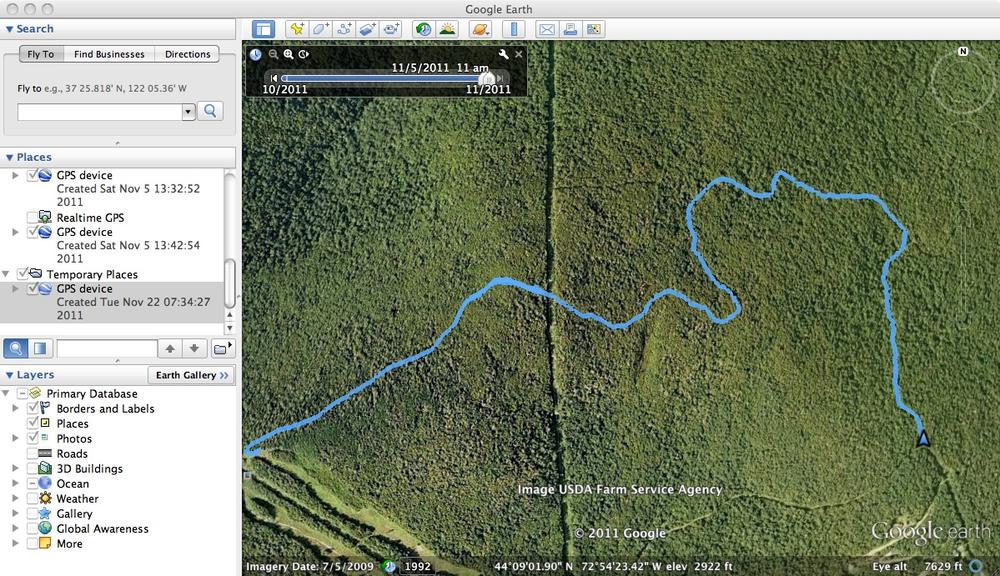
Figure 7-10 shows a sky-high view of your hike in Google Earth. Just a few easements; not too many roads in there!
If you  -click the blue line tracing your path in
Google Earth, you can choose the Show Elevation Profile feature.
This opens up the graphic display along the bottom of the page,
showing all kinds of useful elevation data that you can examine.
Figure 7-11 shows
this graphic display.
-click the blue line tracing your path in
Google Earth, you can choose the Show Elevation Profile feature.
This opens up the graphic display along the bottom of the page,
showing all kinds of useful elevation data that you can examine.
Figure 7-11 shows
this graphic display.
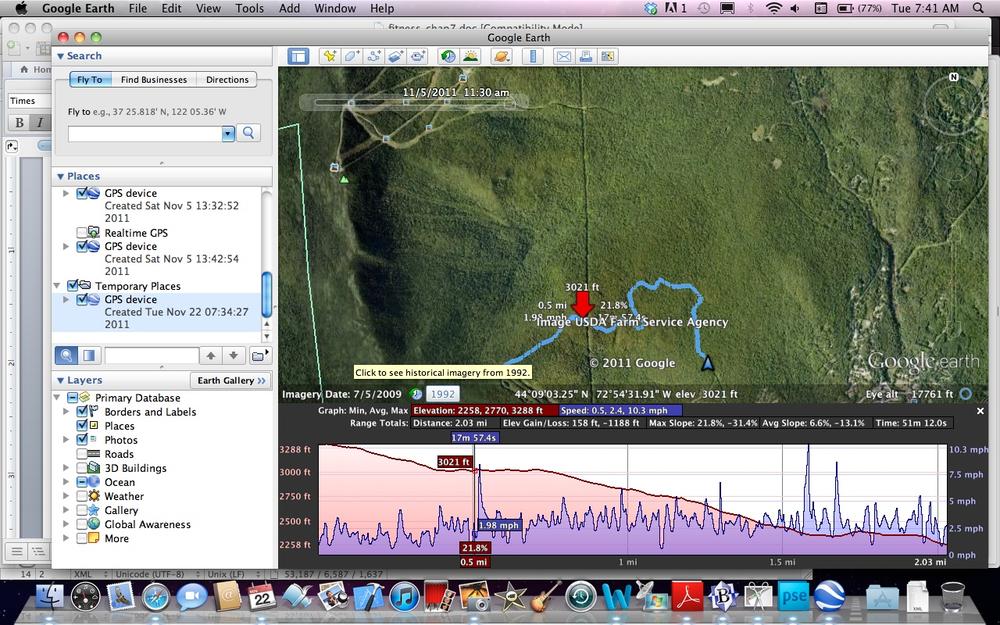
This is a fun mashup with a practical purpose. Suppose you have forestry- or land-management responsibilities and you need to map out routes through complicated terrain, or you simply want a record of a route through the wilderness. This combination of applications will give you most of what you need. The elevation profile in Google Earth will indicate the elevation grade (e.g., 21.8%), the elevation measurement, and the miles per hour at which you were moving, at any point in the hike. Cool!
Note
GPS is notoriously inaccurate, in terms of different devices giving different mile measurements (they sometimes differ by tenths of a mile). This drives runners crazy, for example. You should never really use GPS to measure off an important race route or provide a profile for a newly discovered peak. The elevation grades and miles per hour are estimates. For the vast majority of our purposes, though, the GPS data is good enough.
So, between the Endomondo app on your smartphone, its export feature, and Google Earth, your ability to capture all kinds of hikes, bikes, runs, treks, or whatever with advanced visualization tools is unparalleled. You don’t have to be climbing Mt. Everest either to use this stuff; it will embroider even one of those short urban walks you took during a break from work.
Another nifty software tool that you can use for hiking is the Backpacker GPS Trails app. Unlike Endomondo, this app is specifically designed to record a shareable, GPS-enabled trip with recorded waypoints. A waypoint is a milestone on a route; it can be annotated with icons and a text description. You can mark a waypoint on a route at any important spot, such as where a trail veers in another direction.
The Backpacker app also provides other ways of annotating a map, such as text comments and images. It even has an associated mapping application, for generating printed Topo maps (for a price, however). Figure 7-12 shows the screen on my Android phone.
Backpacker GPS Trails Pro (there’s a Lite version too) has an associated website at www.backpacker.com, with a map and statistical data similar to that provided by Endomondo (the latter is more thorough at capturing the exercise aspects of the hike, and keeping a running count of all the data).
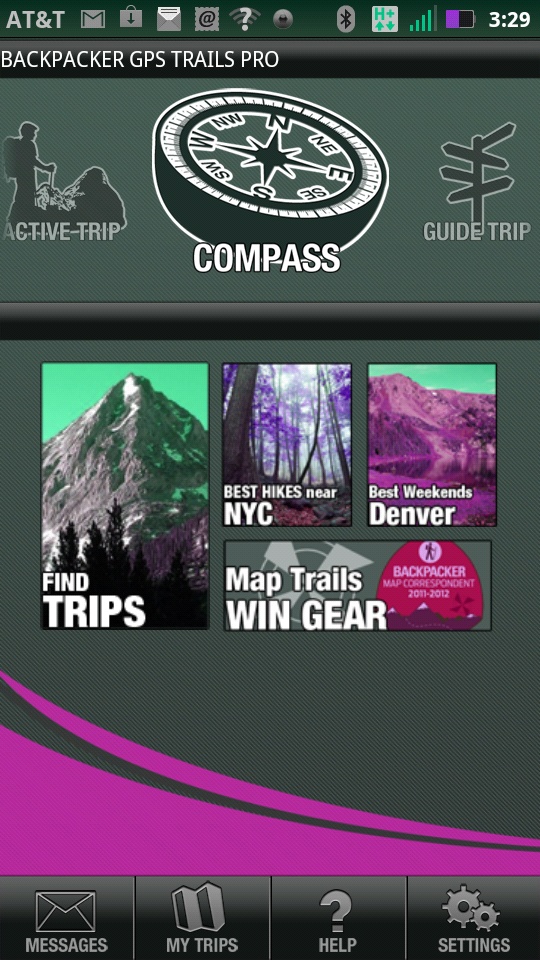
GPS Trails Pro is also designed to plug in preexisting hikes and waypoints, thus allowing the hiker to use his phone as a GPS navigator.
Figure 7-13 shows the page at www.backpacker.com after you’ve stopped recording your trek and (automatically) uploaded the waypoints to the Web. This was a little four-mile walk on the beach at Plum Island, Massachusetts.
Note
A waypoint is marked as a set of geographical coordinates for a location, such as 42.781893, –70.804734.

The little flags in the figure represent the waypoints that I set during the walk. You can annotate the waypoints to provide more information on the hike. The software allows fairly extensive editing of the map and waypoints online. Like Endomondo, it allows the download of a GPX file (with the extension .gpx) that you can plug into another GPS tracker, as well as a KML file that will open up directly in Google Earth.
Note
A KML file is just another kind of XML file that Google Earth knows how to read, with an XML namespace of http://earth.google.com/kml/2.1.
Another feature I like, although it’s commercial, gives you the option of generating a printed topographical map from the hike you recorded, as depicted in Figure 7-14.

This relatively inexpensive app seems promising as an easy way to use your phone and GPS to record and share hikes.
The woods, beaches, and even deserts provide unlimited opportunities for outdoor exercise of a structured (e.g., parcourse) and unstructured nature.
Note
A parcourse or “fitness trail” is an outdoor trail that has various stations set up along the way to do stretching, balancing, and strength exercises. I’ve encountered a number of cool parcourses in Switzerland.
Using the theme of just “making things up” as you go along, I’ve trained with a cross-country team by using what one might call “wild runs” through the woods. This was our own version of MovNat (see the accompanying sidebar). We’d start off with scrambling and pull-ups on a sturdy, low-lying tree branch. This tests all-body strength, flexibility, and, for lack of a better term, tree-climbing ability. There’s nothing like climbing trees for maintaining strength-oriented fitness, and it falls into that “what we’re born for” category. Why have country kids over the ages been so good at climbing trees? How come they don’t have to be taught or coached first?
Note
“We evolved from apes” would be the clichéd, somewhat cheeky response. The point is, we are designed to move naturally over the landscape that surrounds us. It’s just that we go stale sitting inside and in our vehicles all day.
Then we would head off for a trail run, always interspersed with fartleks and pick-ups (dynamically picking up the pace then slowing down). We would stop, go off into the woods, and do balance drills on fallen trees, but extemporaneously. This kind of training is vastly superior to conventional static cross-country training (e.g., do jumping jacks then run till you drop, then do it again).
The runners would always look forward to these wooded romps because they were fun. By the way, they were very strenuous, too.
If you’re lucky enough to live near or visit an open-ocean coastal area, you’ll find out that the seascape provides all the gym you need. Just take off along the sand: running, sprinting, walking (Endomondo tracking is optional). A beach is usually covered with driftwood of varying sizes and weights. This derives from storms that rip trees and manmade structures off the coastline and carry them out to sea.
Note
Unfortunately, the beaches are also covered with an astonishing amount of trash. Ocean pollution is a huge problem in the world. Take part in as many beach clean-ups as you possibly can, organized and on your own. Consider bringing trash bags when you take a walk on the beach.
Use a log or piece of driftwood for jumping drills. Find a piece of wood shaped like a spear and hurl it like a javelin (watching for any beachcombers, of course). My occasional “beach fit” mornings are usually quite remote and during the winter; few other people are around, except maybe my son. Find a heavy piece of wood (those salt-laden and waterlogged pieces of debris can get pretty heavy). Starting in a crouch, pick up the log and push it end over end several times. See Figure 7-15, Figure 7-16, and Figure 7-17.
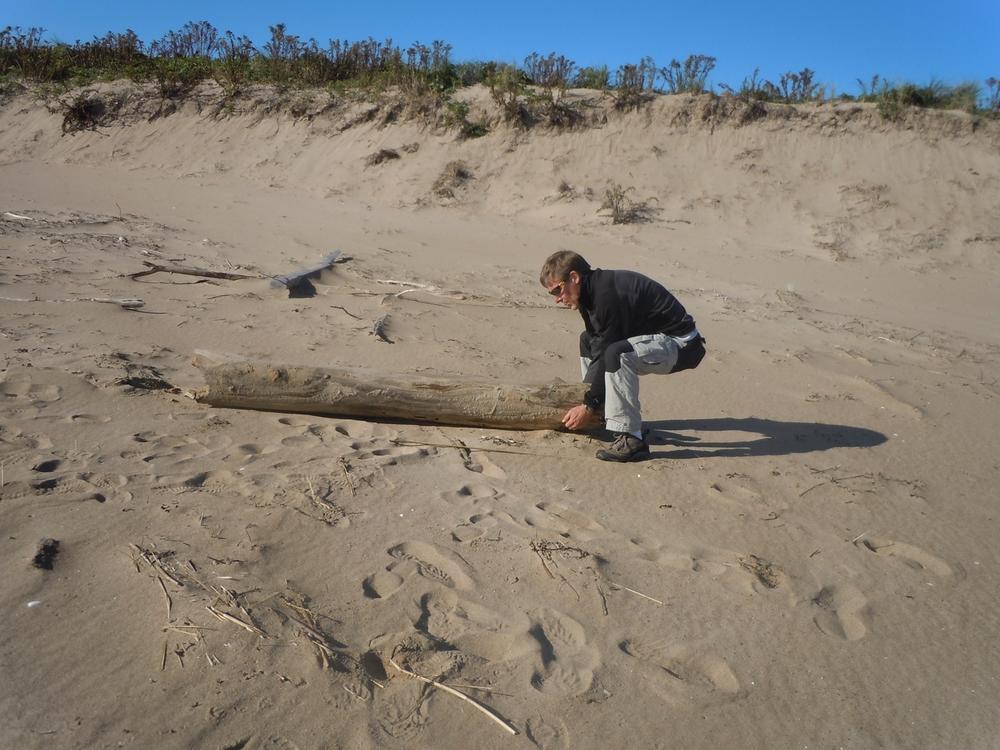
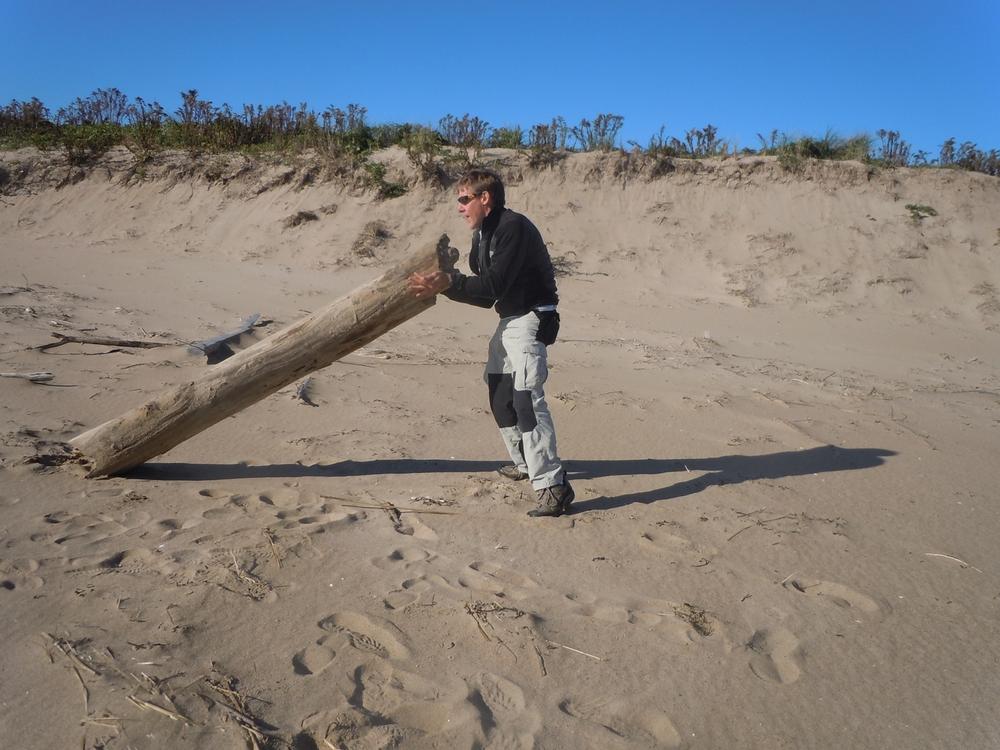
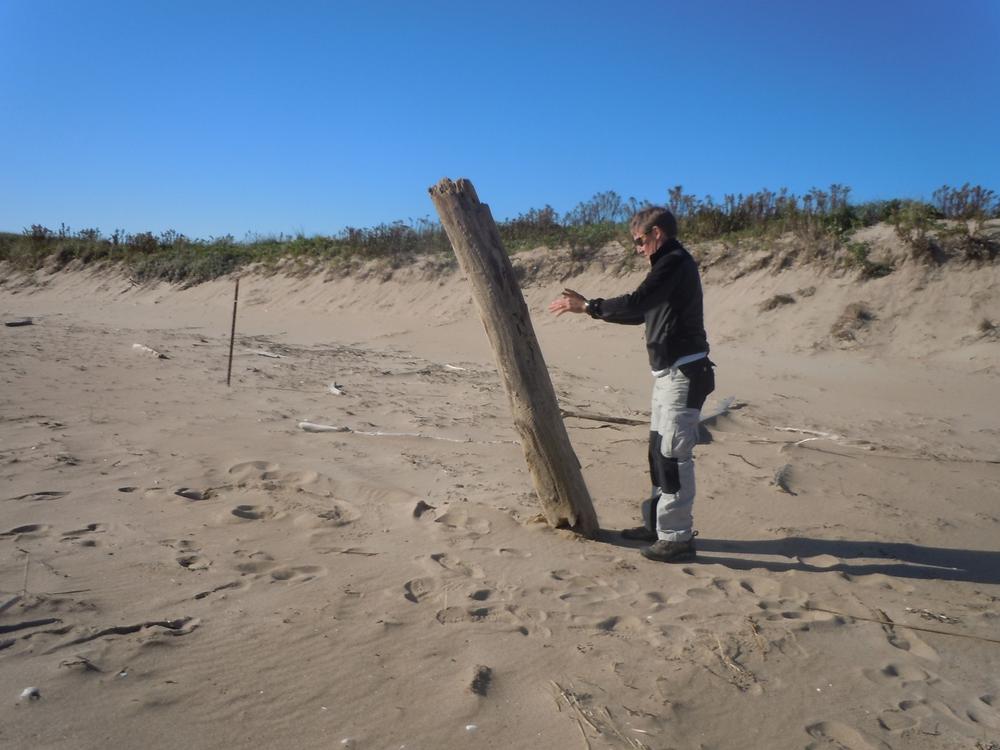
Heavy carrying is great exercise, because it uses so many of the big muscle groups, upper and lower body. Instead of just walking a mile on the beach, walk a mile carrying a heavy piece of driftwood on your shoulder. Team carries are popular, in which a group of people hoist a log onto their shoulders and carry it along the beach. This activity fosters camaraderie and teamwork. One slipup or lazy attitude, and the whole team suffers from the misstep.
Another sequential teamwork drill on the beach involves taking turns carrying a common load across the sand. The cross-country team I worked with, under an excellent coach and athlete, Bob Watson, lined up and took turns carrying a piece of driftwood as fast as they could a specified distance on the beach.
The person carrying the heavy item (like a chunk of driftwood) returns, passes it to the next person in line, then goes to the back of the line to await another turn. This represents another fun teamwork-oriented exercise that involves components of high-intensity resistance exercise and appropriate rests between each carry or rep, not to mention a lot of razzing from the temporarily idle teammates.
Again, the young teammates usually love it, for obvious reasons. It’s a “go with the flow” type of routine, with an element of playfulness. These types of workouts are by no means less effective than traditional, structured training (“Today we’re doing eight 200-meter dashes, six of which must be under 30 seconds”). The playful workouts in pretty, outdoor settings are a good accompaniment to something more difficult to tolerate mentally, such as Tabata sprints.
Note
Obviously, this chapter by no means covers every type of exercise you can do outside. We generally left out team sports, as well as specific sections on the various forms of long-distance running, cycling, and skiing (see Jack Fultz’s run-training methods at the end of this chapter). Space limitations do not allow for this kind of coverage, but all of these specialized outdoor sports can use the techniques described herein to augment their own specific skill requirements and regimens.
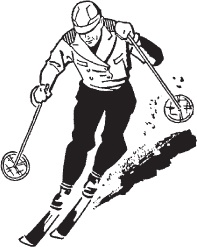
Alpine, or downhill, skiing and snowboarding are fantastic forms of outdoor winter exercise. They are conducive to adoption by all ages; it’s common to see kids of 5 and sprightly codgers of 70 or older kicking up their heels on the slopes. My ski area has an “80-year-old club” with special parking spaces for them (and yes, the club has a few members).
I’ve taken up downhill skiing more in earnest over the last five years, and it’s been a reminder that there is so much variety and nuance to this sport—there’s even a form (called Alpine touring) that involves hiking up a mountain carrying your skis, then hitching into the skis and shooshing down.
Note
This is commonly called “backcountry” skiing or snowboarding, because a groomed resort is not required (but, especially in the Alps and the western US, avalanche training is required). Variations on free-heel skiing include Randonee, Alpine touring (AT skiing, as the lingo goes), and telemark skiing.
Alpine skiing and snowboarding have a number of special benefits:
They foster leg strength, overall body balance, and improved proprioception, or awareness of your body or physicality in space (and your ability to make fast, coordination-oriented adjustments).
Downhill skiing is a great form of aerobic and anaerobic training; for beginner to expert-level skiing, a hard top-of-the-mountain to the bottom run is like a long sprint.
Skiing allows you to adapt to the cold temperatures; be outside during the winter (which drives many of us inside), often in the sun; and burn tons of extra calories as your metabolism ramps up to keep your body temperature stable (my pre-ski breakfasts always include one or two extra eggs, or I lose too much weight or lean mass). Cold-weather sports in general increase thermogenesis, or the burning of extra calories to maintain the homeostasis of your temperature at about 98.6.
It’s a fantastic, “mindful” activity (like Nordic or cross-country skiing) that allows you to join people of all ages in doing something healthy, or to be alone in a wilderness environment and escape urban-type lethargy and stress. Yes, it’s friluftsliv!
It’s not a slow, endurance-focused type of activity with consequent higher oxidative-stress levels and risk of overtraining. Alpine skiing is more like sprinting.

Yes, you can use your tools to track Alpine skiing, with very interesting results.
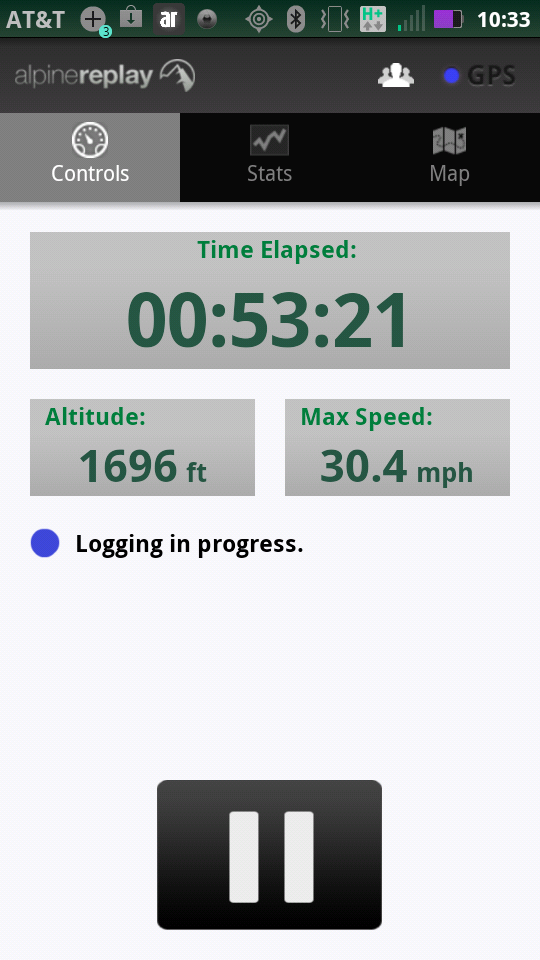
Alpine Replay is an app for both Android and the iPhone that is specially designed to track your ski or snowboard runs, and much more. Similar to the other tracking gear we’ve discussed, you basically load it up on your phone, switch it on, and put it away as you begin compiling your runs, turns, jumps, and aggregate total vertical feet. Later, you log into the site at www.alpinereplay.com to view an impressive collection of statistics, including the total time of active skiing, sustained speeds, fastest speed, aggregated vertical feet skied, number of runs, where you rank in these categories, etc.
Figure 7-18 shows the Alpine Replay screen on my Android phone, in recording mode.
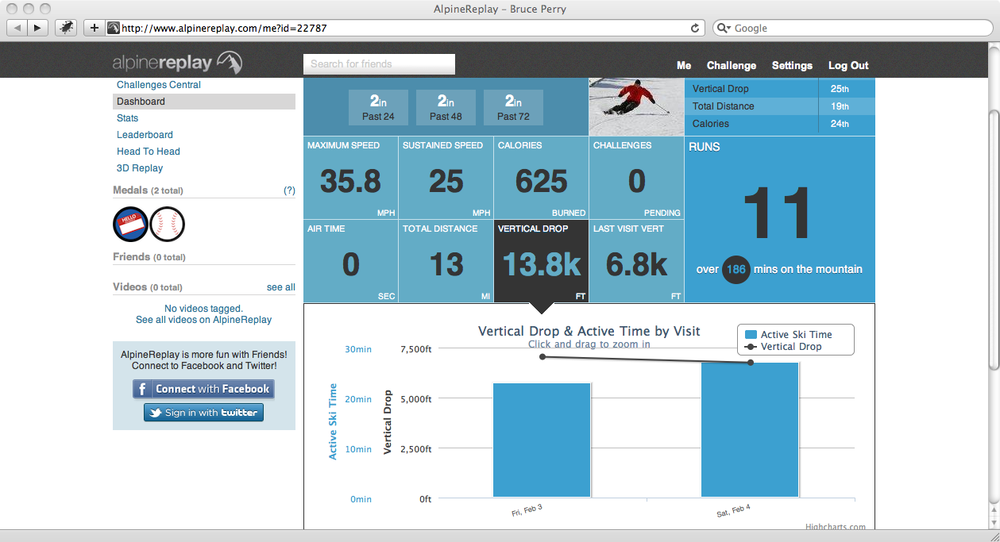
Along with the skiing, the fun begins when you view your stats afterward at www.alpinereplay.com. Figure 7-19 shows the charts on a bunch of downhill ski runs, including fastest run, fastest sustained speed, where you rank among all users (including just within the resort where you skied), the routes you took on a Google Map, and more.
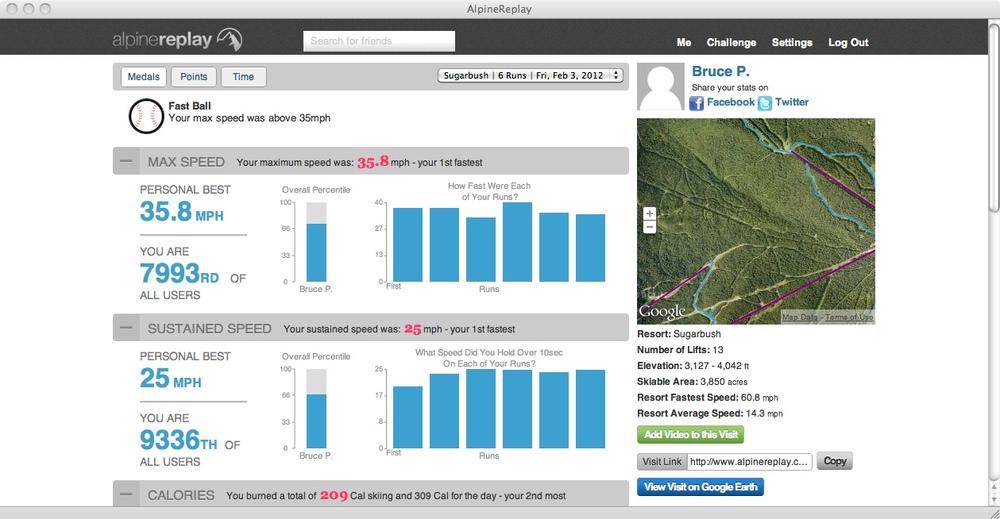
More charts caress your eyeballs after you depart the slopes. Figure 7-20 shows the total distance skied, the vertical drop, the maximum speed, the estimated calories burned, and other data. Through the app’s settings, you can even have the runs automatically posted to Twitter or Facebook.
The app sports a few differentiating details compared with other tools, according to the Alpine Replay website:
We measure speed, airtime, vertical, calories, distance and more, on any mountain in the world. Compare and compete with anyone, including yourself, with the click of a single button on your iPhone or Android. You will see a basic set of stats right on your phone or log into the AlpineReplay.com [site] to see even more detailed stats, compare and compete between friends, push your stats to Facebook and Twitter, or virtually compete against your friends in 3D.
It even boasts of a “patent pending jump detection technology” that’s designed to measure your jumps and how much “big air” time you attained.
I have also used Endomondo and Google Earth to track my Alpine ski runs. We already described this combination in detail in the Hiking and Climbing section. In this section, we’ll quickly show you what kind of data and imagery these apps can generate for skiing. Figure 7-21 shows Endomondo’s Workouts screen based on a brief, hard alpine ski I initiated in Vermont.
The browser view shows a profile of all your runs. You can trace, with your cursor, the yellow line representing each one of your ski runs, finding out the speed and elevation. This aspect was actually a bit risky for me, because of the natural inclination to beat the last run’s speed rate. Normally a conservative, under-control skier and still getting the kinks out of my technique, I hit around 30+mph on one of those curvilinear runs. I’ve since hit about 42 mph on Alpine Replay, but the various phones can be error-prone when reporting maximum speed. You can, in other words, gather a lot of interesting trivia on your ski runs.
Again, all you have to do to track ski runs is launch the Endomondo app on your smartphone, set it for downhill skiing, and tuck it in a pocket. Once in a while you’ll hear the sultry voice tell you that you’ve completed another lap. Finally, in the Workouts section of the Endomondo website, export the ski runs as a GPX file (with a .gpx suffix). Then open that file up in Google Earth, for some more interesting stats and imagery.
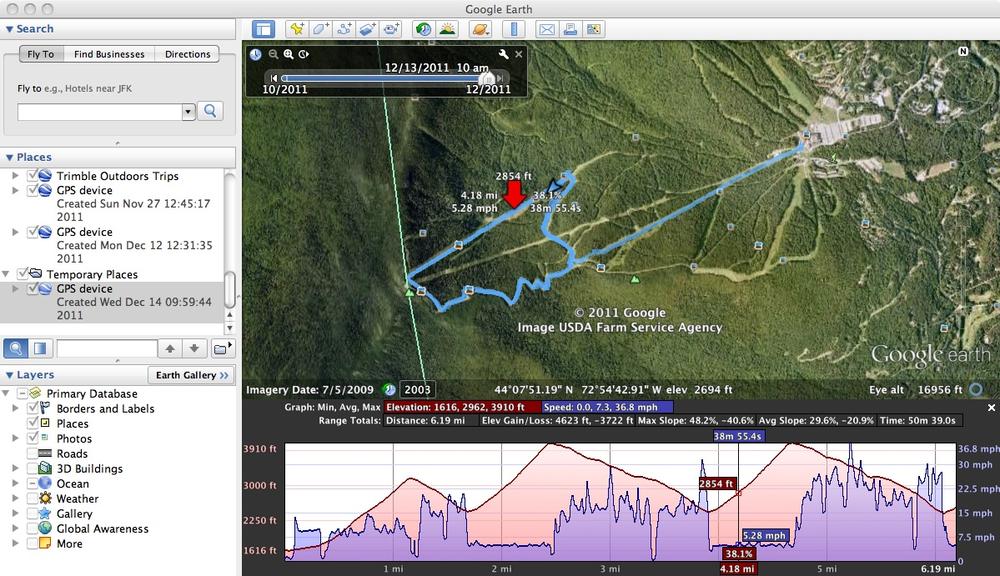
It doesn’t matter what kind of name you give the file in your text editor—skiruns2.gpx would be fine. The data tends to be richer in Google Earth, as Figure 7-22 shows. It even has me going 36.8 mph as a top speed (not sure how Endomondo and Google Earth are drawing different conclusions about speed, using the same data; they apparently use different algorithms).
Note
The GPX file, which is XML markup, includes track points and timestamps every few seconds. Using the latitude and longitude points (which the tool also captures as XML elements), as well as the timestamps, the software tries to capture the speed at which you moved from one geographical point to another, just as a GPS watch for running would do to estimate your pace. People who use GPS for precise measurements have tended to complain about the variances in data produced by different devices.
Google Earth gives you a nice illustration and overview of your ski runs, in terms of the blue line on the mountain. Google Earth will compute your total vertical for the ski runs, or the total number of feet you skied down, as the elevation loss figure—here, about 3,722 feet. A good day of skiing might earn you 15,000 feet or more of vertical.
Another interesting data point is Max Slope, which represents how steep the ski runs can get. Here it was an elevation grade of 48 percent—that’s pretty steep. These tools are excellent for analyzing all your downhill ski days, and spending the day on impressive mountainous terrain such as Big Sky, Montana, Whistler Blackcomb, British Columbia, or Zermatt, Switzerland would generate very interesting visuals.
We include an airport fitness section in this chapter because an airport is kind of outside of our accustomed realm. If you do much traveling, you’ve probably spent a lot of time waiting in or stranded at airports. Let’s see a show of hands for people who’ve been trapped at an airport and felt like crap!
You can generally get around the forced sedentary behavior of airports by crafting your own exercise routine, or perhaps using an airport gym. By using the Airport Gyms website (www.airportgyms.com), you can try to find a gym or health club at the airport where you will be hanging out. In general, good luck with that!
Testing this app, I got three hits for Boston, but two involved 10-minute taxi rides, so they’re not really located at the airport; they’re in hotels that allow you to buy a day pass to use their weight machines, which is worth it only if you have a very long wait at an airport and want to cough up the taxi and gym-pass fare.
Note
Not very practical. You’re usually waiting to board, or if your flight gets bumped, you’re hustling, trying to get on another one.
As for the gym that was within walking distance, a comment included with the search result pointed out that one of the hotels was no longer allowing day passes, so you do have to check with these facilities beforehand, such as by email.
Denver also produced three hits on airport gyms, but all of them required taxi rides. A note stated: “Denver’s airport is located such that it can take some time to get on and off the ‘compound’.”
San Francisco had a number of possibilities, yet all involved taxi or BART subway rides. These aren’t really airport gyms!
I only found gyms located at airports in big hubs like Chicago, so I assume for most travelers who don’t want to jump in a cab and actually leave the airport for a lengthy time (and expense), these airport gyms do not yet have a lot of practical value (the website will be a good resource, however, once airports start getting their acts together). Some of the more elite clubs at airports might have small workout rooms, which their members can use when they aren’t elsewhere in the club drinking scotch and getting massages.
Notice a recurring theme in this chapter?
You can create your own routine at the airport, which is always a good idea since we know that endless sitting is very bad in the long run. Plus, all that lousy food, stress, jet lag, and lethargy feels crummy in general, right? First, just constantly walk, ideally outside, and try to take your carry-on stuff in a backpack. This makes it easier to convert your airport waits into weighted hikes, which are a good form of exercise.
Always take the stairs instead of the escalators, always, and walk instead of lounging on the conveyor belts or moving sidewalks.
Constantly drink water and refrain from stuffing your gullet with all that crappy airport food, like mass-produced pizza, old cellophane-wrapped sandwiches, vending-machine junk, and er, um, wine and margaritas. Just bring some nuts or grab a piece of fruit once in a while. Fasting is perfect for airports.
Along with walking, use the hard seats for inverted pushups, meaning pushups with your feet off the ground. Do some Hindu pushups on the rug. They don’t last long enough to break a sweat, unless you’re waiting in an airport in Jakarta, Indonesia (even then, they might be blasting the AC), and just a few sets of these pushups are great exercise.
You can probably also find a place to do pull-ups, and who cares what the other passengers think! You’ll probably inspire them. Do some deep knee bends or “air squats” with your backpack on, and if you’re outside in the cool weather on tarmac, try some jumping jacks (but with your backpack off for those). The trip will be far pleasanter and healthier if you avoid becoming just another “terminal zombie.”
Jack Fultz: The 1976 Boston Marathon Winner’s Coaching Tips

We interviewed Jack Fultz, who won the Boston Marathon in 1976 in triple-digit heat, then ran a personal best 2:11:17 in 1978. He provides personal coaching services and teaches at Tufts University.
Can you provide a little background on your Boston Marathon coaching experience—e.g., how many runners, how long you’ve been doing it? Do you still run in Boston or any marathons?
I train individuals for Boston and other marathons. The Dana-Farber Marathon Challenge team for which I develop online training programs and oversee runners’ training-related issues is comprised of more than 500 runners each year now—though we’ve grown to this size over our 23 years, starting in 1990 with 19 runners.
I was diagnosed with osteoarthritis in my hip in 2000. I had it resurfaced in the summer of 2010. Despite some infection complications, I’m healthy once again and I work out every day—but I run only very sparingly. Biking is my primary aerobic activity now, though I swim/ERG/elliptical somewhat regularly as well.
How long is the training program (say, in weeks)?
I created 18-week training calendars for the beginner, intermediate, and advanced marathoners on our DFMC team. That’s pretty much what I do for individual clients as well.
What’s the basic routine (I assume it’s molded to the particular runner)? How many miles per week? What kind of runs (long, slow vs. shorter-tempo runs)? How many rest days per week?
My beginner and advanced programs include only four running days each week. Two of the non-running days include some form of running simulation workout—elliptical machine, especially the Cybex Arc Trainer, which I believe to be the single best running simulation machine on the market when set and used appropriately, stationary biking, and/or deep water running.
A lot of variety over various terrains and different speeds of training, gradually building over the 18 weeks in terms of quality and quantity. My advanced program only includes three runs at 20 or more miles but also a few runs at 18 miles, so there are plenty of long runs—and I encourage my runners to run a portion of their long runs at marathon race pace if they’re feeling good and strong.
Do you add any interval or track work?
I encourage all my runners, beginners as well, to include some form of speed training. That can be as simple as including 100-meter long “strides” of quicker paced running near the end of most of their training runs. But I also encourage them to have include at least one run/week where they include some running that is quicker than their regular steady pace, whether that is just some light fartlek running or structured track workouts. Even beginners will benefit from the variety and slightly greater challenge that “speed” training provides. For a 12-minute miler to run 11 or 10-minute pace for 200–800 meters constitutes “speed” training, even though it isn’t all that fast. It is to them.
Do you have the runners do any races during the training period (e.g., 5k or 10k)? Any cross-training (biking, weightlifting)?
Training races are always a good idea to include, especially for the novice racer. The novelty of registering for a race, pinning on a number, starting en masse with a starting gun/horn, and “speeding” over the course against the clock can be intimidating. Running a few races before the big marathon eliminates the novelty factor of racing and the runner will [be] less nervous or intimidated on marathon day. The race also provides a greater training effect than most workouts possibly can.
Do you use any of the new technology gizmos and GPS tools for endurance athletes, like Nike+?
I use a Garmin Edge with HR for much of my biking. I’m staring to consider using HR for some of my individual clients but the larger team is left to their own devices. Many use GPS and some of those use HR—but very few use HR as an exclusive training guide. But it can be very useful if one is well versed on how to use it.
Is there a dietary component to your training program?
I use the standard “see food diet”—I see food and I eat it. I believe that eating behavior is often just as important as “what” one eats—eating more, smaller meals and healthy snacks throughout the day and when eating a complete meal, to eat slowly and not overeat at any given time. By eating slowly, savoring the flavors of the food, we assist our digestive system by swallowing our food in near-liquid form and we’re much more likely to stop eating when our hunger has been satiated rather than when we’re uncomfortably full.
If you were competing in Boston in 2011, what would you do differently compared with your regimen in 1976?
I’d include a lot more of the alternative training I mentioned above. At the height of my racing career I’d average 125 miles/week for 10–12 weeks in preparation for a marathon. That’s a lot of pounding and I’m sure most national and world-class marathoners suffer through a lot of overtraining injuries and lesser overtraining symptoms of fatigue and body ache that could be eliminated by replacing some/many of the body-pounding road miles with time on a Cybex Arc Trainer or doing deep water running. That’s where we go now when injured—but they could serve a runner much more as a preventative tool. I’m an absolute believer in this and I believe I could train a healthy runner for a marathon just as effectively, and maybe more so, by having them do the majority of their training via these safer modalities. They’d require less recovery time between hard workouts, thus being able to do more intensity training and significantly reduce the likelihood of losing training time due to injury.