CHAPTER SIX
THROWING LARGE
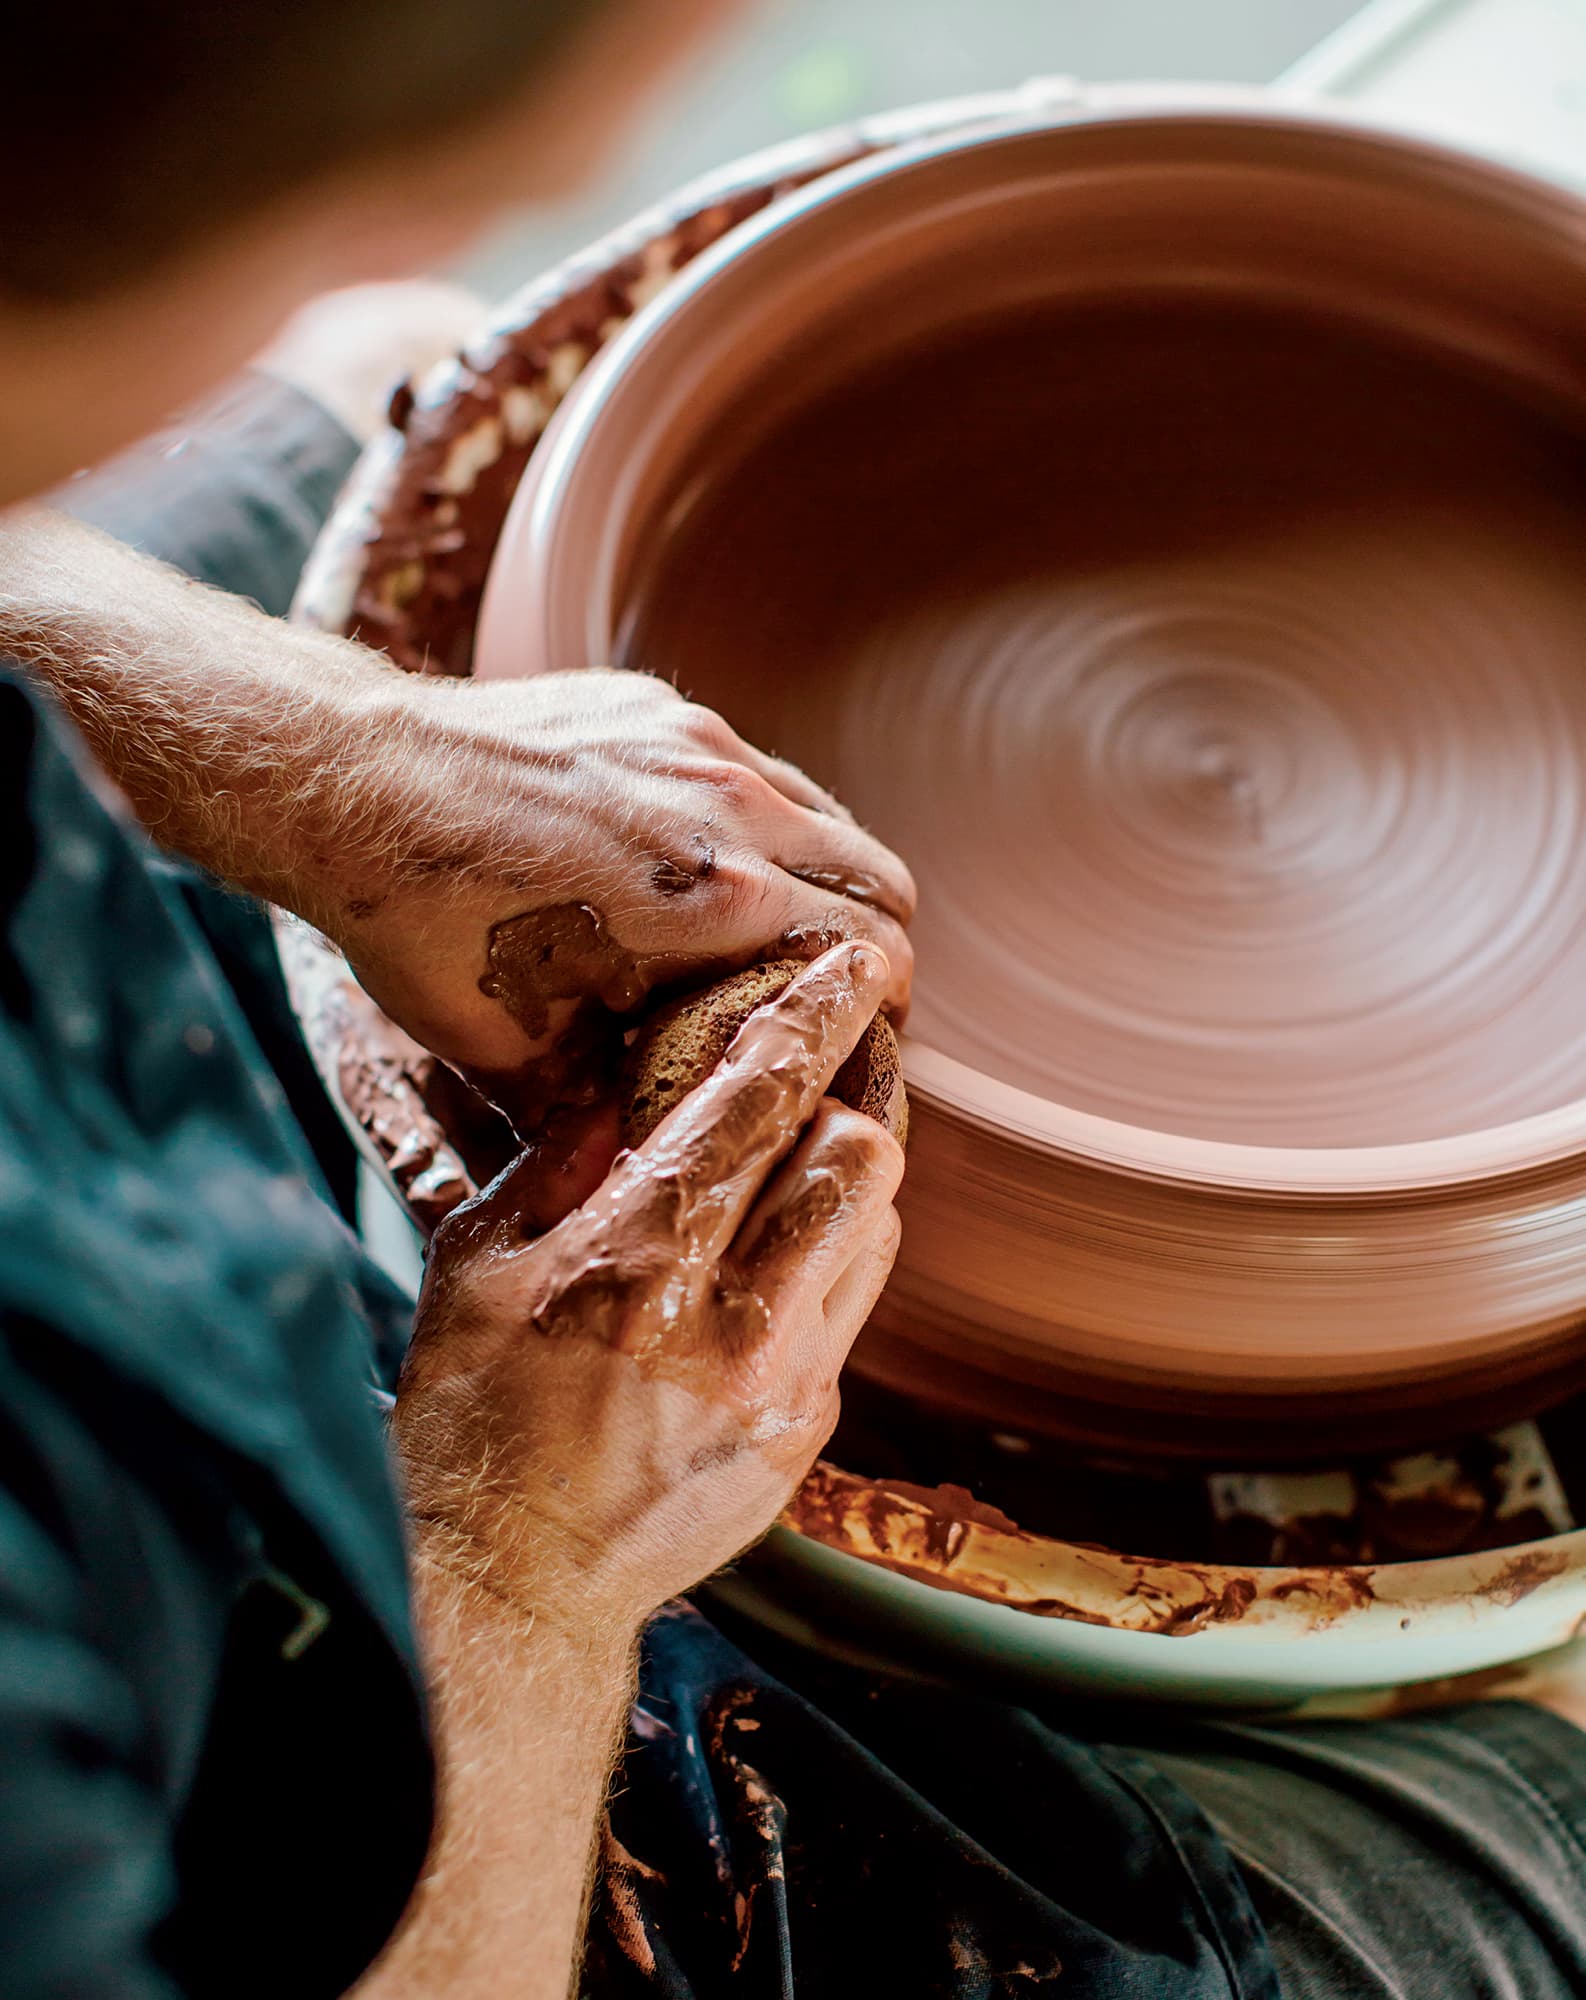
HOPEFULLY IF YOU’RE READING this chapter you’ve come to the point where you’re ready to tackle something bigger—and that means it’s time to throw big pots! If this is your first time working larger, I want to assure you that the skills you already possess will guide you through this process. If, on the other hand, you already know how to make big pots, I want to challenge you to try new techniques and push yourself to increase the scale and complexity of your large forms.
Throwing large forms is a challenge that commands bigger risks and bigger rewards. I find large pots elicit my excitement from the moment I first see them finished to the moment they find a place in someone’s home. Eating out of smaller handmade pots is an experience I always enjoy, but I find extra enjoyment out of serving from a large platter that commands attention on the dinner table. And I have to say, it’s a very gratifying feeling when you unload a 24-inch vase from a 27-inch kiln.
You may also be surprised by the psychological relationship between the human body and the increased scale of a vessel. When objects approach the size of a human torso, we tend to relate to them as if they are animate, somehow sharing the soul and personality of their maker. For example, when standing beside a Peter Volkous stacked vessel, you get the feeling that his presence is permanently linked to the object. Conflating a soul, or spirit, to a large-scale vessel is not solely a concern for the art world, as it occurs in religious rituals and the anthropological studies of past cultures throughout history. In a variety of geographical regions, large pots have been used as grave markers and urns. This connection between the scale of the pot and the representation of human life is built into the way we approach large vessels.
While this might seem like a heavy topic for this book, I wanted to discuss it because large-scale forms present a new opportunity for you as a maker. I encourage you to fully embrace the notion that you are leading the viewer into feeling and experiencing more than they might be expecting from a ceramic object.
GETTING STARTED
Note that before you begin this chapter you should set yourself up for success. That’s right, the first hurdle to making large work is wedging larger amounts of clay. To accomplish this, I recommend using the conical method (shown here), which allows you to wedge larger amounts with ease. Start wedging in a smooth back-and-forth rocking motion. On your backwards movement, stop a little before you normally would. Over the course of a few back-and-forth movements, this will create a small section of clay that your hands will touch and a larger section that will trail behind you. Because the conical method recycles clay from the outside to the middle, the tail section will be worked back in through the wedging process. When you are ready to stop, increase your backwards movement a little farther each time. This will work the tail back into the main cone of clay.
CENTERING
Students often tell me that they are not strong enough to center large amounts of clay. The old adage, “Work smarter, not harder,” comes to mind. With proper technique, throwing large doesn’t have to be harder on your muscles than throwing the smaller forms you are already comfortable making. Throwing large will require you use a full-body approach to throwing, but if you are already working on the wheel regularly, your individual muscles are more than ready to meet the challenge. The methods I demonstrate allow you to step up the amount of clay you use without overly taxing your back or arms. First, I’ll offer a method for adjusting your body position so that you can center 10 pounds of clay (or more) at a time. Then I’ll discuss compound centering with multiple 10-pound units.
Note: Look back here if you need a refresher on the stages of throwing. I will describe my hand placements comparing the wheel head to a clock face.
CENTERING TEN POUNDS OF CLAY (OR MORE)
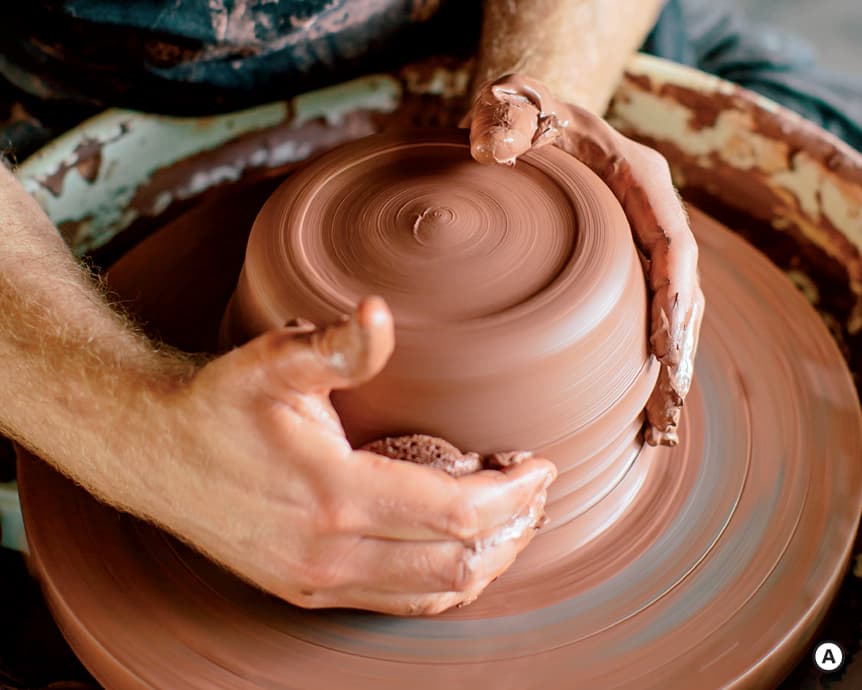
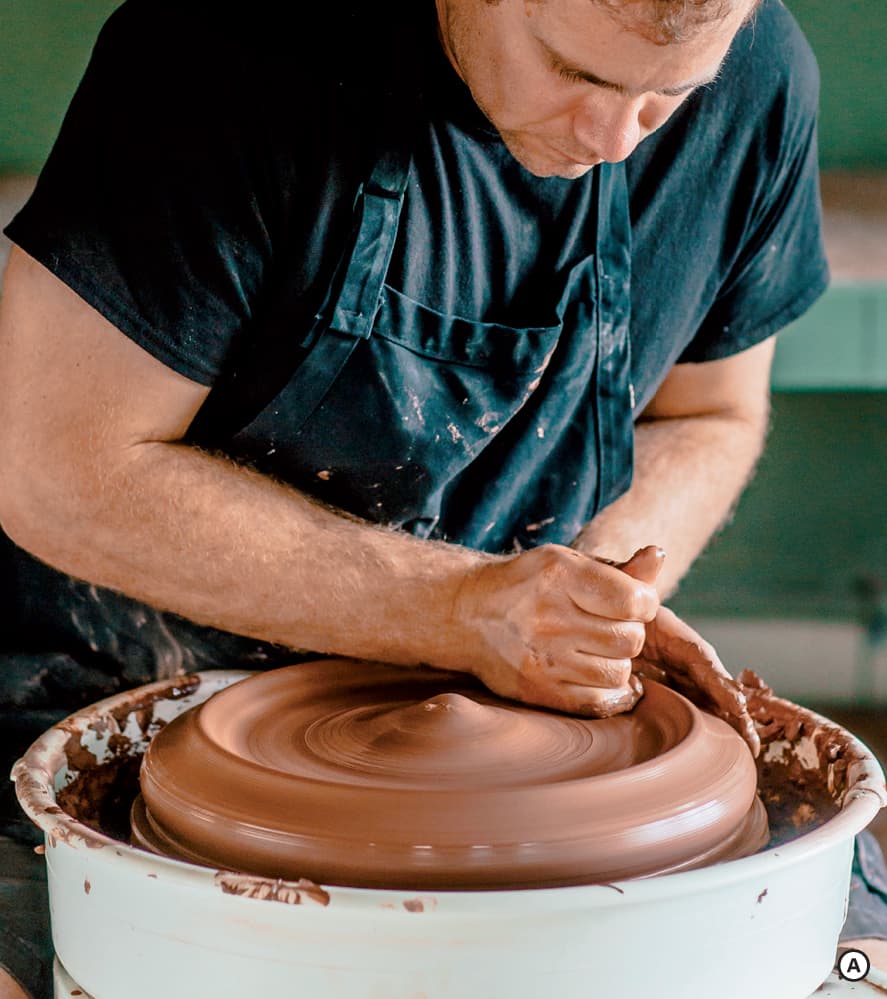
Throw your ball of clay down onto the middle of the wheel head. Get the wheel spinning slowly and use your outstretched palms to beat the clay downward. Your rhythmic pounding should be similar to playing bongo drums. This initial centering involves no water; you’re just roughing out a shape that is easier to center. A
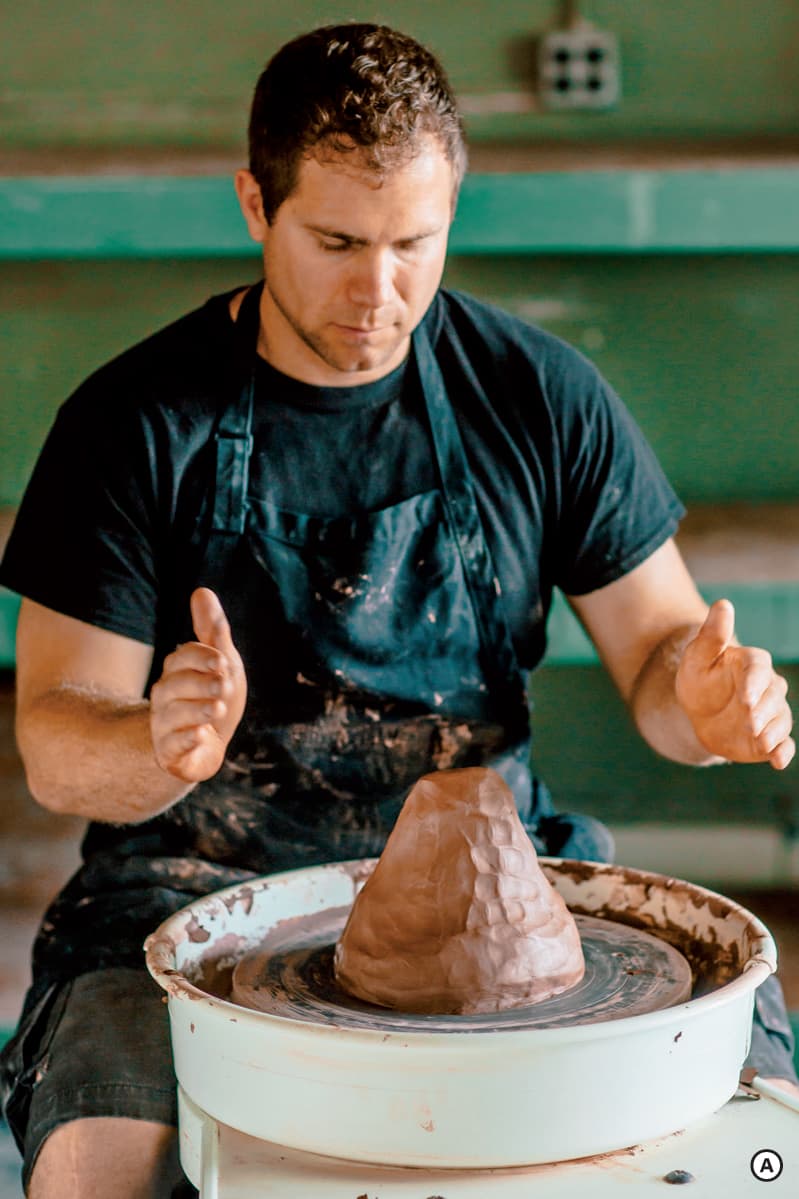
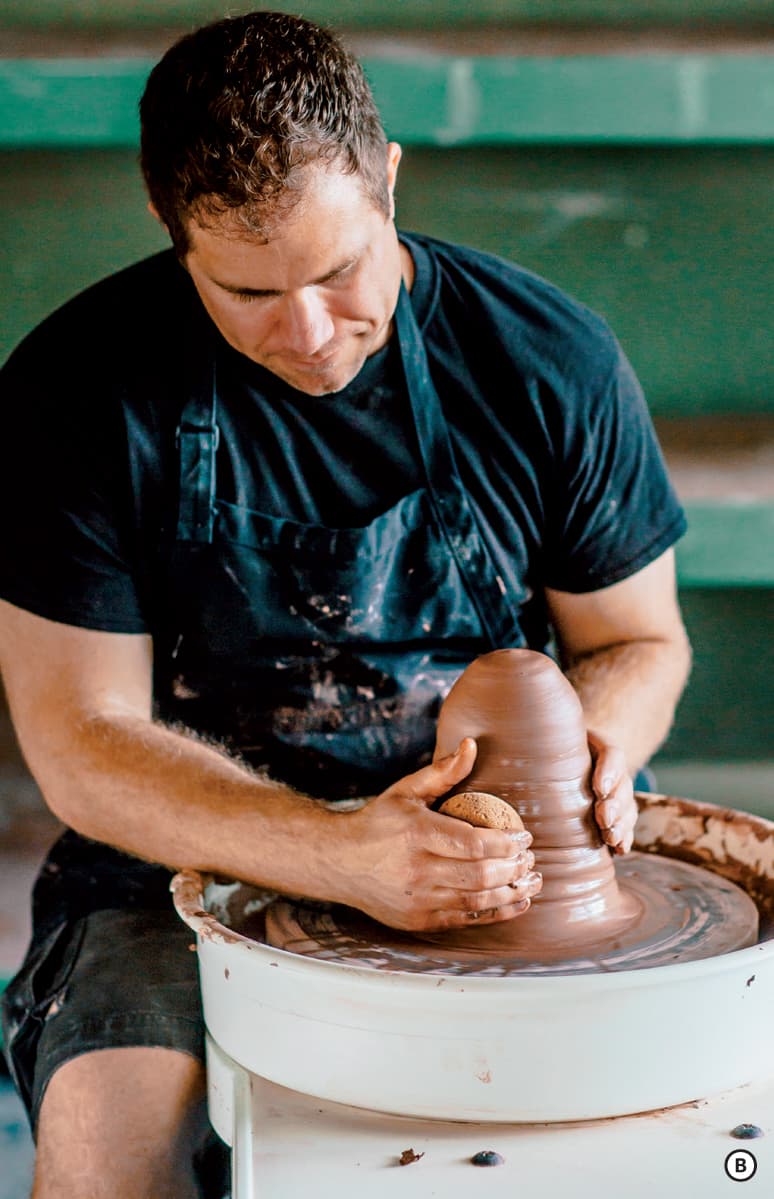
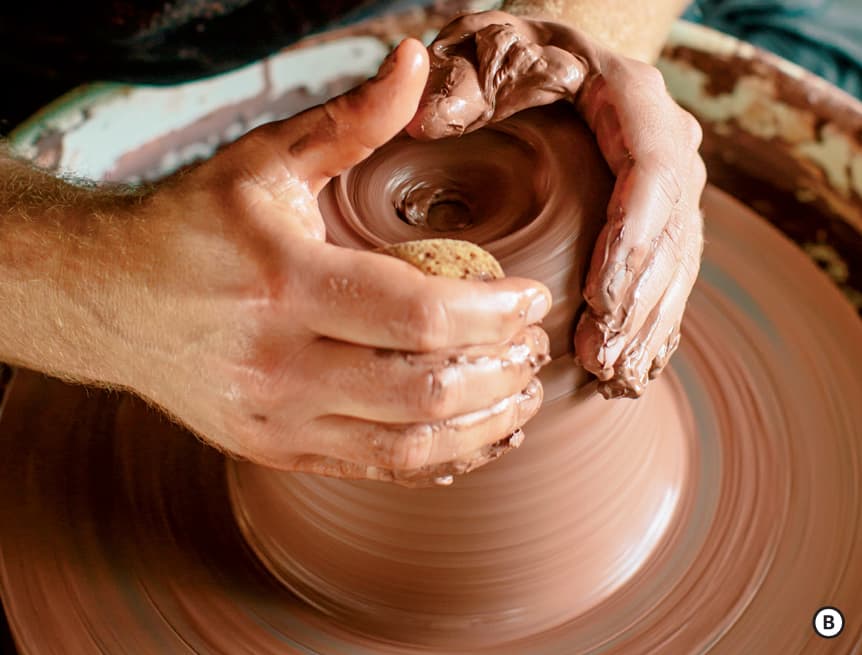
Once you have a uniform dome, wet both your hands and the clay on the wheel before placing your palms inward on the spinning clay. Now set your wheel speed closer to 3/4 speed to utilize the strength of the motor. To generate more power for coning up, adjust your right hand to one o’clock and your left to seven o’clock. B Most people are stronger pulling towards themselves, so use the extra strength from your right hand to create an opposing force with your left. Continue to cone up as you normally would.
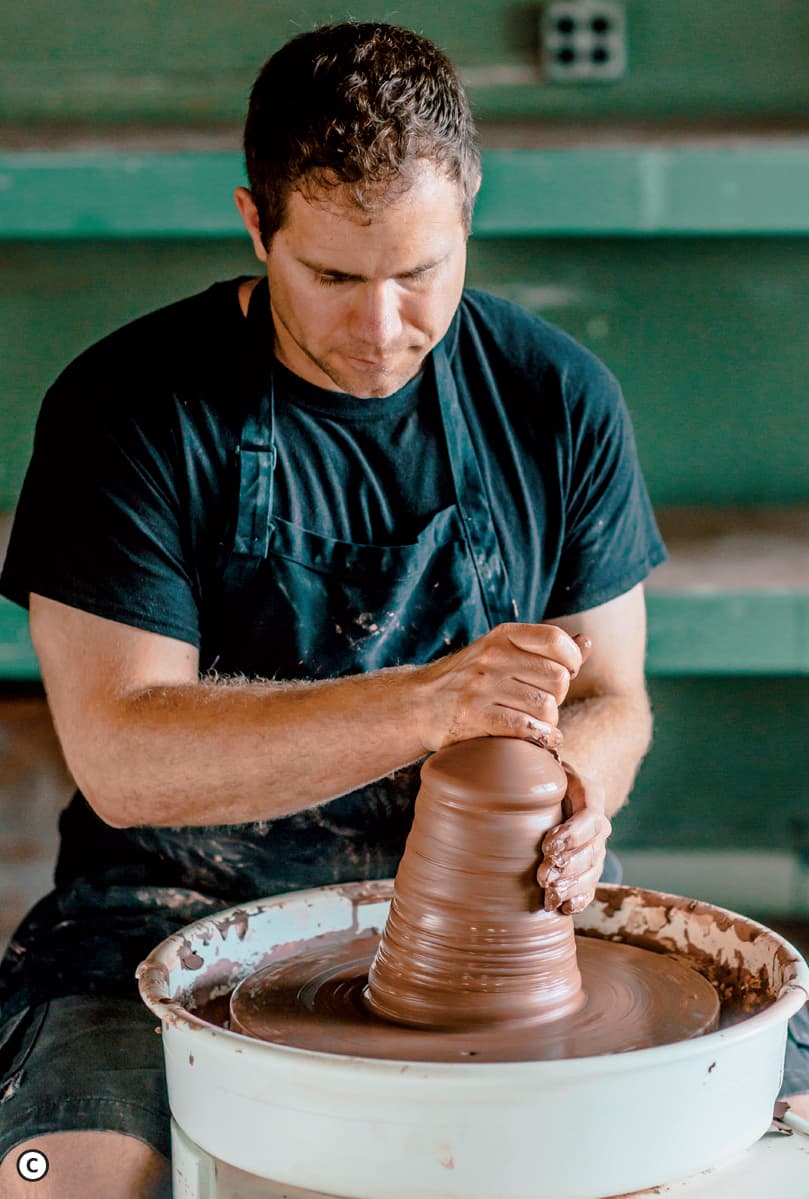
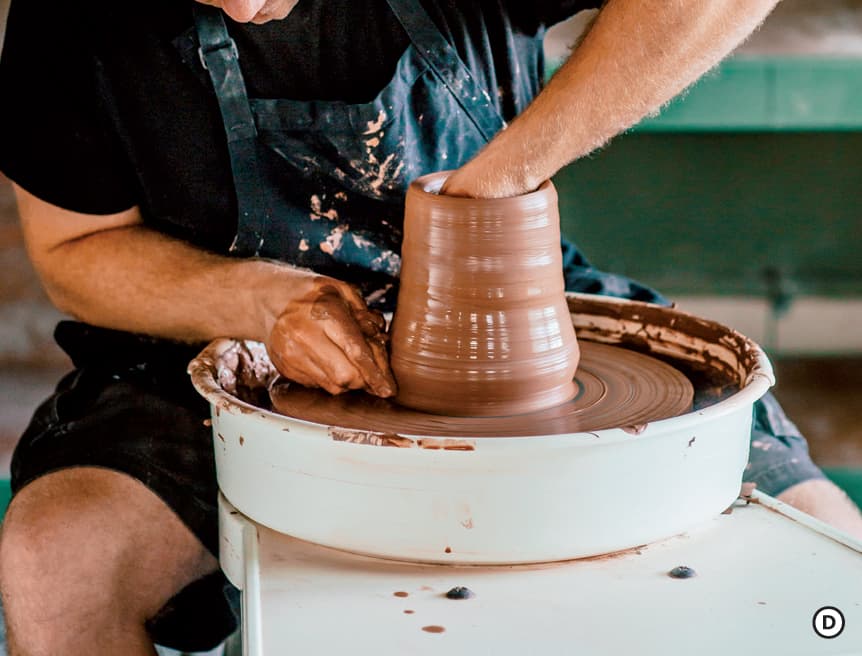
When coning down, hold a wet sponge in your top hand and squeeze when you need extra lubrication. Larger pieces will need proportionally larger amounts of water, but remember to only apply water when you need it so as not to oversaturate the clay. To cone down, slide your clenched right fist towards your torso, past the center line of the wheel. Push down at an angle, engaging the clay with the little finger side of your palm and wrist. C When working on larger amounts of clay, you will need to engage the muscles in your torso and upper arm for extra stability. If needed, stand up to better use the arm as a lever. If the clay starts to dry out, squeeze the sponge to decrease friction. As you push down with your right hand, collect the clay with your left. Complete the centering process as you normally would.
COMPOUND CENTERING
There are times when you might need to center 20 or more pounds of clay. Compound centering offers you an easy way to do this without centering more than 10 pounds at a time. To start, follow the directions shown here for centering 10 pounds.
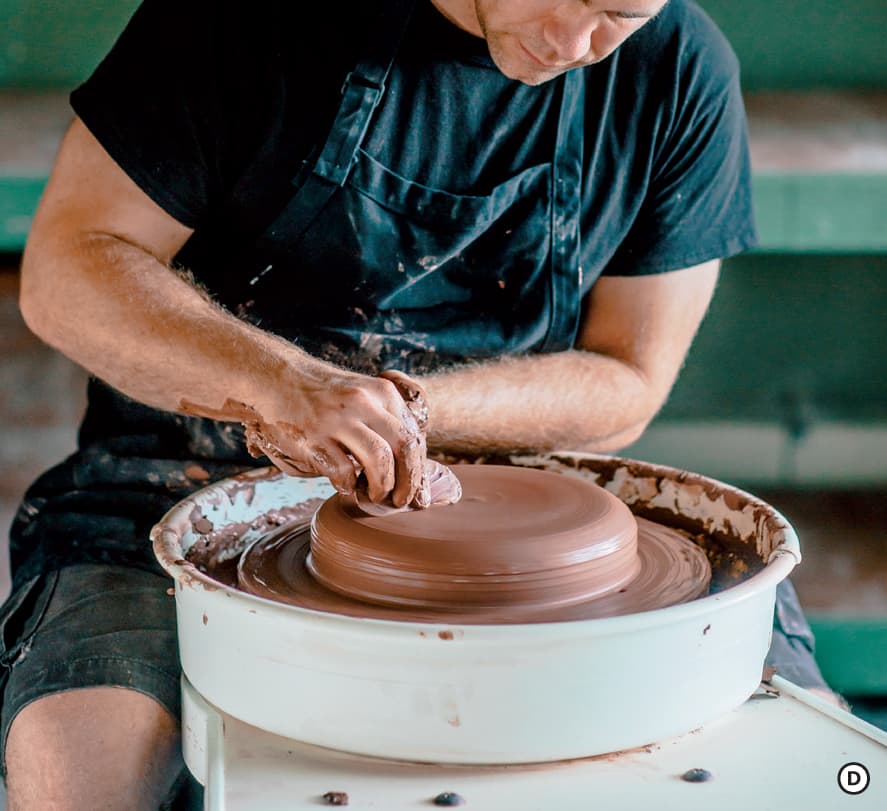
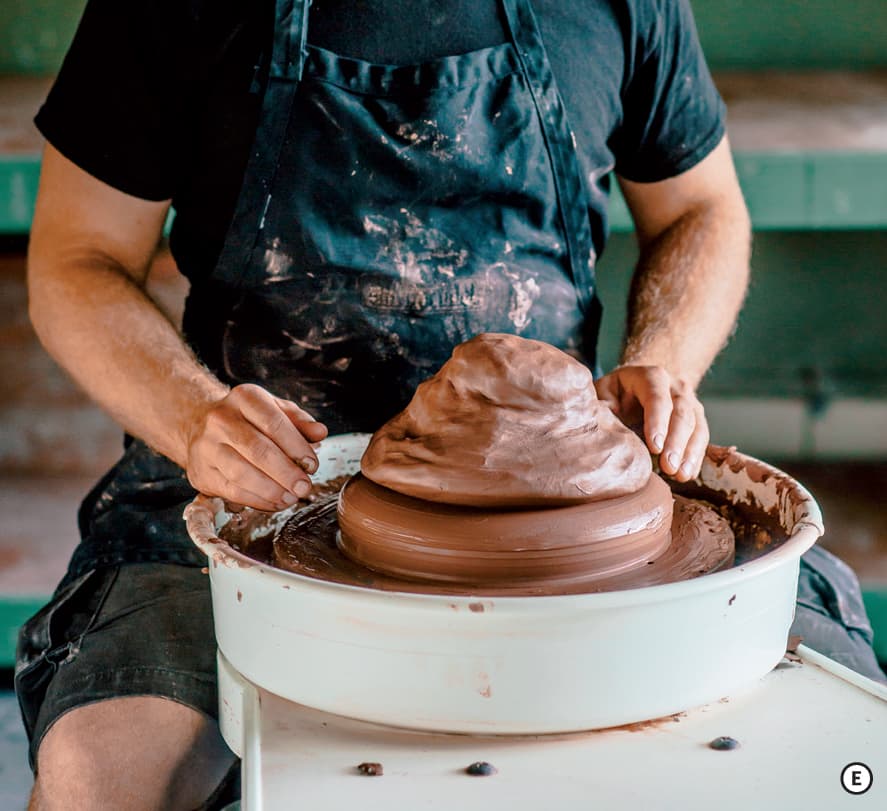
Next, wedge another 10-pound ball and place it beside your wheel. Using a rubber rib, remove any moisture from the top of your clay. D Forcefully throw the new 10-pound ball on top of the already centered clay. Make sure it is stuck in place before continuing. E
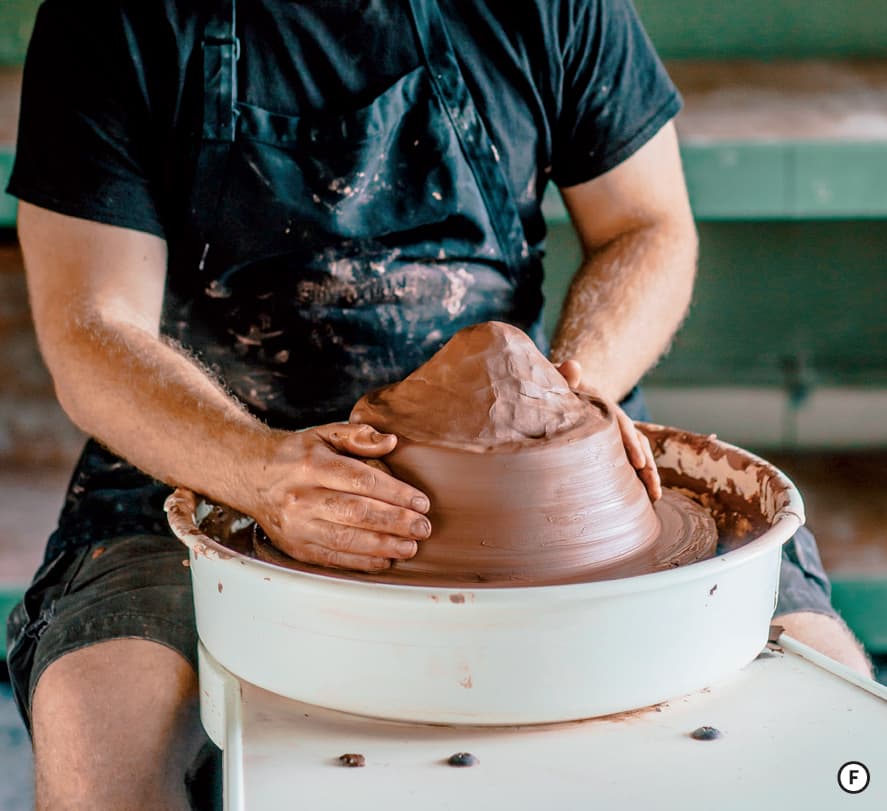
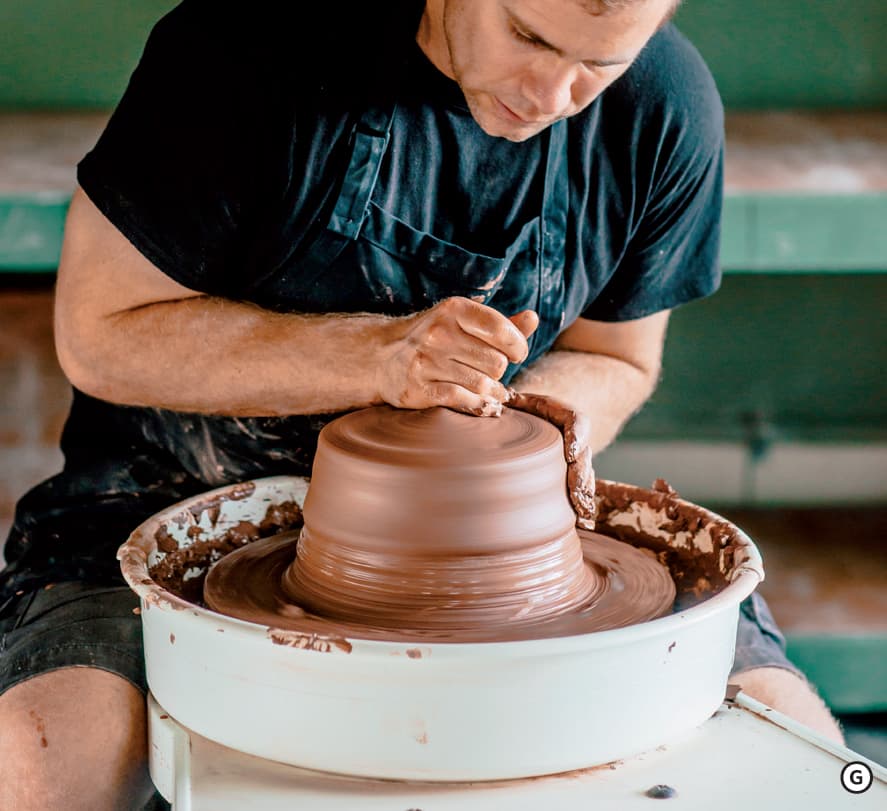
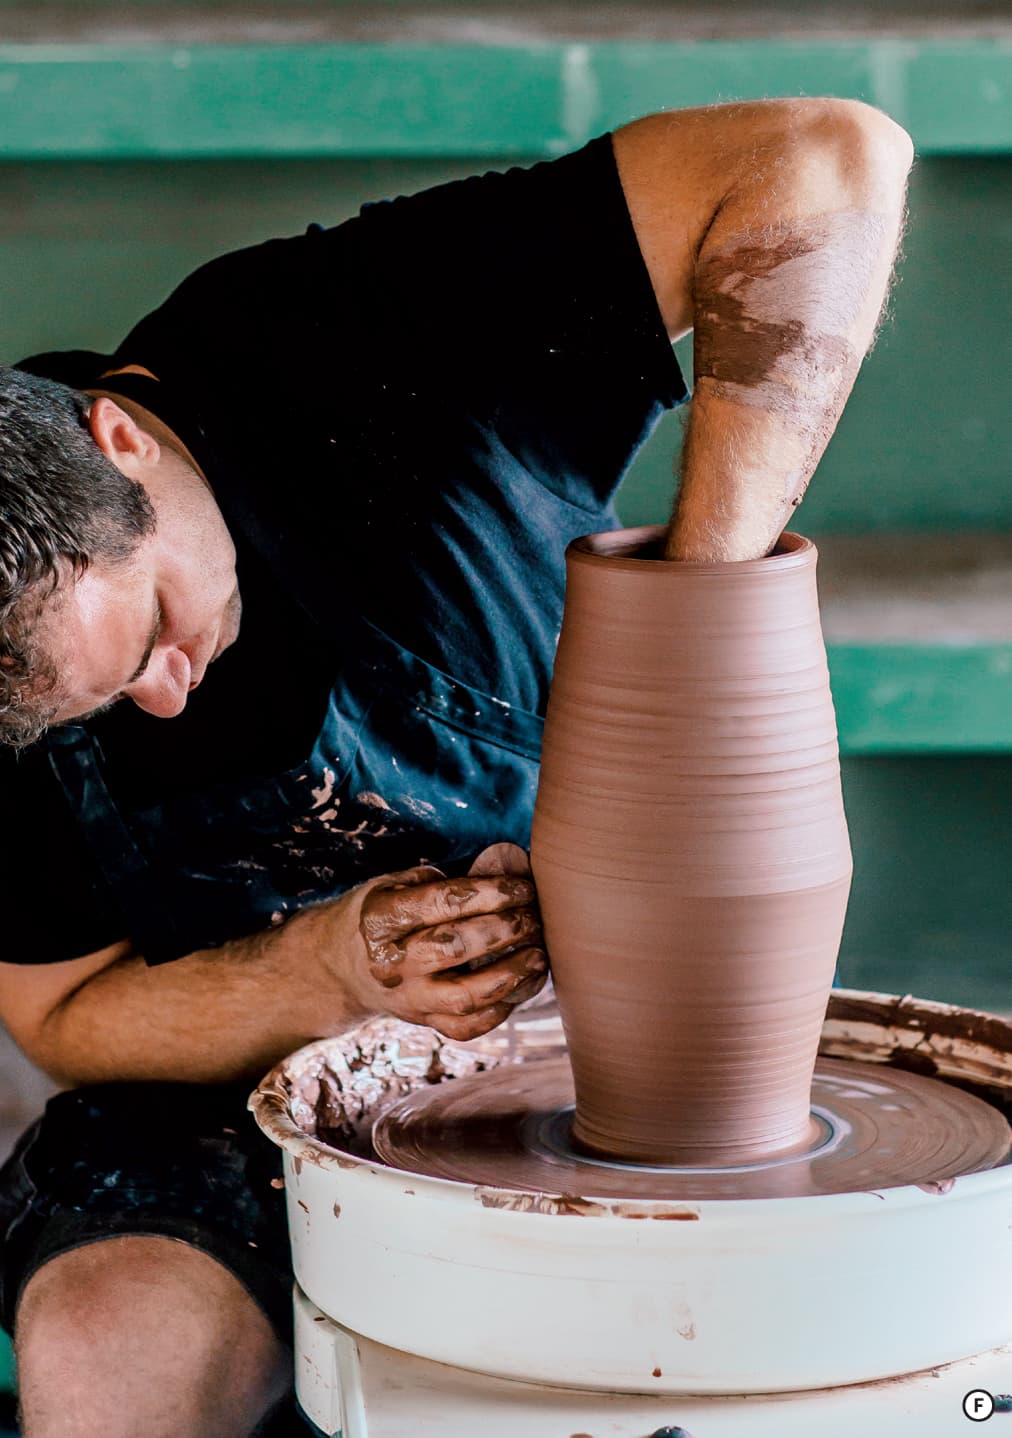
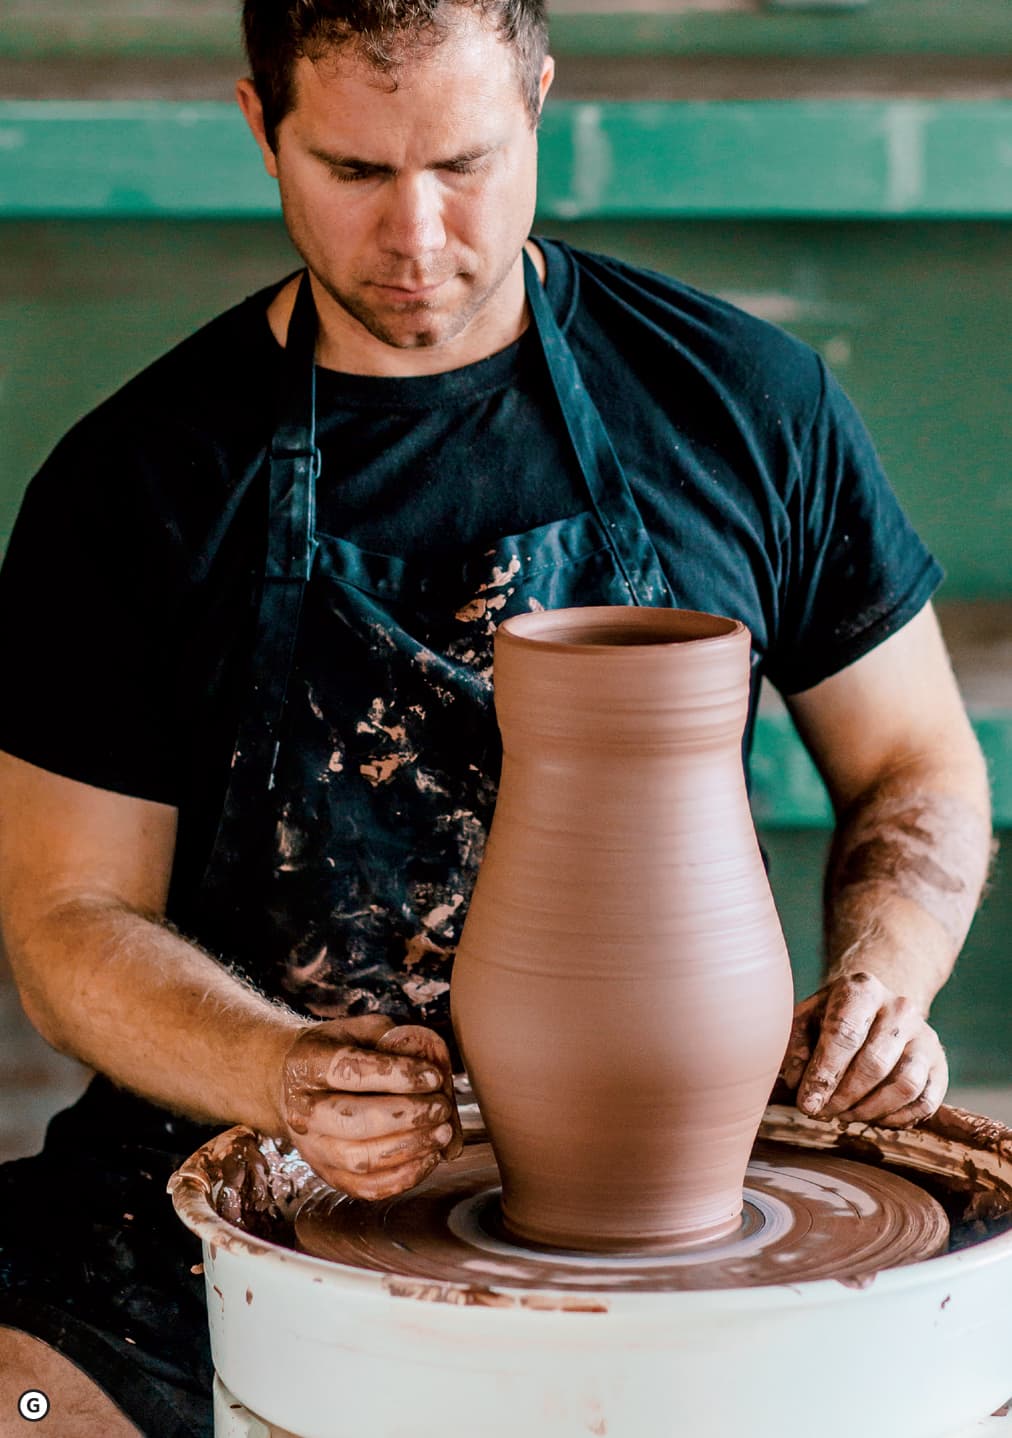
Cone up and down using the same method as you would for the first 10 pounds. When coning down you will unify the new top section of clay with the bottom. The transition between the two should be seamless, so cone up and down again if necessary. Continue to repeat with other 10-pound lumps of clay until you have sufficient clay for your big pot. F G
USING A HEATING DEVICE
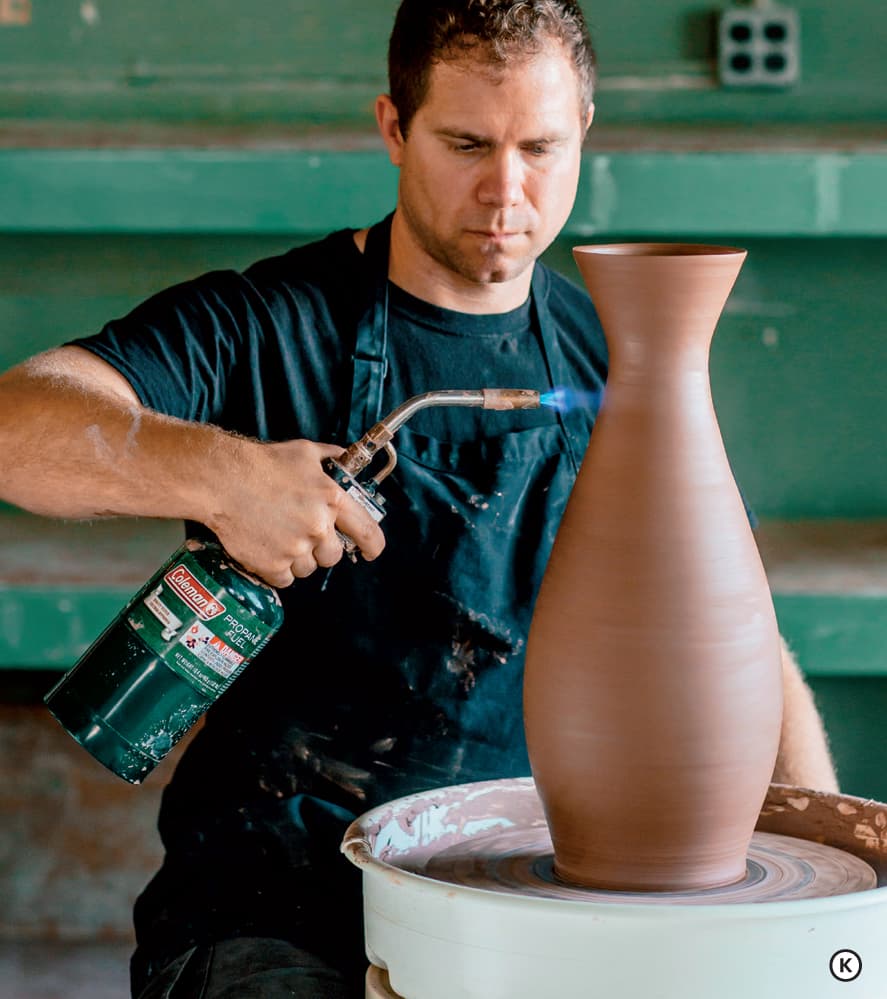
Throughout this chapter you will see references to using a heating device. Properly using one will save you hours of drying time when you are making larger forms. You can choose from a variety of devices, including a hair dryer, wallpaper stripper, or blow torch. When deciding which device to use, consider the safety of the device, the speed at which it works, and any rules that might affect the use of heating devices in public studios.
Devices such as a hair dryer rely on electricity to fuel their heating elements. Their motors push air past a heated metal coil, which produces fast-moving preheated air. The combination of heat and moving air can be effective in drying the surface of a pot. The downside is that mixing electricity into a throwing process that involves water will introduce safety hazards. With proper training and safety precautions, electric devices are safe for most studios. In fact, blow torches are more acutely dangerous because they generate heat with an open flame. Thus, the potential to start a fire or injure yourself with the tool itself is greater. However, they are widely used because they work quickly. You can easily dry a pot to leather hard in five minutes with a blowtorch, where as a heat gun might take ten or fifteen minutes. And again, with proper attention to safety, you can use the device safely.
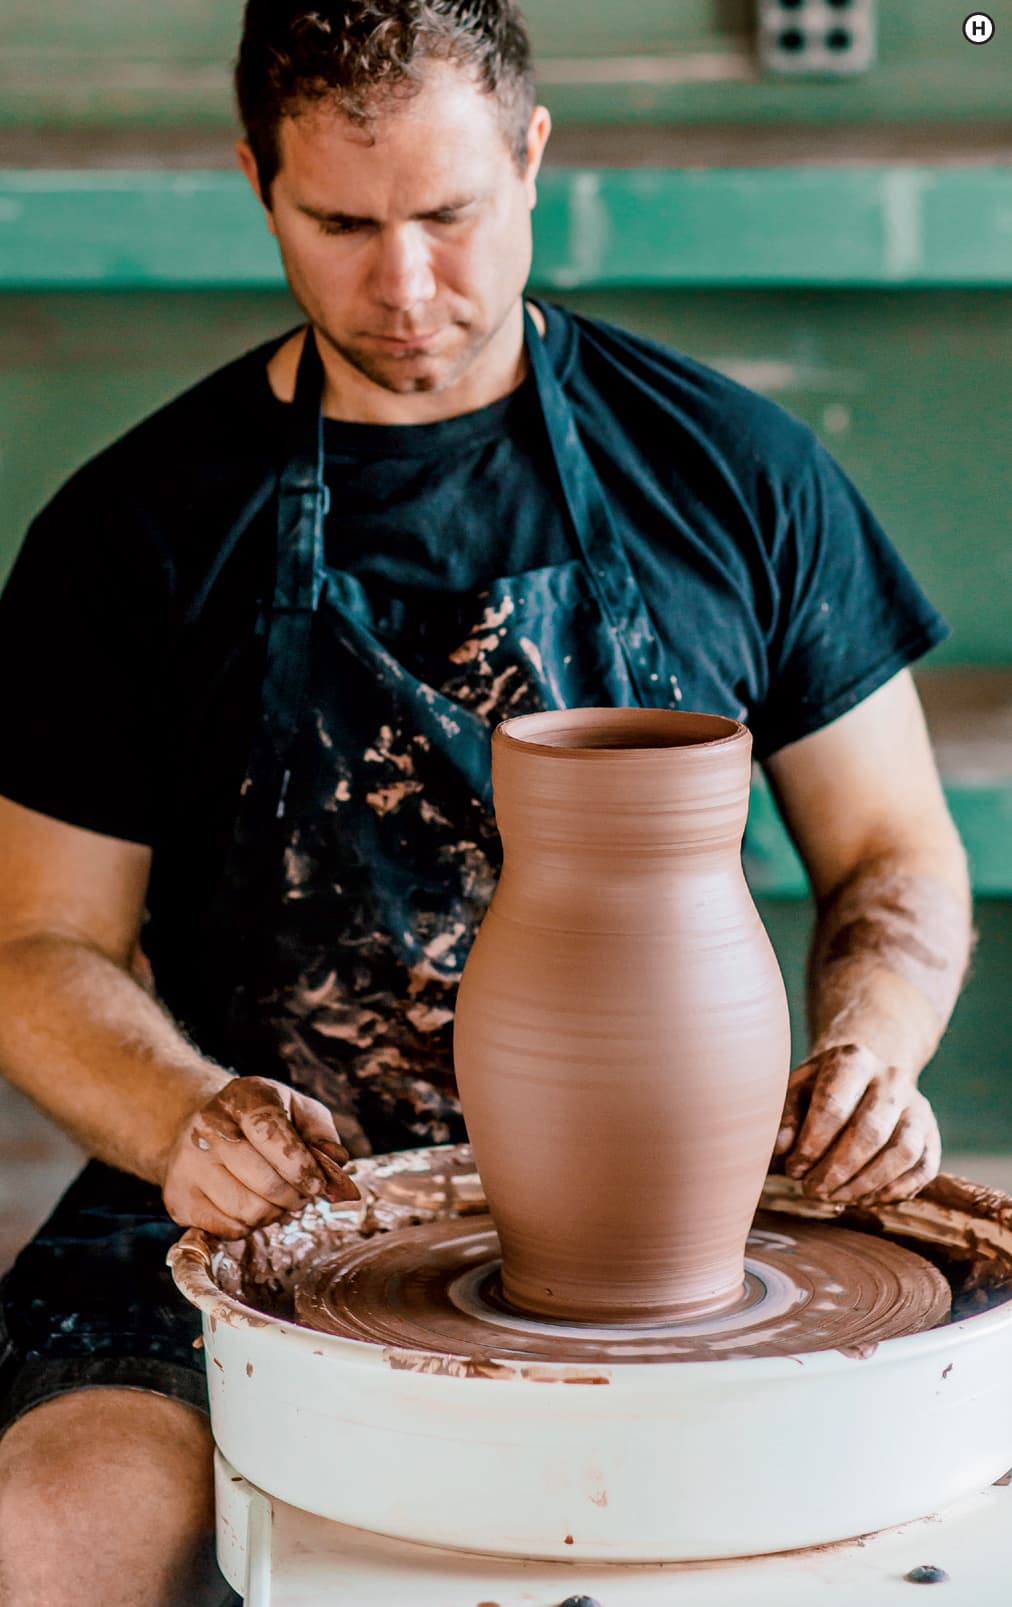
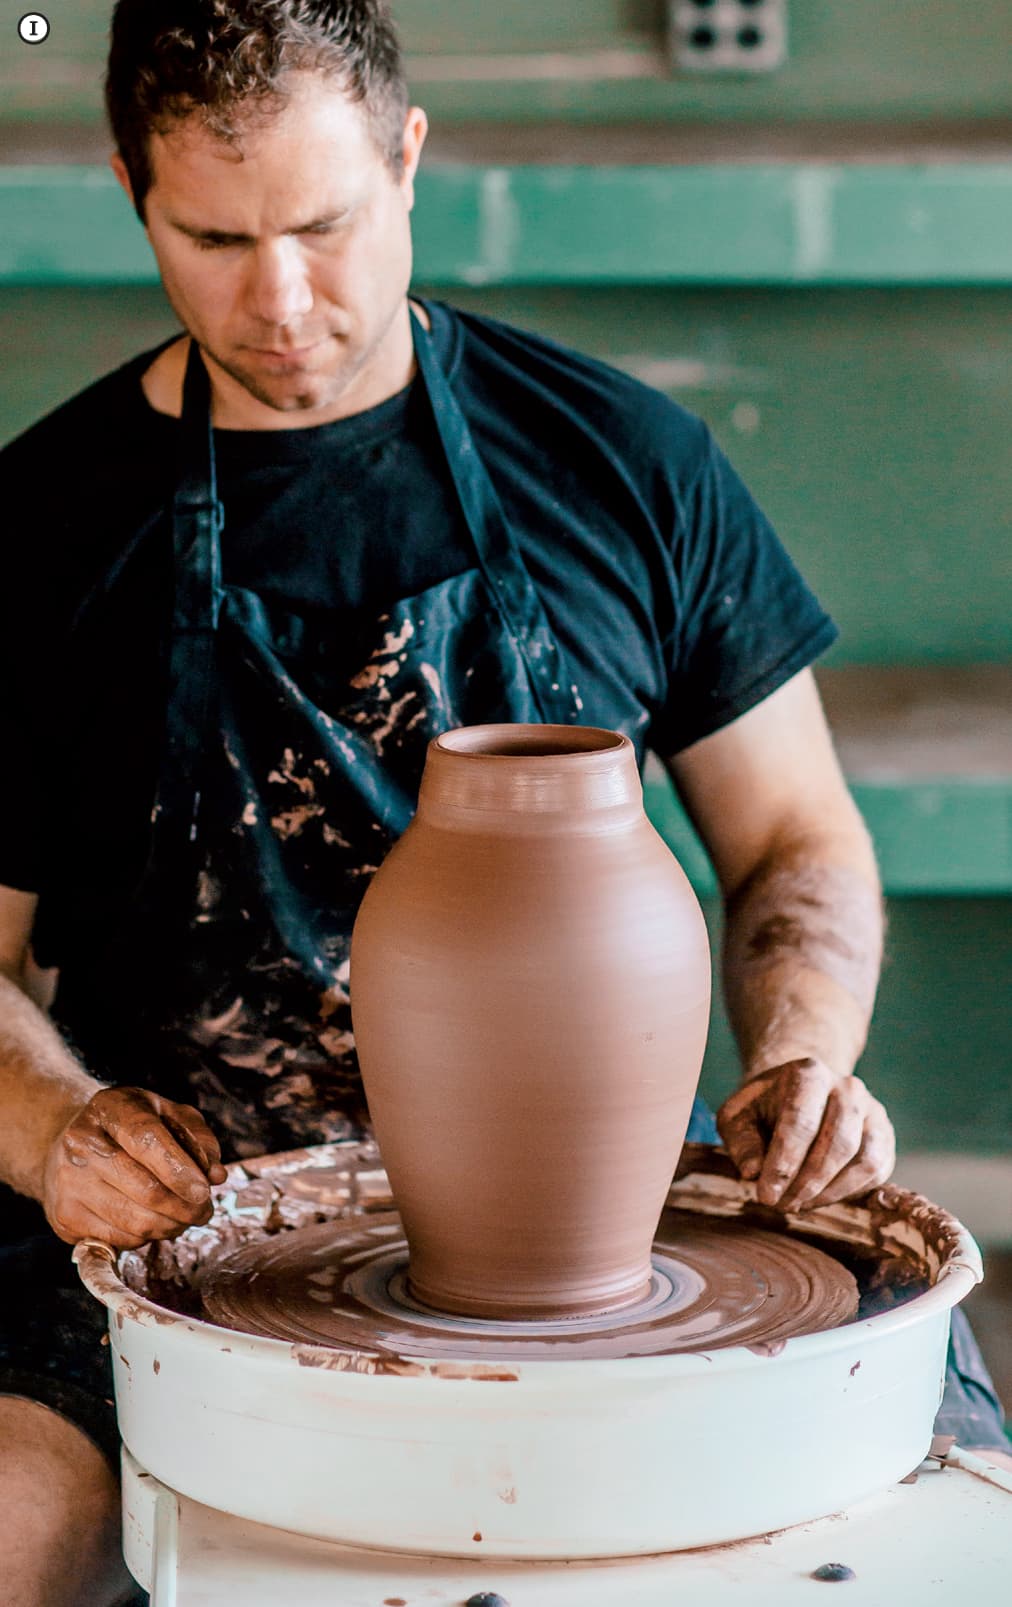
When working with either an electric or gas heating device, make sure to keep the pot rotating as it dries. I find the best method is to slowly turn my wheel as I move my torch up and down the pot’s surface. H Heat the inside and outside of the pot equally, as too much heat in one section will cause excessive shrinkage and cracking. Neglecting to move the heating device around will cause surface water in that spot to turn into steam. Be aware that this could cause steam burns or steam-based explosions (pop outs). Also, be mindful of the surface the pot is resting on. I have seen, and smelled, many half-burned plastic bats that came from the careless application of heat. Lastly, be aware of any children that might be in the studio. Never leave your heating device unattended in the presence of a child—or even a teenager! Even well-behaved children can be tempted to play with fire. Don’t take the risk.

THROWING LARGE AND VERTICAL
When throwing tall, it is especially important to have a game plan. Improvising a form can work well at a small scale, but larger pots made without a plan tend to look tentative and sloppy. Having definitive proportions in your mind will help you visualize the steps necessary to make the pot. Sketching will help you develop a plan that is both efficient and decisive. Even on large forms, the goal is to reach your maximum height in three to five pulls. The taller you get, the more gravity seems to struggle against you. Using clay that is firm, or using a drying device, will help you reach new heights with your pulls.
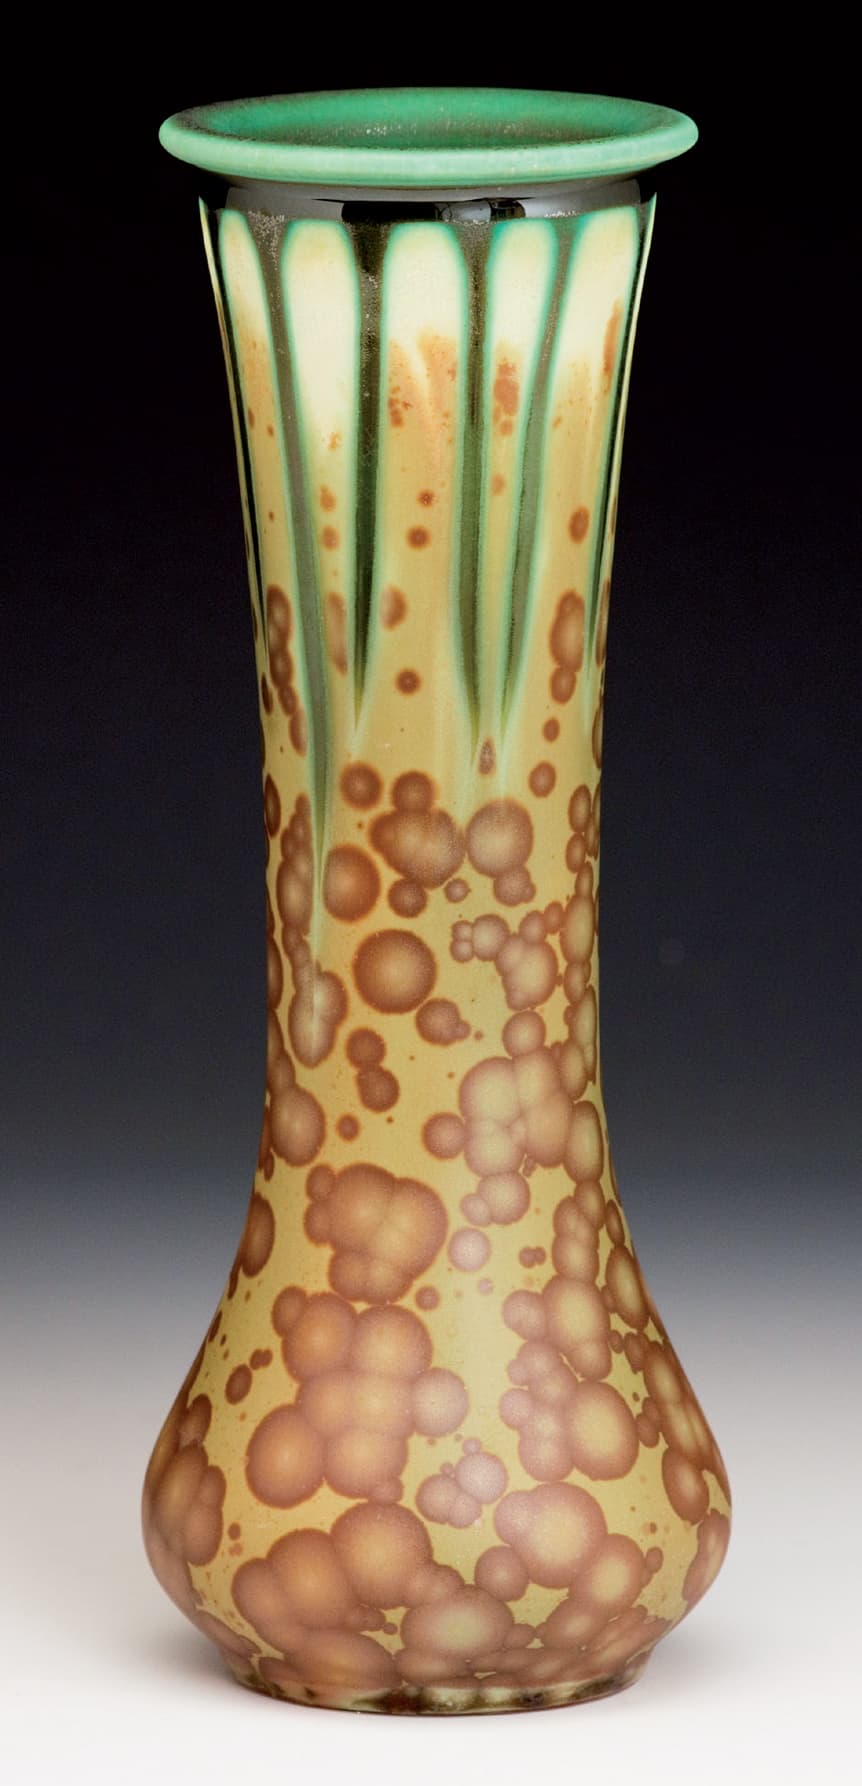
Samantha Henneke of Bulldog Pottery throws beautiful vase forms that are finished with crystalline glazes. The largest forms (more than 18 inches) are thrown in multiple sections, which are refined after they are combined. Photo courtesy of the artist
One characteristic to think about when planning your form is the placement of the visual weight. This corresponds to the area of the form whose curve has the most cubic volume. An upward progressing volume will have the widest part of its curve in the top third of the pot. A downward progressing volume will have the widest part of its curve in the bottom third of the pot. When making a vertical form, like a pitcher, you should decide which type of form you will focus on before you sit at the wheel.
In addition to visual weight, consider how physical weight will affect the use of the pot. Think about how increasing the height of the form will increase the amount of liquid, or foodstuffs, that can be held. For instance, when making a jug, think about how an extra 6 inches of height might add multiple pounds once it is filled with liquid. At some point, you will reach an upper limit of physical weight that will compromise the functional value of the form. Personally, I have chosen to reduce the height of my pitchers because they were difficult to lift with one hand when they were filled with iced tea. After making, and using, large pots, you will determine your own parameters for each pot’s design.
If this is your first time throwing larger amounts of clay, start with 10 pounds and add additional 5-pound increments when you return to the exercise every few weeks. Your goal is to work comfortably with 20 pounds of clay.
Start by securing a bat to the wheel head with bat pins or by throwing a thin slab of clay that it will stick to. Initiate the centering process by coning up the clay. A Remember to slide your right hand forward and your left hand back to generate more power in the push-pull orientation. When using more clay, you’ll find the cone will be taller than you expected. When coning down, stop when your clay is 8 inches off the wheel head. B This will leave your clay centered to a taller height than usual. Open down to 1/4 inch from the wheel head and pull out 3 inches. C Before increasing your interior width, consider how this might affect how much clay you will have to pull the form up.

Now you’ll pull a volcano-type shape. Make a strong first vertical pull, getting as much clay off the wheel head as possible. If you find pulling with the pads of your fingers is not sufficient, try pulling with the knuckle of your bent pointer finger. D You can also wrap a wet sponge around your finger to help lubricate the clay during a long pull. During the second pull, decrease the pressure of your inside hand so that you create a volcano, or cone, shape that is at least twice as wide at the bottom as it is at the top. This will allow you to better access the clay on the bottom of the wheel.
If you need to add water to the pot, hold your damp sponge lightly against the surface of the spinning pot. Waterlogging the clay can keep you from throwing tall, so only add the amount of water necessary to keep your finger sliding over the surface. As your pot increases in height, your left elbow will need to be raised higher so that your forearm won’t rest against the inside edge of the pot. If you notice too much friction at this spot, consider making your third pull while standing up. E This will allow you to pull a large amount of clay while keeping your body aligned over the spinning pot. Compress the rim after every pull.

Regarding moisture, at some point you might consider using a dry throwing technique. For this technique, do not add water to the surface of the pot after the first two initial pulls. Hand placement and throwing dynamics are the same as wet pulling but I suggest slowing the wheel down. Using slightly less pressure for each pull, your fingers will continue to slide across the surface without the need for extra water. As long as the surface of the clay is evenly dry, the friction of your fingers will be even. If you choose to add water after dry throwing, make sure to lubricate the surface evenly. A chattering effect can happen if one part of the pot is wet while the other is dry. Uneven lubrication can also create a torqueing motion that will knock the pot off center. Overall, I find that dry throwing allows me to make each pot a few inches taller than wet throwing techniques.
SHAPING
After five to seven vertical pulls you will be ready for shaping. For large pots, I shape with ribs on both the interior and exterior. F Experiment with rubber, wood, or metal ribs to alter the surface compression of the form. G Using ribs will allow you to stretch the pot as it spins without adding more water. Only add water if you find your rib chatters on the surface of the pot.
The same as for teapots, consider how the visual weight in form is distributed. The widest part of the pot’s curve could be in the lower third of the pot, the middle third of the pot, or the top third of the pot. Notice how changing the curve affects the overall feeling of the form. H I
As you finish the basic form, there are a couple options depending on the function of the pot. If you are making a vase, you will need to terminate the opening of the form to complement the function of holding flowers. J K If you are making a jar, you will need to set a gallery in the lip. As with smaller pots, compress the lip by using a chamois cloth or your fingers. After finishing the pot you will need to cut it and remove it from the wheel. As I mentioned earlier, I recommend throwing big forms on a bat so that the shape will not deform when you pick it up from the wheel. If you threw the pot directly on the wheel head, use your heating device to dry the bottom before dragging the wire underneath and removing it from the wheel.
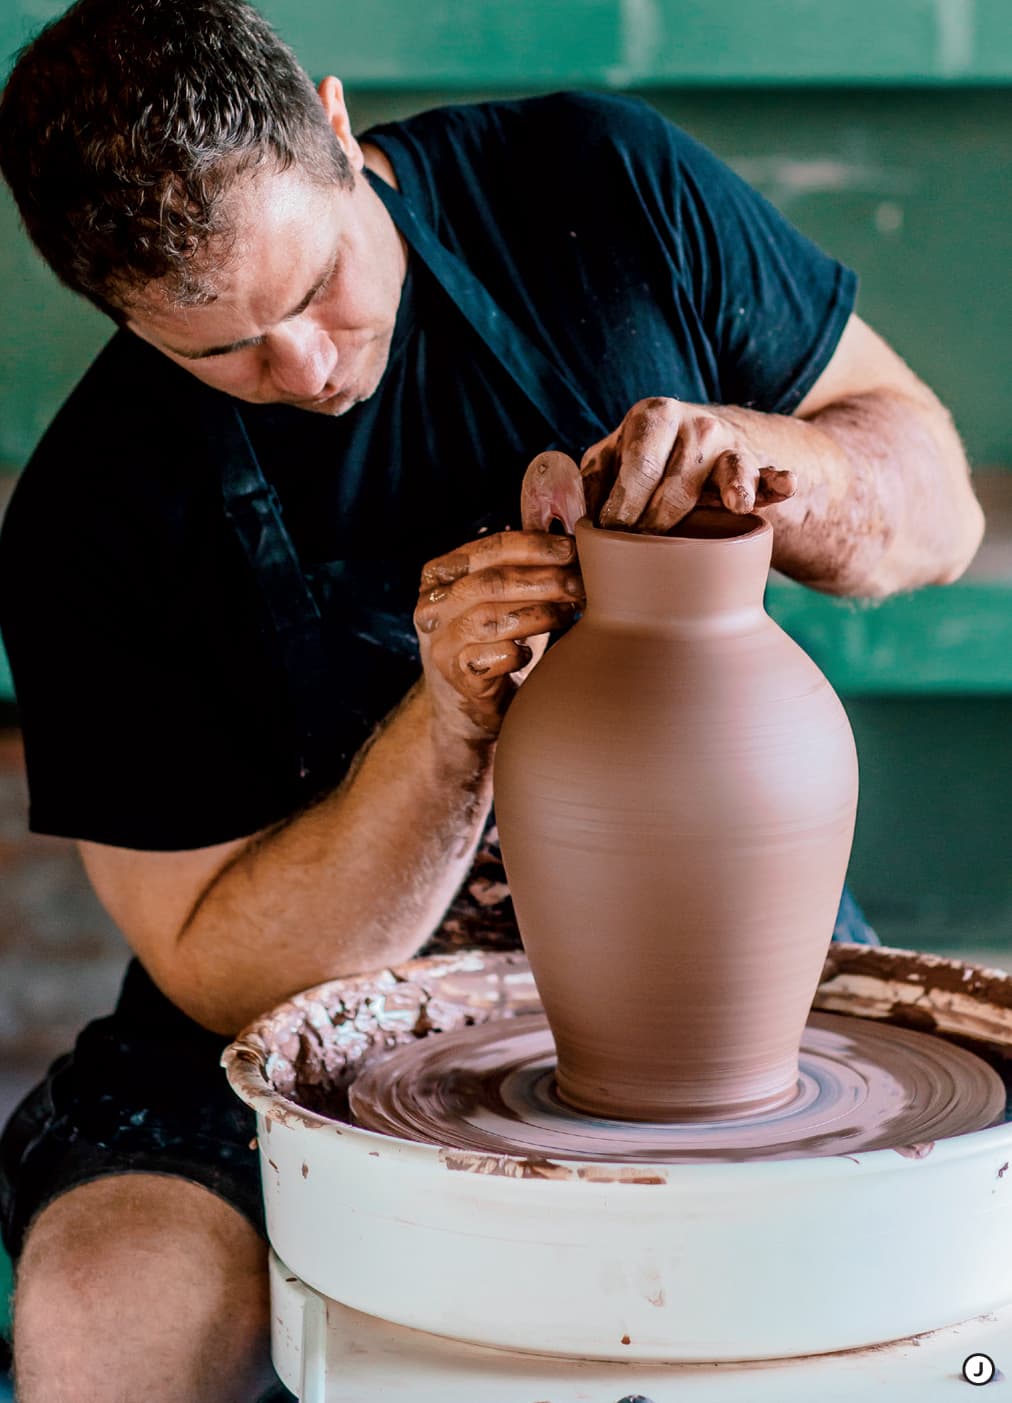

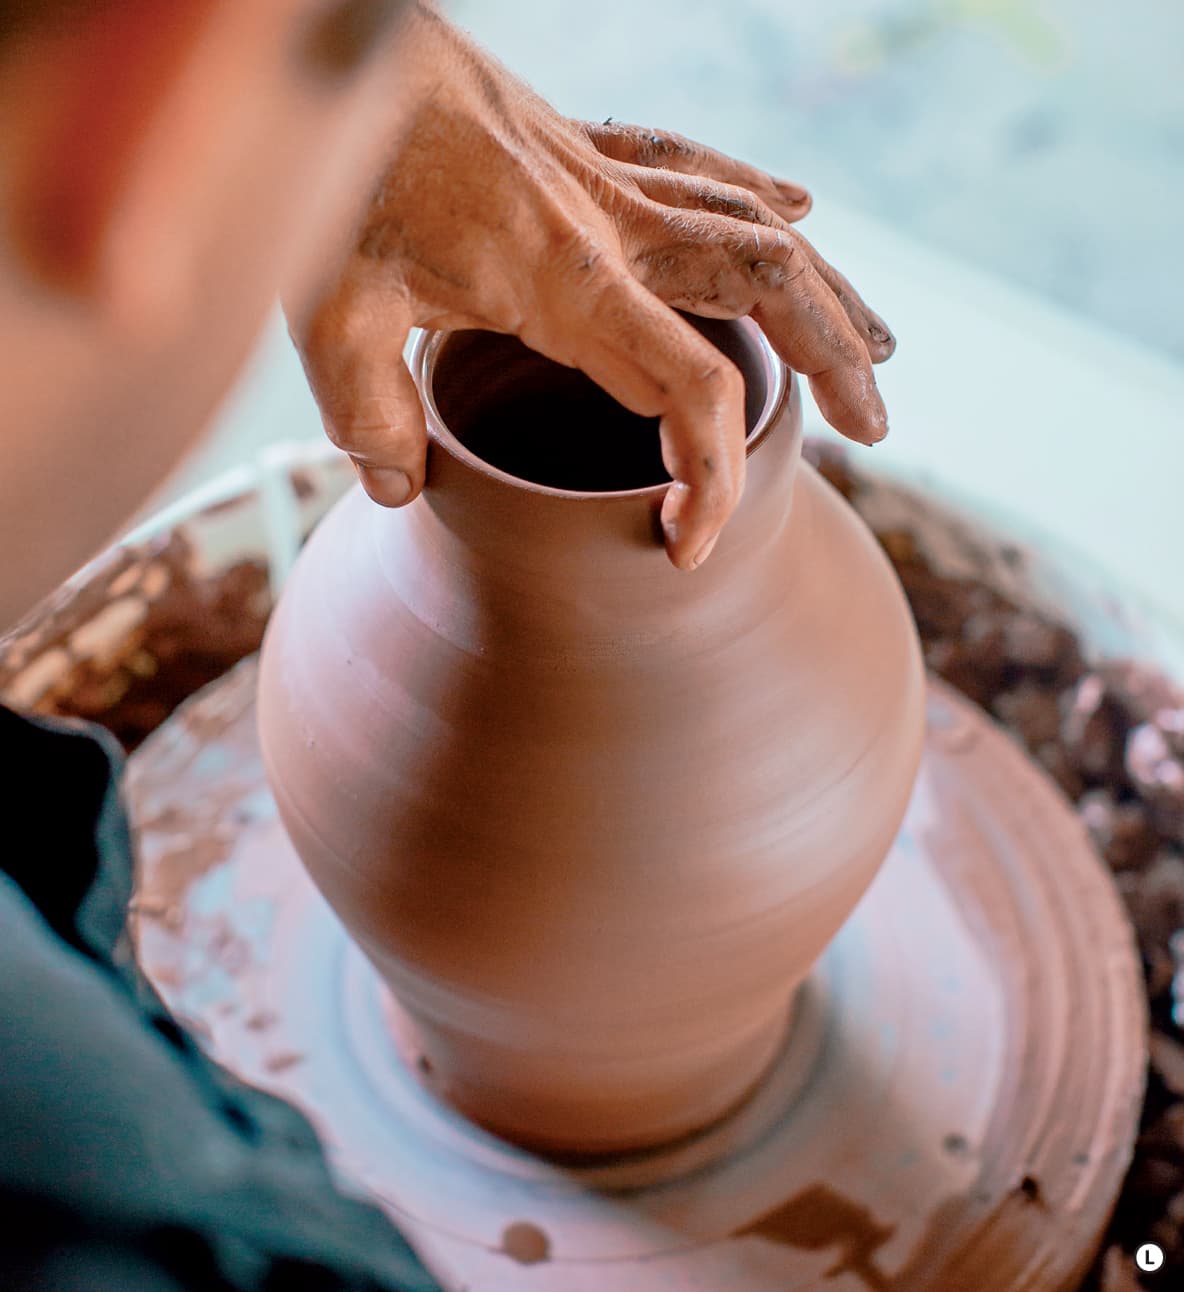
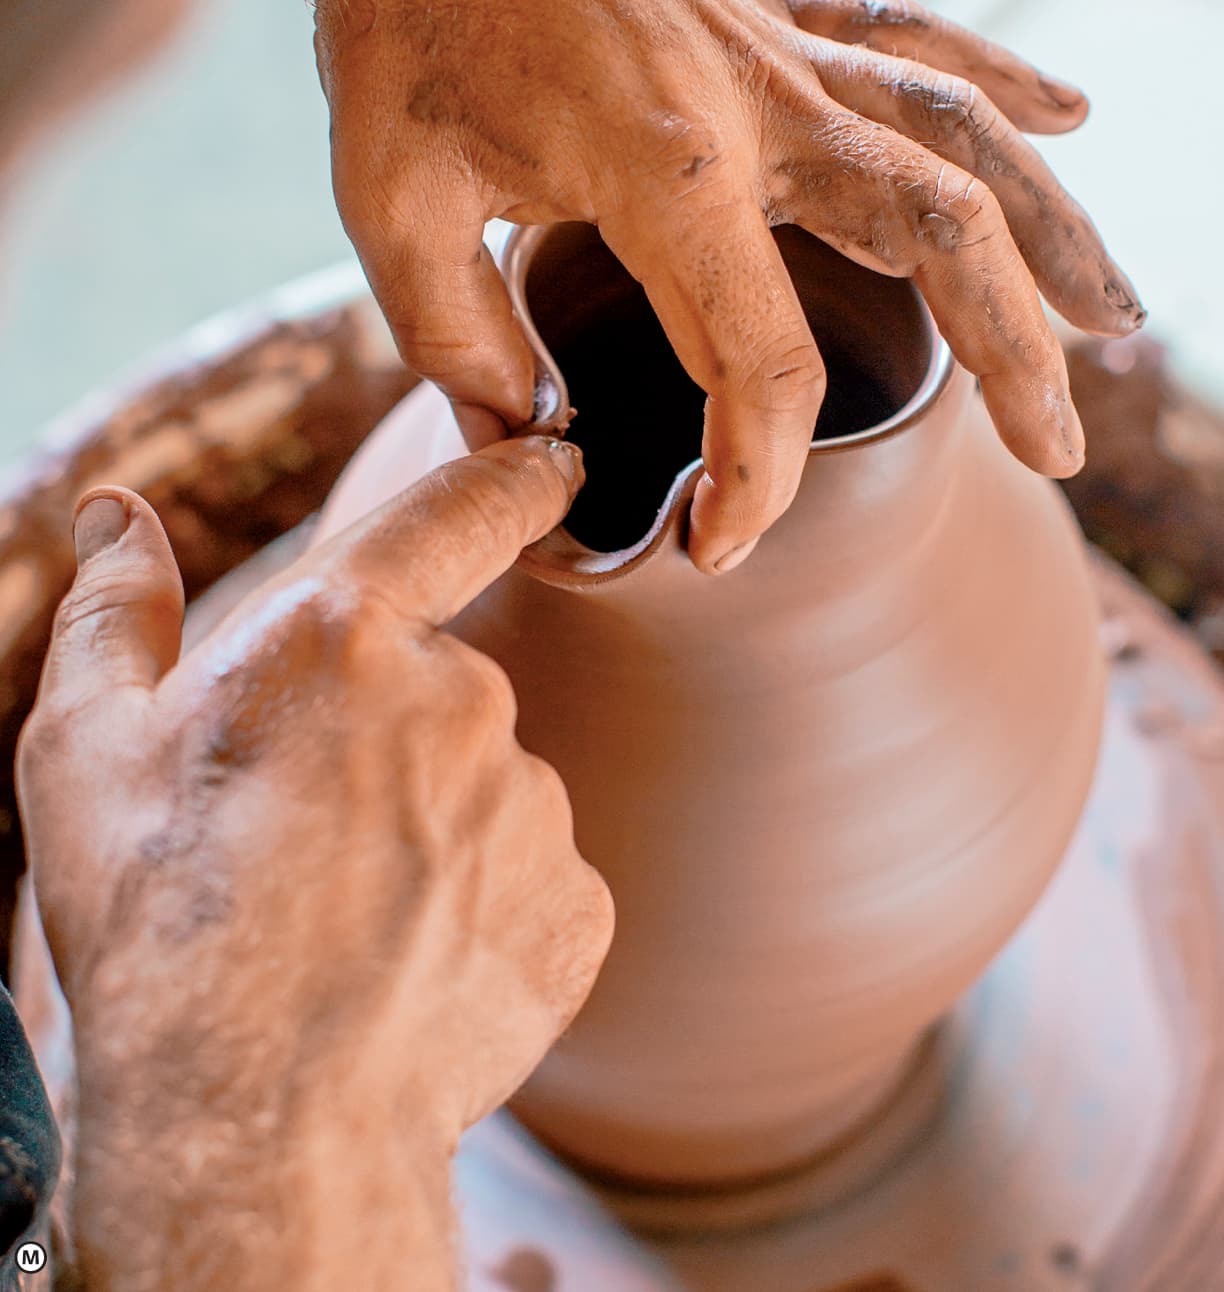
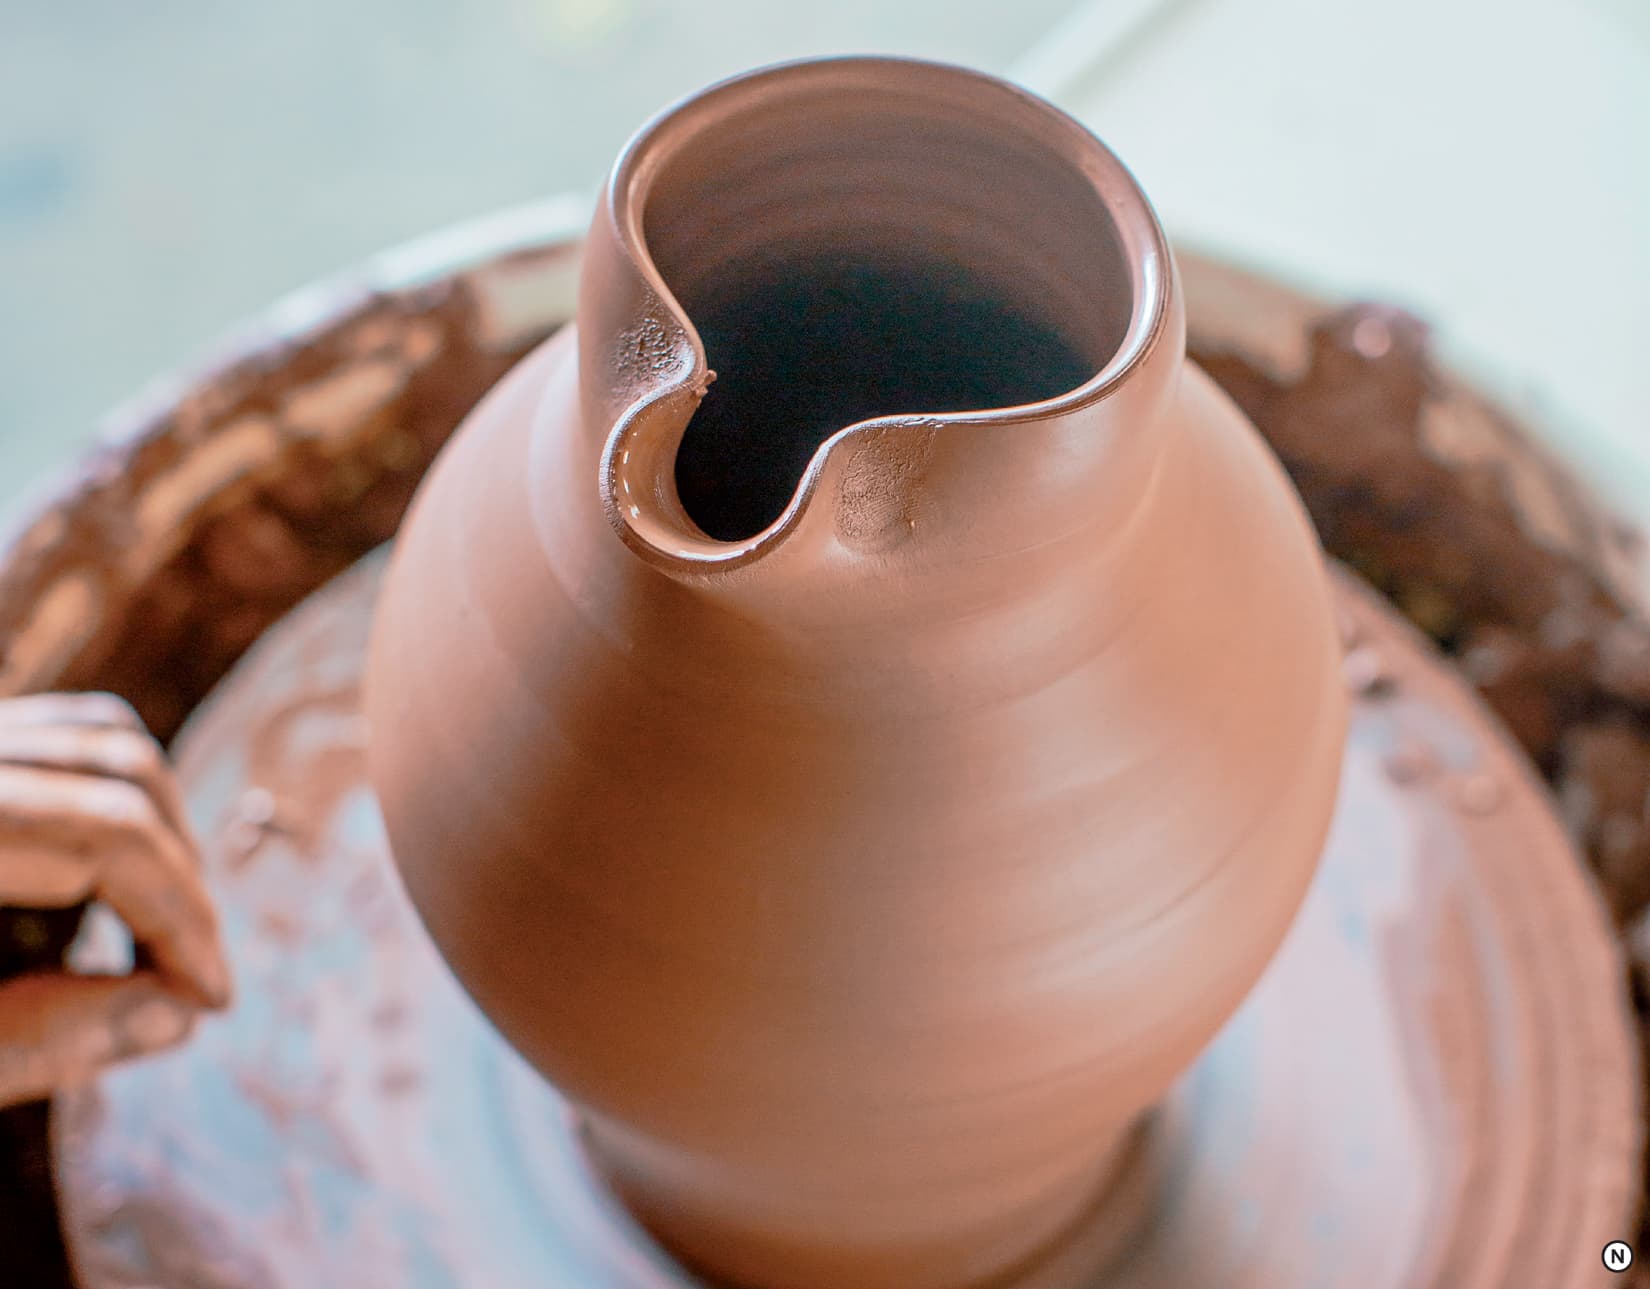
If you are making a pitcher, leave the rim thicker than you normally would for a vase form. Start the spout by choosing its location and squeezing inward with your pointer finger and thumb. L This will create a soft indention, which establishes the width of your spout. To make your spout taller than the rim, start pulling up with a light pinching movement 2 inches below the lip. M This will thin out the area and create a lift towards the spout’s edge. Place your upturned left hand under the rim to support the indentations that establishes the spout’s width. Rub your right pointer finger on the rim’s surface to accentuate the outward curve of the spout. Make sure not to round the lip of the spout when doing this. A crisp edge will keep the spout from dripping. N (For a more detailed description on making pitcher spouts, see here.) When the process is complete, drag your wire tool below the piece and remove it from the wheel.
THROWING IN SECTIONS
Throwing a large pot from one piece of clay can be effective, but I find throwing in sections gives me more height with less effort. Before using this technique, draw a sketch of your form as close to scale as possible. Dissect the form horizontally approximately every 12 inches. For instance, if the finished piece will be 36 inches, divide your piece into three sections. The sections don’t have to be exactly equal, so look to bisect the piece at points where the curve changes from concave to convex. After diagraming your pot, make the pot one section at a time. I encourage you to use bats so you can move the sections on and off the wheel.
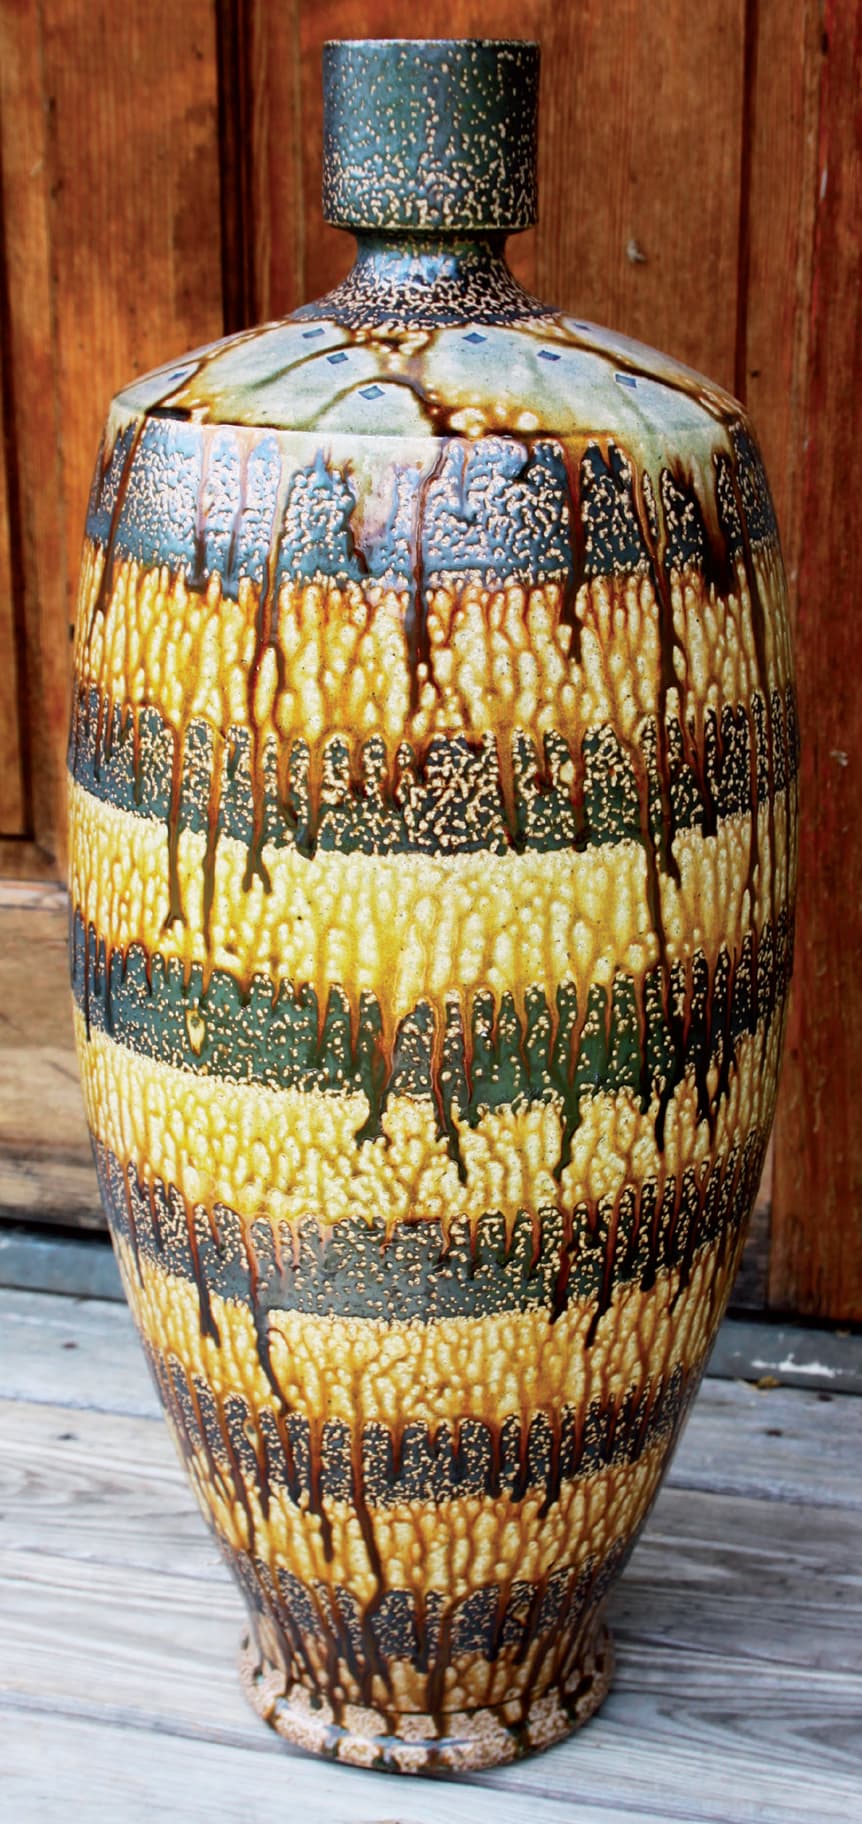
Mark Hewitt throws his large pots in multiple sections. This 26-inch vase was thrown in three sections and then combined. Can you guess where those connections might be? Photo courtesy of the artist
Start by throwing the bottom section of the piece. This bottom portion should be thicker if you need to sustain a large curve or heavy weight from additional sections. As you are throwing, leave the rim at least 1/4 inch thick to make a solid surface for connecting the second piece. I’ve seen potters throw the lip of the bottom section into a subtle U shape to allow excess clay on each side of the connection. This excess clay would later have been smoothed up into the second section to make a strong joint. Before removing the piece from the wheel, dry the bottom portion to leather hard with a heating device. Alternately, if you have multiple wheels at your disposal you can work on the second section on another wheel, allowing the first section to air dry.
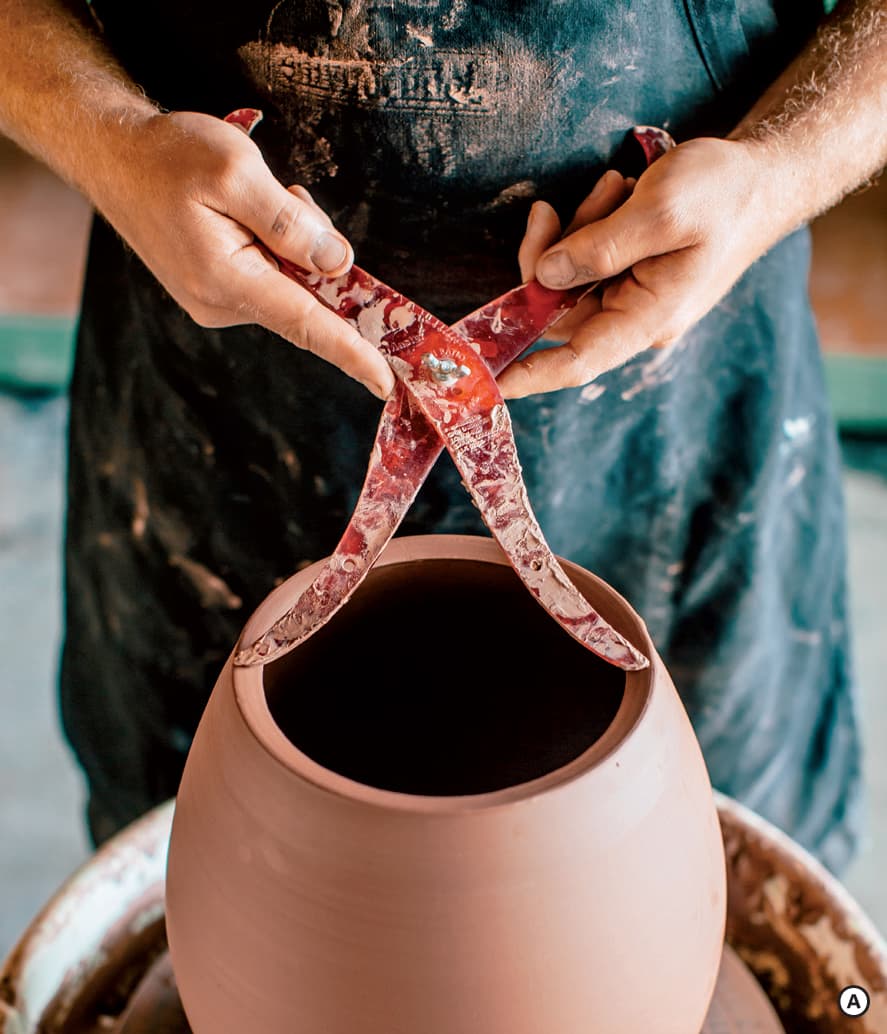
Measure the top rim of your first section with calipers. A The base of the second section must match the rim of the first, so use calipers to measure the precise width. I prefer Lid Master type calipers because they allow me to have the same measurement from both interior and exterior angles. When making the second section, pull close to the maximum height before stopping to attach. Once connected, you will be able to pull it higher and refine the lip. Dry the second section with a heating device until it is soft leather hard. Remove the second section and place it beside your wheel. If you’re working on the wheel and removed the first section, attach it back to the wheel head. Score both the top edge of the first section and the bottom of the second section. B I often flip the second section over to slip and score it. If you do this, make sure not to alter the shape of the soft form.
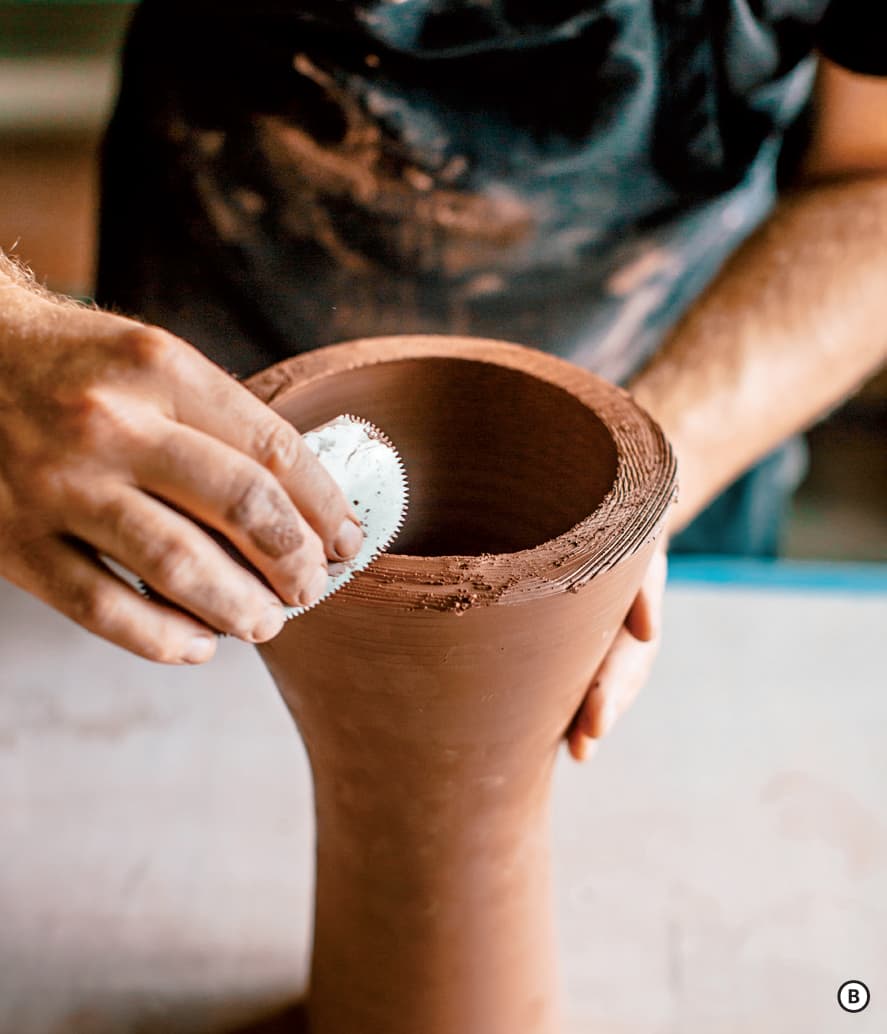
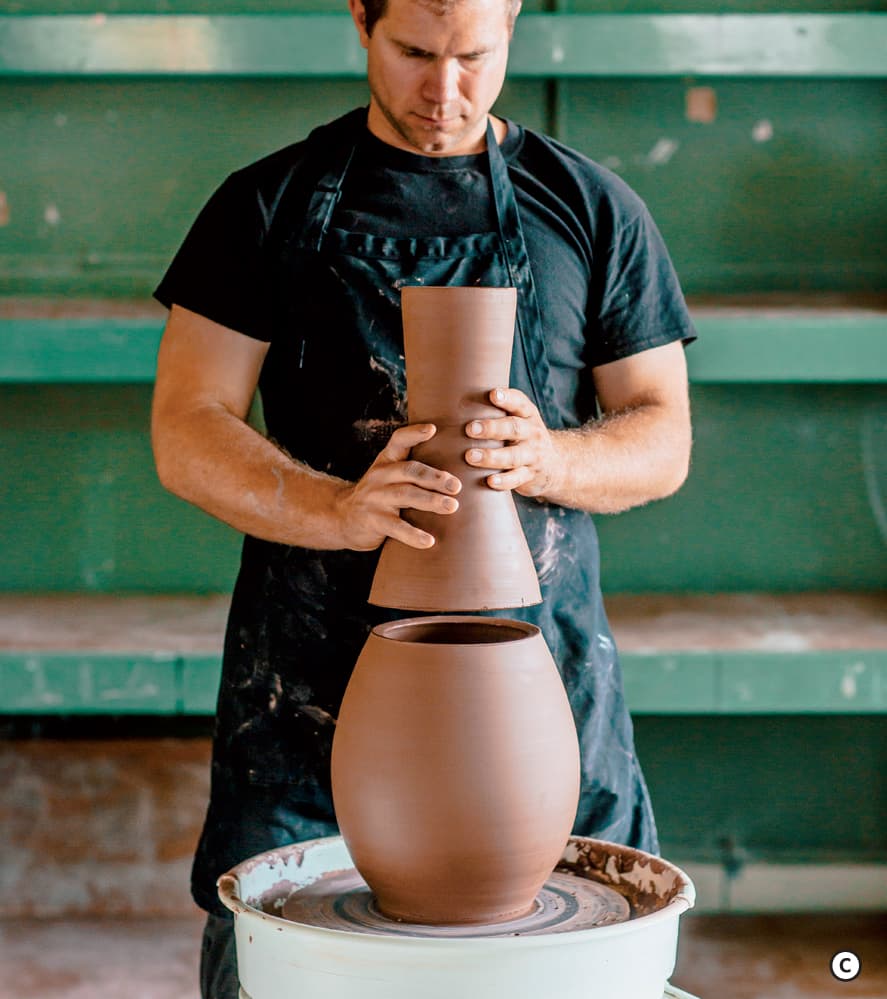
Place the slipped and scored sections together, lining up their connection joints. C Depending on the accuracy of your throwing, you might have one edge that hangs slightly over the other. That is acceptable as long as the central axis of the top section is aligned with the central axis of the bottom. If it is not, you will need to remove the second section and attach it again. Once connected, smooth the two sections together with your finger or a rib. D If the joint is visible from the outside, work the connection with a fettling knife until smooth, or, if needed, add a coil on the inside for strength.
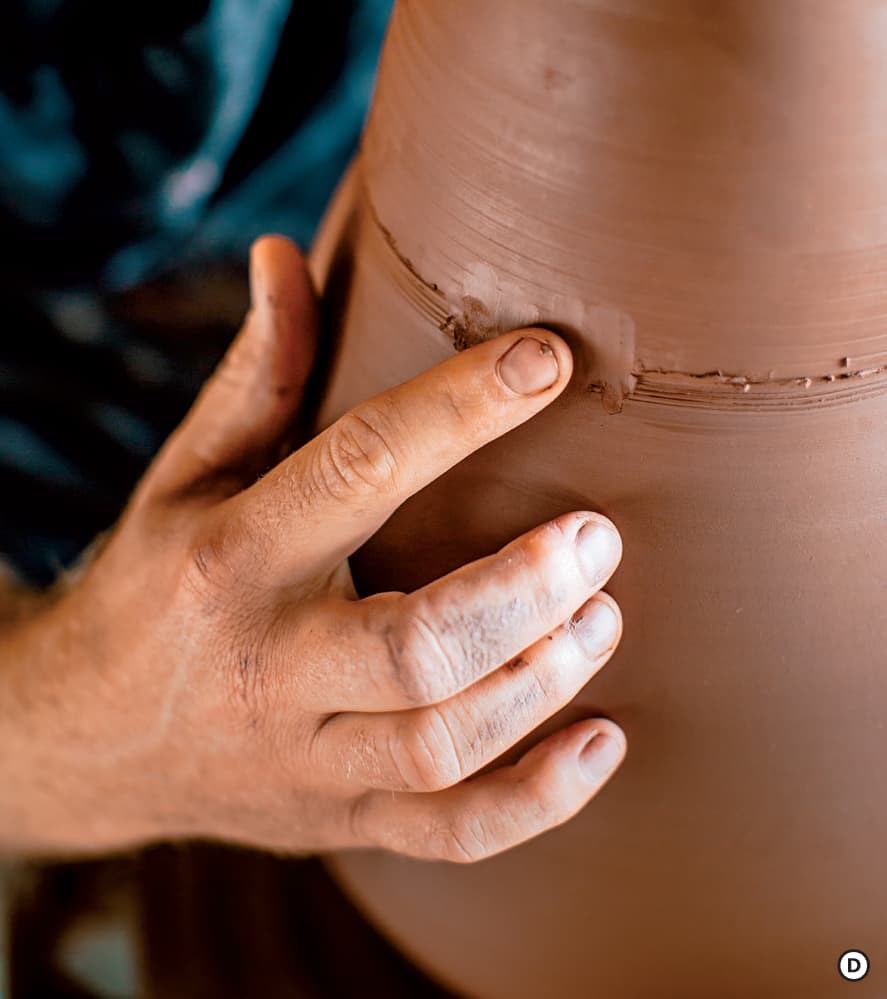
I prefer to make the connections thicker in the throwing process so that I will have extra clay to smooth over the joint. Whether you choose a thicker connection or an added coil, the main goals are increased strength and a smooth connection. You can accomplish those goals with a technique that is comfortable for you.
After connecting the forms, continue to throw the top section. E Your first pulls should address any wobble that is present from an uneven connection. Ideally you will be able to pull the top section so that it is the same thickness as the bottom. Finish the lip of the form as you normally would. F
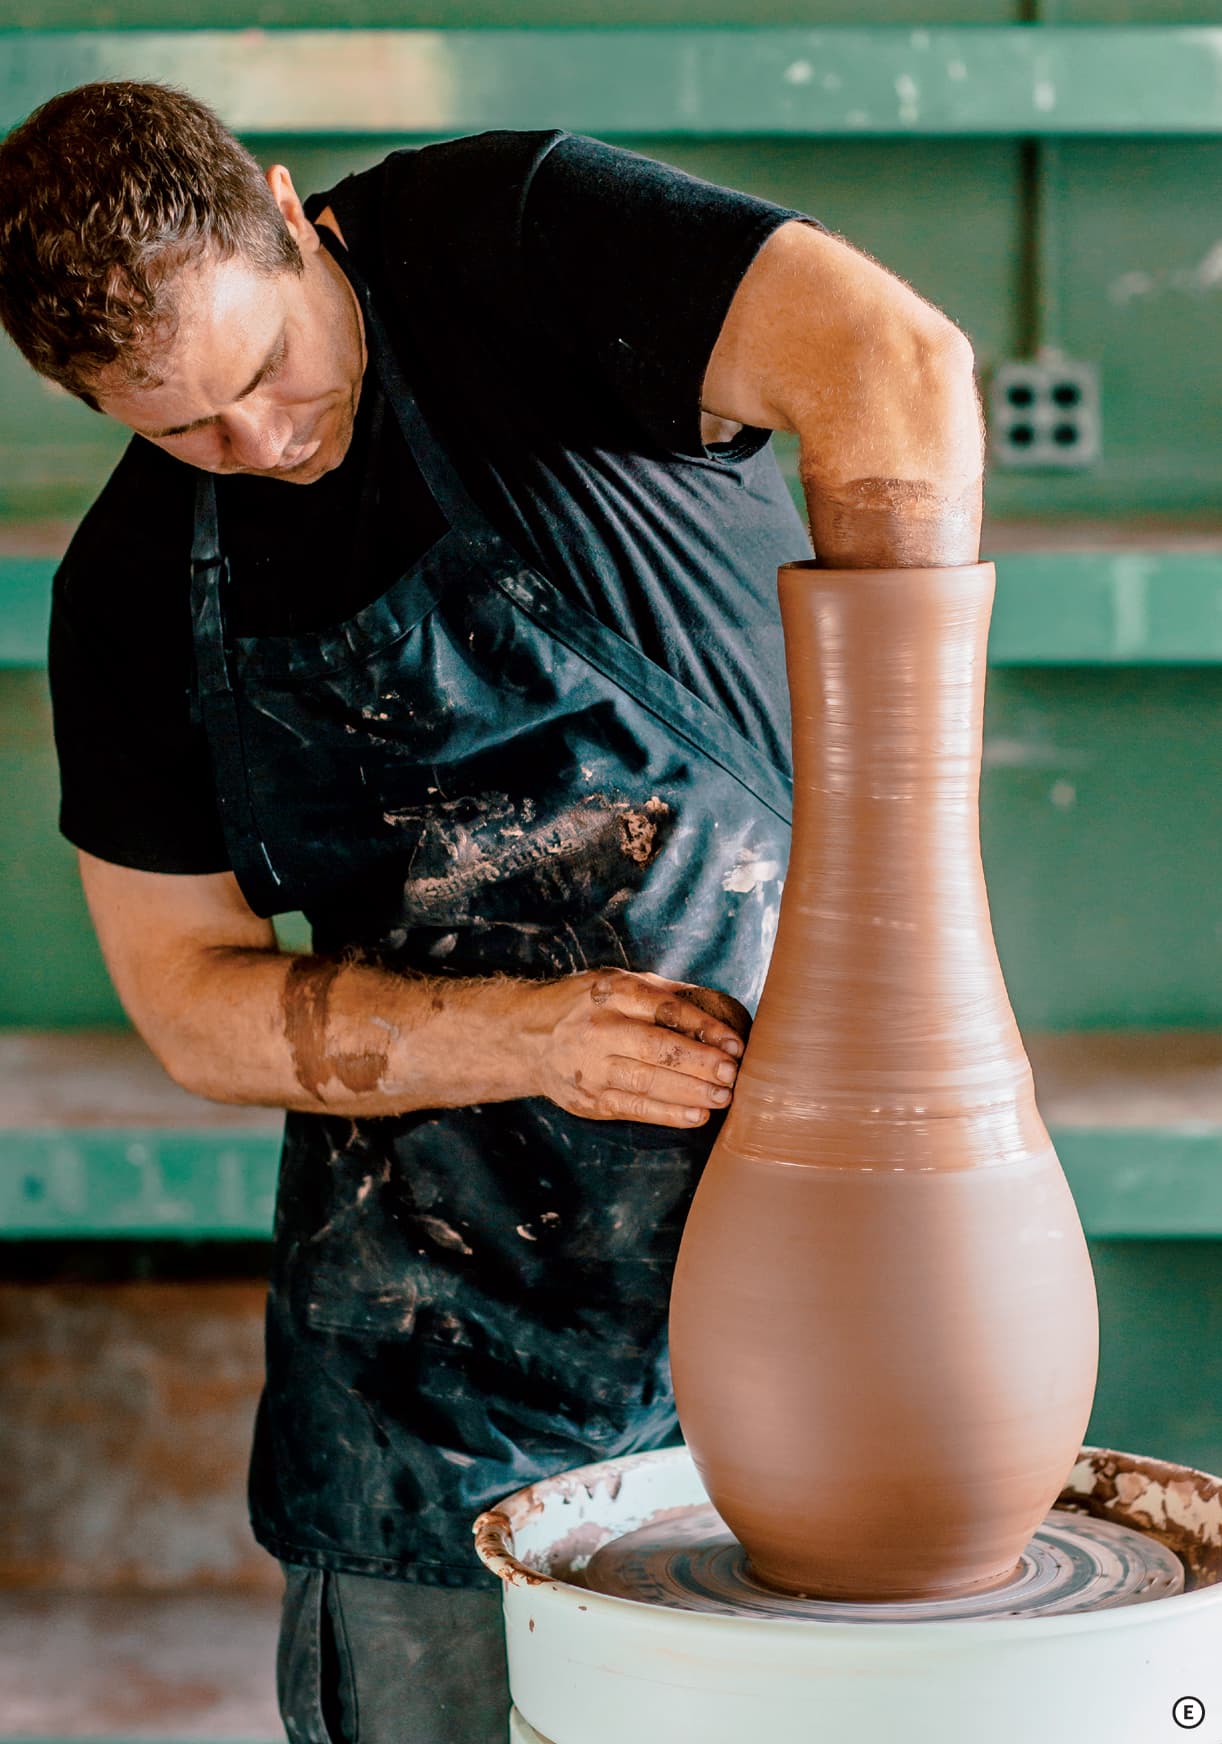
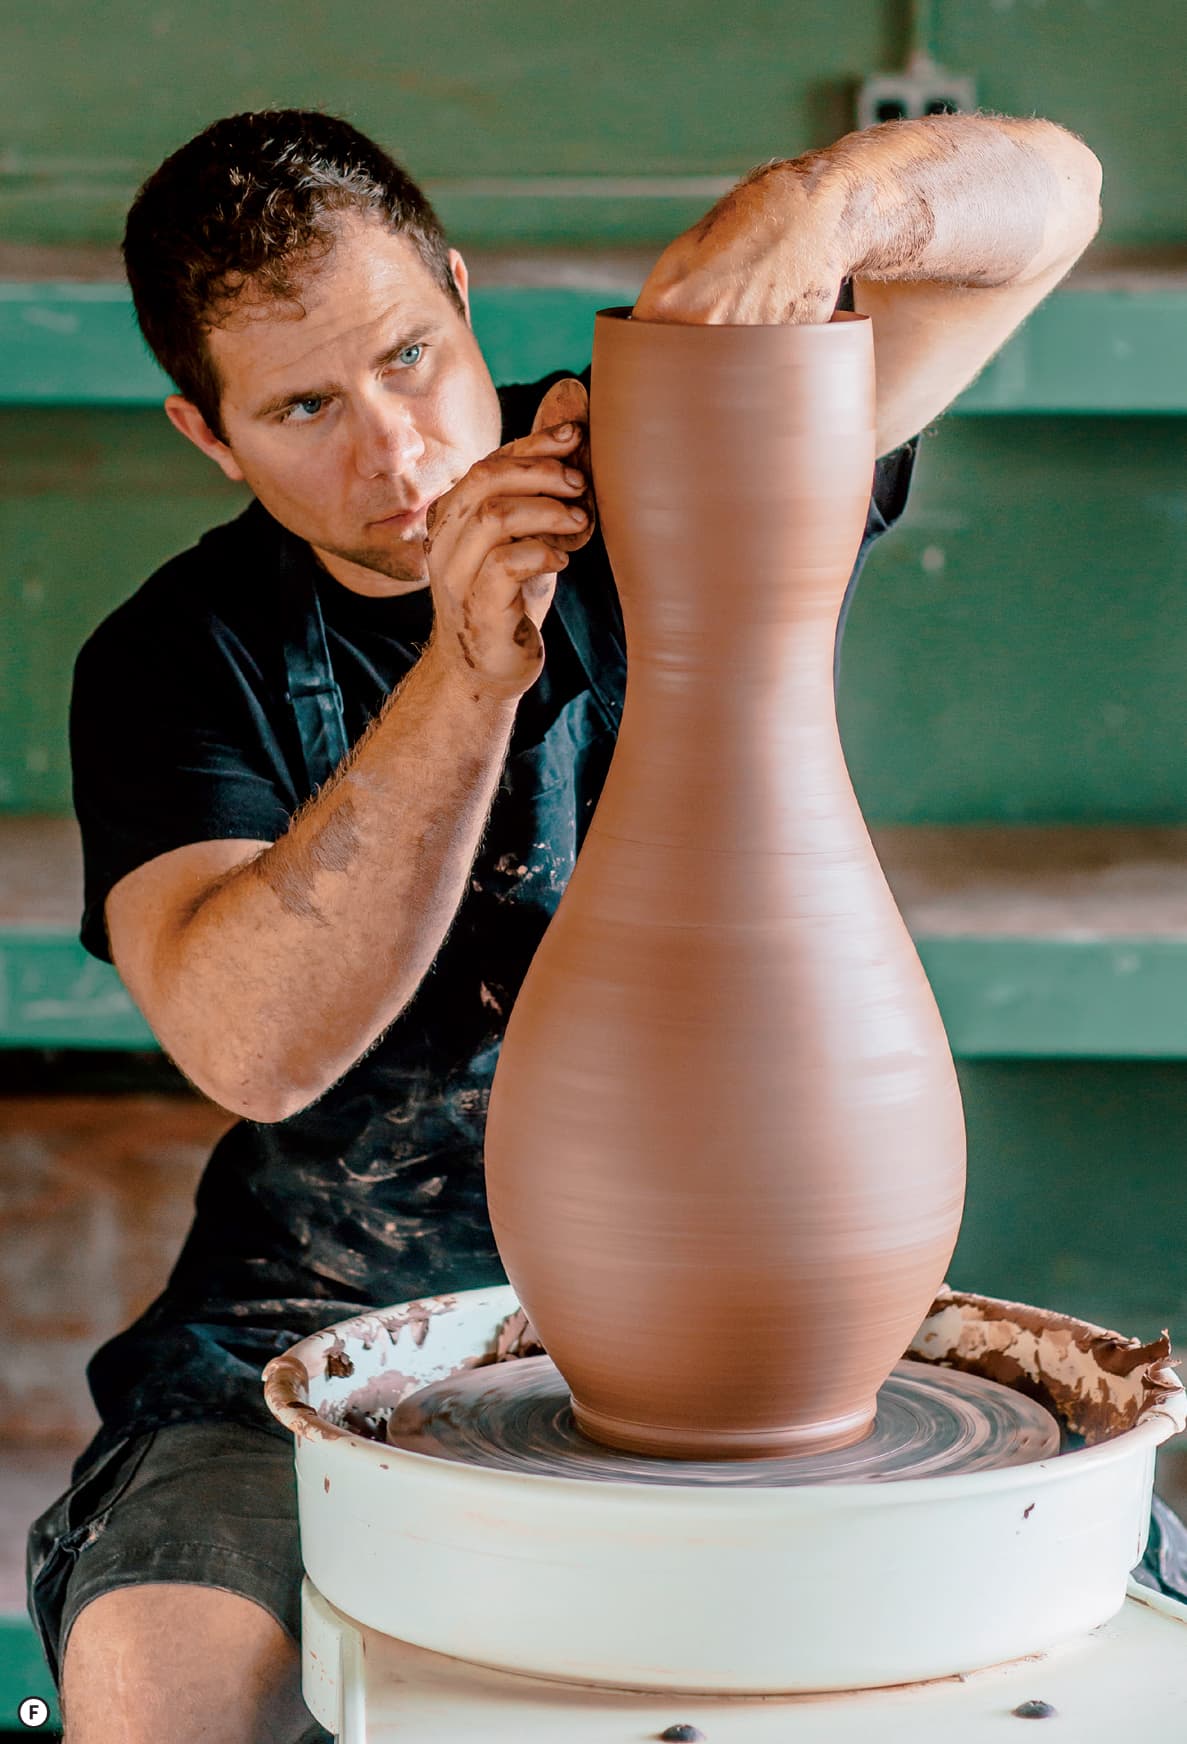
After the piece dries to leather hard, you will be able to trim any unevenness that might be present at the connection point. Be careful not to weaken the pot by removing too much clay. You will be able to flip the pot over and trim a foot in the normal fashion. Make sure to secure the pot to the wheel with coils of clay so it will not fall over in the trimming process.
THROWING WITH COILS
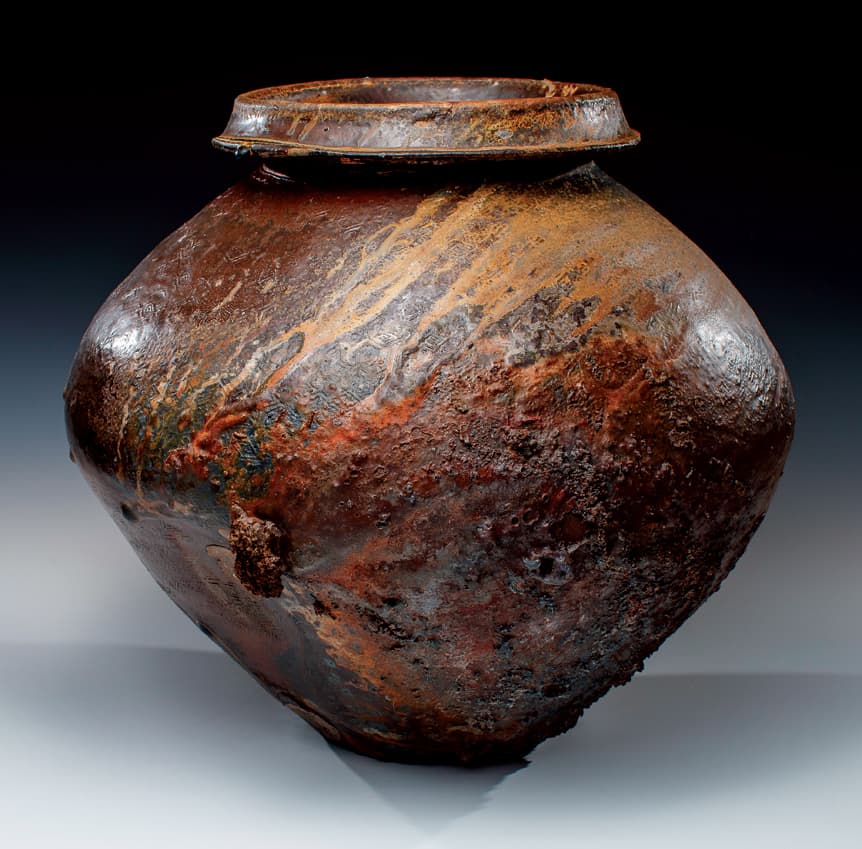
Samuel Johnson is one of many potters who combine coil, thrown, and paddling methods to create their large pieces. Consider combining techniques to come up with a method that works for you.
Many pottery traditions choose to form large pots using a mixture of coil and throwing methods. For this technique, first throw a bottom section similar to the compound method described here. Dry the lower part of the section with a heating device so that it will support the addition of coils. Apply coils that are twice as thick as your middle finger to the top edge of the pot. G Work them into the surface before throwing them to the maximum height. H I As you become more comfortable with the technique, you can increase the thickness of the coils. Try using cut slabs or wide-paddled coils to quickly increase the pot’s height. J As the pot grows you will need to dry the added sections with a heating device so that they will hold the weight of additional coils. K
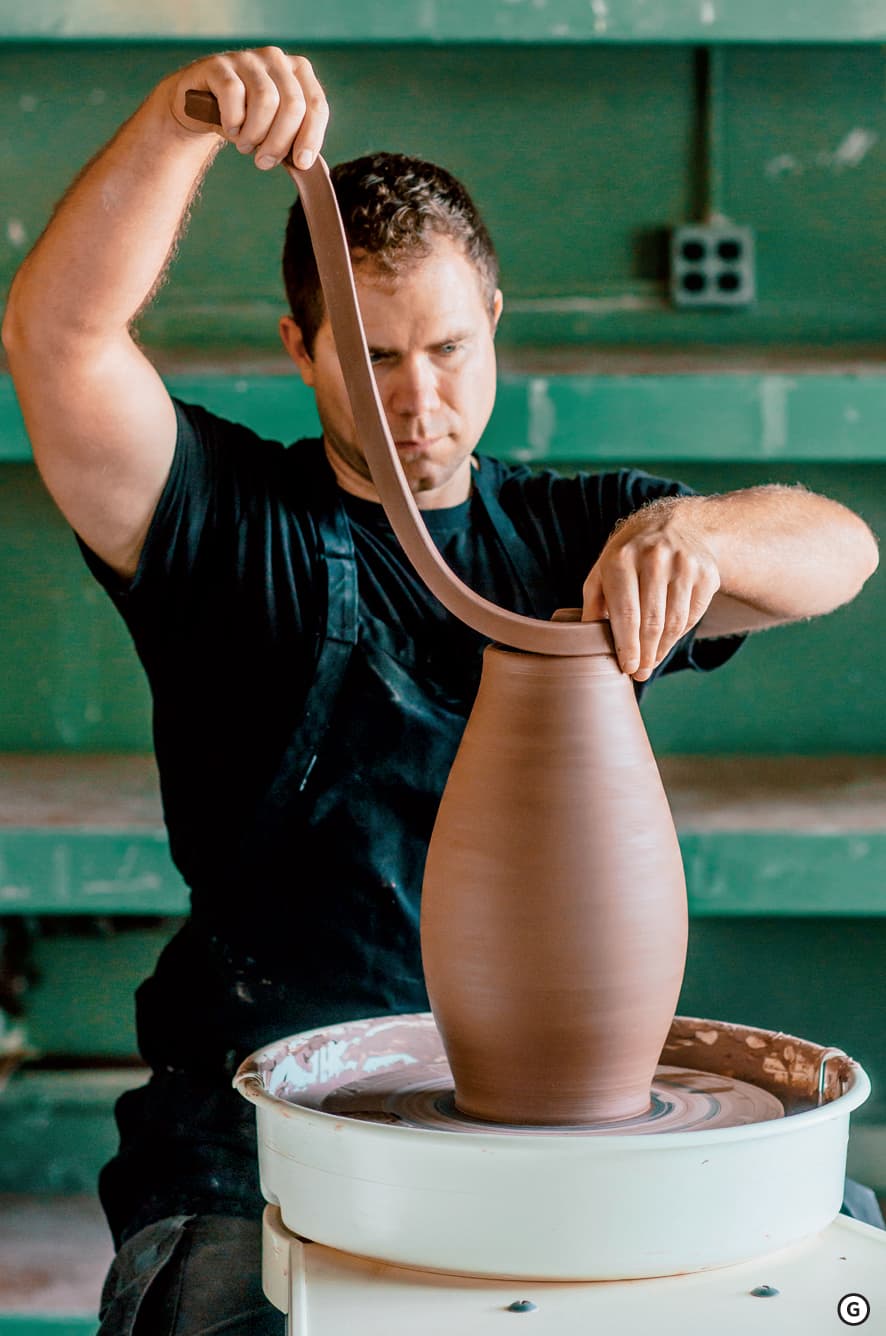
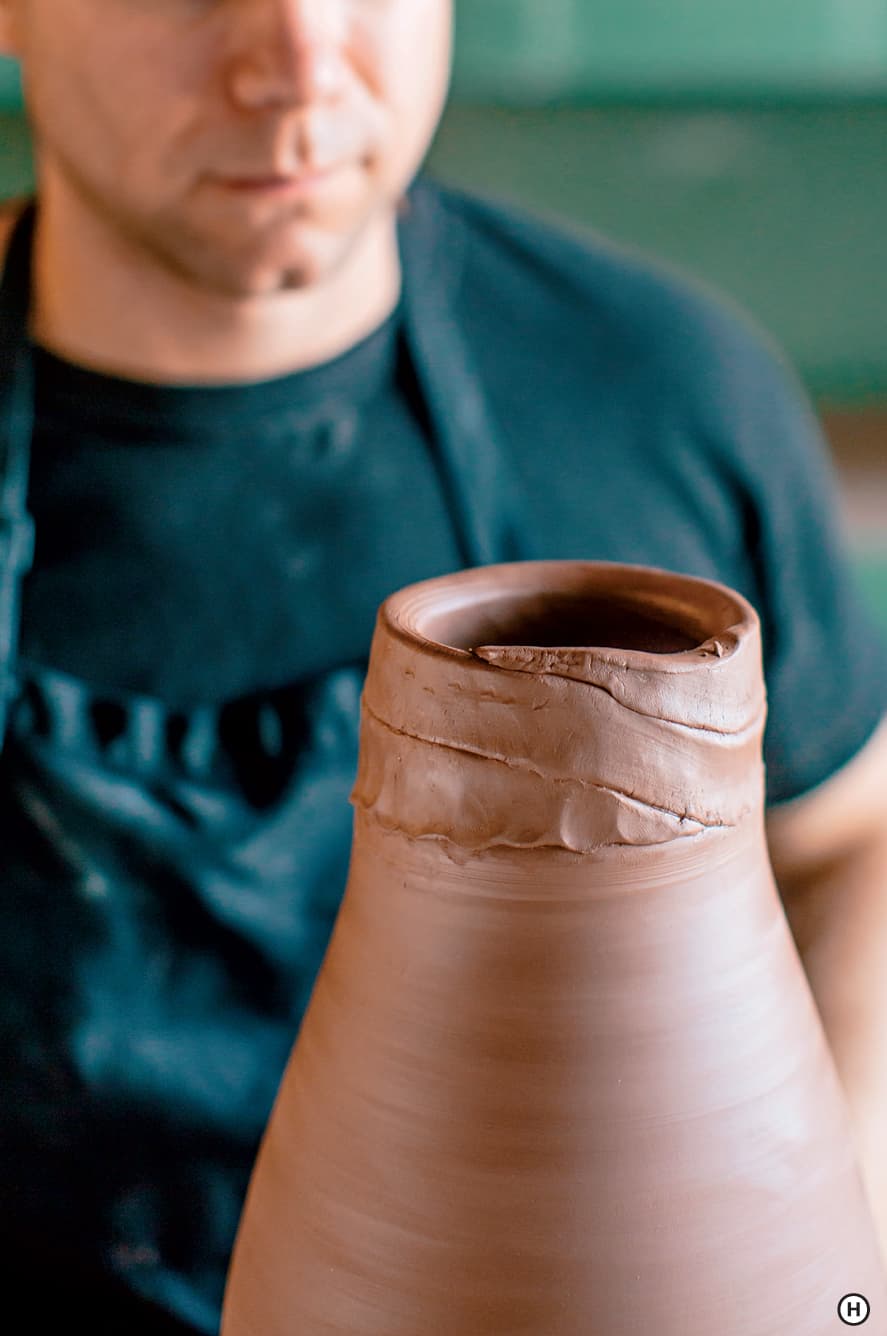
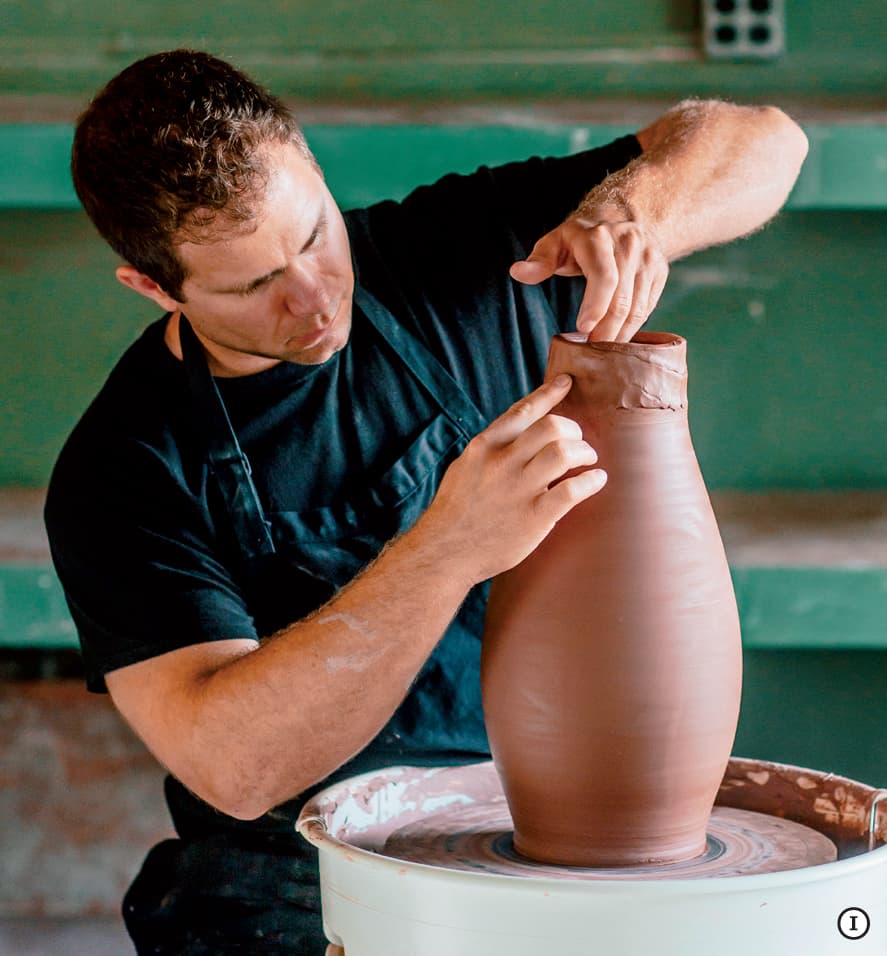
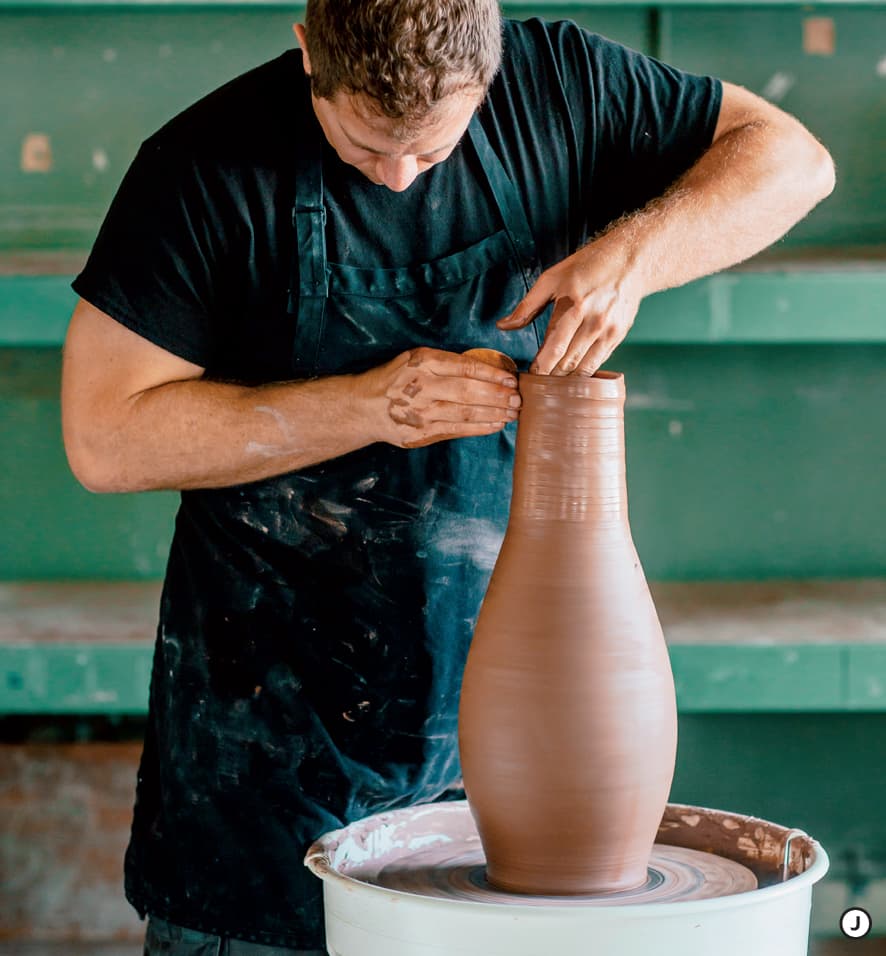
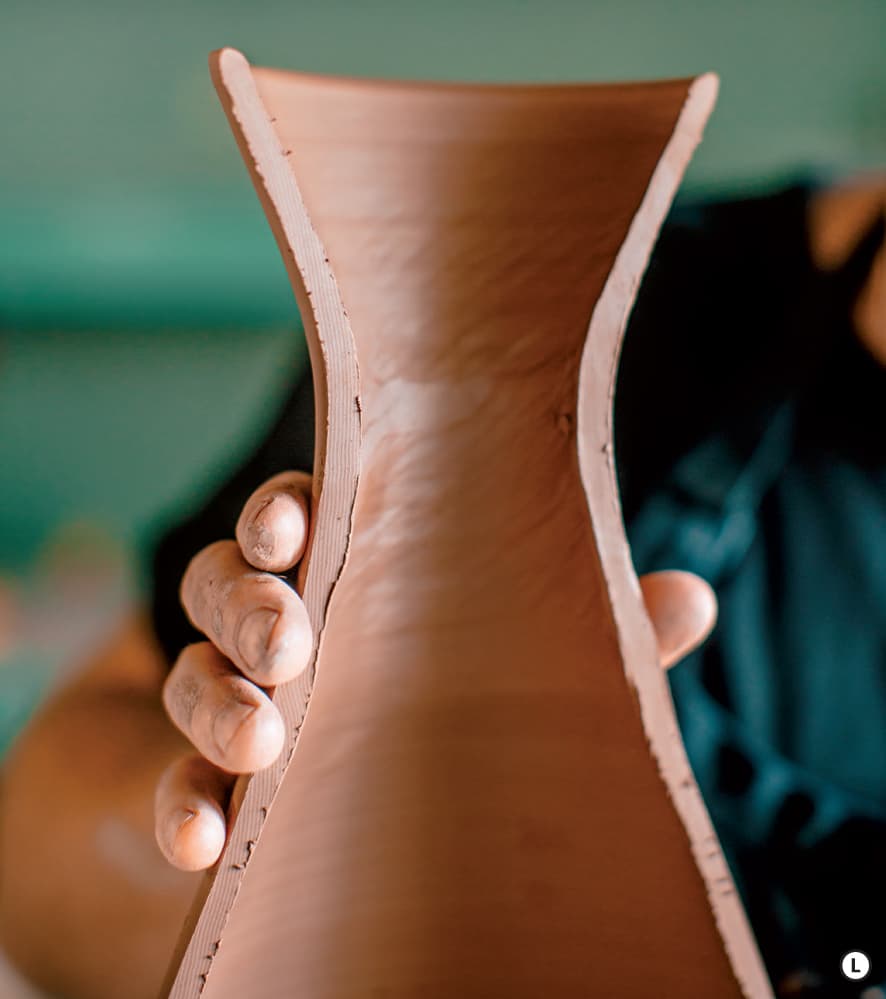
After throwing your first coil pots, cut them in half to gauge how well you transitioned from the thrown pot to the coiled section. L Ideally this should be smooth and uniform after throwing, but don’t be too concerned if there is a slight textural change on the inside. If you find this texture bothers you, or that the coils are completely un-joined on the interior, try using a throwing stick to help you reach the interior curve during the throwing process. You might also use the throwing stick to smooth the interior coils after the pot has been taken off the wheel. This would be the last option to try, though, as the outward pressure of smoothing would affect the silhouette of the pot.
The Korean Onggi tradition utilizes flattened coils and paddling to make large picking jars for making kimchi. American Potter Adam Field uses this method to make large jars and talks about his training and methods in the sidebar.
Adam Field on the Gyeonggi-Do Onggi Tradition
Making big pots has become a right of passage for young potters. Many ceramic centers and art departments have clay competitions challenging their students to throw the tallest pot in a specified amount of time. While these events are an exciting way to form camaraderie between students, they overshadow the long history of making large pots for functional use. Many cultures used large vessels to store grains, ferment alcohol, or store precious spices. One such tradition that is still alive in South Korea is the making of Onggi pots. American potter Adam Field studied the Gyeonggi-do style at Ohbuja Onggi, a seventh-generation Onggi studio operated by the Kim family and lead by Kim Il-Maan, a Korean National Cultural Treasure. Adam says of his time at Ohbuja Onggi, “During my ten-month apprenticeship, I learned all steps of the tradition, from processing raw clay by hand to final delivery of wares to market.” Below you will find images and a description of the Gyeonggi-do method. Give the method a try and see how large you can make a pot using the paddled coil and throw method. For more detail you might watch a series of videos that Adam made on the Onggi process at Adam’s YouTube channel AGField2000.
As with many big pot methods, it is important to have the specific proportions of your form planned before you start the making process. To determine the proportions of your pot, consider a few design principles that are used in the Gyeonggi-do tradition. You might alter these to meet your aesthetic, but make sure to sketch your piece, determining proportions before you start.
• The diameter of the rim and the base are the same.
• The bottom third of the form and the top sixth of the form are straight-edge cone shapes.
• The space between the two cone shapes is a free-floating sphere.
To start, prepare clay by wedging the amount needed for the clay floor. A stoneware formulated for sculpture that has medium grog will be sufficient for use in the Onggi process. The clay should be on the firm side but not excessively soft. For your first pot, start with 2 or 3 pounds. Sprinkle kaolin on the wheel head to help the clay separate after the pot has been finished. Use a wooden paddle to pound the clay into a thin pancake. Continue paddling in a circle until you reach a 3/8-inch thickness. Using the spinning motion of the wheel and a pin tool, cut the clay into your preset width. Through the course of this method, use a slow wheel speed that never goes above 1/4 speed. Onggi potters have a special Onggi kick wheel that allows them to rotate forward and backward during the process. Most of the steps in the Onggi technique are done in a clockwise motion, except for the use of ribs, which are used to shape the form in a counterclockwise motion. While the traditional method uses both clockwise and counterclockwise direction, you might try one direction if you are working on an electric wheel.
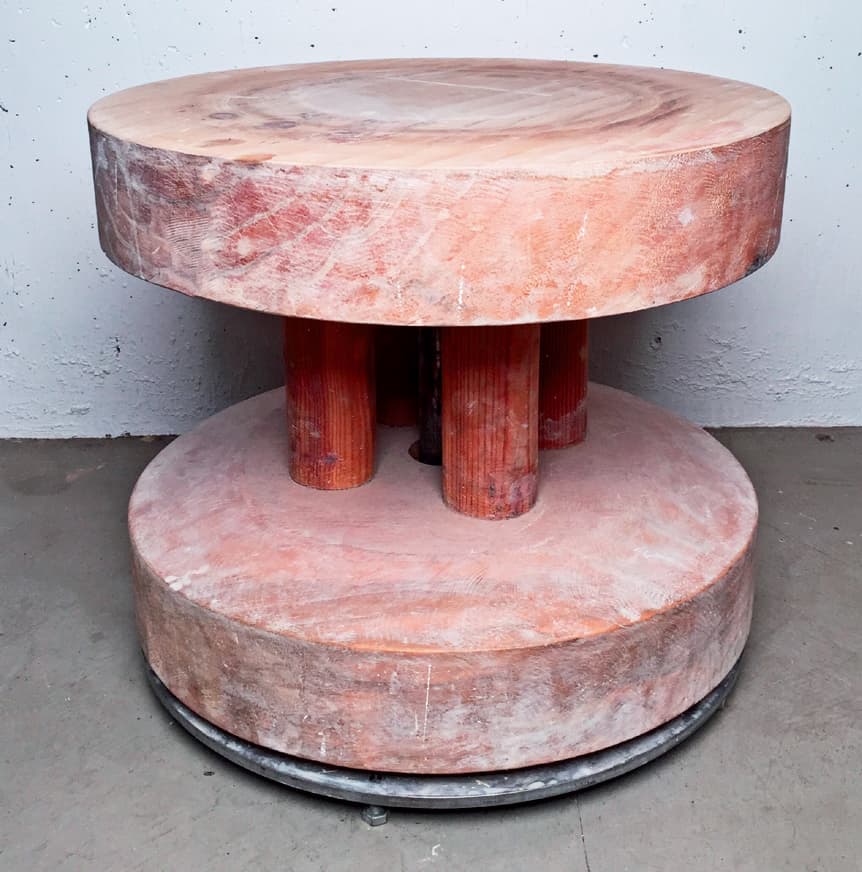
Onggi-style wooden kick wheel. Photo courtesy of the artist
Find a clean, nonabsorbent surface in your studio where you can roll long coils that are roughly 21/2 inches in diameter. Roll four coils approximately 2 feet in length. Lay a coil on the wheel head and paddle until approximately 1/2 inch. Then place the coil on the base you have prepared so that the coil rests vertically. In addition to the flattened coil, add a small round coil that is about the thickness of your thumb at the junction of the wall and the floor of the pot. Moving in a clockwise rotation, work both coils into the base with a downward sweeping motion. Continue around the form for one full repetition, joining the ends together. In the Gyeonggi-do method, you will stack coils on top of each other with one coil, forming a single repetition of the pot. Other Onggi methods spiral the coils around the form for more than one repetition, meaning that there will be a spot where the coil rises at a diagonal to connect two rows.
Attach your second coil and paddle to approximately 3/8-inch thickness and lay it on top of the first coil. Working on the left side of the wheel, with the wheel turning clockwise, squeeze the bottom of the coil and push down onto the coil below it. Your outside left hand acts as a stabilizing wall as your inside right hand works the coil into the clay below it. Apply two more coils in this way until you have four coils stacked and smoothed together. At this point you will start paddling the coils in a slow clockwise rotation. Pictured below you will see a round wooden mallet that looks like a doorknob. This is placed on the interior of the pot. The longer paddle is used to strike the clay from the outside. The pressure created between the mallet and paddle with each strike will thin and shape the clay wall. Make two complete repetitions of the form as you paddle before making another two repetitions of the form using a rib on the inside and outside of the form.
Repeat the process, continuing to work in a two-coil rhythm, adding a pair of coils before paddling and smoothing them. Remember to follow the proportions you set at the beginning and be mindful that you will pinch off excess clay from each coil as you shape smaller sections of the pot. During the process you will not need to add a significant amount of water. Only add water to encourage a smooth ribbed surface. At some point in the process you might want to dry the base with a heating device to add stability to the form. If you choose to do this, do not dry the top 4 inches of the form. This method does not use slipping and scoring, so you will need to make sure you don’t excessively dry clay that will need to be joined with a new coil.
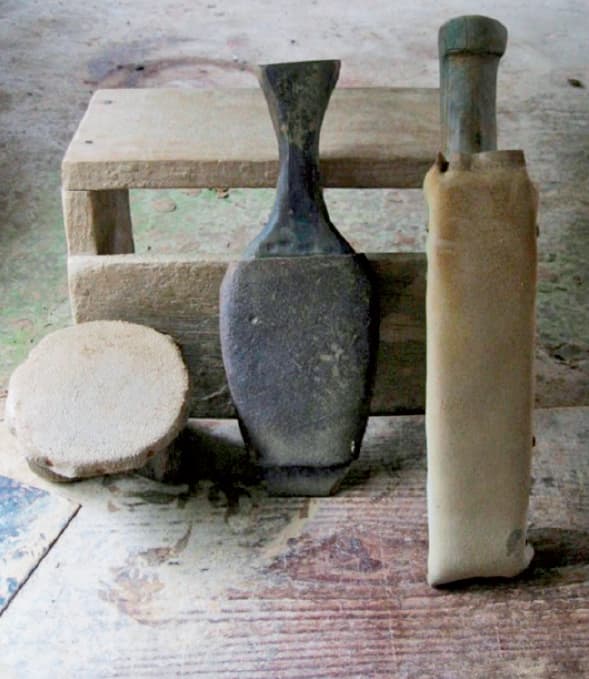
Wooden paddles and mallets used to shape an Onggi pot. Photo courtesy of the artist
The top 5 inches of the form are thrown after the last coils are added, paddled, and ribbed. As the piece narrows above the shoulder, start to think about the lip. In the Gyeonggi-do style, the lip rolls outwards over itself to create a thick, round rim. A small flat spot is then initiated on the rim to allow for rim-to-rim stacking. If you do not plan to stack your pots in your kiln, you can create a rim shape of your choice.
Optional: Consider using the edge of a wooden rib to create a banded texture at the widest point on the form. In the Gyeonggi-do style potters use one of a handful of patterns that utilize fluid wavy lines or textures. Adam Field has developed a unique approach to this stage of decoration. Using carving tools, he lays on patterns that he developed to suit his porcelain pots. The result is a hybrid of contemporary geometric pattern and traditional Onggi form.

Adam Field progresses through the coil-throwing technique used to make large Onggi pots. Photos courtesy of the artist
THROWING LARGE AND HORIZONTAL
Horizontal forms that are wider than they are tall, like platters, are exceptional for their large surface area and graceful lines. Their visual dominance at the table commands attention. Their size is perfect for highlighting surface design or providing a stage for food service. When making large horizontal forms, I suggest using the softest clay possible, while staying aware that centrifugal force will increase as the form reaches its maximum width.

Platters are a wonderful way to create a canvas for decoration. This platter by East Fork Pottery shows the potential for a wide horizontal space to be filled with a slip trailed decoration. Photo courtesy of the artist
As when throwing any large pot, you will need to have a game plan when throwing a large horizontal form. It is best to make a sketch with clear proportions mapped out for the form. Think about the relationship between the width of the piece at the lip and the foot. For a platter the foot will most likely be as wide as the lip. For a bowl, or lidded soup tureen, your lip might be 4 inches or more wider than your foot. Remember the proportional relationship for a balanced bowl that I discussed here applies to larger pots also. The rule of thumb is that the width of the foot can’t be less than one-third of the width of the lip. This is especially true with large pots that will hold large amounts of food and a serving spoon when in use.
Another aspect of successfully throwing horizontal forms is planning where you will trim the pots before they are made. I leave the bottom third of a large bowl thicker than 1/4 inch so that it will sustain the weight of the curve above it during the throwing process. The more drastic a form curves away from its foot, the more clay you might need to support it. When the piece is leather hard you will be able to trim off the excess clay and lighten the piece. Knowing you will be trimming off large amounts of clay means you will need to add weight to your starting amount. An 18-inch bowl that weights 8 pounds after trimming might be made with 9.5 pounds of clay. As you are making a new form make sure to record weights and measures to help you refine how much clay is needed to make a properly weighted finished piece.
Start with 10 pounds of clay. Initiate the centering process by coning up your clay. When coning down, continue to press down until your clay is around 2 inches off the wheel head. This will be much wider than it is tall and probably lower than your center for most other forms.
Open down, leaving at least a 1/4 inch in the base of the form. A more substantial foot can help the platter keep its shape during firing, so make sure not to throw the base too thin. To generate more force, try opening with the bottom side of your closed fist. A By using this fleshy part of your palm, you will be able to push down and out without leaving individual finger marks. Open out until the clay wall just slightly overhangs the base.
Compress the base of the form by pushing down as you move a sponge, or rib, from the outside edge to the center. You can choose to impress a spiral into the base with the rib or completely smooth out the surface. Either way, make sure to make at least three passes to ensure the interior is compressed.
During your first upward pull, decrease your pressure approximately 1/2 inch from the top of the form. This will leave the rim thicker, which will later be thinned out as you throw horizontally. B Your second pull should be similar but with more emphasis on shaping the platter outward. C Engage your third pull at a dramatic angle to establish the core shape of the platter. Compress the rim with your fingers or a chamois cloth after every pull.
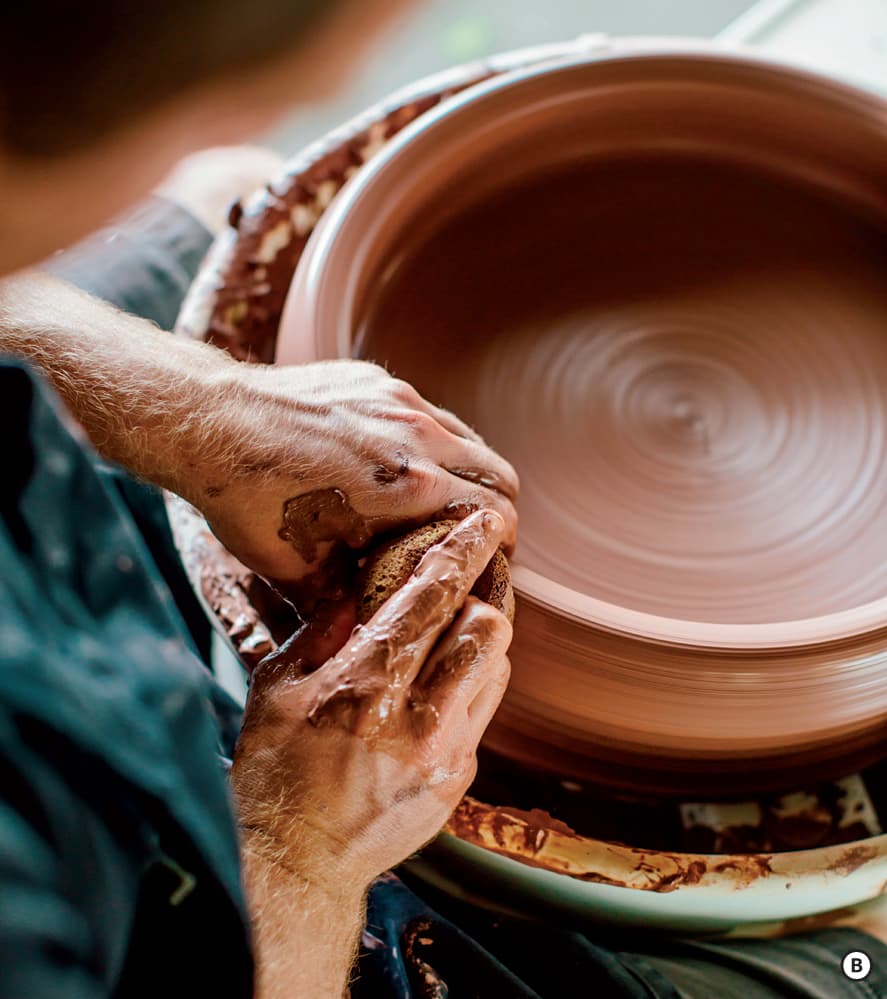

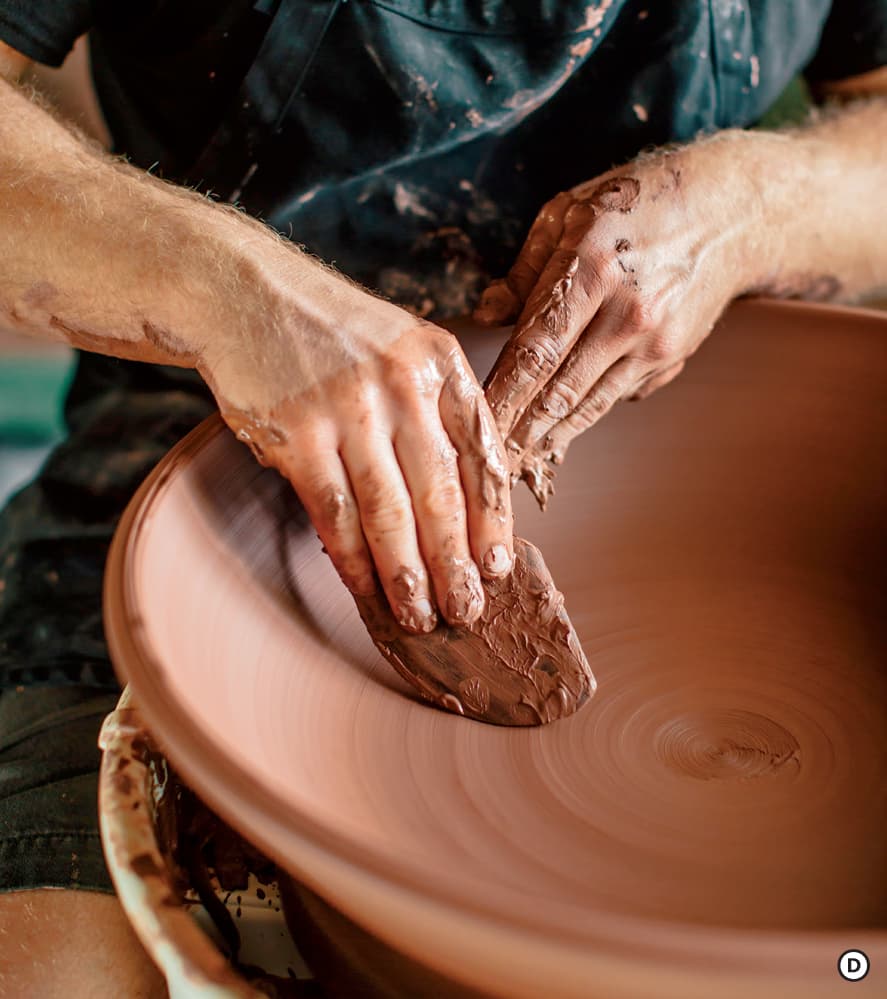
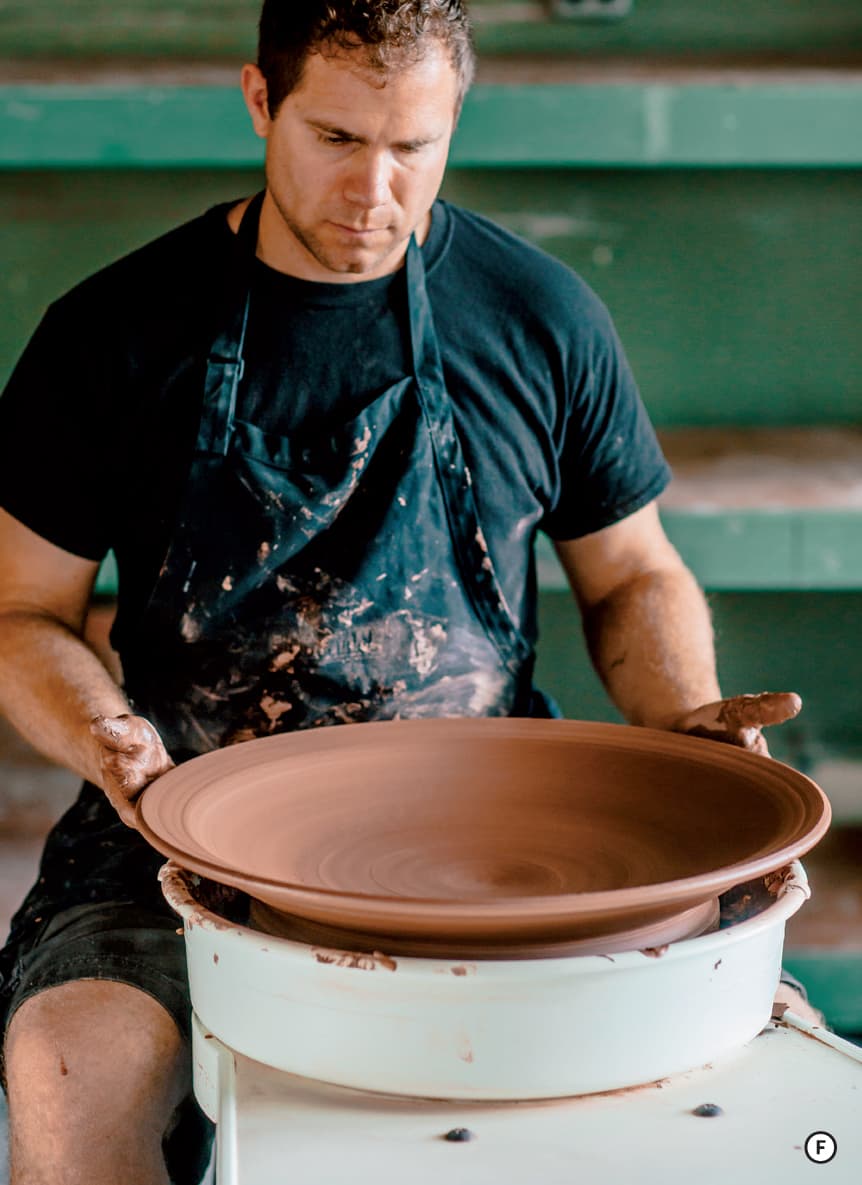
Use a wide wooden rib to ensure the curve is smooth from the edge of the lip to the center. D I’ve heard many potters swear you have to start from the inside out when ribbing, or conversely from the outside in. I alternate between both, working the rib into the areas where the curve is not consistent. E Before finishing the form, make sure your rim is not thin or sharp. F Compressing with a chamois cloth will help round and thicken the edge. As I mentioned before with the foot, the pot’s form will be kept from warping if the rim and foot are more substantial than the body.

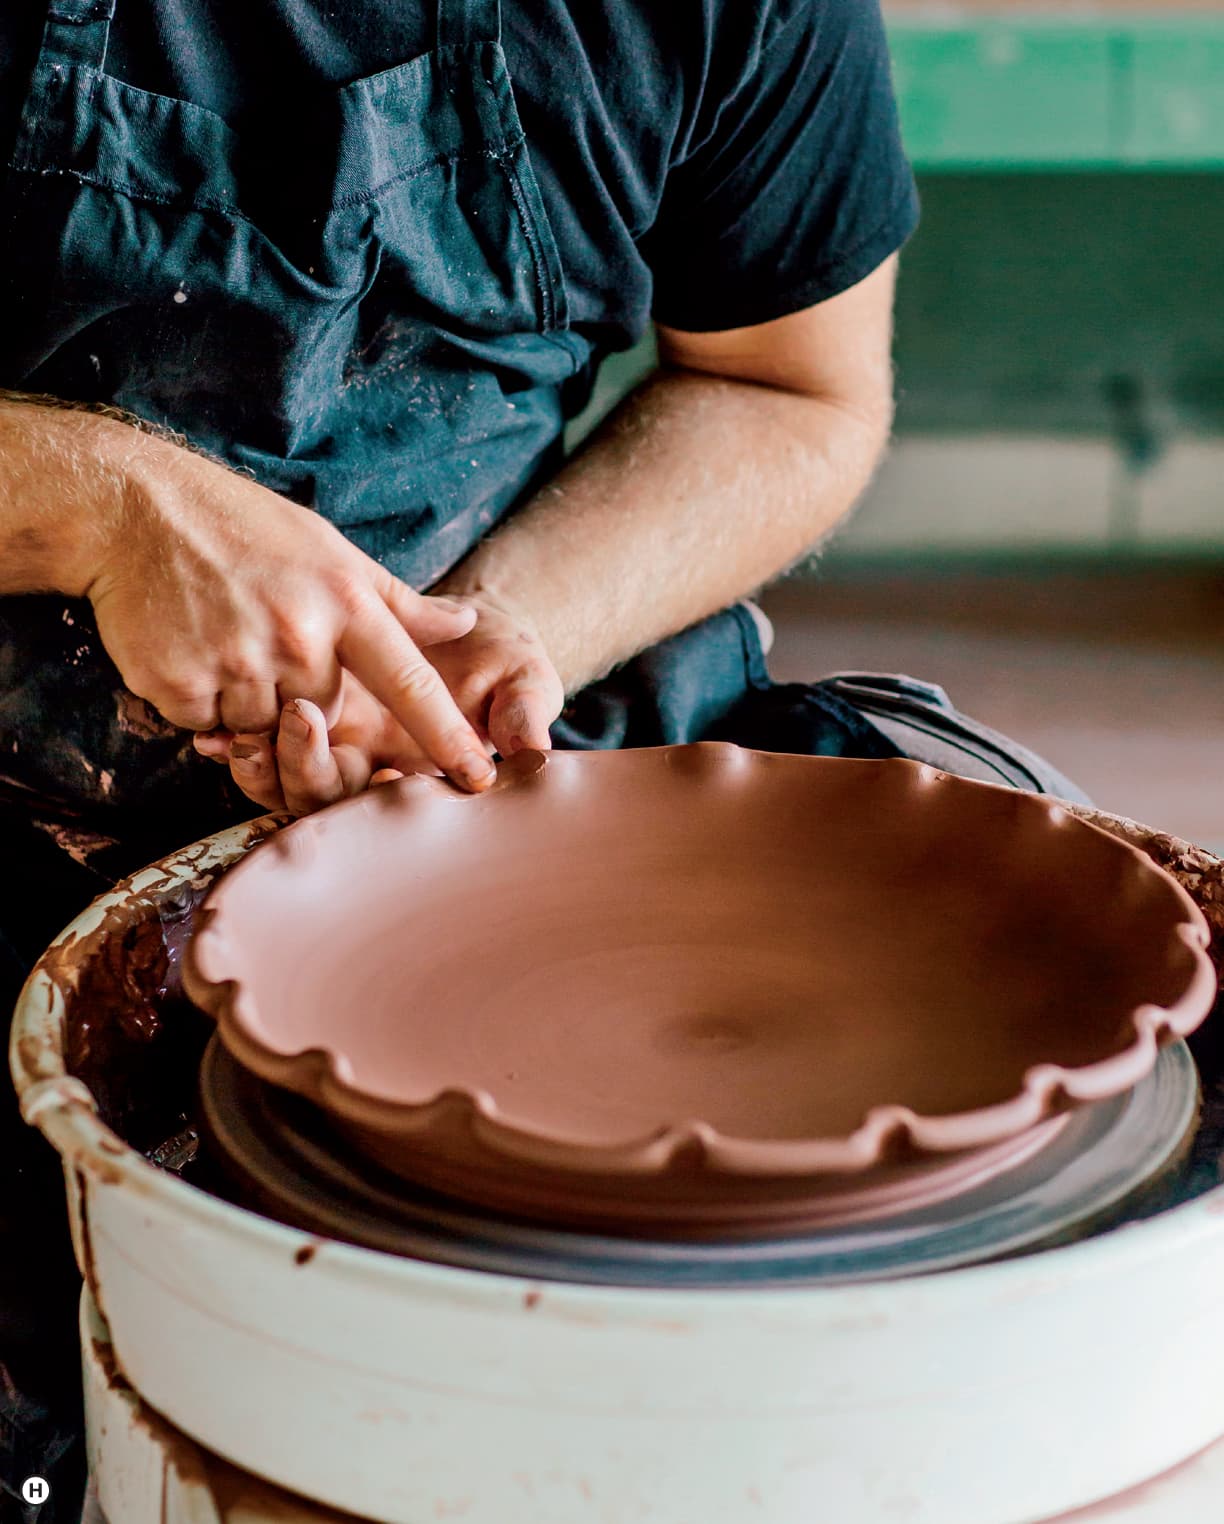
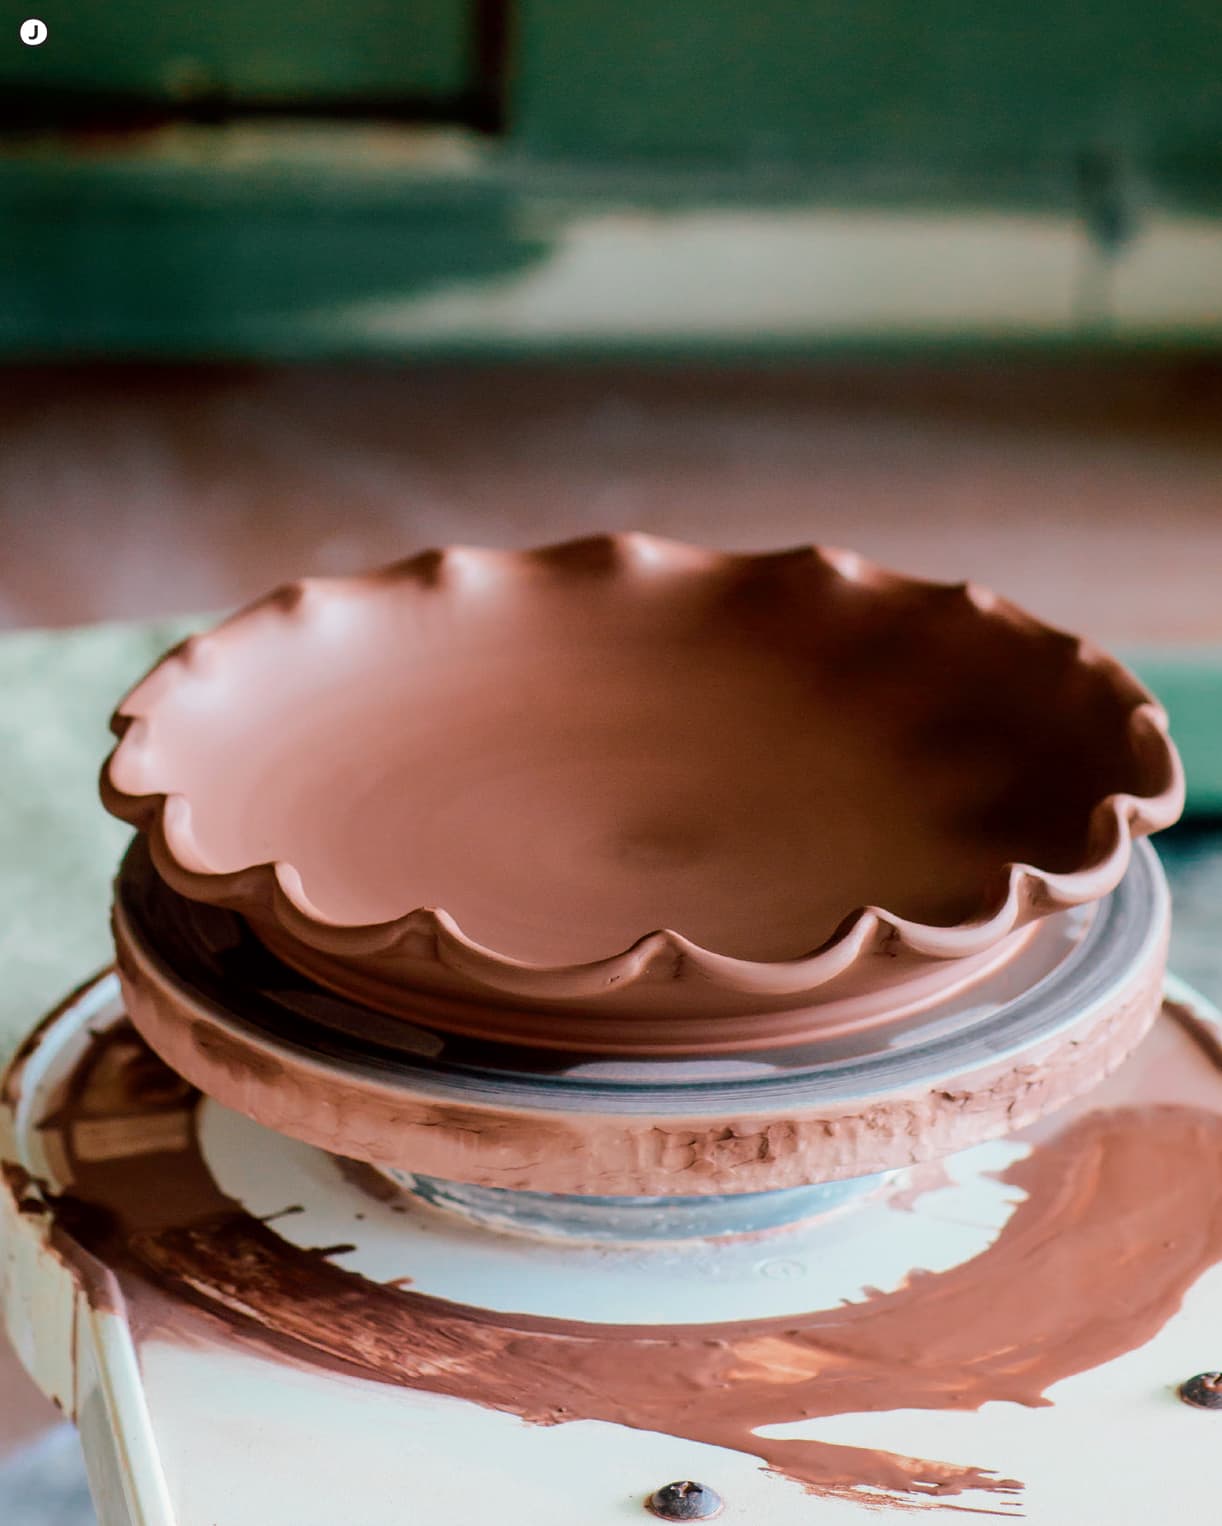
Once you have formed the core of the platter, you may choose to accentuate the rim with scallops or other alterations. To scallop your platter, first divide the rim into any even number between six and twelve. G The more scallops you have, the more energetic the form will be, which will affect how people perceive the pot during use. Too much energy in the form might distract from the food, while too little energy will be a wasted opportunity for expression.
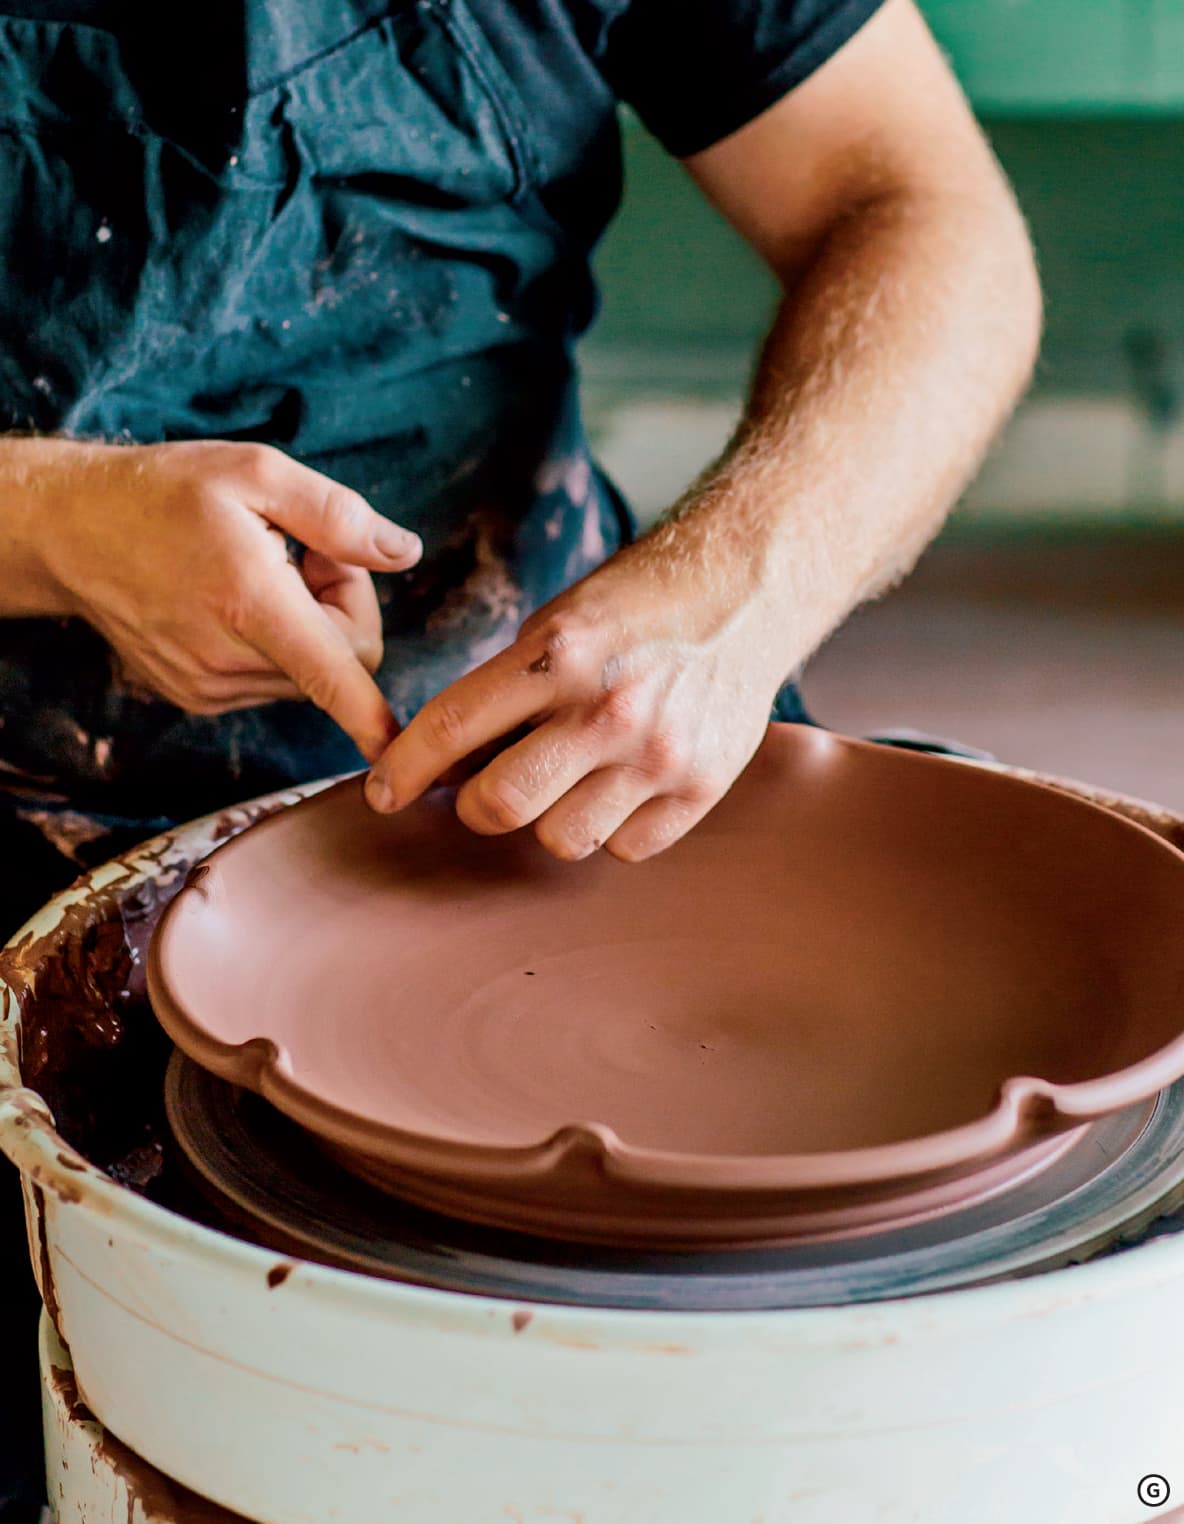
To add the scallops, place your left hand upside down underneath the rim. Place your thumb and pointer finger up against the rim before rubbing between them with your right pointer finger. H The addition of water might be necessary to make the scallops appear clean and smooth. Continue adding scallops until you have circled the pot. Clean up any sharp edges with a wet chamois cloth as the wheel spins slowly. I J

GALLERY
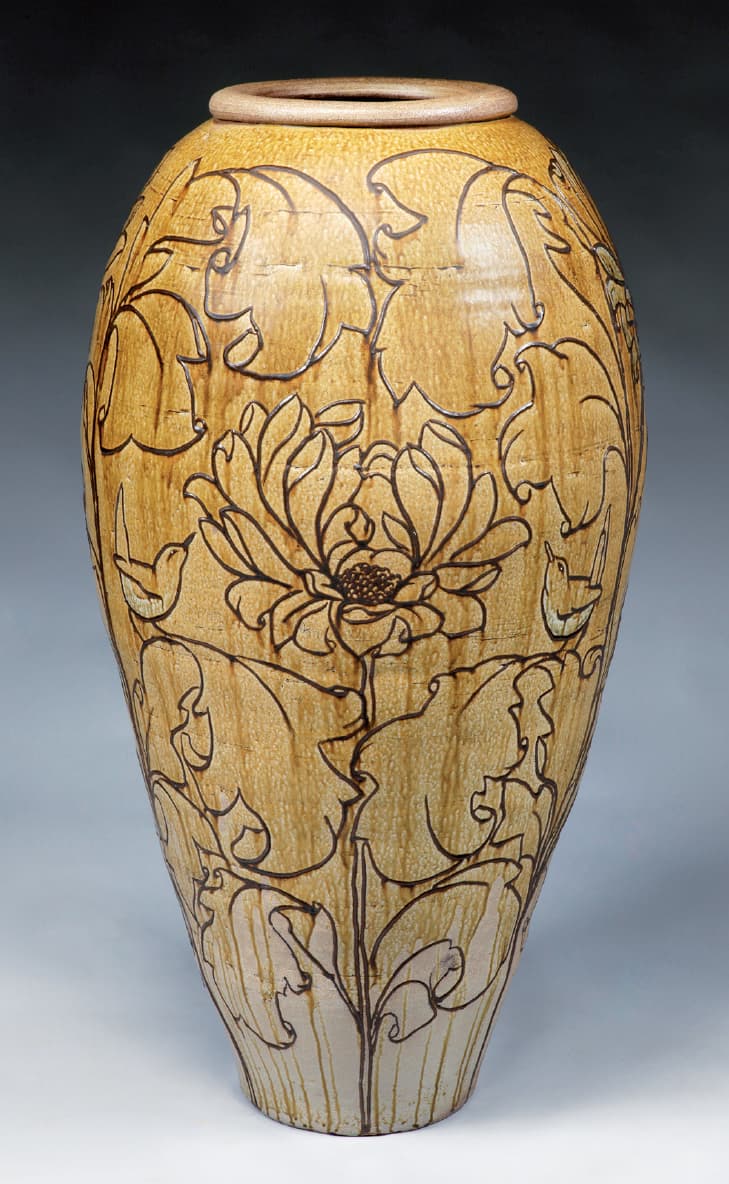
John Vigeland of East Fork Pottery, large vase. Photo by Tim Barnwell, courtesy of the artist
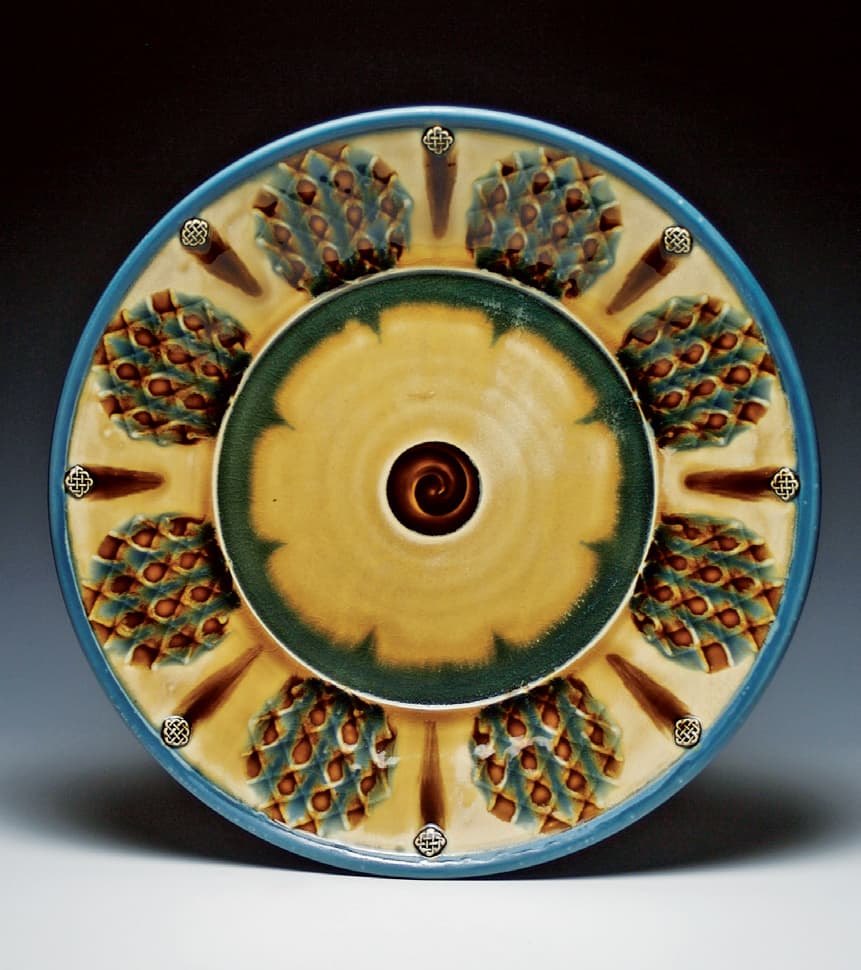
Ryan Greenheck, blue honey platter. Photo courtesy of the artist
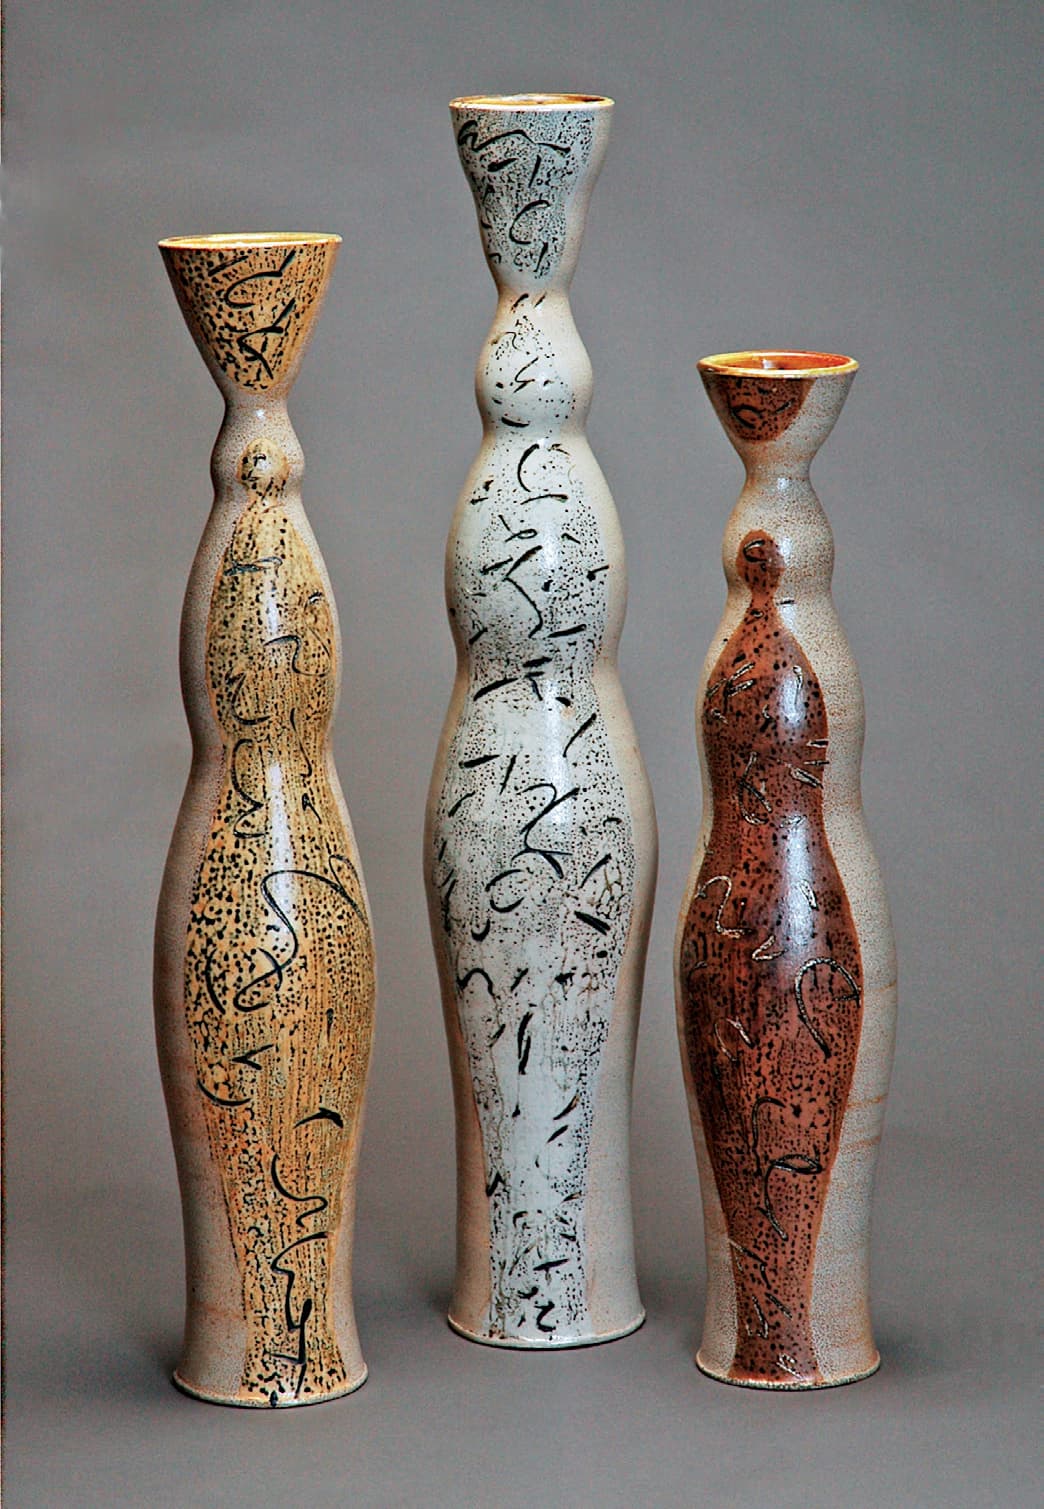
Mark Shapiro, three oval bottles. Photo courtesy of the artist
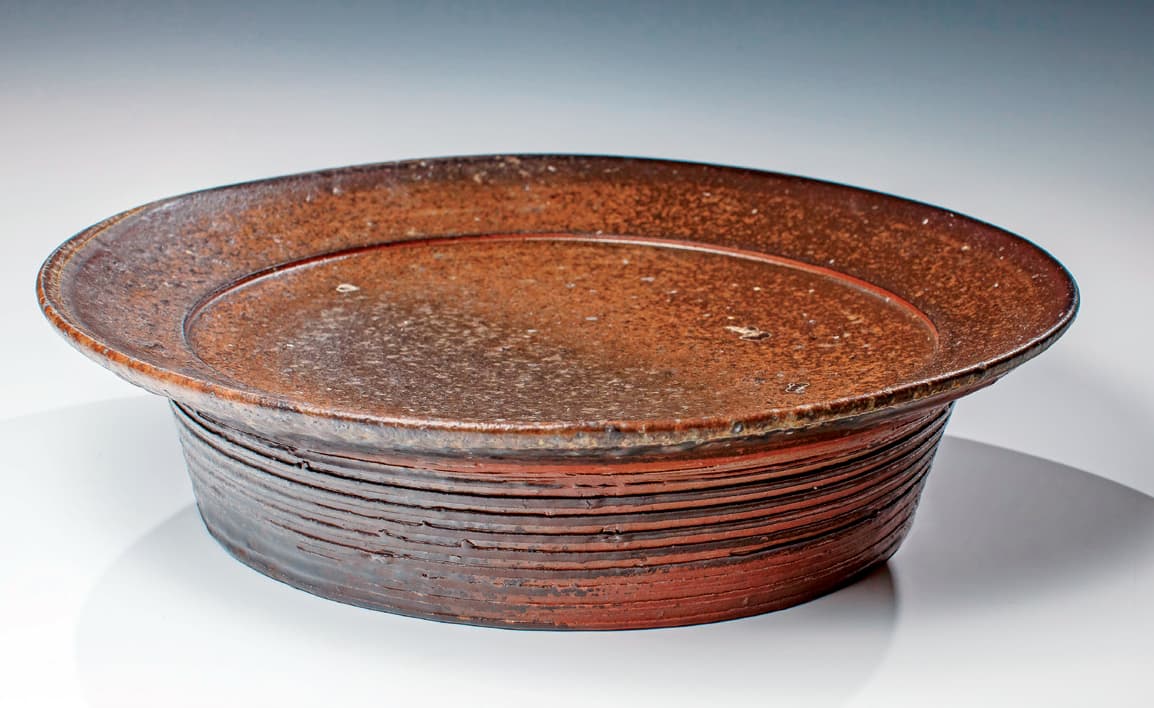
Samuel Johnson, elevated platter with scraped texture. Photo by Steve Diamond Elements, courtesy of the artist
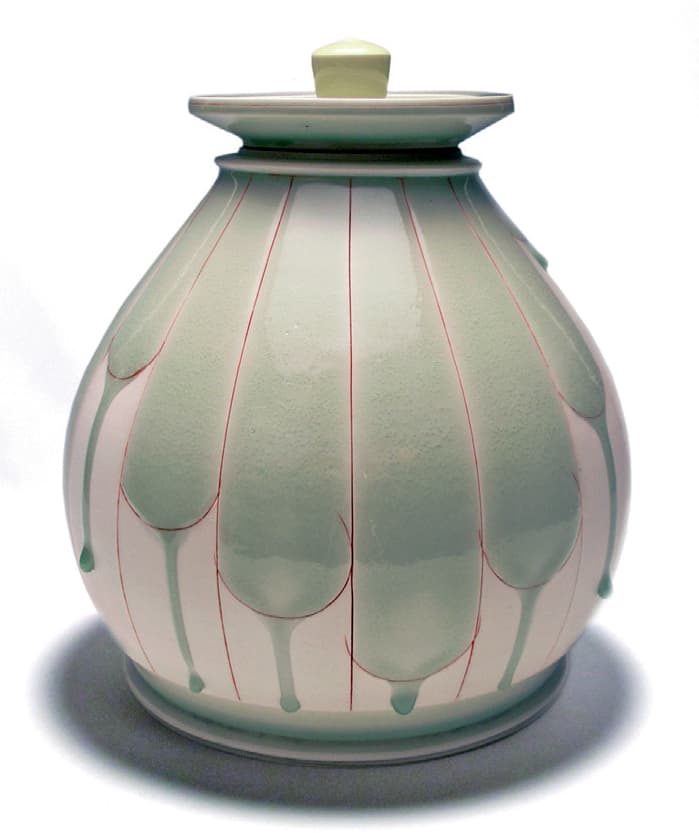
Shawn Spangler, jar. Photo courtesy of the artist
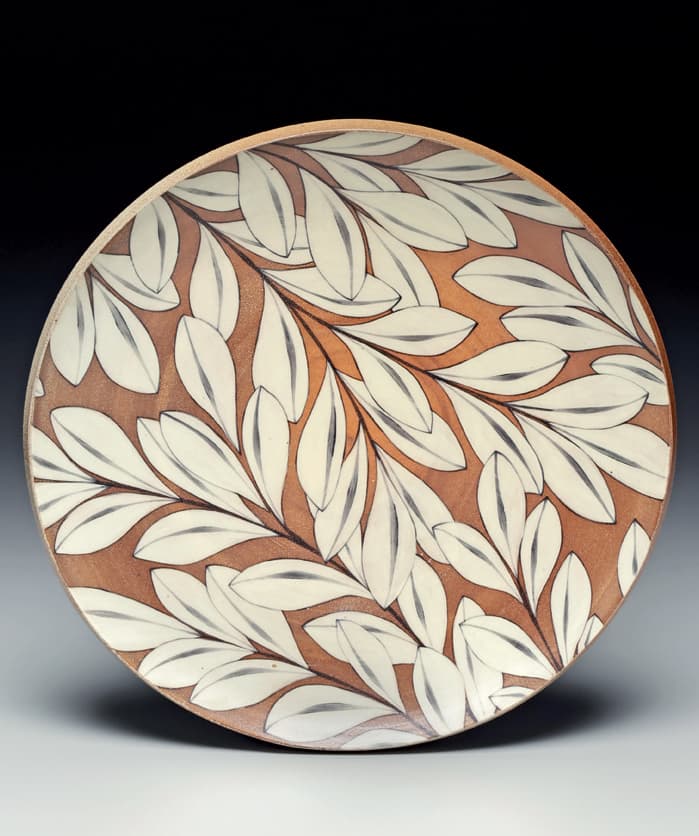
Kyle Carpenter, serving platter. Photo courtesy of the artist
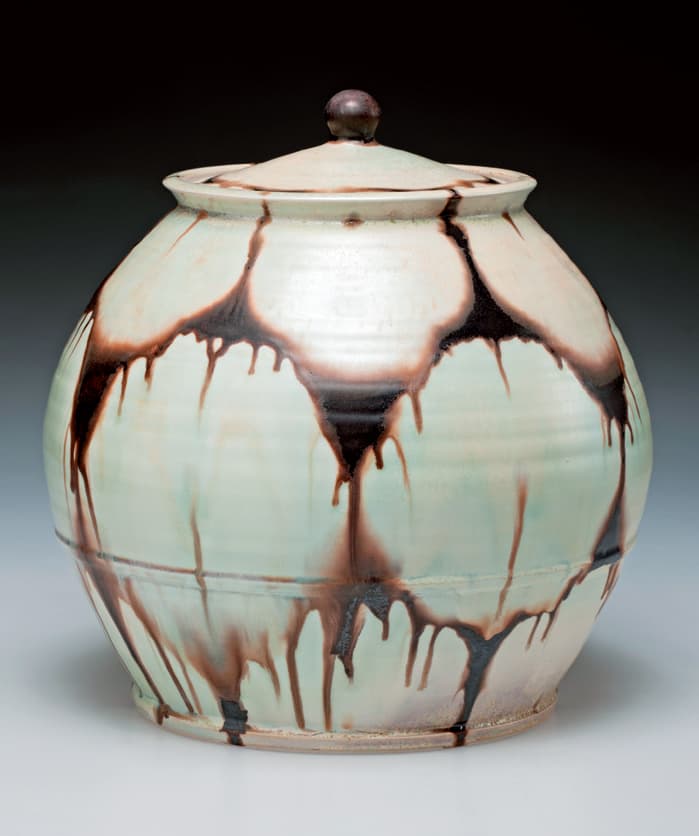
Linda Sikora, storage jar. Photo by Brian Oglesbee, courtesy of the artist
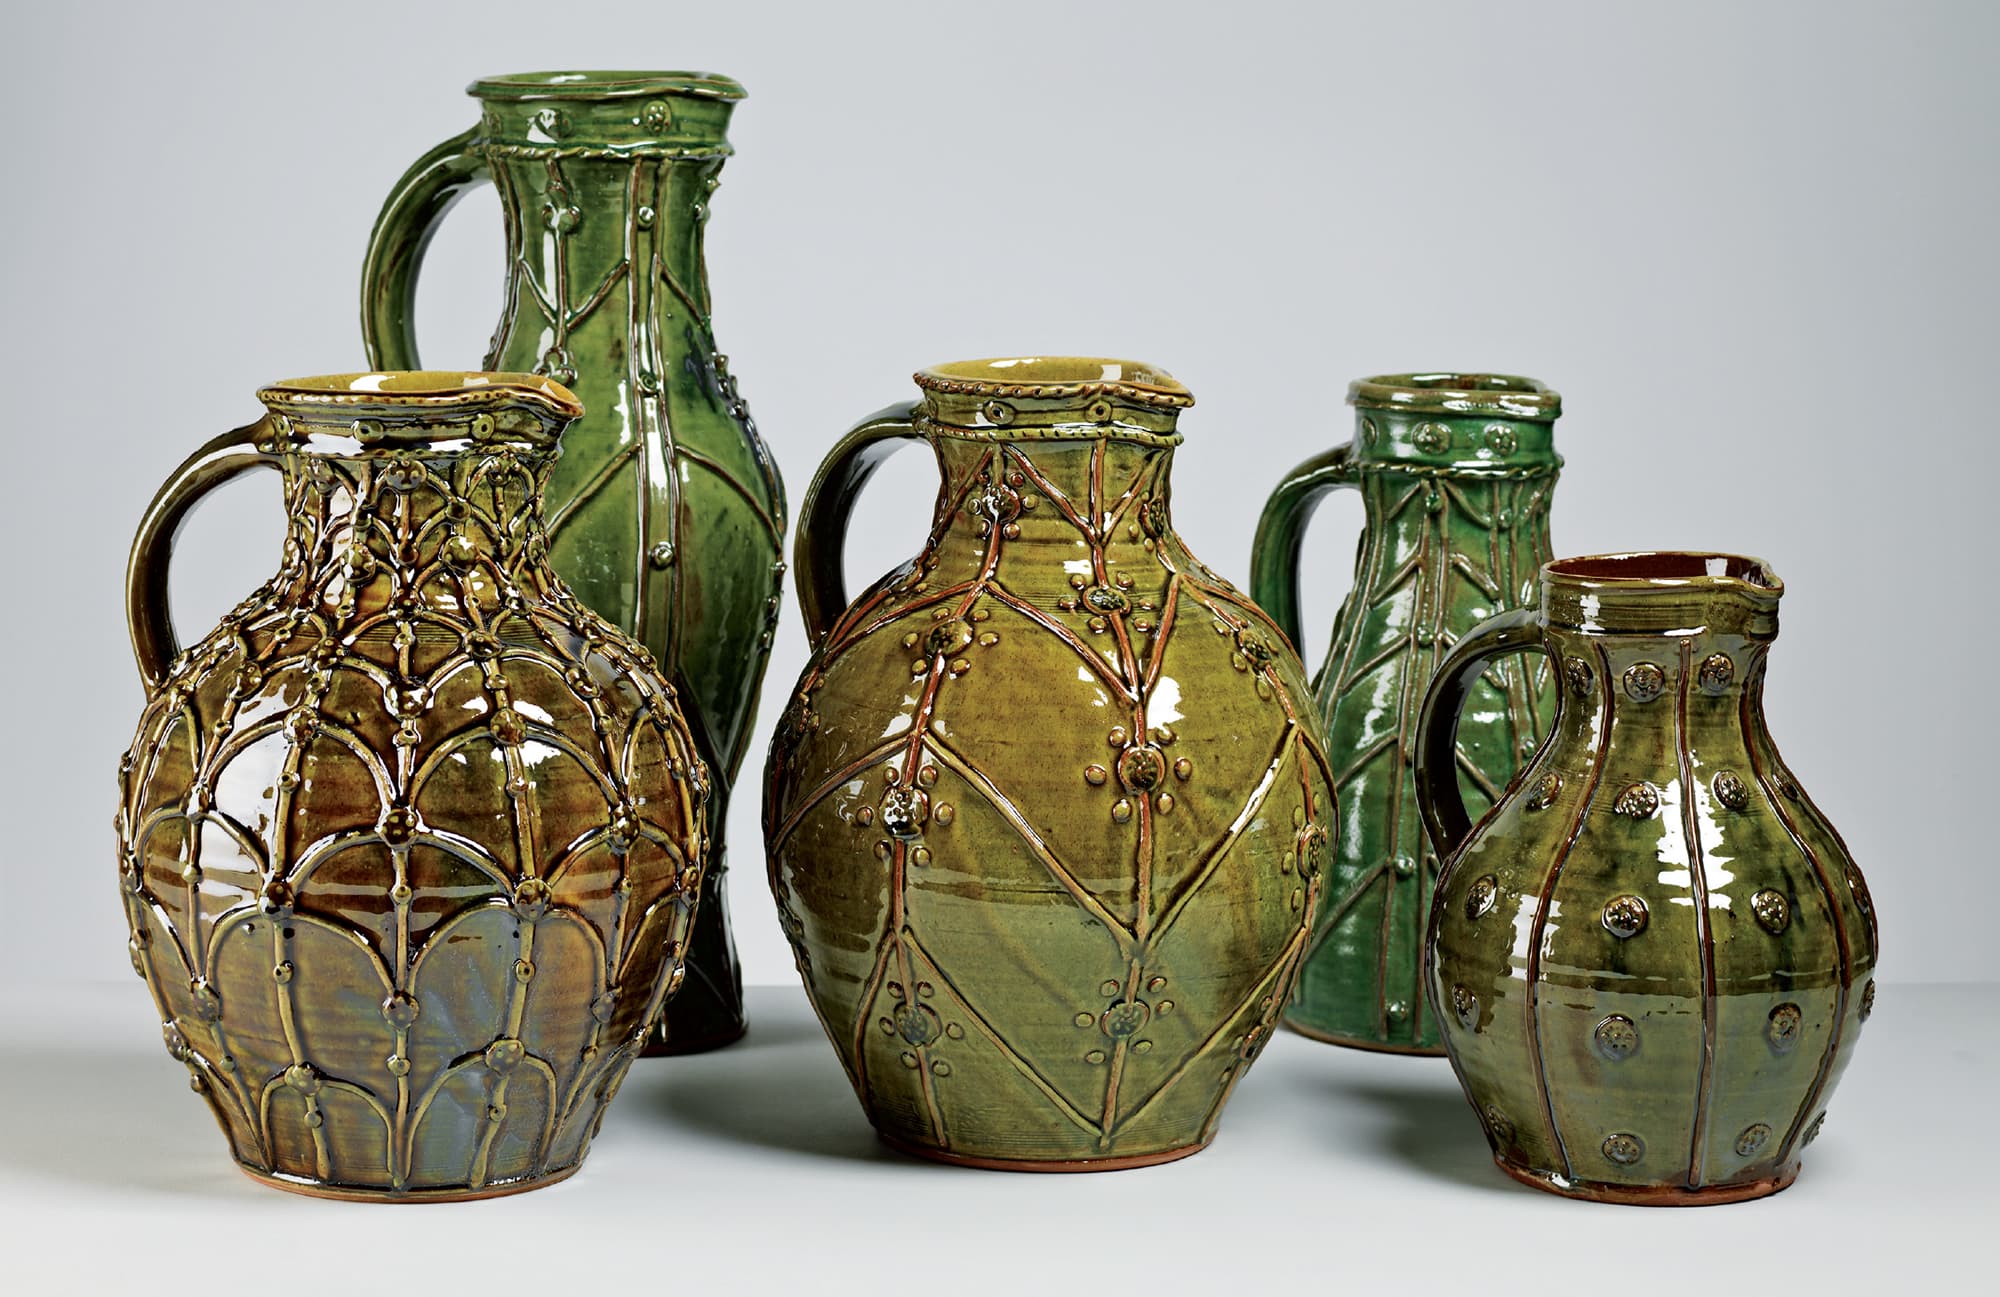
Doug Fitch, pitcher group. Photo by Jonathan Thompson, courtesy of the artist
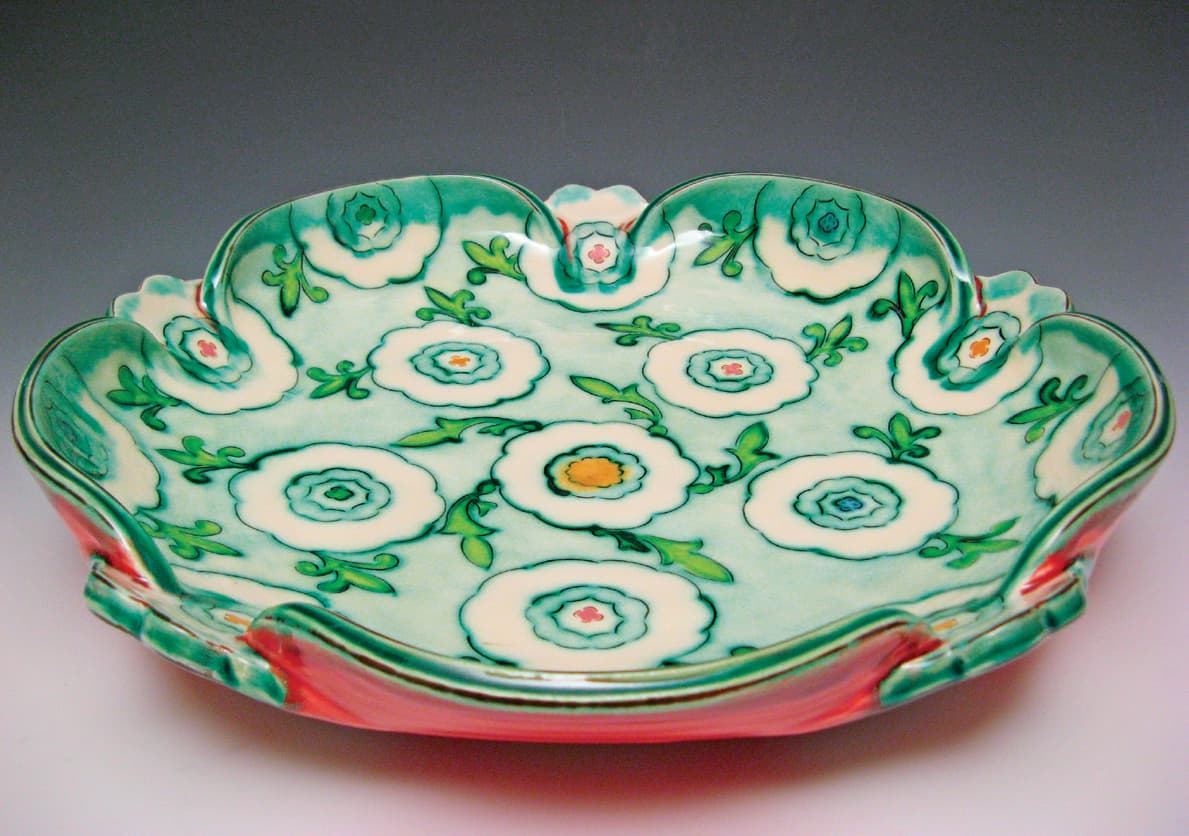
Joan Bruneau, cinquefoil platter. Photo courtesy of the artist

Kathy King, Blood Sweat and Tears. Photo courtesy of the artist
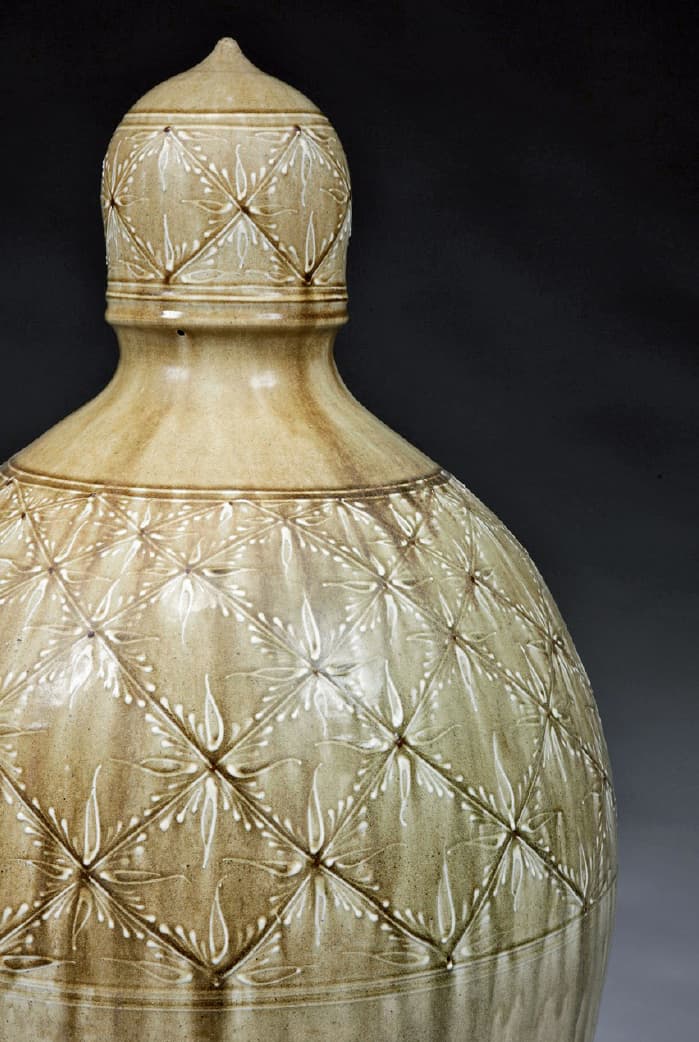
Alex Matisse of East Fork Pottery, large jar. Photo by Tim Robinson, courtesy of the artist

Mark Hewitt, 2-gallon jar. Photo courtesy of the artist
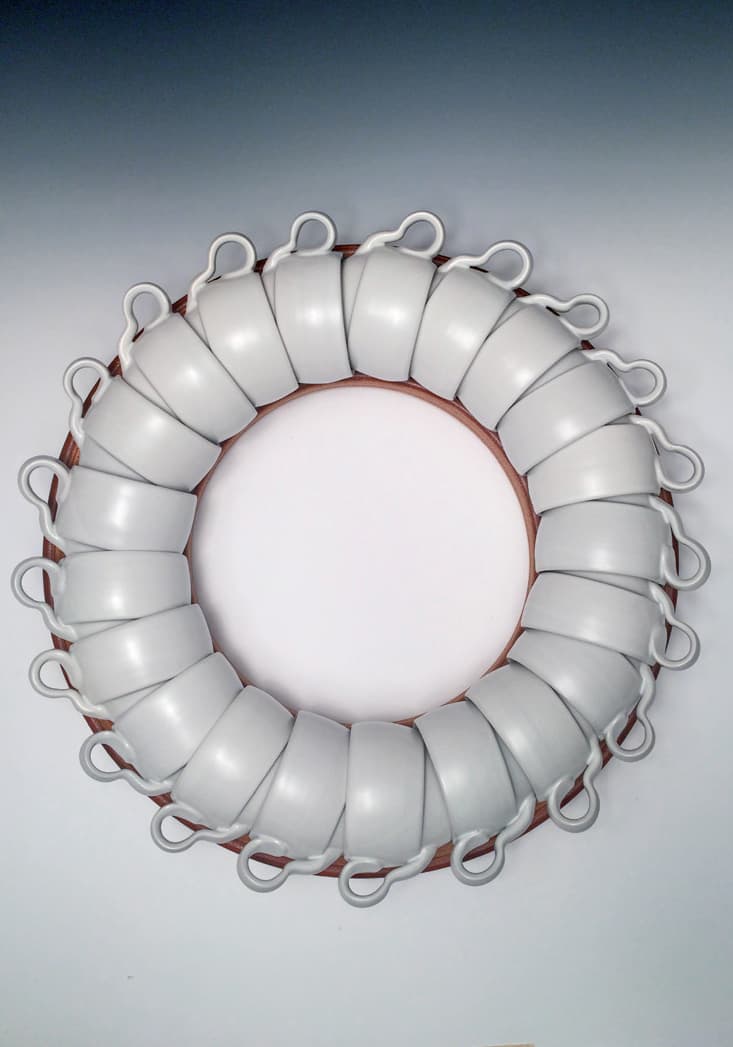
Alleghany Meadows, Flora La Taza Bianco. Photo courtesy of the artist