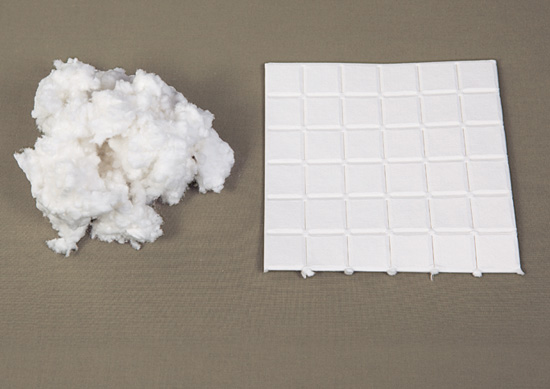
In paper casting, you reproduce a shape by pressing malleable pulp onto that shape and leaving it to dry.
Think of lining the inside or outside of an ice cream cone with wet plaster and letting it dry. The plaster will dry in the shape of the cone. Wet pulp behaves similarly. The same pulp that makes a flat sheet of paper can become a three-dimensional shape.
Because papermaking fibers are microscopic, wet pulp can be worked into or onto a surface’s most minute details and crevices, which are then reproduced when allowed to dry. Consequently, wet pulp is an ideal medium for casting.
Most of what you need for paper casting is the same as for flat papermaking (see page 25). The primary differences are the molds you use, the type of fibers you need for pulp, and any special additives and release agents. All are covered in this chapter.
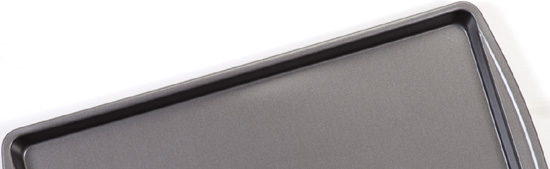
Commercial casting molds are available in three types: plastic, flexible, and rigid.
Plastic. Cookie stamps, soap and candy molds, and many other kinds of plastic crafting molds have interesting detail that will emboss the surface of the finished cast. Hundreds of designs are available in plastic, varying in size from a few inches (candy molds) to a few feet (cement stepping stone molds). Since this plastic has such a hard, shiny surface, the dried cast separates easily from the mold with few problems. Unfortunately, most plastic molds lack surface detail, which may be a disadvantage.
Flexible. Flexible molds are good for three-dimensional pieces of art because they are strong and elastic. Polymer clay casting molds are an example of a flexible mold. However, because cotton linters and recycled papers start out as such a watery medium, flexible molds can be difficult to use. Pressing to remove water and encourage bonding is difficult.
Rigid. Rigid molds are made of fired clay or composite resins. They come in many sizes and shapes, and have multipurpose uses. The same mold might be used for paper casting, cookie or butter stamping, metal embossing, or casting of various products to make jewelry. Rigid molds are generally the most desirable molds for paper casting. They accommodate water and lots of pressing and patting, and further have fine detail and depth. With care, rigid molds can be used over and over and will produce a clear, interesting finished product, ready for various art applications and useful gift projects.
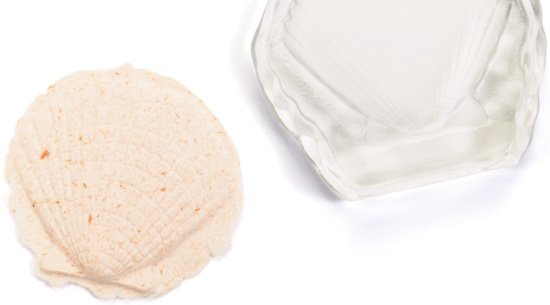
Unglazed ceramic molds are the traditional choice for paper casting molds. The absorbent nature of fired clay draws water into the mold, bringing fibers along into the details and crevices of the image for a superlative cast.
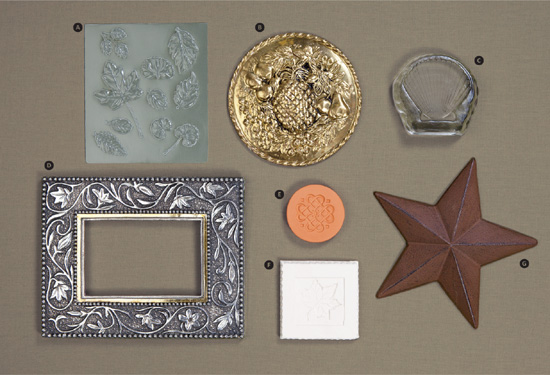
Shown are just a few possible options to use as casting molds:
 plastic push molds for polymer clay
 antique brass plate (found object)
 glass candle diffuser from a dollar store
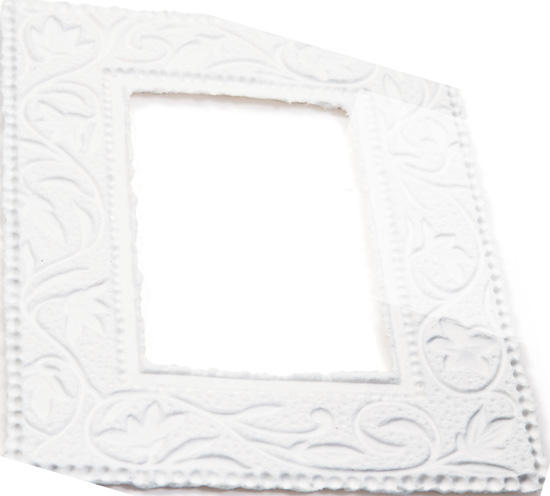
 textured metal picture frame (see page 136)
 commercial terra cotta casting mold
 commercial bisque clay casting mold
 metal wall art (see page 124)
Q: Will plastic candy molds work for paper casting?
A: Most paper-casting molds (see previous page) are made from kiln-fired clay. Clay molds pull water, and fibers with it, into the details of the mold, producing high-resolution results. Plastic molds generally won’t deliver the detail one anticipates. Applying linter or recycled fiber to a nonporous surface encourages formation of air bubbles between the mold and pressed-in pulp. Pock marks may appear on the cast’s surface. If you have some candy molds at home, by all means try them out. If you find the results suitable, the variety of inexpensive plastic molds outweighs any concern.
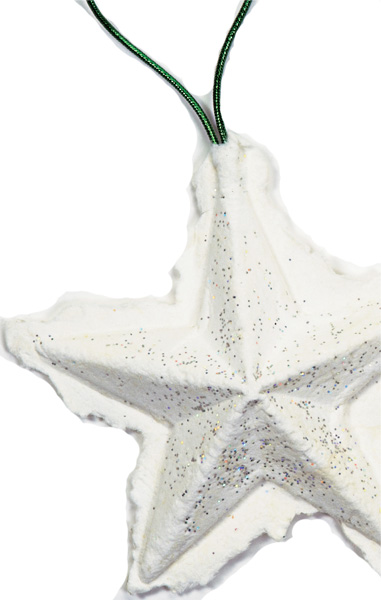
Paper casting is a limitless world in which your imagination can roam endlessly, and your decorative and artistic senses can find a thousand paths to pursue. There are certainly some everyday things around the house, or maybe your grandmother’s attic, that can be used for paper casting. Keep an eye on the amazing and functional shapes and forms found in fast-food restaurants, ice cream parlors, and grocery stores. There are neat tray and small-box forms everywhere. A round shape is universally pleasing and can be useful as well.
Set a glass or similar round object in the middle of a larger round pulp patty (see page 132). With a plastic spatula, push the pulp patty’s edges up around the bottom of the glass, let the pulp dry, and you get all types of coasterlike creations. Spray them with clear polyurethane (see page 127), and they will develop moisture resistance. You also can do your own thing freehand with a turkey baster as a drawing or forming tool. Through surface embedment (see page 64), you can celebrate and immortalize contemporary entertainment and commercial icons, a memento from your kid’s card games, or the graduation card of a grandchild.
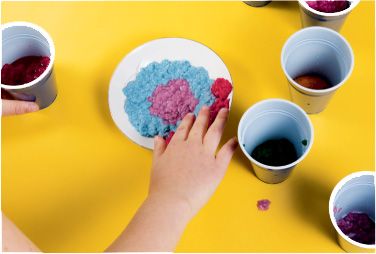
As with other papermaking, any fiber—new or out of your wastebasket — can be used for paper casting. The resources in your wastebasket will give you a broad range of colors and hues that are free. Professionally dyed colored pulp is abundant and free in the form of throw-away colored paper.
Cotton linters have become the “fiber of choice” for paper casting, and the preference is easily explained. Cotton linters sold for casting have been appropriately “beaten.” This process modifies the fiber by shortening it. Short fibers are most desirable for casting because they can enter the casting’s most minute detail.
Linters’ exceptional whiteness allows the eye to see dimension and shadow on the finished cast. The shrinkage rate of the drying pulp is very low, preserving both detail and proportion of the mold. Cotton linters, in terms of an art medium, are economical. These qualities and their exceptional replication of detail provide the characteristics most desired in pulp for paper casting.
Paper Casting Tips
 Are you using recycled pulp? A general guideline for the ratio of wastepaper to water is a torn-up 8½″ × 11″ sheet of paper to 3 cups of water. Run the blender until chunks of paper are no longer visible.
Regardless of what pulp is used (cotton linter or recycled paper), the good news is that both can be processed in a kitchen blender. Should a paper casting fail to turn out for any reason, reblend it. Linters can always be redispersed in a blender for another attempt or project.
Preshredded cotton linters
Cotton linter squares
Cotton linters are available in four forms: sheet pulp, perforated squares, preshredded bulk, and liquid pulp. Some are easier to use and some are less expensive, but every form delivers the beautiful results.
Frequently Asked Questions
Q: My ceramic mold is stained from some colored pulp I used. Is it ruined?
A: No, your mold isn’t ruined. Set the mold on paper toweling. Spritz the mold with a solution of 50 percent water and 50 percent bleach. The bleach water will be absorbed into the clay and neutralize color in the stain. It won’t make the stain disappear, but it usually prevents future casts from picking up the stain color.
Cotton linter sheets. This is the most economical form of cotton linter. For best results and long life for your blender, reduce to 2″ pieces, presoak for several minutes, and then put in a blender with 3 to 4 cups of water. Never blend more than the equivalent of a 5″ × 7″ section in the blender.
Cotton linter squares. Cotton linter squares are easy to use, especially for beginning paper casting. Sheets are perforated into 1″ squares, making it easy to premeasure pulp. The number of squares it takes to cover the mold’s image is the right amount to use. Never blend more than 36 squares at a time.
Preshredded cotton linters. Preshredded cotton linter has the advantage of being very blender friendly. Never exceed 1 cup of linter in the blender at a time.
Liquid pulp. Cotton linter pulp that has been beaten and blended is available by the bucket and can be ordered and shipped from specific vendors (see Resources, page 196). Liquid pulp can be ordered with sizing or other additives included. Follow the directions from the supplier for use and storage tips.
Simple Tints for Cotton Linters
Linters are a wonderful fiber source for paper casting, because the fibers easily form a strong, natural bond. When the water is drained away from the mass of wet fibers, the mass is already forming a workable pulp that can be handled easily. The shrinkage rate of the drying pulp is very low, which helps preserve the detail of the mold.
Although a bright white cotton linter cast is traditional and often preferable, many individuals like to add color to pulp.
Do try: Adding small pieces of gift wrap tissue, napkins, or colorful paper to linters in the blender until the desired hue is reached.
Not recommended: Construction paper (messy and ineffective since dye bleeds into the water and stains molds, sponges, and toweling), food coloring (ineffective and permanent staining similar to construction paper), and acrylic paints (both ineffective and foamy in the blender).
A variety of additives can be used in casting pulp. These are said to yield firmer casting surfaces that are more suitable for painting and to provide other characteristics. Anything put into pulp will have some kind of effect, subtle or obvious. Here are just a few of many options you might try. Be sure you get instructions and any expiration information from your vendor. If they produce a discernible effect on your casting, that’s good. If not, don’t waste your money.
Wax sizing. Many bleached-white bakery sacks are made of heavily waxed paper. Adding some of this paper to cotton linters or other pulp for casting delivers wax sizing to the casting. The more waxed paper added, the harder the surface. The sizing factor prevents feathering and wicking of liquid paints and inks.
Methylcellulose. This sizing agent has mixed reviews for use in castings. Besides providing sizing (see page 33), it is also an adhesive and can cause release problems for a casting. Follow supplier recommendations and use a release agent.
Commercial sizes. Internal sizing is the addition of sizing to pulp before product formation, while external sizing is the addition after product formation.
Calcium carbonate. This hard (ground limestone) filler lends some surface hardness and permanency (meaning the casting will last longer). Some of what is added will be deposited at the surface of a casting.
Papermaker’s clay. The state of Georgia is slowly disappearing into paper, because it is a prime source of kaolin clay. The clay works in a similar way as calcium carbonate, but without affecting permanency. It may give paper casts a grayish tinge.
External polyurethane spray. Spraying clear polyurethane lightly on the face of a cotton linter paper casting can result in a very closed, hard-sized, and firm surface. But addition of anything will result in some loss of brightness. Experiment on small, easy-to-make castings to test results with a particular art medium.
Sometimes, when trying to pull or lift a dry casting from its mold, part or much of the casting sticks to the surface. The casting does not release. If a paper casting shows signs of not releasing, try slipping a thin blade under the casting at some place along its edge and proceed with a delicate touch to lift and pry the cast loose. The same cotton linters that release satisfactorily without additives might present more of a release problem with additives or tinting materials. Severe sticking is unfortunately a harbinger of a paper casting fatality.
Often, a release agent can prevent sticking by facilitating a dry casting to release easily and completely. A release agent is applied to the mold’s surface prior to applying pulp.
Common Release Agents
Silicon spray is easily available, is mostly inorganic, and is least invasive of both the paper and mold. It is easily applied and minimally messy. Read all safety comments on the packaging; you may prefer not to allow children to use it. Below are some other options.
Nonstick vegetable spray
Mold release spray
Glycerin
Paste wax
Petroleum jelly (can be diluted with mineral spirits)
Whichever agent you use, observe safety practices as described on the labels. Use the least amount of release agent possible. No puddles should be visible. A light wipe with an absorbent material will eliminate excess.
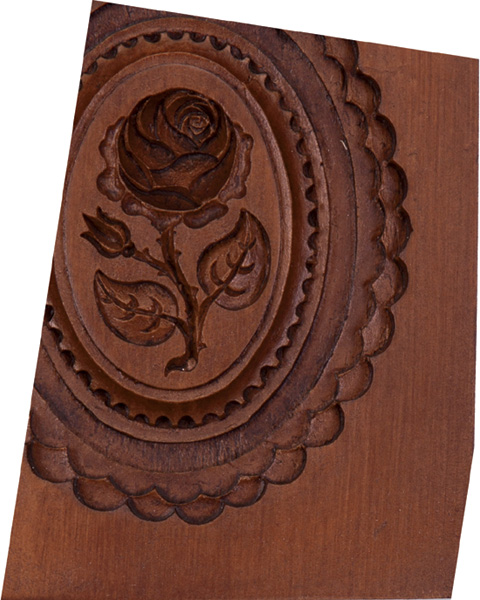
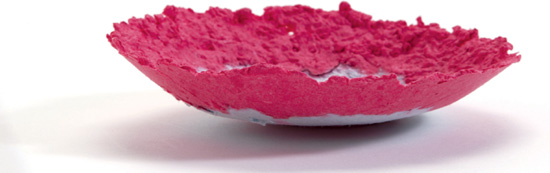
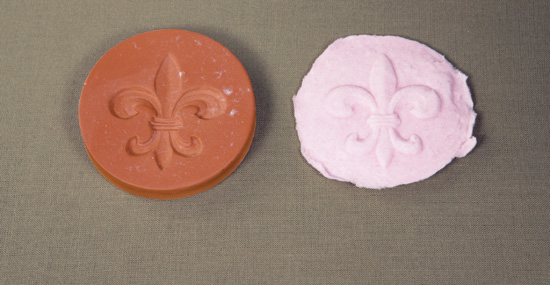
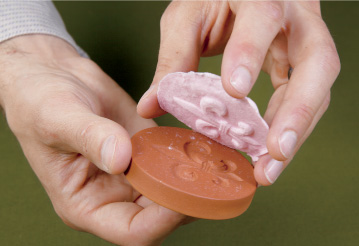
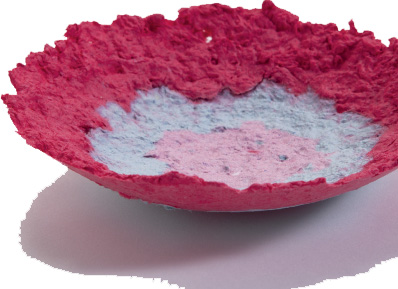
The vintage cookie mold shown on the previous page was used to produce this paper casting.
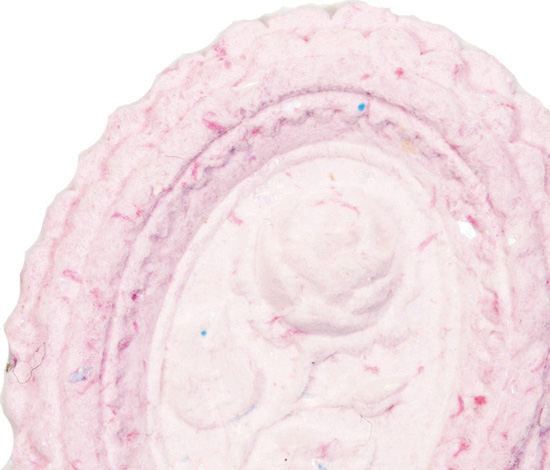
The vintage cookie mold shown on the previous page was used to produce this paper casting.
Frequently Asked Questions
Q: Even after I apply release agent, I’m still having a sticking problem. What’s wrong?
A: Sometimes, small fibers are caught in a detail of the mold. They try to bond with the next round of pulp in the mold and cause sticking or “pocking” on the surface of the cast. To avoid this problem, use a stiff brush to clean the mold and reapply the release agent. Serious sticking in ceramic molds requires boiling the mold in hot water for 10 minutes. Experience has shown this works every time.
Q: Can I use a microwave to dry a paper cast?
A: Not all molds can withstand microwave heat. Ram-pressed ceramic molds are generally fired at a high enough temperature to prevent breakage. Even so, there’s a chance a small air pocket in the clay will fill with water and expand during microwaving, causing the mold to crack or explode. Check manufacturer guidelines regarding microwave safety. If in doubt whether the mold will hold up, avoid microwave drying.
1. Put the microwave on a medium setting.
2. Microwave the ceramic mold and cast for 1 minute.
3. Give the mold a quarter turn.
4. Microwave for 30 seconds.
5. Repeat steps 3 and 4 until dry. Many casts will dry in 2 minutes. If the cast is still damp, peel it from mold and finish with air drying.
Caution: The mold will be hot from microwaving, so take care when handling. Also, prolonged microwaving can cause scorching.
The basic steps for paper casting are very simple. Try this warm-up exercise to whet your appetite.
Instructions
Step 1. Tear off enough cotton linter casting squares, other cotton linters, or six thicknesses of wastepaper (enough to cover the selected mold).
Step 2. Put the linters or wastepaper in the blender with 3 cups of water. Blend on low for several seconds, then on high for 45 seconds.
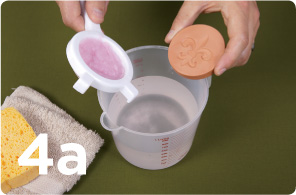
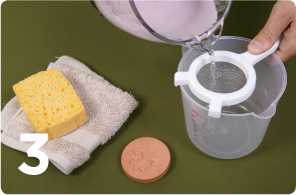
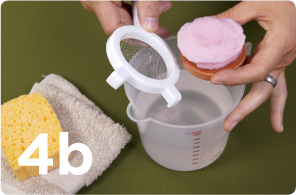
Step 3. Pour the blender’s contents (pulp) into the tea strainer. Let the water drain into the measuring cup.
Step 4. Plop the pulp directly from the strainer onto the mold. Jiggle the pulp gently with your hand, shaking the fibers into the mold’s details. Maintain uniform thickness as much as possible.
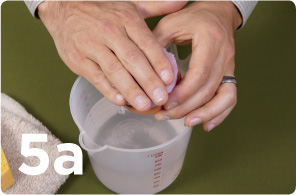
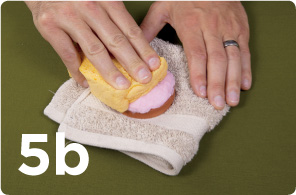
Step 5. Hold the cast over the measuring cup or a sink and press firmly with your hand to settle the pulp and squeeze out the water. When the casting is no longer dripping wet, set it on a flat surface and continue pressing with a sponge to remove more water.
Materials
Cotton linter or selected wastepaper
Kitchen blender
Water
4-cup measuring glass
Tea strainer or wire mesh
Casting mold
Sponge
Toweling, terrycloth, or paper towels
Step 6. Finish up by pressing with a terrycloth or paper towel to remove as much moisture as possible.
Drying a Cast
For final drying, there are four options:
1. Peel the cast carefully from the mold and let it air dry.
2. Place the cast on the mold in front of a fan or heating vent to speed drying.
3. If the mold you’re using can withstand heat, leave the cast on the mold and place it in a 275°F oven. Check it after 10 minutes; drying time depends on cast thickness. Usually, the casting will start to lift from the mold when dry.
4. If the mold is microwave-safe (check the manufacturer’s guidelines), follow the steps in the box on page 129.
Putting pulp on a small mold is quite easy. On bigger molds, bowls, carvings, or other objects, applying pulp can be a bit more of an undertaking. Below is a range of ways to apply pulp; just remember that it’s best to apply a release agent to the mold before applying pulp.
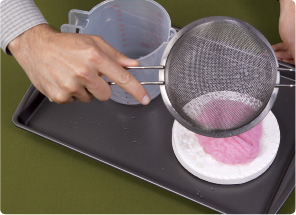
Pulp Pull-Away
An easy way to get pulp onto a flat mold is to pour pulp from a blender into a strainer and let the water drain into a pail or bowl. When the pulp is thick enough to handle (see Handling Pulp, next page), pull chunks of pulp from the strainer and layer them evenly across the surface of the mold. Pat pieces together to form a uniform layer before removing any water.
Laying pulp pieces onto a mold.
Pulp Transfer
A more efficient way to move larger amounts of pulp to a flat mold is sometimes needed. Pour the wet pulp into a strainer and shake it back and forth, making the water drain rapidly and forming the pulp into an oval ball. This can be plopped directly onto the surface of a mold. Repeat until the mold is covered. Pat all sections together to form a uniform layer before removing any water.
Transferring pulp onto a mold directly from a strainer.
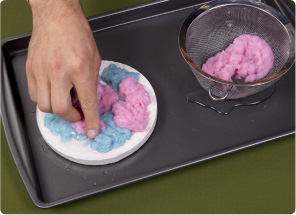
Pulp Patties
Making a cast on the surface of bowls or trays may require yet another process for transferring pulp. Pulp patties are one way to arrange pulp on large, uneven, round, or curved surfaces. Merging patties of diverse colorful pulps is another benefit.
Flattening a pulp patty.
Pour the pulp from the blender into the strainer, letting water drain into a pail or bowl. Now, dump the pulp on any flat surface. With your hands, flatten the pulp into a patty of reasonably uniform thickness; patting it with a firm bristled brush is helpful. Remove water with a sponge, and if necessary, with a terrycloth towel, until the pulp patty can be handled. Finally, place the patty on the mold. Repeat, overlapping colors and wetting patty edges until the container is covered.
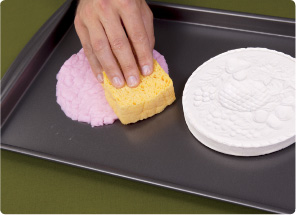
Handling Pulp
Casting often involves handling pulp, laying sections or strips on a mold, and pressing them together into a larger form or shape. The challenge is to remove sufficient water so pulp can be handled, but not so much that adjacent sections or strips won’t bond with each other. Make it a goal to remove no more water than is necessary. Rewet adjacent pulp pieces and sheet edges after application to the mold. Press with a sponge. By doing this, you will restrengthen the bond between individual pieces or sections of pulp.
Easy Bowl
Find a kitchen bowl with a pleasing shape and apply a release agent. Mix a few different colors in plastic cups and press the pulp into place as you like. The water may pool a bit in this method, but carefully blot with a paper towel and allow to air dry as needed.
Fingers are a good way to work different pulps together into a single cohesive mass.
Materials
Cotton linter or selected wastepaper
Kitchen blender
Water
4-cup measuring glass
Tea strainer or wire mesh
Casting mold
Sponge
Toweling, terrycloth, or paper towels
Applying strips of pulp made from recycled paper is another way to arrange pulp on flat molds or everyday objects. Use several colors, if you wish.
Materials
18″ square fine mesh hardware cloth
Bucket, tub, or tray
18″ square window screen
Two wood 1″ × 2 ″ × 12 ″ boards
Pulp (amount depends on how many strips are being made)
Plastic pitcher or turkey baster or squeeze bottle
Sponge, terrycloth, or paper towels

Instructions
Step 1. Put the hardware screen over the bucket or tray, then place the window screen over the hardware cloth.
Step 2. Place two boards beside each other on the screen, as far apart as you want the strip or sheet to be wide. Note: you can also make wedge shapes, handy for making paper casts of bowls.
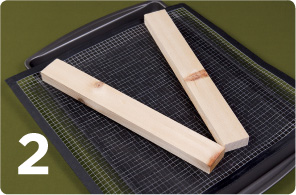
Step 3. Pour or squeeze pulp slowly onto the screen between the boards, to whatever depth desired.
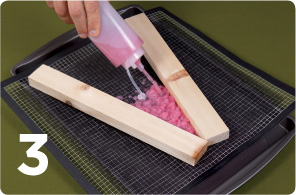
Step 4. Wait for the pulp to drain and then remove the boards.
Step 5. Use a sponge, terrycloth, or paper toweling to remove water from the strips or sheets to a point where they can be handled and applied to a surface or mold.
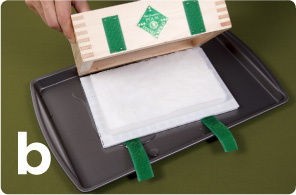
Pulp Sheets and Strips Made with a Deckle
A pour hand mold can be useful for paper casting. A uniform layer of recycled fiber or cotton linter pulp is easily achieved, and that saves a lot of time and effort. Follow the usual steps for papermaking, but increase the amount of recycled fiber to get a thicker pulp layer for casting.
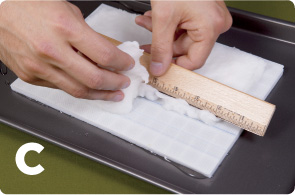
Strips can be torn or pulled from a sheet with the help of a ruler (c) and layered on a mold. They can be laid across the mold, each slightly overlapping the preceding one, until the mold is covered. A second layer can be added at right angles to the first. Strips are an excellent way to build up a paper casting’s thickness.
Holding It All Together
When you cast using strips, a weak spot exists where one strip meets another. Fiber batches do not bond strongly where they touch. Here are some ways to address the problem:
Overlap each layer slightly.
Wet the joints and tease the edges together with a pin or soft brush, or pat with the bristles of a toothbrush.
Hit a joint from either side with a stream of water from a spray bottle. This must be handled deftly and with a delicate touch, or you might damage the casting.
There was one perfect frame on clearance for family wedding pictures when three were needed. A solution? Cast paper frames! For uniform cast thickness and best results, make a sheet of cotton linter pulp.
Materials
Papermaking supplies (see page 25)
36 cotton linter squares
Paper additive (calcium carbonate)
Kitchen butter knife
Textured metal frame
Matte sealer (optional)
Double-stick glue dots or mounting pads
Photo(s) to mount
Instructions
1. Blend the cotton linter squares with ½ teaspoon of paper additive and 4 cups of water. Pour into a 5½″ × 8½″ hand mold. For 8½″ × 11″ deckles, twice as much cotton linter is needed. Repeat blending before forming a sheet.
2. Agitate pulp with fingers to separate fibers. Raise hand mold quickly. Cotton linter clumps (flocks) normally and looks lumpy on the screen. If bare screen can be seen, refloat or reblend and try again.
3. Remove sheet from hand mold. Sponge once over surface to remove water.
4. Use kitchen butter knife to separate sheet into sections sized to lay over sides and top of frame. Pick up sections and place on frame. To bond sections together, overlap where ends meet or pat extra pulp over seams.
5. Use fingers to press cotton linter in frame details. Remove water with sponge, while continuing to work pulp into details.
6. Press and remove as much water as possible. Texture from and details of the design will appear through the back of the cotton linter sheet. A final press with a kitchen towel is a good idea.
7. Tear pulp away from frame edges and center. Set aside to dry.
8. Repeat steps 1 through 7 for additional frames.
9. Optional: Spray a matte sealer over plain or spray-painted casts to offer protection from dust and handling.
Attach frames to matted photographs with glue dots or mounting pads, which work well to attach irregular cast paper to smooth project surfaces. Add dimension by mounting a cast paper frame over a made-to-size cardboard mat covered with recycled or complementary print paper.
Read up on cotton linter (see page 125).
Do not exceed 36 squares in the blender.
Recycled pulp will also work for this project, but additives in manufactured paper may cause pulp to stick. Use a release agent (see page 128).
A pure white, dimensional cast paper surface is beautiful. But you might enjoy experimenting with decorative surface treatments, using a variety of art materials. It’s important to note the following factors can influence the clarity of detail in a paper-cast image: tints and additives in cotton linter pulp, the use of recycled fiber, fixatives or sealers applied to the cast before decoration, or the decorations themselves.
Stuck on You Attach dry paper casts to another paper surface with any household or craft glue. For best results, use double-stick glue dots or mounting pads, which conform to uneven cast surfaces for better adherence.
Here is a list of suggested surface decorations to help you get started. First, use a matte or gloss spray sealer to give casts a better surface for decorative finishes.
Chalk or eye shadow. Apply with foam brush, sponge applicators, or synthetic cotton balls. Use a light touch. Use up those old multicolor eye shadow palettes!
Ink pads. Try small, raised ink pads or dual-color pad markers. Lightly brush across raised details of a cast.
Spray paint. Metallic or monochromatic color can be dramatic. Be sure to read warnings on labels and use in a well-ventilated area.
Acrylic paint. It’s not good for tinting linter, but it’s fine for painting on the surface. It won’t feather, even on an untreated paper cast.
Glitter glue. Highlight raised cast details with iridescent or color glitter glues. Also try glitter glue tinted with watercolor, or lightly color the cast with colored pencil and brush diluted glitter glue over the entire cast.
Spray glitter. When a hint of pearlescence or festive sparkle is needed, try using spray glitter. It may be beneficial to use a surface sealant before applying. Again, check all labels and use in a well-ventilated area.
Gilding/gold leaf. Follow directions on adhesive designed specifically for gilding applications.
Fine-powdered pigments. Create a lustrous metallic or pearlescent finish. These powders must be mixed with another art medium before application. Mix with acrylic matte or gloss medium to create a paint; mix with acrylic matte or gloss medium and a little bit of water for use in a mouth atomizer for a spray finish; or apply with a blending tool by dipping the applicator directly into the container.

All the color techniques from the previous chapters of this book can certainly be applied to paper casting. And, as stated before, the easiest, least expensive, and fastest way to get colored pulp is by recycling color wastepaper with water in a blender. But feel free to pursue any path to colored pulp that your time, interest level, and talent indicate; that’s part of the excitement of the craft and art world.
Casting with Color
In addition to surface decoration or using colored pulp, color can be applied within the cast itself. Some molds’ details may provide walls and dividers to help confine colors to selected areas. Different-colored pulps can be put on and in areas with a turkey baster. Push edges into place with a plastic spatula or similar tool. Removing some water will help stabilize it as adjacent pulp colors are placed. After the colors are laid on, layer a wet pulp patty or newly formed sheet of recycled paper or cotton linter over the entire mold. Use a sponge to press and meld the colored pulp decoration to the wet sheet backing. Experience will bring you greater skill with results you never dreamed possible.
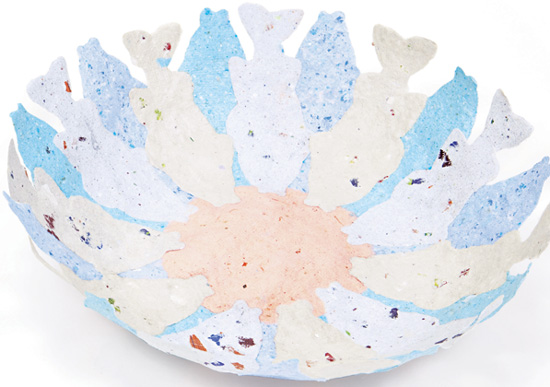
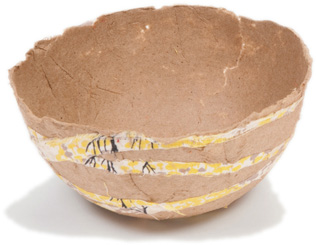
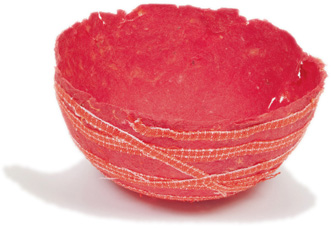
These elegant bowls are cast with fabric strips that are wrapped around the mold and embedded in the pulp. What a great combination of color and technique!
Materials
Papermaking supplies (see page 25)
Bowl to use as a mold
Enough pulp to cover your mold
Vegetable oil for a release agent (spray or apply with a paper towel)
Thin strips of torn fabric
Instructions
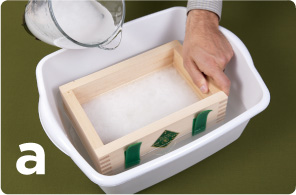
1. Set up the papermaking screen and support screen over a tray or other container for drainage (see page 79).
2. Apply the vegetable oil to the outside of the bowl and set it aside.
3. Prepare the fabric strips by dipping them into pulpy water, and set them aside.
4. Pour pulp onto the screen in a circular shape large enough to cover the outside of the bowl.
5. Place the greased bowl bottom-side down in the center of pulp. Use the papermaking screen to lift the pulp up and onto the mold. Press through the screen with a sponge to shape the pulp against the mold. The pulp will be doubled up and thicker in places where it overlaps, but not to worry. You can even things out as you continue blotting.
6. Turn the bowl bottom side up. Slowly pull up the screen edges and remove it as you work your way around the bowl. Leave the pulp relatively wet for applying fabric.
7. Wrap the fabric around and around the bowl in a spiral. Use the screen and a sponge to press around the bowl, slowly removing as much water as possible. Be careful not to blot too hard, or the pulp might slip on the oily surface. Patch any holes with pieces of wet pulp, and blot again with a sponge. Allow the casting to air dry; if using a glass or ceramic mold, you can dry it in a 150°F oven for an hour or two.
8. When completely dry, release the paper casting from the mold.
These charming little baskets are made in the same way as the bowls, with just a few differences.
Additional Materials
The example was made with a stemless wine glass as the mold
Bits of yarn, feathers, or other embellishments (optional)
Punched out paper flowers (optional)
½″-wide strips of chipboard or scrap cardboard (such as cereal boxes) for handles
Scrapbooking brads
Instructions
1. Follow the same steps as for the bowl, with one exception. If you want embedded materials, such as the feathers, on the outside of the bowl, lay them on the screen before you pour your pulp. If you want them on the inside, like the yarn in the yellow bowl, press them into the pulp after you pour it and before shaping the pulp onto the mold.
2. When the casting is completely dry and removed from the mold, attach any dry embellishments, such as the flower shapes. Brads work well for this, keeping the attachments secure and three-dimensional.
3. Cut the cardboard strips to the length you like for handles. Use a pencil to mark opposite sides of the basket where you want to attach the handles. Use brads to press holes through the basket and then through each end of the cardboard strip, and bend the ends open to secure.

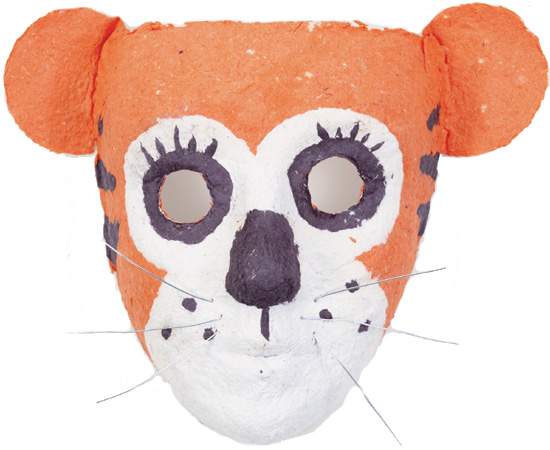
This project is sure to be a hit any time of year. With variations on the ears, this mask can be converted to just about any animal of choice.
Materials
Papermaking supplies (see page 25), including two papermaking screens (use flexible window screen for good drainage)
Enough pulp to cover your mold (orange, white, and black)
Plastic face mask with no embellishments, to use as a mold
Vegetable oil for a release agent (spray or apply with a paper towel)
Round molds, such as tin cans (small, medium, and large, for the eyes and mouth)
Tweezers (optional)
Six pieces of wire for whiskers
Small sharp utility knife or sharp pointed scissors
Hole punch
Strip of ½″ elastic or ribbon, long enough to hold the mask in place
Instructions
1. Set up the papermaking screen and support screen over a tray or other container for drainage.
2. Using orange pulp, pour shapes for the main part of mask and two ears.
3. Place another papermaking screen on top of the pulp and blot with a sponge, but do not flatten completely as you normally would. Leave it a little bit wet, so the pulp is still moldable. Remove the top screen.
4. Coat the outside of the face mask mold with vegetable oil.

5. Use the papermaking screen to lift the orange pulp, turn it over, and place it carefully over the top of the greased mold. Use the second papermaking screen to replace the one you lifted, and set the mask on top of it. Carefully push pulp around with your hands, so that it molds to the shape of the plastic mask, but do not press out all water in the process. Layer the ear shapes on to the sides of the orange base color.
6. Use white pulp to pour white circles — two medium and one large — for the eyes and mouth area. In the same way as the orange pulp, blot and layer the white circles onto the mask mold. Position them carefully and release them from the screen by blotting with a wet sponge.
7. In the same way, use black pulp to pour two small circles for eyes. Blot and layer them onto the mask.
8. Add eyelashes and whisker dots by rolling up pieces of pulp and layering them on to the mask (or use pin-drawing technique, page 94). You may want to use tweezers to move the small bits around.
9. On the papermaking screen, form three triangles in black pulp for each side of the mask. Blot, lift, and layer them in place.
10. Using the screen and a sponge, work your way around the mold, pressing and blotting. Don’t press too hard, or the paper may slip on the greasy surface.
11. Once the shape seems secure and less wet, allow it to air dry. When completely dry, release it from the mold.
12. Press the wires into the mask for whiskers.
13. Use a utility knife or scissors to cut out eye holes in the black circles.
14. Punch a hole on both sides of the mask, below the ears. Thread the elastic through the holes, adjust for size, and tie the ends on both sides of the mask. Or if using ribbon, attach two strips, one on each side, and tie the ends to fit at the back. Put on the mask and grrrrowl!
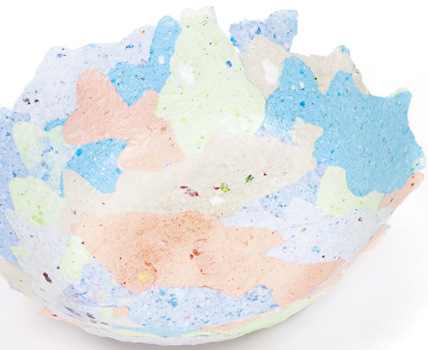
This project uses the self-bonding technique, so there is no need to press or iron dry the fiber fish. A medium-sized plastic bowl makes the best mold, since it is flexible, though metal or glass bowls also will work. You will need to make 20 to 40 handmade paper fish, depending on the size of the bowl you have chosen. You will be using the outside of the bowl as the mold, not the inside. Avoid bowls with prominent rims at the base.
Materials
Six different-colored 8½″ × 11″ papers
Papermaking supplies (see page 25)
Six containers (32 oz. size or greater)
Bowl: choose an eye-pleasing shape (this bowl was 4″ tall with a 10″ diameter)
Clear kitchen plastic wrap
Fish-shaped cookie cutter
Cake pan or tray
Turkey baster
Paper towels
Paintbrush (optional)
Decoupage glue (optional)
Instructions
1. Find wastepaper in six colors you like. For each color of pulp, you will need to recycle an 8½″ × 11″ sized paper sheet. You can mix and match pieces of similarly hued paper to recycle, but the surface area should roughly add up to this.
2. Tear and blend your first color of pulp in the blender with 4 cups of water. Pour the pulp and all of the water into your first container.
3. Repeat step 2 for the remaining five papers, so you have six colors of pulp in your containers.
4. Place your bowl upside down on your work surface and cover the outside of the bowl with clear kitchen plastic wrap. Try to wrap the bowl smoothly, as the wrinkles in the plastic could show up as texture on the inside of your finished fish bowl. Allow several inches of plastic to hang off the rim to make removal of your finished paper bowl easier.
5. Begin making paper fish by placing a papermaking screen on top of your drain rack in a tray. Place the fish-shaped cookie cutter on top of the screen. Depending on the size of your cookie cutter, you may be able to fit two to three fish on a single screen.
6. Use the turkey baster to suction pulp out of one of your containers and then squirt the pulp into the fish cookie cutter. If the cookie cutter is moving around, use your free hand to hold it in place. Fill the cookie cutter ⅛″ deep with pulp.
7. Remove the cookie cutter by pulling straight up. Try not to smear the pulp or decapitate your fish! If there is room on your papermaking screen, create two to three more fish by repeating steps 5 and 6. If you want a contrasting color for the bottom of the bowl, make a circle of pulp to fit.
8. Place the cover screen on top of the fish on the papermaking screen. Use a damp sponge to remove as much water as possible, until the fish peel up easily. Use a paper towel to remove additional water, if necessary.
9. Peel your handmade fish off of the papermaking screen and place the wet paper fish (and the contrasting circle shape, if desired) on the plastic wrap covering the bowl.
10. Repeat steps 6 through 9, overlapping fish and allowing them to point in all directions. Gently press the wet fibers of overlapping fish together with your fingers. Continue until the outside of the bowl is covered with at least two layers of overlapping fish. You can leave several fins or fish lips sticking out along the rim of the bowl for a nice effect. Periodically empty the tray under your draining rack.
11. Let your bowl air dry two to three days (longer in very humid climates), until it is entirely dry. The colors may become less vibrant as the water evaporates from your paper, but as the water is removed, the bonds between your paper bowl’s fibers become stronger and stronger.
12. Pull up on the plastic wrap gently to free your fully dried fish bowl. If you used a plastic bowl for a mold, squeeze the sides of your plastic bowl and have a friend help by pulling on the plastic wrap.
13. Optional: Use a paintbrush and decoupage glue to preserve your bowl. Since the bowl is made of paper, if it gets wet, it could turn back into pulp or lose its shape. The glaze protects your bowl over time. Apply one coat and let dry overnight. Apply an additional coat the next day, if desired.