iOS devices offer standard view controllers for, among other things, taking pictures with the camera and sending email from within your own application. The software ecosystem surrounding your application is extremely rich with such built-in services and applications. You should take advantage of these as much as possible. In this chapter, we’ll look at how you can do that.
Users look for application preferences in two main settings: in the application itself, and in the standard iOS Settings application. For simple applications, applications with few preferences, and applications with preferences that need to be modified regularly, you should keep the preferences within the application itself. However, for more complicated applications, applications with complicated or numerous different preferences, and applications with preferences that the user will rarely have to modify, it’s preferable to use the Settings application.
Warning
Despite it being done in some applications currently for sale on the App Store, Apple advises that you should never split your preferences between the Settings application and a custom settings screen inside your own application. According to Apple, “If you have preferences, pick one solution and use it exclusively.” This is good advice; having multiple places to change settings is confusing not just for the user, but also for you as a developer.
Adding a Preferences panel for your application to the main Settings application is easy. You do this by adding a special Settings.bundle file to your application and then configuring the Root.plist file contained inside the bundle in the Xcode Editor.
When the built-in Settings application launches, it checks each third-party application for the presence of a Settings Bundle. For each bundle it finds, it displays the application’s name and icon on the main page. When the user taps the row belonging to the application, Settings loads the Root.plist Settings Page file and uses that file to display your application’s main page of preferences.
Let’s add a Settings Bundle to the Where Am I? application we wrote in Chapter 10.
Note
Open the Finder and navigate to the location where you saved the latest version of the WhereAmI project. Right-click on the folder containing the project files and select Duplicate. Rename the copy to WhereAmI2. Now open the new version of the project in Xcode and mouse over the blue Project icon at the top of the Project navigator and hit the Enter key, which will make the project name editable. Enter WhereAmI2 as the new project name, and a drop-down will appear, prompting you to approve the changes to the project. Click on Rename when prompted to do so to rename the project.
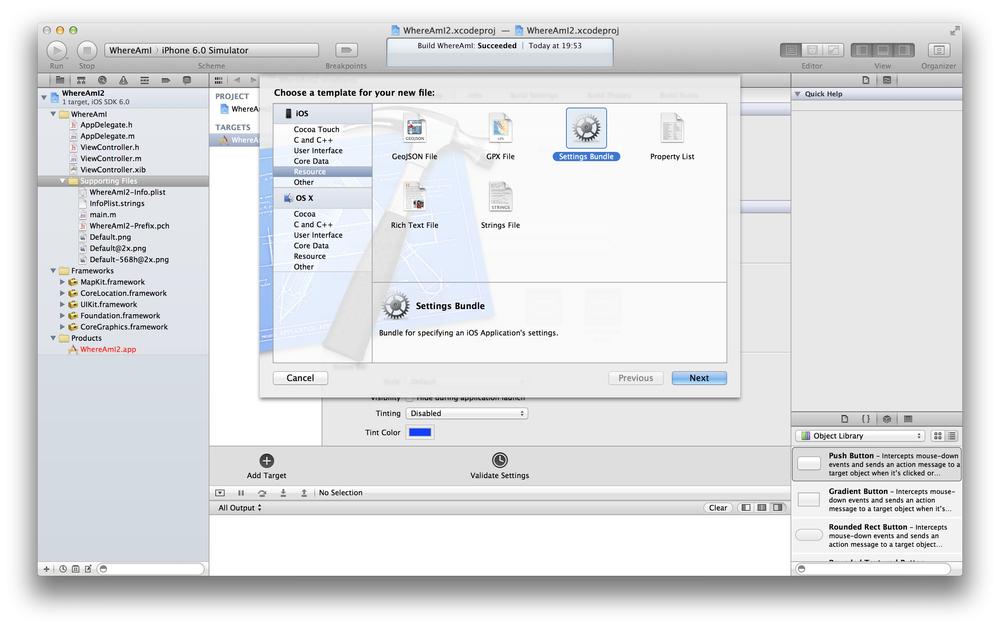
Open the WhereAmI2 project in Xcode, right-click on the Supporting Files group in the Project Navigator panel, and select New File from the menu. In the template chooser window that appears, look at the lefthand panel and select the Resource category in the iOS section, and then select the Settings Bundle from the main panel and click the Next button (see Figure 12-1).
The settings bundle should appear inside the Supporting Files group. If you click the arrow beside it to expand the bundle, you’ll see the Root.plist file that contains an XML description of the settings root page, and an en.lproj directory containing the localized string resource file (for English). You can add further localizations to your Settings Bundle if needed. Click the Root.plist file to open it in the editor and expand the Preference Items, and you should see something like Figure 12-2.

As you can see, the default Settings Bundle contains some example settings. Click the Run button in the Xcode toolbar to build and deploy the application into iPhone Simulator. Tap the simulator’s Home button to quit the application, and then find the Settings application on the Home screen. Tap the Settings application to open it, and you should see something similar to Figure 12-3.
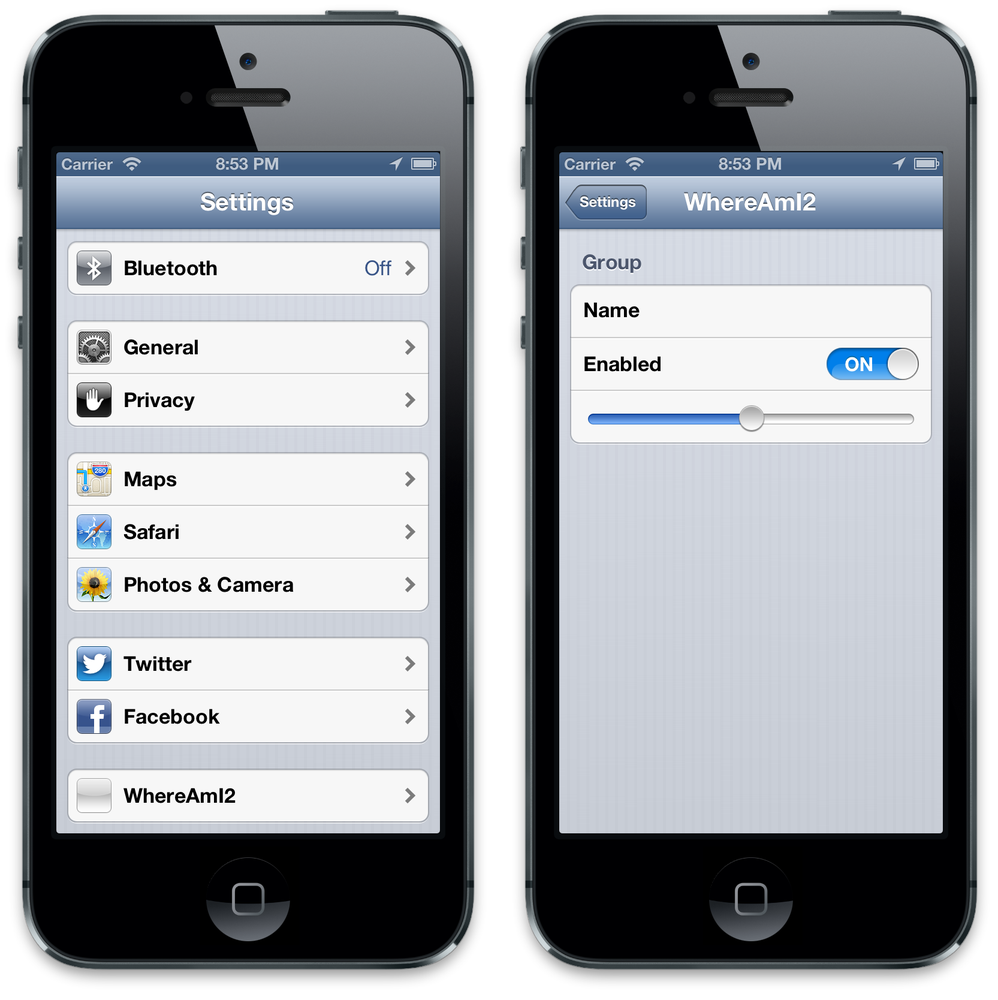
Figure 12-3. The simulator Settings application (left) with the default Settings Bundle we added to the Where Am I? application (right)
Since we haven’t added an icon to the application [see the section on Adding an Icon in the next chapter], the space to the left of the WhereAmI entry has a blank icon; if we had added an icon, it would be displayed next to our application name. If you now tap the WhereAmI entry, you’ll be presented with the default Preferences pane generated from the Settings Bundle.
Note
If a file called Icon-Settings.png (a 29×29-pixel image) is located at the top level of your application’s bundle directory (drag it into the top level of your project under Groups & Files and check the box to copy the item), that icon is used to identify your application preferences in the Settings application. If no such image is present, the Settings application uses a scaled-down version of your application’s icon file instead. See the next chapter for more details about adding Icons to your project.
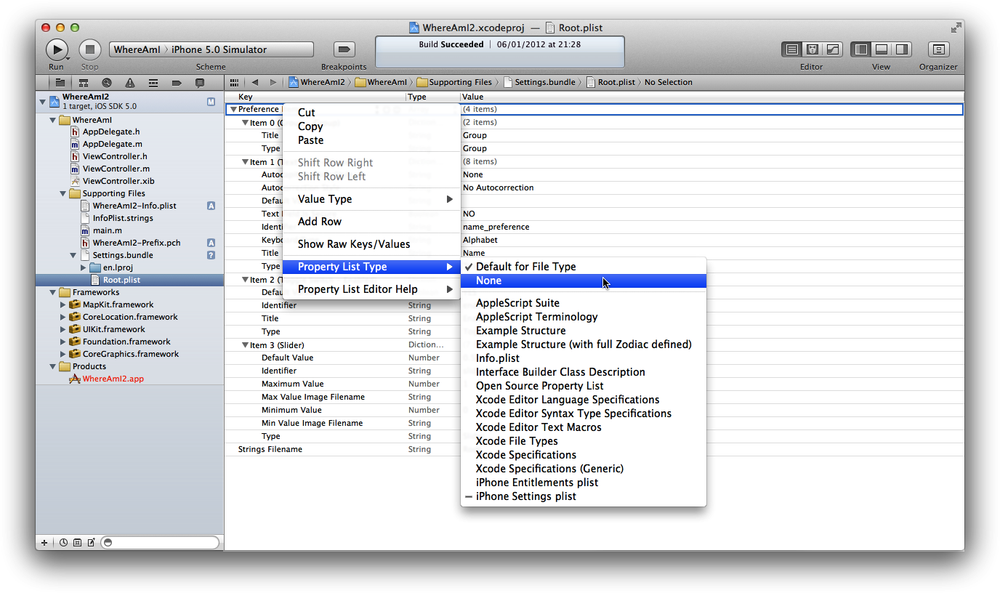
Returning to Xcode, click the Root.plist file inside Settings.bundle to open it in the Xcode Editor, and you’ll see the property list description of the Settings page. Like any property list file, Xcode by default displays the Root.plist file as a key-value pair list. However, you can see the raw XML of the Root.plist property list by right-clicking on the Preference Items key and selecting Property List Type→None (see Figure 12-4).
If you compare Figures 12-2 and 12-3, you can see how the property list file compares to the rendered user interface:
-
Item 0 (
PSGroupSpecifier) is a group label whose value is the stringGroup. -
Item 1 (
PSTextFieldSpecifier) is a text label whose value is the stringName. -
Item 2 (
PSToggleSwitchSpecifier) is a toggle switch labeled “Enabled” with a default value of YES. -
Item 3 (
PSSliderSpecifier) is a slider bar with a minimum value of 0, a maximum value of 1, and a default value of 0.5.
Each interface element in the Settings panel is an item described in the Preference Items array. There are six possible property list keys:
-
Group (
PSGroupSpecifier) -
Title (
PSTitleValueSpecifier) -
Text Field (
PSTextFieldSpecifier) -
Toggle Switch (
PSToggleSwitchSpecifier) -
Multi Value (
PSMultiValueSpecifier) -
Slider (
PSSliderSpecifier)
Additionally, although we won’t go into it here, you can point to Child Preference panes (additional settings pages) using the Child Pane (PSChildPaneSpecifier) property list key.
But let’s modify the default property key list provided by Xcode.
Click on Item 3 and press the Backspace key to delete it from the property list file, then do the same for Item 1. You should be left with a Group and a Toggle Switch.
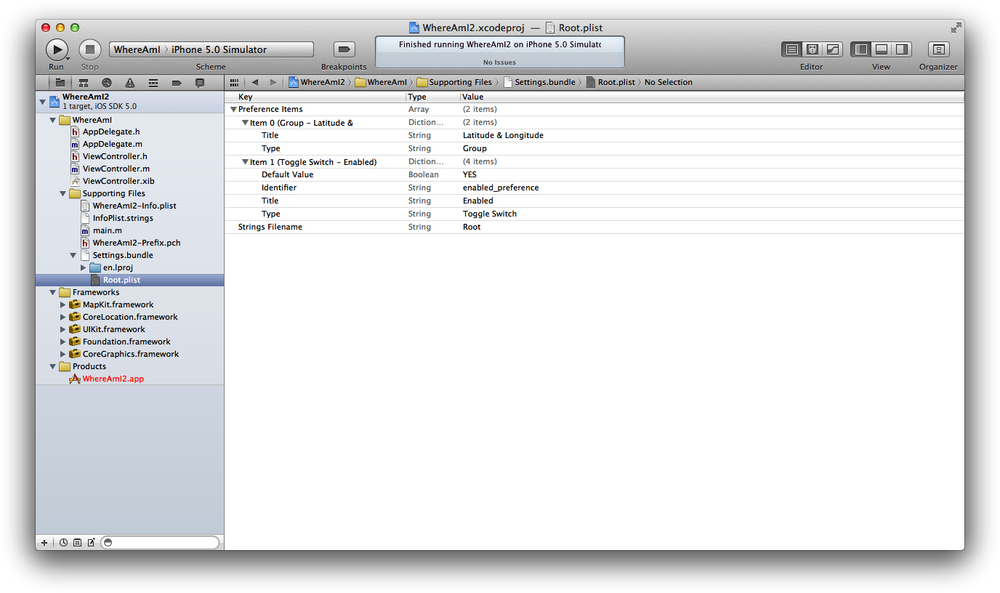
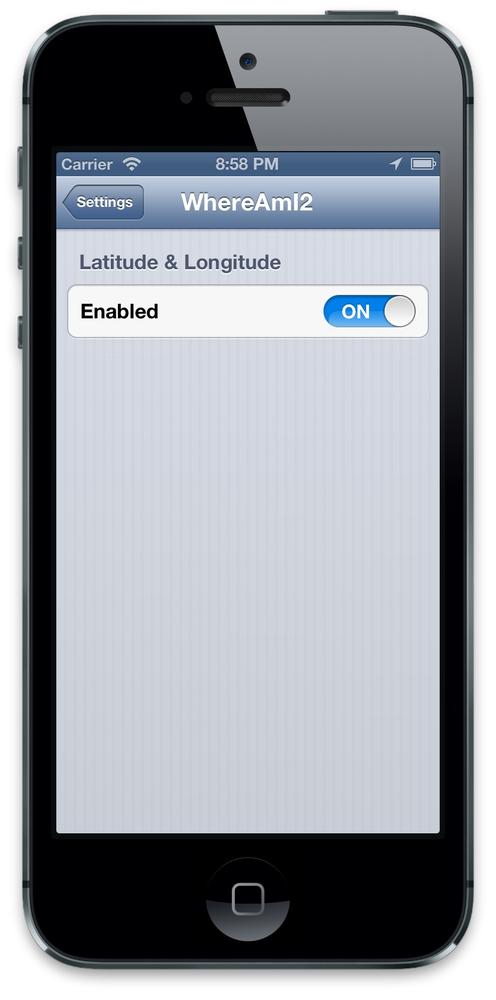
Rename the Group: under Item 0, double-click on the Title property’s value and enter Latitude & Longitude. Keep the Toggle Switch unmodified. After doing this, the Root.plist file should resemble Figure 12-5.
Make sure you’ve saved your changes to the Root.plist file and click the Run button in the Xcode toolbar. Once the application has started, tap the Home button and make your way to the Settings application. Tap the WhereAmI preference entry, and you should now see something closely resembling Figure 12-6. We’re going to use the Preference pane to toggle whether we want the application to display the latitude and longitude on the screen when it displays our map.
Note
When you run your application in Simulator, it stores preference values for your applications in your home directory. The preferences are saved in ~/Library/Application Support/iPhone Simulator/<VERSION>/Applications/<APP_ID>/Library/Preferences, where <VERSION> is the revision of the operating system the simulator is running (e.g., 5.0) and <APP_ID> is a randomly generated directory name. Each time Xcode performs a clean install of your application, any previous version of the application’s preferences will be deleted.
Return to Xcode and click on the AppDelegate.m file to open it in the Xcode Editor. Now add the following class method, which initializes the default settings for the application:
+ (void)initialize {
    NSUserDefaults *defaults = [NSUserDefaults standardUserDefaults];
    NSDictionary *defaultsToRegister =
       [NSDictionary dictionaryWithObject:@"YES" forKey:@"enabled_preference"];
   [defaults registerDefaults:defaultsToRegister];
   [defaults synchronize];
}
If your user has already accessed the application’s settings inside the Settings application before running the application, the default settings will already have been initialized. If this has not been done, the values will not exist and will be set to nil (or in the case of Booleans, to NO). As the application delegate is loaded, this method initializes the user defaults (the initialize: message is sent to each class before it receives any other messages).
Using this method to set the defaults has the unfortunate side effect that you have to specify your defaults in two places: in the Root.plist file, where they properly belong, and in your application delegate, where they don’t.
The right way to deal with this problem is to read in the defaults from the Settings.bundle file, which is stored as part of your application. To do this, replace the initialize: method with the following:
+ (void)initialize {
    NSUserDefaults *defaults = [NSUserDefaults standardUserDefaults];
    NSString *settingsBundle =
      [[NSBundle mainBundle] pathForResource:@"Settings" ofType:@"bundle"];
    NSDictionary *settings =
      [NSDictionary dictionaryWithContentsOfFile:
         [settingsBundle stringByAppendingPathComponent:@"Root.plist"]];

    NSArray *preferences = [settings objectForKey:@"PreferenceSpecifiers"];
    NSMutableDictionary *defaultsToRegister =
      [[NSMutableDictionary alloc] initWithCapacity:[preferences count]];

    [defaults registerDefaults:defaultsToRegister];
    [defaults synchronize];

}
If your application preferences don’t exist when your application is launched, you can therefore read the values directly from the Settings.bundle file rather than having to store the defaults in two places.
You can check that your preference bundle is working correctly by adding the following into the application delegate’s applicationDidFinishLaunching:withOptions method and looking in the Debug area after the application launches. Add the lines shown in bold:
- (BOOL)application:(UIApplication *)application
    didFinishLaunchingWithOptions:(NSDictionary *)launchOptions {

    self.window =
        [[UIWindow alloc] initWithFrame:[[UIScreen mainScreen] bounds]];

    NSUserDefaults *defaults = [NSUserDefaults standardUserDefaults];
    BOOL enabled = [defaults boolForKey:@"enabled_preference"];
    NSLog(@"enabled = %d", enabled);

    self.locationManager = [[CLLocationManager alloc] init];
    if ( [CLLocationManager locationServicesEnabled] ) {
        self.locationManager.delegate = self;
        self.locationManager.distanceFilter = 1000;
        [self.locationManager startUpdatingLocation];
    }

    self.viewController = [[ViewController alloc] initWithNibName:
        @"ViewController" bundle:nil];
    self.window.rootViewController = self.viewController;
    [self.window makeKeyAndVisible];
    return YES;
}
We may have working preferences, but they don’t do anything yet. Let’s change that right now. Click on the ViewController.h interface file to open it in the Xcode Editor, and add the following outlets (shown in bold) to the declaration (inside the curly braces of the @interface block):
#import <UIKit/UIKit.h>
#import <MapKit/MapKit.h>
#import <CoreLocation/CoreLocation.h>

@interface ViewController : UIViewController {
    IBOutlet UIButton *backgroundButton;
    IBOutlet UILabel *latLabel;
    IBOutlet UILabel *longLabel;
}

@property (strong, nonatomic) IBOutlet MKMapView *mapView;
@property (strong, nonatomic) IBOutlet UILabel *latitude;
@property (strong, nonatomic) IBOutlet UILabel *longitude;

@end
There is no need to make them properties.
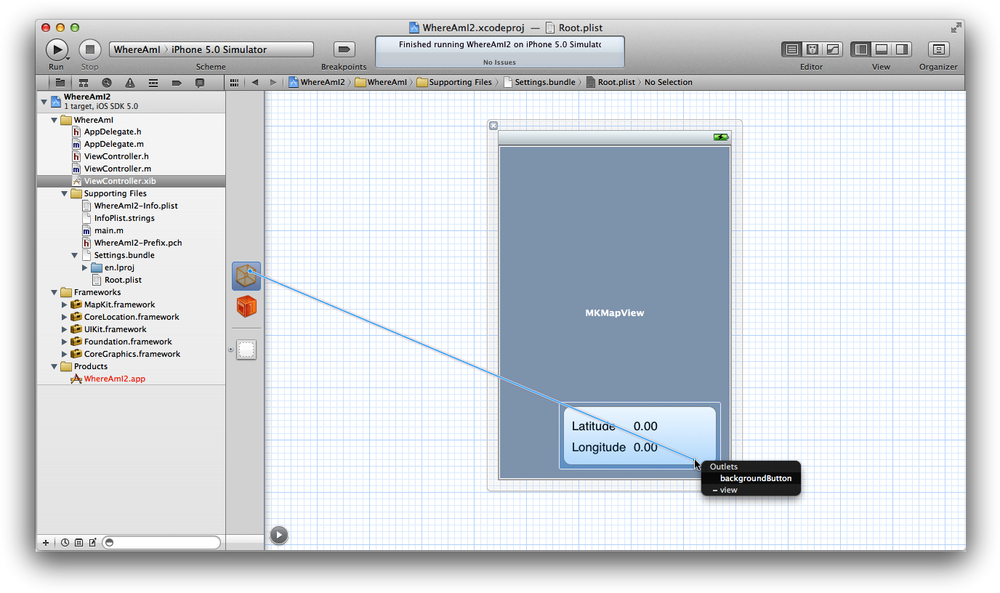
Click the ViewController.xib nib file to open it in Interface Builder. Right-click and drag from File’s Owner to connect the backgroundButton outlet to the UIButton we used as a background for the labels, as shown in Figure 12-7; then connect the latLabel and longLabel outlets to the “Latitude” and “Longitude” UILabel elements, respectively.
Save your changes to the nib file and return to Xcode. Then click on the ViewController.h interface file to open it in the editor, and add the following method declaration:
#import <UIKit/UIKit.h>
#import <MapKit/MapKit.h>
#import <CoreLocation/CoreLocation.h>

@interface ViewController : UIViewController {
    IBOutlet UIButton *backgroundButton;
    IBOutlet UILabel *latLabel;
    IBOutlet UILabel *longLabel;
}

@property (strong, nonatomic) IBOutlet MKMapView *mapView;
@property (strong, nonatomic) IBOutlet UILabel *latitude;
@property (strong, nonatomic) IBOutlet UILabel *longitude;

- (void)updateFromDefaults;

@end
Then in the corresponding ViewController.m file, to open it in the Xcode Editor, add the implementation:
- (void)updateFromDefaults {
    NSUserDefaults *defaults = [NSUserDefaults standardUserDefaults];
    [defaults synchronize];

    if ( [defaults boolForKey:@"enabled_preference"] ) {
        backgroundButton.hidden = NO;
        latLabel.text = @"Latitude";
        longLabel.text = @"Longitude";
    } else {
        backgroundButton.hidden = YES;
        latLabel.text = @"";
        longLabel.text = @"";
    }
}
and add a viewWillAppear: method:
- (void)viewWillAppear:(BOOL)animated {
    [self updateFromDefaults];
    [super viewWillAppear:animated];
}
This method checks the application preferences to see if Latitude & Longitude are enabled. If they are, we set the text of the labels appropriately and make sure the button is visible. Correspondingly, if Latitude & Longitude are disabled, we hide the button and empty both strings.
The viewWillAppear: method will be called before our view is made visible to the user; however, if the user goes off and takes a phone call, or makes a change to the application’s settings, and then switches back to your application, this method will not be called again. As far as the application is concerned, this view was always visible and has never disappeared. We therefore also must call the updateFromDefaults method from our application delegate in the applicationWillEnterForeground: method.
Open the AppDelegate.m file and add the following call:
- (void)applicationWillEnterForeground:(UIApplication *)application {
    [self.viewController updateFromDefaults];
}
We also need to make a small change to the locationManager:didUpdateToLocation:fromLocation: method. Here we have to stop the application from printing the current latitude and longitude to the screen if Latitude & Longitude are disabled via preferences. Add the lines shown in bold (wrapping the two existing assignments):
- (void)locationManager:(CLLocationManager *)manager
    didUpdateToLocation:(CLLocation *)newLocation
           fromLocation:(CLLocation *)oldLocation {

    double miles = 12.0;
    double scalingFactor =
      ABS( cos(2 * M_PI * newLocation.coordinate.latitude /360.0) );

    MKCoordinateSpan span;
    span.latitudeDelta = miles/69.0;
    span.longitudeDelta = miles/( scalingFactor*69.0 );

    MKCoordinateRegion region;
    region.span = span;
    region.center = newLocation.coordinate;

    [self.viewController.mapView setRegion:region animated:YES];
    self.viewController.mapView.showsUserLocation = YES;

    NSUserDefaults *defaults = [NSUserDefaults standardUserDefaults];
    [defaults synchronize];

    if ( [defaults boolForKey:@"enabled_preference"] ) {
        self.viewController.latitude.text =
          [NSString stringWithFormat:@"%f", newLocation.coordinate.latitude];
        self.viewController.longitude.text =
         [NSString stringWithFormat:@"%f", newLocation.coordinate.longitude];
    } else {
        self.viewController.latitude.text = @"";
        self.viewController.longitude.text = @"";
    }
}
This brackets the lines that set the text of the UILabel elements with an if() block; we set the text of the labels only if Latitude & Longitude are enabled in the preferences.
We’re done here. Make sure all of your changes have been saved, and click the Run button in the Xcode toolbar to compile and deploy your application into iPhone Simulator.
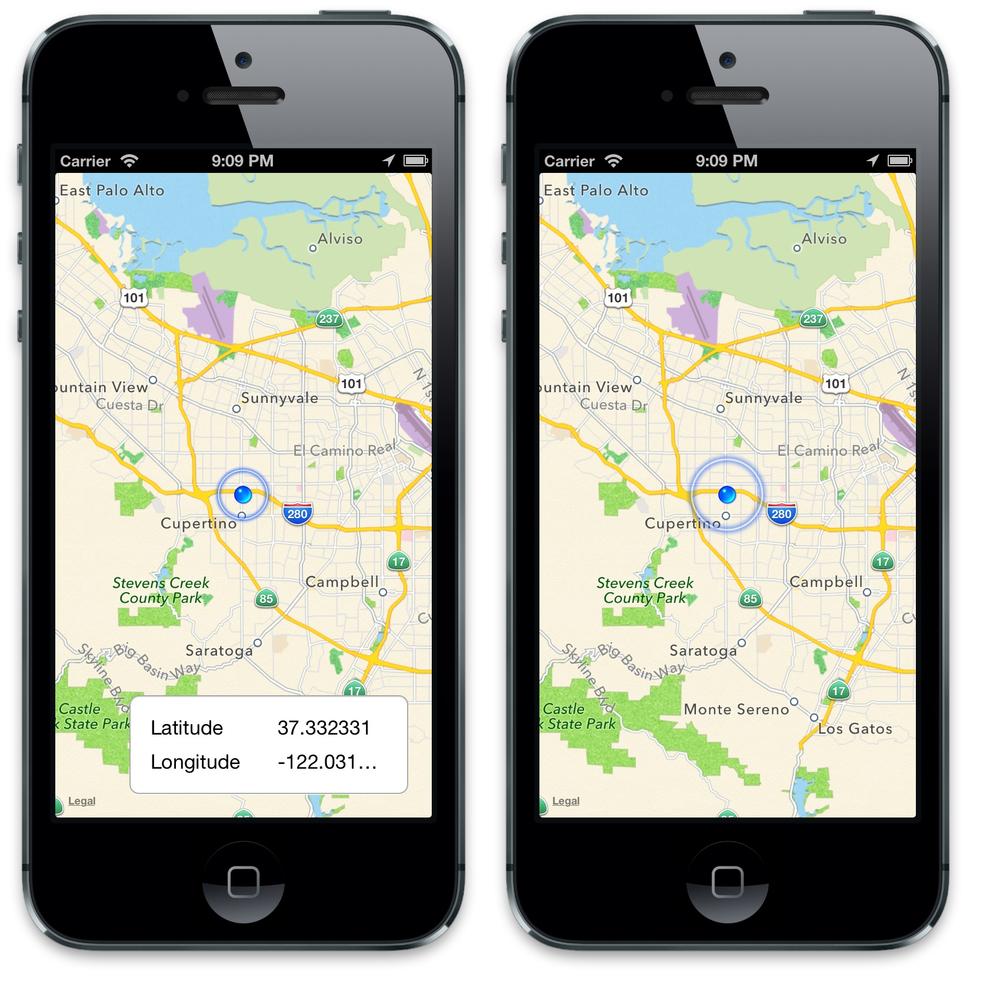
By default, the Latitude & Longitude display is enabled, so everything should appear as before. However, if you disable Latitude & Longitude in Settings and relaunch the Where Am I? application, you’ll see that Latitude & Longitude has disappeared, as shown in Figure 12-8.
The Accounts framework (Accounts.framework) provides a single sign-on model for user accounts. Originally the framework only supported Twitter accounts; however, it is generic, and was built so that Apple can easily add additional account types at a later date without affecting existing code. They duly did so with the arrival of iOS6 and the addition of support for Facebook and Weibo accounts.
Note
The Accounts framework was introduced with the arrival of iOS 5, hand in hand with the now deprecated Twitter framework.
Single sign-on improves the user experience, because applications no longer need to prompt a user separately for login information related to an account. It also simplifies development for sign-on to manage the account authorization process for your application. You can use this framework in conjunction with the Twitter framework to access a user’s Twitter account, and you no longer have to include code to handle OAuth or xAuth in your own application.
We can query and store accounts in the account database using the ACAccountStore class, which is part of the Accounts framework.
Note
To use the Accounts and Social frameworks, we need to add them to the project. Click the Project icon at the top of the Project Navigator panel in Xcode, then click the main Target for the project, and then on the Build Phases tab. Finally, click the Link Binary with Libraries item to open up the list of linked frameworks, and click the + symbol to add the frameworks.
Calling the requestAccessToAccountsWithType:withCompletionHandler: method on the store will present a dialog to the user confirming whether the application should have access to the accounts of this type. If granted, the application has access to protected properties of and operations on all accounts of the type specified.
ACAccountStore *account = [[ACAccountStore alloc] init];
ACAccountType *accountType = [account accountTypeWithAccountTypeIdentifier:
ACAccountTypeIdentifierTwitter];
[account requestAccessToAccountsWithType:accountType
withCompletionHandler:^(BOOL granted, NSError *error) {
if (granted == YES){
NSArray *array = [account accountsWithAccountType:accountType];
NSLog(@"%@",array);
}
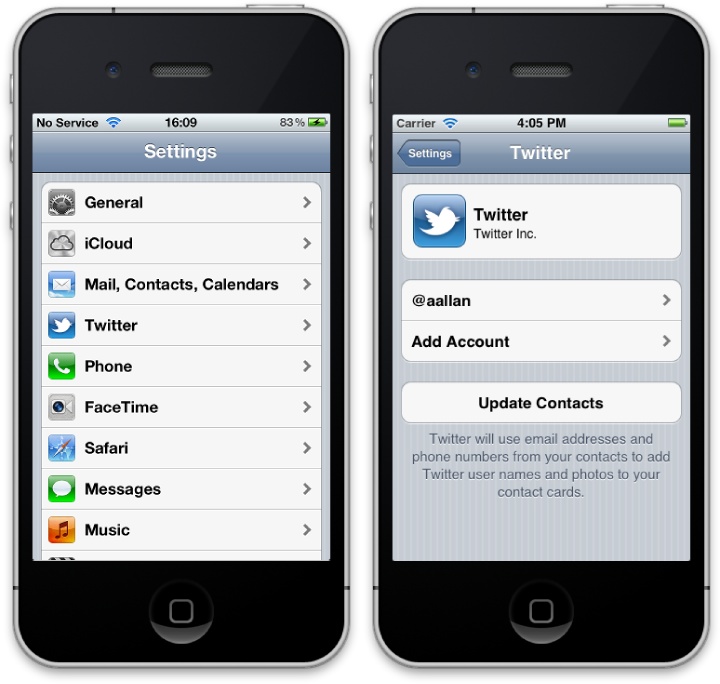
}];If there are no registered accounts of the requested type in the accounts database, then the returned accounts array will be nil. You can add accounts to the database using the Twitter and Facebook panels in the Settings application (see Figure 12-9).
We’ve already looked at the Social framework earlier in the book where we built a simple table view-based application to retrieve the list of trending topics on Twitter (see Chapter 8). As I mentioned there, that’s not the only thing the Social framework can do; much as the standard view controller can send email, the standard modal view controller allows you to send tweets and post to Facebook.
Let’s recycle our Prototype application one more time.
Right-click or Control-click on the folder containing the project files and select Duplicate. Rename the copied folder to Prototype4. Now open the new version of the project in Xcode and mouse over the blue Project icon at the top of the Project navigator and hit the Enter key, which will make the project name editable. Enter Prototype4 as the new project name, and a drop-down will appear prompting you to approve the changes to the project. Click Rename when prompted to rename the project.
Next, prune back the code:
- Open the copy of the project in Xcode and delete the WebViewController.h, WebViewController.m, and WebViewController.xib files by right-clicking on each file in the Project Navigator panel and selecting Delete from the pop-up menu (rather than Remove References Only).
-
Now click the ViewController.m file to open it in the editor. Delete the line where you import the WebViewController.h file and delete all the code in the
pushedGo:method, but not the method itself. -
At this point, we have just the stub of the application, with that Go button and associated
pushedGo:method we can use to trigger the display of our tweet composer view.
Add the Social framework to the project. Then click on the ViewController.m implementation file to import the framework into the class:
#import <Social/Social.h>
and add the following code to the pushedGo: method:
- (IBAction)pushedGo:(id)sender {
SLComposeViewController *socialComposer;
if ( [SLComposeViewController isAvailableForServiceType:
SLServiceTypeTwitter] ) {
socialComposer =
[SLComposeViewController
composeViewControllerForServiceType:SLServiceTypeTwitter];
[socialComposer addImage:[UIImage imageNamed:@"oreilly_logo.gif"]];
[socialComposer
addURL:[NSURL URLWithString:@"http://learningiphoneprogramming.com/"]];
[socialComposer
setInitialText:@"A tweet from an iOS app and the Twitter framework."];
}
socialComposer.completionHandler = ^(SLComposeViewControllerResult result){
NSString *msg;
if (result == SLComposeViewControllerResultCancelled) {
msg = @"Tweet compostion was canceled.";
} else if (result == SLComposeViewControllerResultDone) {
msg = @"Tweet composition completed.";
}
UIAlertView* alertView =
[[UIAlertView alloc] initWithTitle:@"Tweet Status"
message:msg
delegate:nil
cancelButtonTitle:@"Okay"
otherButtonTitles:nil];
[alertView show];
[self dismissViewControllerAnimated:YES completion:nil];
};
[self presentViewController:socialComposer animated:YES completion:nil];
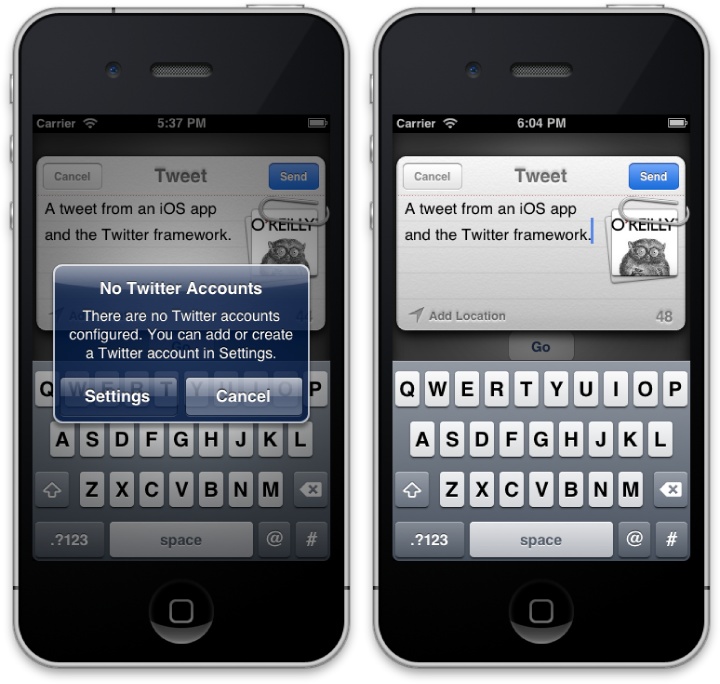
}Before running the code, you’ll need to configure a Twitter account (see Figure 12-9 again). If you skip this step, you’ll see the dialog (on the left) in Figure 12-10; otherwise, you’ll see the standard tweet view controller (right).
One of the more interesting features provided by the SDK is the ability for your application to use custom URL schemes to launch other applications, and in turn, to register custom URL schemes of its own. These schemes can be used to launch your application, either from the browser or from another application on the device. Additionally, such schemes are not just limited to launching the application; you can pass additional information to your application via the URL.
Most of the built-in applications Apple provides respond to custom URL schemes; for example, the Maps, Mail, YouTube, iTunes, and App Store applications will all open in response to custom URLs. However, there are also many established third-party applications with published URL schemes that you can use in your own application.
Note
At the time of this writing, a fairly extensive list of URL schemes for third-party iPhone applications was available at handleOpenURL.
You can easily trigger a telephone call from your application by using the tel: URL scheme:
NSString *string = @"tel:+19995551234";
NSURL *url = [NSURL URLWithString:string];
[[UIApplication sharedApplication] openURL:url];
NSURL *url = [NSURL URLWithString:string];
[[UIApplication sharedApplication] openURL:url];With the arrival of iOS 5, the Settings application acquired a custom URL scheme. Before this, it wasn’t possible to open the Settings application at a specific page:
NSString *string = @"prefs:root=AIRPLANE_MODE";
NSURL *url = [NSURL URLWithString:string];
[[UIApplication sharedApplication] openURL:url];
If the Settings page you want to open has subpages, you can use strings of the form prefs:root=General&path=Bluetooth to access them.
Regardless of what you intend to do after a custom URL launches your application, you must first register your custom scheme using your application’s CityGuide-Info.plist file. Let’s do that for our City Guide application.
Note
You can choose any of the versions of the City Guide application we’ve worked on so far for this addition. I’m going to be using the version from Chapter 8, which was backed by a SQLite database.
Open the project in Xcode and click on its CityGuide-Info.plist file to open it in the Standard Editor. Right-click the top row’s Information Property List and select Add Row (see Figure 12-11).

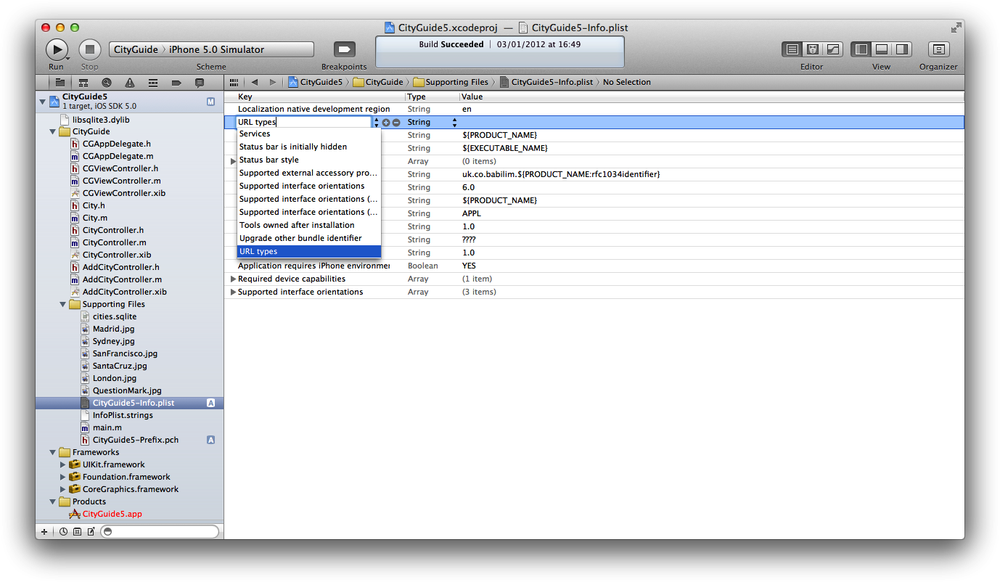
A row will be added and you’ll be prompted to select a key from a drop-down menu. Scroll to the bottom and select “URL types” (see Figure 12-12).
This will create an array key item, so click the disclosure triangle next to “URL types” to expand it.
Click on Item 0 to expand it to show the URL identifier line. The value for this can actually be anything, but it’s normal to use the Bundle Identifier, so double-click the Bundle Identifier value to select it and then copy the identifier string. Then double-click the field to the right of the URL identifier and paste it into the box.
Now right-click on Item 0, and select Add Row. You’ll be presented with a shorter drop-down of possible values; this time select URL Schemes. This will create an array key item. Expand it, double-click the value box for its Item 0, and enter cityguide.
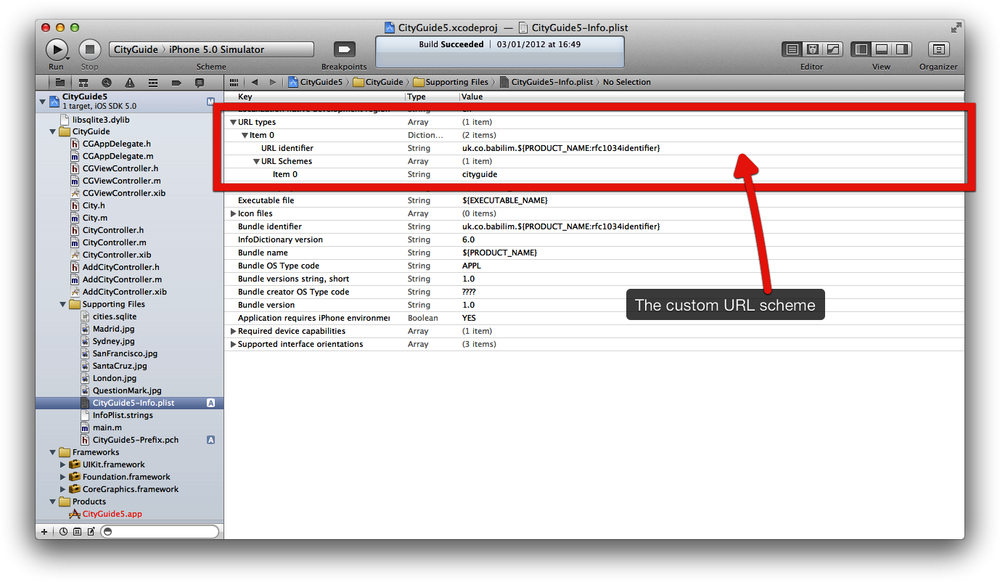
If you’ve followed the procedure correctly, your Info.plist file should now look like mine does in Figure 12-13. We’re done; adding a custom URL scheme to your application really is that easy.
Of course, now that we’ve added the custom URL scheme, we need to modify our application code so that it knows what to do with it. We’re going to modify the City Guide application to take URLs of the form cityguide://<City Name> and open the relevant city page (e.g., the London page for cityguide://London).
Warning
If two different applications register with the same URL scheme, the most recently installed application will be the one that responds to custom URLs conforming to the URL scheme.
If you have separate (i.e., non-universal) applications for the iPhone and the iPad, you should not use the same URL scheme for both applications. If both are installed on the same iOS device, deleting the second application registered against the scheme means that the first application will also no longer be recognized as a responder and the first application will not be registered against it.
To be clear, there is no real way to work around this problem, except by picking a unique URL scheme name and hoping other app developers don’t pick the same one as you.
We really need to make only a few changes to the City Guide application to implement handling custom URL schemes.
If your application is not running when another application requests it to open a custom URL, then an application:didFinishLaunchingWithOptions: message is sent, which includes a UIApplicationLaunchOptionsURLKey key in the launch options. If the application is already running, and backgrounded by the operating system, then the application:openURL:sourceApplication:annotation: method is invoked in the application delegate. If this method is not implemented, then the deprecated application:handleOpenURL: method is called.
Click the CGAppDelegate.m implementation file to open it in the Xcode Editor, and add the following methods:
- (BOOL)application:(UIApplication *)application
            openURL:(NSURL *)url
  sourceApplication:(NSString *)sourceApplication annotation:(id)annotation {

    return [self application:application handleOpenURL:url];
}

- (BOOL)application:(UIApplication *)application handleOpenURL:(NSURL *)url {
    [self.viewController displayCityNamed:[url host]];
    return YES;
}Additionally, you should add the following code to the application:didFinishLaunching WithOptions: method:
- (BOOL)application:(UIApplication *)application
   didFinishLaunchingWithOptions:(NSDictionary *)launchOptions {

    self.window = [[UIWindow alloc] initWithFrame:[[UIScreen mainScreen] bounds]];

    self.cities = [[NSMutableArray alloc] init];
    NSString *filePath = [self copyDatabaseToDocuments];
    [self readCitiesFromDatabaseWithPath:filePath];

    self.viewController =
      [[CGViewController alloc] initWithNibName:@"CGViewController" bundle:nil];
    self.navController = [[UINavigationController alloc]
    initWithRootViewController:self.viewController];
    self.window.rootViewController = self.navController;
    [self.window makeKeyAndVisible];

    // If the UIApplicationLaunchOptionsURLKey is present,
    // we have been launched with a URL
    if ( [launchOptions objectForKey:UIApplicationLaunchOptionsURLKey] != nil ) {
        NSURL *url =
         (NSURL *)[launchOptions valueForKey:UIApplicationLaunchOptionsURLKey];
        if([[[UIDevice currentDevice] systemVersion] hasPrefix:@"3.2"]) {
            [self application:application handleOpenURL:url];
        }
    }

    return YES;
}
Save your changes and then click the CGViewController.h interface file. Here, we need to declare the displayCityNamed: method:
- (void)displayCityNamed:(NSString *)name;
Then, in the corresponding CGViewController.m implementation file, add the method:
- (void)displayCityNamed:(NSString *)host {

    NSIndexPath *indexPath;
    for( int i = 0; i < cities.count; i++ ) {
        City *thisCity = [cities objectAtIndex:i];
        if( [thisCity.cityName isEqualToString:host] ) {
            indexPath = [NSIndexPath indexPathForRow:i inSection:0];
        }
    }

    // Begin debugging code
    UIAlertView *alert =
                  [[UIAlertView alloc]
                     initWithTitle:host
                     message:[NSString stringWithFormat:
                        @"indexPath = %@", indexPath]
                     delegate:nil
                     cancelButtonTitle:nil
                     otherButtonTitles:@"OK", nil];
    [alert show];
    // End debugging code

    CityController *city = [[CityController alloc] initWithIndexPath:indexPath];

    CGAppDelegate *delegate =
    (CGAppDelegate *)[[UIApplication sharedApplication] delegate];
    [delegate.navController pushViewController:city animated:NO];
}-
Displaying the
UIAlertViewis purely for debugging purposes to give some feedback. We’re using it because the Debugger console is unavailable, since the application is started by clicking a URL rather than by running under Xcode. It’s not integral to handling the custom URL scheme, and once you understand what’s going on, you can delete this section of the code.
We’re done. Click the Run button to compile and deploy the application into iPhone Simulator. Once the application is launched, quit the application by clicking the Home button and navigate to Safari. Click on the address bar, enter cityguide://London, and click the Go button (or tap the Return key).
If all goes well, Safari should background and the City Guide application will launch. Soon afterward, you should see something similar to Figure 12-14.
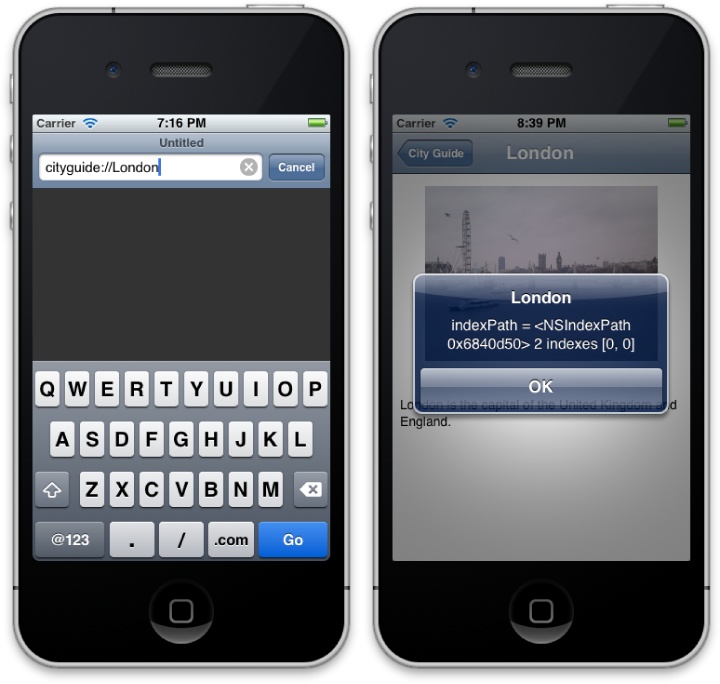
Figure 12-14. Opening the City Guide application from Safari (left) and the City Guide after it opens with the debug UIAlertView visible (right)
This doesn’t work only in Safari; we can now open the City Guide application from other applications using the following snippet of code:
NSString *string = @"cityguide://London";
NSURL *url = [NSURL URLWithString:string];
[[UIApplication sharedApplication] openURL:url];In much the same way as the standard view controllers for picking images and sending email and tweets, Apple has provided a standard way to select and play back iPod media inside your own application.
Warning
The MPMediaPickerController and associated classes make use of the iPod library; this is not present in iPhone Simulator and will work correctly only on the device itself.
However, things are a little bit more complicated than the other cases we’ve looked at; here, we use an MPMediaPickerController that, via the MPMediaPickerControllerDelegate protocol, returns an MPMediaItemCollection object containing the media items the user has selected, and that can be played using an MPMusicPlayerController object.
Note
These picker classes are provided by the Media Player framework; if you want to use them, you must add the Media Player framework to your project in the normal way.
Let’s reuse the Prototype application. Open the Finder and navigate to the location where you saved the Prototype project. Right-click the folder containing the project files and select Duplicate; a folder called Prototype copy will be created containing a duplicate of the project. Rename the folder PrototypePlayer, and just as we did in Chapter 7, prune the application down to the stub with the Go button and associated pushedGo: method that we’ll use to trigger the display of our media player.
Note
To prune the Prototype application down to the stub, you will need to:
- Delete the WebViewController.h, WebViewController.m, and WebView.xib files from your project.
-
Remove the
#import
          "WebViewController.h"
line from ViewController.m. -
Delete the current body of the
pushedGo:method.
Next, open the ViewController.h interface file, import the Media Player framework into the interface (.h) files, and declare your class as an MPMediaPickerControllerDelegate:
#import <UIKit/UIKit.h>
#import <MediaPlayer/MediaPlayer.h>

@interface ViewController : UIViewController <MPMediaPickerControllerDelegate>

@property (weak, nonatomic) IBOutlet UIButton *goButton;

- (IBAction)pushedGo:(id)sender;

@end
Save your changes, and open the ViewController.m implementation file. In the pushedGo: method, instantiate an MPMediaPickerController object and present its view modally to the user:
-(IBAction) pushedGo:(id)sender {
   MPMediaPickerController *mediaPicker =
      [[MPMediaPickerController alloc]
        initWithMediaTypes: MPMediaTypeAnyAudio];
   mediaPicker.delegate = self;
   mediaPicker.allowsPickingMultipleItems = YES;
   [self presentViewController:mediaPicker animated:YES completion:nil];
}
Now implement the following two delegate methods:
- (void) mediaPicker:(MPMediaPickerController *) mediaPicker
  didPickMediaItems:(MPMediaItemCollection *) userMediaItemCollection
{
    [self dismissViewControllerAnimated:YES completion: nil];

    MPMusicPlayerController *musicPlayer =
      [MPMusicPlayerController applicationMusicPlayer];
    [musicPlayer setQueueWithItemCollection: userMediaItemCollection];
    [musicPlayer play];
}

- (void) mediaPickerDidCancel: (MPMediaPickerController *) mediaPicker {
    [self dismissModalViewControllerAnimated: YES];
}Like the UIImagePickerControllerDelegate methods we met earlier in the book, these two methods are used to dismiss the view controller and handle the returned items.
Note
Save your changes, and click on the Run button in the Xcode toolbar to build and deploy your code. Remember that you’ll need to configure your project [see the section Putting the Application on Your iPhone in Chapter 3] to allow you to deploy the application onto your iPhone or iPod touch so that you can test the application on your device.
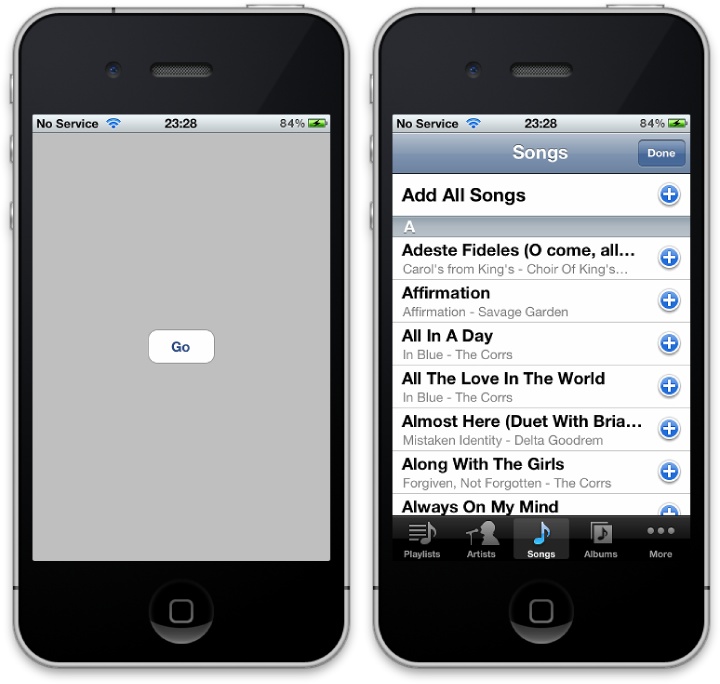
Once your application loads, tap the Go button to bring up the MPMediaPickerController, select some songs, and tap the Done button in the navigation bar (see Figure 12-15). Your music should start playing.
Once playback has begun, you need to keep track of the currently playing item and display that to the user, or at the very least provide some way for the user to pause (or stop) playback, or perhaps to change her selection. The MPMusicPlayerController class provides two methods: the beginGeneratingPlaybackNotifications: method and a corresponding endGeneratingPlaybackNotifications: method.
Add this line to the didPickMediaItems: method:
- (void) mediaPicker:(MPMediaPickerController *) mediaPicker
  didPickMediaItems:(MPMediaItemCollection *) userMediaItemCollection {
    [self dismissModalViewControllerAnimated: YES];

    MPMusicPlayerController *musicPlayer =
      [MPMusicPlayerController applicationMusicPlayer];
    [musicPlayer setQueueWithItemCollection: userMediaItemCollection];
    [musicPlayer beginGeneratingPlaybackNotifications];
    [musicPlayer play];
}
When the begin method is invoked, the class will start to generate notifications of when the player state changes and when the current playback item changes, which your application can register to handle by adding itself as an observer using the NSNotificationCenter class:
- (void) mediaPicker:(MPMediaPickerController *) mediaPicker
  didPickMediaItems:(MPMediaItemCollection *) userMediaItemCollection {
    [self dismissModalViewControllerAnimated: YES];

    MPMusicPlayerController *musicPlayer =
    [MPMusicPlayerController applicationMusicPlayer];
    [musicPlayer setQueueWithItemCollection: userMediaItemCollection];
    [musicPlayer beginGeneratingPlaybackNotifications];

    NSNotificationCenter *notificationCenter = [NSNotificationCenter defaultCenter];
    [notificationCenter
      addObserver:self
         selector:@selector(handleNowPlayingItemChanged:)
             name:@"MPMusicPlayerControllerNowPlayingItemDidChangeNotification"
           object:musicPlayer];

    [notificationCenter
      addObserver:self
         selector:@selector(handlePlaybackStateChanged:)
             name:@"MPMusicPlayerControllerPlaybackStateDidChangeNotification"
           object:musicPlayer];

    [musicPlayer play];

}
This will invoke the selector methods in our class when the appropriate notification arrives. (You could, for example, use the first to update a UILabel in your view telling the user the name of the currently playing song.)
However, for now let’s just implement these methods to print messages to the console log. In the ViewController.h interface file, declare the selector methods:
@interface ViewController : UIViewController <MPMediaPickerControllerDelegate>

@property (weak, nonatomic) IBOutlet UIButton *goButton;

- (IBAction)pushedGo:(id)sender;
- (void)handleNowPlayingItemChanged:(id)notification;
- (void)handlePlaybackStateChanged:(id)notification;

@end
Then, in the ViewController.m implementation file, add the following method. This will be called when the current item being played changes:
- (void)handleNowPlayingItemChanged:(id)notification {
   MPMusicPlayerController *musicPlayer =
      [MPMusicPlayerController applicationMusicPlayer];
   MPMediaItem *currentItem = [musicPlayer nowPlayingItem];
   NSLog(@"%@", currentItem);
}-
Unusually, the
MPMediaItemclass has only one instance method:valueForProperty:. This is because the class can wrap a number of media types, and each type can have a fairly wide range of metadata associated with it. You can find a full list of possible keys in theMPMediaItemclass reference, but keys includeMPMediaItemPropertyTitleandMPMediaItemPropertyArtwork, among others.
While the second method handles changes in state, we can use this to update our user interface (e.g., changing the state of the Play and Stop buttons when the music ends):
- (void)handlePlaybackStateChanged:(id)notification {
    MPMusicPlayerController *musicPlayer =
      [MPMusicPlayerController applicationMusicPlayer];
    MPMusicPlaybackState playbackState = [musicPlayer playbackState];
    if (playbackState == MPMusicPlaybackStatePaused) {
        NSLog(@"Paused");

    } else if (playbackState == MPMusicPlaybackStatePlaying) {
        NSLog(@"Playing");

    } else if (playbackState == MPMusicPlaybackStateStopped) {
        NSLog(@"Stopped");

    }
}
Save your changes, and click the Run button in the Xcode toolbar to build and deploy your code onto your device. Once your application loads, tap the Go button to bring up the MPMediaPickerController again, select some songs, and tap the Done button in the navigation bar. Your music should start playing, and you should see log messages in the Debug area.
Just like the MPMediaPickerController class in the preceding section and the other classes we met earlier in the book, Apple has provided an ABPeoplePickerNavigationController and associated delegate protocol to allow you to both prompt the user for contact information and display contact information to the user. However, in this case, the framework it provides also allows your application to interact with person and group records directly.
Warning
Once you reach the lower levels of the Address Book framework—for instance, dealing with individual person records—the interface presented by the framework is in C rather than Objective-C. This is especially obvious when dealing with the address book programmatically rather than interactively using the navigation controller.
To illustrate how to use the ABPeoplePickerNavigationController, we’re going to reuse the Prototype application code yet again. So, open the Finder and navigate to the location where you saved the Prototype project. Right-click on the folder containing the project files and select Duplicate; a folder called Prototype copy will be created containing a duplicate of the project. Rename the folder Prototype5, and just as we did before, prune the application down to the stub with the Go button and associated pushedGo: method that we’ll use to trigger the display of our address book picker.
After you’ve done that, add the AddressBook and AddressBookUI frameworks into the project. Then click on the ViewController.h interface file to open it in the Xcode Editor. We need to declare the class as both an ABPeoplePickerNavigationControllerDelegate and a UINavigationControllerDelegate. Both declarations are necessary for the class to interact with the ABPeoplePickerNavigationController:
#import <UIKit/UIKit.h>
#import <AddressBook/AddressBook.h>
#import <AddressBookUI/AddressBookUI.h>

@interface ViewController : UIViewController
  <UINavigationControllerDelegate,ABPeoplePickerNavigationControllerDelegate>

@property (weak, nonatomic) IBOutlet UIButton *goButton;

-(IBAction) pushedGo:(id)sender;

@end
Now modify the pushedGo: method in the corresponding ViewController.m implementation file:
-(IBAction) pushedGo:(id)sender {
    ABPeoplePickerNavigationController *peoplePicker =
     [[ABPeoplePickerNavigationController alloc] init];
    peoplePicker.peoplePickerDelegate = self;
    [self presentModalViewController:peoplePicker animated:YES];
}Next, add the three mandatory ABPeoplePickerNavigationControllerDelegate methods specified by the delegate protocol:
- (BOOL)peoplePickerNavigationController: (ABPeoplePickerNavigationController *)picker shouldContinueAfterSelectingPerson:(ABRecordRef)person{ return NO; } - (void)peoplePickerNavigationControllerDidCancel: (ABPeoplePickerNavigationController *)picker
{ [self dismissModalViewControllerAnimated:YES]; }
-
If this method returns
YES, the picker will continue after the user selects a name from the address book, displaying the person’s details. If the method returnsNO, the picker will not continue. If you intend to returnNO, you should also dismiss the view controller.-
This method lets you decide whether the picker should continue after the user selects a name from the address book. The address record is then displayed to the user. If this method returns
YES, the picker will continue after the user selects a property (e.g., a mobile phone number, fax number). If the method returnsNO, the picker will not continue. If you intend to returnNO, you should also dismiss the view controller.-
This method is called when the user taps the Cancel button in the navigation bar of the picker interface.
We’ve reached a point where you can compile and check the code, but remember that you should also add the AddressBook and AddressBookUI frameworks to the project before clicking the Run button in the Xcode toolbar.
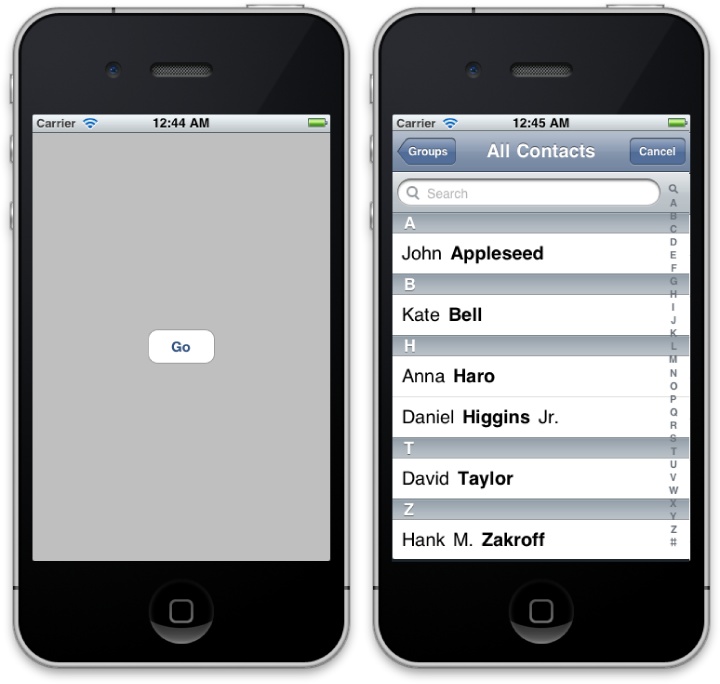
When you do so, you should see the familiar gray screen with the Go button as shown in Figure 12-16; click it and you’ll be presented with a view of the address book. Selecting a name in the address book will dismiss the picker view and return you directly to the main gray screen.
The picker is displayed, but even if the user selects a name from the list, we don’t do anything with the returned record. Let’s add some additional code to the peoplePickerNavigationController:shouldContinueAfterSelectingPerson: method to fix that omission:
- (BOOL)peoplePickerNavigationController:
    (ABPeoplePickerNavigationController *)pickershouldContinueAfterSelectingPerson:
    (ABRecordRef)person  {

    NSString* name =
      (__bridge_transfer NSString *)ABRecordCopyCompositeName(person);

    ABMutableMultiValueRef phones =
      ABRecordCopyValue(person, kABPersonPhoneProperty);
    NSArray *numbers =
      (__bridge_transfer NSArray *)ABMultiValueCopyArrayOfAllValues(phones);

    ABMutableMultiValueRef emails = ABRecordCopyValue(person, kABPersonEmailProperty);
    NSString *addresses =
      (__bridge_transfer NSString *)ABMultiValueCopyArrayOfAllValues(emails);

    NSString *note =
      (__bridge_transfer NSString *)ABRecordCopyValue(person, kABPersonNoteProperty);

    NSLog( @"name = %@, numbers = %@, email = %@, note = %@",
           name, numbers, addresses, note );

    [self dismissModalViewControllerAnimated:YES];
    return NO;
}
There are two basic types of properties: single-value and multivalue. Single-value properties contain data that can have only a single value, such as a person’s name. Multivalue properties contain data that can have multiple values, such as a person’s phone number. You can see from the preceding code that single-value and multivalue properties are handled slightly differently.
Note
You can find a full list of the different properties available in an address book record in the ABPerson class documentation.
Make sure you’ve saved your changes and click the Run button in the Xcode toolbar to compile and deploy your application into iPhone Simulator. When the application launches, click the Go button and then select a name from the list. You should see the output in your Debug area.
What if we want to retrieve a specific phone number from the list? It’s easier to let the user select the phone number they need, and that’s where the peoplePickerNavigationController:shouldContinueAfterSelectingPerson:property:identifier: method would come into play (we returned NO from this earlier in this section, so this example does not allow the user to select a number).
A multivalue property is a list of values, but each value also has a text label and an identifier associated with it. This second delegate method provides you with both the property and the identifier for the value (i.e., a specific phone number) that is of interest to the user.
However, if you know which property value you’re looking for inside the multivalue property, you can programmatically retrieve the identifier for that value. For example, here’s how you’d select the mobile phone number from the list of returned phone numbers:
ABMultiValueRef phones = ABRecordCopyValue(person, kABPersonPhoneProperty);

ABMultiValueIdentifier identifier;
for( int i = 0; i < numbers.count; i++ ) {
    if( CFStringCompare( ABMultiValueCopyLabelAtIndex(phones, i),
        kABPersonPhoneMobileLabel, 1 ) == 0 ) {
        identifier = ABMultiValueGetIdentifierAtIndex(phones, i);
    }
}
You can then retrieve the mobile phone number at any time by using the identifier:
NSString *mobile =
  (__bridge_transfer NSString *)
  ABMultiValueCopyValueAtIndex(phones,
    ABMultiValueGetIndexForIdentifier(phones, identifier));
NSLog(@"Mobile = %@", mobile);You do not have to use the ABPeoplePickerNavigationController to access the address book; you can access it directly, as shown here:
ABAddressBookRef addressBook = ABAddressBookCreate();
CFArrayRef allPeople = ABAddressBookCopyArrayOfAllPeople(addressBook);

for (int i = 0; i < ABAddressBookGetPersonCount(addressBook); i++) {
    ABRecordRef ref = CFArrayGetValueAtIndex(allPeople, i);
    NSString *contact =
        (__bridge_transfer NSString *)ABRecordCopyCompositeName(ref);
    NSLog( @"%@", contact );
}
The preceding code will instantiate a copy of the address book, retrieve references to all of the records, and then iterate through the array of records. Then, in the same way we dealt with records after interactively retrieving them with the picker controller, we print the full name of each contact to the Debug console.
Analogously to the MFMailComposeViewController class we talked about in Chapter 7, the MFMessageComposeViewController from the MessageUI framework (you’ll need to import MessageUI/MessageUI.h for this to work) allows you to compose and send text messages:
MFMessageComposeViewController *controller =
      [[MFMessageComposeViewController alloc] init];
if([MFMessageComposeViewController canSendText]) {
   controller.body = @"Hello world";
   controller.recipients = [NSArray arrayWithObjects:@"12345678", nil];
   controller.messageComposeDelegate = self;
   [self presentModalViewController:controller animated:YES];
}In your header file, make your view controller an MFMessageComposeViewControllerDelegate and a UINavigationControllerDelegate and implement the following callback:
- (void)messageComposeViewController:(MFMessageComposeViewController *)controller
                 didFinishWithResult:(MessageComposeResult)result {
    switch (result) {
        case MessageComposeResultCancelled:
            NSLog(@"Cancelled");
            break;
        case MessageComposeResultFailed:
            NSLog(@"Failed");
            break;
        case MessageComposeResultSent:
            break;
        default:
            break;
    }
    [self dismissViewControllerAnimated:YES completion:nil];
}
which we use to dismiss the modal view controller.
Warning
The MFMessageComposeViewController does not currently support sending multimedia messages.