Figure 821: Nexus 10 “Simulate secondary displays” Preference
Android 4.2 inaugurated support for applications to control what appears
on an external or “secondary” display (e.g., TV connected via HDMI), replacing the default
screen mirroring. This is largely handled through a Presentation object,
where you declare the UI that goes onto the external display, in parallel
with whatever your activity might be displaying on the primary screen.
In this chapter, we will review how Android supports these external displays,
how you can find out if an external display is attached, and how you can use
Presentation objects to control what is shown on that external display.
The author would like to thank Mark Allison, whose “Multiple Screens” blog post series helped to blaze the trail for everyone in this space.
In addition to the core chapters, you should read
the chapter on dialogs and the chapter on MediaRouter
before reading this chapter.
In this chapter, “external displays” refers to a screen that is temporarily associated with an Android device, in contrast with a “primary screen” that is where the Android device normally presents its user interface. So, most Android devices connected to a television via HDMI would consider the television to be a “external display”, with the touchscreen of the device itself as the “primary screen”. However, a Android TV box or a Fire TV connected to a television via HDMI would consider the television to be the “primary screen”, simply because there is no other screen. Some devices themselves may have multiple screens, such as the Sony Tablet P — what those devices do with those screens will be up to the device.
Historically, support for external displays was manufacturer-dependent. Early Android devices had no ability to be displayed on an external display except through so-called “software projectors” like Jens Riboe’s Droid@Screen. Some Android 2.x devices had ports that allowed for HDMI or composite connections to a television or projector. However, control for what would be displayed resided purely in the hands of the manufacturer. Some manufacturers would display whatever was on the touchscreen (a.k.a., “mirroring”). Some manufacturers would do that, but only for select apps, like a built-in video player.
Android 3.0 marked the beginning of Android’s formal support for external displays, as the Motorola XOOM supported mirroring of the LCD’s display via an micro-HDMI port. This mirroring was supplied by the core OS, not via device-dependent means. Any Android 3.0+ device with some sort of HDMI connection (e.g., micro-HDMI port) should support this same sort of mirroring capability.
However, mirroring was all that was possible. There was no means for an application to have something on the external display (e.g., a video) and something else on the primary screen (e.g., playback controls plus IMDB content about the movie being watched).
Android 4.2 changed that, with the introduction of Presentation.
A Presentation is a container for displaying a UI, in the form of a View
hierarchy (like that of an activity), on an external display.
You can think of a Presentation as being a bit like a Dialog in that regard.
Just as a Dialog shows its UI separate from its associated activity, so does
a Presentation. In fact, as it turns out, Presentation inherits from
Dialog.
The biggest difference between a Presentation and an ordinary Dialog, of course,
is where the UI is displayed. A Presentation displays on an external display;
a Dialog displays on the primary screen, overlaying the activity. However, this
difference has a profound implication: the characteristics of the external
display, in terms of size and density, are likely to be different than those of a
primary screen.
Hence, the resources used by the UI on an external display may be different than
the resources used by the primary screen. As a result,
the Context of the Presentation is not the Activity. Rather, it is a
separate Context, one whose Resources object will use the proper resources
based upon the external display characteristics.
This seemingly minor bit of bookkeeping has some rippling effects on setting up
your Presentation, as we will see as this chapter unfolds.
To write an app that uses an external display via a Presentation, you will need
Android 4.2 or higher.
Beyond that, though, you will also need an external display of some form. Presently, you have three major options: emulate it, use a screen connected via some sort of cable, or use Miracast for wireless external displays.
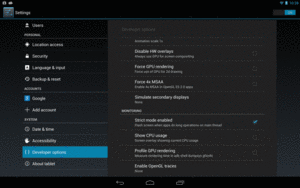
Even without an actual external display, you can lightly test your
Presentation-enabled app via the Developer Options area of Settings on your
Android 4.2 device. There, in the Drawing category, you will see the
“Simulate secondary displays” preference:
Figure 821: Nexus 10 “Simulate secondary displays” Preference
Tapping that will give you various options for what secondary display to emulate:
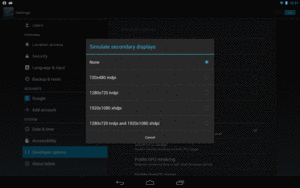
Figure 822: Nexus 10 “Simulate secondary displays” Options
Tapping one of those will give you a small window in the upper-left corner, showing the contents of the external display, overlaid on top of your regular screen:
Figure 823: Nexus 10, Simulating a 720p external display
Normally, that will show a mirrored version of the primary screen, but with
a Presentation-enabled app, it will show what is theoretically shown on the
real external display.
However, there are limits with this technology:
In practice, before you ship a Presentation-capable app, you will want to test
it with an actual physical external display.
If you have a device with HDMI-out capability, and you have the appropriate cable,
you can simply plug that cable between your device and the display. “Tuning” the
display to use that specific HDMI input port should cause your device’s screen
contents to be mirrored to that display. Once this is working, you should be able
to control the contents of that display using Presentation.
Mobile High-Definition Link, or MHL for short, is a relatively new option for connections to displays. On many modern Android devices, the micro USB port supports MHL as well. Some external displays have MHL ports, in which case a male-to-male MHL direct cable will connect the device to the display. Otherwise, MHL can be converted to HDMI via adapters, so an MHL-capable device can attach to any HDMI-compliant display.
SlimPort is another take on the overload-the-micro-USB-port-for-video approach. MHL is used on substantially more devices, but SlimPort appears on several of the Nexus-series devices (Nexus 4, Nexus 5, and the 2013 generation of the Nexus 7). Hence, while users will be more likely to have an MHL device, developers may be somewhat more likely to have a SlimPort device, given the popularity of Nexus devices among Android app developers.
From the standpoint of your programming work, MHL and SlimPort are largely
equivalent — there is nothing that you need to do with your Presentation
to address either of those protocols, let alone anything else like native HDMI.
The new USB 3.1 Type C specification has enough hooks for video display that we may see Android devices starting to use it (along with USB->HDMI adapters) for supporting external displays.
There are a few wireless display standards available. Android 4.2 supports Miracast, based upon WiFiDirect. This is also supported by some devices running earlier versions of Android, such as some Samsung devices (where Miracast is sometimes referred to as “AllShare Cast”). However, unless and until those devices get upgraded to Android 4.2, you cannot control what they display, except perhaps through some manufacturer-specific APIs.
On a Miracast-capable device, going into Settings > Displays > Wireless display will give you the ability to toggle on wireless display support and scan for available displays:
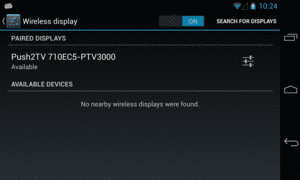
Figure 824: Nexus 4 Wireless Display Settings
You can then elect to attach to one of the available wireless displays and get
your screen mirrored, and later use this with your Presentation-enabled app.
Of course, you also need some sort of Miracast-capable display. As of early 2013, there were few of these. However, you can also get add-on boxes that connect to normal displays via HDMI and make them available via Miracast. One such box is the Netgear PTV3000, whose current firmware supports Miracast along with other wireless display protocols.
Note that Miracast uses a compressed protocol, to minimize the bandwidth needed to transmit the video. This, in turn, can cause some lag.
Note that Intel’s WiDi is an extended version of Miracast.
An up-and-coming competitor to Miracast is WirelessHD. WirelessHD has greater bandwidth requirements. On the other hand, it avoids compression, and therefore the lag that you experience with Miracast. At the time of this writing, though, no WirelessHD-native Android devices are available.
Of course, we can only present a Presentation on an external display if there
is, indeed, such a screen available. There are two approaches for doing this:
using DisplayManager and using MediaRouter. We examined MediaRouter
for detecting live video routes in a preceding chapter,
so let’s focus here on DisplayManager.
DisplayManager is a system service, obtained by calling getSystemService() and
asking for the DISPLAY_SERVICE.
Once you have a DisplayManager, you can ask it to give you a list of all
available displays (getDisplays() with zero arguments) or all available displays
in a certain category (getDisplays() with a single String parameter). As of
API Level 17, the only available display category is DISPLAY_CATEGORY_PRESENTATION.
The difference between the two flavors of getDisplays() is just the sort order:
getDisplays() returns the Display array in arbitrary ordergetDisplays() will put the Display objects matching the
identified category earlier in the arrayThese would be useful if you wanted to pop up a list of available displays to ask
the user which Display to use.
You can also register a DisplayManager.DisplayListener with the DisplayManager
via registerDisplayListener(). This listener will be called when displays are
added (e.g., HDMI cable was connected), removed (e.g., HDMI cable was disconnected),
or changed. It is not completely clear what would trigger a “changed” call, though
possibly an orientation-aware display might report back the revised height and
width.
Note that while DisplayManager was added in API Level 17, Display itself has
been around since API Level 1, though some additions have been made in more recent
Android releases. But, this may mean that you can pass the Display object around
to code supporting older devices without needing to constantly check for SDK level
or add the @TargetApi() annotation.
Also note that the support-v4 library contains a DisplayManagerCompat,
allowing you to call DisplayManager-like methods going all the way back
to API Level 4. This does not give older devices the ability to work
with external displays — that would require a time machine — but it can
make it incrementally easier for you to write your app, without having to
worry about API level. DisplayManagerCompat just gracefully degrades to
returning information only about the device’s standard touchscreen.
Let’s take a look at a small sample app that demonstrates how we can display custom
content on an external display using a Presentation. The app in question
can be found in the
Presentation/Simple
sample project.
Since Presentation extends from Dialog, we provide the UI to be displayed on
the external display via a call to setContentView(), much like we would do
in an activity. Here, we just create a WebView widget in Java, point it to some
Web page, and use it:
  @TargetApi(Build.VERSION_CODES.JELLY_BEAN_MR1)
  private class SimplePresentation extends Presentation {
    SimplePresentation(Context ctxt, Display display) {
      super(ctxt, display);
    }

    @Override
    protected void onCreate(Bundle savedInstanceState) {
      super.onCreate(savedInstanceState);

      WebView wv=new WebView(getContext());

      wv.loadUrl("https://commonsware.com");

      setContentView(wv);
    }
  }
However, there are two distinctive elements of our implementation:
Context (typically the Activity), along with a
Display object indicating where the UI should be presented.WebView constructor uses getContext(), instead of the
Activity object. In this case, that may have no real-world effect, as WebView
is not going to be using any of our resources. But, had we used a LayoutInflater
for inflating our UI, we would need to use one created from getContext(), not from
the activity itself.We need to determine whether there is a suitable external display when our activity comes into the foreground. We also need to determine if an external display was added or removed while we are in the foreground.
So, in onStart(), if we are on an Android 4.2 or higher device, we will get
connected to the MediaRouter to handle those chores:
  @TargetApi(Build.VERSION_CODES.JELLY_BEAN_MR1)
  @Override
  protected void onStart() {
    super.onStart();

    if (Build.VERSION.SDK_INT >= Build.VERSION_CODES.JELLY_BEAN_MR1) {
      if (cb==null) {
        cb=new RouteCallback();
        router=(MediaRouter)getSystemService(MEDIA_ROUTER_SERVICE);
      }

      handleRoute(router.getSelectedRoute(MediaRouter.ROUTE_TYPE_LIVE_VIDEO));
      router.addCallback(MediaRouter.ROUTE_TYPE_LIVE_VIDEO, cb);
    }
  }
Specifically, we:
RouteCallback, an inner class of our activity that
extends SimpleCallback
getSystemService() to obtain a MediaRouter
handleRoute() method on our activity that will update our UI based
upon the current video route, obtained by calling getSelectedRoute() on the
MediaRouter
RouteCallback object with the MediaRouter via addCallback()
The RouteCallback object simply overrides onRoutePresentationDisplayChanged(),
which will be called whenever there is a change in what screens are available
and considered to be the preferred modes for video. There, we just call that
same handleRoute() method that we called in onStart():
  @TargetApi(Build.VERSION_CODES.JELLY_BEAN)
  private class RouteCallback extends SimpleCallback {
    @Override
    public void onRoutePresentationDisplayChanged(MediaRouter router,
                                                  RouteInfo route) {
      handleRoute(route);
    }
  }
Hence, our business logic for showing the presentation is isolated in one
method, handleRoute().
Our onStop() method will undo some of the work done by onStop(), notably
removing our RouteCallback. We will examine that more closely in the next section.
Our handleRoute() method will be called with one of two parameter values:
RouteInfo of the active route we should use for displaying the Presentation
null, indicating that there is no route for such content, other than the
primary screenIf we are passed the RouteInfo, it may represent the route we are already using,
or possibly it may represent a different route entirely.
We need to handle all of those cases, even if some (switching directly from one route to another) may not necessarily be readily testable.
Hence, our handleRoute() method does its best:
  @TargetApi(Build.VERSION_CODES.JELLY_BEAN_MR1)
  private void handleRoute(RouteInfo route) {
    if (route == null) {
      clearPreso();
    }
    else {
      Display display=route.getPresentationDisplay();

      if (route.isEnabled() && display != null) {
        if (preso == null) {
          showPreso(route);
          Log.d(getClass().getSimpleName(), "enabled route");
        }
        else if (preso.getDisplay().getDisplayId() != display.getDisplayId()) {
          clearPreso();
          showPreso(route);
          Log.d(getClass().getSimpleName(), "switched route");
        }
        else {
          // no-op: should already be set
        }
      }
      else {
        clearPreso();
        Log.d(getClass().getSimpleName(), "disabled route");
      }
    }
  }
There are five possibilities handled by this method:
null, then we should no longer be displaying the
Presentation, so we call a clearPreso() method that will handle thatDisplay object,
we also assume that we should no longer be displaying the
Presentation, so we call clearPreso()
Presentation (our preso data member is null), we need to show the
Presentation, which we delegate to a showPreso() methodPresentation, and the ID of the new Display is different than the ID of the
Display our Presentation had been using, we use both clearPreso() and
showPreso() to switch our Presentation to the new Display
Presentation on this Display, we do nothing and wonder why handleRoute()
got calledShowing the Presentation is merely a matter of creating an instance of our
SimplePresentation and calling show() on it, like we would a regular Dialog:
  @TargetApi(Build.VERSION_CODES.JELLY_BEAN_MR1)
  private void showPreso(RouteInfo route) {
    preso=new SimplePresentation(this, route.getPresentationDisplay());
    preso.show();
  }
Clearing the Presentation calls dismiss() on the Presentation, then sets
the preso data member to null to indicate that we are not showing a Presentation:
  @TargetApi(Build.VERSION_CODES.JELLY_BEAN_MR1)
  private void clearPreso() {
    if (preso != null) {
      preso.dismiss();
      preso=null;
    }
  }
Our onPause() uses clearPreso() and removeCallback() to unwind everything:
  @TargetApi(Build.VERSION_CODES.JELLY_BEAN_MR1)
  @Override
  protected void onStop() {
    if (Build.VERSION.SDK_INT >= Build.VERSION_CODES.JELLY_BEAN_MR1) {
      clearPreso();

      if (router != null) {
        router.removeCallback(cb);
      }
    }

    super.onStop();
  }
If you run this with no external display, you will just see a plain TextView
that is the UI for our primary screen:
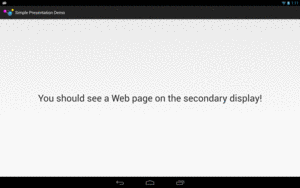
Figure 825: Nexus 10, No Emulated Secondary Display, Showing Sample App
If you run this with an external display, the external display will show our
WebView:
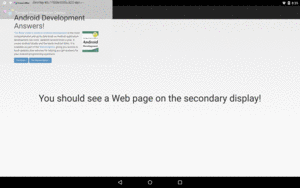
Figure 826: Nexus 10, With Emulated Secondary Display, Showing Sample App
There was a fair bit of code in the previous sample for messing around with
MediaRouter and finding out about changes in the available displays.
To help simplify apps using Presentation, the author of this book maintains
a library, CWAC-Presentation,
with various reusable bits of code for managing Presentations.
One piece of this is PresentationHelper, which isolates all of the display
management logic in a single reusable object. In this section, we will examine
how to use PresentationHelper, then how PresentationHelper itself works, using
DisplayManager under the covers.
Our Presentation/Simpler sample project uses the CWAC-Presentation artifact:
apply plugin: 'com.android.application'

repositories {
    maven {
        url "https://s3.amazonaws.com/repo.commonsware.com"
    }
}

dependencies {
    compile 'com.commonsware.cwac:presentation:0.4.+'
}

android {
    compileSdkVersion 19
    buildToolsVersion "21.1.2"
}
This gives
us access to PresentationHelper. Our MainActivity in the sample creates an
instance of PresentationHelper in onCreate(), stashing the object in a data
member:
  @Override
  protected void onCreate(Bundle savedInstanceState) {
    super.onCreate(savedInstanceState);

    setContentView(R.layout.activity_main);
    helper=new PresentationHelper(this, this);
  }
The constructor for PresentationHelper takes two parameters:
Context object, one that should be valid for the life of the helper, typically
the Activity that creates the helper, andPresentationHelper.Listener — in this case, the interface
is implemented on MainActivity itselfThe activity that creates the helper must forward onPause() and onResume()
lifecycle methods to the equivalent methods on the helper:
  @Override
  public void onResume() {
    super.onResume();
    helper.onResume();
  }

  @Override
  public void onPause() {
    helper.onPause();
    super.onPause();
  }
The implementer of PresentationHelper.Listener also needs to have showPreso() and
clearPreso() methods, much like the ones from the original Presentation sample
in this chapter. showPreso() will be passed a Display object and should
arrange to display a Presentation on that Display:
  @Override
  public void showPreso(Display display) {
    preso=new SimplerPresentation(this, display);
    preso.show();
  }
clearPreso() should get rid of any outstanding Presentation. It is passed a
boolean value, which will be true if we simply lost the Display we were using
(and so the activity might want to display the Presentation contents elsewhere,
such as in the activity itself), or false if the activity is moving to the background
(triggered via onPause()):
  @Override
  public void clearPreso(boolean showInline) {
    if (preso != null) {
      preso.dismiss();
      preso=null;
    }
  }
The implementations here are pretty much the same as the ones used in the previous
example. PresentationHelper has handled all of the Display-management events –
our activity can simply focus on showing or hiding the Presentation on demand.
In many respects, the PresentationHelper from the CWAC-Presentation project works a
lot like the logic in the original Presentation sample’s MainActivity, detecting
various states and calling showPreso() and clearPreso() accordingly. However,
PresentationHelper uses a different mechanism for this — DisplayManager.
The PresentationHelper constructor just stashes the parameters it is passed in data
members and obtains a DisplayManager via getSystemService(), putting it in another
data member:
  /**
   * Basic constructor.
   *
   * @param ctxt a Context, typically the activity that is planning on showing
   *             the Presentation
   * @param listener the callback for show/hide events
   */
  public PresentationHelper(Context ctxt, Listener listener) {
    this.listener=listener;

    if (Build.VERSION.SDK_INT >= Build.VERSION_CODES.JELLY_BEAN_MR1) {
      mgr=
          (DisplayManager)ctxt.getSystemService(Context.DISPLAY_SERVICE);
    }
  }
onResume() calls out to a private handlePreso() method to initialize our state,
and tells the DisplayManager to let it know as displays are attached and detached from
the device, by means of registerDisplayListener():
  /**
   * Call this from onResume() of your activity, so we can determine what
   * changes need to be made to the Presentation, if any
   */
  public void onResume() {
    if (Build.VERSION.SDK_INT >= Build.VERSION_CODES.JELLY_BEAN_MR1) {
      handleRoute();
      mgr.registerDisplayListener(this, null);
    }
  }
The PresentationHelper itself implements the DisplayListener interface, which requires
three callback methods:
onDisplayAdded() is called when a new output display is availableonDisplayChanged() is called when an existing attached display changes its
characteristics onDisplayRemoved() is called whenever a previously-attached output display
has been detachedIn our case, all three methods route to the same handleRoute() method, to update
our state:
  /**
   * {@inheritDoc}
   */
  @Override
  public void onDisplayAdded(int displayId) {
    handleRoute();
  }

  /**
   * {@inheritDoc}
   */
  @Override
  public void onDisplayChanged(int displayId) {
    handleRoute();
  }

  /**
   * {@inheritDoc}
   */
  @Override
  public void onDisplayRemoved(int displayId) {
    handleRoute();
  }
handleRoute() is where the bulk of the “business logic” of PresentationHelper resides:
  private void handleRoute() {
    if (isEnabled()) {
      Display[] displays=
          mgr.getDisplays(DisplayManager.DISPLAY_CATEGORY_PRESENTATION);

      if (displays.length == 0) {
        if (current != null || isFirstRun) {
          listener.clearPreso(true);
          current=null;
        }
      }
      else {
        Display display=displays[0];

        if (display != null && display.isValid()) {
          if (current == null) {
            listener.showPreso(display);
            current=display;
          }
          else if (current.getDisplayId() != display.getDisplayId()) {
            listener.clearPreso(true);
            listener.showPreso(display);
            current=display;
          }
          else {
            // no-op: should already be set
          }
        }
        else if (current != null) {
          listener.clearPreso(true);
          current=null;
        }
      }

      isFirstRun=false;
    }
  }
We get the list of attached displays from the DisplayManager by calling
getDisplays(). By passing in DISPLAY_CATEGORY_PRESENTATION, we are asking for
returned array of Display objects to be ordered such that the preferred display
for presentations is the first element.
If the array is empty, and we already had a current Display from before (or if
this is the first time handlePreso() has run), we call clearPreso() to inform the
listener that there is no Display for presentation purposes.
If we do have a valid Display:
showPreso() to inform the
listener to start displaying things, plus keep track of the current Display in a
data memberDisplay for a
Presentation is different (the ID value of the Display objects differ), we
call clearPreso() and showPreso() to get the listener to switch to the new
Display
handlePreso(), so we do not do anything
of noteIf, for whatever reason, the best Display is not valid, we do the same thing as
if we had no Display at all: call clearPreso().
Finally, in onPause(), we call clearPreso() to ensure that we are no longer
attempting to display anything, plus call unregisterDisplayListener() so we are no
longer informed about changes to the mix of Display objects that might be available:
  /**
   * Call this from onPause() of your activity, so we can determine what
   * changes need to be made to the Presentation, if any
   */
  public void onPause() {
    if (Build.VERSION.SDK_INT >= Build.VERSION_CODES.JELLY_BEAN_MR1) {
      listener.clearPreso(false);
      current=null;

      mgr.unregisterDisplayListener(this);
    }
  }
One headache when using Presentation comes from the fact that it is a Dialog,
which is owned by an Activity. If the device undergoes a configuration change, the
activity will be destroyed and recreated by default, forcing you to destroy and
recreate your Dialog. This, in turn, causes flicker on the external display, as
the display briefly reverts to mirroring while this goes on.
Devices that support external displays may be orientation-locked to landscape when an external display is attached (e.g., an HDMI cable is plugged in). This reduces the odds of a configuration change considerably, as the #1 configuration change is an orientation change. However, that is not a guaranteed “feature” of Android external display support, and there are other configuration changes that could go on (e.g., devices gets plugged into a keyboard dock).
You can either just live with the flicker, or use android:configChanges to try
to avoid the destroy/re-create cycle for the configuration change. As was noted
back in the chapter on configuration changes, this is a risky
approach, as it requires you to remember all your resources that might change on
the configuration change and reset them to reflect the configuration change.
A “middle ground” approach is to ensure that your activity running the Presentation
is orientation-locked to landscape mode, by adding android:orientation="landscape"
to your <activity> in the manifest, then use android:configChanges to handle
the configuration changes related to orientation:
orientationkeyboardHiddenscreenSizescreenLayoutFor those configuration changes, nothing should be needed to be modified in your activity, since you want to be displaying in landscape all of the time, and so you will not need to modify your use of resources. This leaves open the possibility of other configuration changes that would cause flicker on the external display, but those are relatively unlikely to occur while your activity is in the foreground, and so it may not be worth trying to address the flicker in all those cases.
Yet another possibility is to have your presentation be delivered by a service, as we will discuss later in this chapter.
Curiously, the support for Presentation is focused on View. There is nothing
built into Android 4.2 that ties a Presentation to a Fragment. However, this
can be a useful technique, one we can roll ourselves… with a bit of difficulty.
There will be a few apps that will only want to deliver content if there is a external display on which to deliver it. However, the vast majority of apps supporting external displays will do so optionally, still supporting regular Android devices with only primary screens.
In this case, though, we have a problem: we need to show that UI somewhere if there is no external display to show it on. Our only likely answer is to have it be part of our primary UI.
Fragments would seem to be tailor-made for this. We could “throw” a fragment
to the external display if it exists, or incorporate it into our main UI (e.g.,
as another page in a ViewPager) if the external display does not exist, or
even have it be shown by some separate activity on smaller-screen devices like
phones. Our business logic will already have been partitioned between the
fragments — it is merely a question of where the fragment shows up.
The nice thing is that Presentation extends Dialog. We already have a
DialogFragment as part of Android that knows how to display a Dialog
populated by a Fragment implementation of onCreateView(). DialogFragment
even knows how to handle either being part of the main UI or as a separate
dialog.
Hence, one could imagine a PresentationFragment that extends DialogFragment
and adds the ability to either be part of the main UI on the primary screen
or shown on an external display, should one be available.
And, in truth, it is possible to create such a PresentationFragment, though
there are some limitations.
The biggest limitation comes back to the Context used for our UI. Normally,
there is only one Context of relevance: the Activity. In the case of
Presentation, though, there is a separate Context that is tied to the
display characteristics of the external display.
This means that PresentationFragment must manipulate two Context values:
Activity, if the fragment should be part of our main UIContext supplied by the Presentation, if the fragment should be
displayed in the Presentation on the external displayThis makes creating a PresentationFragment class a bit tricky… though not
impossible. After all, if it were impossible, these past several paragraphs
would not be very useful.
The
Presentation/Fragment
sample project has the same UI as the Presentation/Simple project, if there
is an external display. If there is only the primary screen, though, we will
elect to display the WebView side-by-side with our TextView in the main UI
of our activity. And, to pull this off, we will create a PresentationFragment
based on DialogFragment.
Note that this sample project has its android:minSdkVersion set to 17, mostly
to cut down on all of the “only do this if we are on API Level 17” checks and
@TargetApi() annotations. Getting this code to work on earlier versions of
Android is left as an exercise for the reader.
In a simple DialogFragment, we might just override onCreateView() to provide
the contents of the dialog. The default implementation of onCreateDialog()
would create an empty Dialog, to be populated with the View returned by
onCreateView().
In our PresentationFragment subclass of DialogFragment, though,
we need to override onCreateDialog()
to use a Presentation instead of a Dialog… if we have a Presentation to
work with:
package com.commonsware.android.preso.fragment;

import android.app.Dialog;
import android.app.DialogFragment;
import android.app.Presentation;
import android.content.Context;
import android.os.Bundle;
import android.view.Display;

abstract public class PresentationFragment extends DialogFragment {
  private Display display=null;
  private Presentation preso=null;

  @Override
  public Dialog onCreateDialog(Bundle savedInstanceState) {
    if (preso == null) {
      return(super.onCreateDialog(savedInstanceState));
    }

    return(preso);
  }

  public void setDisplay(Context ctxt, Display display) {
    if (display == null) {
      preso=null;
    }
    else {
      preso=new Presentation(ctxt, display, getTheme());
    }

    this.display=display;
  }

  public Display getDisplay() {
    return(display);
  }

  protected Context getContext() {
    if (preso != null) {
      return(preso.getContext());
    }

    return(getActivity());
  }
}
We also expose getDisplay() and setDisplay() accessors, to supply the Display
object to be used if this fragment will be thrown onto an external display.
setDisplay() also creates the Presentation object wrapped around the display,
using the three-parameter Presentation constructor that supplies the theme to
be used (in this case, using the getTheme() method, which a subclass could
override if desired).
PresentationFragment also implements a getContext() method. If this fragment
will be used with a Display and Presentation, this will return the Context
from the Presentation. If not, it returns the Activity associated with this
Fragment.
This project contains a WebPresentationFragment, that pours the same basic
Android source code used elsewhere in this book for a WebViewFragment into
a subclass of PresentationFragment:
package com.commonsware.android.preso.fragment;

import android.annotation.TargetApi;
import android.os.Build;
import android.os.Bundle;
import android.view.LayoutInflater;
import android.view.View;
import android.view.ViewGroup;
import android.webkit.WebView;

public class WebPresentationFragment extends PresentationFragment {
  private WebView mWebView;
  private boolean mIsWebViewAvailable;

  /**
   * Called to instantiate the view. Creates and returns the
   * WebView.
   */
  @Override
  public View onCreateView(LayoutInflater inflater,
                           ViewGroup container,
                           Bundle savedInstanceState) {
    if (mWebView != null) {
      mWebView.destroy();
    }

    mWebView=new WebView(getContext());
    mIsWebViewAvailable=true;
    return mWebView;
  }

  /**
   * Called when the fragment is visible to the user and
   * actively running. Resumes the WebView.
   */
  @TargetApi(11)
  @Override
  public void onPause() {
    super.onPause();

    if (Build.VERSION.SDK_INT >= Build.VERSION_CODES.HONEYCOMB) {
      mWebView.onPause();
    }
  }

  /**
   * Called when the fragment is no longer resumed. Pauses
   * the WebView.
   */
  @TargetApi(11)
  @Override
  public void onResume() {
    if (Build.VERSION.SDK_INT >= Build.VERSION_CODES.HONEYCOMB) {
      mWebView.onResume();
    }

    super.onResume();
  }

  /**
   * Called when the WebView has been detached from the
   * fragment. The WebView is no longer available after this
   * time.
   */
  @Override
  public void onDestroyView() {
    mIsWebViewAvailable=false;
    super.onDestroyView();
  }

  /**
   * Called when the fragment is no longer in use. Destroys
   * the internal state of the WebView.
   */
  @Override
  public void onDestroy() {
    if (mWebView != null) {
      mWebView.destroy();
      mWebView=null;
    }
    super.onDestroy();
  }

  /**
   * Gets the WebView.
   */
  public WebView getWebView() {
    return mIsWebViewAvailable ? mWebView : null;
  }
}
(note: the flawed comments came from the original Android open source code from which this fragment was derived)
The only significant difference, besides the superclass, is that the onCreateView()
method uses getContext(), not getActivity(), as the Context to use when
creating the WebView.
And, the project has a SamplePresentationFragment subclass of WebPresentationFragment,
where we use the factory-method-and-arguments pattern to pass a URL into the
fragment to use for populating the WebView:
package com.commonsware.android.preso.fragment;

import android.content.Context;
import android.os.Bundle;
import android.view.Display;
import android.view.LayoutInflater;
import android.view.View;
import android.view.ViewGroup;

public class SamplePresentationFragment extends WebPresentationFragment {
  private static final String ARG_URL="url";

  public static SamplePresentationFragment newInstance(Context ctxt,
                                                       Display display,
                                                       String url) {
    SamplePresentationFragment frag=new SamplePresentationFragment();

    frag.setDisplay(ctxt, display);

    Bundle b=new Bundle();

    b.putString(ARG_URL, url);
    frag.setArguments(b);

    return(frag);
  }

  @Override
  public View onCreateView(LayoutInflater inflater,
                           ViewGroup container,
                           Bundle savedInstanceState) {
    View result=
        super.onCreateView(inflater, container, savedInstanceState);

    getWebView().loadUrl(getArguments().getString(ARG_URL));

    return(result);
  }
}
Our activity’s layout now contains not only a TextView, but also a FrameLayout
into which we will slot the PresentationFragment if there is no external display:
<LinearLayout xmlns:android="http://schemas.android.com/apk/res/android"
  xmlns:tools="http://schemas.android.com/tools"
  android:layout_width="match_parent"
  android:layout_height="match_parent"
  android:orientation="horizontal"
  tools:context=".MainActivity">

  <TextView
    android:id="@+id/prose"
    android:layout_width="0px"
    android:layout_height="wrap_content"
    android:layout_gravity="center"
    android:layout_weight="1"
    android:gravity="center"
    android:text="@string/secondary"
    android:textSize="40sp"/>

  <FrameLayout
    android:id="@+id/preso"
    android:layout_width="0px"
    android:layout_height="match_parent"
    android:layout_weight="1"
    android:visibility="gone"/>

</LinearLayout>
Note that the FrameLayout is initially set to have gone as its visibility,
meaning that only the TextView will appear. Based on the widths and weights,
the TextView will take up the full screen when the FrameLayout is gone,
or they will split the screen in half otherwise.
In the onCreate() implementation of our activity (MainActivity), we inflate
that layout and grab both the TextView and the FrameLayout,
putting them into data members:
  @Override
  protected void onCreate(Bundle savedInstanceState) {
    super.onCreate(savedInstanceState);

    setContentView(R.layout.activity_main);

    inline=findViewById(R.id.preso);
    prose=(TextView)findViewById(R.id.prose);
  }
Our onStart() method, and our RouteCallback, are identical to those
from the previous sample.
Our handleRoute() method is nearly identical to the original, as is our
onStop() method. The difference is that we need to distinguish whether we
have lost an external display (and therefore want to move the Web page into
the main UI) or if we are going away entirely (and therefore just wish to clean
up the external display, if any). Hence, clearPreso() takes a boolean
parameter (switchToInline), true if we want to show the fragment in the main
UI, false otherwise. And, our onStop() and handleRoute() methods pass
the appropriate value to clearPreso():
  @Override
  protected void onStop() {
    clearPreso(false);

    if (router != null) {
      router.removeCallback(cb);
    }

    super.onStop();
  }

  private void handleRoute(RouteInfo route) {
    if (route == null) {
      clearPreso(true);
    }
    else {
      Display display=route.getPresentationDisplay();

      if (route.isEnabled() && display != null) {
        if (preso == null) {
          showPreso(route);
          Log.d(getClass().getSimpleName(), "enabled route");
        }
        else if (preso.getDisplay().getDisplayId() != display.getDisplayId()) {
          clearPreso(true);
          showPreso(route);
          Log.d(getClass().getSimpleName(), "switched route");
        }
        else {
          // no-op: should already be set
        }
      }
      else {
        clearPreso(true);
        Log.d(getClass().getSimpleName(), "disabled route");
      }
    }
  }
showPreso() is called when we want to display the Presentation on the
external display. Hence, we need to remove the WebPresentationFragment from the
main UI if it is there:
  private void showPreso(RouteInfo route) {
    if (inline.getVisibility() == View.VISIBLE) {
      inline.setVisibility(View.GONE);
      prose.setText(R.string.secondary);

      Fragment f=getFragmentManager().findFragmentById(R.id.preso);

      getFragmentManager().beginTransaction().remove(f).commit();
    }

    preso=buildPreso(route.getPresentationDisplay());
    preso.show(getFragmentManager(), "preso");
  }
Creating the actual PresentationFragment is delegated to a buildPreso()
method, which employs the newInstance() method on the SamplePresentationFragment:
  private PresentationFragment buildPreso(Display display) {
    return(SamplePresentationFragment.newInstance(this, display,
                                                  "https://commonsware.com"));
  }
clearPreso() is responsible for adding the PresentationFragment to the main
UI, if switchToInline is true:
  private void clearPreso(boolean switchToInline) {
    if (switchToInline) {
      inline.setVisibility(View.VISIBLE);
      prose.setText(R.string.primary);
      getFragmentManager().beginTransaction()
                          .add(R.id.preso, buildPreso(null)).commit();
    }

    if (preso != null) {
      preso.dismiss();
      preso=null;
    }
  }
With an external display, the results are visually identical to the original sample. Without an external display, though, our UI is presented side-by-side:
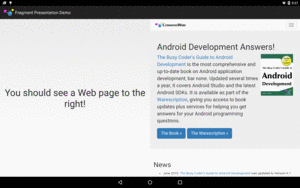
Figure 827: Nexus 10, With Inline PresentationFragment
This implementation of PresentationFragment has its limitations, though.
First, we cannot reuse the same fragment instance for both the inline UI and
the Presentation UI, as they use different Context objects. Hence, production
code will need to arrange to get data out of the old fragment instance and into the
new instance when the screen mix changes. You might be able to leverage
onSaveInstanceState() for that purpose, with a more-sophisticated implementation
of PresentationFragment.
Also, depending upon the device and the external display, you may see
multiple calls to handleRoute(). For example, attaching an external display
may trigger three calls to your RouteCallback, for an attach, a detach, and
another attach event. It is unclear why this occurs. However, it may require some
additional logic in your app to deal with these events, if you encounter them.
At the 2013 Samsung Developer Conference, the author of this book delivered
a presentation on using Presentation.
Rather than use a traditional presentation
package driven from a notebook, the author used
the Presentation/Slides sample app.
This sample
app shows how to show slides on an external display, controlled by a ViewPager
on a device’s touchscreen.
What the audience saw, through most of the presentation, were simple slides.
What the presenter saw was a ViewPager, with tabs, along with action bar
items for various actions:
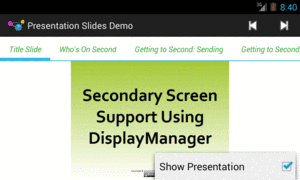
Figure 828: PresentationSlidesDemo, Showing Overflow
The slides themselves are a series of 20 drawable resources (img0, img1, etc.),
put into the
res/drawable-nodpi/ resource directory, as there is no intrinsic “density”
that the slides were prepared for. As we use the slides in ImageView widgets,
their images will be resized to fit the available ImageView space alone, not
taking screen density into account.
There is a matching set of 20 string resources (title0, title1, etc.) containing
a string representation of the slide titles, for use with getPageTitle()
of a PagerAdapter.
That PagerAdapter, named SlidesAdapter, has each slide be visually represented
by an ImageView widget. In this case, SlidesAdapter extends PagerAdapter
directly, skipping fragments:
package com.commonsware.android.preso.slides;

import android.content.Context;
import android.support.v4.view.PagerAdapter;
import android.view.View;
import android.view.ViewGroup;
import android.widget.ImageView;

class SlidesAdapter extends PagerAdapter {
  private static final int[] SLIDES= { R.drawable.img0,
      R.drawable.img1, R.drawable.img2, R.drawable.img3,
      R.drawable.img4, R.drawable.img5, R.drawable.img6,
      R.drawable.img7, R.drawable.img8, R.drawable.img9,
      R.drawable.img10, R.drawable.img11, R.drawable.img12,
      R.drawable.img13, R.drawable.img14, R.drawable.img15,
      R.drawable.img16, R.drawable.img17, R.drawable.img18,
      R.drawable.img19 };
  private static final int[] TITLES= { R.string.title0,
      R.string.title1, R.string.title2, R.string.title3,
      R.string.title4, R.string.title5, R.string.title6,
      R.string.title7, R.string.title8, R.string.title9,
      R.string.title10, R.string.title11, R.string.title12,
      R.string.title13, R.string.title14, R.string.title15,
      R.string.title16, R.string.title17, R.string.title18,
      R.string.title19 };
  private Context ctxt=null;

  SlidesAdapter(Context ctxt) {
    this.ctxt=ctxt;
  }

  @Override
  public Object instantiateItem(ViewGroup container, int position) {
    ImageView page=new ImageView(ctxt);

    page.setImageResource(getPageResource(position));
    container.addView(page,
                      new ViewGroup.LayoutParams(
                                                 ViewGroup.LayoutParams.MATCH_PARENT,
                                                 ViewGroup.LayoutParams.MATCH_PARENT));

    return(page);
  }

  @Override
  public void destroyItem(ViewGroup container, int position,
                          Object object) {
    container.removeView((View)object);
  }

  @Override
  public int getCount() {
    return(SLIDES.length);
  }

  @Override
  public boolean isViewFromObject(View view, Object object) {
    return(view == object);
  }

  @Override
  public String getPageTitle(int position) {
    return(ctxt.getString(TITLES[position]));
  }

  int getPageResource(int position) {
    return(SLIDES[position]);
  }
}
The data for the SlidesAdapter consists of a pair of static int arrays, one
holding the drawable resource IDs, one holding the string resource IDs.
Of note, SlidesAdapter has a getPageResource() method, to return the drawable
resource ID for a given page position, which is used by instantiateItem() for
populating the position’s ImageView.
We also want to be able to show the slide on an external display via a Presentation.
As with the preceding sample app, this one uses a PresentationFragment,
here named SlidePresentationFragment:
package com.commonsware.android.preso.slides;

import android.content.Context;
import android.os.Bundle;
import android.view.Display;
import android.view.LayoutInflater;
import android.view.View;
import android.view.ViewGroup;
import android.widget.ImageView;
import com.commonsware.cwac.preso.PresentationFragment;

public class SlidePresentationFragment extends PresentationFragment {
  private static final String KEY_RESOURCE="r";
  private ImageView slide=null;

  public static SlidePresentationFragment newInstance(Context ctxt,
                                                      Display display,
                                                      int initialResource) {
    SlidePresentationFragment frag=new SlidePresentationFragment();

    frag.setDisplay(ctxt, display);

    Bundle b=new Bundle();

    b.putInt(KEY_RESOURCE, initialResource);
    frag.setArguments(b);

    return(frag);
  }

  @Override
  public View onCreateView(LayoutInflater inflater,
                           ViewGroup container,
                           Bundle savedInstanceState) {
    slide=new ImageView(getContext());

    setSlideContent(getArguments().getInt(KEY_RESOURCE));

    return(slide);
  }

  void setSlideContent(int resourceId) {
    slide.setImageResource(resourceId);
  }
}
Here, in addition to the sort of logic seen in the preceding sample app, we also need to teach the fragment which image it should be showing at any point in time. We do this in two ways:
int named initialResource to the factory method, where
initialResource represents the image to show when the fragment is first
displayed. That value is packaged into the arguments Bundle, and onCreateView()
uses that value.ImageView for this
Presentation is handled by setSlideContent(). This is called by
onCreateView(), passing in the initialResource value.The rest of the business logic for this application can be found in its
overall entry point, MainActivity.
onCreate() of MainActivity is mostly focused on setting up the ViewPager:
  @Override
  protected void onCreate(Bundle savedInstanceState) {
    super.onCreate(savedInstanceState);
    setContentView(R.layout.activity_main);

    TabPageIndicator tabs=(TabPageIndicator)findViewById(R.id.titles);

    pager=(ViewPager)findViewById(R.id.pager);
    adapter=new SlidesAdapter(this);
    pager.setAdapter(adapter);
    tabs.setViewPager(pager);
    tabs.setOnPageChangeListener(this);

    helper=new PresentationHelper(this, this);
  }
The ViewPager and our SampleAdapter are saved in data members of the
activity, for later reference. We also wire in a TabPageIndicator, from
the ViewPagerIndicator library, and arrange to get control in our
OnPageChangeListener methods when the page changes (whether via the tabs
or via a swipe on the ViewPager itself).
onCreate() also hooks up a PresentationHelper, following the recipe
used elsewhere in this chapter. And, as PresentationHelper requires, we
forward along the onResume() and onPause() events to it:
  @Override
  public void onResume() {
    super.onResume();
    helper.onResume();
  }

  @Override
  public void onPause() {
    helper.onPause();
    super.onPause();
  }
In the showPreso() method, required by the PresentationHelper.Listener
interface, we create an instance of SlidePresentationFragment, passing in
the resource ID of the current slide, as determined by the ViewPager:
  @Override
  public void showPreso(Display display) {
    int drawable=adapter.getPageResource(pager.getCurrentItem());

    preso=
        SlidePresentationFragment.newInstance(this, display, drawable);
    preso.show(getFragmentManager(), "preso");
  }
We then show() the PresentationFragment, causing it to appear on the attached
Display.
The corresponding clearPreso() method follows the typical recipe of calling
dismiss() on the PresentationFragment, if one exists:
  @Override
  public void clearPreso(boolean showInline) {
    if (preso != null) {
      preso.dismiss();
      preso=null;
    }
  }
However, the SlidesPresentationFragment now is showing the slide that was current
when the Display was discovered or attached. What happens if the user changes
the slide, using the ViewPager?
In that case, our OnPageChangeListener onPageSelected() method will be called,
and we can update the SlidesPresentationFragment to show the new slide:
  @Override
  public void onPageSelected(int position) {
    if (preso != null) {
      preso.setSlideContent(adapter.getPageResource(position));
    }
  }
The activity also sets up the action bar with three items:
<?xml version="1.0" encoding="utf-8"?>
<menu xmlns:android="http://schemas.android.com/apk/res/android">

  <item
    android:id="@+id/first"
    android:icon="@android:drawable/ic_media_previous"
    android:showAsAction="always"
    android:title="@string/first">
  </item>
  <item
    android:id="@+id/last"
    android:icon="@android:drawable/ic_media_next"
    android:showAsAction="always"
    android:title="@string/last">
  </item>
    <item
    android:id="@+id/present"
    android:checkable="true"
    android:checked="true"
    android:showAsAction="never"
    android:title="@string/show_presentation">
  </item>

</menu>
Two, first and last, simply set the ViewPager position to be the first
or last slide, respectively. This will also update the SlidesPresentationFragment,
as onPageSelected() is called when we call setCurrentItem() on the
ViewPager.
  @Override
  public boolean onCreateOptionsMenu(Menu menu) {
    getMenuInflater().inflate(R.menu.activity_actions, menu);

    return(super.onCreateOptionsMenu(menu));
  }

  @Override
  public boolean onOptionsItemSelected(MenuItem item) {
    switch (item.getItemId()) {
      case R.id.present:
        boolean original=item.isChecked();

        item.setChecked(!original);

        if (original) {
          helper.disable();
        }
        else {
          helper.enable();
        }

        break;

      case R.id.first:
        pager.setCurrentItem(0);
        break;

      case R.id.last:
        pager.setCurrentItem(adapter.getCount() - 1);
        break;
    }

    return(super.onOptionsItemSelected(item));
  }
The other action bar item, present, is a checkable action bar item, initially
set to be checked. This item controls what we are showing on the external
display:
Presentation
The theory here is that, in a presentation, we could switch from showing the slides to showing the audience what the presenter has been seeing all along.
Switching between Presentation and default mirroring is a matter of calling
enable() (to show a Presentation) or disable() (to revert to mirroring)
on the PresentationHelper.
Alas, there is a problem: not all Android 4.2 devices support Presentation, even
though they support displaying content on external displays. Non-Presentation
devices simply support classic mirroring.
Generally speaking, it appears that devices that shipped with Android 4.2
and higher will support Presentation, assuming that they have some sort of
external display support (e.g., MHL). Devices that were upgraded to Android 4.2
are less likely to support Presentation.
Unfortunately, at the present time, there is no known way to detect whether or not
Presentation will work, let alone any means of filtering on this capability in
the Play Store via <uses-feature>. With luck,
this issue
will be addressed in the future.
Since Presentation inherits from Dialog, it also “inherits” one of the limitations
of Dialog: you can only show one from an Activity. In many cases, that is not a big
problem. If you are using the external display as an adjunct to your own app’s use of the
primary touchscreen, you would be using an activity anyway. However, it does prevent one
from using Presentation to, say, implement a video player app that plays on an external
display but does not tie up the touchscreen, so the user can use other apps while the video
plays.
However, as it turns out, it is possible to drive the content of an external display
from a background app… just not by using a Presentation.
The details of this are a bit tricky, derived from one Stack Overflow answer and another Stack Overflow question.
However, you do not need to deal with all of the details, courtesy of PresentationService.
PresentationService is a class in the
CWAC-Presentation library.
PresentationService clones some of the logic from Presentation and Dialog, enough
to allow you to define a View that will be shown on external display, driven by a Service.
PresentationService is an abstract base class for you to extend, where
PresentationService handles showing your content on an external display,
and you simply manage that content.
The CWAC-Presentation library has
a demoService/ directory
containing a sample use of PresentationService. The recipe is fairly simple and
is outlined in the following sections.
The CWAC-Presentation README contains
instructions for attaching the libraries to your project, whether via Gradle dependencies,
downloading a pair of JARs, or using the source form of the Android library project.
As is noted above, PresentationService is an abstract class, so you will need to create
your own concrete subclass of it, under whatever name you wish. And, as with any service,
you will need a <service> element in the manifest. None of this is especially unusual.
The sample app is a service-based rendition of
the Presentation/Slides sample app
described earlier in this chapter. It has a SlideshowService that will display the
slideshow on an external display from the background, switching slides every five seconds.
One of the abstract methods that you will need to implement is getThemeId(). This
should return the value of the style resource that represents the theme that you wish
to use for the widgets you are going to show on the external display.
For example, if your project uses the @style/AppTheme approach that is code-generated for
you, you can simply return R.style.AppTheme from getThemeId(), as the
sample app does:
  @Override
  protected int getThemeId() {
    return(R.style.AppTheme);
  }
The other abstract method you need to implement is buildPresoView(). You are passed
a Context and a LayoutInflater, and your job is to use those to build your UI for the
external display, returning the root view. The LayoutInflater is already set up to use
the theme you provided via getThemeId().
Since this will be called shortly before showing the result on the external display, you can
also take this time to initialize other aspects of your presentation. For example, the
SlideshowService implements Runnable and has a Handler for the main application thread,
initialized in onCreate():
  private Handler handler=null;

  @Override
  public void onCreate() {
    handler=new Handler(Looper.getMainLooper());
    super.onCreate();
  }
buildPresoView() not only returns an ImageView for the slides, but also calls run(), which
populates the ImageView and calls postDelayed() on the Handler to schedule run()
to be called again in five seconds, thereby arranging to update the slide every five seconds:
  @Override
  protected View buildPresoView(Context ctxt, LayoutInflater inflater) {
    iv=new ImageView(ctxt);
    run();

    return(iv);
  }

  @Override
  public void run() {
    iv.setImageResource(SLIDES[iteration % SLIDES.length]);
    iteration+=1;

    handler.postDelayed(this, 5000);
  }
onDestroy() calls removeCallbacks() to break the Handler postDelayed() loop:
  @Override
  public void onDestroy() {
    handler.removeCallbacks(this);

    super.onDestroy();
  }
Calling startService() on your service will then trigger the presentation. Or, more
accurately, it will trigger PresentationService to work with a PresentationHelper
to determine when a presentation should be shown. PresentationService will then
use buildPresoView() to populate the external display. Conversely, calling
stopService() will stop the presentation.
It is up to you to determine what is the trigger for these calls. The sample app simply starts the service immediately when run and stops the service in response to an action bar item click.
While the service is running, you are welcome to use an event bus or other
means to control the contents of the presentation, by manipulating the widgets you created
in buildPresoView().
Note that it is safe to call startService() on the service multiple times,
if you do not know whether the service is already running and need to ensure
that it is running now.
In February 2014, Google released a long-awaited SDK to allow anyone to write
an app that connects to
Chromecast,
Google’s streaming-media HDMI stick. This Cast SDK also works with other
Google Cast-capable devices, like some Android TV models.
A natural question coming out of that
is whether Presentation and DisplayManager work with Chromecast.
The answer is: that depends on how you look at the problem.
While Chromecast may physically resemble a wireless display adapter, in truth it is its own device, running a customized mashup of Android and ChromeOS. Chromecast’s strength is in playing streaming media from any source, primarily directly off of the Internet.
The classic approach for the Google Cast SDK is that
apps are telling the Chromecast what to stream from, not streaming to the
Chromecast itself. As such, the Cast API is distinctly different
from that of Presentation, and while the two both deal with what the Android
device would consider an external display, they are not equivalent solutions.
However:
Presentation with a ChromecastPresentation-workalike API, one that
presumably works with Chromecast without having to go through
the Miracast setupMore coverage of Chromecast can be found in the next chapter.