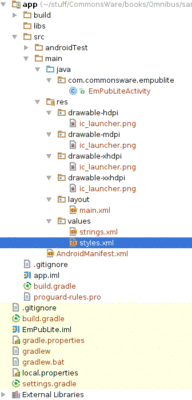
Figure 52: Android Studio Project Explorer, Showing EmPubLite
The Android build system is organized around a specific directory tree structure for your Android project, much like any other Java project. The specifics, though, are fairly unique to Android — the Android build tools do a few extra things to prepare the actual application that will run on the device or emulator.
Making things more complicated is that the default structure is different for the current tools (e.g., Android Studio) and the legacy tools (e.g., Eclipse with the ADT plugin).
Here is a quick primer on the project structure, to help you make sense of it all, particularly for the sample code referenced in this book.
The details of exactly what files are in your project depend upon your choice of IDE. However, regardless of whether you go with Android Studio or something else, there are many elements in common.
AndroidManifest.xml is an XML file describing the application being
built and what components — activities, services, etc. — are being
supplied by that application. You can think of it as being the “table of
contents” of what your application is about, much as a book has a “table
of contents” listing the various parts, chapters, and appendices that appear
in the book.
We will examine the manifest a bit more closely starting in the next chapter.
When you created the project, you
supplied the fully-qualified class name of the “main” activity for the
application (e.g., com.commonsware.android.SomeDemo). You will then find that
your project’s Java source tree already has the package’s directory tree in place,
plus a stub Activity subclass representing your main activity (e.g.,
src/com/commonsware/android/SomeDemoActivity.java). You are welcome to modify this
file and add Java classes as needed to implement your application,
and we will demonstrate that countless times as we progress through this book.
Elsewhere — in directories that you normally do not work with — the Android
build tools will also be code-generating some source code for you each time you
build your app. One of the code-generated Java classes (R.java) will be
important for controlling our user interfaces from our own Java code, and we will
see many references to this R class as we start building applications in earnest.
You will also find that your project has a res/ directory tree. This holds
“resources” — static files that are packaged along with your application,
either in their original form or, occasionally, in a preprocessed form. Some of
the subdirectories you will find or create under res/ include:
res/drawable/ for images (PNG, JPEG, etc.)res/layout/ for XML-based UI layout specificationsres/menu/ for XML-based menu specificationsres/raw/ for general-purpose files (e.g., an audio clip, a CSV file of
account information)res/values/ for strings, dimensions, and the likeres/xml/ for other general-purpose XML files you wish to shipSome of the directory names may have suffixes, like res/drawable-hdpi/. This
indicates that the directory of resources should only be used in certain
circumstances — in this case, the drawable resources should only be used
on devices with high-density screens.
We will cover all of these, and more, later in this book.
The IDE needs to know how to take all of this stuff and come up with an Android APK file. Some of this is already “known” to the IDE based upon how the IDE was written. But some details are things that you may need to configure from time to time, and so those details are stored in files that you will edit, by one means or another, from your IDE.
In Android Studio, most of this knowledge is kept in one or more files
named build.gradle. These are for a build engine known as Gradle,
that Android Studio uses to build APKs and other Android outputs.
In legacy Eclipse-style projects,
this knowledge is scattered among several files, some of which
you might edit manually (e.g., project.properties) and some of which you
would only change through Eclipse itself (e.g., .classpath).
All of those items are stored in a particular directory structure in an Android Studio project… at least by default. Android Studio and Gradle are powerful and can be configured to handle other structures. So, for example, you will find some projects using the legacy Eclipse-style structure, which is different than what Android Studio uses normally.
That being said, most projects that you encounter — including nearly all of the sample apps in this book — will stick with the Android Studio default structure.
In the root directory of your project, the most important item is the
app/ directory, where your application code resides. We will look at that
in the next section.
Beyond the app/ directory, the other noteworthy files in the root of your
project include:
build.gradle, which is part of the build instructions for your project,
as is described abovesettings.gradle, gradle.properties,
and so forth)local.properties, which indicates where your Android SDK tools reside.iml file, where Android Studio holds some additional metadata
about your projectEventually, you will have:
build/ directory, containing the compiled output of your app,
plus various reports and other files related to the build process and
app testing.gradle/ directory, containing Gradle executable code.idea/ directory — this, along with the .iml file, represent
data needed by IntelliJ IDEA, on which Android Studio is basedThe app/ directory, and its contents, are where you will spend most of
your time as a developer. Rarely do you need to manipulate the files in
the project root.
The most important thing in the app/ directory is the src/ directory,
which is the root of your project’s sourcesets, which will be described
in the next section.
Beyond the src/ directory, there are a few other items of note in
app/:
build/ directory, which will hold the outputs of building your
app, including your APK filebuild.gradle file, where most of your project-specific Gradle
configuration will go, to teach Android Studio how to build your appapp.iml file, containing more Android Studio metadataSourcesets are where the “source” of your project is organized. Here, “source” not only refers to programming language source code (e.g., Java), but other types of inputs to the build, such as your resources.
The sourceset that you will spend most of your time in is main/. You
will also have a stub sourceset named androidTest, for use in creating
unit tests, as will be covered later in the book.
Inside of a sourceset, you can have:
java/ directoryres/ directoryassets/ directory, representing other static files you wish packaged with the
application for deployment onto the deviceAndroidManifest.xml file
Figure 52: Android Studio Project Explorer, Showing EmPubLite
A legacy Eclipse-style project has a different structure, with the following items in the project root directory:
AndroidManifest.xml, as is described abovebin/, which holds the application once it is compiled
(note: this directory will be created when you first build your application)res/, which holds your resources, as is described abovesrc/, which holds the Java source code for the applicationIn addition to the files and directories shown above, you may find any of the following in Android projects:
assets/, which holds other static files you wish packaged with the
application for deployment onto the devicegen/, where Android’s build tools will place source code that they generatelibs/, which holds any third-party Java JARs your application requires*.properties, containing configuration data for your buildsproguard.cfg or proguard-project.txt, which are used for
integration with
ProGuard for obfuscating your Android code.classpath)As part of running your app on a device or emulator, the IDE will generate an APK file. You will find this:
build/outputs/apk directory of your Android Studio project, if
the project has no modules (e.g., no app/ directory), orbuild/outputs/apk directory of your module’s directory,
(e.g., app/build/outputs/apk for a traditional Android Studio project), orbin/ directory of your Eclipse-style projectThe APK file is a ZIP archive containing your compiled Java classes, the compiled
edition of your resources (resources.arsc), any un-compiled resources (such
as what you put in res/raw/), and the AndroidManifest.xml file. If you build
a debug version of the application — which is the default — you will
have yourapp-debug.apk as your APK, for an app named yourapp.