Outback hunters and grocery store gatherers alike are drawn to the succulent flavor and toothsome texture of red meat, from big game to beef. Beef jerky is the poster child of preserved protein of any kind, but there are many ways to preserve beef, lamb, venison, elk, and buffalo. The large size of these animals speaks volumes about our need to preserve them; one can only eat so much of a giant beast in one sitting, and early humans, I can only imagine, must have tried every possible way to save some of that meat for tomorrow. Preserved meat is frequently enjoyed on its own (in the realm of jerky), as the base of a flavorful dish (I’m in love with khlea as the starter in a lentil pot), or sandwiched between bread for a hearty meal (come to mama, pastrami!).
Leaner cuts of meat are best for drying; fattier pieces lend themselves better to fat curing and smoking. All of it is most delicious and made safer with a healthy dose of salt in the mix. In my opinion, the salt is as craveable as the meat.
One other safety note: While many preserved-meat traditions have historically been practiced at room temperature, modern scientists insist that preserved meat of any kind should be heated to an internal temperature of 160°F (70°C) before consumption. The hunter or farmer starting with fresh meat needs to take some extra precautions (see here).
Other than that . . . meat on! Flip the page and meet your meat.
Basic Beef Jerky
Next to bacon, savory, toothsome beef jerky is one of the gateway preserved meats for beginners or vegetarians who’ve fallen off the wagon. This particular take on America’s new favorite snack food doesn’t require a food dehydrator; jerky dries just as beautifully in the oven. The key to making beef jerky is slicing the meat very thinly. Your butcher may be willing to slice the meat for you — it’s worth an ask. The other way to ensure success is to know when it’s done. Look for a dry, shredded-looking interior on a thick piece — if you find it, you’ve created portable protein gold. (See photo.)
2 teaspoons freshly cracked black pepper (optional)
Neutral cooking oil (like olive, avocado, sunflower, or safflower oil) to lightly oil the racks (for oven drying)
Instructions
1. Freeze the steak for 30 minutes to make it easier to slice thinly. With a very sharp knife, slice the meat against the grain as thinly as you possibly can, 1⁄8 to 1⁄4 inch thick.
2. Use a small, sharp knife to remove every trace of fat from the meat. Don’t skip this step. Meat can be cured, whereas fat cannot, and the fat may go rancid later.
3. Lay the well-trimmed meat between two layers of paper towels and roll it up tightly to press out as much of the moisture as you can.
4. In a medium bowl, use your hands to toss the meat with the sugar, salt, soy sauce, garlic, and pepper flakes and black pepper, if using. Let the meat marinate for 1 hour to help boost its flavor. Remove the meat and discard the marinade. Now it’s time to dry the meat either in the oven or with a food dehydrator.
Drying in an Oven
1. Preheat your oven to its lowest setting. Position one rack in the middle of the oven and one rack on the bottom. Line two baking sheets with parchment paper.
2. Lightly oil two wire cooling racks and place them on top of the lined baking sheets. Lay the marinated meat on the racks completely flat. Don’t let the pieces touch; allowing airflow in between pieces will help them dry more quickly.
3. Place the baking sheets in the oven. If you don’t have a convection oven, wedge the oven door open with a wooden spoon handle. Depending on your oven, the weather, and the thickness of the meat, your jerky will be done in 3 to 8 hours. Start checking the jerky after 3 hours. It’s ready when you’re able to bend a piece and it breaks.
Drying in a Food Dehydrator
Lay the marinated meat on the rack completely flat. Don’t let the pieces touch; allowing airflow in between pieces will help them dry more quickly. Dry the meat at 160°F (70°C) for 3 to 8 hours, depending on your machine, the weather, and the thickness of the meat. Start checking the jerky after 3 hours. It’s ready when you’re able to bend a piece of jerky and it breaks.
Storage
While your dried jerky is still warm, blot it with paper towels to remove any fat that may be sweating on the surface. Let cool, then store your jerky in a ziplock bag or an airtight container. While the jerky will keep at room temperature for several days, it will keep longer (6 weeks or more) refrigerated. Double-wrapped and frozen, the jerky will last for several months. For best results, fill an empty tea bag or a small piece of cheesecloth with raw rice, close it securely, and place it inside the container to help absorb any residual moisture.
Sour Orange Beef Jerky
Ready to try something beyond the flavor of typical teriyaki? Tangy, warm, and piquant, this mojo-infused dried meat will have your taste buds taking flight.
1 cup orange juice, fresh (from 2 big, juicy oranges) or store-bought
1⁄2 cup lemon juice (from 2 juicy lemons)
2 tablespoons fine sea salt
4 teaspoons ground cumin
Neutral cooking oil (like olive, avocado, sunflower, or safflower oil) to lightly oil the racks (for oven drying)
Instructions
1. Freeze the steak for 30 minutes to make it easier to slice thinly. With a very sharp knife, slice the meat against the grain as thinly as you possibly can, 1⁄8 to 1⁄4 inch thick.
2. Use a small, sharp knife to remove every trace of fat from the meat. Don’t skip this step. Meat can be cured, whereas fat cannot, and the fat may go rancid later.
3. Lay the well-trimmed meat between two layers of paper towels and roll it up tightly to press out as much of the moisture as you can.
4. In a medium bowl, toss the meat with the onion, orange juice, lemon juice, salt, and cumin. Allow the meat to marinate for 1 hour to help boost its flavor. Remove the meat and discard the marinade. (The meat may change color from the acidic juice. Once it dries, however, the color will correct to a succulent red.) Now it’s time to dry the meat either in the oven or with a food dehydrator.
Drying in an Oven
1. Preheat your oven to its lowest setting. Position one rack in the middle of the oven and one rack on the bottom. Line two baking sheets with parchment paper.
2. Lightly oil two wire cooling racks and place them on top of the lined baking sheets. Lay the marinated meat on the racks completely flat. Don’t let the pieces touch; allowing airflow in between pieces will help them dry more quickly.
3. Place the baking sheets in the oven. If you don’t have a convection oven, wedge the oven door open with a wooden spoon handle. Depending on your oven, the weather, and the thickness of the meat, your jerky will be done in 3 to 8 hours. Start checking the jerky after 3 hours. It’s ready when you’re able to bend a piece of jerky and it breaks.
Drying in a Food dehydrator
Lay the marinated meat on the rack completely flat. Don’t let the pieces touch; allowing airflow in between pieces will help them dry more quickly. Dry the meat at 160°F (70°C) for 3 to 8 hours, depending on your machine, the weather, and the thickness of the meat. Start checking the jerky after 3 hours. It’s ready when you’re able to bend a piece of jerky and it breaks.
Storage
While your dried jerky is still warm, blot it between paper towels to remove any fat that may be sweating on the surface. Let cool, then store your jerky in a ziplock bag or an airtight container. While the jerky will keep at room temperature for several days, it will keep longer (6 weeks or more) refrigerated. Double-wrapped and frozen, the jerky will keep for several months. For best results, fill an empty tea bag or a small piece of cheesecloth with raw rice, close it securely, and place it inside the container to help absorb any residual moisture.
This is a jerky you’ll never find on a convenience store shelf. The heft of the yogurt helps boost the protein and gives the meat a softer, more unctuous texture. The salty, mild miso makes this jerky super-savory. Garlic and ginger? Just because. They always give meat a high kick of flavor and spice.
4 teaspoons finely minced garlic (from 3 or 4 large cloves)
2 teaspoons finely minced fresh ginger
2 teaspoons fine sea salt
Neutral cooking oil (like olive, avocado, sunflower, or safflower oil) to lightly oil the racks (for oven drying)
Instructions
1. Freeze the meat for 30 minutes to make it easier to slice thinly. With a very sharp knife, slice the meat against the grain as thinly as you possibly can, 1⁄8 to 1⁄4 inch thick.
2. Use a small, sharp knife to remove every trace of fat from the meat. Don’t skip this step. Meat can be cured, whereas fat cannot, and the fat may go rancid later.
3. Lay the well-trimmed meat between two layers of paper towels and roll it up tightly to press out as much of the moisture as you can.
4. In a medium bowl, combine the yogurt, miso, garlic, ginger, and salt. Toss the beef with the marinade. Let the meat marinate for 30 minutes to help boost its flavor. Remove the meat and discard the marinade. Now it’s time to dry the meat either in the oven or with a food dehydrator.
Drying in an Oven
1. Preheat your oven to its lowest setting. Position one rack in the middle of the oven and one rack on the bottom. Line two baking sheets with parchment paper.
2. Lightly oil two wire cooling racks and place them on top of the lined baking sheets. Lay the marinated meat on the racks completely flat. Don’t let the pieces touch; allowing airflow in between pieces will help them dry more quickly.
3. Place the baking sheets in the oven. If you don’t have a convection oven, wedge the oven door open with a wooden spoon handle. Depending on your oven, the weather, and the thickness of the meat, your jerky will be done in 3 to 8 hours. Start checking the jerky after 3 hours. It’s ready when you’re able to bend a piece of jerky and it breaks.
Drying in a Food Dehydrator
Lay the marinated meat on the rack completely flat. Don’t let the pieces touch; allowing airflow in between pieces will help them dry more quickly. Dry the meat at 160°F (70°C) for 3 to 8 hours, depending on your machine, the weather, and the thickness of the meat. Start checking the jerky after 3 hours. It’s ready when you’re able to bend a piece of jerky and it breaks.
Storage
While your dried jerky is still warm, blot it between paper towels to remove any fat that may be sweating on the surface. Let cool, then store your jerky in a ziplock bag or an airtight container. While the jerky will keep at room temperature for several days, it will keep longer (6 weeks or more) refrigerated. Double-wrapped and frozen, the jerky will keep for several months. For best results, fill an empty tea bag or a small piece of cheesecloth with raw rice, close it securely, and place it inside the container to help absorb any residual moisture.
Big Game Jerky
Maybe you hunt. Or maybe you hunt no further than your butcher shop. Either way, if your meat-loving dinner table is topped only with beef, pork, or chicken, you are missing out on some of the finest delicacies of the land. As with all jerky making, you want to select lean cuts of game and trim off all the fat — think eye of round or tenderloin. This deep, dark marinade is savory, sweet, and complex. Oh, and the best way to crack cardamom pods is to just bite into them enough to make them split.
Neutral cooking oil (like olive, avocado, sunflower, or safflower oil) to lightly oil the racks (for oven drying)
Instructions
1. Remove as much fat from the meat as you can and freeze the meat for 20 to 30 minutes to make it easier to slice. With a very sharp knife, slice the meat as thinly as you possibly can, 1⁄4 to 1⁄3 inch thick.
2. In a large bowl, whisk together the Worcestershire sauce, molasses, soy sauce, lemon zest, caraway seeds, cardamom, and garlic.
3. Drop the sliced meat into the bowl one piece at a time to ensure that each piece is completely coated in the brine. Allow the meat to sit in the marinade for 90 minutes. Remove the meat and discard the marinade. Now it’s time to dry the meat either in the oven or with a food dehydrator.
Drying in an Oven
1. Preheat your oven to its lowest setting. Position one rack in the middle of the oven and one rack on the bottom. Line two baking sheets with parchment paper.
2. Lightly oil two wire cooling racks and place them on top of the lined baking sheets. Lay the marinated meat on the racks completely flat. Don’t let the pieces touch; allowing airflow in between pieces will help them dry more quickly.
3. Place the baking sheets in the oven. If you don’t have a convection oven, wedge the oven door open with a wooden spoon handle. Depending on your oven, the weather, and the thickness of the meat, your jerky will be done in 3 to 8 hours. Start checking the jerky after 3 hours. It’s ready when you’re able to bend a piece of jerky and it breaks.
Drying in a Food Dehydrator
Lay the marinated meat on the rack completely flat. Don’t let the pieces touch; allowing airflow in between pieces will help them dry more quickly. Dry the meat at 160°F (70°C) for 3 to 8 hours, depending on your machine, the weather, and the thickness of the meat. Start checking the jerky after 3 hours. It’s ready when you’re able to bend a piece of jerky and it breaks.
Storage
While your dried jerky is still warm, blot it between paper towels to remove the fat that may be sweating on the surface. Let cool, then store your jerky in a ziplock bag or an airtight container. While the jerky will keep at room temperature for several days, it will keep longer (6 weeks or more) refrigerated. Double-wrapped and frozen, the jerky will keep for several months. For best results, fill a tea bag or a small piece of tied cheesecloth with raw rice and place it inside the container to help absorb any residual moisture.
Meat Energy Bars
Oh sure, there are many brands of meat-based energy bars, but there are many rewards to making your own, including total control over ingredients and quality. This hybrid of energy bar and jerky has a lot going for it, including the protein and nutrition of real meat, sweetness, crunch, and calories for heavy lifting. Based on the idea of pemmican, this is a great alternative use for surplus meat, and the flavor variations are just about endless. When it comes to meat energy bars, store-bought is for suckers.
Feel free to swap out the chia seeds for your favorite nut or to use different dried fruit. A pinch of clove or cinnamon will also warm up the flavors.
Ingredients
1⁄4 cup extra-virgin coconut oil, plus a bit more for the pan
6 ounces jerky of your choice
2⁄3 cup pumpkin seeds
1 cup dried mango
6 large dates, pits removed
2 tablespoons chia seeds
1⁄4 cup honey
Kosher salt
Instructions
1. Prepare an 8-inch square pan by rubbing the bottom, sides, and corners with a small amount of coconut oil.
2. Chop the jerky. If you’re using a knife, make sure it’s sharp, and work it over the jerky until it’s very fine. If you’re going to use a food processor, make sure the jerky is very dry and brittle: dry it on a rack over a rimmed baking sheet in the oven at its lowest temperature or in the food dehydrator at 160°F (70°C) for 1 hour or more, until it crumbles easily. Then process the jerky until it is very fine. Transfer to a medium bowl.
3. Toast the pumpkin seeds to coax out more flavor: Heat a small skillet over medium-high heat. Toast the seeds, stirring constantly, until they turn golden brown, about 3 minutes. Remove from the heat and transfer them to a plate to cool.
4. Chop the cooled pumpkin seeds, or put them in the food processor and pulse a few times to crumble; they should be about the size of bits of granola. Add them to the jerky.
5. Chop the mango and dates very finely, or put them in the food processor and process into a sticky paste. Add them to the jerky, along with the chia seeds and honey. Melt the remaining 1⁄4 cup coconut oil in the microwave, heating it for just a few seconds to make it easier to pour, then add it to the bowl.
6. Mix the contents of the bowl thoroughly with your hands; the mixture should compress and stick together when squeezed. Taste the mixture and add 1⁄2 teaspoon salt at a time if needed.
7. Press the mixture into the prepared pan very firmly until it is flat and even all over, particularly in the corners. Cover and refrigerate until firm, at least 1 hour. Cut into 16 energy bars. Carefully remove each one with a knife or spatula. Serve the bars immediately, or wrap each one individually in plastic wrap.
Storage
Like jerky, these bars can easily be thrown into a backpack or lunchbox for the day, but they will keep for months in the fridge. Wrap each bar in plastic wrap, and then store the bars in a ziplock bag or airtight container.
Pemmican (Native American Dried Fruit and Meat)
Survivalists love it. Paleos love it. This ancient Native American food of dried meat, dried fruit, and animal fat is the inspiration for the meat-based energy bars now flooding the market. It was adopted by fur traders in the eighteenth and nineteenth centuries because it’s portable, calorically dense, nutritious, and well preserved for long journeys. The flavor is intense, but some travelers would eat it as is. Some would simmer it into a stew with onions or potatoes. Note that it might be more convenient to start with dried ground meat, but I prefer jerky strips because they’re leaner. This is also a good use for an abundance of dried fruit and jerky of any kind — beef, bison, elk, venison, or even dried tofu. This recipe calls for tallow, which is a great high-heat cooking fat that has a savory, meaty flavor beloved by chefs. You can use store-bought, or follow the directions here and make your own.
Makes
8 servings
Time
2–10 hours (depending on whether you make the tallow)
Feel free to try any kind of jerky or to replace all or part of the cranberries with dried cherries or dried blueberries. A small dash of honey, ground cloves, or ground cinnamon will also warm up the flavors.
Ingredients
2 pounds (or more) suet (if you are making your own tallow; see How to Make Tallow), or 1⁄4 cup store-bought tallow
6 ounces jerky of your choice
1 cup dried cranberries
1 teaspoon kosher salt
Instructions
1. Prepare a 5- by 9-inch loaf pan by rubbing a dab of tallow around the bottom, corners, and sides.
2. Chop the jerky. If you’re using a knife, make sure it’s sharp, and work it over the jerky until it’s very fine. If you’re going to use a food processor, make sure the jerky is very dry and brittle: dry it on a rack set over a rimmed baking sheet in the oven at its lowest temperature or in the food dehydrator at 160°F (70°C) for 1 hour or more, until it crumbles easily. Then process the jerky until it is very fine. Transfer to a medium mixing bowl.
3. Chop the cranberries, or add them to the food processor and pulse a few times to crumble. They should be about the size of bits of granola. Add them to the jerky, along with the salt.
4. Melt the 1⁄4 cup tallow in the microwave in 20-second bursts until it’s liquid enough to pour. Or place the jar of tallow in a pan of hot water until it melts. Add the tallow to the meat and fruit and stir well. The tallow will hold them together when it firms.
5. Taste the mixture and adjust the salt as necessary, adding it in 1⁄2-teaspoon increments if needed. And feel how soft your hands are from the tallow! Nice.
6. Press the mixture into the prepared loaf pan very firmly until it is flat and even, particularly in the corners. Cover and refrigerate until firm, for at least 1 hour. Slice into eight pieces. Carefully remove each piece with a knife or spatula. Serve the pemmican immediately, or wrap each piece individually in plastic wrap.
Storage
Like jerky, these bars can easily be thrown into a backpack or lunch box for the day, but they will keep for months in the fridge. Wrap each bar in plastic wrap and then store the bars in a ziplock bag or airtight container.
Biltong (South African Dried Meat)
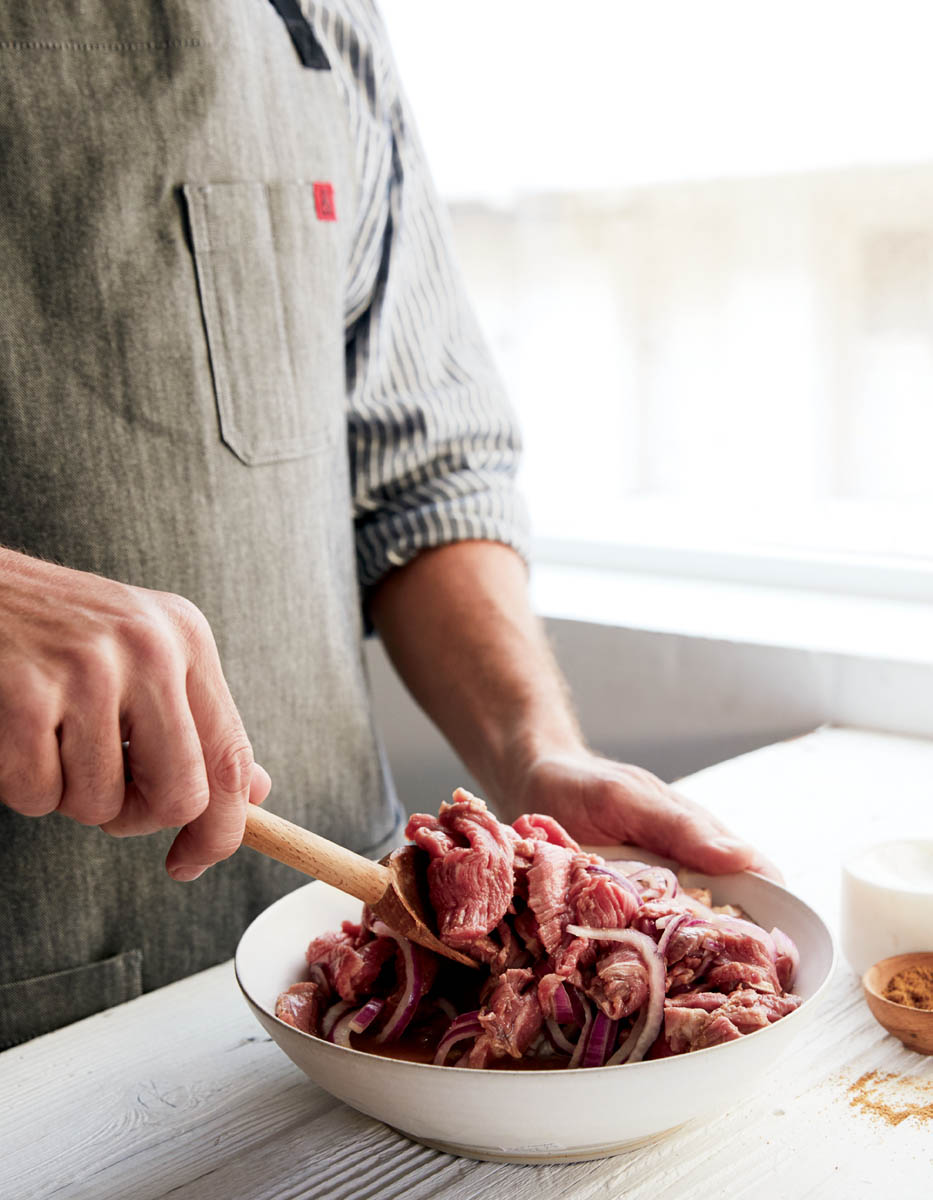
Former Top Chef contestant, beloved San Francisco Bay Area chef, and, above all, native-born South African Elizabeth Binder notes that biltong is not the same thing as beef jerky. Yes, they are both dried meat. But real biltong can be beef or wild game — including springbok, kudu, wildebeest (all types of antelope), or ostrich. The meat is sliced thicker than jerky and then, after drying, cut into bite-size pieces. The meat is hung so that it ages as it dries, which has a huge impact on its flavor. And despite the insistence of current U.S. food safety standards, biltong tends to have some fat. The seasoning of biltong is uniformly very simple: salt, pepper, and lots of freshly toasted coriander. (See photo.)
2 pounds beef fillet, sirloin, rump roast, top round, or bottom round
1 cup red wine vinegar
6 tablespoons coriander seeds
4 teaspoons black peppercorns
2 tablespoons kosher salt
Neutral cooking oil (like olive, avocado, sunflower, or safflower oil) to lightly oil the rack (for oven drying)
Instructions
1. Slice the meat into large pieces about 1 inch thick. Pour the vinegar into a small bowl, then give each piece a quick dip in the vinegar. Let the meat dry on a rack under a fan for 30 to 60 minutes, or until it feels a bit tacky to the touch.
2. While you’re waiting for the meat to dry, toast the coriander seeds: Heat a small skillet over medium heat for 1 minute. Add the coriander and, stirring constantly, toast until light golden brown, about 2 minutes. Remove the pan from the heat, and pour the coriander seeds into a bowl to let them cool.
3. Grind the toasted coriander and peppercorns in a spice grinder, coffee grinder, or food processor until finely ground. Pour the coriander, peppercorns, and salt into a medium bowl.
4. Once the meat has dried, toss it with the ground spices. Cover the bowl and refrigerate overnight. Now it’s time to dry the meat either in the oven or with a food dehydrator.
Drying in an Oven
1. Preheat your oven to its lowest setting. Position one rack in the middle of the oven. Line one baking sheet with parchment paper.
2. Lightly oil a wire cooling rack and place it on top of the lined baking sheet. Keeping the spices intact on the surface of the meat, lay the meat on the rack completely flat. Don’t let the pieces touch; allowing airflow in between pieces will help them dry more quickly.
3. Place the baking sheets in the oven. If you don’t have a convection oven, wedge the oven door open with a wooden spoon handle. Depending on your oven, the weather, and the thickness of the meat, your biltong will be done in 5 to 9 hours. The meat has cured when it feels quite firm and stiff to the touch (like well-done meat) and when it is no longer raw in the middle.
4. Raise the temperature of the oven to 275°F (140°C).
5. To be absolutely certain your biltong is free of contaminants, heat the dried meat in the preheated oven for at least 15 minutes, or until it reaches an internal temperature of 160°F (70°C).
6. To serve the biltong, slice the meat into bite-size pieces.
Drying in a Food Dehydrator
1. Lay the meat, spices intact, on the rack completely flat. Don’t let the pieces touch; allowing airflow in between pieces will help them dry more quickly. For maximum food safety, dry the meat at 160°F (70°C) for 4 to 10 hours, depending on your machine, the weather, and the thickness of the meat. The biltong is ready when it feels very firm all the way through and, when a thick piece is cut, it looks completely cured.
2. Preheat the oven to 275°F (140°C).
3. To be absolutely certain your biltong is free of contaminants, heat the dried meat in the preheated oven for at least 15 minutes, or until it reaches an internal temperature of 160°F (70°C).
4. To serve the biltong, slice the meat into bite-size pieces.
Storage
Once it’s cool, store your biltong in a brown paper bag so it can breathe. While the biltong will keep at room temperature for several days, it will keep longer (6 weeks or more) refrigerated in the bag. Double-wrapped in a ziplock bag and frozen, it will keep for several months.
Khlea (Moroccan Preserved Lamb)
Khlea, also known as khlii, is preserved lamb or beef that, when traditionally prepared, combines a couple of the best practices of ancient food preservation: sun drying and fat curing, with a quick frying in between to help kill any pathogens along the way. Modern food safety dictates a few changes to this recipe: we will dry it in a dehydrator or in the oven, and we’ll store it in the fridge. Khlea is traditionally served chopped with eggs or sautéed as the starting flavor of a pot of lentils, couscous, or beans. Its rich and flavorful fat is also great for cooking.
Neutral cooking oil (like olive, avocado, sunflower, or safflower oil) to lightly oil the racks (for oven drying)
2 cups animal fat (such as tallow, lard, or goose fat) or extra-virgin olive oil
Instructions
1. Chop the lamb into 2-inch cubes, as you would for stew meat. While most preserved meat recipes call for trimming the fat, here we are going to leave it. Pat the meat dry between layers of paper towels until it’s sticky to the touch.
2. In a medium bowl, stir together the garlic, salt, cumin, coriander, and pepper flakes. Add the meat to the bowl and toss it thoroughly. Cover and refrigerate for 12 to 24 hours. Now it’s time to dry the meat either in the oven or with a food dehydrator.
Drying in an Oven
1. Preheat your oven to its lowest setting. Position one rack in the middle of the oven. Line a baking sheet with parchment paper.
2. Lightly oil a wire cooling rack and place it on top of the lined baking sheet. Lay the marinated meat on the rack. Don’t let the pieces touch; allowing airflow in between pieces will help them dry more quickly.
3. Place the baking sheets in the oven. If you don’t have a convection oven, wedge the oven door open with a wooden spoon handle. Depending on your oven, the weather, and the thickness of the meat, the lamb will be dry in 7 to 8 hours. It is ready when it feels hard (like cooked meat) all over. Now it’s time to fry and cure the meat.
Drying in a Food Dehydrator
Lay the marinated meat on the rack. Don’t let the pieces touch; allowing airflow in between pieces will help them dry more quickly. Dry the meat at 160°F (70°C) for 7 to 8 hours, depending on your machine, the weather, and the thickness of the meat. The lamb is ready when it feels hard (like cooked meat) all over. Now it’s time to fry and cure the meat.
Frying and Curing
1. Heat a large skillet over medium heat. Melt the animal fat, and then carefully add the lamb to the pan in a single layer with space between the pieces; work in batches if necessary. Use tongs or chopsticks to fry the meat until golden brown on all sides, 4 to 6 minutes.
2. Pack the fried meat very, very tightly into a quart canning jar. Really press down on the meat to make it fit; it’s soft enough to be flexible, but not so soft that it will fall apart.
3. Carefully pour the warm fat from the pan into the jar. Cover the lamb completely by at least 1⁄2 inch. No part of the meat should be sticking out above the surface of the oil. If it is, add more liquefied fat or oil as necessary to cover it completely. The khlea is ready to eat, but it will become far more flavorful the longer it cures.
Storage
Let the jar cool completely and then store it, covered tightly, in the refrigerator. The khlea will keep for at least 6 months.
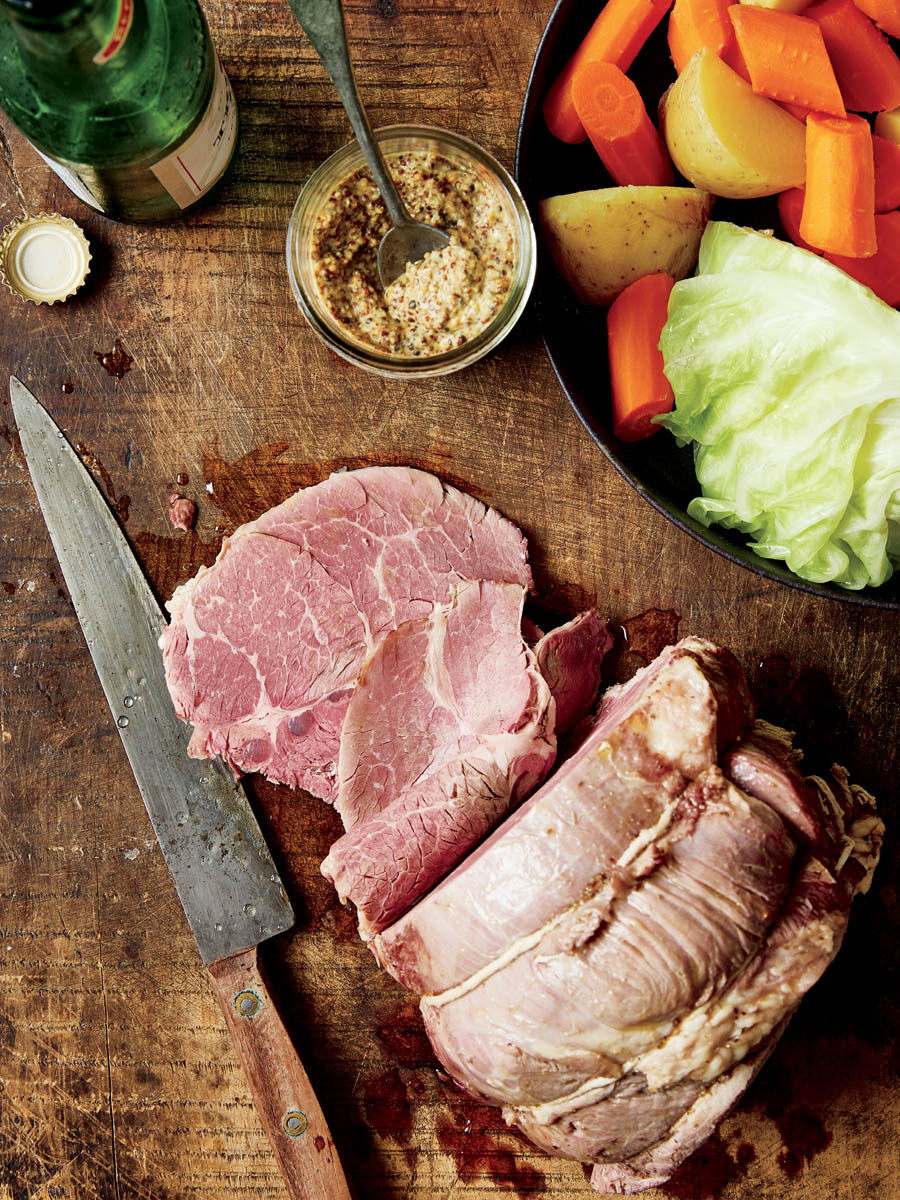
Corned Beef
Why should St. Patrick’s Day get all the meat-filled glory? Any day is a good day to get your meat in a brine. “Corning” the meat means, essentially, pickling it in brine and spices. And as any corned beef aficionado will tell you, this is delicious plated hot (with potatoes, cabbage, Irish soda bread, and, of course, beer) or sliced cold with mustard on rye bread. Don’t let the use of sodium nitrite (the pink curing salt available at some butcher shops or from online sausage-making suppliers) deter you. And if you’d rather have pastrami, cure the beef, then proceed to the instructions for Pastrami.
3 large carrots, peeled and cut into large chunks (optional)
1⁄2 head green cabbage, cut in two, core intact (optional)
Instructions
1. Add the water, salt, sugar, and curing salt to a large deep bowl or small food-safe bucket and stir well to dissolve the solids; the solution will be cloudy. Add the peppercorns, mustard seeds, celery seeds, caraway seeds, garlic, star anise, and bay leaf, then add the meat. Make sure the meat is completely submerged in the brining liquid. If necessary, invert a plate, place it on top of the meat, and weight it down to keep the meat safely below the top of the brine.
2. Cover the bowl and let the beef “corn” in the refrigerator for 10 to 14 days or until fully cured, stirring every couple of days to distribute the spices and checking to make sure the meat is fully covered in brine. The beef will be fully cured when it feels stiff and firm throughout. If you wish to tie the meat for a prettier presentation, do so after the curing process.
3. Once cured, drain and rinse the meat and discard all of the brine ingredients. Place the meat in a large stockpot and cover it with fresh water by 1 inch. Cover and bring to a boil, then reduce the heat to low and simmer for 11⁄2 hours (really, don’t boil it, or else your meat will be tough). If you’re making a meal out of this, add the potatoes, carrots, and cabbage and let them simmer with the beef for the last 30 minutes. The meat is done when the internal temperature at its thickest part is 150°F (65°C).
4. To serve the corned beef hot, trim away large hunks of excess fat. Slice the meat against the grain and on the bias and serve alongside the vegetables. To serve it cold, trim away the excess fat, cover tightly, and refrigerate for at least 8 hours. Slice the meat as thinly as possible.
Storage
Wrapped airtight and refrigerated, corned beef will keep for at least 1 week. Wrapped tightly and frozen, it will keep for at least 6 months.
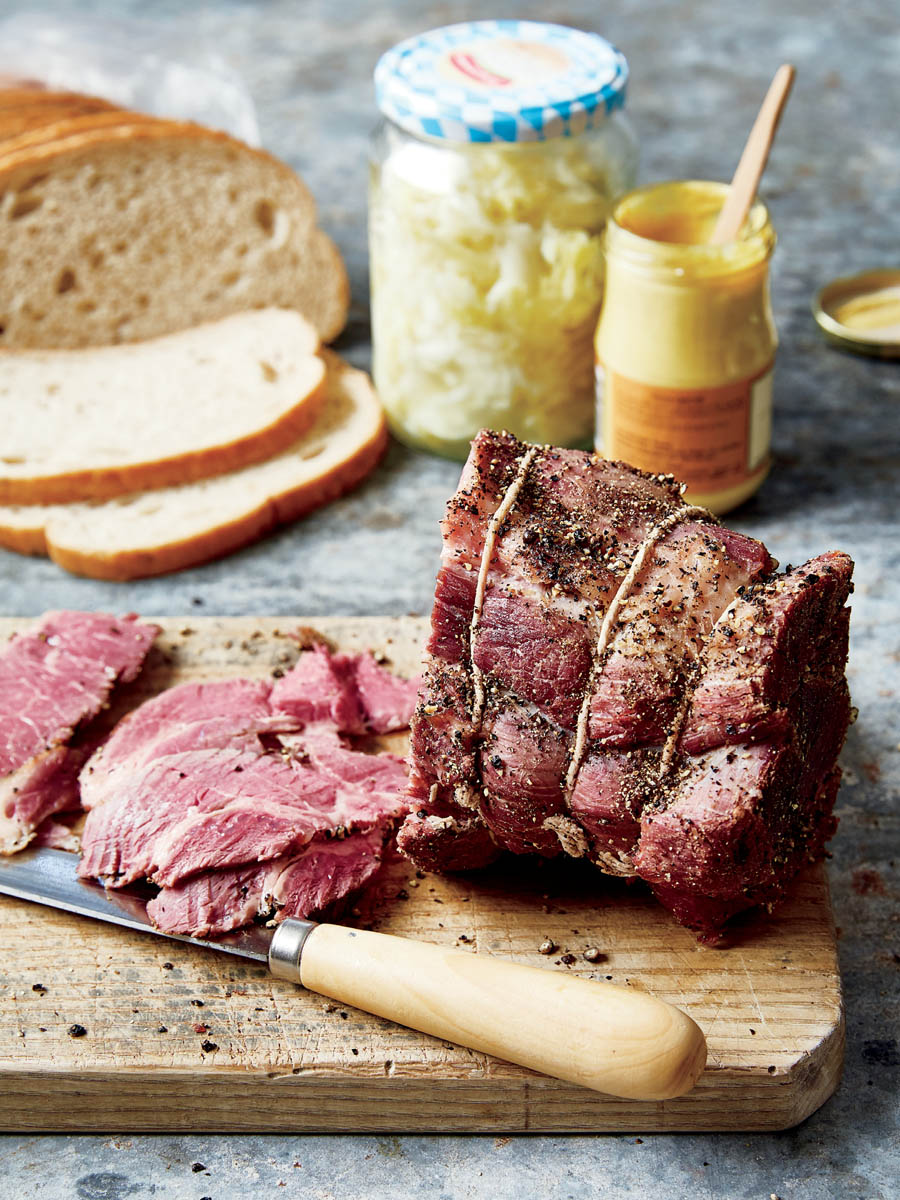
Pastrami
While it begins its life as basic corned beef, pastrami is an example of some serious culinary magic. Making it is a two-step process: first you cure the meat in brine, and then you patiently and slowly smoke it to cook it and add flavor. Note that while your pastrami will be so very tempting to eat immediately after smoking, its initial saltiness may really bowl you over. It truly takes refrigeration, a day of mellowing, and two slices of rye and a healthy slather of mustard for this meat to reach its full potential. That said, if you don’t like salt as much as I do, soak the cured meat in a couple of changes of fresh water before smoking it. To slice your pastrami superthin for sandwiches, freeze your finished, chilled meaty masterpiece for about 30 minutes to firm it up, then go at it with your freshly sharpened knife.
Makes
About 3 pounds
Time
10–14 days for brining, plus 1–2 days for smoking
1 (4-pound) cured Corned Beef, prepared through step 2
2 teaspoons finely crushed black peppercorns
Instructions
1. Discard the brine (including all the solid ingredients) from the corned beef. If you’re planning to soak the meat to reduce its salinity, do it now: Soak the meat in fresh water for 1 hour. Drain and repeat.
2. Pat the meat dry and press on the pepper. Let it sit on a wire rack under a fan to help it dry while you prepare the grill for hot or cold smoking.
Smoking
1. If hot-smoking, smoke the meat with the thickest portion closest to the flame until it reaches an internal temperature of 150°F (65°C) in the center of its thickest part. Note that you may need a second batch of coals after 11⁄2 hours or so; the total cooking time should be 2 to 21⁄2 hours.
If cold-smoking, smoke the meat for 12 hours, then finish it in the oven at 250°F (120°C) or on a low-heat grill for about 1 hour, until it reaches an internal temperature of 160°F (70°C) in the center of its thickest part.
2. Allow the meat to cool completely, and then refrigerate it for 1 day before eating. Slice it thinly and enjoy.
Storage
Tightly wrapped, this pastrami will keep refrigerated for up to 1 week or frozen for at least 6 months.