If I were forced to pick just one meat to enjoy for the rest of my days, it would be the almighty pig. Every bit — the meat, the fat, the skin, and even the ears — is extremely delicious. I know I shouldn’t play favorites, but I cannot tell a lie: whether roasted, fried, grilled, dried, smoked, salted, or pickled, pork is the dinnertime beast to be reckoned with.
There are many recipes here that will be familiar to you, including bacon, ham, and pork rinds. But I’ve also ventured down more untrodden paths, which brought me to Pork Belly Confit, which is pork belly (the same cut used for bacon) that has been given a French treatment. Other more unusual recipes, such as the Salt Pork and the New Orleans–Style Pickle Meat, bring flavor and pork’s richness to slow-simmered suppers that are worth every minute of waiting.
I am particularly in love with two of the Asian preparations of dried pork: Bak Kwa and Rousong. Bak kwa is a thin and flavorful sheet of ground pork that is preserved and then grilled; rousong is pork meat so completely dry that it becomes almost like sprinkles of savory cotton candy on top of rice or eggs. Both, I can assure you, are dried pork that you don’t see often.
Remember that while pork has historically been cured at cool room temperatures in many preserved-meat traditions, modern scientists insist that preserved pork should be heated to an internal temperature between 150°F and 160°F (65°C and 70°C) before being consumed. And hunters and farmers please take note: if you’ve killed your own pigs, you need to dress the meat immediately and take some extra precautions (see here).
Now, get ready to pig out on some pig . . .
Ham
A giant hunk of roast pork is one of the most soulful meals imaginable. Brining makes it juicy and flavorful. The addition of pink curing salt (sodium nitrite) is the thing that separates the ham from the pork. The salt not only helps cure the meat but also keeps its flesh pink — a must for many ham devotees. Smoking the ham is not required, but you will be deeply rewarded for your extra effort. I find that when the ham is smoked, it doesn’t need a glaze, but if your taste buds insist, brush the glaze onto the smoked meat and keep it on the grill for 20 minutes longer.
Makes
About 4 pounds
Time
10–14 days for brining, plus 5 hours for roasting or 1–2 days for smoking
1. To make the brine, combine the water, sugar, salt, onion, rosemary, bay leaves, orange zest, and curing salt in a large deep bowl or small food-safe bucket. Stir until the sugar and salt have dissolved completely.
2. Place the ham into the brine and weight it, if necessary, to keep it completely submerged below the brine line. An inverted plate with a jar full of water or some rocks on top will probably do the trick. Cover with either a lid or plastic wrap and let the ham cure in the brine in the refrigerator for 10 to 14 days. Stir it occasionally to circulate the flavors while it cures.
3. Discard the brine and all of the solids, and let the ham drain. Pat it dry completely. At this point, you can either roast your ham or smoke it.
Roasting
1. Preheat your oven to 375°F (190°C).
2. Place the ham, fat side up, in a baking dish and place in the oven. Roast the ham for 1 hour, then reduce the temperature to 325°F (160°C) and roast for another 1 to 2 hours, until the internal temperature of the meat at its thickest part and away from the bone is 150°F (65°C). Start checking the temperature of the meat 1 hour after reducing the temperature.
3. To make the glaze, combine the sugar and soy sauce in a small bowl. Add the orange juice a little at a time until the glaze is thin enough to be brushed on with a pastry brush.
4. Once the meat reaches temperature, brush the glaze over the top and sides of the ham and return it to the oven for 20 minutes. Let the ham rest for 10 minutes before slicing and serving.
Smoking
1. Pat the ham dry and let it sit under a direct fan while you prepare the grill and the charcoal (if using) for hot or cold smoking.
2. If hot-smoking the meat, place the thickest portion closest to the flame and smoke the meat until it reaches an internal temperature of 150°F (65°C) in the center of its thickest part. Note that you may need a second batch of coals after 11⁄2 hours or so, but the total smoking time should be 2 to 21⁄2 hours. The glaze is not essential for the smoked meat, as the smoke has enough flavor on its own.
If cold-smoking, smoke the meat for 12 hours, then finish it in the oven or on a grill set up for hot smoking until it reaches an internal temperature of 150°F (65°C).
3. Let the meat rest for 10 minutes before slicing and serving.
Storage
Tightly wrapped, the ham will keep refrigerated for at least 1 week or frozen for at least 6 months.
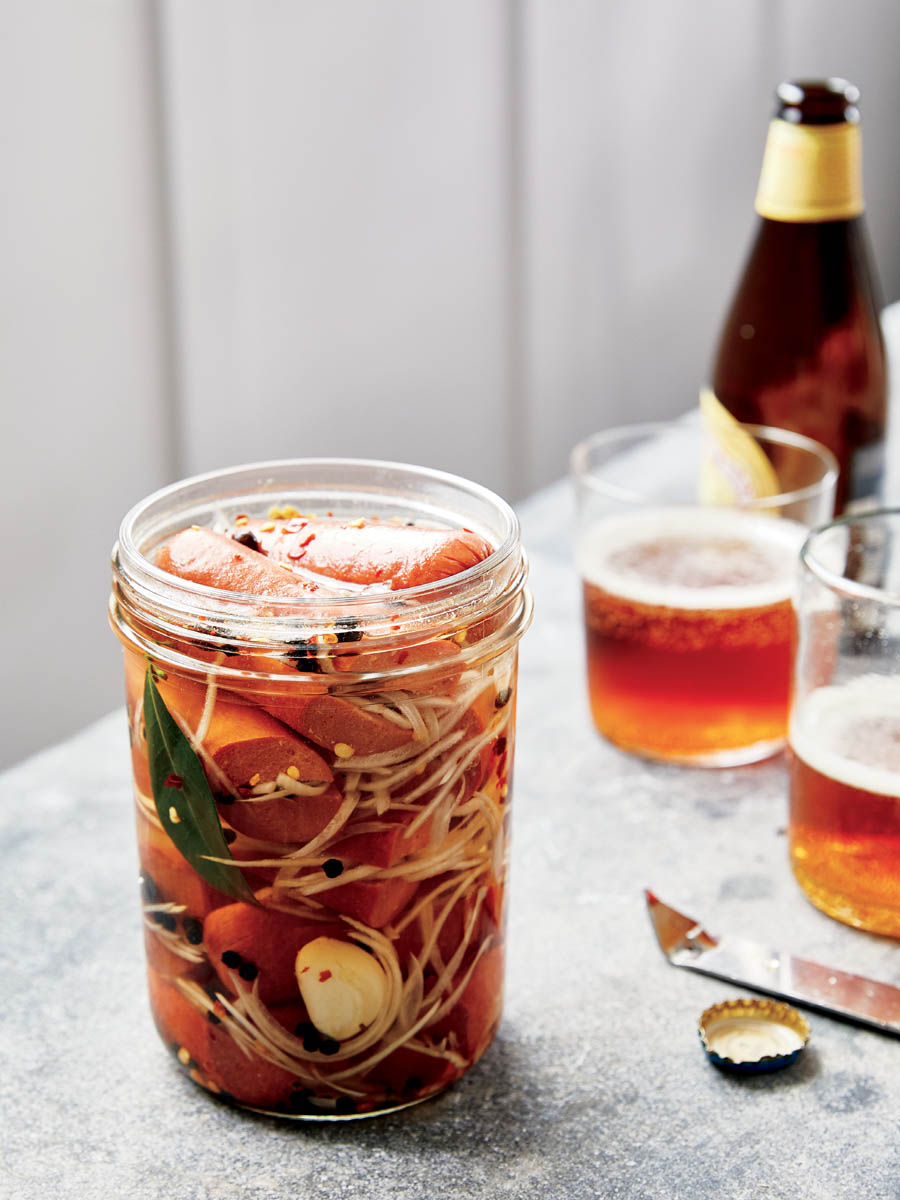
Czech Pickled Hot Dogs
Pickling might not be the first thing that comes to mind with hot dogs, but my kids will tell you that it makes the hot dogs more delicious. The dogs get firm, flavorful, and piquant from the onions and spices. This Czech pub snack, called utopenci or “drowned men,” is meant to be eaten from the jar with an ice-cold beer, but I also like to sauté the pickled onions and dogs with some sauerkraut.
1 small yellow onion, sliced into razor-thin strips
3⁄4 cup distilled white vinegar
1⁄2 cup water
5 teaspoons sugar
2 teaspoons kosher salt
Instructions
1. Place the allspice, bay leaves, garlic, peppercorns, and pepper flakes in a quart canning jar.
2. Remove the hot dogs from their package and pat them dry. Cut them in half. Carefully make a slit lengthwise from the center of each hot dog, being careful not to cut all the way through. You want to slit the dog and open it up like a hot dog bun, leaving the tips intact.
3. Stuff the hot dogs with the raw onion, being careful not to use so much onion that they split in half. Pack the stuffed dogs into the jar as tightly as possible. If there are any remaining onions, pack them on top of the hot dogs.
4. Combine the vinegar, water, sugar, and salt in a small saucepan over high heat, stirring to dissolve the sugar and salt. Once the brine reaches a boil, remove from the heat and pour it over the hot dogs to cover them completely. Cover the jar and let it cool completely before moving to the refrigerator. While the hot dogs are safe to eat anytime, the flavors need 2 weeks to come together.
Storage
Keep these covered and refrigerated, ensuring that the solids stay below the brine line. This pickle will keep for several months.
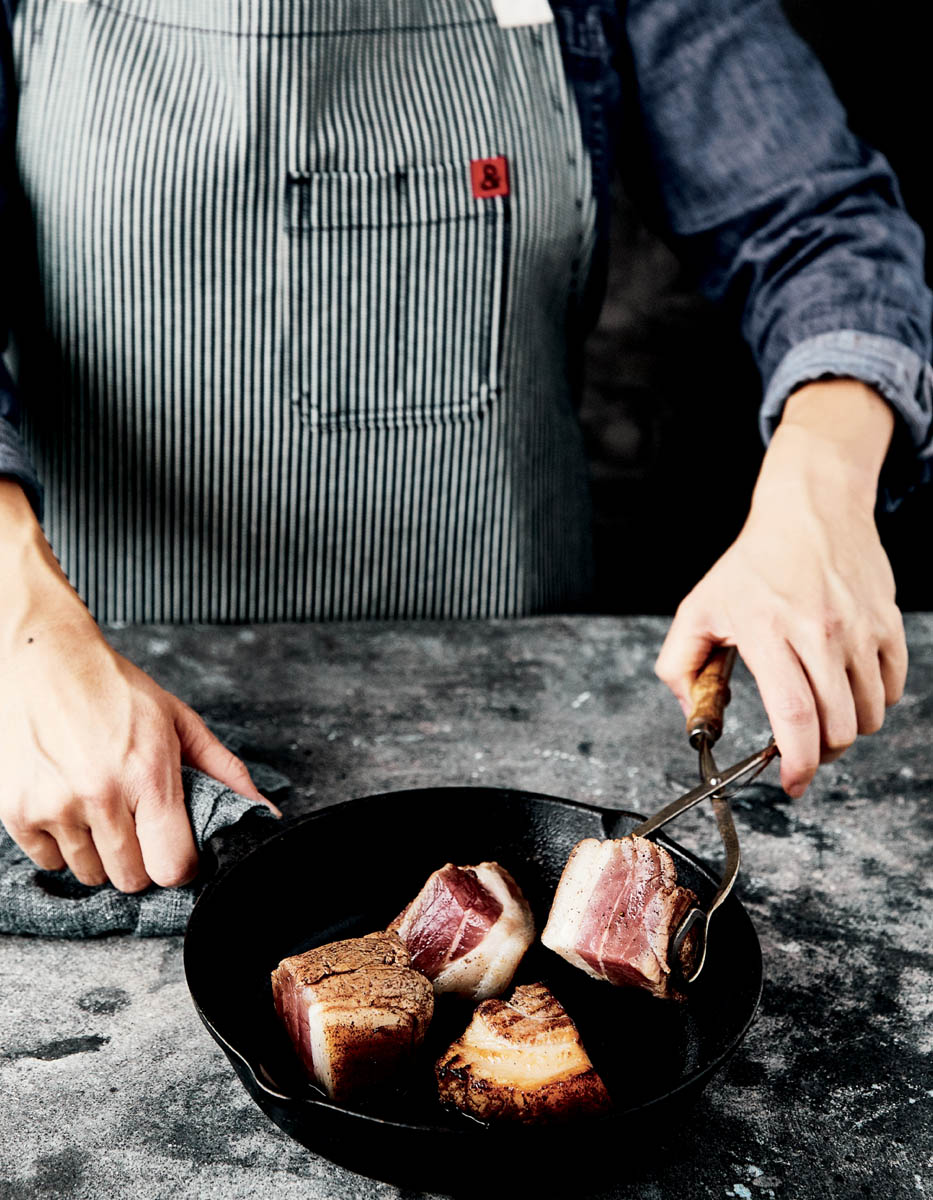
Bacon Extraordinaire
Americans are deeply in love with the meat of all meats, the cured (often smoked) fatty belly of the pig. While its saturated fat content may make bacon a “sometimes” food for health, it is an “always” food for those who swoon for swine, and each slice does contain 3 grams of protein. Bacon must first be dry-rubbed and cured for 7 to 10 days. While you can slice and fry it immediately after curing, American-style bacon is usually smoked as well. Note that you may need to order pork belly from your local butcher or grocery store. And if you can’t buy pink curing salt (sodium nitrite) from your local kitchen supply shop or butcher, order it online from a sausage-making supplier. For another way to fall in love with bacon, use the smoked bacon in Bacon, Roasted Tomato, and Onion Spread.
1. Trim any thin edges from the pork belly so that the piece is of even thickness. (You can save these excess pieces of belly for making sausage or lard, or for roasting into a tasty snack.)
2. Combine the sugar and molasses in a large rectangular baking dish or pan. Mash until thoroughly incorporated; you’ll have a very dark brown sugar. Mix in the kosher salt, curing salt, and pepper. Add the meat to the dish and rub the cure into the meat (like a relaxing porcine spa treatment), spreading it evenly around the sides, top, and bottom. Tuck the rubbed meat into a 1-gallon or oversized ziplock plastic bag, placing it in a single layer. Lay the meat flat in a dish (in case any liquids escape from the bag) and chill in the refrigerator for 7 days, daily massaging the liquids that will accumulate inside the bag into the meat and flipping the bag over.
3. Inspect your bacon. It should be firm to the touch all over, like touching a cooked steak. If the flesh still feels spongy and soft in spots, sprinkle it evenly with an additional 2 tablespoons kosher salt and let it cure a little longer. Check it again after 1 to 2 days.
4. Once the bacon is fully cured, brush off the rub, rinse the meat well, and pat it completely dry. At this point, your bacon is cured but not cooked. You can either fry the slices in a skillet now or smoke them and then fry. Either way, your bacon needs to be cooked before being eaten.
Smoking
If you are smoking the meat, follow the directions for Hot Smoking. You will need 3 cups of hickory sawdust. It will take 11⁄2 to 21⁄2 hours to smoke the pork belly. The interior of the meat must reach 150°F (65°C) to be fully cooked.
Frying
When your bacon is ready, slice it as thin (or as thick) as you like it. (Freezing the bacon for 30 minutes will help you slice it very thinly.) Fry in a skillet over medium heat until browned on both sides. Drain on paper towels and enjoy.
Storage
Cured or smoked bacon can be stored in large slabs, in precut hunks for flavoring beans or other dishes, or in slices layered between pieces of parchment paper and sealed tightly in a freezer storage bag. It will keep in the refrigerator for up to 7 days or in the freezer for at least 3 months.
Cook It
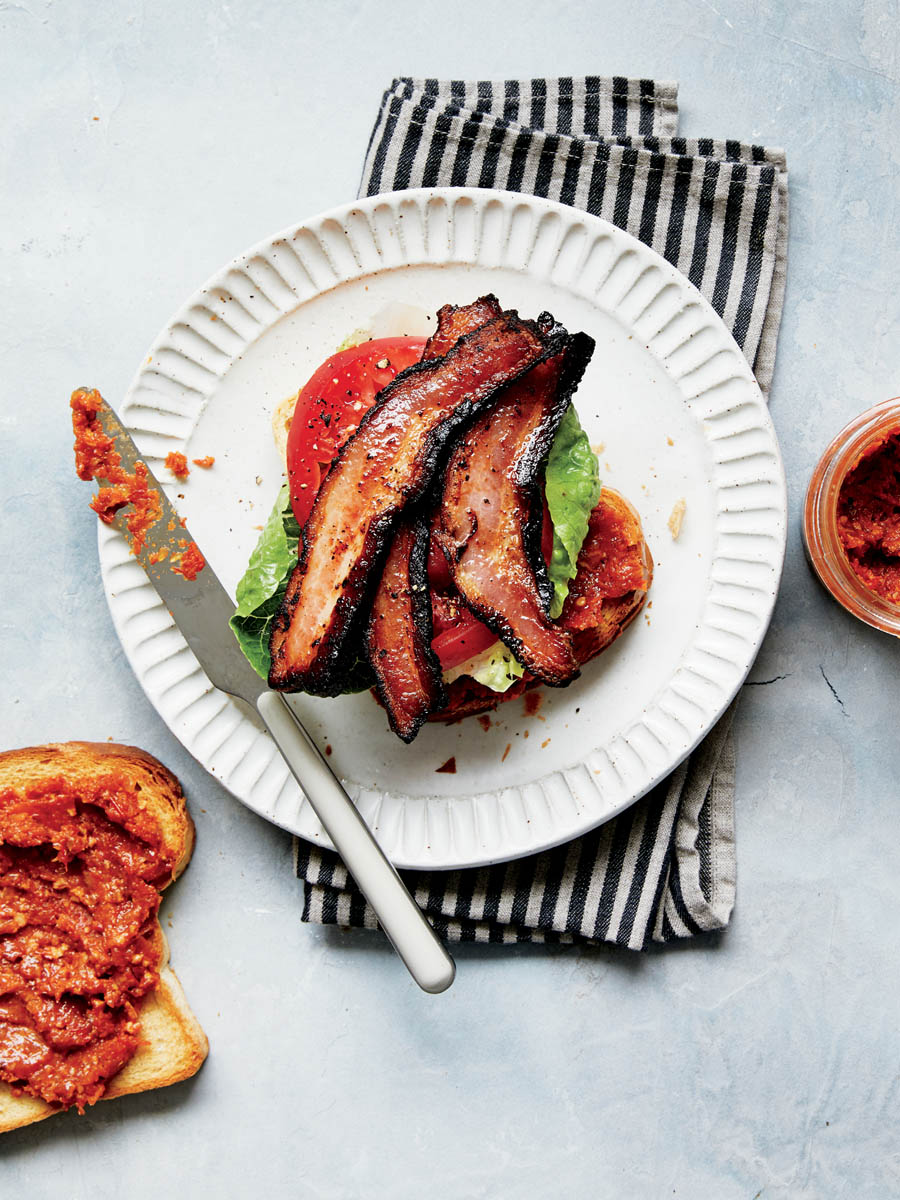
Bacon, Roasted Tomato, and Onion Spread
Makes
About 1 pound
Time
21⁄2 hours
Is this spread good on a BLT? Oh yes. Is it the hero of your new turkey sandwich? Absolutely. Slathered on toast beneath runny egg yolk? You’d better believe it, baby. This is the real deal in savory jams — sweet, smoky, and decadent. While this is an excellent use for your homemade bacon, the results will certainly not suffer if you use good-quality store-bought bacon instead. While lean this isn’t, each pint jar contains about 21 grams of protein. The acidic tomatoes and cured, smoky meat will keep for ages in the refrigerator.
1⁄4 teaspoon piment d’Espelette (French ground red chile pepper; optional)
2 teaspoons apple cider vinegar
Instructions
1. Preheat your oven to 350°F (180°C).
2. Cut the tomatoes in half horizontally. Use your fingers to remove the juice and seeds from inside the fruit. Trim the onion and cut it into eight half-moons, leaving the wedges intact.
3. Arrange the tomatoes and onion on a large rimmed baking sheet, then toss with the oil and 3⁄4 teaspoon of the salt. Spread everything in a single layer with the tomatoes cut side up. Place the baking sheet in the center of the oven and roast for 11⁄2 to 2 hours, until the tomatoes and onions are fragrant and a little dark around the edges.
4. Meanwhile, fry the bacon in batches in a large skillet over medium heat until brown on both sides, 6 to 8 minutes per batch. Drain the cooked bacon on paper towels.
5. Combine the tomatoes, onions, bacon, and any juices from the baking sheet in a food processor. Pulse to mix. Add the sugar, thyme, pepper, piment d’Espelette (if using), vinegar, and remaining 3⁄4 teaspoon salt. Process to combine completely, leaving the mixture spreadable but a little chunky. Note that after cooling, the spread will thicken up. The spread is ready to eat immediately.
Storage
In the refrigerator, this will keep for at least 2 weeks. Covered tightly and frozen, it will keep for at least 4 months.
Salt Pork
This unsmoked, uncooked, super-salty bacon must be cooked before being eaten. While it can be cooked and eaten on its own, its real purpose in the kitchen is to add flavor and fat to slow-cooked food. Salt pork is the backbone of Boston Baked Beans, New England clam chowder, and soul food collard greens. You can just use salt, but I really like the warmth and fragrance salt pork gives to the pot, along with all the other warm seasonings. You can use any scrap pieces of fatty pork — traditionally these scraps were taken on long sea voyages, covered in a giant barrel of salt and fished out when needed — but pork belly is much more widely available and is a great cut because of its meat-to-fat ratio.
1. Combine the salt, sugar, bay, cinnamon, and nutmeg in a large shallow dish.
2. Cut the pork in half lengthwise so that you have two long pieces. Pat the meat dry with paper towels until it’s sticky. Press all sides of the pork into the salt mixture, really rubbing it in to get the mixture to stick to the pork.
3. Place each piece of pork in its own ziplock bag; roll and close the bag tightly to remove all of the air. Let the pork sit in the refrigerator for 1 week, flipping it once a day or so to redistribute the seasonings. The meat should feel stiff and cured after 7 days.
4. The pork is now ready to cook. If you wish to render some of its fat before cooking, simmer it for 20 minutes, drain, and then dry it completely before using.
Storage
The pork will keep in the refrigerator for 2 weeks. Wrapped tightly, it will keep in the freezer for several months.
Cook It
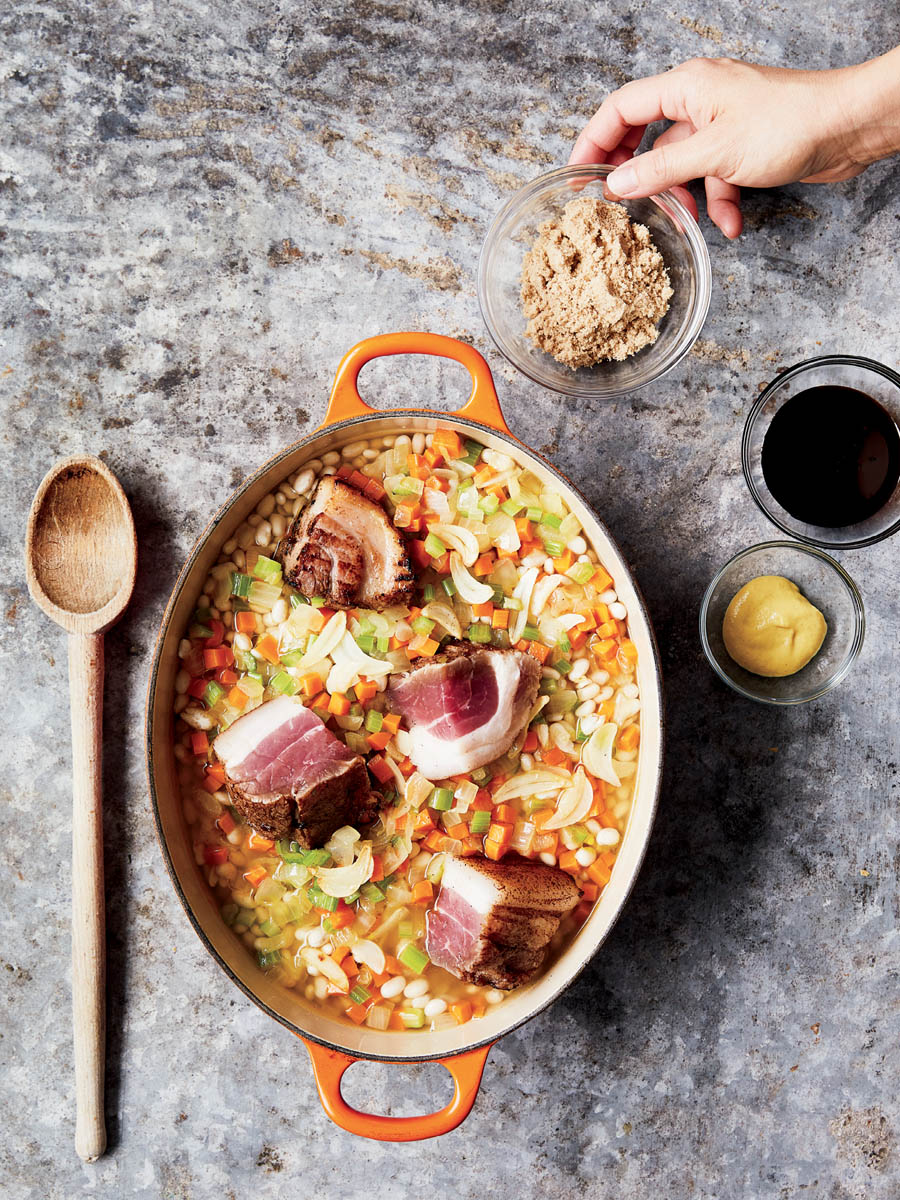
Boston Baked Beans
Makes
2 quarts
Time
1 day
This is one of those dishes that’s even better when (carefully) reheated the next day. Portable? Nope. Fast food? Definitely not. An outstanding use for salt pork? Abso-freakin’-lutely. If you’ve never had homemade baked beans, you are hours away from having an ethereal relationship with navy beans. These are meant to be sweet, making them a great dish to serve alongside smoky barbecue and tangy coleslaw. It’s amazing how just a small portion of meat can really stretch to flavor a whole mess of beans. This is a great way to use your homemade salt pork, but you can also purchase salt pork or slab bacon, or use the same weight of sliced bacon in a pinch.
1. Soak the beans overnight in enough water to cover by 2 inches.
2. Drain the beans and rinse them well. Preheat the oven to 310°F (155°C).
3. Heat an ovenproof Dutch oven over medium-high heat. Cut the salt pork into four big chunks and sear until golden brown on all sides, about 7 minutes, turning as needed. Remove the pork from the pot and lower the heat to medium.
4. Chop the onion, carrot, and celery into raisin-size pieces and add to the pot. Add the kosher salt and sauté until the onion softens, about 6 minutes. Stir in the garlic and sauté for 1 minute longer.
5. Pour about 2 cups of water into the pot and scrape up the delicious browned bits from the bottom. Crank the heat to high and stir in the molasses, brown sugar, and mustard until thoroughly combined. Add the drained beans and enough fresh water to cover them by 2 inches. Bring the mixture to a boil, cover tightly, and place the pot in the hot oven.
6. Let the beans cook for about 7 hours, or until soft and tender. Stir the pot every couple of hours and add more water as needed. The beans should be somewhat thick and soupy.
7. Add salt and pepper to taste. If you’d like it sweeter, add more sugar by the teaspoon. For more acidity, add a tablespoon or so of apple cider vinegar.
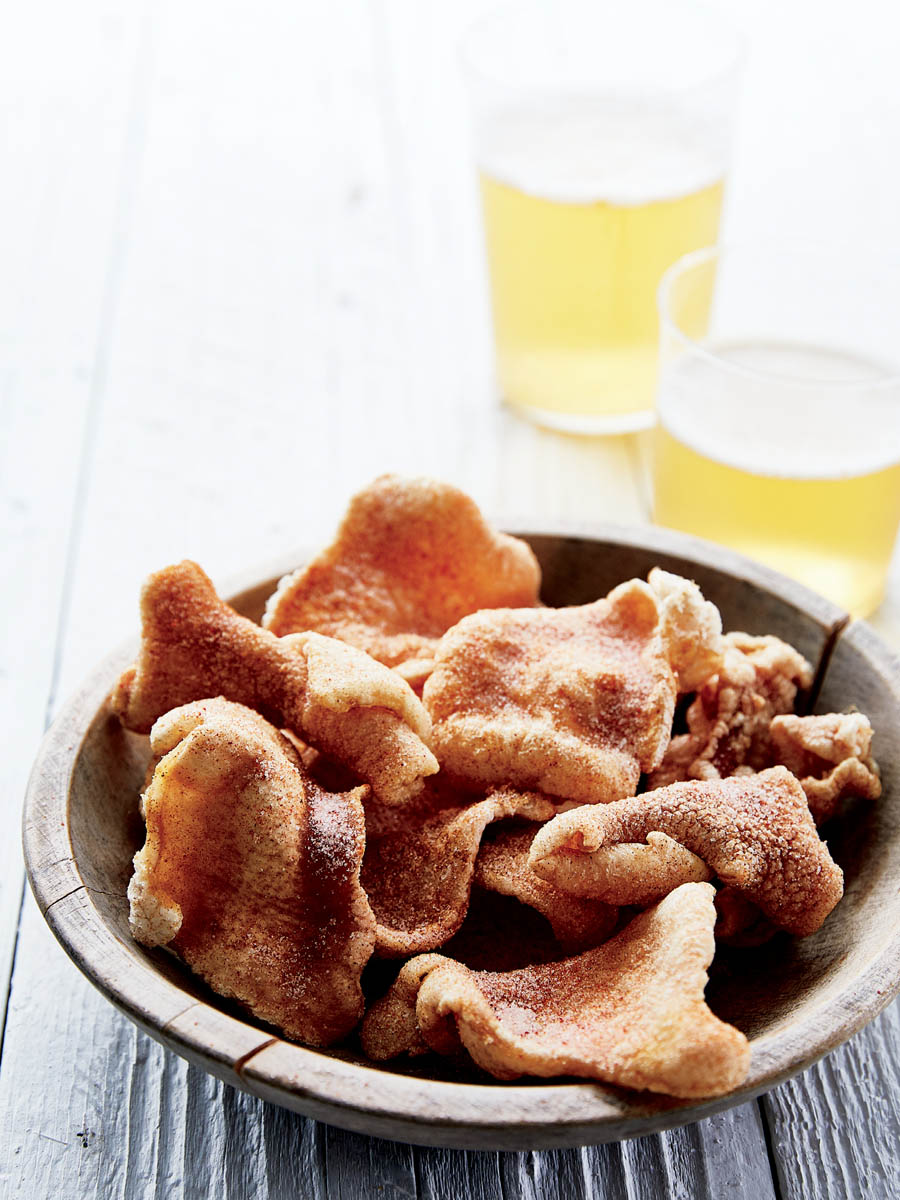
Pork Rinds
Here’s a surprise that potato chips don’t want you to know: pork rinds have a whopping 17 grams of protein per 1-ounce serving. Of course, you’re more likely to buy pork rinds than to make them, but if you do find yourself in possession of some pig skin — say, left over from making your own Bacon Extraordinaire or Salt Pork — then you might wish to consider including homemade crispy, puffy pork rinds in your future. Making them is a two-step process: the skin is first slowly rendered of its fat, then it is flash-fried in hot lard or oil until it puffs and crisps. Feel free to use only salt as a seasoning, but a dash of sugar and ground chile makes these irresistible. These are delicious on their own, but they also lend heft and crunch to soups and salads when sprinkled on top. You will need a wok and a candy or deep-frying thermometer for this recipe.
Makes
About 13⁄4 pounds
Time
About 14 hours
Ingredients
2 pounds pig skin
About 1⁄4 cup kosher salt
5 cups vegetable oil
2 tablespoons sugar
1⁄2 teaspoon ground cayenne pepper, or as desired
Instructions
1. Preheat your oven to 200°F (90°C). Line a baking sheet with parchment paper and place a wire rack on top of the paper.
2. Using a sharp knife, cut away as much fat as possible from the underside of the pig skin. Sprinkle the salt on both sides of the skin and place the skin on the prepared baking sheet, fat side down.
3. Place the baking sheet in the center of the oven and cook for 7 to 8 hours, until the fat is very soft and the skin starts to harden. Remove the skin from the oven and use a spoon to scrape away any remaining fat. Return the skin to the oven and cook for another 3 to 5 hours, until all of the fat has melted away and the skin is hard.
4. Once the skin is cool enough to handle, use your hands or kitchen shears to break the skin into 2-inch pieces.
5. Heat the oil in a wok with a candy or deep-frying thermometer attached over medium-high heat until it reaches 360°F (182°C), 5 to 8 minutes. While you’re waiting, line a large baking sheet with clean paper bags, paper towels, or newspaper for draining, and have some long tongs ready.
6. Working in batches of about five rinds at a time (they will puff up to be much larger than their current size), carefully add the rinds to the oil and swirl them around until they puff dramatically, about 30 seconds. Remove them from the oil and let them drain in a single layer on the prepared baking sheet.
7. Taste the pork rinds and season with additional salt if needed. If seasoning with sugar and cayenne, place the pork rinds in a large paper bag. Add the sugar and cayenne and shake the bag to evenly coat the rinds. Eat those delicious warm pork rinds immediately.
Storage
Puffed rinds will retain their crispiness for about 5 days when stored in a ziplock bag or container along with a tea bag or cheesecloth filled with a small amount of raw rice to help absorb the ambient moisture. The fully rendered hard skin (before frying) can be stored airtight in the refrigerator or freezer for up to 1 year.
Pork Belly Confit
While duck confit is a French classic of duck meat cooked and preserved in its own fat, the hefty fat content of pork belly makes it a fine candidate for fat curing as well. As with duck confit, making this is a two-step process: the meat is dry-rubbed in salt and seasonings to cure it and add flavor, and then it is slowly poached in hot fat to tenderize the meat and help render some of its fat. The coconut oil here gives the pork a lovely flavor. After curing, the meat is delicious when seared and served over steamed rice with wok-tossed greens or broccoli. Use every bit of the flavorful fat in place of oil or butter for cooking vegetables, frying eggs, searing meat, and more.
2. Combine the salt, sugar, cinnamon, cloves, and mustard in a small bowl. Rub the spice mixture on all sides of each piece of pork. Stud the pork with the ginger and garlic slices all over. Place the seasoned meat in a baking dish; it’s important to use a small dish that’s just large enough to hold the pork snugly in a single layer. Cover the dish with plastic wrap and refrigerate for 2 days.
3. Preheat the oven to 200°F (90°C).
4. Brush away the garlic, ginger, and as much of the salt mixture as possible from the meat and discard. Return the meat to the dish.
5. Place the coconut oil in a heatproof measuring cup. To gently melt it, either put the measuring cup in the microwave for 10 seconds at a time, or submerge the measuring cup in a pan of warm water.
6. Add enough coconut oil to the baking dish to just cover the surface of the pork. Place the pork into the oven and bake for 4 hours, or until tender when pierced with a fork.
7. Let the pork cool, then cover and let cure in the fat in the refrigerator for at least a few days before using. To serve, use a spoon to pull the pork out of the fat, then sear it on all sides.
Storage
You can let the pork cool in its baking dish with the fat covering it, then cover the dish with plastic wrap and store in the fridge. To save refrigerator space, you can also spoon the meat into a quart canning jar and then carefully pour the fat over the pork, pressing down on the meat as needed to submerge it completely. If completely covered in the fat, this meat will keep in the refrigerator for at least 6 months.
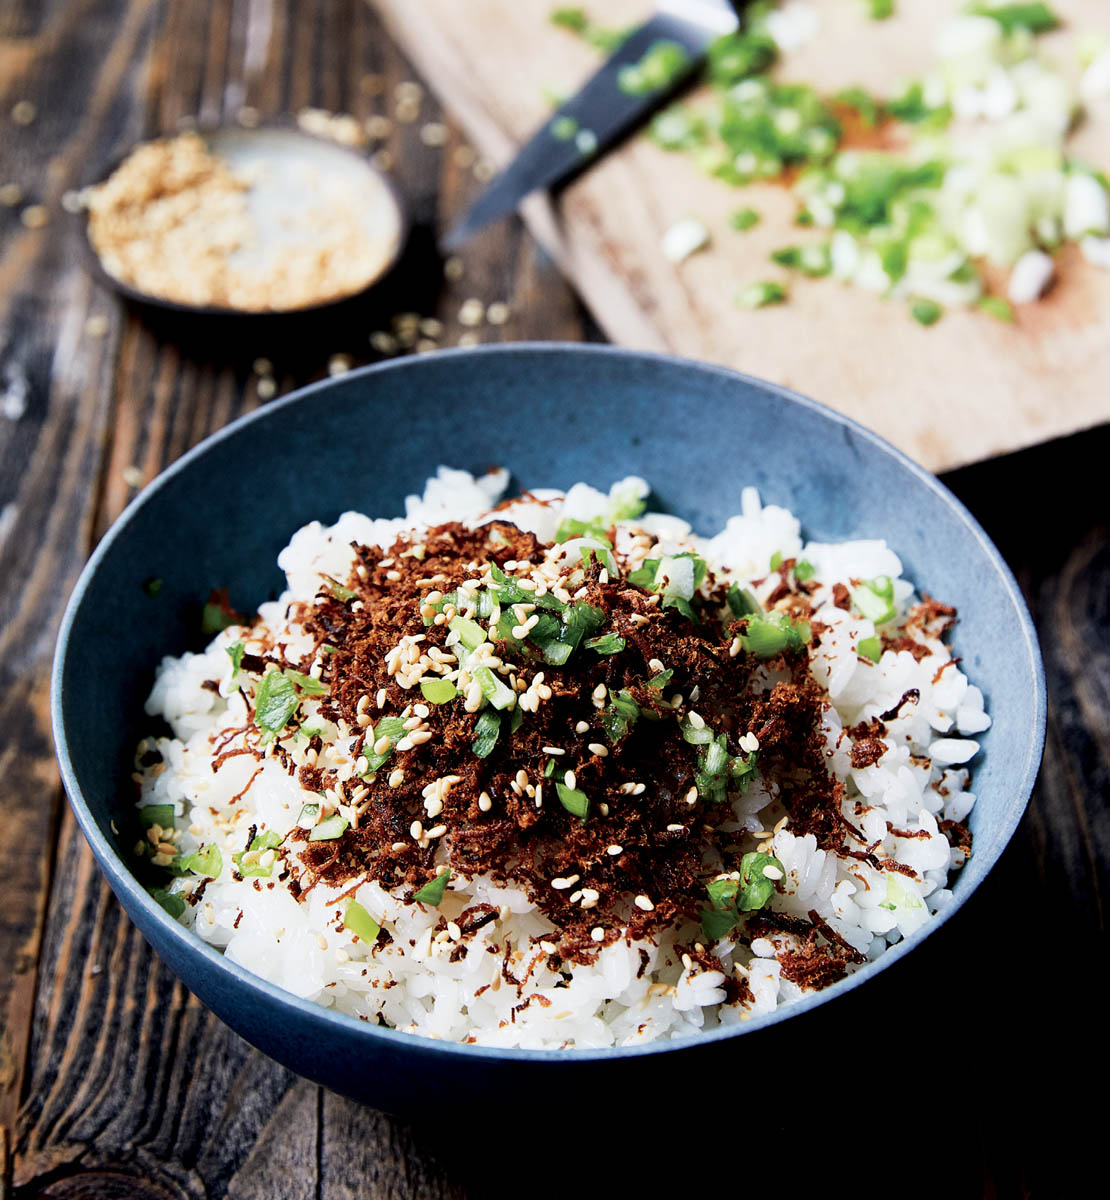
Rousong (Pork Floss)
Rousong, pork floss, pork wool, meat floss, pork sung, pork fu — no matter what you call it, this savory Asian condiment adds a rich, salty flavor and the fluffy texture of cotton candy to any dish. Making it is a two-step process that is lengthy but easy. The meat is simmered and braised until incredibly tender, shredded, and then dried in a hot pan. It’s traditionally enjoyed on top of congee or jook, a rich rice soup, but it is also great sprinkled on top of rice, noodles, tofu, pizza, or chocolate-covered bacon.
Makes
41⁄2 cups
Time
41⁄2 hours
Method
Pan-drying
Ingredients
1 pound pork tenderloin, cut into 11⁄2-inch chunks
6 cups water
1⁄2 cup soy sauce
1⁄4 cup sugar
1⁄2 small, sweet apple
6 (1⁄4-inch) slices fresh ginger
3 garlic cloves, smashed
1 star anise
2 tablespoons rice vinegar
1⁄4 cup neutral cooking oil (like olive, avocado, sunflower, or safflower oil)
Instructions
1. Combine the pork, water, soy sauce, sugar, apple, ginger, garlic, star anise, and vinegar in a large Dutch oven over high heat. Bring to a boil, then reduce the heat to a low simmer. Cook the pork uncovered, stirring occasionally, until the pot contains just 1⁄2 inch or so of liquid, about 21⁄2 hours. Then begin to stir the pot frequently to break up the meat, keep it from sticking, and help moisture escape. Increase the heat to medium and keep stirring until the bottom of the pot is dry, about 30 minutes longer. The meat should be completely fork-tender. (If it’s not, add another cup or so of water, cover, and let the meat gently simmer until completely fork-tender. Then remove the lid and let the liquid reduce completely.)
2. Remove the pot from the heat. Remove the ginger and any other remaining solids. Using a sturdy spoon, thoroughly shred the meat until there are no clumps.
3. Return the pot to medium-high heat. Add the oil and stir the meat to coat. Keep stirring and mashing and scraping the bottom of the pot until the meat is completely dry and flossy, 8 to 13 minutes. Your rousong is ready to eat.
Storage
Spread out the rousong on a rimmed baking sheet to let it cool completely before storing. If you realize after cooling that it’s not completely dry, return it to the pot and dry it further, then let it cool again. Store your rousong in an airtight container or a ziplock bag at room temperature for 4 months, or longer.
New Orleans–Style Pickle Meat
Some people bring ham hocks, tasso, or smoked sausage to the bean pot, and all meat flavorings are welcome. But in many Louisiana kitchens, proper red beans and rice (see recipe) requires a healthy hunk of pickle meat, also called pickled pork, for flavor and succulence. Historically, this preserved meat comprises the bits and ends not usually eaten as fresh meat. Today, you can purchase a chemical-laden version, but this far more flavorful small-batch version is easy enough to make at home.
1. Combine the salt, bay, pepper, mustard, allspice, and cloves in a small bowl.
2. Peel the onion, cut it into quarters, then slice it as thinly as possible. Scatter half of the onion in a square baking dish just large enough to hold the meat in a single layer.
3. Roll each cube of pork in the spice and salt mixture and pack the pieces tightly on top of the onion. Scatter the other half of the onion on top and press it down to compress the meat and onion.
4. Combine 1 cup of the vinegar with 1 cup of the water. Gently pour the brine into the baking dish until it just covers the meat and onions. (Use the remainder of the vinegar and water if needed.) Cover the dish tightly with plastic wrap and leave it in the refrigerator for at least 4 days and up to 2 weeks.
5. To use the meat, discard the onions and remove the meat from the brine; do not rinse. Cook the meat, stewed thoroughly in a bean pot or simmered with greens, before eating.
Storage
Store the pickle meat in its brine in the refrigerator for up to 2 weeks, or wrapped airtight, without the onion and the brine, in the freezer for several months.
Cook It
Red Beans and Rice with Pickle Meat
Makes
About 3 quarts
Time
1 day
Red beans and rice is the chicken soup of the Louisiana soul — hearty, homey, and delicious. The warm spices of the pickled meat make this dish fragrant and complex, but you can also substitute smoked sausage. This is one bean dish where canned just won’t cut it. This preparation traditionally contains small red beans, but if you can’t find them, you can substitute dark red kidney beans. Eat this on its own, over rice, or with corn bread or crusty French bread.
Ingredients
1 pound dried red beans or dark red kidney beans
3 tablespoons bacon fat or extra-virgin olive oil
1. Wash the beans and let them soak overnight or for at least 8 hours. Drain and rinse them well, then set aside.
2. Heat the bacon fat in a large Dutch oven over high heat for 1 minute. Add the meat to the pot in a single layer with space between the pieces. Let it brown, undisturbed, for 3 to 4 minutes per side. The meat will release easily from the pan when it’s ready to be turned. Once the meat is brown on all sides, remove it from the pot and set it aside.
3. Chop the celery, peppers, and onion into bean-size pieces. Add the onion and 1 teaspoon of the salt to the pot. Stir to coat the onion and cook until soft, about 4 minutes. Add the celery and peppers and cook, stirring often, until the vegetables soften and turn a bit brown, about 6 minutes longer. Add the garlic and cook, stirring constantly, for 1 minute.
4. Add about 2 cups of water and scrape up all of those delicious brown bits from the bottom of the pot. Add the beans, meat, bay, thyme, and cayenne and stir to combine. Add enough water to cover everything in the pot by 2 inches and bring the liquid to a boil. Adjust the heat as needed to maintain a low simmer and cook until the beans are tender, about 4 hours. Do not boil, or else the meat will get tough.
5. Add the pepper and then season with salt to taste. Garnish with the parsley and scallions just before serving.
Storage
Refrigerate and eat within 1 week. Or store in an airtight container and freeze for several months.
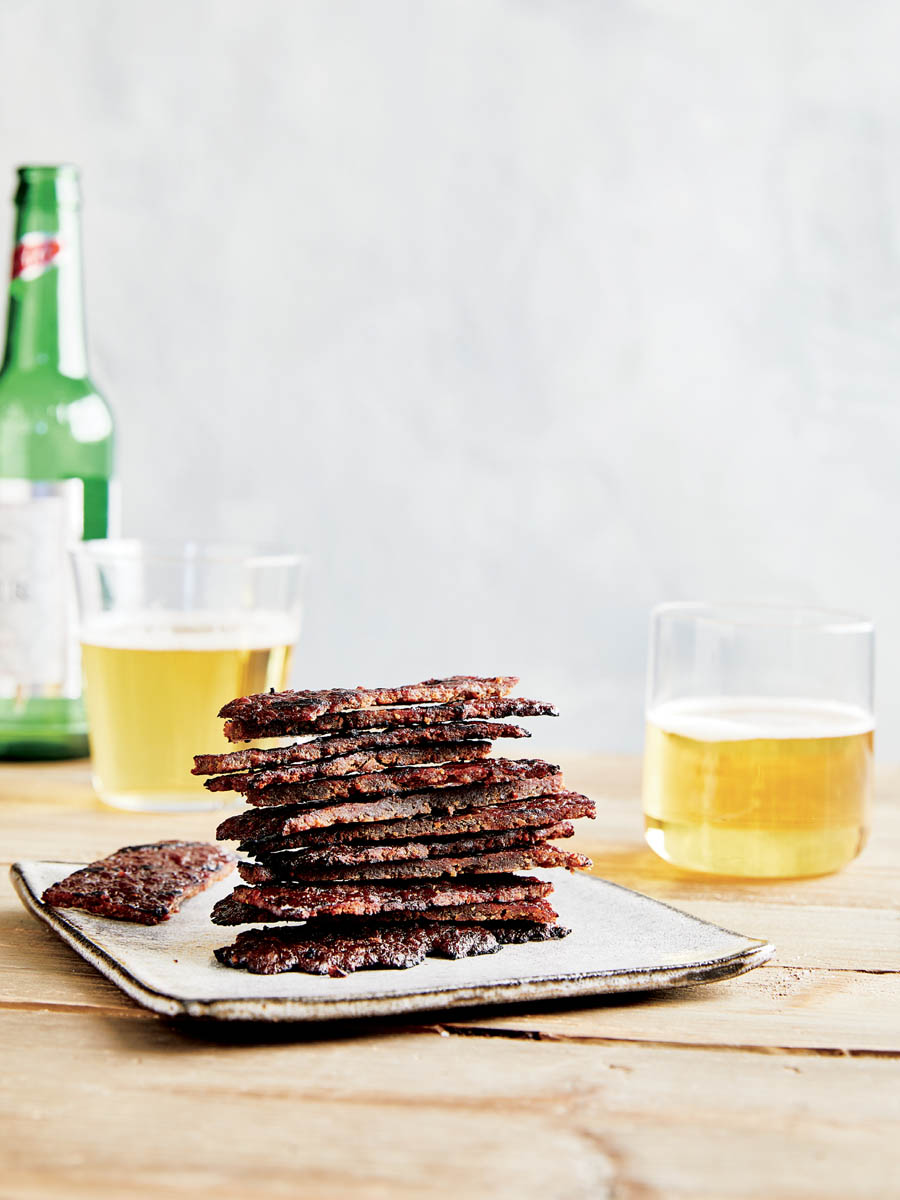
Bak Kwa (Chinese-Style Dried Pork)
Talk to anyone from Singapore, Malaysia, or parts of China about this traditional New Year’s street food and you will immediately get oohs and ahhs. Heavily spiced ground pork is dried into a large sheet of salty and sweet meat leather, which is then cut into squares and finished over a charcoal grill. Traditional preparations often call for red food coloring, but we’re going to skip that. Because there is ground meat involved, take extra precaution with cleanliness, and make certain that the meat is thoroughly dried and then cooked until very hot before serving. If you have difficulty finding some of the Asian ingredients in your local grocery store, you will be able to purchase them online.
2 tablespoons Shaoxing cooking wine, sake, or dry sherry
4 teaspoons soy sauce
2 teaspoons sriracha
1⁄2 teaspoon toasted sesame oil
Neutral cooking oil (like olive, avocado, sunflower, or safflower oil) for the rack
Instructions
1. Preheat your oven to 200°F (90°C). Line a rimmed baking sheet with parchment paper.
2. Combine the pork, sugar, five-spice powder, pepper, fish sauce, wine, soy sauce, sriracha, and sesame oil in a large bowl. Mix thoroughly with clean hands.
3. Pour the meat mixture onto the baking sheet and press the meat into a thin, even layer that covers the entire pan. If you have an offset spatula, this is a great time to use it. Take your time here, as it is important that the meat is spread in an even layer.
4. Place the baking sheet in the oven. If you don’t have a convection oven, stick a wooden spoon in the oven door to let moisture escape. Dry the meat for about 31⁄2 hours. You will see fat bubble up to the top, but the meat itself should be quite dry and one cohesive piece.
5. Lightly oil a cooling rack. Remove the tray from the oven and carefully invert the sheet of meat onto the rack, peeling off the parchment. Lay a clean sheet of parchment or aluminum foil on the bottom of the sheet pan to catch any drips, and move the rack onto the pan. What was formerly the bottom of the bak kwa is now on top, with the rack beneath it to let air circulate. Return the baking sheet to the oven, replace the spoon, if using, in the door, and let the meat dry for another 2 hours, or until fully dry.
6. Use paper towels to blot the bak kwa on both sides and let it cool completely. Use a pizza cutter or sharp knife to cut the sheet into large rectangles, about 2 by 4 inches.
7. When you’re ready to eat the bak kwa, cook it on a grill over a hot fire, or in a skillet or stovetop grill pan over medium-high heat, until fragrant and lightly charred, 1 to 2 minutes per side.
Storage
You may store cut rectangles of dried bak kwa in a ziplock bag or airtight container in the refrigerator for several weeks, or double-wrapped in the freezer for several months. Don’t grill the bak kwa until you’re ready to serve it.
Coppiette (Roman-Style Dried Pork)
I hear that this dried meat was traditionally hung to dry in front of the fireplace at the local tavern. Pork loin can be sold under a number of names, including center-cut pork roast, center-cut loin, and center-cut rib roast. Essentially, you want a large hunk of lean, boneless pork. It will sometimes have a large fat cap on one side (delicious for roasting, but removed for drying). And while I’m not usually a big fan of garlic powder, it works here because its flavor permeates the meat during the long dry-curing time and stays flavorful even after the dip in red wine. (See photo.)
Neutral cooking oil (like olive, avocado, sunflower, or safflower oil) to lightly oil the rack (for oven drying)
Instructions
1. Cut away any fat from the meat and cut the meat into long, thick pieces (about 3⁄4 inch thick and 6 inches long). Pat the meat dry all over with paper towels.
2. Combine the salt, oregano, pepper flakes, and garlic powder in a medium bowl. Drop the meat into the bowl and, using your hands, massage it vigorously to rub the cure into the meat. Once it is coated evenly all over, pack the meat tightly into the bowl and cover the bowl with plastic wrap. Let it sit in the refrigerator for 3 days.
3. Pour the wine into a shallow bowl. Dip one piece of meat at a time into the wine to cover it completely, then let the wine drip back into the bowl. Lay the meat out on a rack. Now it’s time to dry the meat either in the oven or with a food dehydrator.
Drying in an Oven
1. Preheat your oven to its lowest setting. Position one rack in the middle of the oven. Line one baking sheet with parchment paper.
2. Lightly oil a cooling rack and place it on top of the lined baking sheet. Lay the marinated meat on the rack completely flat. Don’t let the pieces touch; allowing airflow in between pieces will help them dry more quickly.
3. Place the baking sheets in the oven. If you don’t have a convection oven, wedge the oven door open with a wooden spoon handle. Depending on your oven, the weather, and the thickness of the meat, your coppiette will be done in 5 to 9 hours. The coppiette is ready when it feels very firm all the way through. Cut into a thick piece to check. It should look cured all the way through.
Drying in a Food Dehydrator
Lay the marinated meat on the rack completely flat. Don’t let the pieces touch; allowing airflow in between pieces will help them dry more quickly. For maximum food safety, dry the meat at 160°F (70°C) for 4 to 7 hours, depending on your machine, the weather, and the thickness of the meat. The coppiette is ready when it feels very firm all the way through. Cut into a thick piece to check. It should look cured all the way through.
Storage
Once it is cool, store your coppiette in a ziplock bag or an airtight container. While the meat will keep at room temperature for several days, it will keep longer (6 weeks or more) refrigerated. Double-wrapped and frozen, the coppiette will keep for several months. For best results, fill an empty tea bag or a small piece of cheesecloth with raw rice, close it securely, and place it inside the container to help absorb any residual moisture.