Chapter 5
Using Network Plugins and Themes
IN THIS CHAPTER
 Understanding theme management
Understanding networkwide plugins
Finding networkwide and Must-Use plugins
When you add new plugins and themes to your WordPress installation, you add new functionality and aesthetics. But you don’t just multiply your choices; the possibilities become endless. You can gather and display information from across the network, for example, or make the same features available to everyone. You can choose to have the same theme on all sites or different themes. You can not only manage plugins and themes on a global level but also have site-specific control.
In this chapter, I show you how certain functionality appears across the network and how certain plugins look by default on all sites for all users. I also cover controlling access to different themes for different sites.
One of the interesting features of a network is the extensive use of the mu-plugins folder. In this chapter, I describe exactly how this folder processes plugin code. I also cover the Network Activate link on the Plugins page, which is very similar to the Activate link but has important differences.
 This chapter doesn't cover installing plugins and themes. I cover installing plugins in Book 7, Chapter 2 and installing themes in Book 6, Chapter 2.
Using One Theme on Multiple Sites
In certain situations (such as when you want consistent branding and design across your entire network), each site in a network is used as a subsection of the main site. You could set up WordPress networks with a magazine-style design on your main site and populate the content with different posts from sites within your network, aggregating all the content to the main site. You can see an example on the BBC America website at http://www.bbcamerica.com. (See Figure 5-1.)

FIGURE 5-1: BBC America’s WordPress network.
BBC America is a cable and satellite network that airs popular British television shows. On the main site, all the article links point to different sites within the Multisite network. Each show has its own site within the network, and the main page of the website (or the main site in the WordPress Multisite network) is a separate site that aggregates the content from all the sites within the network, making it easy for visitors to discover content on each show.
The sites within the BBC America network use the same theme to display their content, making the branding consistent across the network sites — a good example of a magazine-style theme that aggregates content from sites within a network.
Although each site in the network operates separately from the main (network admin) site, you may want each site to look the same as the main site because it ties into the main site visually, through design and branding, and provides a consistent experience for visitors to any site within the network. You may have a custom theme specially made for the main site, with added features to display networkwide content. If consistency and network branding are your goals, you may want to create a single theme to be used on all sites within your network (not just your main site).
Book 6 discusses how WordPress accesses themes that are stored on the web server. When the network is enabled, these themes are shared among all sites and are available on the site administrator’s Dashboard. If a theme file is changed, every site in the network that uses the theme experiences the change, because only one copy of the theme is being served. When a theme is enabled, it appears on the Manage Theme screen of the administrator’s Dashboard (accessed by hovering the mouse pointer over the Appearance menu of the Network Admin Dashboard and clicking the Themes link). Users can choose to activate this theme so that it displays on the front side of the site. You must activate a theme for use across all sites in a network by clicking the Network Enable link on the Theme menu in the Network Admin Dashboard. (Access the Themes screen by clicking the Themes menu link on the Network Admin Dashboard.)
The main network site could have 20 themes installed in the main WordPress installation, but if you haven’t enabled these themes for use across the entire network, site administrators can’t see network-disabled themes on their Dashboards and, therefore, can’t use them on their sites.
If a consistent network design is what you’re after, you’ll run into a few troubles with the WordPress network because by default, no matter what themes you’ve activated, the default WordPress Twenty Nineteen theme gets activated whenever new sites are created within your network. It would be nice if WordPress provided a global setting on the Network Admin Dashboard that allowed administrators to assign the default theme to every site that’s created. Currently, however, that feature is available only by adding a small line of code to the WordPress configuration file (which I cover in “Setting the default theme for sites” later in this chapter).
Enabling themes for individual sites
You may have a customized theme for one particular site that you don’t want other sites within the network to use or access. You, as network admin, can edit each site in the network. You can perform basic tasks such as enabling, disabling, or adding themes to the network without leaving your Dashboard. If you want to make a theme available for use on only one site and unavailable for other sites, follow these steps:
Click the Network Admin link on the My Sites menu in the top-left corner of your Dashboard; then click the Sites link.
The Sites screen appears, showing a list of all sites in the network, sorted by creation date. (See Figure 5-2.)
Hover your mouse pointer over the site you want to enable a theme for and then click the Edit link.
The Edit Site screen displays on your Dashboard.
Click the Themes tab of the Edit Sites screen.
The screen lists themes that you can enable for the site you’re editing. (See Figure 5-3.)
Click the Enable link for the theme you want to use for the site you’re editing.
The Edit Site screen refreshes with the Theme tab still active and displays a message stating that the theme has been enabled.
- Repeat these steps for any other sites on which you want to enable a theme.
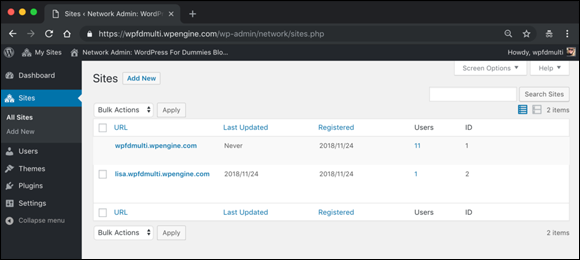
FIGURE 5-2: A list of sites in the network.

FIGURE 5-3: The Edit Site screen with the Themes tab active.
Installing themes for network use
Installing a theme for use on your network involves the same process you use to install a theme on your individual site (see Book 6, Chapter 2) but with an extra step: You have to enable each theme on the Network Admin Dashboard to activate it on the Appearance menu of the individual site administrators’ Dashboards. Here’s how to enable a theme so that all your site owners can use it on their sites:
Click the Network Admin link on the My Sites menu in the top-left corner of your Dashboard and then click the Themes menu link.
The Themes screen appears, displaying a list of installed themes. (See Figure 5-4.) Each theme installed in the
/wp-content/themesfolder is listed on this screen.Click the Network Enable link for the theme you want to use.
Enabling a theme causes it to appear in the list of available themes on each network site's Dashboard (but doesn’t change any user’s active theme; it merely makes this theme available for use).
- Repeat these steps to enable more themes on your network.

FIGURE 5-4: A list of themes used in the network.
Just installing a new theme in your main WordPress installation doesn’t make it available for use networkwide. As the network admin, you always have to enable a theme before your site owners can use it.
Setting the default theme for sites
When a new site is created on the network, by default it displays the Twenty Nineteen theme provided within WordPress, which is the default theme for all new WordPress installations. If you want to use a different theme for all new sites, you can add a define statement to the wp-config.php file of your WordPress installation. (Check out Book 2, Chapter 5 to familiarize yourself with the wp-config.php file that you're modifying.)
Install your theme on the server, as I outline in Book 6, chapters 1 and 2. You may also want to enable the theme networkwide, as outlined in “Installing themes for network use” earlier in this chapter. This step isn’t necessary, but if you have other themes available, and if the active theme is disabled, a user who switches away from that theme won’t be able to switch back to it.
Because the Twenty Nineteen WordPress theme is already the default, I use another popular WordPress theme (the default theme before TwentyNineteen was released) called TwentySeventeen (https://wordpress.org/themes/twentyseventeen). To set this theme as the default theme for all sites within a network, follow these steps:
Log in to your web server via SFTP.
Book 2, Chapter 2 discusses using SFTP.
Open the
wp-config.phpfile in your favorite text editor.See Book 2, Chapter 5 for details about the
wp-config.phpfile. Save a copy of your original
 wp-config.phpfile to your desktop before editing it in case you make any mistakes in the next few steps.- Locate the following line of code in the
wp-config.phpfile:define( 'WPLANG', '' );You can find this line toward the bottom of the file; scroll until you locate it.
- Add a new blank line below it.
Type define( 'WP_DEFAULT_THEME', 'twentyseventeen' );
This one line of code tells WordPress to use the TwentySeventeen theme as the default theme for all new sites within your network.
The part of the line of code in step 5 that looks like this — 'twentyseventeen'— is the name of the folder that contains the theme in the/wp-content/themes/folder in the file directory on your web server. The name within quotes should be identical to the name of the folder where the theme files reside.Save the
wp-config.phpfile, and upload it to your web server.All new sites created now display the TwentySeventeen theme.
Gathering and Displaying Networkwide Content
Depending on your needs, you may want to gather content from sites across your network to display on the front page of the main site (as the BBC America website does). Although some plugins can perform this task for you, you can accomplish the same thing by placing a few lines of code in your theme template file.
The main page of your network is controlled by the theme that's active on the Themes screen of your regular Dashboard (which you access by hovering your mouse pointer over Appearance and clicking the Themes link). You can customize this theme with the code samples provided in the next section, “Adding posts from network sites.”
Adding posts from network sites
One of the best ways to pull visitors into your site is to display a short list of headlines from posts on other sites within your network. If you have a single WordPress site, the Recent Posts widget can handle this task. When you’re running a network, however, you have no built-in way to pull a list of posts from across all the sites in your network. But the Network Posts Extended plugin (https://wordpress.org/plugins/network-posts-extended) allows you to share posts and pages from across your entire network on any given page on your main site through the use of a shortcode. The shortcode provided by the plugin has a variety of parameters you can use to customize the display of the content. You can specify the number of posts to display, for example, or display content only from certain sites. You can use several parameters and custom HTML elements with the shortcode; all the options available to you are listed at https://wordpress.org/plugins/network-posts-extended.
Listing network sites
To list all the sites in the network, use the Multisite Directory plugin, available for free on the WordPress website at https://wordpress.org/plugins/multisite-directory. You install this plugin just as you do any other plugin in WordPress; see Book 7, chapters 1 and 2 for information on installing WordPress plugins.
To display a listing of sites from your network, you must include a shortcode that the plugin developer provides within the body of a page or post published to your main site. The most common and most useful method is to create a page that includes the plugin shortcode. To list all network sites, follow these steps (which use the default TwentyNineteen theme):
- Log in to the WordPress Dashboard of the main site.
Hover your mouse pointer over Pages, and click the Add New link.
The Add New Page screen appears.
Fill in a title for your page.
You might type something like Network Sites List.
Click the Add Block icon.
This step loads the blocks you can use to create content on a page.
- Select the Shortcode block below the Widgets heading.
Add the
[site-directory display="list"]shortcode in the text field.This shortcode displays a list of site titles. (See Figure 5-5.)
The shortcode for this plugin accepts several parameters that customize the display of the sites. All the options available to you are listed on the Multisite Directory plugin's page at https://wordpress.org/plugins/multisite-directory.Publish the page.
Now when you visit the page on your website, you see that it displays the list of sites in the network. (See Figure 5-6.)

FIGURE 5-5: Adding a shortcode to a page by using the Shortcode widget block.

FIGURE 5-6: A page showing the list of network sites.
Using and Installing Networkwide Plugins
Networkwide plugins perform an action globally (across all sites in the network). These plugins are called network plugins because a single copy of a plugin is used across all sites within the network; it doesn’t matter whether your network has 5 or 500 sites. All sites within the network use the same copy.
When you have a single installation of WordPress on a single site, the Activate link on the Plugins page turns on that plugin for that site. (See Book 7, chapters 1 and 2.) When you have multiple sites in a network that use the Multisite feature, the Activate link works the same way for the site on which you activate the plugin.
You see a Network Activate link on the Plugins screen of the Network Admin Dashboard. This link activates the plugin on all sites in the network (turns the plugin on for all network sites). You can’t manage plugin options globally, however, unless the plugin itself is coded to let you do so. A list of network-activated plugins appears on the Plugins screen of the Network Admin Dashboard (which you access by clicking the Plugins menu link).
Any changes made in a plugin affect every site within your network.
A special breed of plugins — Must-Use — gets installed in the /wp-content/mu-plugins folder on your web server. Any plugin file placed inside this folder runs as though it were part of the WordPress core installation. The plugins in this folder execute automatically without the need for activation in your Dashboard.
 You can't install or access the plugins in the
 /wp-content/mu-plugins/ folder from the WordPress Dashboard. If you use the Install Plugins screen (hover your mouse pointer over Plugins, and click the Add New link) to find and install a plugin, you’re required to move the plugin files from the /wp-content/plugins folder to the /wp-content/mu-plugins folder.
Generally, plugins placed in the /wp-content/mu-plugins folder are for networkwide features or customizations that users can't disable. An example is a custom-branded login page on each site in your network. If a plugin design adds a new menu item, the menu item appears as soon as the plugin is placed in the /wp-content/mu-plugins folder, without further need for activation from the Dashboard.
Not all plugins placed in the /wp-content/mu-plugins folder appear in the plugins list on the Plugins screen, because not all of them require activation. After you create the /wp-content/mu-plugins folder via SFTP or your web host's control panel, a new Must-Use link appears on the Plugins screen, as shown in Figure 5-7. This link displays the plugins that are included in the /wp-content/mu-plugins folder but doesn’t give you the ability to activate, deactivate, or edit them.
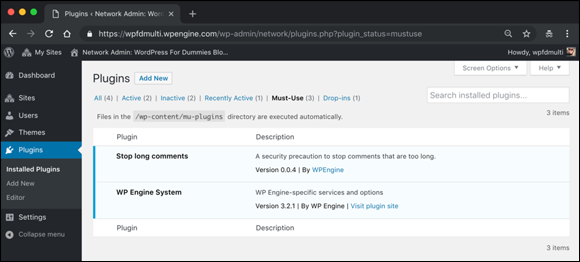
FIGURE 5-7: The Must-Use link on the Plugins screen.
You still control plugin settings on a per-site basis; you must visit the back end of each site if you want to alter any settings provided by the plugin.
Here’s how to create the /wp-content/mu-plugins folder and install a networkwide plugin:
- Connect to your web server via SFTP.
Navigate to the
/wp-contentfolder.You see the subdirectories
pluginsandthemes.Using your SFTP program, create a
mu-pluginssubdirectory.Most SFTP programs allow you to right-click in the SFTP window with your mouse and add a new folder from the shortcut menu.
Upload the plugin file (not the plugin folder) to the
/wp-content/mu-pluginsfolder on your web server.The plugin runs in your installation immediately.
Generally speaking, the only plugins that go in this folder are ones that have explicit instructions (typically located in the
readme.txtfile) to that effect.
Discovering Handy Multisite Plugins
You can find Multisite plugins that take advantage of WordPress's Multisite functionality on the WordPress Plugins page at https://wordpress.org/plugins.
Usually, Multisite plugins are tagged with certain keywords that help you find them, such as multisite and network. Use the search field on the Plugins page to search for a plugin by keyword. The WordPress website displays a page that lists the related plugins, such as https://wordpress.org/plugins/search/multisite or https://wordpress.org/plugins/search/network.
You can find more plugins by searching in search engines and by searching the WordPress Support page (https://wordpress.org/support).