The Lock screen is designed to give you a glimpse of useful information—the time, your battery charge, the current WiFi network signal, the number of new email messages waiting, and so on—without any red tape like having to sign in and type a password.
You can add other programs’ information on this choice slice of real estate, too. And you can change the photo that appears as the Lock screen wallpaper, or even turn the Lock screen into a slideshow.
The quickest way to open the Lock screen settings is to search for them, like this:
Now you can proceed.
You might not have a deep-seated psychological attachment to whatever standard “wallpaper” came on your Lock screen. Fortunately, it’s easy to change.
Start by opening the Lock screen settings screen, as described above. Here you’ll discover a choice of several starter images for the Lock screen.
If you like one of the suggested images, pick it. If not, choose Browse.
You wind up looking at the contents of your computer’s Pictures folder. If you’ve ever accumulated any graphics (saved from the Web, for example, or uploaded from your camera), their thumbnails appear here.
Pick the image you want, and then choose “Choose image.”
Presto: Your selected photo is the new, improved Lock screen wallpaper.
It’s an unsung but great new feature of Windows 8.1: Your Lock screen can now be a digital photo frame, cycling through a selection of handsome photos right there on your desk. You paid good money for that machine; why shouldn’t it make itself useful when you’re not actually doing work on it?
To turn this feature on, open the Lock screen settings page as described above. When you turn on “Play a slide show on the Lock screen,” you’re rewarded with a passel of new options:
Use pictures from. It wouldn’t be much of a slideshow without some actual photos. This, then, is where you specify which photos you want to appear.
Windows proposes two folders: Pictures (the cloud icon means “photos stored on your SkyDrive”) and Pictures (the drive icon means “photos on this computer’s Pictures folder). But you can use “Add a folder” to choose additional folders full of photos.
Include Camera Roll folders from this PC and SkyDrive. Do you want pictures you’ve taken with this computer’s camera (that is, the ones on your Camera Roll) and your other Windows and Windows phone gadgets’ cameras (which are auto-synced to your SkyDrive) included in the slideshow?
Only use the photos that will best fit on my screen. Windows, in the Lock screen slideshow, will favor photos whose proportions match your screen, so you don’t wind up with empty black bars.
Play a slide show when using battery power. A slideshow uses more battery power than a not-slideshow. Leave this off for best battery life. (This option appears only if your computer can run on battery power.)
When my PC is inactive, show the lock screen instead of turning off the screen. Ordinarily, your computer goes to sleep when you haven’t used it for a while; the screen goes dark to save power and heat. If you turn on this option, though, it won’t blink to camersleep—it will blink to the Lock screen and begin the slideshow.
Turn off screen after slide show has played for: If you’ve truly wandered away from your computer for the night, it might not make sense for your slideshow to play, over and over, using electricity, for the benefit of an empty office. This option makes the slideshow end after 30 minutes, an hour, or 3 hours, at which point the screen finally goes dark.
Once your Lock screen slideshow begins, you’re in for a treat. Each photo appears for about 12 seconds, slowly zooming in for added coolness. Then the next one fades in or slides in. Every now and then, Windows shakes things up by combining a few photos into a tiled mosaic. It’s hours of fun for the whole family.
You’re not limited to weather, battery, date, and number of emails; you can introduce other apps’ information onto your Lock screen. On the other hand, you don’t have to look at weather, battery, date, and number of emails, either. The point is, you can add or delete app information from this screen.
To do so, open the Lock screen settings screen, as described a couple of pages ago. Examine the “Lock screen apps” heading (Figure 2-8).
Here you can see that the Lock screen has room to display info
bits from up to seven apps. The icons for Weather, Mail, and
Messages may already be selected; the slots represented by the
 buttons are available for your use. Click one
to choose from a list of Lock screen–compatible programs. (Only some
apps show up as available, because only some apps can park their
data bits on the Lock screen.)
buttons are available for your use. Click one
to choose from a list of Lock screen–compatible programs. (Only some
apps show up as available, because only some apps can park their
data bits on the Lock screen.)
Note
If you choose Weather as one of these seven apps, you will not, in fact, see any weather-related information on your Lock screen except when there’s a severe weather alert for your city. If you want to see weather information all the time, choose Weather as the “detailed status” app, as described next.
You can also make an app stop appearing on the Lock screen. Follow steps 1, 2, and 3 above. In the row of seven square icons, tap the one you want to squelch, and then tap “Don’t show quick status here.”
In Figure 2-9, you can see the peculiar option called “Choose an app to display detailed status.” This one anointed app gets special treatment.

Figure 2-9. Top: The “detailed status” app gets several lines of text. If you choose Calendar for this job, as shown here, you see a few lines that represent your next appointment. If you choose Weather, you get a quick weather report. Bottom: What determines how many of the tiny app icons appear on your Lock screen—and which icons they are? You do. In the settings for the Lock screen, you can choose up to seven apps. Their up-to-date info will appear on the Lock screen as tiny icons. One of them gets special treatment: a multiline textual readout (“detailed status”)—in this case, the Calendar.
Most Lock screen apps have to convey all their information in the form of a single icon: an envelope to represent Mail, for example (and a small number next to it denoting how many new messages you have). But the app you choose to show detailed status gets four lines of text, right next to the big clock on the Lock screen (Figure 2-9, top).
Choosing a new “detailed status” app is quick and easy; just tap the gray-and-white icon that currently appears under the “Choose an app” line.
Note
The list of choices includes only apps that have been expressly designed to work with the “detailed status” option. You’ll probably find that very few apps show up in this list.
You can also choose no app. In the list of apps, tap “Don’t show detailed status on the lock screen.”
New in Windows 8.1: If you turn on this option, then you can fire up the Camera app directly from the Lock screen—by swiping down on the Lock screen. The idea is to let you bypass the delay and fuss of the password screens when all you want to do is take a quick photo with your tablet.
The Lock screen is handy on a tablet or a laptop. But if you have a desktop PC, you might consider it just another layer of unnecessary red tape.
Fortunately, if you have Windows 8 Pro, with a few judicious clicks, you can eliminate the Lock screen (if you have the Pro or Enterprise version of Windows 8). From now on, waking or turning on your computer takes you directly to the password screen. You save a step every time you use your machine.
The steps may sound a tad technical, but you only have to go through them once.
You can read more about the Run dialog box on Build Your Own Toolbars. But, for now, you open this dialog box by pressing
 +R.
+R.Don’t have a keyboard? From the Start screen, type run, and then tap the Run icon that appears.
Type gpedit.msc and hit OK.
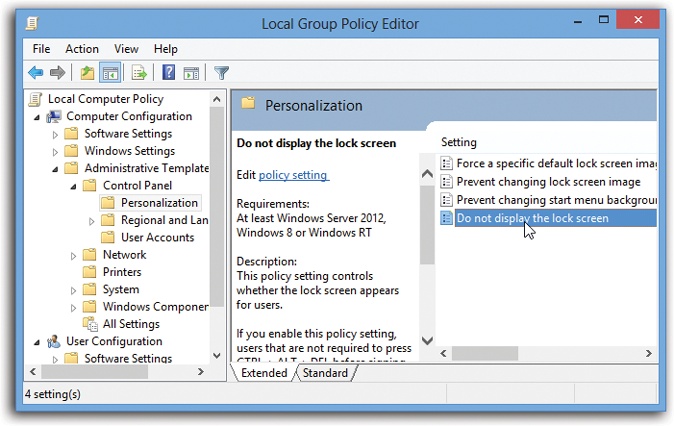
The Local Group Policy Editor appears (Figure 2-10).
Note
If it doesn’t, you might have to install this app. As you’re about to discover, this sort of mucking around is intended for the hopelessly nerdy, but you can handle it.
From the Start screen, type mmc and press Enter. In the results, tap mmc, and allow the installation.
Now you’ve opened up the Console app. Choose File→Add/Remove Snap-in. In the next dialog box, select Group Policy Object Editor and then click Add. You should now be able to follow the steps in this tutorial!
In the list of folders, expand Administrative Templates→Control Panel→Personalization.
In the main window, the “Do not display the lock screen” option is staring you in the face.
Double-click “Do not display the lock screen” and turn on Enabled.
From now on, whenever you wake up or turn on your computer, you’ll go straight to the password screen. The Lock screen is gone forever (or at least until you repeat these steps but turn on “Not configured” in step 4).