For years, the taskbar—the strip of colorful icons at the bottom of your screen—has been one of the most prominent and important elements of the Windows interface (Figure 6-23). Today, you can call it Taskbar, Extreme Makeover Edition; starting in Windows 7, it began doing a lot of things it had never done before.
Here’s an introduction to its functions, old and new:
The Start menu is gone now. As you know from the beginning of this chapter, the Start screen now replaces the old Start menu (although it’s easy enough to bring back the Start menu).
The taskbar lists your open programs and windows. The icons on the taskbar make it easy to switch from one open program to another—from your Web browser to your email programs, for example—or even to specific windows within those programs.
The taskbar lets you open your favorite programs. You read that right. The taskbar is now a launcher, just like the Dock in the Mac’s OS X or the Quick Launch toolbar in old Windows versions. It’s a mini–Start menu.
The system tray (notification area) is at the right end. These tiny icons show you the status of your network connection, battery life, and so on.
The Show Desktop button hides at the far-right end. You can read more about this invisible button on Layering Windows.
You’ve already read about the Start screen; the following pages cover the taskbar’s other functions.
Tip
You can operate the taskbar entirely from the keyboard. Press
 +T to highlight the first button on it, as
indicated by a subtle glow. Then you can “walk” across its buttons
by pressing the left/right arrow keys, or by pressing
+T (add the Shift key to “walk” in the
opposite direction). Once a button is highlighted, you can tap the
space bar to “click” it, press Shift+F10 to “right-click” it, or
press the Menu key
+T to highlight the first button on it, as
indicated by a subtle glow. Then you can “walk” across its buttons
by pressing the left/right arrow keys, or by pressing
+T (add the Shift key to “walk” in the
opposite direction). Once a button is highlighted, you can tap the
space bar to “click” it, press Shift+F10 to “right-click” it, or
press the Menu key  on your keyboard to open the icon’s jump
list. Who needs a mouse anymore?
on your keyboard to open the icon’s jump
list. Who needs a mouse anymore?
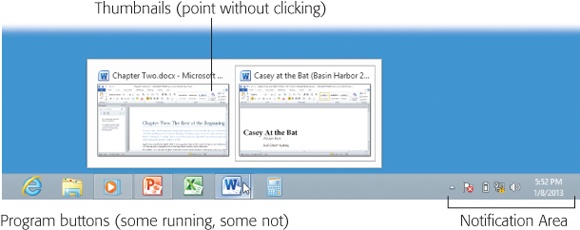
Figure 6-23. The taskbar offers buttons for every program you’re running—and every program you’ve pinned there for easy access later.
Every open window is represented by a button—an actual miniature of the window itself—that sprouts from its program’s taskbar icon. These buttons make it easy to switch among open programs and windows. Just click one to bring its associated window into the foreground, even if it has been minimized.
Once you know what to look for, you can distinguish an open program from a closed one, a frontmost window from a background one, and so on (see Figure 6-24).
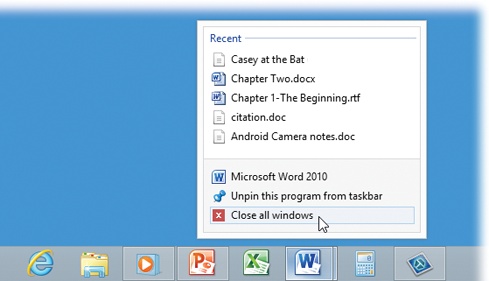
Figure 6-24. An icon without a border is a program you haven’t opened yet (the first and second ones here, for example). A brightened background indicates the active (frontmost) program. Right-clicking one of these buttons lets you perform tasks on all the windows together, such as closing them all at once.
If you point to a program’s button without clicking, it sprouts thumbnail images of the windows themselves. Figure 6-25 shows the effect. It’s a lot more informative than just reading the windows’ names, as in days of yore (your previous Windows versions, that is). The thumbnails are especially good at helping you spot a particular Web page, photo, or PDF document.
Tip
There’s a tiny Close button ( ) in each thumbnail, too, which makes it
easy to close a window without having to bring it forward first.
(Or click the thumbnail itself with your mouse’s scroll wheel, or
use your middle mouse button, if you have one.) Each thumbnail
also has a hidden shortcut menu. Right-click to see your
options!
) in each thumbnail, too, which makes it
easy to close a window without having to bring it forward first.
(Or click the thumbnail itself with your mouse’s scroll wheel, or
use your middle mouse button, if you have one.) Each thumbnail
also has a hidden shortcut menu. Right-click to see your
options!
Those window miniatures are all fine, but the taskbar can also show you full-screen previews of your windows.
To see them, point to one of the thumbnails without clicking. As you can see in Figure 6-25, Windows now displays that window at full size, right on the screen, even if it was minimized, buried, or hidden. Keep moving your cursor across the thumbnails (if there are more than one); each time the pointer lands on a thumbnail, the full-size window preview changes to show what’s in it.
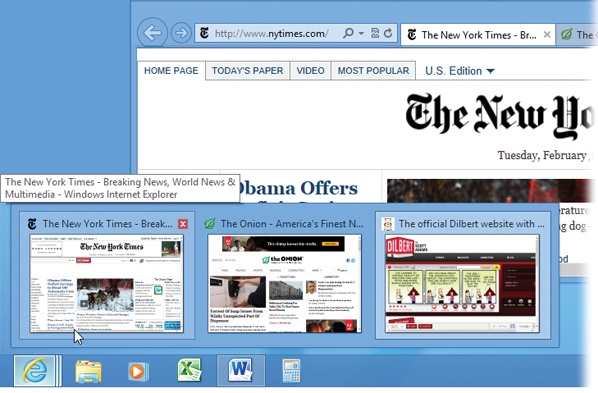
Figure 6-25. Pointing to a taskbar button produces “live” thumbnail previews of the windows themselves, which can be a huge help. Click a thumbnail to open its window. Then, as long as you’re pointing around, try pointing to one of the thumbnails. You see a full-size preview of the corresponding window (in this case, a Web window). Click the thumbnail to make that window active.
When you find the window you want, click on the thumbnail you’re already pointing to. The window pops open so you can work in it.
In the old days, opening a lot of windows might produce a relatively useless display of truncated buttons. Not only were the buttons too narrow to read the names of the windows, but the buttons appeared in chronological order, not software-program order.
As you may have noticed, though, Windows now automatically consolidates open windows into a single program button. (There’s even a subtle visual sign that a program has multiple windows open: Its taskbar icon appears to be “stacked,” like the first icon in Figure 6-25.) All the Word documents are accessible from the Word icon, all the Excel documents sprout from the Excel icon, and so on.
Point to a taskbar button to see the thumbnails of the corresponding windows, complete with their names; click to jump directly to the one you want.
Despite all the newfangled techniques, some of the following time-honored basics still apply:
If a program has only one window open, you can hide or show it by clicking the program’s taskbar button—a great feature that a lot of PC fans miss. (To hide a background window, click its taskbar button twice: once to bring the window forward, then a pause, then again to hide it.)
To minimize, maximize, restore, or close a window, even if you can’t see it on the screen, point to its program’s button on the taskbar. When the window thumbnails pop up, right-click the one you want, and choose from the shortcut menu.
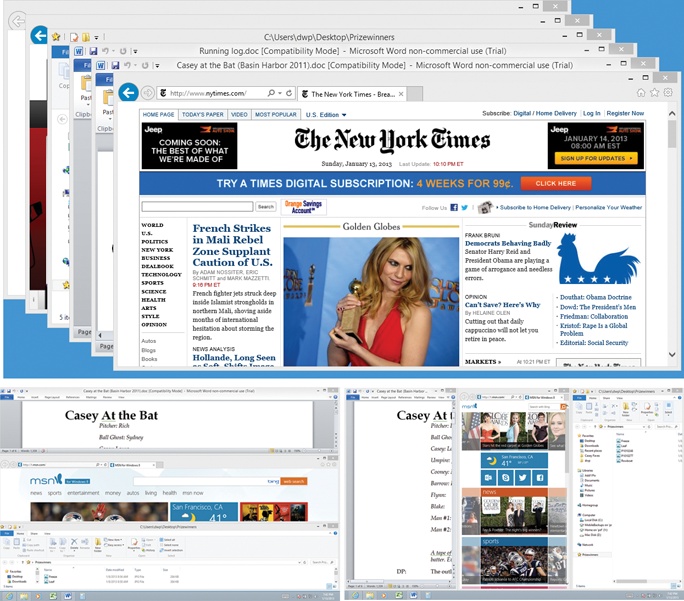
Windows can make all open windows visible at once, either by cascading them, stacking them, or displaying them in side-by-side vertical slices. (All three options are shown in Figure 6-26.) To create this effect, right-click a blank spot on the taskbar and choose Cascade Windows from the shortcut menu.
To hide all open windows in one fell swoop, press
+D. Or right-click a blank spot on the
taskbar and choose “Show the desktop” from the shortcut menu. Or
point to (or click) the Show Desktop rectangle at the far-right
end of the taskbar.To bring the windows back, repeat that step.
Tip
When the taskbar is crowded with buttons, it may not be easy to find a blank spot to click. Usually there’s a little gap near the right end; you can make it easier to find some blank space by enlarging the taskbar, as described on Changing the Taskbar’s Size.
Each time you open a program, its icon appears on the taskbar. That’s the way it’s always been. And when you exit that program, its icon disappears from the taskbar.
These days, however, there’s a twist: You can pin a program’s icon to the taskbar so that it’s always there, even when it’s not open. One quick click opens the app. The idea, of course, is to put frequently used programs front and center, always on the screen, so you don’t have to flip back to the Start screen to find them.
To pin a program to the taskbar in this way, use one of these two tricks:
Drag a program’s icon directly to any spot on the taskbar, as shown in Figure 6-27. You can drag them from any Explorer window or from the desktop.
Right-click a program’s icon (or its shortcut icon), wherever it happens to be. From the shortcut menu, choose Pin to Taskbar. The icon appears instantly at the right end of the taskbar. This technique requires less mousing, of course, but it also deprives you of the chance to specify where the new icon goes.
GEM IN THE ROUGH: Secret Keystrokes of the Taskbar Icons
There’s secret keyboard shortcuts lurking in them thar taskbar icons.
It turns out that the first 10 icons, left to right, have built-in keystrokes that “click” them: the
key plus the numbers 1, 2, 3, and so on
(up to 0, which means 10).If you use this keystroke to “click” the icon of a program that’s not running, it opens up as though you’d clicked it. If you “click” a program that has only one window open, that window pops to the front. If you “click” a program with more than one window open, the icon sprouts thumbnail previews of all of them, and the first window pops to the front.
Remember that you can drag icons around on the taskbar, in effect reassigning those 1-through-0 keystrokes.
Right-click an open program’s taskbar icon, wherever it happens to be. From the shortcut menu, choose Pin to Taskbar. In other words, the program’s icon might be on the taskbar now, because it’s running—but you’ve just told it to stay there even after you exit it.

Figure 6-27. To install a program on your taskbar, drag its icon to any spot; the other icons scoot aside to make room. (Here a program is being dragged from the Program Files folder, the behind-the-scenes source of all desktop programs.)
Once an icon is on the taskbar, you can open it with a single click. By all means, stick your favorites there; over the years, you’ll save yourself thousands of unnecessary Start-screen trips.
Tip
If you Shift-click a taskbar icon, you open another window for that program—for example, a new Web-browser window, a new Microsoft Word document, and so on. (Clicking with your mouse’s scroll wheel, or middle mouse button, does the same thing.) Add the Ctrl key to open the program as an administrator.
And if you Shift-right-click a taskbar icon, you see the same menu of window-management commands (Cascade, Restore, and so on) that you get when you right-click a blank spot on the taskbar.
If you change your mind about a program icon you’ve parked on the taskbar, it’s easy to move an icon to a new place—just drag it with your mouse.
You can also remove one altogether. Right-click the program’s icon—in the taskbar or anywhere on your PC—and, from the shortcut menu, choose “Unpin this program from taskbar.”
Note
The taskbar is really intended to display the icons of programs. If you try to drag a file or a folder, you’ll succeed only in adding it to a program’s jump list, as described next. If you want quick, one-click taskbar access to files, folders, and disks, you can have it—by using the Links toolbar (Links Toolbar).