File Explorer has only one purpose in life: to help you manage the icons of your files, folders, and disks. You could spend your entire workday just mastering the techniques of naming, copying, moving, and deleting these icons—and plenty of people do.
Here’s the crash course.
To rename a file, folder, printer, or disk icon, you need to open up its “renaming rectangle.” You can do so with any of the following methods:
Highlight the icon and then press the F2 key.
Highlight the icon. On the Home tab of the Ribbon, click Rename.
Click carefully, just once, on a previously highlighted icon’s name.
Right-click the icon and choose Rename from the shortcut menu.
Tip
You can even rename your hard drive so you don’t go your entire career with a drive named “Local Disk.” Just rename its icon (in the Computer window) as you would any other.
In any case, once the renaming rectangle has appeared, type
the new name you want and then press Enter. Use all the standard
text-editing tricks: Press Backspace to fix a typo, press the
 and
and  keys to position the insertion point, and so
on. When you’re finished editing the name, press Enter to make it
stick. (If another icon in the folder has the same name, Windows
beeps and makes you choose another name.)
keys to position the insertion point, and so
on. When you’re finished editing the name, press Enter to make it
stick. (If another icon in the folder has the same name, Windows
beeps and makes you choose another name.)
Tip
If you highlight a bunch of icons at once and then open the renaming rectangle for any one of them, you wind up renaming all of them. For example, if you’ve highlighted three folders called Cats, Dogs, and Fish, then renaming one of them to Animals changes the original set of names to Animals (1), Animals (2), and Animals (3).
If that’s not what you want, press Ctrl+Z (that’s the keystroke for Undo) to restore all the original names.
A folder or filename can technically be up to 260 characters long. In practice, though, you won’t be able to produce filenames that long; that’s because that maximum must also include the file extension (the three-letter suffix that identifies the file type) and even the file’s folder path (like C:\Users\Casey\My Pictures).
Note, too, that because they’re reserved for behind-the-scenes use, Windows doesn’t let you use any of these symbols in a Windows filename: \ / : * ? ″ < > |
You can give more than one file or folder the same name, as long as they’re not in the same folder.
Note
Windows comes factory-set not to show you filename extensions. That’s why you sometimes might think you see two different files called, say, “Quarterly Sales,” both in the same folder.
The explanation is that one filename may end with .doc (a Word document), and the other may end with .xls (an Excel document). But because these suffixes are hidden, the files look like they have exactly the same name. To un-hide filename extensions, turn on the “File name extensions” checkbox. It’s on the View tab of the Ribbon.
Properties are a big deal in Windows. Properties are preference settings that you can change independently for every icon on your machine.
To view the properties for an icon, choose from these techniques:
Right-click the icon; choose Properties from the shortcut menu.
Highlight the icon in an Explorer window; click the Properties button. (It’s the wee tiny icon at the upper-left corner of the window, in the Quick Access toolbar. Looks like a tiny page with a checkmark.)
Highlight the icon. On the Ribbon, on the Home tab, click Properties.
While pressing Alt, double-click the icon.
Highlight the icon; press Alt+Enter.
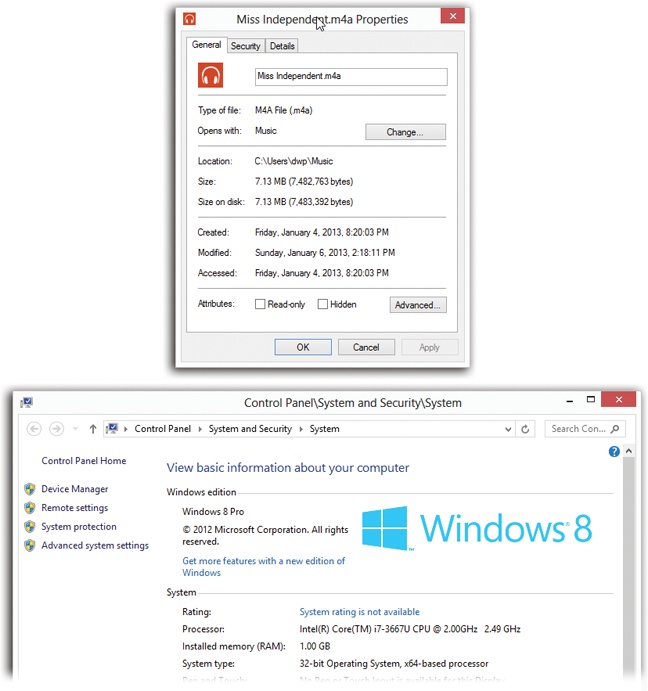
Figure 7-7. The Properties dialog boxes are different for every kind of icon. In the months and years to come, you may find many occasions when adjusting the behavior of some icon has big benefits in simplicity and productivity. Top: The Properties dialog box for a song file. Bottom: The Properties window for the computer itself looks quite a bit different. It is, in fact, part of the Control Panel.
Tip
You can also see some basic info about any icon (type, size, and so on) by pointing to it without clicking. A little info balloon pops up, saving you the trouble of opening the Properties box or even the Details pane.
These settings aren’t the same for every kind of icon, however. Here’s what you can expect when opening the Properties dialog boxes of various icons (Figure 7-7).
There are about 500 different ways to open the Properties dialog box for your This PC icon. For example, you can click This PC in the navigation bar of any window and then click “System properties” on the Ribbon’s Computer tab. Or right-click the Computer icon (in the nav bar again); from the shortcut menu, choose Properties.
The System Properties window is packed with useful information about your machine: what kind of processor is inside, how much memory (RAM) it has, whether or not it has a touchscreen, and what version of Windows you’ve got.
The panel at the left side of the window (shown in Figure 7-7, bottom) includes some useful links—“Device Manager,” “Remote settings,” “System protection,” and “Advanced system settings”—all of which are described in the appropriate chapters of this book.
Note, however, that most of them work by opening the old System Properties Control Panel. Its tabs give a terse, but more complete, look at the tech specs and features of your PC. These, too, are described in the relevant parts of this book—all except “Computer Name.” Here, you can type a plain-English name for your computer (“Casey’s Laptop,” for example). That’s how it will appear to other people on the network, if you have one.
In a disk’s Properties dialog box, you can see all kinds of information about the disk itself, like its name (which you can change right there in the box), its capacity (which you can’t), and how much of it is full.
This dialog box’s various tabs are also gateways to a host of maintenance and backup features, including Disk Cleanup, Error-checking, Defrag, Backup, and Quotas; all of these are described in Chapters Chapter 21 and Chapter 22.
The properties for a plain old document depend on what kind of document it is. You always see a General tab, but other tabs may also appear (especially for Microsoft Office files).
General. This screen offers all the obvious information about the document—location, size, modification date, and so on. The read-only checkbox locks the document. In the read-only state, you can open the document and read it, but you can’t make any changes to it.
Note
If you make a folder read-only, it affects only the files already inside. If you add additional files later, they remain editable.
Hidden turns the icon invisible. It’s a great way to prevent something from being deleted, but because the icon becomes invisible, you may find it a bit difficult to open yourself.
The Advanced button offers a few additional options. “File is ready for archiving” means “Back me up.” This message is intended for the old Backup and Restore program described in Chapter 22, and it indicates that this document has been changed since the last time it was backed up (or that it’s never been backed up). “Allow this file to have contents indexed in addition to file properties” lets you indicate that this file should, or should not, be part of the Search index described earlier in this chapter.
“Compress contents to save disk space” is described later in this chapter. Finally, “Encrypt contents to secure data” is described on Working with zipped folders.
Security has to do with the technical NTFS permissions of a file or folder, technical on/off switches that govern who can do what to the contents. You see this tab only if the hard drive is formatted with NTFS.
Custom. The Properties window of certain older Office documents includes this tab, where you can look up a document’s word count, author, revision number, and many other statistics. But you should by no means feel limited to these 21 properties.
Using the Custom tab, you can create properties of your own—Working Title, Panic Level, Privacy Quotient, or whatever you like. Just specify a property type using the Type pop-up menu (Text, Date, Number, Yes/No); type the property name into the Name text box (or choose one of the canned options in its pop-up menu); and then click Add.
You can then fill in the Value text box for the individual file in question (so that its Panic Level is Red Alert, for example).
Note
This is an older form of tagging files—a lot like the tags feature described on Tags, Metadata, and Properties—except that you can’t use Windows Search to find them. Especially technical people can, however, perform query-language searches for these values.
The Details tab reveals the sorts of details—tags, categories, authors, and so on—that are searchable by Windows’ search command. You can edit these little tidbits right in the dialog box.
This box also tells you how many words, lines, and paragraphs are in a particular Word document. For a graphics document, the Summary tab indicates the graphic’s dimensions, resolution, and color settings.
The Previous Versions tab appears only if you’ve gone to the extraordinary trouble of resurrecting Windows 7’s Previous Versions feature, which lets you revert a document or a folder to an earlier version.
The Properties dialog box for a folder offers five (or six) tabs:
General, Security. Here you find the same sorts of checkboxes and options as you do for data files, described above.
Sharing makes the folder susceptible to invasion by other people—either in person, when they log into this PC, or from across your office network (see Chapter 27).
Location. This tab appears only for folders you’ve included in a library (Libraries). It identifies where the folder really sits.
Customize. The first pop-up menu here lets you apply a folder template to any folder: General Items, Documents, Pictures, Music, or Videos. A template is nothing more than a canned layout with a predesigned set of Ribbon tabs, icon sizes, column headings, and so on.
You may already have noticed that your Pictures library displays a nice big thumbnail icon for each of your photos, and that your Music library presents a tidy Details-view list of all your songs, with Ribbon buttons like “Play all,” “Play To,” and “Add to playlist.” Here’s your chance to apply those same expertly designed templates to folders of your own making.
This dialog box also lets you change the icon for a folder, as described in the next section.
There’s not much here that you can change yourself, but you certainly get a lot to look at. For starters, there are the General and Details tabs described above.
But you may also find an important Compatibility tab, which may one day come to save your bacon. It lets you trick a pre–Windows 8.1 program into running on Microsoft’s latest.
You can change the actual, inch-tall illustrations that Windows uses to represent the little icons replete in your electronic world. You can’t, however, use a single method to do so; Microsoft has divided up the controls between two different locations.
First, you can change the icon for some of the important Windows desktop icons: the Recycle Bin, Documents, and so on. To do so, right-click a blank spot on the desktop. From the shortcut menu, choose Personalize.
In the resulting window, click “Change desktop icons” in the task pane at the left side. You’ll see a collection of those important Windows icons. Click one, and then click Change Icon to choose a replacement from a collection Microsoft provides. (You haven’t lived until you’ve made your Recycle Bin look like a giant blue thumbtack!)
Ordinarily, when your Explorer window is in Tiles, Content, or a fairly big Icon view, each folder’s icon resembles what’s in it. You actually see a tiny photo, music album, or Word document peeking out of the open-folder icon.
This means, however, that the icon may actually change over time, as you put different things into it. If you’d rather freeze a folder’s icon so it doesn’t keep changing, you can choose an image that will appear to peek out from inside that folder.
Note
The following steps also let you change what a particular shortcut icon looks like. Unfortunately, Windows offers no way to change an actual document’s icon.
Actually, you have two ways to change a folder’s icon. Both begin the same way: Right-click the folder or shortcut whose icon you want to change. From the shortcut menu, choose Properties, and then click the Customize tab. Now you have a choice (Figure 7-8):
Change what image is peeking out of the file-folder icon. Click Choose File. Windows now lets you hunt for icons on your hard drive. These can be picture files, icons downloaded from the Internet, icons embedded inside program files and .dll files, or icons you’ve made yourself using a freeware or shareware icon-making program. Find the graphic, click it, click Open, and then click OK.
It may take a couple of minutes for Windows to update the folder image, but eventually, you see your hand-selected image “falling out” of the file-folder icon.
Completely replace the file-folder image. Click Change Icon. Windows offers up a palette of canned graphics; click the one you want, and then click OK. Instantly, the original folder bears the new image.