If your fondness for the standard Windows arrow cursor begins to wane, you can assert your individuality by choosing a different pointer shape. For starters, you might want to choose a bigger arrow cursor—a great solution on today’s tinier-pixel, shrunken-cursor monitors.
Begin by clicking “Change mouse pointers” at the left side of the Personalization dialog box shown in Figure 8-3. In a flash, you arrive at the dialog box shown in Figure 8-9.
At this point, you can proceed in any of three ways:
Scheme. There’s more to Windows cursors than just the arrow pointer. At various times, you may also see the spinning circular cursor (which means, “Wait; I’m thinking,” or “Wait; I’ve crashed”), the I-beam cursor (which appears when you’re editing text), the little pointing-finger hand that appears when you point to a Web link, and so on.
All these cursors come prepackaged into design-coordinated sets called schemes. To look over the cursor shapes in a different scheme, use the Scheme drop-down list; the corresponding pointer collection appears in the Customize list box. The ones whose names include “large” or “extra large” offer jumbo, magnified cursors ideal for very large screens or failing eyesight. When you find one that seems like an improvement over the factory-setting set, click OK.
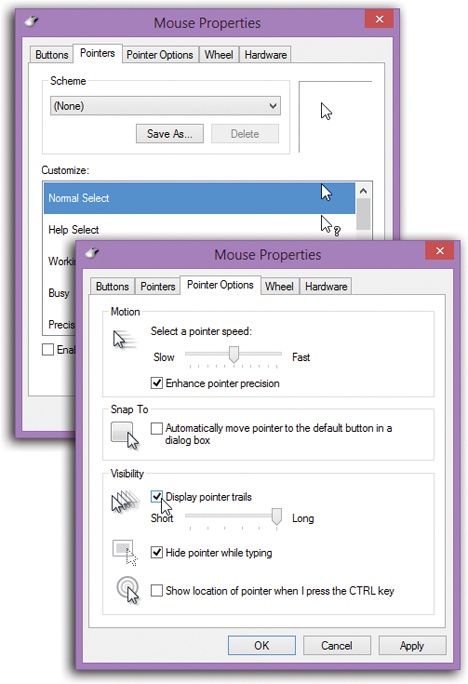
Figure 8-9. Top: The Pointers dialog box, where you can choose a bigger cursor (or a differently shaped one). Bottom: The Pointer Options tab. Ever lose your mouse pointer while working on a laptop with a dim screen? Maybe pointer trails could help. Or have you ever worked on a desktop computer with a mouse pointer that seems to take forever to move across the desktop? Try increasing the pointer speed.
Select individual pointers. You don’t have to change to a completely different scheme; you can also replace just one cursor. To do so, click the pointer you want to change, and then click the Browse button. You’re shown the vast array of cursor-replacement icons (which are in the Local Disk (C:)→Windows→Cursors folder). Click one to see what it looks like; double-click to select it.
Create your own pointer scheme. Once you’ve replaced a cursor shape, you’ve also changed the scheme to which it belongs. At this point, either click OK to activate your change and get back to work, or save the new, improved scheme under its own name, so you can switch back to the original when nostalgia calls. To do so, click the Save As button, name the scheme, and then click OK.
Tip
The “Enable pointer shadow” checkbox at the bottom of this tab is pretty neat. It casts a shadow on whatever’s beneath the cursor, as though it’s skimming just above the surface of your screen.
Clicking the Pointer Options tab offers a few more random cursor-related functions (Figure 8-9, bottom):
Pointer speed. It comes as a surprise to many people that the cursor doesn’t move five inches when the mouse moves five inches on the desk. Instead, you can set things up so that moving the mouse one millimeter moves the pointer one full inch—or vice versa—using the “Select a pointer speed” slider.
It may come as an even greater surprise that the cursor doesn’t generally move proportionally to the mouse’s movement, regardless of your “Pointer speed” setting. Instead, the cursor moves farther when you move the mouse faster. How much farther depends on how you set the “Select a pointer speed” slider.
The Fast setting is nice if you have an enormous monitor, since it prevents you from needing an equally large mouse pad to get from one corner to another. The Slow setting, on the other hand, can be frustrating, since it forces you to constantly pick up and put down the mouse as you scoot across the screen. (You can also turn off the disproportionate-movement feature completely by turning off “Enhance pointer precision.”)
Snap To. A hefty percentage of the times when you reach for the mouse, it’s to click a button in a dialog box. If you, like millions of people before you, usually click the default (outlined) button—such as OK, Next, or Yes—then the Snap To feature can save you the effort of positioning the cursor before clicking.
When you turn on Snap To, every time a dialog box appears, your mouse pointer jumps automatically to the default button so that all you need to do is click. (And to click a different button, like Cancel, you have to move the mouse only slightly to reach it.)
Display pointer trails. The options available for enhancing pointer visibility (or invisibility) are mildly useful under certain circumstances, but mostly they’re just for show.
If you turn on “Display pointer trails,” for example, you get ghost images that trail behind the cursor like a bunch of little ducklings following their mother. In general, this stuttering-cursor effect is irritating. On rare occasions, however, you may find that it helps locate the cursor—for example, if you’re making a presentation on a low-contrast LCD projector.
Hide pointer while typing is useful if you find that the cursor sometimes gets in the way of the words on your screen. As soon as you use the keyboard, the pointer disappears; just move the mouse to make the pointer reappear.
Show location of pointer when I press the CTRL key. If you’ve managed to lose the cursor on an LCD projector or a laptop with an inferior screen, this feature helps you gain your bearings. After turning on this checkbox, Windows displays an animated concentric ring each time you press the Ctrl key to pinpoint the cursor’s location.
Tip
You can also fatten up the insertion point—the cursor that appears when you’re editing text. See Other Options.