Most people don’t buy their computers from Microsoft. Most computers come from companies like Dell, HP, Acer, and Lenovo; they install Windows on each computer before customers take delivery.
Many PC companies sweeten the pot by preinstalling other programs, such as Quicken, Microsoft Works, Microsoft Office, more games, educational software, and so on. The great thing about preloaded programs is that they don’t need installing. Just double-click their desktop icons, or choose their names from the Start screen, and you’re off and working.
Sooner or later, though, you’ll probably want to exploit the massive library of Windows software and add to your collection. Today, almost all new desktop software comes to your PC from one of two sources: a disc (CD or DVD) or the Internet. (The following discussion doesn’t apply to TileWorld apps, which are simpler to find and install.)
An installer program generally transfers the software files to the correct places on your hard drive. The installer also adds the new program’s name to the Start screen, tells Windows about the kinds of files (file extensions) it can open, and makes certain changes to your Registry (Appendix B).
You can often get away with blindly installing some new desktop program without heeding the checklist below. But for the healthiest PC and the least time on hold with tech support, answer these questions before you install anything:
Are you an administrator? Windows derives part of its security and stability by handling new software installations with suspicion. For example, you can’t install most programs unless you have an administrator account (Virtual Private Networking).
Does it run in Windows 8? If the software or its Web site specifically says it’s compatible with 8, great. Install away. Otherwise, consult the Microsoft Web site, which includes a list—not a complete one, but a long one—of Win8-compatible programs.
Tip
See Really Ancient Apps for compatibility tips.
Is the coast clear? Exit all your open programs. You should also turn off your virus-scanning software, which may take the arrival of your new software the wrong way.
Am I prepared to backtrack? If you’re at all concerned about the health and safety of the software you’re about to install, remember that the System Restore feature (System Restore) takes an automatic snapshot of your system just before any software installation. If the new program turns out to be a bit hostile, you can rewind your system to its former, happier working condition.
Some commercial software comes on CD or DVD. On each one is a program called Setup.exe, which, on most installation discs, runs automatically when you insert the disc into the machine. You’re witnessing the AutoPlay feature at work.
If AutoPlay is working, then a few seconds after you insert the disc, the “wait” cursor appears. A few seconds later, the welcome screen for your new software appears, and you may be asked to answer a few onscreen questions (for example, to specify the folder into which you want the new program installed). Along the way, the program may ask you to type in a serial number, which is usually on a sticker on the disc envelope or the registration card.
When the installation is over—and sometimes after restarting the PC—the Start screen now displays an icon, at the far right, for the new program. It’s now ready for action.
When you download a new program from the Internet (see Figure 10-15), you have a couple of decisions to make:
Are you darned sure? Internet downloads are the most common sources of PC virus infections. If you’re downloading from a brand-name site like Shareware.com or Versiontracker.com (or a software company’s site, like Microsoft.com), you’re generally safe. But if the site is unfamiliar, be very, very afraid.
Run or Save? You can find thousands of Windows programs (demos, free programs, and shareware) at Web sites like www.download.com, www.tucows.com, or www.versiontracker.com.
When you actually click a program’s Download button, though, you’re asked if you want to Run its installer or Save it (Figure 10-15). Most of the time, Run is fine; that means your PC will download the installer program to your hard drive, open the installer, install the software you wanted, and then completely disappear. There’s no cleanup to worry about.
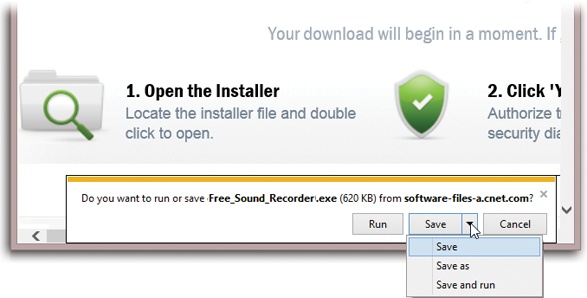
Figure 10-15. When you download something, a box or bar like this one appears. Click Run to download and install the program, or Save to retain the installer program on your hard drive for later. The “Save as” command lets you choose a folder location for the file.
If you click Save instead, then your browser will download the installer program to your hard drive—and that’s it. Your job is to find that installer program, double-click it, install the program—and then delete the installer program later, if you have no further use for it.
Tip
Ordinarily, Windows puts the downloaded installer into your Downloads folder. But if you prefer to stash it somewhere else—on the desktop, for example, where it will be easier to find—choose “Save as” from the Save pop-up menu, as shown in Figure 10-15. (That’s a feature of Internet Explorer, although other Web browsers offer similar features.) After the download is complete, quit or hide your browser. Unzip the file, if necessary, and then run the downloaded installer.
The Windows installer may have dumped over a gigabyte of software onto your hard drive, but it was only warming up. Plenty of second-tier programs and features are available to Windows—stuff that Microsoft didn’t want to burden you with right off the bat, but copied to your hard drive just in case.
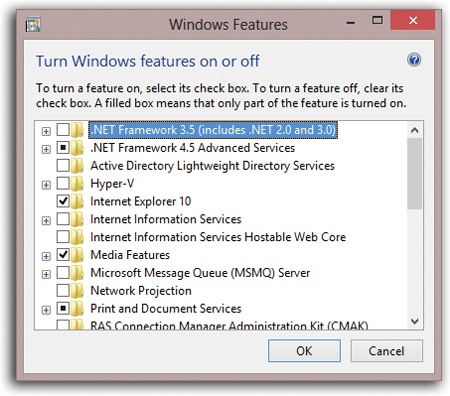
Want to see the master list of software components you have and haven’t yet installed? The quickest method is to open the Start screen. Type features and select Settings under the search box. In the search results, click “Turn Windows features on or off.”
You’ve just opened the Windows Features Wizard—basically a list of all the optional Windows software chunks. Checkmarks appear next to some of them; these are the ones you already have. The checkboxes that aren’t turned on are the options you still haven’t installed.
As you peruse the list, keep in mind the following:
To learn what something is, point to it without clicking. A description appears in a tooltip balloon.
Turn on the checkboxes for software bits you want to install. Turn off the checkboxes of elements you already have but would like Windows to hide.
Figure 10-16. Most of the optional installations involve networking and administrative tools designed for corporate computer technicians. Still, you might want to turn off Games if you don’t have that kind of time to kill, or Tablet PC Optional Components if your computer doesn’t have a touchscreen.
Some of these checkboxes’ titles are just catchalls for bigger groups of independent software chunks (see Figure 10-16).