Sun Angles and Path
This appendix enables you to determine where the sun will be in relationship to your site any time of any day of the year. Use it as a companion to Integrated Design Patterns One through Five in chapter 4. The goal is to fully understand the seasonally changing play of sun and shadow in order to design passively heated and cooled buildings and landscapes. In addition, this appendix will help you optimally place solar power systems, solar hot water systems, above-ground cisterns, trees, and water-harvesting earthworks in an integrated design that boosts their combined potential in all seasons. Summer shade and cooling will be maximized where needed, while winter sun exposure will be retained for free winter heat, light, and solar power. You will reduce consumption, while increasing your sustainable resource production.
This appendix is divided into three sections:
Section one provides basic guidelines for the orientation of buildings and their solar power arrays for all latitudes, and illustrates how sun paths vary by season and latitude across the globe.
Section two gives you sun path diagrams for numerous latitudes to help show where the sun will be at any time of any day of the year. Use these to design for direct solar access where and when you need sun and for shadows where and when you need shade.
Section three shows you different ways to find True North using the stars, the sun, or a compass.
SECTION ONE
SOLAR POWER GUIDELINES AND SEASONAL SUN PATHS FOR MULTIPLE LATITUDES
Buildings that are oriented correctly to the sun to maximize free/passive on-site solar power, summer cooling, and winter heating save water—as do buildings powered by wind and/or micro-hydro power. That’s because, as the WCE: Water Costs of Energy chart in appendix 9 illustrates, from 0.5 to 30 gallons (1.5 to 114 liters) of water are consumed per kilowatt-hour (kWh) of electricity produced at conventional thermoelectric power plants such as coal and nuclear plants, and at hydroelectric plants, which evaporate most of that water from the reservoir behind their dam.1
The sun’s path and a building’s orientation to the sun are used to determine optimal angles for installing solar or photovoltaic (PV) panels that are fixed to the roof. For maximum efficiency, both the long axis of the house and the panels should ideally face True South in the northern hemisphere and True North in the southern hemisphere (see figures 4.5A, B in chapter 4).
True North and True South point directly to the geographic North and South Poles at the Earth’s axis points, and thus relate directly to the Earth’s movement and the sun’s path across the planet. Thus they are more exact solar directions than magnetic/compass north and south, which point to shifting magnetic fields in the general area of the planet’s poles. Magnetic/ compass north and south vary from place-to-place and over time due to local magnetic anomalies, and they must be corrected by place-specific magnetic declinations. The last section of this appendix shows you different ways to find True North and South.
Panels that are fixed to a roof, facing the sun, are among the least expensive ways to utilize solar panels. A more expensive option is mounting solar panels on a moving tracker that tracks the sun to keep the panels pointing directly at the sun throughout the day. Trackers increase sunlight hitting the panels by about 10% in winter and about 40% in summer2 when the path of the summer sun traverses more of the sky over a longer period of time.
If using fixed, roof-mounted solar panels, your panels should be angled at the same degree as the angle of your latitude. For example, if you live at 44˚ latitude, your panels should be angled at 44˚ facing the winter sun. You can increase the efficiency of the panels by 5 to 10% if you mount them to the roof with a ratchet or other mechanism that allows you to change their angle seasonally. The summer angle should then be set about 15˚ less than the latitude angle, and the winter angle should be set about 15˚ greater.3 Thus, at 44˚ latitude, the summer angle of the panels will be about 29˚ and the winter angle will be about 59˚.
In some instances you may want to modify the angle of fixed panels to accommodate your climate, seasonal weather, and electrical use patterns. For example, in coastal Oregon the winters are very wet and cloudy resulting in poor solar power production. The summers are great with lots of sun, so it may be wise to mount the panels to maximize exposure to the summer sun angle rather than to the sparse winter sun. High seasonal electrical needs may make it beneficial to mount panels at the desired angle to favor the season with the highest power usage.
Always mount your panels at angles of 15° or steeper regardless of your latitude, weather, or power usage, so that rainfall and gravity can assist the panels in self-cleaning. Flatter-angled panels tend to accumulate more dust and other materials. For example, in figures A7.1A and B the panels are set at a seasonal angle of 15° rather than 0° to facilitate self-cleaning.
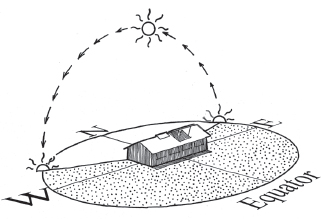
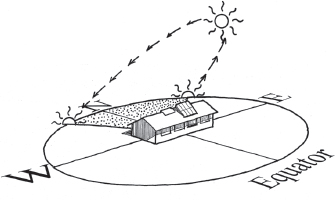
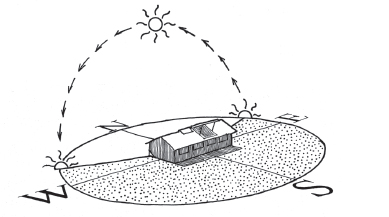
Fig. A7.1A. Sun’s path at 0˚ latitude (the Equator) on the summer solstice. Panels set at 15˚. Sun rises and sets 23˚ N of due east and west. Noonday sun 67˚ above northern horizon
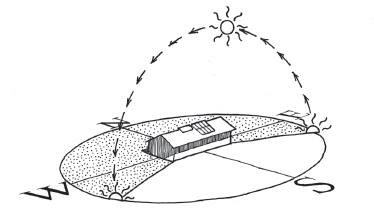
Fig. A7.1B. Sun’s path at 0˚ latitude (the Equator) on the winter solstice. Panels set at 15˚. Sun rises and sets 23˚ S of due east and west. Noonday sun 67˚ above southern horizon
Don’t worry about trying to collect all available solar energy during the day. Instead, angle panels to collect what you can in the optimal hours of sunlight between the solar time hours of 8 A.M. and 4 P.M. in summer and 9 A.M. and 3 P.M. in winter. Solar time is based on the sun’s actual location in the sky and changes throughout the year, while clock time divides time into equal 24-hour days throughout the year and does not reflect the sun’s location in the sky.
Figures A7.2A – A7.7B show conditions for the northern hemisphere; shaded areas denote where the sun does not traverse. (For southern hemisphere sun-path illustrations see SunAndShadeHarvesting.com). The mounted panel angles in the figures have all been set to their optimal seasonal and self-cleaning angle. In a simpler but somewhat less efficient installation, the mounted panels would be fixed in place throughout the year at the same angle as the latitude of the site (unless there is a need to maintain a minimum 15˚ angle for self-cleaning).
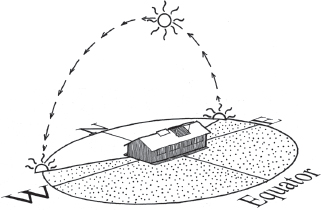
Fig. A7.2A. Sun’s path at 12˚ N latitude on the summer solstice. Panels set at 15˚. Sun rises and sets 24˚ N of due east and west. Noonday sun 79˚ above northern horizon
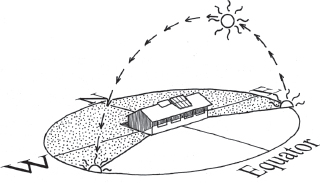
Fig. A7.2B. Sun’s path at 12˚ N latitude on the winter solstice. Panels set at 15˚. Sun rises and sets 24˚ S of due east and west. Noonday sun 55˚ above southern horizon
Fig. A7.3A. Sun’s path at 23.5˚ N latitude (Tropic of Cancer) on the summer solstice. Panels set at 15˚. Sun rises and sets 26˚ N of due east and west. Noonday sun 90˚ above northern horizon, directly overhead
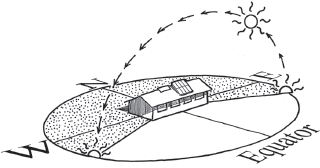
Fig. A7.3B. Sun’s path at 23.5˚ N latitude (Tropic of Cancer) on the winter solstice. Panels set at 39˚. Sun rises and sets 26˚ S of due east and west. Noonday sun 43˚ above southern horizon
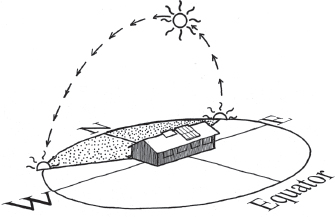
Fig. A7.4A. Sun’s path at 32˚ N latitude on the summer solstice. Panels set at 20˚ (flush with the 20˚ angle of the roof). Sun rises and sets 28˚ N of due east and west. Noonday sun 81˚ above southern horizon
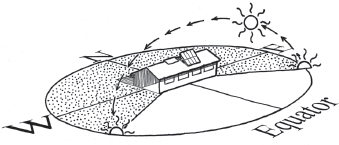
Fig. A7.4B. Sun’s path at 32˚ N latitude on the winter solstice. Panels set at 47˚. Sun rises and sets 28˚ S of due east and west. Noonday sun 35˚ above southern horizon
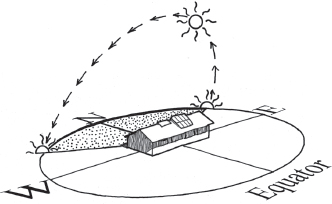
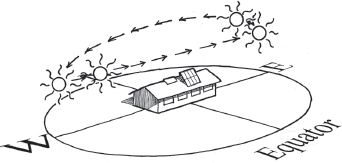
Fig. A7.5A. Sun’s path at 44˚ N latitude on the summer solstice. Panels set at 29˚. Sun rises and sets 33˚ N of due east and west. Noonday sun 69˚ above southern horizon
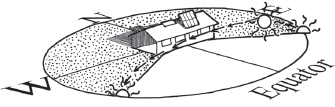
Fig. A7.5B. Sun’s path at 44˚ N latitude on the winter solstice. Panels set at 59˚. Sun rises and sets 33˚ S of due east and west. Noonday sun 23˚ above southern horizon
Fig. A7.6A. Sun’s path at 56˚ N latitude on the summer solstice. Panels set at 41˚. Sun rises and sets 44˚ N of due east and west. Noonday sun 57˚ above southern horizon
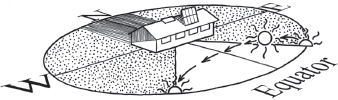
Fig. A7.6B. Sun’s path at 56˚ N latitude on the winter solstice. Panels set at 71˚. Sun rises and sets 44˚ S of due east and west. Noonday sun 11˚ above southern horizon
Fig. A7.7A. Sun’s path at 68˚ N latitude on the summer solstice. Panels set at 53˚. Sun never rises or sets, but is always up on the summer solstice. Noonday sun 46˚ above southern horizon

Fig. A7.7B. Sun’s path at 68˚ N latitude on the winter solstice. Panels set at 83˚. Sun never rises or sets, but is always below the southern horizon on the winter solstice due to being within the Arctic Circle, which begins at 66.5˚ N. Noonday sun is approximately 1˚ below the southern horizon.
Fig. A7.8. Sun angles and shadow lengths affected by latitude and season (elevation view). Dotted lines show the angle of the sun as it relates to the shadow cast by the roof and roof-mounted solar panels that are seasonally adjusted to receive more direct sun.
Overhangs are the same on all images to highlight the differences in sun angles, but the overhangs could be designed to be retracted where needed for more winter sun for heating, or extended for more summer shade for cooling.
THE SUN PATH DIAGRAMS AND HOW TO USE THEM
Use the sun path diagrams to determine:
• The hours of direct sunlight a building, garden, or surface will receive at any time of the year
• Where in the sky the sun will be at any time of the year
• How objects will beneficially or negatively shade a building, garden, or other surface on different dates at different times.
Diagram definitions (adapted from The Food and Heat Producing Solar Greenhouse by Bill Yanda and Rick Fisher, 19804):
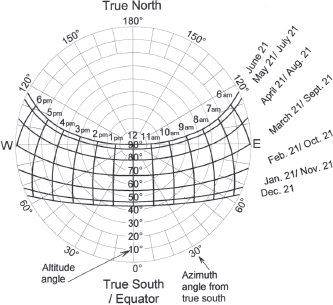
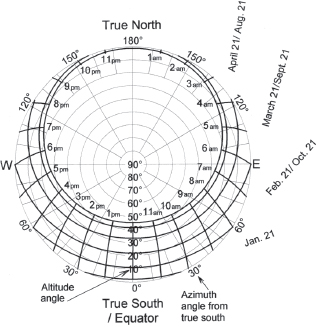
• Sun path - From our viewpoint on Earth, this is the apparent movement of the sun through the sky. On our diagrams, the sweeping east-to-west lines are the sun’s path on the 21st of each month, to correspond with the winter/summer solstices and spring/fall equinoxes (figures A7.9 and A7.12).
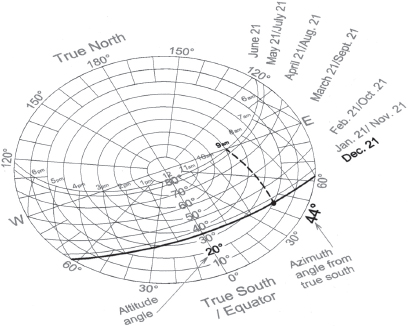
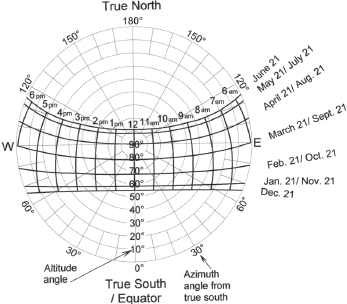
Fig. A7.9. Sun path diagram for 32˚ N latitude. Line representing the sun’s path on December 21 is highlighted in bold. Bold dot represents where the sun will be at 9 A.M. on that date. The dot is the intersection point of the date line (solid bold) and the time line (dashed bold).
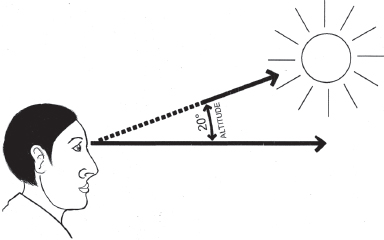
• Altitude - Sometimes called Elevation Angle. The height of the sun in degrees above a true horizon—not affected by mountains, buildings, or other topography (figure A7.10). Altitudes are shown on the sun path diagrams as concentric circles at 10˚ intervals (figure A7.12).
Fig. A7.10. Altitude angle (20˚) of the sun above the horizon at 9 A.M. on Dec. 21 at 32˚ latitude. Adapted from The Passive Solar Energy Book by Ed Mazria, Rodale Press, 1979
• Azimuth - The distance of the sun in degrees east or west of True South (equator-side) in the northern hemisphere, or the distance in degrees east or west of True North (equator-side) in the southern hemisphere (figure A7.11). The azimuth is shown on the radii of the diagrams (figure A7.12).
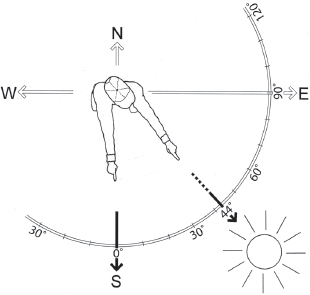
Fig. A7.11. Azimuth angle (44˚) of the sun east of True South at 9 A.M. on Dec. 21 at 32˚N latitude. Adapted from The Passive Solar Energy Book by Ed Mazria, Rodale Press, 1979
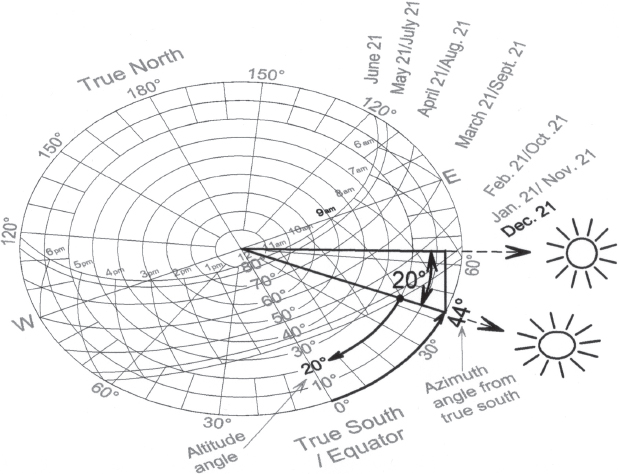
Fig. A7.12. Using the 32˚N latitude sun path diagram to find the sun’s altitude angle and azimuth angle for 9 A.M. on December 21. Find Dec. 21, and follow the curving line of its sun path. Find 9 A.M., and follow its line to where it intersects with the Dec. 21 date line. Now make a line from the center of the circle to that intersection point and beyond to the outermost ring of the circle to see that at 9 A.M. on Dec. 21 the sun will be 44˚ (azimuth angle) east of True South. Finally, look again to the date/time intersection point to see it is on the 20˚ (altitude angle) concentric circle, signifying that on Dec. 21 at 9 A.M. the sun will also be 20˚ above the horizon.
• Hour of day - The generally vertical curved lines on the sun-path diagram represent the solar (NOT daylight savings or time zone) time of the day. They are marked across the top of the sun-path line (figures A7.9 and A7.12).
• Solar noon – When using the term “noon” throughout this book, I mean solar or true noon— the point at which the sun is highest in the sky on any given day. Unlike clock noon, solar noon is the time of day that divides the daylight hours for that day exactly in half. The other solar hours of the day relate directly to solar noon. For example, solar 11 A.M. is one hour before solar noon.
Solar or true noon is not the same as clock noon. In fact, it can be more than an hour different. The time of solar noon changes throughout the year. The exact date, your location in a time zone, and consideration of Daylight Savings Time will all affect the clock time of your local solar noon.
Several websites where you can look up solar noon for your area:
• SunriseSunset.com (United States & Canada). Solar noon is the mid time between the given sunrise and sunset times.
• TimeAndDate.com (World locations). Under Sun & Moon page, click “Sun Calculator.”
• ESRL.noaa.gov/gmd/grad/solcalc
• Winter-Solstice Shadow Ratio Calculator page in the Sun & Shade Harvesting section at HarvestingRainwater.com
SOME WAYS YOU CAN USE THE SUN PATH DIAGRAMS
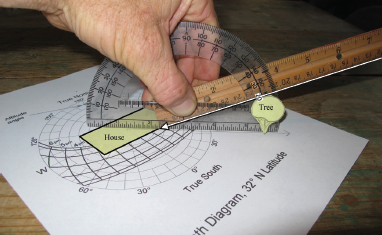
Fig. A7.13. Example of finding length and direction of shadows cast at 9 A.M. on Dec. 21 at 32˚ N latitude using a cut-out of a tree set in relationship to a cut-out of a house’s footprint—all drawn, cut out, and placed to-scale with one another. House footprint and tree oriented on diagram using its compass directions, in the same way house and tree are oriented (or planned to be oriented) on the land.
Sunlight ray, simulated by the bottom of the ruler, is shown at an altitude angle of 20˚ and runs from top of the cut-out of tree to bottom of south side of house to denote shadow cast by the tree at this date and time.
Protractor resting on azimuth angle of 44˚ demonstrates that placement of tree and its associated shadow will not shade house at 9 A.M. or during the rest of key solar access hours between 9 A.M. and 3 P.M.
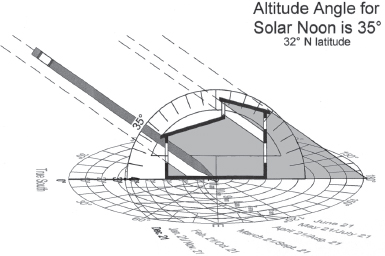
Fig. A7.14. A to-scale model or to-scale drawing of a building can be overlaid on the sun path diagram to see how changing sun angles will interface with the building’s windows, walls, and interior. Here an elevation view drawing of a house illustrates the sun’s altitude angle 35˚, azimuth angle 0˚, and the location of direct sunlight and shadows at solar noon on December 21.
SUN PATH DIAGRAMS
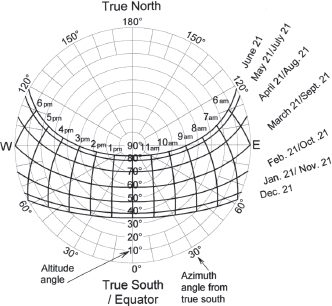
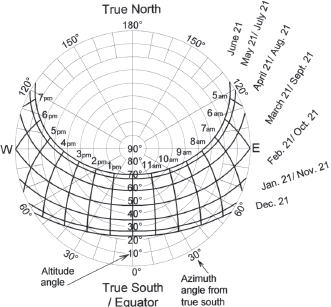
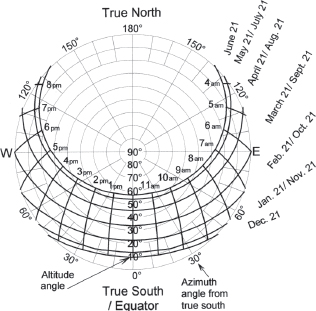
Diagrams in this appendix are given for 0˚, 12˚, 24˚, 32˚, 44˚, 56˚, and 68˚ of latitude (figures A7.15 – A7.21B). Larger versions of these diagrams are given for every four degrees of latitude on the Sun Path Diagrams page in the Sun & Shade Harvesting section of HarvestingRainwater.com. You can also obtain a sun path diagram for your exact latitude at http://solardat.uoregon.edu/PolarSunChartProgram.html, but note that the orientation and layout of the diagram will differ somewhat from those I give you here. To use the figures provided in this appendix, refer to the diagram closest to your latitude.
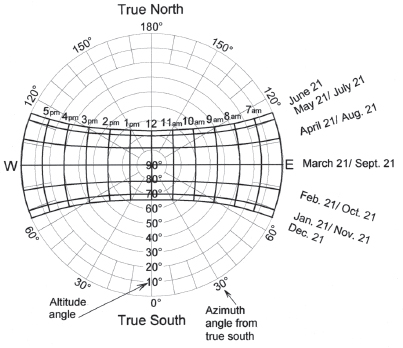
Fig. A7.15. Sun path diagram, 0˚ latitude (Equator). The tropical latitudes surround the Equator and comprise all areas on Earth where the sun reaches a point directly overhead at least once during the solar year. At the Equator this occurs at noon on the spring and fall equinox.
Fig. A7.16A. Sun path diagram, 12˚ N latitude. At this latitude the noonday sun on April 21 and August 21 is directly overhead—90˚ above the Equator-/south-facing horizon. The noonday sun on June 21 is 103˚ above the Equator-/south-facing horizon (77˚ above the north-facing horizon).
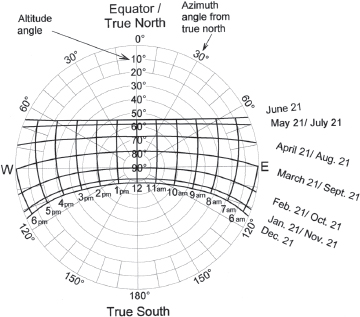
Fig. A7.16B. Sun path diagram, 12˚ S latitude. At this latitude the noonday sun on February 21 and October 21 is directly overhead—90˚ above the Equator-/north-facing horizon. The noonday sun on December 21 is 103˚ above the Equator-/north-facing horizon (77˚ above the south-facing horizon).
Fig. A7.17A. Sun path diagram, 24˚ N latitude. (Tropic of Cancer equals 23.5˚) The Tropic of Cancer is the northern limit of the tropical latitudes. Here the noonday sun on the summer solstice is directly overhead—90˚ above the Equator-/south-facing horizon.
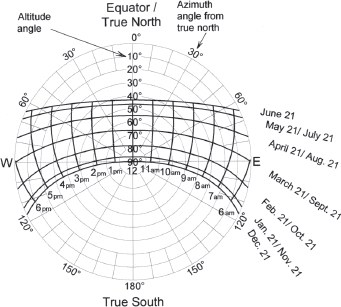
Fig. A7.17B. Sun path diagram, 24˚ S latitude. (Tropic of Capricorn equals 23.5˚) The Tropic of Cancer is the southern limit of the tropical latitudes. Here the noonday sun on the summer solstice is directly overhead—90˚ above the Equator-/north-facing horizon.
Fig. A7.18A. Sun path diagram, 32˚ N latitude
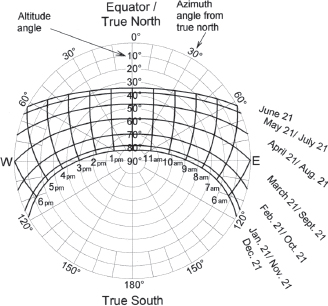
Fig. A7.18B. Sun path diagram, 32˚ S latitude
Fig. A7.19A. Sun path diagram, 44˚ N latitude
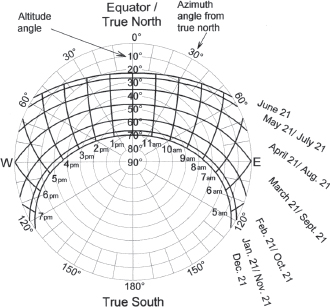
Fig. A7.19B. Sun path diagram, 44˚ S latitude
Fig. A7.20A. Sun path diagram, 56˚ N latitude
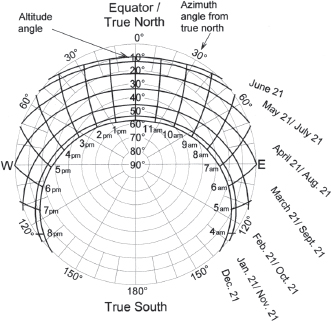
Fig. A7.20B. Sun path diagram, 56˚ S latitude
Fig. A7.21A. Sun path diagram, 68˚ N latitude (Arctic Circle begins at 66.5˚ N)
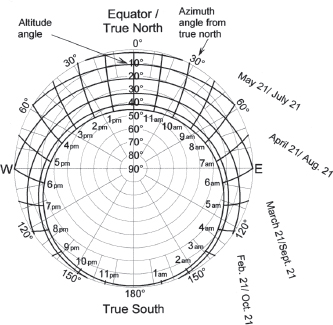
Fig. A7.21B. Sun path diagram, 68˚ S latitude (Antarctic Circle begins at 66.5˚ S)
SUN PATH DIAGRAM REFERENCES:
• University of Oregon Solar Radiation Monitoring Laboratory polar sun path chart program http://solardat.uoregon.edu/PolarSunChartProgram.html
• The Food and Heat Producing Solar Greenhouse by Bill Yanda and Rick Fisher, John Muir Publications, 1980
• Sun, Wind, and Light by G.Z. Brown and Mark DeKay, John Wiley & Sons, 2001
DIFFERENT WAYS TO FIND TRUE NORTH
Finding True North is useful for finding your way, and for optimally orienting a building or solar panels to the sun to maximize power production, passive/free heating and cooling, and passive/free winter daylight.
Orient a new building, an addition to an existing building, or an array of solar panels fixed in place, so their long-axis is perpendicular to this north-south line, and thus it has an east-west orientation (see Integrated Design Pattern One section of chapter 4 for illustrations and more information).
Below are three ways to find True North (besides knowing that at Solar Noon the sun is exactly on True South-True North line).
One: Finding True North using the North Star (Polaris)
This is my favorite way to find True North. I find it easy to use and more accurate than using a compass—for which I would also need to know the declination. In addition, it connects me with the night sky and motivates me to reduce light pollution so I can keep on using it. Friend and mentor, David Omick (Omick.net) explains the process as follows:
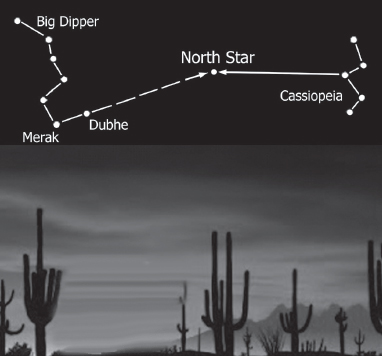
Fig. A7.22. The North Star is located about midway between the central star of Cassiopeia and the Big Dipper. Extend a line about 5 times as long as the distance between stars Dubhe and Merak in the direction of the Big Dipper’s opening to find the North Star.
There are a few limitations to using Polaris to find True North. Obviously, it has to be done at night. Bad light pollution can make this difficult or impossible (see DarkSky.org for strategies on reducing light pollution). It doesn’t work in the southern hemisphere (there’s no corresponding star that can be used in the southern hemisphere). It is not precisely accurate, although it’s very close. From our perspective here on earth, Polaris appears to revolve in a circle about 0.7˚ around True North. This means that Polaris will be exactly True North twice a day and twice a day it will be at it’s farthest point from True North. At it farthest, it is about 1.5 times the diameter of the moon disc away from True North. That’s still very close.
Steps to using Polaris to find True North.
1. Find Polaris. Either use a star guide or this method: Assuming you know where the Big Dipper (scientifically known as Ursa Major) is, imagine a line that passes through the two stars (scientifically known as Dubhe and Merak) that form the far side of the bowl from the handle (the bowl is the part the soup would be in). Now imagine extending this line (in the direction the soup would come out of the bowl, not the other direction). Polaris will be more or less on that line and about 4 or 5 times the distance that Dubhe and Merak are from each other (figure A7.22). Note that Polaris is not as bright as Dubhe or Merak and that although Polaris is visible every night from everywhere in the northern hemisphere (unless there is too much light pollution), the Big Dipper may not be.
2. Now, drive a tall stake into the ground. This can be a wooden stake, piece of rebar, pipe, etc., and should be about 5-6 feet (1.5 m) tall. The stake should be as vertical as possible.
3. Position your eye near the ground on the south side of the stake (the side away from Polaris) and about 10 feet (3 m) away from the stake.
4. Move back and forth until your eye is in line with both Polaris and the stake. Drive another stake into the ground where your eye is. The two stakes are now on a True North-South line.
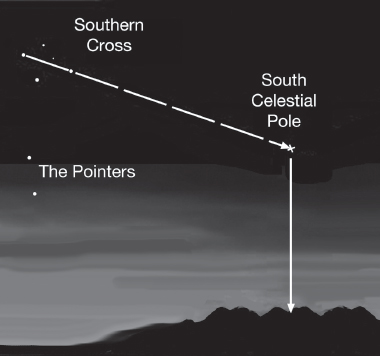
Fig. A7.23. In the southern hemisphere the two stars that make up the long axis of the Southern Cross “point” to an imaginary point, called the South Celestial Pole, which is above the South Pole. Extend an imaginary line four and a half times the length of the cross to the point of the South Celestial Pole. From this point, drop a line vertically down to the horizon. This gives you the direction of True South.
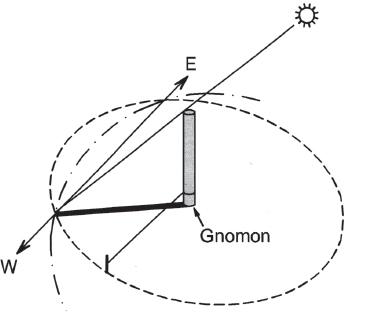
Two: Using the shadow cast by a stick to find True North and South
This is the most accurate way to find True North and South. At solar noon, the shadow cast by an object will be its shortest length for the day. To use this fact, follow the steps below:
1. Plant a stick vertically in flat, level ground that will be in full sun throughout the day. (The stick should stick up above the ground about 18 inches or 45 cm.) This vertical stick will be your gnomon, a vertical shaft casting a shadow used as an indicator.
2. On the ground (at least about an hour and a half or so before noon), mark the end of the gnomon’s shadow.
3. Every 15 minutes or so, again mark the end of the gnomon’s shadow. The shadow will get shorter (though the difference will be slight). At a certain point, the shadow will begin to change direction from leaning somewhat to the west, to leaning somewhat to the east, and begin to become longer. Mark another several shadow lengths past what you think is the shortest shadow.
4. Draw a line (likely curved) in the dirt connecting all the shadow length marks you made.
5. Now tie a string to the base of your gnomon stick. Make sure the string is long enough, once tied to the gnomon, to cross over the line (connecting the shadow length markers) you just made in the dirt.
6. Tie a smaller pencil-sized stick to the open (non-gnomon) end of the string. Pull the string straight and taut, and mark a circle in the dirt (with your pencil stick kept vertical) around the gnomon.
7. Now find the two points where the circle around your gnomon intersects with the line you made when connecting the ends of the gnomon’s shadows. Draw a straight line between these two intersection points—this is your approximate east-west line (figure A7.24A).
Fig. A7.24A. Finding direction with the shadow cast by a vertical stick gnomon. Dot–dash line denotes the end of the shadow cast by the gnomon, marked throughout the day.
Dotted line denotes a circle drawn around the gnomon at a diameter equaling the length of a string tied to the base of the gnomon.
A line drawn between the two points where the dot-dash (shadow) line and the dotted (string) line intersect is the site’s approximate east-west line.
Adapted from A Guide to Prehistoric Astronomy in the Southwest, by J. McKim Malville, Johnson Books, 2008
Dotted line denotes a circle drawn around the gnomon at a diameter equaling the length of a string tied to the base of the gnomon.
Lines drawn between the two points where the dot-dash (shadow) line and the dotted (string) line intersect denote the site’s approximate east-west line marked on the solstices.
Adapted from A Guide to Prehistoric Astronomy in the Southwest, by J. McKim Malville, Johnson Books, 2008
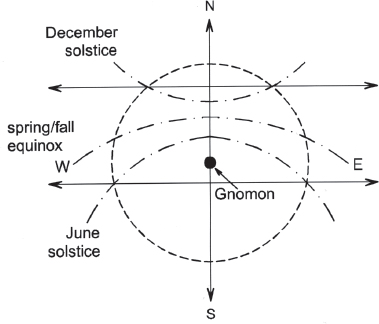
8. Draw a straight line perpendicular to the east-west line. This is your approximate north-south line (figure A7.24B).
Fig. A7.24B. View of gnomon (in northern hemisphere) from above. Dot-dash lines denote the end of the shadow cast by the gnomon, marked throughout the day, at the December and June solstices and the spring and fall equinoxes. These lines will vary somewhat depending on the latitude of where the gnomon is placed.
Three: Using a compass and magnetic declination to find North
A compass reads magnetic north, so to find True North you’ll need to adjust your compass reading by some degrees east or west based on your location’s magnetic declination. Magnetic declination is the angle in degrees your compass reading needs to be corrected by in order to find True North. Magnetic declination changes from place-to-place and over time due to magnetic changes in the earth’s core.
1. Use the website below to find the magnetic declination for your site.
2. Then make the necessary correction to your compass so it can point to True North. Search “how to adjust compass to your site’s declination” online to see how.