♦ De-slumping exercise
♦ The standing alternative
♦ Fine-tuning the position of the back support
♦ How long – how often
♦ Tracking your progress
Now that you have read about the potential pitfalls of slumping and how it might be one of the crucial factors that limits your breathing, I will share with you the first and possibly the most vital exercise that you will do within the Brice Method. Please don’t be tempted to skip mastering this, thinking it is too basic to pay any real attention to. It is simple but can have profound benefits if you pay full attention to the details included. That, along with practice, may be one of the most important skills you can learn from this book.
Being aware of your body and actively de-slumping is a key skill that you will be asked to repeat before you undertake any activity, even going to the toilet!
De-slumping exercise
Preparation
For this exercise, you will need a high-backed chair that is firm and supportive. You will find a sofa or lounge chair will be far too soft to provide any meaningful support to your spine. A dining table chair with arms or a relatively firm office chair is what you will need. If the chair has arms, it may assist you, but if your chair has no arms you can still do the exercise.
You will also need a rolled-up towel or a back support of some sort draped over the top of the backrest (see Figure 4.1). A description of the different types of back support you can use is detailed in Addendum 2 (page 141), but to start, a rolled-up towel should suffice.
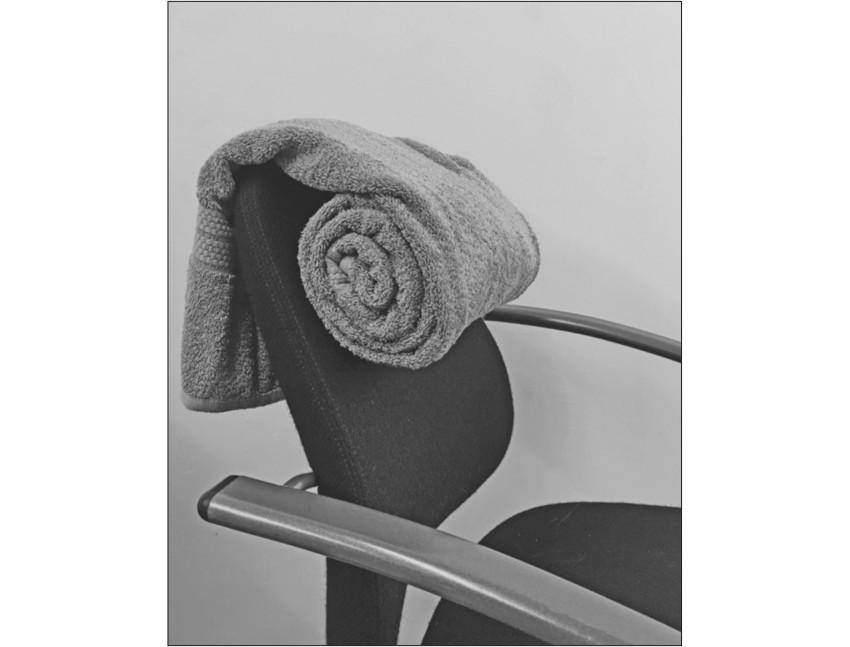
Figure 4.1: Rolled-up towel back support
Self-awareness preparation
Sit on a chair as you normally would. Position a rolled-up towel or back support as shown on the right-hand side of Figure 4.2 (supported posture) and listen again to your breathing as you did before in the Landmark 1 Self-test earlier in the book (page 13).
Ask yourself the following questions and be more aware of what you are actually doing when you inhale and exhale:
- notice where your head is in relation to your body
- notice how you are holding your shoulders
- think about the pace and speed of your breathing
- recognise how deep your breath is going into your lungs
- think about how satisfying each breath is.

Figure 4.2: Unsupported versus supported posture
How to do the exercise
- Sit down on the firm high-backed chair, with your bottom pushed right back into the seat.
- Ensure that the rolled-up towel or back support pad is positioned below and between your shoulder blades (refer back to Figure 4.2). The rolled-up towel or pad should be big enough for you to feel it push against your ribs, but not so big that you are being toppled forwards.
- Now try to draw your shoulder blades backwards and downwards, whilst drawing the nape of your neck backwards. The towel or back support will act as a pivot point, allowing your ribs to open up like a fan, and artificially supporting and expanding your chest in the process.
- When you draw your shoulders backwards and downwards, you may find that your hands will need to fall by your hips or slide back on the arms of your chair. Work with this by putting your hands on your hips if your chair has no arms, or drawing your elbows back if your chair has got arm rests.
Some lucky individuals (a rough estimate of 35%) will get immediate improvement in their breathlessness from this position. While the head lifts and balances on the top of the spine, the shoulder blades fall back into a relaxed position and the ribs flare open; the lungs expand inside the rib cage.
For most, this position will feel quite odd at first as you are asking your chest to move in a way it may not have done for some considerable time. The body does not always like change, especially rapid change, so please take a little time to relax into the position gradually. A few may even feel the position is rather painful. If this is the case for you, don’t force things too quickly, but please persevere; many a patient who would have given up after feeling a little odd at this stage has gone on to surprise me with the considerable improvements they have made in their breathing over the programme.
At first this new body alignment is challenging the posture that you may have developed over months, years or possibly even decades, so it won’t be corrected overnight. In reality, most patients take a little time to let the body settle down and recognise that this new posture is not wrong for them. It is just different. When your body has got used to being held in one position for a long time, it is essentially ‘stuck in a rut’, and getting out of that rut needs some determined and repeated effort.
As your back continues to press against the towel, or pad, below and between your shoulder blades, it will directly push against your ribs. As your ribs are directly attached to your spine, you may notice that as your body relaxes that your head lifts and you feel as if you have become taller. This elongation of the body may mean that you start to feel the muscles around your waist work a little harder. (Engaging the muscles of your waist is part of the body’s natural balancing mechanism, and later on in the book you will discover how it aids natural breathing – see page 84.)
Moving yourself into a more erect position can feel a little unnatural at first; you may even find that your body will tell you it does not like it. Most of my patients have been so slumped for so long that their body has got used to being in a poor posture. If you do feel uncomfortable in this new position, rest assured that this should only be temporary, and your discomfort should ease away relatively quickly. (Refer back to the monitoring any pain section in the Introduction.) Holding this upright position for a few minutes can help take some of the strain off the muscles that are normally holding you slumped forwards. Again, you may feel some neck discomfort, but if you can try to relax and persevere, you are likely to find some relief as the body moulds to its more erect stance. I joke with my patients to help them realise that having a little discomfort is natural. I tell them that their rib cage is used to being as flexible as a breezeblock, and will take a little while to recognise that it can move again. Whilst it is a lame joke, a smile can often help reduce tension. So, the advice here is, don’t try to push it or force it; let it happen naturally. There is a song title there methinks!
If you are one of the lucky ones, who immediately find their body falling onto a position of ease, with their head feeling balanced on top of their neck, the muscles of their neck and upper shoulders feeling slack and relaxed, and their chest falling open, you will begin to realise that your breathing is no longer driven by your neck muscles. You may even find that you do not need to suck air in as much.
Advice if you have back problems
If you have a severe back problem that means you cannot use a direct support against your ribs, you can alternatively try to perch on the front of a chair keeping your spine as upright as possible, with your shoulders drawn back and your head retracted over your body. This is very similar to the position you would otherwise adopt in the Brice Method.
The standing alternative
There is an alternative approach if you do not have a suitable chair, or if you get severe pain in the back from doing the de-slumping exercise sitting down.
You can do this exercise standing up against a wall if you prefer. To do this you will need to stand with your back to the wall, with your feet about 10 inches (25 cm) away from the wall and with your knees very slightly bent. This bend in the knees helps to stop the pelvis from rocking forwards and engages the tummy muscles slightly. The towel or support pad needs to be between you and the wall in exactly the same place as shown in Figure 4.2, and you will need to follow the instructions as if you were seated, keeping your knees slightly bent and your hips not tilted forwards. Leaning back against the support towards the wall will open up your rib cage in the same way it did in the seated position.
Having the support of the pad behind your back has the effect of pushing your rib cage forwards, upwards and flaring it outwards. Your spine simultaneously regains a more erect position, causing your head to draw up and back over your body and taking some of the strain off your neck.
The amount of improvement to your posture will depend upon the degree of immobility that you have had, the length of time you have been slumped, plus any other conditions that contribute to your discomfort. Do, however, try to persevere with this exercise; it will play a pivotal part in your progression, and failure to improve this will greatly limit your progress through the remainder of this book.
What to do if you are feeling light-headed and woozy
Every so often, I get patients who feel slightly woozy or light-headed just from adopting this erect body position. If you do get this problem, it is likely that, over time, you have developed such a forced inhalation technique from breathing that you will habitually try to suck maximum amounts of air into your chest, even when your body does not need it. As this new body position opens up your chest, negating the need to actively suck the air in hard, the chest is pretty much full, and you will feel like you are over-breathing. Over-breathing in this situation can be rather distressing, but do not worry overly about this; you will learn later in the book some techniques to overcome this issue.
Fine-tuning the position of the back support
The positioning of the back support between you and the chair or wall will ultimately depend upon personal preference. I recommend that you start with the gentler option of the towel or spongy roll, as these provide you with enough support to relax your body and breathe deeply with less direct pressure than the other options that I will detail later. The towel and the pad tend to give a generalised effect, working over a number of ribs.
The best location for the towel or lumber roll is just below the lower point of your shoulder blades, closest to your spine. This will give support and provide a pivot in the middle of your back as the forward pressure is placed between four and six ribs at a time. This is shown as position C in Figure 4.3. As the supports are quite large and will not fit between the shoulder blades easily, many of my patients find that they progress on to spikey peanuts or tennis balls placed in a sock. These supports are smaller and firmer, and push against the rib cage to open one to three ribs at a time. As such, they are ideal to open up specific areas of the chest. (See Addendum 2, page 142, for more details on these types of equipment.)
In Figure 4.3, you can see the vertical placement of three smaller, more direct supports: A, B and C.
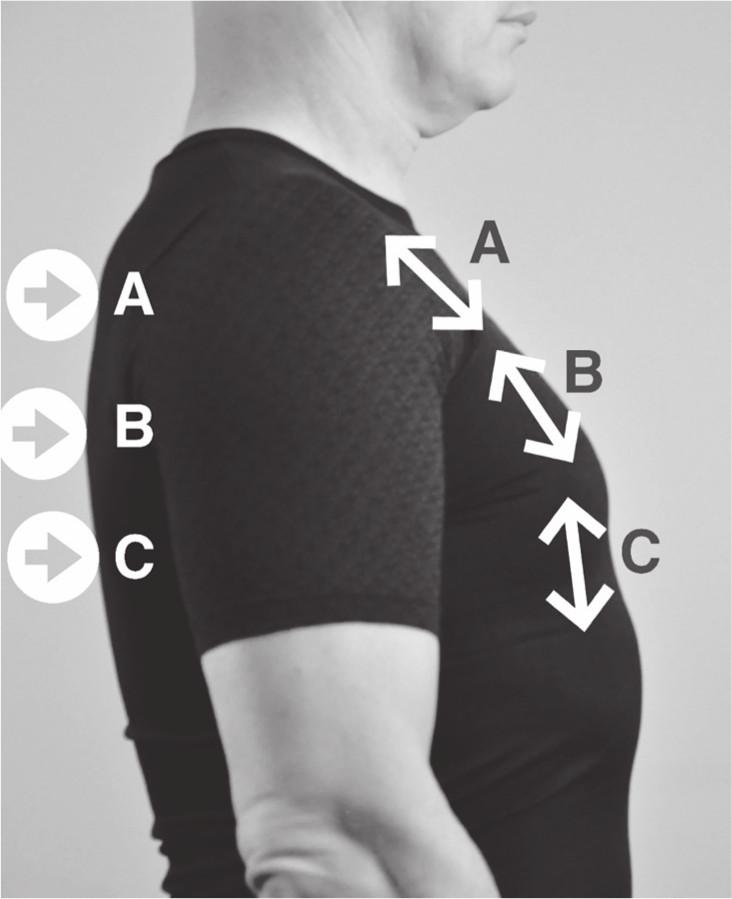
Figure 4.3 Location of support
A. If you place the support high between the shoulder blades you will find the top part of the rib cage will open up if you lean back against the support.
B. Supporting mid-way down the rib cage, between the lowest corner of the shoulder blades, will open the mid region of the rib cage.
C. Supports on the lower ribs, below the shoulder blades, will flare open the lowest part of the rib cage.
In complete contrast to the general effects of the towel and the lumbar role, the tennis balls or spikey peanuts will need much more trial and error to best suit your body.
Using these tools not only helps you gain self-awareness, but as you try the ball in different places you will find that place where you get the most ease. The experience of being aware of your lungs and how you can improve your breathing by doing something as simple as this can be quite liberating.
As you practise the exercise above you will get more accustomed to using the back support. Over time your body may eventually change shape, and you may find that you need to alter the position of the support to get the most benefit.
How often, how long?
I recommend that you first try to sit in this position four or five times each day. The main reason for doing this so frequently, especially in the first few weeks, is so that you start to recognise how the relative positioning of your spine, head, shoulders and ribs plays such an important part in how you can breathe more naturally. Regular practice is the only way you will break old habits. Old habits tend to die hard, but regular, consistent effort almost always works for my patients.
You can adopt this position for as long as you feel comfortable. That might be for a minute before you have to stop, or you may be able to maintain the position for a maximum of about 10 minutes before it becomes uncomfortable. How long you keep the support in place is entirely up to you. Remember that if you do feel even a moderate amount of pain, you are unlikely to get the benefit of relaxed breathing you are aiming for. If you suffer from arthritis and get severe pain in the neck or shoulders when you do this exercise, either reposition yourself so you can lower the pain level, or leave the exercise a little while until you can try it again and remain relatively pain free. (Remember, you can always refer to the section on monitoring pain in the Introduction, page 8.)
As you practise the upright, de-slumped posture you will find that your lungs are opened up naturally. You will find that air is drawn into your lungs without the need to actively inhale. This may feel quite surprising, even quite unnerving at first. If you have spent the last few months or years trying to force air into a compressed lung by sucking, you will probably be amazed at how easy it is to inhale in this position. With practice, your body should be able to regulate the amount of air it takes in passively, only taking in the amount it needs to do a certain activity. This is precisely what the human body was designed to do! When you get used to sitting and standing like this you may find that slumping in your sofa, and leaning over counter tops become your lungs’ worst enemies. Your upright pose should hopefully become your new ‘position of ease’.
For most of my patients who are able to learn this erect breathing technique, there is not any real need to train muscles of inhalation. Inhalation training is the mainstay of most rehabilitation programmes; however, I feel that this technique becomes pretty much redundant. I would even go as far as to say that active inhalation training at the early stages of breathing training is counter-productive as it emphasises hard work, often recruiting the neck muscles when they are not needed, and most importantly overlooks the significance of having an open chest and lungs. I feel that inhalation training should only really be used for COPD patients once they are able to breathe in a relaxed fashion and are starting to get fit enough to extend themselves into what might be considered full fitness training.
Tracking your progress
Once you feel that you have managed to experience some benefit from Exercise 1, do the Landmark 2 Self-test which follows this chapter, and then move straight on to the following chapters, as executing the next few exercises is likely to help mobilise your upper body and facilitate your adopting a more upright posture.