♦ Aerobic and anaerobic respiration
♦ Visualisation exercise
♦ How to pace your breathing
♦ Exercises for paced rhythmic breathing
Walking on the spot
Punching side to side
♦ Building up to true aerobic exercise
♦ Choosing what rhythmic exercise to do
Recline bike
Arm bike
Upright bike
Treadmill
♦ Mastering walking and breathing
♦ Are you ready to progress?
The most common mistake that I find my COPD patients make when they first start to walk or move more than a few yards without guidance, is that they forget to breathe.
It may sound silly that they have got to an age (in many cases a ripe old age) and forgotten the most basic life skill, especially when you consider the fact that a breath is pretty much the first thing they did when they were born, so they have been doing it all their lives.
Oddly enough, there is a good reason why this phenomenon occurs. The human body is quite capable of providing energy for muscular activity for a short period of time without using oxygen as the fuel. Thus, you can do a little bout of exercise without really having to use your lungs.
As some COPD patients have become extremely inactive, their bodies have learned how to rely on this alternative energy system to get them from A to B. With time, the cycle of deconditioning takes its toll and the body learns to use what is called the ‘anaerobic’ energy system rather than ‘aerobic’ (oxygen-based) energy system whenever stressed.
Here is a very simple explanation of the difference between aerobic and anaerobic energy systems.
- Aerobic respiration: The human muscular system that enables us to move is designed to work most effectively with oxygen as the energy source. This is called ‘aerobic’ respiration and the term translates as ‘with oxygen’. By using oxygen as a fuel, the muscles can work pretty much until complete exhaustion, as long as the intensity of exercise is moderate enough not to over-tax the system. Distance running, cycling, hiking, rowing and exercise classes are all forms of aerobic exercise.
- Anaerobic respiration: Translated, ‘anaerobic’ means ‘without oxygen’. Whilst the muscular system needs oxygen to work at its most efficient, there are times when we humans have had to react and move quickly and powerfully, even more quickly than it takes the heart and lungs to get pumping oxygenated blood round the body. Imagine our ancestors in the jungle, seeing a tiger about to pounce. If they had to wait for their heart and lungs to pump sufficient oxygenated blood to the relevant muscles, they would not have survived. To get an immediate boost of powerful energy to get away from the tiger, the anaerobic energy system uses energy that has been stored in the muscles to be used in times of extreme need. Using this form of stored energy is less efficient when compared with burning oxygen and gives off more waste products. Not only that, the anaerobic energy system has a finite supply of energy, and when you are working hard, you may find that it will only last up to a maximum of 90 seconds before it runs dry. Exercising without oxygen is also not a clean process; it gives off a lot of waste products (such as lactic acid) that sit in the muscles rather than getting flushed away by the circulating blood. This means that anaerobic exercise can not only be more painful for the muscles than aerobic exercise, but the build-up of waste products acts like a poison to the body and will ultimately limit further physical activity.
It is interesting to note that the most sedentary COPD patients tend to do only tiny bursts of activity. In doing so, they generally use the energy stored in their muscles anaerobically. These individuals rarely do any type of exercise for long enough to utilise their aerobic system, and it is little wonder that this system becomes deconditioned.
The good news is that there is a simple technique that can be used to combat this double-edged sword of a problem. It is to breathe before you move!
I have found the simplest way to teach patients how to breathe before they move is to use a visualisation exercise.
Visualisation exercise
Sit quietly away from distractions, close your eyes and picture the following:
- You are driving a car and you can see a big hill approaching.
- As you reach the bottom of the hill, you don’t accelerate up the hill, but you maintain the same amount of throttle as when you were on the flat.
- If you did this you would soon find your car starting to lose momentum, the engine would start to strain and eventually might cough and splutter a little before stalling.
This might be exactly how your body reacts when you walk up a hill or flight of stairs if you have forgotten to breathe. Including the coughing and spluttering and coming to a grinding halt!
Now, picture the following:
- You are coming to the same hill and you start to accelerate well before the hill starts and continue to do so when you climb the hill.
- The car sweeps up the hill with no issues, no strain and no struggle.
This is what should happen to your body if you start to breathe a little harder before you come to a hill or flight of stairs.
If you practise, you can learn how to prepare your body for exercise well in advance and pre-oxygenate your blood, giving your body momentum where it used to have inertia.
How to pace your breathing
There are a number of breathing techniques designed to control the pace at which you breathe. Most have been developed not specifically for COPD patients but have been adapted slightly from those designed for healthy individuals. Most involve focusing on a long, deep inhalation, and long exhalation. The most common one used is to breathe in for a count of 4 and out for a count of 4. Having tried this with patients before I started focusing on correcting postural imbalances, sucking air in actively was the only way of getting air into their compressed lungs. However, I found that when my patients adopted an upright posture, their lungs were already quite open, and being full of air they only had to focus on a slow and controlled exhalation.
As described in earlier chapters, the pacing that my patients found the most natural was to say to themselves the words ‘one thousand, two thousand, three thousand’ as they breathed out and ‘one thousand’ as they breathed in. (By counting this way each breath takes approximately 4 seconds in total, giving a respiration rate of 15 breaths per minute. This pacing appears to be ideal for gentle exercise.)
This 3000:1000 (‘parachute’) pacing is easily coordinated with leg and arm movements, such as steps, pedals or strokes or any other rhythmic movement. I have used this as the starting point for working with patients, and whilst it does not have to be strictly adhered to, I have found that the simple 3:1 ratio works really well.
Exercises for paced rhythmic breathing
Choose whichever of these exercises suits you best:
- walking on the spot
- seated side punches.
If you can stand and move your legs comfortably and safely, try walking on the spot. If your legs are weak and unsteady or you have back, or joint, problems, try the seated side punches.
Walking on the spot exercise

Figure 8.1: Walking on the spot
- Stand up tall with your shoulders back and your hands hanging loosely to the side of your hips (don’t slouch).
- Start counting and controlling your breathing, counting to yourself ‘one thousand, two thousand, three thousand’ as you breathe out and ‘one thousand’ as you breathe in.
- After you have done three cycles of breathing, start adding leg movements to each count. This means you will be walking with three steps being timed with your out breath, and one step sequenced with your in breath.
- Repeat the cycle above, walking for between 10 and 20 cycles and then stand still. After you have stopped, you should continue to breathe in the 3000:1000 ratio as it is very common to return to the old habit of stopping activity and reverting back to gasping breaths for recovery.
Punching side to side exercise
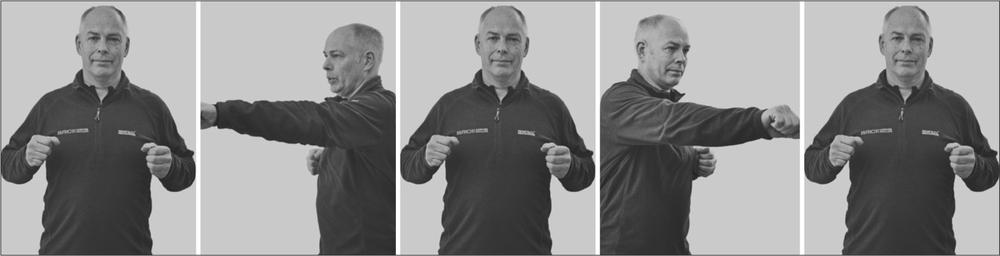
Figure 8.2: Punching side-to-side
- Perch on the front of a chair, sitting up tall with your shoulders and elbows back and hands in a fist to the side of your body. (Don’t slouch.)
- Start counting and controlling your breathing counting to yourself ‘one thousand, two thousand, three thousand’ as you breathe out and counting ‘one thousand’ as you breathe in.
- After you have done three cycles of breathing, start punching across your body at approximately shoulder level, rotating your body about the erect spine, one arm movement to each count. This means you will be moving with three punches being sequenced with your out breath, and one punch sequenced with your in breath.
- Try punching for between 10 and 20 cycles and then stop. After you have stopped, you should continue to breathe in the 3000:1000 ratio, as it is very common for patients to have got into the old habit of stopping activity and reverting back to gasping breaths for recovery. Going back to your old habits could cause your breathing to become more distressing.
With either the walking or the punching exercise it is important that you try not to push yourself too hard. If you have learned the breathing patterns and breathing exercises to this point well enough, you should find these exercises surprisingly simple. You should also make sure you stop before you start feeling breathless. Getting very short of breath is counter-productive. I prefer my patients to feel in control. The stress and tension that come with being breathless mean you have lost control.
You should feel the muscles working gently and rhythmically, and if you can visualise your body being relaxed and calm, you are more likely to find that the movement feels good. After all, movement is a natural state for the human body. Nearly everybody feels good when they move after being stationary for a length of time. Enjoy that feeling and use it to reinforce your own self-awareness and improve your confidence in your body, so that you can move and not get terribly out of breath.
If you find it particularly hard to adopt this breathing pattern, I stress, the 3:1 pacing is not a strict rule to follow. You can for instance allow breath to take slightly longer to go in, so do not get concerned if every so often your body takes more air in, especially when you are first learning the technique. It is probable that you have developed quite ingrained breathing patterns, and it is therefore likely to take some time to override these habitual patterns.
You may find that you need to adopt a different breathing pattern of 4000 out:2000 in. Whichever pattern helps you to breathe without any feelings of stress and tension, especially in the neck and upper chest, will be good to start with.
Building up to doing true aerobic exercise
Continuous exercise that elevates the heart and breathing rate is called ‘cardiovascular exercise’, and as it is a bit of a mouthful, you will often find it commonly shortened to ‘CV exercise’. If you do find yourself talking to a fitness instructor, you will undoubtedly hear the term CV training.
To do cardiovascular exercise over a prolonged period of time takes a little while to build up to. I tend to start patients off with short periods of gentle rhythmic exercise with rest periods in between, so that their breathing returns to normal. If you find one of the exercises above easy to do, you can then start to try other forms of exercise. Once again, the emphasis is on avoiding getting out of breath.
When starting patients on CV exercise I find that I have two challenges, depending upon the person I have in front of me. There are those who are really reluctant to do much CV exercise, as they have struggled excessively in the past, and those who push themselves too hard. My advice is the same for both. Work to the point that you start to feel your breathing rate and depth are elevated, but try to stop before you get out of breath, Avoiding the onset of fear, panic, frustration and embarrassment of being breathless is key to ensuring you progress. Don’t over-do it!
Developing your ability and improving your confidence
Starting off slowly and gently for short periods of time and gradually building up the length of time you do is key. Don’t be tempted to try and work too fast or too hard, too soon. All this will do is increase the likelihood of your getting out of breath faster.
I frequently start my patients off with four or five short bouts of 30 seconds to 1 minute of exercise with rest periods in between. The objective is to get the breathing pace correct, and to get them used to the idea that they can exercise and not be breathless. They are usually quite surprised when their breathing is comfortable and not challenging.
Within a couple of workout sessions, patients have usually built up to doing bouts of at least 2–3 minutes, again with short rest periods in between. Usually they will do several exercises in this fashion within one workout with other strength or mobility exercises.
Gradually, as the body acclimatises to the idea of moving, joints will start to feel as if they are warming up and becoming more mobile, the blood flows more readily, transporting oxygen, nutrients and waste around the body, and the breathing pattern often stabilises quite naturally. I am always amazed at how patients who have struggled to breathe at rest can actually manage to breathe with relative ease when they are getting used to being active again.
Once you start to feel the benefit of the naturally induced increase in respiration that accompanies exercise, you will start to take control over how much exercise you might be able to do. Do not be concerned if you are only able to increase this slowly. The speed of your progress is often related to the severity of your condition, and there is no magic formula. It is merely the consistency of your approach and your focus on getting the techniques correct that will help you progress as fast as your body will allow.
In my clinic, once a person has mastered the breathing sequence and does not show the signs of even mild breathlessness and moderate discomfort with their breathing for a couple of sessions in the gym, I will often let them decide how long they can keep up the exercise before they have to stop. Strangely, more often than not these patients will surprise themselves, and sometimes they will even surprise me. They will often work longer than they would have dared to dream possible a couple of weeks previously.
Choosing what rhythmic exercise to do
Your choice of exercise will depend ultimately on what other health conditions you may have, as well as the degree of restriction you have with your breathing.
I am fortunate enough to work in a commercial gym and I have access to a wide range of equipment that makes exercise safe and easy. Figure 8.3 gives a breakdown of the machine choices that I work with to build up stamina and train the cardiovascular system. If you have, or can get, access to such a facility, the various benefits to your cardiovascular system from the different exercise machines are shown in the chart.

Figure 8.3: Cardiovascular exercise machine choice
Listed below are my four preferred CV exercise options for those with COPD, along with my rationale for choosing them in this order.
Recline bike
A stationary recline bike is generally the CV exercise that I recommend most for patients with COPD to start with.
A recline bike allows you to sit down so you can exercise without all your body weight on your legs, unlike walking or other standing exercise. The back rest adequately supports your back, so it is great if you have a painful back or poor abdominal strength. The support from the back rest, and the fact that most have handles beside the seat, enables you to sit upright. You will find that if you do not use the handles in front of you (as if you are steering a normal bicycle), you can draw your elbows back behind you, and this will serve to further elongate your spine, opening up your chest cavity, with the ribs flaring out, and your sternum being lifted off your abdomen. Often you can immediately feel your breathing being driven by your diaphragm, and the emphasis being taken off the muscles in your neck and shoulders.
There are some patients whom a recline exercise bike does not suit. This does not always mean that a person will never be able to use this machine; merely that they need to do a little work to get their body ready to cycle. Having hip and knee joint pain (replacement joints are very common nowadays), plus very severe back pain, are the most common reasons that I do not recommend the recline bike to patients. With back pain, you may find you are unable to lift your knee to get your leg over the central part of the bike to sit down. Often if you practise the ‘high knee lift’ exercise from Chapter 7 (page 84), you can learn how to get your leg over. The limitation that some patients find with knee or hip joint replacements, or pain, may mean that they cannot get their leg to do a full cycle of the pedals. If this is the case for you, you might try to gradually build up the range of motion of your legs, or change the way you cycle. Sometimes people who can’t complete a full cycle are not bending their ankle joint, making the knee and hip do all the work. By toe-ing (pushing the toe as you extend your leg away from your body, and pulling the toe back as your foot is pulled forward on the circular motion) will take up some of the effort and make it possible to pedal effectively and without discomfort or pain.

Arm bike
The arm bicycle, or ‘arm ergometer’ as it is sometimes known, is my second favourite CV machine to be used by patients with COPD. Those patients with leg or hip problems may not be able to do much exercise on their lower limbs, and this exercise is a great alternative. It can also be done seated, so body weight or deconditioned leg muscles are less of an issue.
As the name suggests, you can use an arm bike to work the upper body in a rhythmic fashion. You need to be sitting tall essentially, perching on the chair you are working from. Perching on the chair prevents you from sitting on it like a sofa, and elongates the spine, making each vertebra engage in almost every exercise, this one included. When you first start using the arm bike you will find that you tend to emphasise the use of your arms in isolation without trying to use the muscles of your back and waist.
You should sit tall, with your chest high, and your head up to ensure your body is not slumped. Your lungs will then be as open as can be before you start to pedal with your arms. When you do start to pedal you should sit leaning forwards slightly to engage your abdominal muscles and back muscles. Once you have got momentum in your arm movements, you should start to roll your shoulders, keeping your pelvis still on the seat. Rotating your shoulders so that your rib cage rotates slightly about the axis of your spine engages all of the postural muscles of your abdomen, back and chest, as well as all of the muscles that cause your spine to lengthen. This gives your body a more powerful shape to work from, and is the position you will see the sailors on the round-the-world sailing ships use to winch the main sails up.

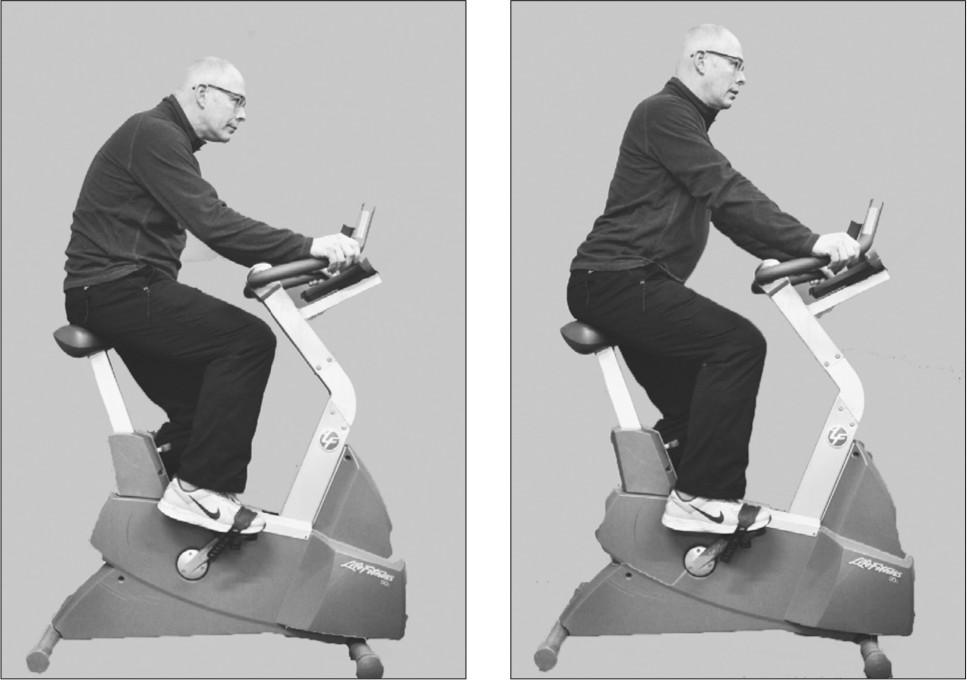
Upright bike
Due to the fact that the seats on upright bikes are a little uncomfortable for the average unfit person, and because there is no back support, I have found that the upright bike is less ideal for COPD patients than the recline bike. The lack of a back rest means that you will tend to lean forwards, usually in a hunched position, which is more likely to collapse your lungs as your ribs are forced down on to the contents of your abdomen.
If you can maintain an upright posture, or if you can keep your spine relatively straight and do not feel too precarious, the upright bike can still be a good exercise to help develop your CV fitness. As the saddle supports you, you will find that your legs do not have to take 100% of your body weight and there is not the impact on the body that you can get from walking. In a similar fashion to the recline bike, the range of motion you need to complete the revolutions of the pedals may mean that those with replacement, or injured, knees and hips can be limited at first with their cycling. Saying that, it is rare that patients do not get to complete a full revolution comfortably after a few attempts. This may mean you have to persevere at first and keep trying, as well as doing the lower limb exercises like heel to bottom (page 85) in Chapter 7.
Treadmill
To many of my patients the idea of walking on a treadmill seems a little daunting at first. Some have done challenging treadmill tests in hospital to monitor their heart’s response to exercise, a test which at the best of times can be quite uncomfortable. Others will have seen the comedy of errors clips that are shown on the TV or on the Internet, and be rather worried they might ‘come a cropper’.
There are several benefits in using a treadmill over walking outside. The first benefit is that if you get tired you can stop and don’t have to walk back. This can be very useful if you do not have any idea of how far you can comfortably walk, especially if you are susceptible to exacerbations or panic attacks. Another benefit is that with correct training you can maintain a very good posture by holding on to the handles.
There are some simple tips as to how you should use a treadmill:
- Firstly, you should always try to stand tall, and not allow yourself to hunch forwards.
- You shouldn’t grip the handles too tightly either, as doing this will put additional stress on the muscles of your shoulders and neck. Remember the amount of stress your neck muscles are under when your head is leaning forwards and you are looking down. (See Figure 3.2 in Chapter 3.)
- Thinking of this weight being like a yoke round your neck as you walk will certainly make you want to stay upright and not hunch over.
With a treadmill, it is probably obvious that you should start slowly and get into a rhythm.
One difficulty of using a treadmill is you do have to support your full bodyweight, something that you may find difficult if you have joint problems or poor balance.
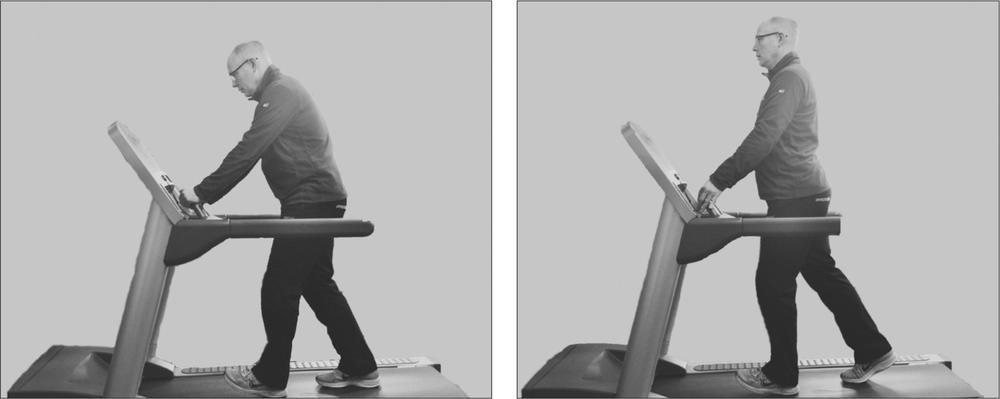
Figure 8.7: Treadmill – bad versus good (straight back, open chest) posture
I have found that other cardiovascular exercise machines are usually less effective for new COPD patients, either due to the simple fact that they are too demanding in terms of intensity, or they are more likely to need considerable strength to use them correctly.
At the end of the day, the single most natural form of cardiovascular exercise is walking. Walking may be quite challenging if you are just learning the breathing techniques, but the breathing pattern is the same 3000:1000 ratio, and this technique is explained in the next section.
Mastering walking and breathing
Very often I find that patients with COPD who have not been shown how to breathe properly when they are being active are in a hurry to get things over and done with to avoid having to tax their lungs unduly.
Walking is the most common activity that COPD patients are likely to avoid. I put this down, in part, to the fact that they will have learned to rely almost entirely on their anaerobic system to complete a task. This means that these patients will rush ahead and feel completely pooped before they have got more than a few yards. Doing this would not only break your confidence and cause you concern, but you can also get very frustrated, embarrassed or angry. Avoiding this can take a little practice, but is relatively easy to do.
Before you even start walking you should:
- Check your posture. You should stand tall squeezing your shoulder blades back and down towards your lower back; this can help you open your chest, and make you think about what you are going to do and how you are going to breathe before you move.
- You should think about controlling your breathing in a set pattern. This pattern matches the breath to the number of steps. As before in this book, the breathing sequence matches the 3 steps out, 1 step in approach. Using the steps as you breathe is a fantastic way of sequencing your breathing with your walking.
- Make sure you don’t take short steps. I jest with my patients that walking like a Geisha, or trotting along as if you have your trousers round your ankles, makes you take quick breaths, which is not very relaxing. Longer, slower strides are better for you as your breathing is less likely to be frantic.
Once you have practised walking like this for a while, you will probably find that you gradually start to relax a little as you walk. If you have become fearful of getting out of breath through walking, or if you get embarrassed or frustrated when not being able to do things you consider should be really easy, you may find it will take a little time before you can truly relax.
You should start with slow gentle strides, exhaling and counting to three, and letting the air flow back in naturally and not sucking for one step.
As you practise the three steps out/one step in walking pattern, you will eventually become more confident and are likely to start thinking about tackling more intensive challenges, such as walking upstairs, or even up hills.
When approaching stairs or hills, I ask patients to prepare themselves by starting to control their breathing a good few strides before they start climbing. They can do this by starting to breathe using the 3:1 exhalation to inhalation stride pattern.
This is rather like the visualisation exercise I explained earlier in this chapter. Imagine you are driving a car up to a hill and you start accelerating before you reach the hill. If you stand tall with your chest open, adopt the 3:1 ratio and slightly increase the depth of your breathing, you are less likely to cough and splutter up the hill or stairs.
With practice, many patients have told me that they do not have the same feeling of dread and panic as they used to when they have this challenge. Soon they feel that they do not have the same trepidation when they see stairs in a shop or when they visit someone’s house with an upstairs toilet.
Eventually, the activities that you have practised in this chapter form habits you can replicate with whatever activity or form of exercise you choose to do.
The simple movement patterns that you practise time and time again will often re-awaken the body’s natural breathing rhythm. I find it fascinating how so many of my early stage patients wander into the gym sessions saying that their breathing has been poor even when they have been resting, only to find that their breathing almost normalises once they start doing this gentle, rhythmic style of exercise. It is almost as if the body has stored the memory of how it should breathe normally, and keeps it secret until it is asked to do it well.
Are you ready to progress?
In this chapter you should have managed to practise and understand the need for a rhythmic, consistent pace to your breathing as you exercise. Practising these techniques will ultimately help you to get a more relaxed flow of air in and out of your lungs as you move. It is recommended that you maintain the practice described in the previous chapters and exercise four times a day, to help embed them as your new breathing habits.
If you feel that the 3:1 exhalation-to-inspiration ratio does not suit you, read through the chapter again and you will see that this is only a guideline; you may feel better with a slightly different ratio. Similarly, if you find the parachute counting 3000:1000 hard to master, do not worry. It is again just a guide that many people have found useful.
Once you feel that you have fully benefited from the exercises in this chapter, you should think about moving on to Chapter 9 - Increasing effort and developing strength.